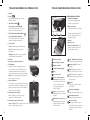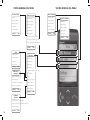
1
User Guide
ClarityLife
Mobile Telephone
TM
C900
TM
E
N
G
L
I
S
H
OK
C90
0
1
4
7
*
+
pqr
s
0
gh
i
8
2 abc
5 jkl
tuv
6
9 wxyz
# a/A/1
3 def
mn
o
E
S
P
A
ñ
O
L
TABLE OF CONTENTS
TABLE OF CONTENTS
Introduction........................................................................................................... 4
Emergency Calls................................................................................................. 24
Important Safety Instructions/Warnings.................................................... 5
Parts Checklist.....................................................................................................11
Quick Reference Guide.....................................................................................12
C900 Keys/Functions..........................................................................................13
Installation
Inserting the SIM Card........................................................................................15
Inserting the Battery...........................................................................................16
Inserting Standard Batteries...............................................................................16
Charging the Battery...........................................................................................16
Battery and Strength Indication.........................................................................17
Basic Telephone Operation
Turning the phone on and off.............................................................................18
Setting Date and Time........................................................................................18
Making and Ending a Call....................................................................................18
Accepting an Incoming Call................................................................................19
Last Number Redial............................................................................................19
Phonebook
Dialing from the Phonebook............................................................................. 20
Changing Phonebook Entries.............................................................................21
Searching Phonebook Entries.............................................................................21
Managing the Top 10.......................................................................................... 22
Phonebook settings............................................................................................ 22
Saving numbers from caller lists to Phonebook............................................... 22
Saving numbers to Phonebook via Text (SMS)................................................ 23
Saving the Emergency Numbers....................................................................... 24
In Need of Assistance Right Away.................................................................... 25
What Happens after you press the Help Button............................................ 25
Deactivating the Emergency Button................................................................. 25
Other Telephone Operations
Small Menu.......................................................................................................... 26
Dialed Numbers................................................................................................. 26
Missed Calls........................................................................................................ 26
Received Calls..................................................................................................... 26
Voicemail............................................................................................................. 27
Settings................................................................................................................ 27
Alarm Clock........................................................................................................ 28
Manual Key and Auto Key Lock........................................................................ 29
My Menu............................................................................................................. 30
Reminders........................................................................................................... 30
SMS (Text) Messaging
SMS On and Off..................................................................................................31
Writing an SMS....................................................................................................31
Sending your written SMS................................................................................. 33
Answering a received SMS................................................................................ 33
Creating and Inserting Templates..................................................................... 34
Overview of Menus............................................................................................ 36
Troubleshooting.................................................................................................. 40
Technical Specifications................................................................................... 42
FCC Requirements and Regulations........................................................... 44
Warranty and Service...................................................................................... 46
INTRODUCTION
Dear mobile phone users,
Congratulations on having purchased your ClarityLife mobile
phone! This booklet will provide you with the most essential
information needed for quick familiarization with your new
mobile phone. You can use the following pages of this user guide
to decide on just how much time you want to invest in getting to
know the most important functions of your mobile phone.
We hope you will enjoy using your ClarityLife phone.
important SAFETY INSTRUCTIONS
Please read the following safety instructions before using your ClarityLife C900 Dual Band
Mobile Phone and accessories. Please keep these instructions for your reference. When
using this product, these safety precautions and warnings should be followed to reduce the
risk of fire, electric shock, injury to persons and damage to property. Additional warnings
may be present on the product, packaging, or in the user instructions.
WARNINGS
Emergency Call Feature
When the emergency button is pressed the emergency numbers saved in the phone’s
address book will be called in the order you have selected until a party is reached. Up
to five emergency numbers may be saved in the address book. The numbers and the
order they will be called must be entered into the phone in order to ensure the desired
numbers are dialed when the emergency button is pressed. After you have entered
your five emergency numbers, you should test the phone’s emergency call feature by
pressing the emergency button to ensure that you have correctly entered the numbers
into the phone.
Since the phone service must be purchased in advance through monthly pre-paid
credits, you must ensure that you have made your pre-payment in order for the phone
service to remain activated. If you do not make your monthly pre-payment or if you do
not make a full monthly payment, you will lose your phone service, and the phone and
the emergency call feature will not be available.
You must also ensure that the phone’s battery is fully-charged at all times and that the
phone is in good working condition in order for the emergency call feature to work.
If the phone is outside of a coverage area, if network service is temporarily suspended
by the network carrier, or if there is network or phone interference, the emergency call
feature may not be available during those times.
This phone is not equipped with a global positioning service or other means to locate
the physical location of the phone. Consequently, if an emergency situation arises but
you are unable to provide your location to an emergency contact person in your address book, neither they nor an emergency response service may be able to locate you.
The SIM card must be installed and activated before you will receive any phone service.
If the SIM card is damaged or replaced, the emergency contact numbers you entered
into the phone will be lost. In that case you must re-enter your five emergency contact
numbers into the phone’s address book in order to restore the emergency call feature.
4
5
important SAFETY INSTRUCTIONS
important SAFETY INSTRUCTIONS
After you have re-entered your five emergency numbers, you should test the
phone’s emergency call feature by pressing the emergency button to ensure that you
have correctly entered the numbers into the phone.
Radio Frequency Interference
Turn the phone off in health care facilities when any regulations posted in these areas
instruct you to do so. Hospitals and health care facilities may use equipment that is
sensitive to external RF energy.
Driving Safely
Pacemakers
The Health Industry Manufacturers Association recommends that a minimum separation of 6 inches be maintained between a handheld wireless phone and a pacemaker to avoid potential interference with the pacemaker. Persons with pacemakers:
• Should always keep the phone more than 6 inches from their pacemaker when the phone is turned on;
• Should not carry the phone in a breast pocket;
• Should use the ear opposite the pacemaker to minimize the potential for interference; and
Health Care Facilities
If you have any reason to suspect that interference is taking place, turn
the phone off immediately.
Use of a mobile phone with or without a headset while driving cars or other motorized vehicles is not recommended and is against the law in some areas. Check and
follow local laws and regulations regarding use of a mobile phone while driving.
If you decide to use a mobile phone while driving a vehicle, give your full attention to
driving safely and keep the following Driving Tips in mind* :
• Get to know your phone and its features such as speed dial and redial.
• Position your phone within easy reach.
• Dial sensibly and assess the traffic; place calls when you are not moving.
• Let the person you are speaking with know you are driving; if necessary suspend the call in heavy traffic or hazardous weather conditions.
• Do not take notes or look up phone numbers while driving.
Hearing Aids
• Use a headphones or headsets for convenience and comfort.
The phone may interfere with some hearing aids. If it does, consult the hearing aid
manufacturer or your physician for alternatives or remedies.
• Do not engage in stressful or emotional conversations that might divert your attention from the road.
Other Medical Devices
• Dial 911 or other local emergency numbers to report serious emergencies – it’s free from your phone
If you use any other personal medical device, consult the device manufacturer or
your physician to determine if it is adequately shielded from external RF energy.
• Use your phone to help others in emergencies.
*
Compliance with Mobile Phone Use Restrictions
Air Travel
Mobile phone use may be prohibited during air travel.
Driving Tips used with permission from CTIA-The Wireless Association ®
For Vehicles Equipped with an Air Bag
An air bag inflates with great force. Do not store the phone or any of its accessories
in the area over the air bag or in the air bag deployment area.
Posted Signs
Obey posted signs or notices prohibiting mobile phone use in certain locations,
including but not limited to blasting areas, health care facilities and aircraft.
6
7
important SAFETY INSTRUCTIONS
important SAFETY INSTRUCTIONS
Maintenance and Care
Use Environment
Handling the Phone
Avoiding Water and Wet Locations
Do not drop, disassemble, open, crush, bend, deform, puncture, shred, microwave,
incinerate, paint, or insert foreign objects into the phone.
Do not use the phone in rain, or near washbasins or other wet locations. Take care
not to spill any food or liquid on the phone. In case the phone gets wet, unplug all
cables, turn off the phone before cleaning, and allow it to dry thoroughly before
turning it on again. Do not attempt to dry the phone with an external heat source,
such as a microwave oven or hair dryer.
If the phone has been submerged in water, punctured, or subjected to a severe fall,
do not use it until you take it to an authorized service provider. For service information, contact Clarity at 1-800-426-3738.
Discontinue use of your phone and contact Clarity at 1-800-426-3738 if
the product overheats, has a damaged cord or plug or if the product has
been damaged.
Removable Battery
This phone contains removable battery cells. Change the battery cells only as
directed in the user manual.
Connecting Accessories
Do not force connectors into ports. In case of experiencing unreasonable resistance
when attempting to insert a connector in a port, check for compatibility, obstruction in the port, or a disfigured connector.
Choking Hazard
Never allow children to play with the phone or accessories—small parts may be a
choking hazard.
Explosive Atmosphere Warning
Do not use or charge the phone in areas with potentially explosive atmospheres
such as (but not limited to): fueling areas, blasting areas, in vehicles transporting
flammable fluids, etc. Obey all posted signs.
Listening Level Warning
Product Cleaning
Exposure to high volume sound levels may damage your hearing. Although there
is no single volume setting that is appropriate for everyone, you should always use
your headset or headphones with the volume set at moderate levels and avoid
prolonged exposure to high volume sound levels. The louder the volume, the less
time is required before your hearing could be affected. You may experience different
sound levels when using your headset or headphones with different devices. The
device you use and its settings affect the level of sound you hear. If you experience
hearing discomfort, you should stop listening to the device through your headset or
headphones. To protect your hearing, some hearing experts suggest that you:
Use only a slightly damp lint-free cloth to clean the phone. Use of household cleaners, alcohol, or other chemicals may damage your mobile phone.
1. Set the volume control in a low position before putting the headset or head
phones on your ears.
Do not insert anything into the phone other than as directed in the user manual
because this may cause damage to the internal components or cause injury to you.
Not Customer Serviceable
This phone is not customer serviceable. Do not attempt to repair or modify the
phone. Doing so may result in injury or void your warranty.
2. Limit the amount of time you use headsets or headphones at high volume.
8
9
important SAFETY INSTRUCTIONS
C900
Par ts Checklist
3. Avoid turning up the volume to block out noisy surroundings.
4. Turn the volume down if the sound from the headset or headphones prevents you from hearing people speaking near you. See www.plantronics.com/
healthandsafety for more information on headsets and hearing.
Exposure to Electromagnetic Energy in the Radio Frequency Band
When turned on, this device transmits and receives electromagnetic radiation in
the radio frequency (RF) bandwidth through its antenna. By international scientific
agreement, the unit of measurement of RF energy is the “specific absorption rate”,
or SAR. In the United States, the applicable SAR limit for the C900, set by the FCC
is 1.60 mW/g (millionths of watts per gram of mass), or 1.60 W/Kg (watts per
kilogram of mass). The maximum SAR exposure measured for the C900 was 0.738
W/Kg when the phone was turned on but not in use (body position), and 0.264 W/
Kg when the phone was in use (cheek position). In all cases, the phone was passed
by an independent testing facility.
OK
C90
0
1
4
7
*
+
pqr
s
0
gh
i
8
2 abc
5 jkl
tuv
6
3 def
mn
o
9 wxyz
# a/A/1
C900 Phone
AC Adapter
Disposal and Recycling
Check and follow local laws regarding disposal and recycling of your phone.
ble
ea
arg
ch
Re
ry
tte
Ba
Rechargeable Battery
User Guide
10
11
C900
C900 KEYS / FUNCTIONS
Quick Reference
1 Display Screen
2 Arrow keys
For scrolling through the phone book and menu
3 Answer/OK Key
Press to Answer a Call
Press to select option shown on the screen above this key
1
4 End call/Clear/Back Key
Battery contacts
5 Alert lights
Inserting the Battery
Insert the battery into phone battery
compartment as shown in Figure 1. The
battery contacts have to face the gold
colored contacts of the mobile phone.
Press to End a Call
Press to select option shown on the screen above this key
Green: Blinks during incoming calls
Red: Blinks when the battery needs to be recharged
Figure 1
5
6 Microphone
7 Port for Battery Charger
8 Help Button
Program 5 emergency contacts from the C900’s phone book. When the Help Button is pressed, these numbers will automatically dial in the sequence they are programmed. Note: We do not recommend programming 911 as an
7
emergency contact.
Charging the C900
Connect the Power Adapter into the
bottom of the C900 and the other end in
to a 120V wall outlet as shown in Figure 2.
6
9 Volume Control
Press (+) or (-) to change the volume during a call. When 11
the phone is ringing: press to turn off the ring tone (the ring I mportant
tone will automatically be on for the next call).
Charge the battery for 4 hours
before making your first call.
10 Battery Compartment
Figure 2
High-performance Li-ion battery or 3 AAA
Alkaline Batteries
8
9
11 Lanyard Ring
Insert Lanyard – This allows the user to wear phone around the neck.
12
4
3
2
Orange: Blinks during charging and remains on when the battery is full
10
13
C900 KEYS / FUNCTIONS
1
C900 KEYS / FUNCTIONS
Flashlight
1 Flashlight
2 On/Off Button
Press and hold for three seconds to turn phone On or Off.
On/Off
Alarm clock
Key lock
3
4
2
Push to Open
the SLIDER
5
3 Alarm Clock
4 Key Lock
Press to prevent accidental pressing of keys. Press button for three seconds to activate or deactivate.
5 To make a Call: slide the phone open and dial the desired number on
the keypad.
installation
Inserting the SIM Card
To make calls with the phone, you require a SIM card. This
is how it is inserted:
• Turn the closed mobile phone around, so its front is facing
downwards. Hold it with both hands and use your thumbs
to slide the battery cover out applying light pressure (Fig.1)
• Remove the battery (if it is already in the phone) by lifting
Fig. 1
it at its lower right corner. (Fig.2)
• Pull out the SIM card holder using your fingernail or a
sharp object. The SIM card holder is on the right side
underneath the emergency button. (Fig.3)
• Insert the SIM card into its holder with the gold colored
contacts facing down and the missing corner of the card
on the bottom right. (Fig.4a)
Fig. 2
• Slide the SIM card holder back into its slot.
Battery Status
Text messages: special characters
Call forward active
Key: Press and hold to call your
Alarm on
Ring tone off
Key: Shift between capital and lower-
Clock
case letters and numbers when writing text messages
Signal strength
Flashlight
Roaming: There is no additional
charge for roaming if you are on
the ClarityLife Service Plan.
Press and hold: flashlight is on
On/Off Button
Press and hold for 3 seconds
Top 10: the most important numbers
will be at the beginning of the phone
book.
Alarm Clock Button
Last Number Redial: Press and
Prevents accidental pressing of keys
(press for 3 seconds to activate/deactivate the key lock)
hold for three seconds to redial
last number dialed.
14
voicemail service
Key: Press and hold: most recent
10 numbers dialed
Activate/deactivate the alarm clock
Key lock
• Error message Insert SIM card on the display.
Note: Some SIM cards are thinner than others.
If this error message appears although you have already inserted
the SIM card, please insert a thick piece of paper between the
SIM card and the top side of the SIM card holder. (Fig.4b)
Fig. 3
PIN Codes for the SIM Card
When first using a new SIM card, a 4-digit PIN code must
be entered. The PIN code is provided in the documentation
you received from your network operator. Other people
cannot turn on your phone without knowing your PIN
(Personal Identification Number). Your PIN is however not
required when your phone is turned on, which would allow
people to use it should it be lost or stolen.
To enter the PIN code, slide open the mobile phone and
enter the PIN using the keypad. Confirm the PIN code with
(possible entry errors when entering the numbers can
be deleted with
).
Fig. 4a
Paper
Fig. 4b
15
installation
installation
Tip: To avoid problems caused by forgetting/losing your PIN
code, we recommend that you deactivate the PIN code.
Open the phone and press the
until you have reached
Settings. Next scroll down by pressing the
to PIN
Request, press the
. At this point, a 4-digit PIN code
will be requested once again.
Enter the PIN code via the keypad and confirm your entry
with
.
To return to the standby mode, press
mobile phone.
Fig. 5
or close the
Please note: A PIN code deactivation is not possible with
some network providers.
Inserting the Battery
• The battery contacts have to face the gold colored
contacts of the mobile phone. (Fig.5)
• Replace the battery cover back by sliding it with the two
Fig. 6
hooks in front onto the mobile phone.
Inserting Standard Batteries
• Please note the
• During the charging phase, the mobile phone screen
displays the battery symbol and Charging. At the
same time, the signal light flashes orange when there
is a connection between the charging device and the
mobile phone. (This will start about ten (10) seconds after
the connection of the charger to the phone).
• As soon as the battery is fully charged, the display
shows Battery Full, the orange light will be on and
have stopped flashing.
• Now separate the charger from both the mobile
phone and the power socket.
Battery and signal strength indication
One bar of the battery status icon corresponds to 25% capacity (4 bars = 100%). If the battery level falls under 25% and
the alert at the bottom of the mobile phone blinks red, please
charge the battery using the charger.
The signal strength is displayed on the right of the screen. If it
is below 25%, the reception and the acoustic quality of calls
are strongly affected. If that is the case, please try to find a
place where the signal is better. (Fig. 8)
Fig. 8
symbols at the bottom of
the battery compartment. When inserting ensure the
ends match the corresponding symbols.
AAA
• Put the battery cover back by sliding it with its two
hooks first onto the mobile phone.
Charging the Battery
Important: Charge the battery for at least 4
hours before making your first call. (Fig. 7)
• Insert the power plug into the 120V wall outlet.
Fig. 7
16
• Connect the charger to the phone by plugging it into
the port at the bottom end of the mobile phone.
17
BASIC telephone operation
BASIC telephone operation
Turning the phone On and Off
Accepting an incoming call
Press down
on the upper side of the phone for 3 seconds. This function allows you
to turn the phone on and off.
When your phone is being called, it rings and vibrates. The green alert light and the
torch blinks: the number or name (if stored in the phone book) of the caller is displayed on the screen.
Setting the TIME and DATE
Time
• Open the phone, press the
press the
button until you have reached Settings, and then
to select.
• Next press the
button and scroll to Time & Date and select by pressing
• Then select Set Time by pressing
• Use the keypad or
or by opening the slider. You
can speak on the phone with the slider both open
or closed.
• Accept a call with
.
.
buttons to enter desired time. Double digits must be
entered for hour and
• Press
to end the call.
Please note! Closing the open slider does NOT end the phone call!
• To reject a call, press
when the phone is ringing.
• If you do not want to reject a call, but you do not want the phone to keep ringing
either (e.g. if you are sitting in a waiting room), press the
and the ring tone will be switched off for this call.
key of the volume control,
• minutes (for example “09” and “00” for 9:00).
After you enter the hour press the
button to set minutes. After the desired
time is set press
to save. The display screen will show Time set!
LAST NUMBER REDIAL
• Open the slider, and press the
• Press
Date
for three seconds.
to call the last number dialed.
button to Set Date then press
button.
• Press the
the
• Use the keypad or
to enter Month, Day and Year (MM/DD/YYYY). After
entering the Year press the
button to Save setting.
Making a call
• Slide open the mobile phone and dial the phone number using the keypad. Next
call the number by pressing the
button.
• To end a call press
button. If the person you are talking to ends the call before
you do, you do not need to press
.
Note: You can dial numbers from the phonebook without sliding open your phone,
please see phonebook section
on page 20.
18
19
phonebook operations
PHONE BOOK
The phone book enables you to save, change and search
for up to 200 names and numbers.
phonebook operations
• Press the
button to scroll to Phone book and select by pressing
• Next, select Search Name by pressing
.
.
• Search for the phonebook contact by pressing one or more of the starting letter of
D .,! ? ‚ „ @ :1
Dabc2äà
Ddef3è
Dghi4
Djkl5
Dmno6ö
Dpqrs7ß
Dtuv8ü
Dwxyz9
D space; 0
D.,?!‚„:;()@+$€£¥#%*&~=¤
D You are able to
change between
lower and upper
case letters, as well
as selecting numbers only (“Abc”
“ABC” “abc” “123”)
Fig. 9
Saving new numbers in the phone book
• Open the phone, press
button until you have
reached Phone book, then press the
button
to select.
• Press the
and scroll to Add contact, then press the
• Enter the name of your contact using the keypad and
button.
Example:
abc
2
• Call the selected number by pressing the
button.
Changing phone book entries
• Open your phone, press the
button until you reach Phonebook, then press
to select.
button.
save by pressing the
the name on the keypad.
Press once to enter “A”
Press twice to enter “B”
Press 3 times to enter “C”
Press 4 times to enter “2”
All characters and functions, which can be selected, are
listed in the sidebar table (Fig. 9). Every button stands for
several characters of functions depending on how often
the respective button is pressed when in the
“ABC mode”.
Use the keypad to enter the phone number. Save the
phonebook entry by pressing
.
Dialing from the phonebook
When the slider is closed, contacts in the phone book are
displayed in alphabetical order.
• Select the name you wish to call by pressing the
button to the desired name and number. Call the
number by pressing
.
• Press the
and scroll to Edit contact, then press the
button to select.
• Next, use the
buttons or keypad to select the phonebook entry you wish to
change, select by pressing .
• If necessary, correct the name and number by using the keypad or press
delete characters.
Continue, by pressing
to
.
Searching for phone book entries
Important Note: You are able to search and call tele-phone numbers from the phonebook with the slider both opened and closed.
Searching while the phone slider is closed:
• Press the
Press the
to scroll to the desired phone book entry and select by pressing
button once again to dial number.
.
Searching with the slider opened
• Press the
and scroll to Phonebook and select by pressing
• Next, select Search name by pressing
.
.
• Search for the phonebook contact by using the keypad to enter one or more starting
letters of the name.
• Call the number you selected by pressing
.
Searching for name and number when slider is open:
20
21
phonebook operations
Phonebook operations
Managing the Top 10
With the Top 10 function you can list the most frequently
used or most important numbers at the beginning of your
phone book independent of alphabetical order. This means
you can quickly access and call these contacts when the slider
is closed. (Fig. 10)
• Open your phone, press the
book, then press
until you reach Phone-
to select.
and scroll to Top 10, select by pressing
. Proceed by selecting Add Top No. 1.
Your phone book entries will now be displayed. Use the
buttons to scroll to the desired entry and select by
pressing .
• Next press the
Scroll with
to the
Small Menu.
Fig. 10
• To add more numbers to your Top 10, repeat the steps
above.
Phonebook settings
• Save entry: specifies where you save new phone book
Saving numbers to Phonebook
via Text (SMS)
See page 29 for other SMS text options
• This function makes it very easy to add new contacts to
your phonebook and the best thing about it is your family
and friends do the job for you! Simply follow the instructions below:
• Someone will need to send a Text (SMS) message using the
following format:
• #Name#Number# (Example: #Tommy#18004263738#)
Be sure to include the area code.
• The name and number are then automatically stored in the
phonebook once the text (SMS) is received.
• Please note: When your Text (SMS) memory is full, no
phonebook entries can be received via an SMS.
• To block this feature, go to menu SMS Messages then
SMS in PHoneBk and select Off.
entries. If you save new contacts to the SIM card, you can
transfer your phone book to other mobile phones. If you
save new entries to the phone memory, the phone book
stays on your mobile phone even if you change the SIM card.
• Memory in use: allows you to search for contacts from
the SIM card and or the phone memory.
• Memory status: this shows how much memory is used on
the SIM card or in the phone book.
Saving numbers from caller lists to phonebook
• If you are viewing a caller list (Missed calls, Dialed Calls,
22
Received Calls) and wish to save one of the telephone
numbers into the phone book, use the
to scroll to
Save to phonebooks at the bottom of the list. Select by
pressing
. Next, scroll to the number you wish to save
and press
to select. Proceed by entering the name of
the contact and save by pressing .
23
EMERGENCY operations
Emergency Calls
• The last option is to choose whether or not a text (SMS) message will be sent to the
Important: Please read Warnings for Emergency Call Feature in front of manual.
In an emergency, press the Help button on the back of the C900 to automatically
dial up to five (5) predetermined numbers. When someone presses the red help
button on the back of the mobile phone, these numbers will automatically dial in the
sequence in which they have been preselected on the phone.
When dialing the emergency number there will be an emergency tone emitted.
When the called party answers the phone, they will hear the emergency tone and
will have to press “0” to activate the call. This is to avoid being connected to the
call party’s answering machine or voicemail. If the contact is designated as a “Help
Organization,” the call will be activated when answered. If a contact is not reached,
the phone will dial the next number automatically. It will dial the list of contacts up
to three (3) times. If no contacts are reached after the third cycle, the C900 will
automatically pick up the next incoming call within one hour.
• First select five (5) numbers and their sequence for your Emergency Contact list.
These numbers must already be stored in the phone book.
button until you have reached the Phone-
book, then select by
pressing .
• Next, press the
select by
pressing
button until you have reached Emergency Numbers, then
.
• Select Save Emergency No option by pressing
. You will then begin saving
numbers under the five allotted spaces. Begin by selecting Save Emergency
No. 1 by pressing the
button.
• The phone will then go to the phonebook. Scroll through the entries and when the
desired one is highlighted, press the
contacts. Highlight Yes or No using the
to select.
buttons and press
• For adding further emergency numbers please repeat the above steps.
In Need of Assistance Right Away
Important: Please see Emergency warnings in front
of guide.
• Press the Red Heart button on the back of the phone and hold for three seconds.
The C900 will call and send SMS messages to the five (5) contacts you programmed
into the Help Button. (They will be called in the order they are programmed into the
phone)
Note: The Emergency button also functions when the key lock is activated.
• To stop the Emergency call, press and hold the
button for three (3) seconds.
Saving the Emergency numbers
• Open the phone and press the
EMERGENCY operations
button.
What Happens after you press the Help Button
When you press the Help Button, the emergency numbers you have saved are
automatically dialed in the sequence you have pre-selected on your phone.
At the same time, the emergency contacts receive a text (SMS) message, if this feature
has been selected, informing them that they are about to receive an emergency call
and that they have to press the “0”
key within the first 60 seconds of the call.
Deactivating the Emergency Button
button to Settings and select by pressing
. Next, press the
button until you have reached Emergency Button and
select by pressing . The buttons will allow you to highlight your choice and then
save by pressing .
• Slide open the phone, and press the
• The next option is to choose whether the number is “Private” or a “Help Organiza-
tion.” Choose “Private” if the number is for an individual. Choose “Help Organization” if the number is a Call Center of Assisted Living Community.
24
25
other telephone operations
Small Menu – When phone slider is closed
• When the slider is closed, contacts in the phone book are
displayed in alphabetical order in the form of an easy-toread list. (Fig. 11)
Dialed Numbers
• If this menu option is highlighted with a black background,
the last number dialed is displayed.
• To display a list of most recently dialed numbers press the
Fig. 11
button. All the numbers or names (if stored in the
phone book) will be displayed with the date and time the
call was made.
• To make a call from a dialed number, select the desired
number with the
the call by pressing
buttons and start
.
other telephone operations
• To make a call from the received calls, select the
desired number with the
call by pressing .
buttons and start the
Voicemail Number
If you press and hold the 0 button for three (3) seconds
you will automatically be connected to your voicemail.
Should this number not be stored on your mobile phone
or your SIM card, you will be asked to enter it. If you do
not know the number, please call your network operator. (Fig. 12)
Settings
In order to change settings (e.g. alarm clock, ring tone
volume, display contrast…) you will perform this function under Settings.
Fig. 12
• Open your phone, press the
Missed Calls
• If this menu option is highlighted with a black background,
the last number dialed is displayed.
• To display the most recently missed calls press the
button. All numbers or names (if stored in the phone book)
will be displayed with the date and time the call was missed.
• To make a call from the missed calls, select the desired
number with the
pressing .
buttons and start the call by
Received Calls
• If this menu option is highlighted with a black background,
the number or name (if stored in the phonebook) of the
last call is shown on the display.
button until you reach Settings, then press
to select. Next, browse
through the menu and follow the instructions on the
display.
Alarm Clock
• For a quick entry into the Alarm Clock menu, press the
button on the top side of the mobile phone for
three (3) seconds.
• To enter through the menu, follow these steps: Open
the phone, press the
button until you reach
Settings, then press
to select. Next, press the
button until you have reached Alarm Clock and
select by pressing .
• To display the list of received calls press the
button. All
numbers or names (if stored in the phone book) will be
displayed with the date and time the call was received.
26
27
other telephone operations
other telephone operations
Set the Alarm
• To set the alarm clock enter the hour by pressing the
buttons or press
the keypad by entering double digits (for example, “07” for 7 a.m.) and save by
pressing .
• To set the minutes press the
digits and save by pressing
• Press the
buttons or press the keypad by entering double
.
to choose AM, PM or 24 hour format, save by pressing
.
• After the time alarm time is set, press the
or close the slider to return the phone in
standby position. An alarm clock symbol will now appear in the header of the menu.
Alarm and Snooze function
• Press
to end the alarm. Should the alarm function not be fully deactivated, the alarm
clock will go off at the same time every day.
• In order to be woken up or reminded again five (5) minutes later, press
for the
snooze function while the alarm is ringing. This can be repeated as often as you would
like.
• If you do not press the
button to end the alarm, the alarm will ring again every three
(3) minutes for a maximum of ninety (90) minutes.
Editing the Alarm Time
• Access the Alarm Clock Menu (see section under Alarm Clock)
• Select New Time by pressing
. Next follow the same instructions under Set the Alarm
on page 25 .
button
to select. Then use the
to scroll to Alarm Melody and
select by pressing . Use the
buttons to scroll
through the different melodies and save the desired melody
by pressing .
Note: Select a melody that is significantly different from
your ring tone, in order not to get the two confused.
Manual Key Lock and Auto Key Lock
To ensure that no calls can be made accidentally (e.g.
when the phone is in a pocket or a bag) the keypad can
be locked.
Please Note: Incoming calls can be accepted as usual. If
you wish to reject a call you must unlock the keypad first.
Manual Key Lock
button on
the top left of the phone for three (3) seconds. A large
key symbol will appear on the menu screen to display
the key lock is activated.
• To activate the key lock, hold down the
• To deactivate the key lock press and hold the
button for three seconds or slide open the phone.
If you do not want the set alarm to ring at the same time on the next day, you will want to
deactivate the alarm clock.
This feature will automatically lock your phone when it is
closed and has not been used for ten (10) seconds
or more.
• Enter the Alarm Clock Menu (see page 25)
To activate the automatic key lock:
• Press the
button to scroll to Off and select by pressing
.
Settings, then press
button until you reach Settings, then press
Fig. 13
• Open your phone, press the button until you reach
Setting the Alarm Melody
• Open your phone, press the
Standby Mode
(Slider closed)
Automatic Key Lock
Deactivating the Alarm Function
28
• Next select Sound & Alerts by pressing the
to select.
to select.
button to scroll to Keypad Auto
Lock and select by pressing .
• Next press the
• Last, select On by pressing
to activate this function.
29
other telephone operations
SMS/TEXT operations
SMS/Text Messages
• A large key symbol will appear on the menu screen to display the key lock is acti-
vated. To deactivate the key lock press and hold the
slide open the phone.
button for three seconds or
SMS/Text Messages
My Menu
My Menu allows you to quickly select your most often used menu items. (For example
Alarm Clock, Ring tone On/Off, etc.)
SMS (Short Message Service) is a written short message, which can be sent to all
mobile phone users. Charges do apply when sending and receiving an SMS. Please
check with your network provider on cost.
SMS On or Off
Activating My Menu
• Open your phone, press the
button until you reach Settings, then press
to scroll down to My Menu and select by pressing
activate this function by pressing .
• Press
to select.
. Select ON to
If you do not wish to receive or send text messages, you can switch off the SMS
menu.
Writing an SMS
• Open the mobile phone and select SMS Messages by pressing
.
Entering My Menu
• Next select Write New SMS by pressing
• The black background needs to be over the picture of the phonebook in order for My
• Use the keypad to write your text. To delete individual characters, press the
Menu to appear at the bottom left of the screen. To select My Menu press the
button. (Fig. 13)
button. This deletes the entered character to the left. To delete all entered text,
hold down the
button for three (3) seconds.
• Select your favorite menu items for My Menu and their desired order
to select My Menu. Next press the
press the
button.
• Press
• Next, go to the
button to select options and then
button to scroll to your desired menu item and select it with
• Scroll to select the position number in the My Menu list and save by pressing
.
.
All characters and functions, which can be selected, are listed in the following table.
Every key stands for several characters or functions depending on how often the
respective key is pressed when in the “ABC mode” (see the explanation after the
table).
• Repeat the previous three (3) steps to add additional items to My Menu.
Examples for function keys:
• Save the selection by pressing
the
.
and confirm the request Save Change? by pressing
button.
Reminders
You can save Birthdays and set reminders. If the name is a contact that is stored in our
phone memory (not on your SIM card), you will be asked if you would like to call the
person after you have been reminded.
jkl
press 1x = j
press 1x = Space
press 2x = k
press 2x = 0
press 3x = l
press 4x = 5
• To insert blank spaces (the spaces between characters), press
• Insert punctuation marks (. , ! ?) by pressing
once.
repeatedly.
If the person is on the SIM card and not in your phone memory, or is not saved as a
contact, you will be required to enter the person‘s name for the Birthday reminder. After
being reminded you will not be asked whether you wish to call the contact.
30
31
SMS/TEXT operations
D .,! ? ‚ „ @ :1
Dabc2äà
Ddef3è
Dghi4
Djkl5
Dmno6ö
Dpqrs7ß
Dtuv8ü
Dwxyz9
D space; 0
D.,?!‚„:;()@+$€£¥#%*&~=¤
D You are able to
change between
lower and upper
case letters, as well
as selecting numbers only (“Abc”
“ABC” “abc” “123”)
Fig. 14
SMS/TEXT operations
Special characters: Enter the selection menu for
. By repeatedly pressing
special characters by pressing
or
, you can move from left to right. By pressing
the 2 button, you can move up in the table, with 4 to
the left, with 6 to the right and with 8 down. If you have
reached the desired character, press the
button to
insert the character into your text. (Fig. 14)
When pressing the # key, you can switch between
for options:
You can send a maximum of 480 characters at once (this will automatically be
divided in up to three messages).
Sending your written SMS
• To send the completed text, press the
button. Next, select Send by pressing
.
ABC: upper case
There are three (3) ways to choose or enter the
recipient of your message:
Abc: mixed case (lower case letters with capital letters
at the beginning of the sentence)
1. The number is already in your phone book.
Abc: lower case
Select Phonebook by pressing the
button twice. Use the
buttons to scroll
to the name or enter the first letter of the name with the keypad. When the desired
contact is highlighted with a black background, confirm by pressing . To send the
message press .
123: numbers only
The selected mode is shown on the display next to
the ¢ symbol.
• While entering text you can also insert numbers by
following these steps: Press the
button for Next,
then press the
button to scroll to Insert numbers,
select by pressing . You can then enter a number by
using the keypad or Search for a number from the
Phonebook or from the list of Unsaved numbers.
Contacts from the phonebook (name and number) can
be inserted into the SMS text as follows:
button for Next, then press the
button to scroll to Insert name, select by
pressing .
Select Search by pressing , scroll to Unsaved numbers and select by pressing
. With the list of telephone numbers now displayed (dialed, received, missed calls),
scroll to the desired number and select by pressing . Press
to send text.
3. A telephone number can also be entered manually on the keypad.
Then send Text by pressing .
A short alert tone and vibration informs you that you have received an SMS. The
screen will display New SMS.
• Select names in the phone book using the keypad or
and insert them into the SMS by pressing
2. The telephone number has recently been used but is not stored in the
phonebook:
Receiving an SMS (text)
• Press the
.
In the upper right hand corner of the display, you can see
how many characters you have left to enter in the SMS.
Example: 1/135 shows that you are in the first text message and you have 135 characters remaining in this SMS. If
32
you enter more than 160 characters, the text is sent two messages. As soon as you
roll over into a second message, the display will read 2/….
• To read the SMS, press
. If text is long, press the
button to scroll down.
Answering a received SMS
• After reading a text press the
pressing
button until you reached Reply, then select by
.
33
SMS/TEXT operations
SMS/TEXT operations
Now you have the choice between four (4) options:
• Write your own text with the keypad.
1. Empty Screen (enter your own text using the keypad)
• Press
2. Original Text (this will copy the text of the received SMS into your answer)
3. Templates
4. Prewritten short answers (for example, Yes, No, Everything OK)
Scroll to desired option and select by pressing
Next, press
to send message.
.
to save as a template.
Changing already existing templates:
• Slide open the mobile phone and select SMS
Messages by pressing
• Scroll the
.
button to scroll to Templates and select by pressing
• Go to the template you wish to change and press the button to select.
Deleting SMS
• To edit the template, scroll to Edit/Send Template and press
Since you cannot receive further text messages when the SMS memory is full, you
need to delete messages to create memory space from time to time.
• Edit the text by using the keypad. Delete characters by pressing the
• Open the phone and select SMS Messages by
pressing
to go into the sub-menu. Press
to select.
button.
again to send the changed
template.
.
button to scroll to Delete SMS and press
can delete all saved messages by selecting All SMS.
• Next press the
• Next, press
.
to select. You
• You can also delete specific folders, for example, all received messages. Press the
button to scroll to Received SMS and press
Delete all received SMS, confirm by pressing.
to select. You are then asked
Creating and Inserting Templates
Templates are prewritten messages, such as Call me, Coming later or I love you. Selections of templates are already stored on your phone, and you can also create your
own. They are useful for saving time when sending short messages. All templates can
be changed before you send them.
Creating New Templates
• Slide open the mobile phone and select SMS
messages by pressing
.
button to scroll to Templates and
select by pressing .
• Press the
• Next press
34
to select New Template.
35
OVERVIEW OF MENUS
Delete SMS
Slider closed.
Headline shows
Time & symbols.
OVERVIEW OF MENUS
SMS Messages
Call Info
All SMS
Write new SMS
Missed calls
Received SMS
Received SMS
Dialed numbers
Sent SMS
Sent SMS
Received calls
Unsent SMS
Unsent SMS
Delete all calls
Templates
Templates
Call duration
Delete SMS
Select
Select
Back
Service Centre No. for SMS
Send PhoneBk contact by SMS
Call Duration
Last Call
All calls
Dialed numbers
Received calls
Back
Clear timers
Select
Back
SMS in PhoneBk (On/
Off/PhoneBk only)
Select
Slider open:
Main Menu
Back
Top10
Phone Book
Add Top10
Change sequence
Search name
Edit Top10
Add contact
Delete Top10
Select
Edit contact
Back
Emerg. Numbers
Add Emerg. No.
Send PhoneBk contact by SMS
Copy contact
Top10
Change sequence
Emergency numbers
Exchange Emerg. No.
Delete Emerg. No.
Select
Delete contact
Back
PhoneBk Settings
Mailbox number
PhoneBk settings
SMS in PhoneBk
Select
Back
Save entry on (SIM Card/Phone)
Memory in use (Phone & SIM Card/SIM Card/
Phone)
Memory status
36
Select
Back
37
OVERVIEW OF MENUS
OVERVIEW OF MENUS
Settings
Sound & alert
Sound & alert
Ring tone (1-5)
Handset volume (1-5)
Alarm melody (1-5)
Display contrast (-5 to +5)
Ringer volume (0-5)
Text size (Small/Large)
Silent mode (On/Off )
Text size SMS (Small/Large)
Increasing ring (On/Off )
Language
Vibrating alert (On/Off )
Time & date
Key tones (click/tone/silent)
Alarm clock
SMS Message alert (On/Off )
Calculator
Handset volume (1-5)
Keypad auto lock (On/Off )
Select
Back
My Menu (On/Off )
Network selection (Auto/Manual/Preferred)
Headline shows (Operator/Time & symbol)
Call waiting (Activate/Cancel/Check status)
Call forward
Withhold number (Yes/No)
Save energy
PIN request (On/Off/ change PIN)
Help Text (On/Off )
Time & date
Set time
Time format (24h/AM/PM)
Set date
Date format
Show clock
Select
Back
Backup with SMS
SMS in PhoneBk (On/Off/PhoneBk only)
PhoneBk settings
Top10
Emergency button (On/Off )
Emergency numbers
Birthday reminder
Mailbox number
38
Birthday
reminder
Service Centre No. for SMS
New birthday
SMS menu (On/Off )
Edit birthday
0000 to enter Settings (On/Off )
Delete birthday
Master Reset (Reset settings/Reset all)
Select
Select
Back
Back
39
TROUBLESHOOTING
The Call is not Connected (Call Failed)
• Verify the number and the area code you have dialed are correct.
• Make sure you have activated service on your phone.
• If you are on a monthly pre-paid service, make sure you have not run
out of minutes.
TROUBLESHOOTING
• If your display says Limited Service you can only call the emergency
number 911.
• If a SIM card is not inserted into the phone, you can only call the
emergency number 911.
• If you prepaid monthly plan is out of minutes, you can only call the
emergency number 911.
Insert SIM Card appears on screen and your SIM card is
already inserted.
How can reception be improved?
• Some SIM cards are thinner than others. If this error message appears,
• If the signal is not strong, search for another location to make or
please insert a thick piece of paper between the SIM card and the top
side of the SIM card holder.
The mobile phone display is blank (screen off)
• The phone may be in energy mode and the display has switched off.
(Please note: you can still receive calls.) To turn display back on press
one of the arrow buttons.
• A blank screen can also mean that the phone is switched to off. Press
the button for three seconds to turn phone back on.
continue with a call. For example, when indoors, move towards a
window. (Please note: that elevators, underground railways, tunnels
and underground parkinge have poor reception.) Making calls with the
phone open will improve the signal strength compared to making calls
with the phone closed.
Can I block/withhold my telephone number?
• If you do not want the person you are calling to see your telephone
number, deactivate the transmission of your phone number in the main
menu under Settings / Withhold number.
• Confirm that the Battery has been inserted and the phone is charged.
The Key symbol is displayed and the phone does not respond?
How often should the rechargeable battery be recharged?
• Do not recharge the rechargeable battery after every phone conversa-
• The automatic key lock can be deactivated by opening the phone or
pressing the button for three (3) seconds.
tion. Over the course of time, this leads to reduced battery capacity.
• The battery icon, located in the top left side of the screen, displays how
full the battery is. When the battery goes bellow three bars, we
recommend to charge the unit.
• The Red LED light will blink at the bottom of the phone when the
phone needs charging
Can an Emergency call be made without a signal?
• You cannot make a call when the phone has no signal.
40
What is the SMS service center number?
• A central network operator number via which the short message
service is handled. This number is usually already stored on your SIM
card by the operator and does not have to be entered or changed.
Was my SMS delivered successfully?
• If your text message is shown within the Sent SMS folder, it was
sent successfully.
41
TECHNICAL SPECIFICATIONS
General
Model Number: C900
Frequency:
GSM 850MHz band and 1900MHz
band for USA
Amplification:
20 decibels
Weights and Dimensions of phone
Weight: 152 g
Dimensions: 4.5 x 2.17 x 1.12 inches
Battery Information
Battery life talk time: 180 minutes
Battery life standby time: 150 hours
Battery: Li-Ion 3.7v 1000mAh, Supports non-
rechargeable batteries (3 x AAA 4,5V)
Clarity Contact Information:
Customer Service: 1-800-426-3738
Address: 4289 Bonny Oaks Drive
Chattanooga, TN 37406
FCC REQUIREMENTS AND REGULATIONS
Part 15 of FCC Rules
Information
This device complies with Part 15 of the
FCC Rules. Operation is subject
to the following two conditions: (1) This
device may not cause harmful interference, and (2) this device must accept
any interference received, including
interference that may cause undesired
operation.
Your equipment has been tested and
found to comply with the limits of
a Class B digital device, pursuant to
Part 15 of FCC rules. These limits
are designed to provide reasonable
protection against harmful interference
in residential installation.
This equipment generates, uses and can
radiate radio frequency energy and, if
not installed and used in accordance
with the instructions, may cause harmful interference to radio communications. However, there is no guarantee
that interference will not occur in a
particular installation; if this equipment
does cause harmful interference to
radio or television reception, which can
be determined by turning the equipment off and on, you are encouraged to
try to correct the interference by one
of the following measures:
1. Where it can be done safely, reorient the receiving television or radio antenna.
42
2.
To the extent possible, relocate the television, radio or other receiver with respect to the
telephone equipment. (This
increases the separation between the telephone equipment and
the receiver.)
3. Connect the telephone equip-
ment into an outlet on a circuit different from that to which
the television, radio, or other
receiver is connected.
4. Consult the dealer or an
experienced Radio/TV
Technician for help.
CAUTION: Changes or modifications to this equipment not
expressly approved by the party
responsible for compliance could
void the user’s authority to operate
the equipment.
Privacy of communications may not be
ensured when using this phone.
Caution: To maintain the compliance with the FCC’s RF exposure
guideline, place the base unit at least
20 cm from nearby persons.
For body worn operation, this handset
has been tested and meets the FCC
RF exposure guidelines when used
with the (Plantronics) accessories
supplied or designated for this product.
Use of other accessories may not
ensure compliance with FCC RF
exposure guidelines.
43
FCC REQUIREMENTS AND REGULATIONS
Industry Canada Technical
Specifications
This product meets the
applicable Industry Canada
technical specifications.
Before installing this equipment, users
should ensure that it is permissible to
be connected to the facilities of the
local telecommunications company. The
equipment must also be installed using
an acceptable method of connection. In
some cases, the company’s inside wiring
associated with a single line individual
service may be extended by means of
a certified connector assembly (telephone extension cord). The customer
should be aware that compliance with
the above conditions may not prevent
degradation of service in some situations. Repairs to certified equipment
should be made by an authorized Canadian maintenance facility designated by
the supplier.
Any repairs or alterations made by the
user to this equipment, or equipment
malfunctions, may give the telecommunications company cause to request the
user to disconnect the equipment.
Users should ensure for their own
protection that the electrical ground
connections of the power utility, telephone lines and internal metallic water
pipe system, if present, are connected
together. This precaution may be
particularly important in rural areas.
44
CAUTION: Users should not
attempt to make such connections
themselves, but should contact the
appropriate electrical inspection authority, or electrician, as appropriate.
The Ringer Equivalence Number is an
indication of the maximum number of
terminals allowed to be connected to
a telephone interface. The termination on an interface may consist of any
combination of devices subject only
to the requirement that the sum of
the Ringer Equivalence Numbers of
all the devices does not exceed five.
(The term “IC:” before the certification/registration number only signifies
that the Industry Canada technical
specifications were met.)
This Class B digital apparatus complies
with Canadian ICES-003.
The party responsible for
regulatory compliance:
Clarity, A Division of Plantronics, Inc.
4289 Bonny Oaks Drive, Suite 106
Chattanooga, TN 37406
Phone: 1-800-552-3368
WARRANTY AND SERVICE
The following warranty and service
information applies only to products
purchased and used in the U.S. and
Canada. For warranty information in
other countries, please contact your
local retailer or distributor.
manufacture different types of
equipment and Clarity does not
warrant that its equipment is compatible with the equipment of a particular
phone company.
Implied Warranties
Limited Warranty
Clarity, a division of Plantronics, Inc.
(“Clarity”) warrants to the original
consumer purchaser that, except for
limitations and exclusions set forth
below, this product shall be free from
defects in materials and workmanship
for a period of one (1) year from the
date of original purchase (“Warranty
Period”). The obligation of Clarity
under this warranty shall be at Clarity‘s
option, without charge, of any part or
unit that proves to be defective in
material or workmanship during the
Warranty Period.
Exclusions from Warranty
This warranty applies only to defects
in factory materials and factory
workmanship. Any condition caused
by accident, abuse, misuse or improper
operation, violation of instructions
furnished by Clarity, destruction or
alteration, improper electrical voltages
or currents, or repair or maintenance
attempted by anyone other than
Clarity or an authorized service
center, is not a defect covered by
this warranty. Telephone companies
Under state law, you may be entitled
to the benefit of certain implied
warranties. These implied warranties
will continue in force only during the
warranty period. Some states do allow
limitations on how long an implied
warranty lasts, so the above limitation
may not apply to you.
Incidental or
Consequential Damages
Neither Clarity nor your retail dealer or
selling distributors has any responsibility for any incidental or consequential
damages including without limitation,
commercial loss or profit, or for any
incidental expenses, expenses, loss of
time, or inconvenience. Some states
do not allow exclusion or limitation of
incidental or consequential damage, so
the above limitation or exclusion may
not apply to you.
Other Legal Rights
This warranty gives you specific legal
rights and you may also have other
rights which vary from state to state.
45
WARRANTY AND SERVICE
How to Obtain
Warranty Service
To obtain warranty service, please
prepay shipment and return the
unit to the appropriate facility
listed below.
In the United States
Please use the original container, or
pack the unit(s) in a sturdy carton
with sufficient packing material to prevent
damage.
Include the following
information:
In Canada
1.
2.
3.
4.
5.
6.
Plantronics Service Center
8112 Trans-Canada Hwy.
Ville St. Laurent. Que.
Canada H4S 1M5
Damage occurring during shipment is
deemed the responsibility of the carrier,
and claims should be made directly with
the carrier.
Clarity Service Center
4289 Bonny Oaks Drive, Suite 106
Chattanooga, Tennessee 37406
Tel: Fax:
(423) 622-7793 or
(800) 426-3738
(423) 622-7646 or
(800) 325-8871
A proof-of-purchase indicating model number and date of purchase.
Bill-to address.
Ship-to address.
Number and description of
units shipped.
Name and telephone number
of person to call, should contact be necessary.
Reason for return and descrip-
tion of the problem.
Guía del Usuario
ClarityLife
Teléfono Celular
TM
C900
TM
E
N
G
L
I
S
H
OK
Tel: (800) 540-8363
(514) 956-8363
Fax: (514) 956-1825
C90
0
1
4
7
*
46
+
pqr
s
0
gh
i
8
2 abc
5 jkl
tuv
6
9 wxyz
# a/A/1
3 def
mn
o
E
S
P
A
ñ
O
L
Tabla de contenido
Tabla de contenido
Introducción......................................................................................................... 50
Otras funciones del teléfono
Instrucciones de seguridad..............................................................................51
Lista de partes..................................................................................................... 58
Guía de referencia rápida.................................................................................59
Teclas/funciones del modelo C900............................................................... 60
Instalación
Forma de insertar la tarjeta SIM....................................................................... 62
Códigos PIN para la tarjeta SIM........................................................................ 62
Informatción de la batería.................................................................................. 63
Menú abreviado...................................................................................................74
Números marcados............................................................................................74
Llamadas perdidas...............................................................................................74
Llamadas recibidas............................................................................................. 75
Correo de voz.................................................................................................... 75
Configuraciones.................................................................................................. 75
Alarma de reloj....................................................................................................76
Bloqueo manual y automático del teclado....................................................... 78
Mi menú.............................................................................................................. 79
Avisos.................................................................................................................. 80
Operación básica del teléfono celular
Mensajes de texto (SMS)
Activación y desactivación de la opción SMS....................................................81
Procedimiento para escribir un mensaje de texto (servicio SMS)..................81
Procedimiento para enviar el mensaje de texto (servicio SMS)..................... 83
Procedimiento para contestar un mensaje de texto
recibido (servicio SMS).................................................................................. 84
Procedimiento para crear e insertar
mensajes predeterminados........................................................................... 86
Prendido y apagado del teléfono celular.......................................................... 65
Procedimiento para fijar la fecha y la hora....................................................... 65
Procedimiento para hacer una llamada y terminarla....................................... 66
Contestar una llamada....................................................................................... 66
Nueva marcación del último número marcado............................................... 66
Directorio telefónico
Procedimiento para hacer llamadas desde el
directorio telefónico...................................................................................... 67
Cambiar los registros realizados en el directorio telefónico.......................... 68
Procedimiento para buscar en la lista del directorio telefónico..................... 69
Manejo de la lista de los 10 números más importantes (Top 10).................. 69
Configuraciones del directorio telefónico....................................................... 70
Procedimiento para guardar números en el directorio
telefónico utilizando texto (SMS).................................................................. 70
Guardar en la agenda los números de llamadas entrantes............................. 70
Llamadas de emergencia
Importante procedimiento para guardar en memoria los
números de emergencias................................................................................71
Llamada a servicios de urgencias.......................................................................71
Lo que sucede después de presionar la tecla de ayuda................................... 73
Procedimiento para desactivar la tecla de emergencias................................. 73
Visión general del menú.................................................................................. 88
Solución de problemas..................................................................................... 92
Especificaciones técnicas................................................................................. 95
Requerimientos y regulaciones FCC........................................................... 96
Garantía y servicio............................................................................................. 98
Introducción
Gracias por comprar el teléfono celular modelo
C900 «ClarityLife».
Este es un modelo muy sencillo y fácil de usar, que amplifica el
sonido entrante hasta 20dB. La tecla de ayuda, localizada en la
parte posterior del teléfono, permite al usuario programar hasta
cinco (5) números de contacto para emergencias.
Esta guía del usuario así como la guía de inicio rápido le permitirá
conocer la información que usted necesitará para usar el modelo
C900 en forma efectiva, fácil y segura. Lea este manual a fondo
antes de usar el teléfono celular. Mantenga este manual cerca del
teléfono para tener una fácil referencia.
Esperamos que usted disfrute del teléfono «ClarityLife».
Instrucciones importantes de seguridad
Por favor, lea las siguientes instrucciones de seguridad antes de usar su teléfono
celular ClarityLife modelo C900 de doble banda y sus accesorios. Por favor, guarde
estas instrucciones para su referencia. Siga las precauciones de seguridad y las
advertencias cuando use este producto, con el objeto de reducir el riesgo de incendio, descarga eléctrica, lesiones personales y daños a la propiedad. El producto, el
empaque o las instrucciones para el usuario, pueden traer advertencias adicionales
ADVERTENCIAS
Opción de llamada de emergencia
Al oprimir el botón de emergencia se llamará, en el orden que usted seleccionó, a los
números de emergencia guardados en la agenda de direcciones del teléfono celular,
hasta que alguno responda. Se pueden guardar hasta 5 números de emergencia en
la agenda de direcciones. Los números y el orden de llamada deben ser digitados en
el teléfono, para asegurar que los números deseados se marquen al oprimir el botón
de emergencia. Luego de registrar los 5 números de emergencia, se debe comprobar
que esté funcionando la opción de llamada de emergencia del teléfono, presionando el
botón de emergencia, para asegurarse que los números fueron registrados correctamente en el teléfono.
Dado que el servicio telefónico funciona mediante la modalidad de pagos por mes
anticipado, se debe estar siempre seguro de que cada pago anticipado se haya efectuado
realmente, para que el servicio telefónico se mantenga activado. Si usted no hace el pago
mensual previo o si no paga el valor completo del mes, perderá el servicio telefónico, y
tanto el teléfono como la opción de llamada de emergencia no estarán disponibles.
También debe asegurarse que la batería del teléfono esté siempre completamente
cargada, y que el teléfono esté en buenas condiciones, para que la opción de llamada de
emergencia funcione.
La opción de llamada de emergencia no estará disponible si el teléfono se encuentra
fuera del área de cobertura, el servicio de red está suspendido temporalmente por el
operador, o si hay una interferencia telefónica o de la red.
Este teléfono no viene equipado con servicio de posicionamiento global (GPS), ni otros
medios para localizar su posición física. En consecuencia, si se presenta una situación de
emergencia en la cual le sea imposible suministrar su ubicación, a una de las personas que
usted ha registrado en la agenda de direcciones como contacto de emergencia, ni ésta ni un
servicio de respuesta de emergencia podrán localizarlo por intermedio del teléfono celular.
50
51
Instrucciones importantes de seguridad
La tarjeta SIM debe estar instalada y activada, antes de que usted reciba cualquier
servicio telefónico. Si la tarjeta SIM se daña o es remplazada, se perderán los números de contacto de emergencia que usted registró en el teléfono. En ese caso, usted
deberá volver a registrar los 5 números de contacto de emergencia en la agenda de
direcciones del teléfono, para restaurar la opción de llamada de emergencia.
Después de haber registrado los 5 números de emergencia nuevamente, compruebe
que la opción de llamada de emergencia del teléfono está funcionando, presionando
el botón de emergencia para asegurarse que los números fueron registrados correctamente en el teléfono.
Interferencia de la frecuencia de radio
Marcapasos
La asociación de fabricantes de la industria de la salud (Health Industry Manufacturers Association) recomienda que se mantenga una separación mínima de 6 pulgadas
entre un teléfono celular y un marcapasos, para evitar una posible interferencia con
este último. Las personas con marcapasos deben seguir los siguientes consejos:
• Mantener siempre una distancia mayor a 6 pulgadas entre el teléfono encendido y
el marcapasos.
• No llevar el teléfono en un bolsillo que quede a la altura del pecho.
• Usar el oído del lado opuesto al del marcapasos, para minimizar el potencial de
interferencia.
• Si tiene alguna razón para sospechar que hay una interferencia, apague el
teléfono inmediatamente.
Conformidad con las restricciones del uso del
teléfono celular
Viajes aéreos
El uso del teléfono celular puede estar prohibido durante los vuelos.
Letreros
Obedezca los letreros o señales que prohíban el uso de los teléfonos celulares en
ciertos sitios incluyendo, más no limitadas a ellas, las áreas con riesgo de explosión,
las instalaciones médicas y los aviones.
Instalaciones médicas
Apague el teléfono en las instalaciones médicas, cuando haya regulaciones señaladas
en estas áreas que le indiquen hacerlo. Los hospitales y otras instalaciones médicas,
pueden hacer uso de equipos sensibles a la energía de radiofrecuencia externa.
Conducir con seguridad
No se recomienda el uso del teléfono celular, con o sin el uso de audífonos, mientras
se conducen carros u otros vehículos motorizados, además de ser contrario a la ley
en algunas áreas. Entérese y siga las leyes locales y las regulaciones concernientes al
uso del teléfono celular mientras se conduce.
Si usted decide usar el teléfono celular mientras conduce un vehículo, preste toda su
atención a conducir de manera segura y tenga en mente los siguientes consejos de
conducción1:
Nota: Se necesita confirmar la recomendación de la Asociación. (HIMA)
• Familiarícese con su teléfono y las opciones que ofrece, tales como la forma como se hacen una marcación rápida y una repetición de llamada.
Audífonos
• Ubique su teléfono en un sitio de fácil alcance.
El teléfono puede interferir con algunos audífonos. Si esto ocurre, consulte con el
fabricante del audífono o con su médico para analizar alternativas o soluciones.
• Marque con precaución y evalúe el tráfico; haga las llamadas cuando no esté
en movimiento.
Otros dispositivos médicos
• Infórmele a su interlocutor que usted está conduciendo; de ser necesario, suspenda la llamada si se encuentra con tráfico pesado o condiciones
climáticas peligrosas.
Si usted usa cualquier otro dispositivo médico personal, consulte con el fabricante
o con su médico, para determinar si éste está protegido adecuadamente contra la
energía de radiofrecuencia externa.
52
Instrucciones importantes de seguridad
• No tome notas ni busque números telefónicos mientras esté conduciendo.
53
Instrucciones importantes de seguridad
• Use audífonos o dispositivos similares para su mayor conveniencia y comodidad.
• No entable conversaciones que lo tensionen o que sean muy emotivas, en tal forma que puedan desviar su atención del camino.
éste sea el adecuado para el tipo de conector, que no haya obstrucción alguna
dentro del puerto o que el conector no esté deformado.
• Marque 911 u otros números locales de emergencia para reportar
emergencias serias – son llamadas gratuitas desde su teléfono.
No inserte nada en el teléfono de forma diferente a como se indica en el manual del
usuario, porque esto puede ocasionar algún daño a los componentes internos del
equipo, o causarle una lesión a usted.
• Use su teléfono para ayudar a otros en emergencias.
No puede ser reparado por el usuario
• Consejos de conducción dados con la autorización de la asociación para los
Este teléfono no está diseñado para ser modificado de acuerdo a los gustos del
usuario. No intente arreglarlo o modificarlo; de lo contrario, podría lesionarse o
invalidar la garantía.
sistemas inalámbricos (CTIA-The Wireless Association®)
• Para vehículos equipados con sistemas de protección de «bolsa de aire» (Air Bag)
• Una bolsa de aire se infla con mucha fuerza. No guarde su teléfono ni cualquiera de
sus accesorios, en sitios que queden sobre la bolsa de aire o en el área donde ésta
se despliega.
Limpieza del producto
Mantenimiento y cuidado
Use solamente un paño libre de motas, ligeramente humedecido, para limpiar el
teléfono. El uso de limpiadores para el hogar, alcohol u otros químicos puede dañar
su teléfono celular.
Manejo del teléfono
Uso en relación con el medioambiente
No deje caer su teléfono, ni lo desarme, abra, aplaste, doble, deforme, perfore,
triture o pinte; no lo introduzca en el microondas; no le prenda fuego y no inserte
objetos extraños dentro de él.
Evite el agua y los sitios mojados
Si el teléfono ha sido sumergido en agua, perforado o sometido a una caída severa,
no lo use hasta llevarlo a un proveedor de servicio autorizado. Para información
del servicio, póngase en contacto con Clarity en 1-800-426-3738.
Suspenda el uso de su teléfono y póngase en contacto con Clarity en
1-800-426-3738 si el producto se recalienta, tiene cables o enchufes dañados,
o si el producto ha sufrido algún daño.
Batería removible
Este teléfono funciona con pilas removibles. Cambie las pilas siguiendo las
indicaciones dadas en el manual de usuario.
Conexión de los accessorios
No fuerce los conectores dentro de los puertos. En caso de experimentar una
resistencia excesiva al tratar de insertar un conector en un puerto, revise que
54
Instrucciones importantes de seguridad
No use el teléfono bajo la lluvia o cerca a los lavamanos y otros sitios mojados.
Tenga cuidado de no derramar comida ni bebidas en el teléfono. En caso de que el
teléfono se moje, desconecte todos los cables, apague el teléfono antes de limpiarlo
y deje que se seque perfectamente antes de encenderlo de nuevo. No intente secar
el teléfono con una fuente externa de calor, como por ejemplo el horno microondas
o un secador de pelo.
Peligro de asfixia
Nunca permita a los niños jugar con el teléfono o sus accesorios — las partes
pequeñas pueden representar un peligro de asfixia.
Advertencia para ambientes con riesgo de explosiones
No use ni cargue el teléfono en áreas que sean potencialmente explosivas, como por
ejemplo — más no únicamente- estaciones de gasolina, áreas de explosión, dentro
de vehículos que transporten fluidos inflamables, etc. Obedezca todos los letreros
de advertencia.
55
Instrucciones importantes de seguridad
Advertencia de nivel de volumen
La exposición a altos niveles de volumen puede lesionar su oído. Aunque no existe
un único ajuste de volumen que sea apropiado para todos, usted debe usar siempre
sus audífonos o el dispositivo de audición que se trate ajustado a un volumen moderado, evitando la prolongada exposición a sonidos con altos niveles de volumen.
Cuanto más alto el volumen, menor el tiempo que se requiere para que su oído se
vea afectado. Usted puede sentir distintos niveles de sonido, utilizando los mismos
audífonos o dispositivos de audio con diferentes equipos. El aparato que use y
sus ajustes afectan el nivel del sonido que usted oye. Si experimenta cualquier incomodidad al escuchar su equipo, debe suspender el uso de los audífonos o dispositivo
de audición que esté utilizando. Para proteger su oído, algunos
expertos sugieren que:
1. Ajuste el control en un volumen bajo, antes de colocar en sus oídos los
audífonos o dispositivo de audición que esté utilizando.
2. Disminuya la cantidad de tiempo que usa los audífonos o dispositivo de
audición, ajustados a altos volúmenes.
3. Evite subir el volumen de su equipo con el propósito de bloquear
entornos ruidosos.
Instrucciones importantes de seguridad
Exposición a la energía electromagnética en la banda de
frecuencia de radio
Cuando está encendido, este aparato transmite y recibe radiación electromagnética
en el ancho de banda de la radiofrecuencia (RF), a través de su antena. Mediante un
acuerdo científico internacional, la unidad de medida de la energía contenida en la
frecuencia de radio es el «coeficiente específico de absorción» (SAR por sus siglas
en Inglés). En los Estados Unidos, el límite aplicable del coeficiente SAR para el
teléfono celular modelo C900, es de 1.60 mW/Kg (millonésima parte de vatio por
gramo de masa) o lo que es lo mismo 1.60 W/Kg (vatios por kilogramo de masa), tal
como ha sido establecido por la FCC. La máxima medida de exposición SAR para el
modelo C900 fue 0.738 W/Kg, cuando el teléfono estaba encendido pero no en uso
(ubicado en el cuerpo); y 0.264 W/Kg cuando el teléfono estaba siendo utilizado
(ubicado en la mejilla). En todos los casos, el teléfono fue aprobado
por instituciones de prueba independientes, dedicadas a la realización de pruebas de
laboratorio.
Desecho y reciclaje
Revise y siga las leyes locales en cuanto a la eliminación y el reciclaje de su teléfono.
4. Baje el volumen de sus audífonos o dispositivo de audio, si el volumen al que
están ajustados le impide escuchar a la gente que se encuentra a su alrededor. Visite www.plantronics.com/healthandsafety para obtener mayor información acerca de los dispositivos de audio, y del proceso de audición.
56
57
Contenido
C900
C900
Guía de referencia rápida
Contactos de
la bateria
Clari
ty
OK
Cómo insertar la batería
1
4
7
pqr
s
*
+
0
gh
i
8
2 abc
5 jkl
tuv
6
9wxyz
Insert the battery into phone battery
compartment as shown in Figura 1. The
battery contacts have to face the gold
colored contacts of the mobile phone.
3 def
mn
o
#a/A/1
Teléfono Celular
Figura 1
Cargador del
Teléfono Celular
Cómo cargar el modelo C900
Conecte el adaptador en la parte baja del
teléfono C900 y el otro extremo a una toma
de 120V, como se muestra en la Figura 2.
ble
ea
arg
ch
Re
ry
tte
Ba
Batería Recargable
I mportant E
Cargue la bateria por
4 horas antes de hacer
la primera llamada.
Figura 2
Guía del Usuario
58
59
teclas/funciones del modelo C900
teclas /funciones del modelo C900
1 Pantalla
2 Flechas
1
Pressione para desplazarse por el directorio
telefónico y el menú
DISTRIBUCIÓN DE LAS TECLAS
1 Tecla «Encender/Apagar»
Flashlight
Presione durante 3 segundos para
encender o apagar el teléfono.
3 Tecla «Contestar/OK»
2 Bloqueo del teclado
Presione para contestar la llamada
Presione para seleccionar una opción que se muestre en la pantalla sobre esta tecla
Presione para prevenir que las teclas se On/Off
1
4 Tecla «Finalizar llamada/Borrar/Atrás»
Alarm clock
Key lock
3
4
2
Presione para finalizar la llamada
Presione para seleccionar una opción que se muestre en la pantalla sobre esta tecla
Push to Open
the SLIDER
5 Luces de alerta
Verde: Paradea durante las llamadas entrantes
Roja: Paradea cuando la bateria necesita
ser recargada
3
4
2
Naranja: Parpadea durante la carga y permanece encendida cuando la batería esta llena
9 Control de Volumen
Presione (+) o (-) para ajustar el volumen durante una llamada. Cuando el teléfono está timbrando: presione para apagar el timbre (éste se encenderá automática
mente para la siquiente llamada).
10 Compartimento de la batería
teléfono colgado alrededor del cuello)
60
teléfono para abrirlo y marque enel teclado el nûmero deseado.
Estado de la batería
Tecla – Manteniéndola presionada:
Llamada siguiente activada
10 números marcados recientemente
Alarma encendida
Timbre de llamada apagado
7
6
11
8
9
Bateria compuesta por iones de litio de alto
rendimiento 0 3 pilas alcalinas AAA
11 Cordón para colgar el móvil al cuello
Inserte el cordón – (Éste le permite al usuario llevar el 3 Linterna
4 Alarma de reloj
5 Para hacer una llamada: Deslice el 5
6 Micrófono
7 Puerto para el cargador de la batería
8 Tecla «Ayuda»
Programe 5 contacdos de emergencia del direc-
torio teléfonico del modelo C900. Estos números se marcarán automáticamente en la secuencia en
que están programados al presionar la tecla «Ayuda». Nota: No se recomienda programar el número 911 como contacto de emergencia.
5
opriman accidentalmente. (Presione la tecia por 3 segundos para activar o
desactivar el bloqueo).
especiales
Tecla: Manténgala presionada para
Reloj
llamar a su servicio de correo de voz
Fuerza de la señal
Tecla: Para alternar letras mayúsculas,
Servicio de activación internacional: No hay tarifa adicional
minúsculas y números cuando escriba
mensajes de texto
por el servicio de activación internacional – roaming, si usted se
encuentra suscrito al plan de
servicio ClarityLife
Linterna
Top 10: Los números más impor-
Activar/desactivar la alarma del reloj
tantes aparecerán al inicio directorio
telefónico
Último número marcado: Presione
10
Mensajes de Texto: Caracteres
y mantenga presionado por tres
segundos, para marcar el último
número de llamada
Manténgalo presionado: la linterna
está encendida
Tecla «Encender/Apagar»
Tecla «Alarma del reloj»
Activate/deactivate the alarm clock
Bloqueo del teclado
Previene que las teclas se opriman
accidentalmente. (Presione la tecla por
3 segundos para activar o desactivar
el bloqueo.
61
Instalación
Forma de insertar la tarjeta SIM
Para realizar llamadas con el teléfono se necesita una tarjeta
SIM. Así es como se inserta:
• Voltee el teléfono cerrado para que el frente quede boca
abajo. Sosténgalo con ambas y use sus pulgares para aplicar
un poco de presión y deslizar la tapa de la batería. (Foto 1)
Foto 1
• Si la batería ya eståa en el teléfono, quîtela levantándola de
la esquina inferior derecha. (Foto 2)
• Saque el contenedor de la tarjeta SIM usando su uña o
algún objeto puntudo. El contenedor de la tarjeta SIM eståa
en el lado derecho, bajo la tecla de emergencia. (Foto 3)
• Inserte la tarjeta SIM en el contenedor, con los contactos
Foto 2
dorados hacia abajo y la esquina con borde recortado, en la
parte inferior derecha. (Foto 4)
• Deslice el contenedor de la tarjeta SIM de nuevo en
la ranura.
• Mensaje de error «Inserte tarjeta SIM» en la pantella.
Foto 3
Foto 4a
Papel
Foto 4b
62
Algunas tarjetas SIM son más delgadas que otras.
Instalación
Para ingresar el código PIN, deslice la tapa protectora
del teléfono celular para abrirlo y digite el número PIN utilizando el teclado. Confirme el código PIN con (cualquier
error en el registro puede ser borrado con).
Sugerencia: para evitar problemas causados por el olvido o
la pérdida de su código PIN, le recomendamos que desactive
el código PIN.
Abra el teléfono y presione la tecla
hasta que
aparezca en su pantalla la señal «Configuraciones». A
continuación, y presionando la tecla
abra la ventanilla
de opciones y seleccione la opción «requerimiento de
PIN»; en este punto presione la tecla
para seleccionarlo. Si la opción «apagado» no está resaltada con un fondo
negro, vaya hasta esa opción y selecciónela presionando.
En este punto un código PIN de 4 dígitos le será solicitado
nuevamente. Ingrese el código PIN por medio del teclado
y confírmelo presionando la tecla
.
Para regresar al modo de «espera» presione o cierre el
teléfono celular.
Por favor tenga en cuenta: la desactivación del código
PIN no está disponible con algunos proveedores de red.
Si este mensaje de error aparece aunque ya se haya insertado
la tarjeta SIM, por favor introduzca un pedazo de papel
delgado entre la tarjeta SIM y el lado superior del contenedor
de la tarjeta. (Foto 4b)
Procedimiento para insertar
la batería
Códigos PIN para la tarjeta SIM
• Los contactos de la batería deben dar contra los contac-
Cuando se use por primera vez la tarjeta SIM,se debe
ingresar el código PIN de 4 dígitos. Este código aparece en
la documentación que usted debe recibir por parte de su
operador de red. Ninguna persona diferente a usted puede
encender su teléfono sin conocer su código PIN (número
personal de identificación). Sin embargo, su número PIN
no es requerido si su teléfono ya está encendido, lo que
permite que personas desconocidas lo utilicen en caso de
pérdida o robo.
tos dorados del teléfono celular. (Foto 5)
• Coloque la tapa nuevamente deslizando dos pestañas de
la parte frontal en el teléfono.
Procedimiento para insertar las
baterías corrientes
¡Advertencia! ¡Las baterías AAA no pueden ser cargadas mientras se encuentren dentro del teléfono celular!
63
Instalación
Foto 5
• Por favor, tenga en cuenta los simbolos
Operación básica del teléfono celular
AAA
en la parte inferior del compartimento de la batería.
Cuando las inserte, asegúrese quos lados concuerden
con los simbolos respectivos. (Foto 5)
• Coloque la tapa de la batería nuevamente, deslizando
primero las dos pestañas de la parte frontal en el
teléfono.
Procedimiento para cargar la batería
Importante: Cargue la batería al menos por 4 horas antes
de hacer la primera llamada.
• Inserte el enchufe en la toma de corriente de 120V,
localizada en la pared. (Foto 7)
• Conecte el cargador al teléfono, insertando el otro
extremo del cargador en el puerto correspondiente.
• Durante la fase de carga, la pantalla del teléfono celular
Foto 6
muestra el símbolo de una batería y la palabra «cargando». Al mismo tiempo un bombillito con luz de color
naranja permanece titilando, mientras permanezca la
conexión entre el cargador y el teléfono. (Esta señal de
luz se iniciará unos 10 segundos después que el cargador
se haya conectado al teléfono).
• Tan pronto como la batería esté totalmente cargada,
aparecerá en la pantalla del celular el aviso «Batería
cargada», y el bombillo con la luz naranja dejará de titilar
mientras que permanece encendido.
• En este momento puede desconectar el cargador, tanto
del teléfono celular como de la toma de corriente
localizada en la pared.
Indicación de batería y fuerza de señal
Una línea en la escala indicadora del estado de carga de la
batería indica un 25% de capacidad (4 líneas corresponden
al 100% de la carga). Si el nivel de carga de la batería cae
64
por debajo del 25% y la señal de alerta en la parte inferior
del teléfono celular empieza a titilar con un color rojo, la
batería se debe cargar utilizando el cargador. (Foto 7)
El indicador de la fuerza de la señal se encuentra en el lado
derecho de la pantalla. Si el mismo se encuentra por debajo
del 25%, la recepción y la calidad acústica de las llamadas se
verán fuertemente afectadas. Si es éste el caso, por favor
sitúese en un sitio diferente donde la señal se reciba mejor.
Foto 7
Encender y apagar del teléfono celular
Presione durante tres (3) segundos la tecla
que encuentra en la parte superior del teléfono celular. Esta función
permite encender y apagar el teléfono.
Procedimiento para configurar la
fecha y la hora
La fecha
• Abra el teléfono celular y presione la tecla
hasta que
aparezca en la pantalla el aviso «Configuración», y
presione entonces la tecla
para seleccionar
esta opción.
• A continuación presione la tecla
y arrastre el cursor
hasta que encuentre la opción «Hora y fecha», y
selecciónela presionando la tecla .
• En este momento seleccione la opción «configurar la
hora» presionando la tecla
.
• Utilice el teclado o las teclas
para escoger la hora
que se desee. Se debe digitar el formato de dígitos dobles
para seleccionar las horas y los minutos (por ejemplo,
«09» y «00» para señalar la hora 9:00). Después que se
haya seleccionado la hora, presione la tecla
para digitar
los minutos. Después que se haya digitado la hora
requerida, presione
para guardar la información. En la
pantalla debe aparecer el aviso, ¡Hora seleccionada!
65
Operación básica del teléfono celular
Fecha
DIRECTORIO TELEFÓNICO
• Si usted no desea rechazar una llamada pero no desea
para digitar la fecha, y luego presione la
tecla
. Use el teclado o las teclas
para ingresar el
mes, el día y el año (MM/DD/AAAA).
• Presione la tecla
Después deingresar los datos correspondientes al año,
presione la tecla
para guardar la información.
Procedimiento para hacer una llamada
Deslice la tapa del teléfono celular para abrirlo y marque el
número telefónico, utilizando para ello el teclado.
A continuación haga la llamada presionando la tecla
.
Para terminar la llamada presione la tecla
. Si la per-sona
con quien está hablando finaliza la llamada antes
que usted cuelgue, entonces usted no necesita presionar la
tecla
.
Nota: usted puede marcar los números desde el directorio
telefónico, sin abrir el celular; para ello consulte la sección correspondiente al directorio telefónico en la página.
Procedimiento para contestar una llamada
• Cuando el teléfono está recibiendo una llamada, él timbra y
vibra. La luz de alerta de color verde, empieza a parpadear y
el número o el nombre (si éste está almacenado en la
agenda) de la persona que llama, aparece en la pantalla.
o deslizando la
tapa del teléfono para abrirlo. (Usted puede hablar con la
tapa del teléfono corrida o cerrada).
que el teléfono siga timbrando, presione la tecla
que controla el volumen y así el tono del timbre se
apagará para esta llamada en particular.
Repetición de la llamada al último
número marcado
Deslice la tapa que cierra el teléfono celular y presione
la tecla «*» /
por tres segundos. El último número
marcado aparecerá en la pantalla. Presione entonces la
tecla
para iniciar el marcado.
Directorio telefónico
El directorio telefónico le permite guardar, cambiar y
buscar hasta 200 nombres y números telefónicos.
Procedimiento para guardar nuevos números en
el directorio telefónico
• Abra el teléfono y presione la tecla
hasta que se
ubique en la leyenda «Directorio telefónico» y
luego presione la tecla
para seleccionarla.
• Presione la tecla
y arrastre el cursor hasta que
encuentre la leyenda «Agregar contacto» y luego
presione la tecla
para seleccionarla. Ingrese el
nombre de su contacto utilizando para ello el teclado y
guarde la información presionando la tecla
.
• Acepte la llamada presionando la tecla
• Presione la tecla
para finalizar la llamada.
¡Por favor tenga en cuenta! ¡Cerrar el teléfono
deslizando la tapa NO termina la llamada!
• Para rechazar una llamada presione la tecla
teléfono esté timbrando.
66
cuando el
Ejemplo
abc
2
Presione una vez para ingresar la letra «A»
Presione dos veces para ingresar la letra «B»
Presione 3 veces para ingresar la letra «C»
Presione 4 veces para ingresar el número «2»
Todos los caracteres y funciones que pueden ser seleccionados, aparecen en la tabla que sigue a continuación.
Cada botón sirve para señalar varios caracteres de
D .,! ? ‚ „ @ :1
Dabc2äà
Ddef3è
Dghi4
Djkl5
Dmno6ö
Dpqrs7ß
Dtuv8ü
Dwxyz9
D space; 0
D.,?!‚„:;()@+$€£¥#%*&~=¤
D Usted puede
cambiar entre letras
minúsculas y mayúsculas, o seleccionar
números únicamente. (« Abc», « ABC»,
«abc», «123»).
Foto 8
67
DIRECTORIO TELEFÓNICO
DIRECTORIO TELEFÓNICO
funciones, dependiendo de las veces que el respectivo
botón sea presionado cuando se encuentre en el modo
«ABC». (Foto 8)
• Presione la tecla
y arrastre el cursor hasta encontrar la leyenda «Editar contacto»; aquí presione la
tecla
para seleccionarla. A continuación use los
botones
o el teclado, para seleccionar el registro
deseado en el directorio telefónico, y
entonces selecciónelo presionando
.
Utilice el teclado para digitar el número telefónico.
Guarde la entrada en el directorio telefónico
.
presionando
• Si es necesario, corrija el nombre y el número utili-
Procedimiento para hacer una llamada desde el
directorio telefónico
Cuando la tapa deslizante que protege el teléfono celular
está cerrada, los contactos digitados en el directorio
telefónico se muestran en orden alfabético.
• Seleccione el nombre de la persona que desea llamar
Cómo buscar entre los registros hechos en el
directorio telefónico
presionando la tecla
, en el nombre y número que
corresponda. Llame al número deseado presionando la
tecla
.
Nota importante: Es posible buscar y llamar a los
números telefónicos seleccionados en el directorio telefónico,
teniendo el teléfono abierto o cerrado.
Procedimiento para buscar un nombre y un número, cuando
la tapa deslizante protectora que cierra el teléfono se
encuentra abierta:
Buscando la información con el teléfono cerrado
• Presione la tecla
para arrastrar el cursor hasta que
encuentre la leyenda «Directorio telefónico» y
selecciónela presionando la tecla
. A continuación
seleccione la leyenda «Buscar nombre» presionando
la tecla
.
• Busque el contacto deseado en el directorio tele-fónico,
presionando en el teclado una o más de las letras
iniciales del nombre buscado.
• Llame al número seleccionado presionando la tecla
Procedimiento para cambiar los registros
realizados en el directorio telefónico
• Abra el teléfono y presione la tecla
hasta que
encuentre el directorio telefónico y luego presione
para seleccionarlo.
68
zando para ello el teclado o presionando
para
borrar los caracteres digitados. Continúe mediante la
presión de la tecla
.
.
para deslizar el cursor hasta el regPresione la tecla
istro deseado en el directorio telefónico y selecciónelo
presionando la tecla. Presione luego la tecla
una vez
más, para marcar el número encontrado.
Buscando la información con el teléfono abierto
• Presione la tecla
y arrastre el cursor hasta
encontrar la leyenda «Directorio telefónico», y
seleccione presionando la tecla
.
• A continuación seleccione la leyenda «Buscar nom-
bre» presionando la tecla
.
• Busque el contacto deseado en el directorio tele-
fónico, utilizando para ello el teclado o digitando una
o más letras, de las primeras letras del nombre.
• Llame al número deseado presionando
.
69
DIRECTORIO TELEFÓNICO
Procedimiento para manejar los 10 números
más importantes de la lista
• Con la función denominada «10 más importantes»
(Top 10) se puede digitar al inicio del directorio telefónico
los contactos más frecuentes o los números más importantes, independientemente de su orden alfabético. Esto
significa que usted puede acceder rápidamente y llamar a
estos contactos cuando la tapa del teléfono esté cerrada.
• Abra el teléfono celular y presione la tecla
hasta que la
leyenda «Directorio telefónico» aparezca en la pantalla,
y presione entonces
para seleccionarla.
• A continuación presione la tecla
y deslice el cursor hasta
que encuentre la leyenda «10 más importantes» y
selecciónela presionando. En este momento seleccione
«Agregue los 10 más importantes» presionando la
tecla
. Continúe con este procedimiento mediante la
selección de la leyenda «Agregue el Nº 1». En este
momento aparecerán en la pantalla los registros que se
hayan hecho. Utilice los botones
para deslizar el
cursor hasta el registro deseado y selecciónelo presionando
la tecla
.
• Para agregar más números hasta alcanzar la cifra de los 10
permitidos, repita los pasos señalados.
Configuración del directorio telefónico
Guardar registros: especifica dónde se guardan los nuevos
registros en el directorio telefónico. Si se guardan los nuevos
contactos en la tarjeta SIM, se puede transferir su directorio
telefónico a otros teléfonos celulares. Si se guardan esas
nuevas entradas en la memoria del teléfono, el directorio
telefónico permanecerá en el teléfono celular, inclusive si se
cambia la tarjeta SIM.
Memoria en uso: permite buscar los contactos desde la
tarjeta SIM y/o la memoria del teléfono.
70
LLAMADAS DE EMERGENCIA
Estado de la memoria: Muestra cuánta memoria está en uso
en la tarjeta SIM o en el directorio telefónico.
Procedimiento para guardar los números
de la lista de llamadas entrantes, en el
directorio telefónico
Si usted está mirando cualquiera de las listas de llamadas (llamadas perdidas, llamadas hechas, llamadas recibidas), y desea
guardar cualquiera en el directorio telefónico, utilice la tecla
para deslizar el cursor hasta la posición en que aparece la leyenda
«Guardar en el directorio telefónico», al final de la lista.
Seleccione presionando
. A continuación deslice el cursor
hasta el número que desea guardar y presione
para seleccionarlo. Continúe la operación registrando el nombre del contacto
y guárdelo presionando
.
Procedimiento para guardar números en el
directorio telefónico utilizando texto (SMS)
Véase la página 79 para encontrar otras opciones de
texto (SMS)
• Esta función hace muy fácil la adición de nuevos contactos en el
directorio telefónico y lo mejor de todo es, ¡que sus familiares y
amigos hacen el trabajo por usted! Simplemente siga las
indicaciones que se dan a continuación:
• Alguien necesita enviar un mensaje de texto (SMS) usando el
siguiente formato: #Nombre#Número# (ejemplo: #Tommy#18004263738#). Asegúrese de incluir el código de área.
• El nombre y número son entonces grabados automáticamente
en el directorio automático una vez el texto (SMS) sea recibido.
• Por favor tenga en cuenta: cuando la memoria de texto (SMS)
esté llena, no se podrán guardar más números en el directorio
telefónico usando la opción SMS.
• Para bloquear esta opción vaya al menú «Mensajes SMS»,
luego «SMS en el Directorio Telefónico» y seleccione
«Apagado».
71
LLAMADAS DE EMERGENCIA
Llamadas de emergencia
Importante: por favor lea las advertencias para la Opción de
Llamadas de Emergencia que se encuentran al inicio de este
manual.
En una emergencia presione la tecla «Ayuda» que se encuentra en la parte posterior del teléfono celular modelo
C900 para marcar automáticamente los cinco (5) números
predeterminados. Cuando alguien presiona la tecla roja que
se encuentra en la parte posterior del teléfono celular, estos
números se marcarán automáticamente, en la secuencia en la
que hayan sido preseleccionados en el teléfono.
Cuando se marca el teléfono de emergencia, se escuchará un
tono característico de la llamada de emergencia. Cuando la
llamada es respondida, la persona que la recibe escuchará el
tono de emergencia y tendrá que presionar la tecla correspondiente al «0», para activar la llamada. Esto se hace con
el objeto de evitar que en el lado al que se hace la llamada,
responda por medio de un contestador automático. Si la
persona a la que se llama se trata de una «Organización de
Ayuda», la llamada será activada tan pronto sea respondida.
Si un contacto no ha sido posible de contactar, el teléfono
marcará automáticamente el siguiente número en la lista. En
esta forma se marcarán los números de la lista hasta tres (3)
veces seguidas. Si ningún contacto ha sido posible de alcanzar
después del ciclo de llamadas consecutivas, el teléfono modelo C900 contestará automáticamente la siguiente llamada
que se reciba en el transcurso de una hora.
Procedimiento para guardar los números
de Emergencia
• Primero seleccione los cinco (5) números y su secuencia
para la lista de «Contactos en caso de Emergencia».
Estos números deben haber sido ya guardados en el
directorio telefónico.
72
LLAMADAS DE EMERGENCIA
• Abra el teléfono y presione la tecla
hasta que encuentre el título «Directorio telefónico», y luego presione la
tecla
.
• A continuación presione la tecla
hasta que encuentre el
título «Números de Emergencia» y selecciónelo
presionando
.
• Seleccione la opción «Guardar Número de Emergen-
cia» presionando
. Entonces empezará a guardar los
números en los cinco espacios reservados para ellos.
Empiece a hacer los registros seleccionando el título
«Guardar Emergencia Nº 1» presionando la tecla
.
• El cursor se irá entonces hasta el directorio telefónico. Allí
deslice el cursor por entre todos los registros y cuando
encuentre resaltado el que busca, presione la tecla
.
• La siguiente opción es escoger si el número es «privado» o
corresponde a una «Organización de Ayuda».
Seleccione «Privado», si el número corresponde a un
individuo. Seleccione «Organización de Ayuda», si el
número corresponde a un «Centro de Llamadas» (Call
Center) perteneciente a una « Comunidad de Vida
Asistida».
• La última opción es escoger si se enviará un mensaje de
texto (SMS) a estos contactos. Resalte Si o No utilizando
los botones
y presione para
seleccionarlo.
• Para agregar más números de emergencia por favor repita
los pasos descritos anteriormente.
Para llamadas de urgencia
Importante: por favor lea las advertencias sobre «Emergencias» que se encuentran al inicio de la guía.
73
LLAMADAS DE EMERGENCIA
• Presione la tecla con el ícono de un corazón rojo que se
encuentra en la parte posterior del teléfono, y manténgalo
presionado durante tres segundos. El teléfono C900 llamará y
enviará mensajes, a los cinco (5) contactos que usted ha
programado en su botón de ayuda. (Ellos serán llamados en el
orden en que fueron programados en el teléfono).
Nota: La tecla de emergencia también funciona cuando el bloqueo
del teclado está activado.
• Para detener una llamada de emergencia presione
y mantenga presionado por tres (3) segundos la
tecla
.
Operación básica del teléfono celular
Otras funciones del teléfono
celular
Menú abreviado – Cuando la tapa protectora del
teléfono está cerrada
Cuando la tapa que cubre el teléfono está cerrada, los
contactos que se encuentran en el directorio telefónico se
muestran en orden alfabético, en forma de una lista de fácil
lectura.
Números marcados
• Si esta opción del menú se encuentra resaltada con
Lo que pasa después que usted ha presionado la tecla
de «Ayuda»
• Cuando usted presiona la tecla de «Ayuda», los números de
emergencia que usted ha guardado son automáticamente
marcados, en la secuencia en que los ha preseleccionado en el
teléfono.
• Al mismo tiempo, los contactos de emergencia reciben un
mensaje de texto (SMS) si la opción ha sido seleccionada,
informándoles que están a punto de recibir una llamada de
emergencia y que ellos tienen que presionar la tecla «0»,
durante los primeros 60 segundos de la llamada.
un fondo negro, el último número marcado aparece en la
pantalla. (Foto 9)
12:14
Números marcados
• Para mostrar una lista de los números marcados re-
cientemente, presione la tecla. Todos los números o
nombres (siempre y cuando haya sido guardado en el
directorio telefónico), se mostrarán junto con la fecha y
la hora en que las llamadas fueron realizadas.
• Para hacer una llamada desde un número ya marcado,
seleccione el número deseado con los botones
comience la llamada presionando la tecla
.
y
Albert
Bruno
Mi menú
Foto 9
Llamadas perdidas
74
Procedimiento para desactivar la tecla de «Emergencia»
• Si esta opción del menú aparece resaltada con un fondo
Deslice la tapa de protección del teléfono y ábralo para luego
presionar la tecla
, hasta que encuentre el título «configuración» y selecciónelo presionando
. A continuación
presione la tecla
hasta que encuentre el título «Tecla de
emergencia», y selecciónelo
presionando. Las teclas
permitirán resaltar la alternativa
que se haya escogido y guardarla presionando la tecla
.
• Para mostrar las llamadas perdidas más recientes
negro, el último número marcado aparecerá en pantalla.
presione la tecla
. Todos los números o nombres
(siempre y cuando haya sido guardado en el directorio
telefónico), se mostrarán en la pantalla junto con la fecha
y la hora en que la llamada fue perdida.
• Para llamar a alguno de los teléfonos correspondientes a
la lista de llamadas perdidas, seleccione el número
deseado utilizando los botones
y comience la
llamada presionando la tecla
.
75
Operación básica del teléfono celular
Menú corto
Mensajes recibidos
Llamadas recibidas
Última: 1-800-426-3738
Llamadas perdidas
Números marcados
Seleccione
Foto 10
Atrás
Operación básica del teléfono celular
Llamadas recibidas
Alarma del reloj
• Si esta opción del menú aparece resaltada con un fondo
• Para acceder en forma rápida al menú donde se encuentra
negro, el número o nombre (siempre y cuando haya sido
guardado en el directorio telefónico) de la última
llamada, se mostrará en la pantalla. (Foto 10)
el menú de alarma de reloj, presione durante tres (3)
segundos la tecla
que se encuentra en la parte superior
del teléfono celular.
• Para mostrar la lista de las llamadas recibidas presione la
• Para entrar por el menú siga estos pasos: abra el teléfono y
tecla
. Todos los números o los nombres (siempre y
cuando hayan sido guardados en el directorio telefónico),
aparecerán en la pantalla junto con la fecha y la hora en
que llamada fue recibida.
• Para hacer una llamada desde uno de los teléfonos que
aparecen en la lista de llamadas recibidas, seleccione el
número deseado con los botones
y comience la
llamada presionando la tecla
.
Número de correo de voz
Si usted presiona por tres segundos seguidos la tecla «0»,
automáticamente se conectará con su correo de voz. En
caso que este número no hubiese sido guardado en el teléfono celular o en la tarjeta SIM, se le requerirá hacerlo. Si
usted no conoce el número, por favor llame a su operador
de red.
Configuraciones
• Con el objeto de cambiar las configuraciones (p.ej. la
alarma del reloj, el volumen del timbre, el contraste de la
pantalla...), estas operaciones se podrán realizar desde la
opción de «Configuraciones».
hasta que llegue a
la posición «Configuraciones»; luego presione la tecla
para seleccionarlo. A continuación busque a través
del menú y siga las instrucciones indicadas en la pantalla.
presione la tecla
hasta que encuentre la opción «Configuraciones»; luego presione
para seleccionar dicha
opción. A continuación presione la tecla
hasta que llegue
a la opción «Alarma de reloj» y selecciónela presionando
.
Procedimiento para colocar la alarma
Para colocar la alarma de reloj seleccione la hora presionando los botones
, o presione el teclado digitando el
sistema de dígitos dobles (por ejemplo, «07» para indicar las 7
a.m.), y guarde la información presionando la tecla
.
• Para colocar los minutos presione los botones
o presione el teclado, digitando el sistema de dígitos
dobles y guarde la información presionando la tecla
.
• Presione los botones
para seleccionar A.M., P.M., o
el formato de las 24 horas, presionando
para guardar la
información.
• Después de colocada la hora para el despertador, presione
o cierre la tapa deslizante para colocar
el teléfono nuevamente en posición de espera. Un símbolo
indicando la alarma del reloj aparecerá en
el encabezado del menú.
• Abra su teléfono y presione la tecla
76
Funciones de alarma y despertador
• Presione
para apagar la alarma. En caso que la alarma no
hubiese sido totalmente desactivada, la alarma del reloj se
activará a la misma hora todos
los días.
77
Operación básica del teléfono celular
• Con el objeto de ser despertado nuevamente cinco (5) minutos
más tarde, presione la tecla
para activar la función despertador mientras que la alarma esté sonando. Esta operación puede
ser repetida tan a menudo como se desee.
• Si usted no presiona la tecla
para apagar la alarma, ésta
volverá a sonar cada tres (3) minutos hasta por un máximo de
noventa (90) minutos.
Procedimiento para cambiar la hora de
la alarma
• Ingrese al menú de alarma de reloj (véase la sección bajo el
título «alarma de reloj»).
• Seleccione la nueva hora presionando
. A continuación siga
las mismas indicaciones que aparecen bajo el título «colocando la alarma» en la página.
Procedimiento para desactivar la función
de alarma
• Si usted no desea que el timbre de la alarma suene a la misma
hora al día siguiente, debe desactivar la alarma del reloj.
• Entre al menú de la «alarma del reloj»
(Vea la página 74)
• Presione la tecla
para deslizar el cursor hasta
que encuentre la opción «Apagar» y selecciónela presionando
.
Procedimiento para configurar el tono de
la alarma
• Abra el teléfono celular y presione la tecla
hasta que
encuentre la opción «Configuración»; luego presione la
tecla
para seleccionarla.
Operación básica del teléfono celular
• A continuación seleccione la opción «Tonos y
Alertas» presionando la tecla
. Luego utilice la tecla
y arrastre el cursor hasta que encuentre la opción
Tono de la alarma; selecciónela presionando la tecla
. Utilice los botones
y deslice el cursor a través de
las diferentes melodías, y guarde la que le guste presionando la tecla
.
Nota: Seleccione un tono que sea significativamente diferente
de su tono de llamada con el objeto de evitar confusiones.
Bloqueo manual y bloqueo automático
Para asegurar que no se hagan llamadas accidentales (p.ej.
cuando el teléfono esté guardado en un bolsillo o en un
bolso), el teclado puede ser bloqueado.
Por favor tenga en cuenta: las llamadas entrantes pueden
ser aceptadas normalmente. Si usted desea rechazar una
llamada, primero debe desbloquear el teclado.
Bloqueo manual
• Con el objeto de activar el bloqueo del teclado, mantenga
presionado por tres (3) segundos la tecla
que se
encuentra en la parte superior izquierda del teléfono. Un
símbolo grande semejante a una llave aparecerá en la
pantalla del menú, señalando que la opción de bloqueo
está activada.
• Para desactivar el bloqueo presione durante tres segundos
la tecla
, o abra el teléfono.
Bloqueo automático
• Esta función bloqueará automáticamente el teléfono,
cuando esté cerrado y no haya sido utilizado durante diez
(10) segundos o más.
• Para activar el bloqueo automático:
78
79
Operación básica del teléfono celular
Modo en espera
(Teléfono cerrado)
12:14
hasta que
encuentre la opción «Configuración»; después
presione la tecla
para seleccionarla.
• Abra su teléfono y presione la tecla
• A continuación presione la tecla
Números marcados
y arrastre el cursor
hasta que encuentre la opción «Bloqueo Automático del Teclado»; selecciónela presionando la tecla
.
• Finalmente seleccione «encender», presionando la
Albert
tecla
Bruno
para activar esta función.
• El símbolo de una gran llave aparecerá en el menú de la
pantalla, señalando que la función de bloqueo está
activada. Para desactivar el bloqueo, presione durante
tres segundos seguidos la tecla
o abra el teléfono.
Mi menú
Mi menú
Mi menú
12:14
Mi menú
Buscar nombre
La opción Mi Menú permite seleccionar rápidamente, las
alternativas que se usan con más frecuencia (por ejemplo,
alarma de reloj, encendido y apagado del timbre, etc.).
(Foto 11)
Alarma de reloj
Cómo activar la opción «Mi Menú»
Calculadora
• Abra el teléfono celular y presione el tecla
Timbre off + vibraon
Seleccione
Foto 11
Atrás
hasta
que llegue a la opción «Configuración»; luego presione
para seleccionarla.
• Presione
para arrastrar el cursor hasta la opción
«Mi Menú» y selecciónela presionando
. Active esta
función presionando
.
Manejo de la función «Mi menú»
El dibujo correspondiente al directorio telefónico tiene
que aparecer resaltado con fondo negro, con el fin de
hacer aparecer el título «Mi Menú», en la parte inferior
izquierda de la pantalla del teléfono celular. Para seleccionar esta función, presione el tecla
. (Foto 11)
80
SISTEMA SMS/MENSAJES DE TEXTO
• Seleccione los ítems preferidos de la función «Mi Menú» en
el orden que se prefiera.
para seleccionar «Mi Menú».
En seguida presione la tecla
para situarse sobre
cada una de las opciones que se desee, y una vez se
encuentre sobre cada una de ellas, presione
para
seleccionarla.
• Presione la tecla
• A continuación utilice nuevamente la tecla
para
arrastrar el cursor hasta el ítem deseado, y selecciónelo
con la tecla
.
• Arrastre nuevamente el cursor, para seleccionar la
posición en que se desea dejar el ítem seleccionado dentro
de la lista «Mi Menú», y guárdelo presionando la tecla
.
• Repita los tres (3) pasos anteriores para adicionar op-
ciones a la lista «Mi Menú».
• Guarde toda la selección escogida presionando la
tecla
, y confirme la pregunta « ¿Guardar los cambios?» presionando la tecla
.
Avisos para recordar fechas
El sistema permite guardar fechas especiales como el de
un cumpleaños por ejemplo, y colocarle una señal que se
la recuerde. Si el nombre de la persona en cuestión ha
sido guardado en la memoria del teléfono celular (no en la
memoria de la tarjeta SIM), el sistema le preguntará si desea
llamarla después de haber sido recordada.
Si el nombre de la persona se encuentra grabado en la
memoria de la tarjeta SIM, no en la del teléfono celular, o
no está grabado como un contacto, el sistema le solicitará
grabar dicho nombre para poderlo recordar en la fecha
indicada. Después de haber sido recordada la fecha que se
trate, en este caso el sistema no le preguntará si desea hacer
la llamada correspondiente.
81
SISTEMA SMS/MENSAJES DE TEXTO
Sistema SMS / Mensajes de texto
Sistema SMS / Mensajes de texto
El sistema de servicio de mensajes cortos, SMS, permite
enviar mensajes escritos a todos los usuarios de teléfonos
celulares. Se generan costos adicionales cuando se hace
uso de este servicio. Por favor pregunte a su proveedor de
servicios de red acerca de estos costos.
Encendido y apagado del servicio SMS
Si no se desea enviar o recibir mensajes de textos, el servicio
SMS puede ser apagado.
Forma de escribir un mensaje SMS
• Abra el teléfono celular y seleccione la función
«Mensajes de texto» presionando
.
• En seguida seleccione la alternativa «Escribir un nuevo
SMS» presionando.
• Ayúdese del teclado para escribir el texto. Para borrar
caracteres individuales presione la tecla
. Esta tecla
borra los caracteres escritos hacia la izquierda. Para borrar
todo un párrafo, mantenga presionada la tecla
durante
tres (3) segundos.
Todos los caracteres y funciones que pueden ser utilizados
aparecen en la siguiente tabla. Cada tecla sirve para determinar varios caracteres o funciones, dependiendo de la manera
como se pulse la tecla respectiva cuando se encuentra bajo
el modo «ABC» (favor referirse a la explicación que se da al
final de la tabla).
Ejempios para teclas de función:
jkl
82
Presione 1x = j
Presione 2x = k
Presione 3x = l
Presione 1x = Espacio
Presione 2x = 0
Presione 4x = 5
SISTEMA SMS/MENSAJES DE TEXTO
Para insertar espacios en blanco (espacios entre caracteres) presione
una sola vez. Para insertar marcas
de puntuación (p.ej. ¿?, ¡!, ...) presione la tecla
en
forma repetida.
Ubique esta información a la izquierda del texto anterior,
como en la pasada guía del usuario.
Escritura de caracteres especiales: Ingrese al menú
de selección de caracteres especiales presionando la tecla
. Presionando en forma repetida las teclas
o
se puede desplazar el cursor de izquierda a derecha. Presionando la tecla correspondiente al número
«2», se puede desplazar hacia arriba dentro de la tabla;
con la tecla correspondiente al número «4», hacia la
izquierda; con la tecla correspondiente al número «6»,
hacia la derecha y con la tecla correspondiente al número
«8», hacia abajo. Una vez que se haya alcanzado el signo
deseado, presione la tecla
para insertar ese signo
dentro del texto. (Foto 12)
Cuando se presione la tecla # se tienen varias opciones:
ABC: Mayúsculas
D .,! ? ‚ „ @ :1
Dabc2äà
Ddef3è
Dghi4
Djkl5
Dmno6ö
Dpqrs7ß
Dtuv8ü
Dwxyz9
D space; 0
D.,?!‚„:;()@+$€£¥#%*&~=¤
D Usted puede
cambiar entre letras
minúsculas y mayúsculas, o seleccionar
números únicamente. (« Abc», « ABC»,
«abc», «123»).
Foto 12
Abc: Caso mixto (la primera letra con mayúscula y las dos siguientes con minúscula)
Abc: Minúsculas
123: se insertan solamente números
El modo seleccionado se muestra en la pantalla al lado del
símbolo ¢ .
Al momento de escribirse un texto, se pueden escribir
también números siguiendo los pasos descritos a continuación: presione la tecla
para indicar «siguiente»,
y a continuación presione la tecla
para desplazar el
cursor hasta encontrar el título «Insertar números»,
y seleccionar el que se desee presionando la tecla
. En este momento se puede seleccionar un número
utilizando el teclado, o seleccionar la opción «Buscar»
83
SISTEMA SMS/MENSAJES DE TEXTO
para hacerlo dentro del directorio telefónico o dentro de la lista «Números no
grabados».
Los contactos que se encuentren en el directorio telefónico (nombre con su correspondiente número), pueden ser insertados dentro del texto de un mensaje SMS en
la siguiente forma:
para indicar «Siguiente» y luego presione la tecla
para
desplazar el cursor hasta el título «Inserte un nombre»; selecciónelo presionando
. Seleccione los nombres del directorio telefónico ayudándose del teclado
del teléfono celular, o de las teclas
, e insértelos en la función SMS presionando la tecla
.
• Presione la tecla
• En la esquina superior derecha de la pantalla, aparecerá la información sobre la
cantidad de caracteres que se han insertado en la función SMS.
del primer mensaje, y que todavía quedan 135 caracteres disponibles para ese
mensaje. Si se digitan más de 160 caracteres, el texto será enviado como dos
mensajes diferentes. Tan
pronto como usted salte al segundo mensaje, la pantalla señalará 2/...
• Se puede enviar un máximo de 480 caracteres por cada mensaje (los cuales serán
divididos automáticamente en tres mensajes).
Procedimiento para enviar los mensajes escritos a través del sistema SMS
. A continuación
Existen tres (3) formas de seleccionar el destinatario de
su mensaje:
1.)El número ya se encuentra grabado en el directorio telefónico. Seleccione el directorio telefónico presionando dos veces la tecla
. Utilice las teclas
para arrastrar el cursor hasta el nombre deseado, o digite con el teclado del
teléfono celular la primera letra de dicho nombre. Cuando el contacto deseado aparezca resaltado en un fondo negro, confírmelo presionando la tecla
. Para enviar el
mensaje presione la tecla
.
84
2. El número telefónico fue utilizado recientemente pero no se grabó en el directorio
telefónico: seleccione «Buscar» presionando la tecla
y arrastre el cursor
hasta el título «Números no grabados»; haga la selección presionando
. Con
la lista de los números telefónicos en su pantalla (números marcados, números
recibidos y llamadas perdidas),
arrastre el cursor hasta el número deseado y selecciónelo presionando
. Presione
nuevamente para enviar el mensaje.
3. El número telefónico puede ser digitado directamente en forma
manual, utilizando el teclado del teléfono celular. Una vez se haya terminado de escribir el texto del mensaje, se debe presionar
para enviarlo.
Procedimiento para recibir un mensaje a través de la función SMS (texto)
• Por ejemplo: la anotación 1/135 significa que la persona se encuentra en el texto
Para enviar el texto una vez se haya terminado presione la tecla
seleccione «Enviar» presionando la tecla
.
SISTEMA SMS/MENSAJES DE TEXTO
Cuando se reciba un mensaje SMS, el teléfono celular emitirá un tono corto de
alerta y también vibrará. En la pantalla aparecerá la leyenda «Nuevo mensaje».
Para leer el mensaje SMS presione la tecla
la tecla
para desplazarse a través de él.
. Si el texto es largo, se debe presionar
Forma de responder un mensaje SMS recibido
Después de leer el texto presione la tecla
hasta que se llegue a la opción «Responder»; se selecciona presionando la tecla
.
En este momento se tienen cuatro (4) opciones:
1. Pantalla vacía (Digite su propio texto utilizando para ello el teclado del celular)
2. Texto original (Esta opción copiará el texto del
mensaje SMS recibido, en el texto que se está
escribiendo)
3. Mensajes predeterminados Respuesta cortas pregrabadas (por ejemplo, Sí, No, Sí a todo)
4. Arrastre el cursor hasta la posición deseada y selecciónela presionando la tecla . A continuación presione la tecla
para enviar el mensaje.
85
SISTEMA SMS/MENSAJES DE TEXTO
Operación básica del teléfono celular
Forma de borrar los mensajes SMS
• A continuación se debe escribir el texto utilizando para ello el teclado del celular.
Cuando la memoria de la función SMS está llena no se puede recibir más mensajes;
por lo tanto, es necesario de tiempo en tiempo borrar los mensajes para crear
espacio en dicha memoria.
• Presione
• Abra el teléfono celular y seleccione la opción
Método para cambiar un mensaje
predeterminado existente:
«Mensajes SMS», presionando la tecla
.
para desplazar el cursor hasta el título «Borrar SMS»; seleccione esta opción presionando
. Se pueden borrar todos los
mensajes grabados seleccionando la opción «Todos los mensajes SMS».
• A continuación presione la tecla
• También se puede borrar carpetas específicas, por ejemplo la carpeta «todos los
mensajes recibidos». Presione la tecla
para desplazarse hasta el título
«SMS recibidos» y selecciónelo presionando
. El sistema ofrecerá la opción
«Borrar todos los mensajes SMS recibidos»; confírmela presionando
.
Forma de crear e insertar mensajes
predeterminados
Las plantillas constituyen mensajes escritos pregrabados, tales como «Llámeme»,
«Regreso pronto», o «Te amo». El teléfono celular tiene una lista de mensajes
predeterminados ya grabados en su memoria, a la que se le puede adicionar otros de
preferencia del usuario.
Estos mensajes son muy útiles al momento de ahorrar tiempo, cuando se envíen
mensajes cortos. Todos los mensajes predeterminados pueden ser cambiados
antes de ser enviados.
Forma de crear nuevos mensajes
predeterminados
• Abra el teléfono deslizando la tapa protectora y
seleccione la opción «Mensajes SMS» presionando
. Presione la tecla
para desplazar el cursor hasta el título «predela tecla
terminados» y
selecciónelo presionando la tecla
. A continuación presione la tecla, para
seleccionar la alternativa bajo
el título «Nuevo predeterminado».
86
para grabarlo como un mensaje
predeterminado.
Abra el teléfono deslizando la tapa protectora y seleccione la opción «Mensajes
SMS», presionando la tecla
. Con la tecla
, deslice el cursor hasta
el título «Predeterminados» y selecciónelo presionando la tecla
. Desplácese
hasta el mesaje predeterminado que desee y selecciónelo presionando la tecla
. Para editarl desplácese hasta el título «Editar / Enviar predeterminado» y
selecciónelo presionando la tecla . Edite el texto utilizando el teclado del teléfono
celular. Para borrar caracteres se debe presionar la tecla
. A continuación presione la tecla
para ingresar en el sub-menú que se presenta. Presione nuevamente la tecla
para enviar el mensaje predeterminado que se ha cambiado.
Visión general del menú
Teléfono cerrado:
Menú corto
Presione
varias vecaes.
Teléfono abierto:
Menú principal
Men´u corto
Menú
Mensajes recibidos
Mensajes de texto
Llamadas recibidas
Datos de llamba
Llamadas perdidas
Directorio
Números marcados
Ajustes
Atrás
«Menú corto»
Vea también la sección 3
Seleccione
«Menú principal»
Vea también la página
siguiente
87
Visión general del menú
Borrar mensajes
TODOS
Mensajes enviados
Borrandores
Mensajes necibidos
Mensajes enviados
Llamadas recibidas
Seleccione
Borrar mensajes
No. centro de servicios para SMS
Duración de llamada
Última llamada
Todas las llamadas
Números marcados
Duración de llamada
Predeterminados
Atrás
Números marcados
Borrar todas
Borradores
Predeterminados
Datos de llamada
Llamadas perdidas
Nuevo mensaje
Mensajes recibidos
Seleccione
Mensajes de texto
Visión general del menú
Atrás
Llamadas recibidas
Borrar tiempos
Seleccione
Atrás
Enviar contacto del directorio por SMS
SMS en directorio On/Off/sólo directoria
Seleccione
Atrás
Top10
Directorio
Añadir Top10
Cambiar secuencia
Buscar nombre
Editar Top10
Añadir contacto
Borrar Top10
Seleccione
Editar contacto
Atrás
Números de
emergencia
Borrar contacto
Envir contacto del directorio par SMS
Copiar contacto
Agegar No. de emergencia
Top10
Cambiar secuencia
Número de emergencia
Intercambiar No. de emergencia
Número de buzón
Borrar No. de emergencia
Configurar directorio
Seleccione
SMS en directorio
Atrás
Seleccione
Atrás
Configurar
directorio
Guardar entrada en (Tarjeta SIM/Teléfono)
Memoria en uso (Teléfono y tarjeta SIM/tarjeta SIM/teléfono)
Estado de la memoria
88
Seleccione
Atrás
89
Visión general del menú
Visión general del menú
Configuración
Sonido y Alerta
Timbre de llamada (1-5)
Sonido y Alerta
Volumen de auricular (1-5)
Contraste de pantalla (-5 a +5)
Tamaño de texto (Pequefío/Gnande)
Tamaño texto de SMS SMS (Pequefío/Gnande)
Idioma
Tono de alarma (1-5)
Volumen de timbre (0-5)
Modo silencioso (On/Off)
Volumen en aumento (On/Off)
Vibrador (On/Off)
Tonos teclado (Clic/Tono/SMS.)
Hora y fecha
Alerta SMS (On/Off)
Alarma de reloj
Volumen de auricular (1-5)
Calculadora
Blog. auto. del teclado (On/Off)
Seleccione
Atrás
Mi menú (On/Off)
Selección red (Auto/Manual/Preferido)
Hora y fecha
Encabezado (Operador/Tiempo y símbolo
Ajuste hora
Llamada en espera (Activar/Cancelar/Revisar estado)
Formato tiempo (24h/AM/PM)
Llamada siquiente
Ajuste fecha
Recordar número (Sí/No)
Formato fecha
Ahorrar energía
Mostrar reloj
Requerir PIN (On/Off/Cambiar PIN)
Seleccione
Atrás
Ayuda de texto (On/Off)
Grabar con SMS
SMS en directorio (On/Off/Sólo directorio)
Configuración directorio
Top10
Tecla emergencia (On/Off)
Números de emergencia
Avisos de cumpleaños
Número de buzón
Avisos de
cumpleaños
Nueva cumpleaños
No. centro de servicios para SMS
Menú SMS (On/Off)
Editar cumpleaños
Borrar cumpleaños
0000 Para configurar (On/Off)
Seleccione
Atrás
Restarar (Restaurar configuración/Restaurar todo)
Seleccione
90
Atrás
91
Solución de problemas
La llamada no entra (llamada fallida)
• Verifique que el número y el código de área marcados
estén correctos.
Solución de problemas
• El diodo de luz roja localizado en la parte inferior del teléfono celular
empezará a titilar, indicando que la batería necesita nueva carga.
• Asegúrese de haber activado el servicio en el teléfono celular.
¿Se puede realizar una llamada de emergencia mientras que
el teléfono celular no tenga señal?
• Si el servicio que se ha tomado corresponde al plan prepago, asegúrese
• No se puede realizar llamadas mientras el teléfono celular carezca
que aún tiene minutos disponibles.
de señal.
En la pantalla del celular aparece la leyenda «Inserte la
tarjeta SIM», aún cuando ya está instalada.
• Si en la pantalla aparece la leyenda «Servicio limitado», solamente
• Algunas tarjetas SIM son más delgadas que otras. Si en la pantalla
• Si el teléfono celular no tiene la tarjeta SIM en su lugar, solamente
aparece este mensaje de error, por favor inserte un pedazo de papel
grueso entre la tarjeta SIM y el extremo superior del contenedor de la
tarjeta.
La pantalla del teléfono celular aparece en blanco
(pantalla apagada)
• El teléfono celular puede estar en el modo de carga y la pantalla
se ha apagado (aún así las llamadas serán recibidas). Para volver a
encender la pantalla, presione cualquiera de las teclas que van
marcadas con flechas.
• Una pantalla que aparece totalmente en blanco, también puede indicar
que el teléfono celular está apagado. Para encenderlo presione la tecla
por espacio de tres segundos.
• Asegúrese que la batería está colocada en su lugar, y que tiene
carga suficiente.
¿Cuán a menudo se debe recargar la batería?
• No recargue la batería siempre que termine una conversación telefóni-
ca. Con el paso del tiempo, esto provocará una reducción en la
capacidad de recarga de la misma.
se puede llamar al número 911.
se puede llamar al número 911.
• Si el plan de pago mensual por anticipado no tiene más minutos di-
sponibles, solamente se puede llamar al número 911.
¿Cómo se puede mejorar la recepción de la señal?
• Si la recepción de la señal no es fuerte, se debe buscar otro sitio
donde ubicarse o continuar con la llamada. Por ejemplo, si se
encuentra en sitios cerrados, se debe dirigir hacia alguna ventana
(favor tener en cuenta, que en sitios tales como ascensores, trenes
subterráneos, túneles y garajes de estacionamiento bajo tierra, la
recepción de señales es muy pobre). La realización de llamadas con
el teléfono abierto mejora la fuerza de la señal, que cuando se
hacen con el teléfono cerrado.
¿Puedo bloquear o suspender la información de mi
número telefónico?
• Si se desea que la persona a la que está haciendo una llamada no
pueda reconocer el número de su teléfono celular, desactive la
transmisión de esa información en el menú principal, que se
encuentra bajo el título «Configuración / Suspender número».
• El ícono correspondiente a la batería, que se encuentra en la parte
superior izquierda de la pantalla, muestra la carga actual de la batería.
Cuando el ícono muestra menos de tres barras, se recomienda cargar
la batería.
92
93
Solución de problemas
El ícono de la llave aparece en pantalla y el
teléfono no responde
• El bloqueo automático del teléfono celular puede ser desactivado
cuando se abre el mismo, o se presiona la tecla con el ícono de la
llave durante tres (3) segundos continuos.
Especificaciones técnicas
Información general
Número de modelo: C900
Frecuencia:
GSM bandas de 850 MHz y de 1.900 MHz
dentro de los Estados Unidos
Amplificación:
20 decibeles
¿Qué es el número telefónico del centro de
servicio SMS?
Peso y dimensiones del aparato celular
• Es un número de operador de la red central a través del cual se
Peso: 152 gr.
Dimensiones: 4.5 x 2.17 x 1.12 pulgadas
maneja el servicio de envío de mensajes cortos (SMS). Este número
usualmente está grabado por el operador en la tarjeta SIM, y por lo
tanto no tiene que ser grabado nuevamente o cambiado.
¿Cómo se sabe que el mensaje SMS fue
enviado realmente?
• Si el texto del mensaje aparece escrito en la carpeta «SMS enviados»,
el mismo fue enviado en forma exitosa.
Información sobre la batería
Tiempo máximo de operación
de la batería en llamadas: 180 minutos
Tiempo máximo de duración
de la batería en tiempo
de espera: 150 minutos
Tipo de batería:
Contiene iones de Litio; 3.7V
y 1.000mAh; funciona con
baterías recargables (tres unidades de clase AAA y 4.5V)
Información de contacto en Clarity:
Servicio al cliente: 1-800-426-3738
Dirección:
94
4289 Bonny Oaks Drive
Chattanooga, TN 37406
95
Requerimientos y regulaciones de la FCC
Sección 15 de la Normativa de la
FCC Información
Este aparato cumple con la Sección 15
de la Normativa de la FCC. El funcionamiento está sujeto a las siguientes dos
condiciones: (1) Este aparato no debe
generar interferencia dañinas, y (2) este
aparato debe aceptar cualquier interferencia, incluyendo aquella que pudiera
causar funcionamiento indebido.
Se ha probado su equipo y cumple
con los límites de un aparato digital
Clase B, según la normativa de la
FCC, Sección 15. Estos límites están
diseñados para proporcionar protección razonable contra la interferencia
dañina en instalaciones residenciales.
Este equipo genera, utiliza y puede
irradiar energía de frecuencias de radio,
y si no se instala de acuerdo a las
instru-cciones, puede causar interferencias dañinas a las comunicaciones radiales. Sin embargo, no existen garantías
de que no habrá interferencias en una
instalación determinada; si este equipo
causa en verdad interferencias dañinas
a la recepción radial o televisiva, que
puede determinarse apagando y encendiendo el equipo; se le insta a intentar
corregir la interferencia tomando
alguna de las siguientes medidas:
1. Donde se pueda hacer con
seguridad, reoriente la antena de televisión o radio.
96
2.
Dentro de lo posible, reubique el televisor, la radio u otro receptor con respecto al equipo telefónico. (Esto aumenta la separación entre
el teléfono y el receptor).
3.
Conecte el teléfono en un toma
que se encuentre en un circuito diferente al que esté conectado el televisor, radio u otro receptor.
4. Consulte al distribuidor o a un
Técnico experimentado en Radio
y Televisión para más ayuda.
PRECAUCIÓN: Los cambios o
modificaciones que no estén aprobados explícitamente por el fabricante
responsable del cumplimiento podrían
anular la autoridad del usuario para
operar el equipo.
Especificación Técnica de
Industry Canada
Este producto cumple con las
especificaciones técnicas
aplicables de Industry Canada
Luego de instalar este equipo, los
usuarios deben asegurarse que está
permitido conectarlo a las instalaciones
de la empresa telefónica local. El
equipo debe además instalarse utilizando un método de conexión aceptable.
En algunos casos, el cableado telefónico
interior asociado a un servicio individual de línea única puede extenderse
mediante un conector certificado
Requerimientos y regulaciones de la FCC
(cable telefónico de alargue). El cliente
deberá saber que el cumplimiento de
las condiciones arriba descritas en
algunas situaciones puede no evitar
la degradación del servicio. Las
reparaciones al equipo certificado
deberán ser realizadas por una
instalación de mantenimiento canadiense autorizada, designada por
el proveedor.
Cualquier reparación o modificaciones realizada por el usuario a este
equipo, o funcionamiento defectuoso
del equipo, puede darle razones a la
compañía de telecomunicaciones de
solicitarle al usuario que desconecte
el equipo.
Los usuarios deberán asegurarse por
su propia seguridad que las conexiones
de puesta a tierra de la electricidad,
la línea eléctrica y los sistemas de
cañerías internos metálicos estén
conectados entre sí. Esta precaución
puede ser de importancia especial en
zonas rurales.
permitido por línea telefónica. El
extremo de la línea telefónica puede
consistir cualquier combinación de
aparatos, atendiendo al requisito de que
la suma de los Números de Equivalencia
de Repiques de todos los aparatos no
sea mayor a cinco.
(El término “IC” antes del número de
certificado/registro sólo significa que
se cumplieron con las especificaciones
técnicas de Industry Canada).
La división responsable por el
cumplimiento normativo:
Clarity, A Division of Plantronics, Inc.
4289 Bonny Oaks Drive, Suite 106
Chattanooga, TN 37406
Teléfono: 1-800-552-3368
PRECAUCIÓN: Los usuarios no deberán intentar realizar dicha conexión
ellos mismos, sino que deberán contactarse con un electricista o autoridad
de inspección eléctrica adecuados,
según corresponda.
El Número de Equivalencia de
Repiques (REN) es una indicación
del número máximo de terminales
97
Garantía y servicio
La siguiente garantía e información de
servicio sólo es aplicable a productos
adquiridos y utilizados en los Estados
Unidos y Canadá. Contáctese con su
distribuidor o vendedor local para
mayor información acerca de la información de garantía en otros países.
imiento a cargo de alguien distinto a Clarity o sus centros de servicios autorizados,
no es un defecto cubierto por la presente
garantía. Las compañías telefónicas
fabrican distintos tipos de equipos y
Clarity no garantiza que este equipo sea
compatible con los equipos
de determinada compañía telefónica.
Otros Derechos Legales
Garantías Implícitas
Para obtener service en garantía, por
favor pague el envío por adelantado y
envíe la unidad a la instalación adecuada
abajo listada:
Garantía Limitada
Clarity, una división de Plantronics, Inc.
(“Clarity”) garantiza al comprador
usuario original que, salvo las limitaciones y excepciones delineadas más
abajo, este producto estará libre de
defectos de materiales y mano de
obra por un período de un (1) año a
partir de la fecha original de compra
(“Período de Garantía”). La obligación
de Clarity según la presente garantía
será elección de Clarity, sin cargo,
de cualquier parte o unidad que sea
en efecto defectuosa por materiales
o mano de obra durante el Períodode
Garantía.
Excepciones a la Garantía
Esta garantía sólo es aplicable a defectos
en los materiales de fabricación y mano
de obra de fabricación. Cualquier
condición que haya sido causada por
accidentes, abuso, mal uso u operación
inadecuada, violación a las instrucciones
provistas por Clarity, destrucción o
modificación, corrientes o voltajes
inapropiados, o reparación o manten98
Garantía y servicio
Según la ley estatal, puede tener
derecho a ciertas garantías implícitas.
Estas garantías implícitas continuarán
en vigor sólo durante el período de
garantía. En algunos estados las garantías
implícitas no prescriben, por lo que las
limitaciones arriba descritas pueden no
ser aplicables a usted.
Daños Incidentales o Consecuentes
Ni Clarity ni su vendedor local o
distribuidores tienen ninguna responsabilidad sobre daños Incidentales o
consecuentes, incluyendo, sin límites,
lucro cesante o pérdidas comerciales, o
de cualquier gasto, pérdida de tiempo
o inconveniente incidental. En algunos
estados los daños incidentales o consecuentes no tienen excepciones o
limitaciones, por lo que las limitaciones
arriba descritas pueden no ser aplicables
a usted.
Esta garantía le confiere derechos
legales específicos y puede tener
otros derechos que varían de estado
en estado.
Cómo Conseguir el Service
En Garantía
En los Estados Unidos
Clarity Service Center
4289 Bonny Oaks Drive, Suite 106
Chattanooga, Tennessee 37406
Tel: (423) 622-7793 o
(800) 426-3738
Fax: (423) 622-7646 o
(800) 325-8871
que no se dañe(n). Incluya la
siguiente información:
1.
2.
3.
4.
5.
6.
Comprobante de compra indi-
cando número de modelo y fecha de compra.
Dirección para enviar la factura.
Dirección para enviar la reparación.
Cantidad y descripción de las unidades enviadas.
Nombre y número de teléfono de
una persona a la que se pueda contactar de ser necesario.
Razón de la devolución y descrip-
ción del problema.
Los daños que ocurran durante el
envío serán considerados responsabilidad del transportista, y los reclamos
deberán efectuarse directamente con
el transportista.
En Canadá
Plantronics Service Center
8112 Trans-Canada Hwy.
Ville St. Laurent. Que.
Canada H4S 1M5
Tel: (800) 540-8363
(514) 956-8363
Fax: (514) 956-1825
Por favor utilice la caja original, o
embale la(s) unidad(es) en una caja
de cartón embalada de tal forma
99
Clarity, a Division of Plantronics, Inc.
4289 Bonny Oaks Drive, Suite 106
Chattanooga, TN 37406
1-800-552-3368
www.clarityproducts.com
©2008 Clarity, a Division of Plantronics, Inc. All rights reserved. Amplifying Your Life, Clarity,
the amplification device, Clarity and the amplification device combined, Clarity Power, and C900
are trademarks or registered trademarks of Plantronics, Inc. FCC Registration complies with
part 68 of FCC rules and regulations.
Rev. A (8-08)