1
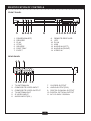
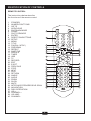
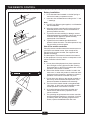
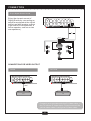
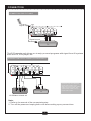
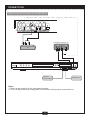
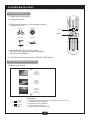
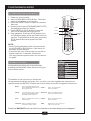
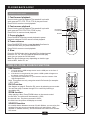
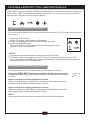
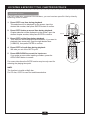
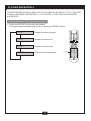
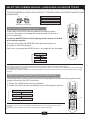
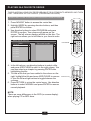
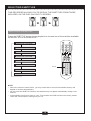
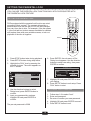
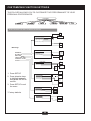
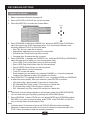
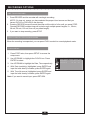
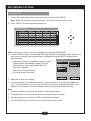
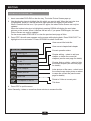
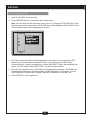
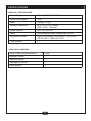
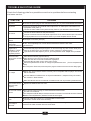
1611305
DivX DVD RECORDER
with battery backup
TM
PLEASE CAREFULLY READ
THIS MANUAL BEFORE
OPERATING THIS UNIT
SAFETY INFORMATION
The light flash with an arrowhead symbol,
within an equilateral triangle, is intended to
alert the user to the presence of uninsulated
"dangerous voltage" within the product's
enclosure that may be of sufficient magnitude
to constitute a risk of electric shock to
persons.
The exclamation point within the equilateral
triangle is intended to alert the user to the
presence of important operating and
maintenance (servicing) instructions in the
literature accompanying the appliance.
The use of controls, adjustment or the performance of
procedures other than specified may result here in
hazardous radiation exposure.
Visible laser radiation when open and interlocks
defeated.
DO NOT STARE INTO BEAM.
by Macrovision Corporation. Reverse engineering or
disassembly is prohibited
This digital video disc player employs a laser System.
IMPORTANT SAFETY INSTRUCTIONS
1)
2)
3)
4)
5)
6)
7)
8)
9)
FCC NOTICE:
This equipment has been tested and found to comply
with the limits for a Class B digital device, pursuant to
part 15 of the FCC rule. These limits are designed to
provide reasonable protection against harmful
interference in a residential installation. This
equipment generates, uses and can radiate radio
frequency energy and, if not installed and used in
accordance with the instructions, may cause harmful
interference to radio communications. However, this is
no guarantee that interference will not occur in a
particular installation.
If this equipment does cause harmful interference to
radio or television reception, which can be determined
by turning the equipment off or on, the user is
encouraged to try to correct the interference by one or
more of the follow measures.
•
Reorient or relocate the receiving antenna.
•
Increase the separation between the equipment
and receiver.
•
Connect the equipment into an outlet on a circuit
different from that to which the receiver is
connected.
•
Consult the dealer or an experienced radio/TV
technician for help.
This product incorporates copyright protection
technology that is protected by method claims of
certain U.S. patents and other intellectual property
rights owned by Macrovision Corporation and other
rights owners.Use of this copyright protection
technology must be authorized by Macrovision
Corporation, and is intended for home and other
limited viewing uses only unless otherwise authorized
10)
11)
12)
13)
14)
15)
16)
Read these instructions.
Keep these instructions.
Heed all warnings.
Follow all instructions.
Do not use this apparatus near water.
Clean only with dry cloth.
Do not block any ventilation openings. Install in
accordance with the manufacturer's instructions.
Do not install near any heat sources such as
radiators, heat registers, stoves, or other
apparatus (including amplifiers) that produce
heat.
Do not defeat the safety purpose of the polarized
or grounding-type plug. A polarized plug has two
blades with one wider than the other. A grounding
type plug has two blades and a third grounding
prong. The wide blade or the third prong are
provided for your safety. If the provided plug does
not fit into your outlet, consult an electrician for
replacement of the obsolete outlet.
Protect the power cord from being walked on or
pinched particularly at plugs, convenience
receptacles, and the point where they exit from
the apparatus.
Only use attachments/accessories specified by
the manufacturer.
Use only with the cart, stand, tripod, bracket, or
table specified by the manufacturer, or sold with
the apparatus. When a cart is used, use caution
when moving the cart/apparatus combination to
avoid injury from tip-over.
Unplug this apparatus during lightning storms or
when unused for long periods of time.
Refer all servicing to qualified service personnel.
Servicing is required when the apparatus has
been damaged in any way, such as power supply
cord or plug is damaged, liquid has been spilled
or objects have fallen into the apparatus, the
apparatus has been exposed to rain or moisture,
does not operate normally, or has been dropped.
"WARNING" To reduce the risk of fire or electric
shock, do not expose this apparatus to rain or
moisture.
"CAUTION" - These servicing instructions are for
use by qualified service personnel only. To reduce
the risk of electric shock do not perform any
servicing other than that contained in the operating
instructions unless you are qualified to do so.
INTRODUCTION
Your DivX DVD Recorder With Battery Backup combines the
functionalities of DVD player and recorder. As a DVD player, you will
be able to enjoy full length movies with true cinema picture quality,
and stereo or multichannel sound (depending on the disc and your
playback system). Unique features of this player include component
video and S-Video outputs, progressive scan for greater picture
clarity. What's more, as a DVD Video Recorder, it has some of the
key features that allow you to record programs conveniently such as:
• A complete DVD + RW/DVD +R recorder;
• Preset recording;
• Playback of pre-recorded or user-recorded DVDs and Cds; and
• View, edit and play from a pre-recorded DVD +RW.
COM PA CT
V I D E O
TM
DIGITAL AUDIO
COM PA CT
DIGITAL VIDEO
3
DVD+R
DVD+ReWritable
UNPACKING
When shipping the player, the original shipping carton and packing comes in handy. For
maximum protection, re-pack the unit as it was originally packed at the factory. It is normal for
your charger tray to partially open after you have unpacked the unit. This is a feature designed
to allow easier access to the disc inside the tray during diagnostics.First check and identify the
contents of your player package, as listed below:
• 1611305 DivX DVD Recorder
• Remote control
• RCA cables (3) x 2 (1yellow, 1 red and 1 white)
• Owner's manual
If any item should be damaged or missing, please inform your supplier without delay. Keep the
packaging materials as you may need them to transport your player in the future.
WHERE TO PLACE YOUR DVDRECORDER
1. Place the unit on a firm, flat surface.
2. When you place this unit near a radio or VCR the playback picture may become poor and/or
distorted. In this situation, move the DVD video player away from the other units.
3. Keep away from direct sunlight & domestic heating equipment.
4. If placed in a cabinet, please allow at least 1 inch (2.5cm) of free space around the player for
proper ventilation.
TO OBTAIN ACLEAR PICTURE
This player is a high-tech, precision device. If the optical pick-up lens and disc drive parts are
dirty or worn down, the picture quality will become poor. To obtain a clear picture, we
recommend regular inspection and maintenance (i.e. cleaning or parts replacement) every
1,000 hours of use depending on the operating environment. For details, please contact your
nearest dealer.
1
TABLE OF CONTENTS
Safety Information ..................................................................................................... i
Introduction...............................................................................................................1
Table Of Contents ....................................................................................................2
Identification Of Controls ..........................................................................................3
The Remote Control .................................................................................................5
Connection ...............................................................................................................6
Mp3 & Progressive Scan ........................................................................................10
Playing Back A Disc ...............................................................................................11
Playing A Normal Disc ......................................................................................11
Playing A DVD +RW Or DVD+R Disc...............................................................11
General Features..............................................................................................13
USB, DV, Zoom, Source Function..........................................................................13
Locating A Specific Title, Chapter Or Track ...........................................................14
Playing Repeatedly ................................................................................................16
Selecting Camera Angles, Languages & Audio Settings .......................................17
Playing In A Favourite Order ..................................................................................18
Selecting Subtitles ..................................................................................................19
Setting The Parental Lock ......................................................................................20
Customizing Dvd Function Settings .......................................................................21
Recording Options .................................................................................................22
Channel Search ................................................................................................22
Normal Recording.............................................................................................23
One-touch Record ............................................................................................24
Time Record .....................................................................................................25
Editing ...................................................................................................................26
Editing A Title Of DVD +RW .............................................................................26
Editing A Disc Of DVD +RW Or DVD +R..........................................................29
Specifications .........................................................................................................30
Trouble Shooting Guide .........................................................................................31
2
IDENTIFICATION OF CONTROLS
FRONT PANEL
2
1
1.
2.
3.
4.
5.
6.
7.
3
4
5
6
7
POWER(ON/OFF)
RECORD
PLAY
STOP
SOURCE
DISC TRAY
EJECT
8.
9.
10.
11.
12.
13.
14.
8
9
10
11 12 13 14
REMOTE RECEIVER
VFD
DV IN
USB
AUDIO IN (LEFT)
AUDIO IN (RIGHT)
VIDEO IN
REAR PANEL
1.
2.
3.
4.
5.
6.
1
2
4
5
3
6
7
8
9 10
11
7.
8.
9.
10.
11.
TV ANTENNA IN
COMPOSITE VIDEO INPUT
COMPOSITE VIDEO OUTPUT
TV ANTENNA OUT
S-VIDEO INPUT
AUDIO INPUT(R/L)
3
S-VIDEO OUTPUT
AUDIO OUTPUT(R/L)
DIGITAL COAXIAL OUTPUT
DIGITAL OPTICAL OUTPUT
AC 110-240V 50/60Hz
IDENTIFICATION OF CONTROLS
REMOTE CONTROL
The instructions below describe
the functions of the remote control
1.
2.
3.
4.
5.
6.
7.
8.
9.
10.
11.
12.
13.
14.
15.
16.
17.
18.
19.
20.
21.
22.
23.
24.
25.
26.
27.
28.
29.
30.
31.
32.
33.
34.
35.
36.
37.
38.
39.
40.
STANDBY
NUMERIC BUTTONS
GO TO
ADD/CLEAR
FAST BACKWARD
PAUSE
FAST FORWARD
ENTER
DIRECTION BUTTONS
SETUP
MENU
TITLE
P/N(PAL / NTSC)
PROGRAM
REPEAT
SUBTITLE
SOURCE
TIMER
USB
TV
RECORD
EDIT
EJECT
PREVIOUS
STOP
NEXT
PLAY
RETURN
ANGLE
AUDIO
ZOOM
SLOW
MUTE
INTERLACE/PROGRESSIVE SCAN
NAVIGATION
DISC/OPERATION
VOL+
CHANNEL +
VOLUME CHANNEL -
1
23
2
3
4
5
24
6
25
7
26
27
8
9
4
10
28
11
29
12
30
13
31
14
32
15
33
16
34
17
35
18
36
19
37
20
38
21
39
22
40
THE REMOTE CONTROL
Battery Installation:
1.
Push downward and outward on the leaf spring to
remove the battery compartment cover.
2. Insert two size AA batteries according to the "+" and
"-" markings.
Note:
A. Do NOT mix different types together, or old batteries
with new batteries.
B. When the remote controller will not be used for an
extended period of time, remove the batteries to
prevent possible corrosion.
C. To prevent corrosion resulting in damage, remove
exhausted batteries immediately. Where the remote
controller doesn't appear to operate normally,
replace both of the batteries.
D. Typical life for the batteries provided with this
product is about 6 months. The life expectance may
vary according to the use status.
AP
P:
5M
Use of the remote controller
Point the remote controller toward the remote sensor on
your DVD home theater center. Upon receipt of the
signal from the remote controller, the equipment will
operate accordingly.
The description in this manual is based on the buttons
on the equipment. You may use the counterparts on the
remote controller to do the same.
Note:
A. Do not place this equipment in a place exposed to
direct sunlight or strong light source like inverting
fluorescent light, or else it may interfere with correct
operation of the remote controller.
B. When other similar remote controller is used in the
same room, or when this product is used near other
equipment using infrared ray, interference with the
operation of this remote controller may occur.
C. Do not place any object on the remote controller or
else it may cause unintentional depression of the
buttons and waste the batteries unnecessarily.
D. The front of the chassis should not be glazed with
color glass, or else it may cause interference with
normal operation of the remote controller.
E. Any barrier between the remote controller and
remote sensor will block any operation of the
remote controller.
F. The operating range between the remote controller
and the equipment shall be no more than 16 inches
(5 meters). When the operating range becomes
shorter, replace the batteries with new ones.
5
CONNECTION
Enjoy Digital Stereo Sound
Enjoy the dynamic sound of
Digital Stereo by connecting an
amplifier equipped with a digital
audio input and speaker system
(right and left front speakers, a
centre speaker, and one or two
rear speakers).
or
Audio Cable
CONNECTION FOR VIDEO OUTPUT
GOOD
BETTER
Composite
video
S-video
TV
TV
Connect your recorder with the S-Video cable, if
the TV has an S-Video input. Do not connect the
yellow video cable if using the S-Video cable.
6
CONNECTION
CONNECTION FOR TV TUNER
Signal input
Video
Audio
Signal output
TV
The DVD recorder unit allows you to enjoy or record programs with signal from AV systems
such as VCR, DVD player, etc.
CONNECTION FOR AV SIGNAL (A/V REAR INPUT)
VIDEO IN
Connect your recorder with
the S-Video cable, if the
Signal source has an S-Video
input. Do not connect the
yellow video cable if using
the S-Video cable.
OR
S-VIDEO
AUDIO IN
TV
EXTERNAL SIGNAL AV
Note:
1. Refer to the manual of the connected system.
2. Turn off the power and unplug both units before setting up any connections.
7
CONNECTION
CONNECTION FOR AV SIGNAL (A/V FRONT INPUT)
EXTERNAL SIGNAL AV
TV
OR
VIDEO IN
DIGITAL
VIDEO INPUT
USB INPUT
Note:
1. Refer to the manual of the connected system.
2. Turn off the power and unplug both units before setting up any connections.
8
MP3&PROGRESSIVE SCAN
WHAT IS MP3?
MP3 refers to a new format of music files available for playback over the internet. The
popularity of MP3 allows people to download music from MP3 website into one's home
computer.
WHAT IS PROGRESSIVE SCAN?
Progressive scan creates a picture with double the scan lines of traditional component
video pictures and creates a sharper image. The advantages of progressive scan video
output are reduced picture flickering and motion artifacts as well as a sharper image on
large screens.
THIS PRODUCT COMPLIES WITH FDA RADIATION PERFORMANCE
STANDARDS 21 CFR SUBCHAPTER J.
Manufactured under license from Dolby Laboratories. "Dolby" and the
double-D symbol are trademarks of Dolby Laboratories. Confidential
Unpublished Works. 1992-1997 Dolby Laboratories, Inc. All rights
reserved.
Apparatus Claims of U.S. Patent Nos. 4,631,603.4,577,216.4,819,098
and 4,907,093 licensed for limited viewing uses only.
This product incorporates copyright protection technology that is protected by
method claims of certain U.S. Patents and other intellectual property rights owned
by Macrovision Corporation and other rights owners. Use of this copyright
protection technology must be authorized by Macrovision Corporation, and is
intended for home and limited viewing uses only unless otherwise authorized by
Macrovision Corporation. Reverse engineering or disassembly is prohibited.
It is forbidden by law to copy, broadcast, show, broadcast on cable, play in public,
and rent copyrighted material without permission.
DVD video discs are copy protected, and any recordings made from these discs
will be distorted.
9
PLAYING BACK A DISC
PLAYING A NORMAL DISC
1. Power on your recorder.
2. Inset a DVD disc.
3. Press direction keys or the number buttons
to select the title.
TITLE 1
TITLE 2
PLAY
ENTER
TITLE 3
TITLE 4
4. Press the ENTER or PLAY button.
The DVD video player will start playback
from the title selected.
5. To remove the disc, press the OPEN/CLOSE button.
PLAYING A DVD+RW or DVD+R DISC
Index picture screen
1. TITLE
01/01/2004
12:03:07
SP 00:00:20
2. TITLE
01/02/2004
12:05:08
HQ 00:02:30
3. TITLE
01/03/2004
12:07:01
SLP 01:05:32
1.
2.
3.
4.
5
.
1. TITLE
01/01/2004
12:02:05
SP 00:00:20
Description:
1. The name of the recording. The default name is TITLE.
2. The date of the recording.
3. The time of the recording.
4. The recording quality.
5. The length of the recording.
10
PLAYING BACK A DISC
PLAYING A DVD+RW or DVD+R DISC
1. Power on your recorder.
2. Insert a DVD+RW or DVD+R disc. The index
pictures will appear on the screen.
3. Press the EJECT button to open or close the
disc tray.
4. Use direction keys (UP/DOWN/RIGHT/LEFT)
to highlight the item you desire.
5. Press ENTER or PLAY button to start the
movie or a selected part of the movie.
6. Stop playback: Press the STOP button once
to freeze the image; press the PLAY button to
resume. To playback from the start, press the
STOP button twice then press the PLAY
button.
EJECT
STOP
PLAY
Direction
button
ENTER
NOTE:
• After finishing playback of all titles contained
on a DVD+RW or DVD+R disc, it will return to
the Index Picture screen.
• The power will turn off when there is no disc or
signal output for 13 minutes 20 seconds.
You may press the power button to turn the unit
on again.
DVD
GENERAL FEATURES
MODE
All playback operation can be accessed by
pressing the NAVIGAT button twice to bring you
to the control menu.
Track mode
TITLE
CHAPTER
AUDIO
SUBTITLE
ANGLE
T-TIME
Normal
Play
01/02
01/15
02/02-CH
Off
01/01
00:01:22-01:29:52
The details of every function is as follows:
Using the directional arrows (right, left, up, down) you can highlight the selection you
require and press ENTER. To leave the control menu, press the navigation button once.
MODE:
Set your preferable playback mode
such as PROGRAM, SHUFFLE and
various repeat mode.
AUDIO:
TRACK:
Control playback by various setting
such as FAST FORWARD, FAST
REVERSE, PAUSE, STOP, etc.
SUBTITLE: Select an available subtitle by
TITLE:
Select an available title by inputting
the title number
ANGLE:
Select your desired camera
angle, if available.
TIME:
Displays the current run time and
total run time of the disc.
CHAPTER: Select an available chapter by
inputting the chapter number
Select your desired audio
setting, if available.
inputting the subtitle number
Press the NAVIGAT button a third time and the on-screen-display will disappear.
11
PLAYING BACK A DISC
GENERAL FEATURES
1. Fast forward playback
Press I during normal playback.The speed will cycle with
each press as: FF2, FF4, FF16, FF32 or play as normal
Press PLAYto resume normal playback.
2. Fast reverse playback
Press @ during normal playback.The speed will cycle with
each press as: FR2, FR4, FR16, FR32 or play.
Press PLAY to resume normal playback.
3. Pause playback
REVERSE/
FORWARD
PLAY
ENTER
Press PAUSE/STEPduring normal playback to pause
playback andpress PLAYto resume normal playback.
4. Frame advance
Press PAUSE/STEP during normal playback.One frame is
advanced each time you press PAUSE/STEP.
Press PLAYto resume normal playback.
5. Slow
Press the SLOW button during playbackThe playback speed
becomes 1/2, 1/4, 1/8 of the normal speed ornormal play
each time you press the SLOW button.
Note:The above features vary depending on the disc type
such as MP3, Audio CD, etc.
USB, DV, ZOOM, SOURCE FUNCTION
USB function
1.
2.
3.
You must put the USB storage device into the USB port on the front of
the DVD recorder.
If the device is recognized by the system a USB symbol will appear on
the bottom corner of your screen.
Then press the USB button on your remote to see the contents of the
USB storage device.
Note: This system can only recognize certain file formats (for example:
*.JPG, *.MP3)
DV IN Function
See diagram on page 8. Enter the DV source by selecting source mode.
You can then play a camera through DV or record by inserting a
recordable disk.
ZOOM function
When playing a disc, Press ZOOM button on the remote control:
the first time: the picture will be zoomed in 150%;
the second time: the picture zoomed in 200%;
the third time: the picture will display as normal;
SOURCE function
It's a switch button between sources of Audio &video, you can enjoy the
program from any source connected to this unit (set-top box, video
recorder or satellite receiver), and at the same time record from another
A/V source.
12
ZOOM
USB
LOCATING A SPECIFIC TITLE, CHAPTER OR TRACK
DVD Video Discs are normally divided into titles and sub-divided into chapters. Similarly,
CD's (audio, HDCD, and Mp3) are divided into tracks. You can conveniently locate any
specific title, chapter, or track with this player.
Chapter 1
Chapter 2
Chapter 1
Chapter 2
Chapter 3
LOCATING A TITLE USING THE TITLE MENU
You can locate a specific title using the title menu function, if a DVD video disc contains
a title menu.
1. Press the TITLE button
on the TV screen, the title menu will appear.
2. Press the direction buttons to select the title you want
3. Press the ENTER button
This will cause the DVD video player to start playback from
chapter 1 of the title selected.
TITLE 1
TITLE 2
TITLE 3
TITLE 4
NOTE:
There are some disc that does not respond to this function.
If different instructions appear on the TV screen, follow those instructions. The
instructions above are describing the basic procedure, but procedures may depend
on the contents of the DVD video disc.
LOCATING A SPECIFIC CHAPTER OR TRACK
This player allows you to locate consecutive chapters or tracks.
Press the PREVI/NEXT button repeatedly to display the requested
chapter or track. The player starts playback from the selected chapter
or track.
How to locate preceeding chapters or tracks
When you press the previous button, the player starts playback from
the beginning of the preceding chapter or track.
How to locate succeeding chapters or tracks
When you press the NEXT button, the player starts playback from the
beginning of the succeeding chapter or track.
NOTE:
On some discs the titles may not display the sub-divided chatpers.
13
PREVIOUS
NEXT
LOCATING A SPECIFIC TITLE, CHAPTER OR TRACK
LOCATING A TITLE
If a DVD video disc contains title numbers, you can locate a specific title by directly
selecting a title number.
1. Press GOTO one time during playback.
Title selection will be displayed on the screen, input the
desired title number, then press ENTER button to confirm.
2. Press GOTO button a second time during playback.
Chapter selection will be displayed on the screen, input the
desired chapter number, then press ENTER to confirm.
3. Press GOTO a third time during playback.
Time selection will be displayed on the screen, If you want to
playback from some point, input the right desired time
(H:MM:SS), then press ENTER to confirm.
4. Press GOTO a fourth time during playback.
Will take you out of the GOTO cycle.
5. Press ADD/CLEAR to correct the input error.
If you make an error while inputting numbers, press the
ADD/CLEAR button to correct.
For some video discs the GOTO function may be only used for
selecting the playing time point.
NOTE:
The function is invalid on Mp3 disc.
For CD disc, GOTO is used for track/time selection.
14
GOTO
ADD/
CLEAR
ENTER
PLAYING REPEATEDLY
THIS RECORDER ALSO ALLOWS YOU TO PLAYBACK A SPECIFIC TITLE, CHAPTER,
TRACK or SEGMENT REPEATEDLY. (TITLE REPEAT, CHAPTER/TRACK REPEAT,
A-B REPEAT)
HOW TO REPEAT A TITLE, CHAPTER or TRACK
1. Press the REPEAT button during playback.
The repeat mode changes each time you press the REPEAT button.
C-RPT
Repeat the same chapter.
T-RPT
Repeat the same title.
D-RPT
Repeat the whole disc.
NORMAL
Resume normal playback.
15
REPEAT
SELECTING CAMERA ANGLES, LANGUAGES & AUDIO SETTINGS
THIS RECORDER ALLOWS YOU TO SELECT FROM SEVERAL DIFFERENT ANGLES AND
LANGUAGES.
ANGLE 1
AUDIO:01/03 GER DOLBY
ANGLE 2
AUDIO:02/03 ENG DOLBY
AUDIO:03/03 CHI DOLBY
Selecting the camera angle
Selecting a language
HOW TO CHANGE THE CAMERA ANGLE
If the video on the DVD was recorded with multiple angles,
you have the option to change the camera angle of the scene
you are watching.
Press the ANGLE button while playing back a scene recorded
with multiple angles.
You may only press the ANGLE button when the angle icon
is shown on the DVD display.
ANGLE
Each time you press the ANGLE button, the angle will be changed.
ANGLE: 01/03
ANGLE: 02/03
ANGLE: 03/03
NOTE:
The angle function will not work on DVD video discs that do not contain recorded multiple angles.
During still playback, you are able to change the camera angle. When you resume to normal playback, the camera angle
will change to the new settings.
The angle icon indicator will illuminate while playing back a title that contains at least one scene recorded from multiple
angles.
HOW TO SELECT A LANGUAGE & PLAYBACK AUDIO SETTING
This player allows you to select a preferred language and sound recording system from
those included on the DVD video disc.
1. Press the AUDIO button during playback.
2. Press the AUDIO button repeatedly to cycle through the options.
AUDIO:01/03 GER DOLBY
AUDIO:02/03 ENG DOLBY
AUDIO:03/03 CHI DOLBY
AUDIO
NOTE:
The player returns to the initial default settings when you turn on the player or replace
a disc.
The player plays a default sound when unsupported format is selected.
16
PLAYING IN A FAVORITE ORDER
THIS PLAYER ALLOWS YOU TO PROGRAM UP TO 99 ITEMS INTO MEMORY AND THEN
PLAY THEM BACK IN THAT ORDER. (PROGRAM/PLAYBACK)
HOW TO SET TITLES, CHAPTERS or TRACKS IN A FAVORITE ORDER
1. Press NAVIGAT button to access the control bar.
2. Highlight MODE by pressing direction buttons, and then
press ENTER to confirm.
3. Use direction buttons to select PROGRAM and press
ENTER to confirm. Two columns will appear on the
screen. The left column displays all titles on the disc. The
right column allows you to edit titles in your favorite order.
Edit program play list
TITLE
Favorite/Program
PROGRAM
TITLE 01
TITLE 02
TITLE 03
TITLE 04
TITLE 05
TITLE 06
4. In the left column, use direction buttons to select a title,
and press ADD/CLEAR to add it to the right column. You
can also select one chapter by pressing ENTER after
highlighting the title
5. To clear a title that you have added in the column on the
right, highlight the title and press ADD/CLEAR to remove
it. Use the left and right arrows to toggle between the
columns.
6. Press RETURN to return the control menu. Use direction
buttons to select NORMAL and press ENTER to resume
normal playback.
NOTE:
There are some differences in the OSD (on screen display)
when playing CD or MP3 discs.
17
ADD/CLEAR
SELECTING SUBTITLES
THIS RECORDER ALLOWS YOU TO DISPLAY THE SUBTITLES FROM THOSE
INCLUDED ON THE DISC ON YOUR TV SCREEN.
Good afternoon
Bonsoir
Buenas tardes
HOW TO DISPLAY SUBTITLES
Press the SUBTITLE button during playback to choose one of the subtitles available
on the disc, or turn the subtitle off.
SUBTITLE: 01/07 ENG
SUBTITLE: 02/07 GER
SUBTITLE: 03/07 SPA
SUBTITLE: 04/07 FRE
SUBTITLE: 05/07 CHI
SUBTITLE: 06/07 HUN
Subtitle
SUBTITLE: 07/07 HIN
OFF
NOTE:
• Due to the nature of some DVD's, you may not be able to turn off the subtitles as they will
appear on screen automatically.
• As you press the SUBTITLE button, the subtitles may not appear immediately during some
scenes.
• If the subtitles continue to show on your TV even after the DVD has been turned off, please
check the closed caption settings on your TV.
18
SETTING THE PARENTAL LOCK
YOU CAN USE THE PARENTAL LOCK FUNCTION ONLY WITH DVD EQUIPPED WITH
THE PARENTAL LOCK FEATURE.
SETTING THE PARENTAL LOCK
DVDs equipped with the parental lock function are rated
according to their content. The contents allowed by a
parental lock level and the way a DVD can be controlled
may vary from disc to disc. For example, if the disc allows
it, you could edit out violent scenes unsuitable for children
and replace them with more suitable scenes, or lock out
playback of the disc all together.
SETUP
6. Press ENTER; the sub-menu of Set
Rating Level appears. Use the direction
buttons to select one rating, then press
ENTER to confirm.
1. Press STOP button twice during playback.
2. Press SETUP button during stop status.
3. Highlight the PLAY icon by pressing the
direction buttons. The menu appears on
the TV screen.
Set Rating Level
OFF
OFF
8:Aduit
SYSTEM SETUP - PLAYBACK
TV aspect ratio
Letter Box
Rating level
OFF
Digital audio output
RAW
OK
NEW
7. Highlight OK and press ENTER to save
your setting.
8. Press SETUP button to exit setup. Press
PLAY button to start.
1
4. Use the direction buttons to select
Rating level, press ENTER button to
confirm.
5. Input your password by numbers,
highlight OK and press ENTER to
confirm.
TO CHANGE YOUR PASSWORD
1.
2.
3.
4.
5.
The pre-set password is 3308
19
Follow step 1-8 to select "new".
Enter new password.
Re-enter to confirm your new password.
Highlight OK and press ENTER to save it.
Press SETUP button to exit.
CUSTOMIZING FUNCTION SETTINGS
THIS PLAYER ALLOWS YOU TO CUSTOMIZE THE PERFORMANCE TO YOUR
PERSONAL PREFERENCES.
SETUPMENU
GENERAL
PLAYBACK
RECORD
LANGUAGE
CHANNEL SCAN
DISPLAYING THE SETUP MENU SCREEN
On*
f
Of
*
Interlace
Progressive
General Setup
Screen saver
Progressive/Interlace
Video output format
Restore factory settings
PAL*
NTSC
Ok
Main Page
Playback Setup
GENERAL
PLAYBACK
RECORD
LANGUAGE
CHANNEL SCAN
CLOCK
16:9
Pan Scan*
Letter box *
TV aspect ratio
Rating level
Off
Digital audio output
RAW*
LPCM
Record Setup
Auto chapter marker
Default source
Default quality
On*
Of f
HQ
SP*
EP
SLP
HQ
1. Press SETUP.
2. Press direction keys
to highlight category,
then press ENTER to
confirm.
3. Press SETUP to exit
the menu.
* Factory defaults
Front CVBS
Rear CVBS
Tuner
........
English*
French
......
Language Setup
OSD language
Menu language
Subtitle language
Audio language
English*
French
......
Off*
English
French
......
English*
French
......
Channel Scan
System Setup
Scan channels
Modify channel information
Air
Cable
SCAN
EDIT
Date& Time Setup
Date(mm/dd/yy)
Time(hh:mm:ss)
01/01/04
12:00:00
20
CLOCK
RECORDING OPTIONS
CHANNEL SEARCH
To record TV programs, you should search TV channels first.
1. Press SETUP to access the setup menu.
2. Press UP/DOWN to highlight the icon CHANNEL SCAN and press ENTER.
3. Use the direction buttons to highlight SCAN and press ENTER button to
confirm. It will search channels automatically. In the SKIP column, the channel
which cannot be found will be marked. During auto-searching, press STOP to
cancel searching.
SYSTEM SETUP - CHANNEL SCAN
Tuner input source
Cable
Scan channels
SCAN
Modify channel information
EDIT
1
4. To browse the found channels, press the direction buttons to modify channel
information and press ENTER to enter the modify menu, or you also can input
numbers and press ENTER.
5. If you want to skip one channel, use the direction buttons to highlight the skip
space of the corresponding channel, and press ENTER to confirm.
6. Press SETUP again to exit.
Note:
• For NTSC-M, NTSC-M/M TV system, the channel numbers 1-199. Different
audio frequencies adapt to different systems.
• Press RETURN or UP to retum to the main control menu.
21
RECORDING OPTIONS
NORMAL RECORDING
1. Make connections illustrated as page 6-8
2. Insert a DVD+RW or DVD+R disc into the recorder
3. Press NAVIGATION to access the Control Menu
RECORD
MODE
SOURCE
QUALITY
REC TO
TRICK
HTLE
CHAPTER
TIME
NAVIGATION
(DVD+R)
New Title
Ch000
SLP
DVD-VIDEO
Stop
07/07
01
0:04:20/5:27:31
New Title
Append title
Overwrite title
Overwrite disc
STOP
4. Press UP/DOWN to highlight the MODE icon, and press ENTER and UP/DOWN to
select the record way for the new record event. You could select different mode
according different DVD+R or DVD+RW discs.
• New Title: Set up a new title in the disc.
• Append title: Append the new record on a record title.
• Overwrite title: Overwrite the last title to record.
• Overwrite disc: Overwrite the disc to record.
5. Press UP/DOWN to highlight the SOURCE icon, and press ENTER and UP/DOWN to
select the input source which you have connected as step 1.
• Front CVBS: Front Audio/Video Input (on the front panel)
• Rear CVBS: Rear Audio/Video Input (on the rear panel)
• Rear S-VIDEO: Rear S-Video (on the rear panel)
• DV: Digital Vidicon (on the front panel)
• Tuner:TV (on the rear panel)
• Each channel (you can select it by pressing CHANNEL+/- or input the assigned
number of the channel to select your desired one directly)
6. Press RIGHT/LEFT to highlight the QUALITY icon, and press ENTER and UP/DOWN
to select the record quality. After your selection, press ENTER to confirm it.
• HQ: High quality, approximately 60 minutes on a blank disc.
• SP: Standard Play quality, nearly 120 minutes on a blank disc.
• EP: Extend Play, nearly 240 minutes on a blank disc.
• SLP: Standard Long Play, nearly 360 minutes on a blank disc.
Note:
• The quality of its recording is based on the selection made in the RECORD MODE.
• You can select the type of quality by pressing the ADD/CLEAR button.
7. Press UP/DOWN to select TRICK icon, and press ENTER and UP/DOWN to select
RECORD. If you want to stop recording, press STOP. If the DVD+RW or DVD+R is
new, it will take about three minutes to stop.
Note:
• It will take about 30 minutes to format the DVD+R/+RW disc before recording.
• Generally, it takes more time and no more than 5 minutes to rename the disc if the
STOP button is pressed to stop the recording operation.
22
RECORDING OPTIONS
ONE-TOUCH RECORD
1. Press RECORD and the recorder will now begin recording.
NOTE: If it does not, ensure you have selected the proper in/out source and that you
have a DVD+R or DVD+RW in the disc tray.
2. Pressing RECORD once will record the show until the disk is full or until you press STOP.
Pressing RECORD multiple times will cycle through multiple preset lengths, i.e., 30 min,
60 min, 90 min, 120 min, then off (no preset length).
3. If you want to stop recording, press STOP.
HOW TO SWITCH TO PLAYBACK MODE
When the recording is suspended, you can press PLAY to switch to normal playback mode.
CLOCK SETUP
1. Press STOP twice, then press SETUP to access the
setup menu.
2. Use UP/DOWN to highlight the CLOCK icon. Press
ENTER to select.
SYSTEM SETUP - CLOCK
Date(mm/dd/yy)
3. Use UP/DOWN to highlight the Date, Time respectively
4. With Date (mm/dd/yy) highlighted, press ENTER and
input the local date by numbers, press ENTER again.
5. With Time (hh:mm:ss) highlighted, press ENTER and
input the local time by numbers, press ENTER again.
Note: If you want to cancel input, press RETURN.
23
Time(hh:mm:ss)
1
0 1 / 0 1 / 0 0
1 2 : 0 4 : 3 9
RECORDING OPTIONS
TIMER
TIMERRECORD
RECORD
1. Ensure your recorder’s time and date are current (using CLOCK SETUP).
Note: When you unplug the power connection, the clock information may be lost.
2. Press TIMER, the record scheduler will pop up.
Record scheduter
TIMER
Source
Quality
Date
Start
End
1
2
3
4
6
8
SELECT
Note: If you want to delete a schedule, highlight the one, press ADD/CLEAR.
3. Use UP/DOWN to select one schedule, and press ENTER to access Item Editor as below. In
each item you can also use direction keys to highlight and press ENTER to choose your
desired setting:
Item Editor
• Signal input source, see details on page 22, step 5.
Source
Front CVBS
• Record quality, see details on page 22, step 6.
Quality
SP
• Record mode : once, daily, weekly, Mon~Fri,
Mode
ONCE
Mon~Sat, weekend.
DATE
• Start time for timer recording
0 1 / 0 1 / 0 4
Start
1 2 : 4 5
• End time for timer recording
1 3 : 4 5
End
OK
Cancel
4. Select OK to save your setting.
5. Five minutes prior to a scheduled recording, if your recorder is on, a prompt will appear on
your TV screen asking if you would like to continue or cancel a scheduled recording. If the
prompt is not answered it will automatically continue with the scheduled recording.
Note:
1. The timer recording function will be effective under standby status.
2. In standby mode, your recorder will turn on 2 minutes before recording.
3. During recording, you can press STOP to suspend the recording.
4. A DVD+RW/DVD+R can record for up to 343 minutes, up to 48 titles.
24
EDITING
EDITING A TITLE OF DVD + RW
1. Insert a recorded DVD+RW on the disc tray. The index Picture Screen pops up.
2. Use the direction keys to highlight the title which you want to edit. When the top index icon
is highlighted, press UP and the previous index pictures will display on the screen.
When it reaches the first one, if you press UP again, the index Picture Screen can only be
updated.
When the bottom index icon is highlighted, pressing DOWN will display the next index
pictures on the screen. When it reaches the last one, if you press DOWN again, the index
Picture Screen can only be updated.
On the screen select PREV/NEXT to view the previous/next page of titles.
3. Press EDIT, the edit menu appears on the screen while playing back. Press RIGHT/LEFT to
highlight one icon and enter it. Press UP/DOWN to select a sub-item.
View current title/ total title
View current chapter/total chapter
EDIT MODE
Current operation status
Title:04/14
Chapter editing – select to add one
chapter, or delete the current/all
chapters (see the next page for details)
Chapter: 01/01
PLAY
Chapter hide or unhide – select to hide
the current chapter (see the next page
for details)
Chapter marker
Hide chapter
Index picture or title name – select to set
the current image index picture or select
to name the current title (see the next
page for details)
Index picture
Split title
Divide to 2 titles at current point.
T-Elapsed: 0:00:02
Title timer
4. Press EDIT to quit the menu.
Note: Generally, it takes no more than three minutes to rename the title.
25
EDITING
CHAPTER EDITING
From the control menu, select the Chapter Marker icon, press SELECT repeatedly, it will cycle as
follows:
• Insert marker is selected by pressing ENTER, a new chapter marker will be added to the
current point.
• Delete marker is selected by pressing ENTER, the marker of the current chapter will be
deleted.
• Delete all markers is selected by pressing ENTER, all of the chapter markers will be deleted.
Note: If only one chapter is available in the current title, only Insert marker is available to select.
CHAPTER HIDE OR UNHIDE
From the control menu, select the Hide chapter icon, press ENTER
When the icon displays C-hide, it shows the current chapter is visible, and you can select it to
hide it by pressing ENTER.
When the icon displays C-unhide, it shows the current chapter is invisible, and you can select it
to unhide it by pressing ENTER
TITLE ICON (INDEX PICTURE)
From the control menu, select the Index picture icon, press ENTER button.
When you want to set the current frame as the icon of the current title (a miniature picture will
appear in the Index Picture Screen) press ENTER with T-ICON displayed.
SPLIT TITLE
Select the title you want to divide.
Press UP/DOWN to Split title menu.
Press ENTER button and divide current title to 2 titles at current playing point.
Note:
Some editing functions cannot be completed on a DVD+R; however, all functions can be done
on a DVD+RW.
26
EDITING
EDITING A DVD+RW DISC
1. Insert a DVD+RW on the disc tray.
2. Press DISC/OP button to access the disc editing menu.
Note: You can enter the disc operation menu from the first page of DVD+RW disc. Enter
the first page and the information of DVD+RW disc will be displayed. Press RIGHT button
and the operate menu will be displayed on screen.
PAL
3. The disc current information will be displayed on background, you could press LEFT
button here to get the whole information screen. You can find out the Disc Name,
Record start time, current recorded time, current NON-EMPTY titles, the remaining free
space, the DVD video Format (NTSC/PAL), the disc-locked state etc.
4. Enter the disc operation menu. With each icon highlighted by pressing UP/DOWN, the
corresponding description of each operation will be displayed on the screen, such as
Play, Erase disc, Rename disc, Record a new title, overwrite disc, lock disc, etc.
5. Press ENTER to run the operation.
27
EDITING
EDITING A DVD+RW OR DVD+R DISC
This icon is selected to view the disc information.
Play
PLAY (DVD+R and DVD+RW)
Highlight the icon and press ENTER. It will start to play the first title on the disc.
Erase Disc
ERASE DISK (VD+RW only)
Press ENTER to begin erasing.
Rename Disc
RENAME DISC (DVD+R and DVD+RW)
Highlight the icon and press ENTER. A keyboard will be displayed. Enter the disc name you
want, then move curser to OK button and press ENTER. The name of the disc will be changed.
Note: The maximum length of the disc name is 9 characters.
Finalize Disc
FINALIZE DISC (DVD+R only)
Highlight the icon and press ENTER. It will take a few minutes to finalize the disc.
Note:
• If a DVD+R disc has been finalized, you cannot record or edit the DVD+R any more.
• You must finalize a DVD+R to make the dsic compatible with other DVD players.
Record a New Title
RECORD A NEW TITLE (DVD+R and DVD+RW)
Highlight the icon and press ENTER. The unit will quit the disc operation mode and switch to the
monitor mode, thus, you could start the record operation.
Lock Disc
LOCK (DVD+RW only)
When the LOCK icon is displayed, it indicates you can lock the current disc. If you have locked
your disc, you can’t make any changes except to play it back. You can unlock by selecting
UNLOCK.
Note:
• A different interface will be displayed depending on the type of disc.
• Please check your unit and owner’s manual to obtain proper operating instructions.
28
SPECIFICATIONS
PERSONAL VIDEO RECORDER
Power Supply
110V - 240V AC 60Hz/50Hz
Power Consumption
35W
Mass
9.9 lbs (4.5 kg)
External Dimensions
20.5 x 14.9 x 6.1 inches
(522 x 380 x 155 mm)
Signal System
AUTO/NTSC/PAL
Laser
Semiconductor laser, wavelength 650 nm
DVD, DVD+R/RW, DVD-R/RW, VCD, SVCD,
CD-DA, MP3, JPEG CD, DivX
1.1
Supported Formats
USB Version
SUPPLIED ACCESSORIES
Audio Cable (red/white/yellow)
1 pair
Remote Control
1
Batteries (AAA)
2
Package for the unit
1
User manual
1
29
TROUBLE SHOOTING GUIDE
Check the following guide for a possible correction to a problem before contacting
customer service.
SYMPTOM
Correction
No power
Connect the power plug into the wall outlet securely. Or
. no press ON/STANDBY/OFF button
No picture
Verify the connection from the DVD video output to the TV video input. Then switch TV to
appropriate mode (video 1)
Connect the video cable into the jacks securely. Refer to your television owners manual.
No sound
Black & White
picture
Connect the audio cables into the jacks securely
Verify the connection from the DVD audio output to the TV or receiver audio input. Then switch
to the appropriate source on the receiver. Refer to your audio amplifier owners manual.
Damaged S connector (bent pin)
The playback
Asmall amount of picture distortion may appear because of a poor quality video/sound transfer
to disc. This is especially true of some discs manufactured between 1997-1998..
picture has
Scratched
disc
occasional distortion
Brightness is
unstable or noises
are produced on
playback pictures
Connect the DVD player directly through the TV and not through any other source. What you're
viewing is the effect of the copy protection circuitry required on all DVD players.
If you don't have a video input on your TV, you must purchase an RF adapter from your dealer
The DVD video
player does not start
playback
Place the disc with the graphics side up.
Place the disc on the disc tray correctly inside the guide.
Make sure the disc is free from scratches & fingerprints.
Press the SETUP button to turn off the menu screen.
Cancel the parental lock function or change the parental lock level. (The Pre-set password is
3308.)
Turn the power off then disconnect the power plug and reinsert it back into the wall. Retry again.
.
MP3 won't read disc
or it skips
Reburn disc as the software edition used may not be compatible with the player. Check web
site for instruction.
Use new editions of software such as Voyetra Audiostation 4, Adaptec's"Easy CD Creator,
NTI or Roxio' s Toast Titanium.
Make sure MP3 file are not encoded with a variable bit rate such as provided by Real Networks.
The remote control
does not work
properly
Replace the batteries with new ones.
The recorder cannot
record.
The type of the disc is wrong, it's not a DVD+RW or DVD+R disc.
The disc is recorded full.
The disc(DVD+R,DVD+RW) is locked,it should be unlocked. The DVD+R has been finalized.
Different format(NTSC/PAL) between the disc and the signal.
Some keys do not
work
The type of the disc is wrong, it s not a DVD+RW or DVD+R disc.
The unit is in record mode or it is recording.
The image is
distorted.
The setup between Interlaced video and Progressive video is wrong.
Press the I/P button to switch from one to the other
.
30
LIMITED WARRANTY
Who is Providing This Warranty?
•
cosmetic damage;
•
•
externally generated static, signal reception or
antenna problems not caused by your Product; or
batteries.
•
This warranty also DOES NOT COVER, and in no
case will we be liable for, any incidental damages
(such as transportation costs to and from an
authorized service provider, or loss of time) or
consequential damages (such as costs of repairing
or replacing other property which is damaged,
including tapes, discs, speakers not included with
your Product or other accessories, or external
electrical systems) resulting from the use of your
Product. Some states do not allow the exclusion or
limitation of incidental or consequential damages, so
the above limitation or exclusion may not apply to
you.
•
Defacing the serial number, or using your Product for
commercial or institutional purposes, voids this
warranty.
Orbyx Electronics, LLC (“Orbyx"), as the distributor
of this Centrios™ product (your “Product”).
What Does This Warranty Cover?
•
This warranty covers defects in materials or
workmanship in your Product under normal use and
conditions.
What is the Period of Coverage?
•
This warranty covers your Product for 12 months
from the original purchase date.
Who Is Covered?
•
This warranty covers the original consumer
purchaser. Coverage terminates if you sell or
otherwise transfer your Product.
What Will We Do To Correct Problems?
•
We will repair your Product or replace your Product
with a new or reconditioned equivalent product, at
our option.
Are There Other Warranties?
How Do You Get Service?
•
Call Orbyx TOLL FREE at 1-866-363-3059 for
instructions for obtaining warranty service from
Orbyx’s authorized service providers.
•
Or, return your Product directly to the retail store
from which you purchased the Product.
•
When you obtain service for your Product, you must
provide a purchase receipt (or other proof of the
original purchase date) and a description of the
defect(s).
•
There are no express warranties other than those
expressed herein. Neither the sales personnel nor
any other person is authorized to make any other
warranties or to extend the duration of any
warranties.
•
ANY IMPLIED WARRANTIES, INCLUDING ANY
IMPLIED WARRANTY OF MERCHANTABILITY (AN
UNWRITTEN WARRANTY THAT A PRODUCT IS
FIT FOR ORDINARY USE), ARE LIMITED TO 90
DAYS. Some states do not allow limitations on how
long an implied warranty lasts, so the above
limitation may not apply to you.
What Does This Warranty Not Cover?
•
This warranty DOES NOT COVER:
•
damage due to misuse, abuse, alteration,
unauthorized repair, or accident (such as improper
electrical current);
•
damage due to “acts of God” (such as lightning) or
other contingencies beyond our control;
How Does State Law Apply?
•
This warranty gives you specific legal rights, and you
may also have other rights which vary from state to
state.
LIMITED WARRANTY
ORBYX ELECTRONICS WARRANTY
ORBYX Electronics warrants that this product will be free
from defects in materials and workmanship for a period of
one (1) year from the date of purchase. Within this period,
simply take the product and your proof of purchase to any
ORBYX Electronics store or dealer and the product will
be repaired without charge for parts and labour. ORBYX
Electronics reserves the right to charge for transportation.
Any product which has been subject to misuse or
accidental damage is excluded from this warranty.
This warranty is only applicable to a product purchased
through ORBYX Electronics' company owned stores and
dealers and to a product that is presented for repair in a
country where ORBYX Electronics offers the product for
sale. While this warranty does not confer any legal rights
other than those set out above, you may have additional
statutory rights which will vary under the laws of the
various countries, states, province and other
governmental entities in which ORBYX Electronics
operates. This warranty is subject to all statutory rights
you may have in the country of purchase.
Distributed exclusively in the U.S. by Orbyx Electronics, LLC
501 South Cheryl Lane, Walnut, CA 91789
Imported in Canada for/Importé au Canada pour
Orbyx Electronics, Concord, Canada, L4K 4M3
Manufactured in China
For product support please contact
www.orbyxelectronics.com or 1-866-363-3059
Limited Warranty/Garantie Limitée
U.S.A & Canada
© 2005 ORBYX Electronics. All Rights Reserved.
31