1
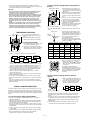
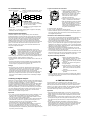
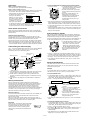
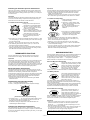
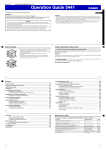
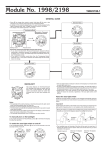
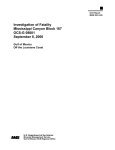
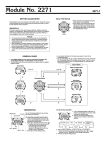
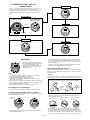
2. OPERATION CHART: QW-1471
GENERAL GUIDE
Stopwatch Mode
• Press C to change from mode to mode. Hold down C for one or two
seconds in any mode to switch back to the Timekeeping Mode.
• In addition to the modes illustrated below, this watch is also equipped
with a Digital Compass Mode. See “Digital Compass Functions” for
details.
A
S
Timekeeping Mode
N
W
E
N
B
▼
N
A
▼
(Barometric Pressure/
Temperature Display)
(Timekeeping Display)
Alarm Mode
Press D .
hPa mb
E
W
C
P
A
P
S
W
A
SE
S
C
S
D
S
E
Bearing sensor
Pressure sensor
A
▼
▼
Altimeter Mode
Data Recall Mode
AUTO
m
C
AUTO
A
m
▼
P
S
C
ALTI
A
S
RECALL
• In order to protect against running down the battery, the auto backlight
function is automatically turned off approximately three hours after you
turn it on. Repeat the above procedure to turn the auto backlight function
back on if you want.
• Pressing E in any mode illuminates the display for about two seconds,
regardless of the auto backlight function on/off setting.
BACKLIGHT
This watch features an electroluminescent
(EL) backlight that helps you easily read the
face, even in total darkness. Its Auto
Backlight function automatically lights the
watch face whenever you turn your wrist
towards your face.
B
A
P
A
About the Auto Backlight function
S
While the Auto Backlight function is turned on, the backlight automatically
lights for about two seconds in any mode whenever you position your wrist
as described below.
D
C
E
Notes
Important!
• The backlight of the watch employs an electroluminescent (EL) light,
which loses illuminating power after very long use.
• Frequent use of the backlight shortens the battery life.
• The illumination provided by the backlight may be hard to see when
viewed under direct sunlight.
• The watch will emit an audible sound whenever the display is illuminated.
This is caused by a transistor that vibrates when the EL panel lights up. It
does not indicate malfunction of the watch.
• The backlight automatically turns off whenever an alarm sounds.
Avoid wearing the watch on the inside of your wrist. Doing so causes the
Auto Backlight to operate when it is not needed, which shortens battery life.
Moving the watch to a position that is parallel to the ground and then tilting
it towards you more than 40 degrees causes the backlight to illuminate.
Parallel to
ground
To manually turn on the backlight
More
than 40°
In any mode, press E to illuminate the display for about two seconds.
To switch the auto backlight function on and off
• The backlight may not illuminate if the face of the watch is more than 15
degrees off parallel to the left or right. Make sure that the back of your
hand is parallel to the ground.
In the Timekeeping Mode, hold down D for one or two seconds to turn the
auto backlight function on and off.
Auto backlight
indicator
Parallel to ground
More than 15 degrees
too high
More than 15 degrees
too low
P
P
A
ON
A
S
S
• Static electricity or magnetic force can interfere with proper operation of
the auto backlight function. If the auto backlight does not illuminate, try
moving the watch back to the starting position (parallel with the ground)
and then tilt it back toward you again. If this does not work, drop your arm
all the way down so it hangs at your side, and then bring it back up again.
OFF
• The auto backlight indicator is shown on the display in all modes while
the auto backlight function is on.
—3—
• Under certain conditions the backlight may not light until about one
second or less after turn the face of the watch towards you. This does not
necessarily indicate malfunction of the backlight.
To take a direction reading without storing data into
memory
Magnetic north indicator
Warning!
Direction
• Never try to read your watch when mountain climbing or hiking in
areas that are dark or in areas with poor footing. Doing so is
dangerous and can result in serious personal injury.
• Never try to read your watch when running on a roadside or in any
other location where there might be vehicular or pedestrian traffic.
Doing so is dangerous and can result in serious personal injury.
• Never try to read your watch when riding on a bicycle or when
operating a motorcycle or any other motor vehicle. Doing so is
dangerous and can result in a traffic accident and serious personal
injury.
• When you are wearing the watch, make sure that its auto backlight
function is turned off before riding on a bicycle or operating a
motorcycle or any other motor vehicle. Sudden and unintended
operation of the auto backlight can create a distraction, which can
result in a traffic accident and serious personal injury.
Date
B
A
P
A
S
BEARING
D
C
E
Mode indicator
Time
Direction value (in degrees)
1. Place the watch on a flat surface or (if
you are wearing the watch), make sure
that your wrist is horizontal (in relation to
the horizon).
• Note that taking a measurement while the
watch is not horizontal (in relation to the
horizon) can result in large measurement
error.
2. Point the 12 o’clock position of the watch
in the direction you want to measure.
3. Press B to enter the Digital Compass
Mode and to start a Digital Compass
measurement operation.
• After about one second, the direction that
the 12 o’clock position of the watch is
pointing appears on the display.
• Also, four indicators appear to indicate magnetic north, south, east, and
west.
Magnetic north
TIMEKEEPING FUNCTIONS
Displayed
direction
Day of week
You can set the time and date in the
Graphic display Month – Date Timekeeping Mode, which you can enter
using C .
• In the Timekeeping Mode, the graphic
B
A
display shows counting of the seconds.
Direction
value
To set the time and date
1. In the Timekeeping Mode, press D until
the Timekeeping Display appears.
2. Hold down A until the seconds digits
start to flash on the display. The seconds
digits flash because they are selected.
S
D
C
E
Hour
PM indicator
Direction
Meaning
Direction
N
North
SSW
E
East
WNW
S
South
W
West
SW
Southwest
NW
Northwest
Seconds
Minutes
3. Press C to change the selection in the following sequence.
Seconds
Date
Minutes
Hour
Month
Northnortheast
Eastsoutheast
NNE
12/24-Hour
Format
ESE
Year
N
W
SW
NE
4. While the seconds digits are selected (flashing), press D to reset the
seconds to “00”. If you press D while the seconds count is in the range of
30 to 59, it is reset to “00” and 1 is added to the minutes. If the seconds
count is in the range of 00 to 29, the minutes count is unchanged.
5. While any other digits (besides seconds) are selected (flashing), press
D to increase the number or B to decrease it. Holding down either
button changes the current selection at high speed.
While the 12/24-hour setting is selected, press B or D to switch
between the two formats.
6. After you set the time and date, press A to return to the Timekeeping
Mode (Timekeeping Display).
NW
N
W
P
A
S
E
S
BEARING
S
A
SE
P
E
Year
• The direction value that appears on the
display represents the clockwise angle
formed between magnetic north (which is
0 degrees) and the displayed direction.
• You can repeat steps 1 through 3 as
many times as you like.
• The following table shows the meanings
of each of the direction abbreviations that
appear on the display.
Meaning
Southsouthwest
Westnorthwest
Direction
NE
Northeast
WSW
SE
Southeast
NNW
ENE
SSE
Meaning
Eastnortheast
Southsoutheast
Westsouthwest
Northnorthwest
4. Next, you can adjust the rotary direction
bezel so that the “N” or “ ” mark is
aligned with the magnetic north indicator.
This correctly aligns all of the markings
on the bezel.
• The Digital Compass operation is
automatically interrupted whenever an
alarm (Daily Alarm or Hourly Time Signal)
sounds. If this happens, start the Digital
Compass operation again from the
beginning.
To take a direction reading and store data into
memory
• The day of the week is automatically set in accordance with the date.
• The date can be set within the range of January 1, 1995 to December 31,
2039.
• If you do not operate any button for a few minutes while a selection is
flashing, the flashing stops and the watch goes back to the Timekeeping
Mode automatically.
B
A
A
1. While in the Digital Compass Mode, use
D to select the memory area where you
want to store the data. Each time you
press D , the selected memory area
changes in the following sequence.
S
BEARING
DIGITAL COMPASS FUNCTIONS
C
D
E
Memory number
(memory area display only)
This watch features a built-in bearing sensor that indicates any one of 16
directions. Up to five sets of direction readings can be stored into memory.
Each set of data includes the direction, along with the date and time of the
measurement. Direction readings can be performed in the Digital Compass
Mode.
Normal
Display
Memory 1
Memory 2
Memory 5
Memory 4
Memory 3
• Each memory area is identified by a number from 1 through 5. The
Normal Display shows the current time and date without a memory
number.
• If the memory area you select already contains data, that data appears
on the display whenever the memory area is selected. Performing a
Digital Compass operation replaces the existing data with the newly
measured data.
To enter and exit the Digital Compass Mode
1. While in the Timekeeping or Altimeter Mode, press B to enter the
Digital Compass Mode.
• At this time, the watch immediately starts a Digital Compass operation.
After about one second, the direction that the 12 o’clock position of the
watch is pointing appears on the display.
• If you do not perform any button operation for a few minutes, the watch
automatically returns to the mode you were in before entering the Digital
Compass Mode.
2. Use the same procedures as described in steps 1 through 4 under
“To take a direction reading without storing data into memory.”
2. Press C to return to the mode you were in before entering the Digital
Compass Mode.
• Note that when you enter the Digital Compass Mode from the Altimeter
Mode, the Altimeter Mode measurement (see “About altitude
measurements”) continues to be performed internally.
—4—
To perform bidirectional calibration
To recall data from memory
Magnetic north indicator
Direction
Date
While in the Digital Compass Mode, use D
to scroll through the data in the following
sequence.
A
B
1. While in the Digital Compass Mode
(Normal Display), hold down A until the
upper display changes to show “–1–”.
• At this time, the magnetic north indicator
flashes at the 12 o’clock position to
indicate that the watch is ready to
calibrate the first direction.
D
2. Place the watch on a level surface, and
press B to calibrate the first direction.
• When the calibration procedure is complete,
the message “OK” appears in the upper
display. This soon changes to “–2–” and the
magnetic north indicator flashes at the 6
o’clock position to indicate that the watch is
ready for the second direction.
B
A
Normal
Display
Memory 1
Memory 2
Memory 5
Memory 4
Memory 3
A
S
BEARING
C
E
P
A
S
To delete data
BEARING
D
C
E
Time
Direction value
Memory No.
1. While in the Digital Compass Mode,
scroll through the data items and display
the one you want to delete.
2. Hold down A until the displayed value
changes to “– – –”.
3. Rotate the watch 180 degrees.
4. Press B again to calibrate the second direction.
• When the calibration procedure is complete, the message “OK” appears
in the upper display. After a short while, the watch automatically returns
to the Digital Compass Mode.
• Holding down A causes the message “CLR” to appear on the display,
followed by the value changing to “– – –”.
Digital Compass Precautions
This watch features a built-in magnetic bearing sensor that detects
terrestrial magnetism. This means that the northern direction indicated by
this watch is magnetic north, which is somewhat different from true polar
north. The magnetic north pole is located in northern Canada, while the
magnetic south pole is in southern Australia. Note that the difference
between magnetic north and true north as measured with all magnetic
compasses tends to be greater as one gets closer to either of the magnetic
poles. You should also remember that some maps indicate true north
(instead of magnetic north), and so you should make allowances when
using such maps with this watch.
Precautions about bidirectional calibration
• You can use any two opposing directions for bidirectional calibration. You
must, however, make sure that they are 180 degrees opposite each
other. Remember that if you perform the procedure incorrectly, you will
get wrong readings from the Digital Compass.
• Do not move the watch during the one or two seconds (from the point you
press B up to the point that “OK” appears in the upper display) that the
calibration of each direction is in progress. If you do, the message “ERR”
appears in the upper display. When this happens, restart the bidirectional
calibration procedure from the beginning.
• The appearance of “ERR” during bidirectional calibration can also be
caused by local interference. If you suspect that this is the case, move to
another location and try the procedure again.
• You should perform bidirectional calibration in an environment that is the
same as that where you plan to be using the Digital Compass. If you plan
to use it in an open field, for example, calibrate in an open field.
Location
• Using the Digital Compass when you are near a
source of strong magnetism can cause large errors in
readings. Because of this, you should avoid using the
Digital Compass while in the vicinity of the following
types of objects: permanent magnets (magnetic
necklaces, etc.), concentrations of metal (metal doors,
lockers, etc.), high tension wires, aerial wires, household appliances (TVs,
personal computers, washing machines, freezers, etc.)
To perform northerly calibration
B
A
• Accurate direction measurements are impossible while in a train, boat, air
plane, etc.
• Accurate measurements are also impossible indoors, especially inside
ferroconcrete structures. This is because the metal framework of such
structures picks up magnetism from appliances, etc.
A
1. While in the Digital Compass Mode
(Normal Display), hold down A until the
upper display changes to show “–1–”.
2. Press C to start the northerly calibration
procedure.
• At this time, the indicator “N” appears in
the upper display.
S
BEARING
Storage
D
C
• The precision of the compass may deteriorate if the watch becomes
magnetized. Because of this, you should be sure to store the watch away
from magnets or any other sources of strong magnetism, including:
permanent magnets (magnetic necklaces, etc.) and household
appliances (TVs, personal computers, washing machines, freezers, etc.)
• Whenever you suspect that the watch may have become magnetized,
perform one of the calibration procedures under “Calibrating the Digital
Compass”.
E
3. Place the watch on a level surface, and
position it so that its 12 o’clock position
points north (as measured with another
compass).
4. Press B to start the calibration
operation.
• When the calibration procedure is complete, the message “OK” appears
in the upper display. After a short while, the watch automatically returns
to the Digital Compass Mode.
Calibrating the Digital Compass
ALTIMETER FUNCTIONS
Whenever you suspect that the readings produced by the Digital Compass
are wrong, you should calibrate it. You can use either one of two calibration
procedures: bidirectional calibration or northerly calibration.
You should use bidirectional calibration when you want to calibrate the Digital
Compass to operate within an area exposed to magnetic force. This type of
calibration should be used if the watch become magnetized for any reason.
With northerly calibration, you “teach” the watch which way is north (which
you have to determine with another compass or some other means). You
could use this calibration procedure, for example, to set the watch to
indicate true north instead of magnetic north.
A built-in altimeter uses a pressure sensor to detect the current air
pressure which is then used to estimate the current altitude in accordance
with ISA (International Standard Atmosphere) values for altitude and air
pressure. If you preset a reference altitude, the watch will also calculate the
current relative altitude based on your preset value. Altimeter functions
also include data storage memory and an altitude alarm.
Important!
• This watch estimates altitude based on air pressure. This means that
altitude readings for the same location may vary if air pressure changes.
• Sudden changes in the weather make it impossible to produce accurate
altitude readings.
• This watch employs a semiconductor pressure sensor, which is affected
by temperature changes. When taking altitude measurements, be sure to
do so while ensuring that the watch is not exposed to temperature
changes.
• Do not use this watch while participating in sports where there are
sudden altitude changes. Also, do not use this watch for applications that
demand professional or industrial level precision. This watch should not
be used while engaging in the following activities: sky diving, hang
gliding, paragliding, gyrocopter riding, glider riding, etc.
Important!
• If you want to perform both bidirectional and northerly calibration, be sure
to perform bidirectional calibration first, and then perform northerly
calibration. This is necessary because bidirectional calibration cancels
any previously set northerly calibration setting.
• If you do not perform any button operation for two or three minutes while
either calibration procedure is in progress (while the magnetic north
indicator is flashing at the 12 or 6 o’clock position), the watch
automatically returns to the Digital Compass Mode.
• The more correctly you perform bidirectional calibration, the better the
accuracy of your Digital Compass readouts. You should perform
bidirectional calibration whenever you change environments where you
use the Digital Compass, and whenever you feel that the Digital Compass
is producing incorrect readings.
—5—
To store altitude data into memory (memory measurement)
Applications
When no reference altitude is preset:
• The watch produces approximate altitude readings.
Auto memory indicator
B
A
When a reference altitude is preset:
• Before beginning the climb, set the reference altitude to 0 m at the foot of
the mountain. This makes it possible to determine the difference in
altitude between the reference point and your destination.
AL
AUTO
m
C
• To determine the height of a tall
building, set the reference
altitude to 0 m on the ground
floor. Note, however, that if the
building is pressurized or air
conditioned, you may not be
able to get a good reading.
P
A
S
ALTI
D
C
E
• Auto memory measurement cuts off automatically whenever there are 49
sets of data stored in memory. The 50th set of data measured when you
stop the measurement operation in step 2 below is also stored in memory.
• To determine the difference in altitude between your house and the
another location, set the reference altitude to 0 m at your house, and then
check the reading when you arrive at the other location.
2. To stop measurements at any point, hold down D again until the watch
emits a short beep.
• A final measurement is taken when you switch memory measurement off,
and that data is also stored into memory. Such data is indicated by “FIN”
during the recall operation.
About altitude measurements
There are two types of altitude measurements: those for displayed data
(Altimeter Mode measurements) and those for memory data (see “Memory
measurements”).
Setting a Reference Altitude
After you set a reference altitude, the watch automatically calculates the
difference between the current altitude and your preset value. The altitude
measurements produced by this watch are subject to error caused by
changes in atmospheric pressure. Because of this, we recommend that you
set the reference altitude during your climb whenever one is available.
Altimeter mode measurement
This type of measurement is performed only when the watch is in the
Altimeter Mode. As soon as you enter the Altimeter Mode, measurements
are taken every five seconds for the first three minutes. After that,
measurements are taken every two minutes. The display unit for Altimeter
Mode measurements is 5 m, and the measurement range is 0 to 4000 m.
• The measured altitude may be a negative value in cases where there is a
reference altitude value set or because of certain atmospheric conditions.
B
A
AL
AUTO
m
Understanding the altimeter display
Use C to enter the Altimeter Mode. Note that once you enter the Altimeter
Mode, if you do not press any button for 10 or 11 hours, the watch
automatically returns to the Timekeeping Mode.
Auto memory
indicator *2
AL
AUTO
AL
AUTO
m
C
A
P
S
A
ALTI
2. Press D to increase the current reference altitude value by 5 m or B to
decrease it. Holding down either button changes the value at high speed.
• You can set the reference altitude within the range of –4000 m to 4000 m.
• Pressing B and D at the same time returns to the “OFF” message.
3. After setting the reference altitude you want, press A to return to the
Altimeter Mode.
Altitude alarm *3
Current altitude
About the Altitude Alarm
Current time
The altitude alarm sounds for about five seconds whenever the current
altitude matches a preset value. You can press any button to stop the
alarm after it starts to sound.
S
ALTI
E
D
Example
Current temperature
Mode indicator *1
If you set the altitude alarm at 130 meters, it sounds when you pass the
130-meter mark on your way up and on your way back down.
flashes while a measurement is being taken every five seconds.
*1 “ALTI”
It does not flash during measurements taken every two minutes.
flashes on the display while a memory measurement is in
*2 “AUTO”
progress. The indicator stops flashing while no measurement is being
To set the altitude alarm
1. In the Altimeter Mode, hold down A until the display clears. After 4 or 5
seconds, either “OFF” or the current reference altitude value (if set) will
start to flash. The data flashes because it is selected.
2. Press C to change the selection in the following sequence.
performed.
AL ” appears on the display when the altitude alarm is switched on.
*3 “
Memory measurements
Altitude Alarm Setting
Reference Altitude Setting
Memory measurements are taken independently of Altimeter Mode
measurements and stored directly into memory (along with temperature
measurements) for later recall. With memory measurement, the watch
continuously performs measurements whenever the minutes in the
Timekeeping Mode reach 00, 15, 30, or 45, until you switch memory
measurements off. The watch continues to take measurements regardless
of whether or not you change modes, so you can keep a running log of
altitude and temperature changes automatically.
Altitude alarm indicator
B
A
AL
AUTO
m
About the memory...
A
S
ALTI
The memory item stored by the watch consists of the current altitude, plus
the month, date, time, and temperature. Data is stored in the same
sequence that it is input.
Memory can hold a total of 50 sets of data, which is enough to store 12
hours and 15 minutes of memory data. See “To recall altitude measurement
data from memory” for details on how to recall memory data.
D
C
E
3. Press C to select the altitude alarm
setting display (indicated by the “AL”
indicator).
4. Press D to increase the altitude alarm
value by 5 m or B to decrease it.
Holding down either button changes the
value at high speed.
• You can set the altitude alarm setting
within the range of –4000 m to 4000 m.
• Press B and D at the same time to
change the setting to “0”.
5. After setting the altitude alarm value, press A to return to the Altimeter
Mode.
To switch the altitude alarm on and off
Important!
Further memory measurements become impossible
whenever memory is full. The message “FULL” on
the display indicates that memory is full. Always
check the amount of memory remaining before
starting memory measurements, and delete data if
necessary.
1. In the Altimeter Mode, hold down A until
the display clears. After 4 or 5 seconds,
either “OFF” or the current reference
altitude value (if set) will start to flash.
The data flashes because it is selected.
• The “OFF” indicator appears when the
factory setting is being used for the
calibration.
E
D
C
S
C
Current altitude
(flashing)
B
A
A
ALTI
Altitude Graph
(unit: 10m)
Graphic display
Remaining memory
1. In the Altimeter Mode, hold down D until
the watch emits a short beep, indicating
the start of the measurement.
• The data measured when you first start
memory measurement is also stored into
memory.
• The “AUTO” indicator flashes on the
display when you start memory
measurements. The “AUTO” indicator
continues to flash (indicating that
measurements continue) even if you
change modes.
A
1. In the Altimeter Mode, hold down A until the display clears. After 4 or 5
seconds, either “OFF” or the current reference altitude value (if set) will
start to flash. The data flashes because it is selected.
2. Press E to switch the altitude alarm on and off.
• The indicator “ AL ” is shown on the display while the altitude alarm is on.
S
ALTI
3. After switching the altitude alarm on or off, press A to return to the
Altimeter Mode.
• If the altitude alarm is on, the altitude alarm indicator remains on the
display when you change to another mode.
—6—
About the graphic display
Important!
In the Altimeter Mode, the graphic display normally indicates the counting of
the current time’s seconds. When a memory measurement operation is being
performed while the altitude alarm is on, however, the watch automatically
divides the graphic display into 10 equal parts. Each part represents 1/10 of
the difference between the first altitude measured by the memory
measurement operation and the value you set as the altitude alarm. The
graphic representation gives you some idea of how much farther you must
go to reach the altitude indicated by the altitude alarm setting.
• The graphic representation described below is not shown on the display if
the altitude alarm is switched off.
You cannot delete data while a memory measurement is in progress
(“AUTO” flashing on the display).
AUTO
m
C
A
D
C
E
alarm setting.
The graphic display would appear as
illustrated here when your current altitude is
700 meters, after you set the altitude alarm
for 1000 meters and the initial
measurement was 0 meters. Note that
seven segments of the graph are darkened
because you are 7/10 of the way to the
value set for the altitude alarm.
Current
altitude
2. To clear the data, hold down A until the
watch emits a long beep (and until “CLR”
stops flashing on the display).
S
RECALL
Example: When the initially measured altitude is less than the altitude
Altitude
alarm
setting
1. In the Recall Mode, display the initial
data of the set of memory data you want
to delete.
• Display the maximum altitude or the
minimum altitude if you want to delete it.
B
A
BAROMETER FUNCTIONS
This watch uses a pressure sensor to measure atmospheric pressure. This
sensor can be calibrated.
Important!
The barometer that is built into this watch measures changes in
atmospheric pressure, which you can then apply to your own weather
predictions. It is not intended for use as a precision instrument in official
weather prediction or reporting applications.
• Segments in the graphic display darken as you approach the altitude
alarm setting. If you descend away from the altitude alarm setting, the
darkened segments are cleared from the graphic display.
• All 10 segments are darkened when you reach or exceed the altitude set
for the altitude alarm.
• If your current altitude is lower than that registered for the initial
measurement, none of the graphic display segments are darkened.
Example barometer applications
• Before going mountain climbing, you can take readings to find out the
probable upcoming weather.
• You can predict the weather for golf or other outdoor activities.
Example: When the initially measured altitude is greater than the altitude
alarm setting.
Altitude
alarm
setting
About barometric measurements
The graphic display would appear as
illustrated here when your current altitude is
1500 meters, after you set the altitude
alarm for 1000 meters and the initial
measurement was 2000 meters. Note that
five segments of the graph are darkened
because you are 5/10 of the way to the
value set for the altitude alarm.
Current
altitude
The barometer automatically takes measurements every two hours (starting
from midnight), regardless of what mode you are in. The last measurement
result, along with the current temperature is displayed in the Timekeeping Mode.
Understanding the barometer display
1. Use C to enter the Timekeeping Mode.
2. Press D to display the Barometric Pressure/Temperature Display.
• Segments in the graphic display darken as you approach the altitude
alarm setting. If you ascend away from the altitude alarm setting, the
darkened segments are cleared from the graphic display.
• All 10 segments are darkened when you reach or exceed the altitude set
for the altitude alarm.
• If your current altitude is higher than that registered for the initial
measurement, none of the graphic display segments are darkened.
Temperature
D
B
D
S
D
C
E
[ Barometric Pressure/Temperature Display ]
The barometric pressure graph shows the barometric readings for the
*1 past
26 hours. The flashing point on the right of the display is the point
for the last measurement.
Some countries call to this unit as hecto-pascal (hPa), while other
*2 countries
call it millibars (mb). It really makes no difference, because
1 hPa = 1 mb. In this manual, we will refer to hPa/mb or hPa (mb).
D
AUTO
The display shows “– – – – hPa/mb” if a measured value falls outside
*3 the
range of 610 hPa/mb to 1100 hPa/mb. The normal display will return
D
as soon as the pressure returns within the allowable range.
AUTO
m
m
C
Last measurement *3
(updated every 2 hours)
A
Altitude graph *
AUTO
C
P
1. Use C to enter the Data Recall Mode.
2. Press D to scroll forward through the stored data items or B to scroll
backward.
• Holding down either button scrolls through the data items at high speed.
• The data item that is displayed when you exit the Data Recall Mode is still
displayed the next time you enter the Data Recall Mode.
A
Barometric pressure graph *1
(unit: 1 hPa/mb*2)
hPa mb
To recall altitude measurement data from memory
Date Altitude
B
A
m
C
C
Using the barometric pressure graph
A
P
S
A
RECALL
B
D
C
B
S
RECALL
A
B
S
RECALL
Changes in barometric pressure are caused by changes in the weather and
temperature. The following shows how to interpret the data that appears on
the barometric pressure graph.
B
E
Temperature
Mode indicator
[ Initial Display ]
A rising graph generally means better
weather.
[ Final Display ]
shows nine segments between the maximum and minimum altitudes
* Itachieved
during a memory measurement. The segments indicate how
A falling graph generally means
deteriorating weather.
altitude changed during the measurement.
• The maximum and minimum altitudes achieved during a measurement
operation are also stored in memory. When the maximum altitude is
recalled, the message “MAX” alternates every second with the date in the
upper display. The message “MIN” appears for the minimum altitude.
• Measured data is stored in memory even if an error occurs during the
measurement. For details on errors, see “Warning Indicators”.
Note that if there are sudden changes in weather or
temperature, the graph line of past measurements
may run off the top or bottom of the display. The
entire graph will become visible once atmospheric
conditions stabilize.
To delete data from memory
The following conditions cause the barometric pressure measurement to be
skipped, with the corresponding point on the barometric pressure graph
being left blank.
• Barometric reading that is out of range (610 hPa/mb to 1100 hPa/mb)
• Sensor malfunction
• Dead battery
The following procedure deletes a entire set (from start measurement to
end measurement) of memory data.
—7—
Calibrating the barometric pressure measurement
Important!
The sensor of this watch is calibrated at the factory before shipment and
further adjustment is normally not required. If noticeable error is found in
the barometric pressure readings produced by the watch, you can adjust it
to correct the error.
Incorrectly calibrating the temperature measurement of this watch can result
in incorrect readings. Carefully read the following before doing anything.
• Compare the readings produced by the watch with those of another
reliable, accurate thermometer.
• If adjustment is required, remove the watch from your wrist and wait for
20 or 30 minutes to give the temperature of the watch time to stabilize.
Important!
Incorrectly calibrating the barometric pressure measurement of this watch
can result in incorrect readings. Compare the readings produced by the
watch with those of another reliable, accurate barometer.
To calibrate the temperature
B
A
To calibrate the barometric pressure
hPa mb
C
A
S
D
C
hPa mb
1. Display the barometric pressure and
temperature in the Timekeeping Mode.
2. Hold down A until the display clears.
“OFF” or the temperature value should
be flashing on the display.
3. Press C to show the barometric
pressure calibration display. At this time,
“OFF” or the barometric pressure value
should be flashing on the display.
• The “OFF” indicator appears when the
factory setting is being used for the
calibration.
B
A
E
C
A
E
C
4. After calibrating the temperature, press A to return to the Barometric
Pressure/Temperature Display.
• If you do not operate any button for a few minutes while the temperature
digits are flashing, the flashing stops and the watch goes back to the
Barometric Pressure/Temperature Display.
WARNING INDICATORS
Warning indicators appear whenever any of the conditions described below
occur. Appearance of a warning indicator causes any measurement
operation that is currently underway to stop. Warning indicators appear in
the upper display, and this causes “– – –” to replace any directional,
altitude, barometer, or temperature values on the display.
A built-in temperature sensor measures temperature and shows the
measured value on the display. The thermometer can be calibrated.
Important!
Temperature measurements are affected by your body temperature (while
you are wearing the watch), direct sunlight, and moisture. To achieve a
more accurate temperature measurement, remove the watch from your
wrist, place it in a well ventilated location out of direct sunlight, and wipe off
all moisture from the case. It takes approximately 20 to 30 minutes for the
case of the watch to reach the actual surrounding temperature.
Abnormal Magnetic Field Indicator
This indicator appears whenever the Digital
Compass has a problem obtaining a correct
reading. This condition could indicate that
the watch is within a very high magnetic
field, and so you should try moving to
another location. Also, see “Digital
Compass Precautions” for further information on conditions that cause errors.
About temperature measurements
Temperature measurements are taken automatically every five minutes,
regardless of what mode the watch is in. Measured temperature values can
be viewed in the Timekeeping or Altimeter Modes. Temperature
measurements are taken every five seconds for the first three minutes after
you display the Timekeeping Mode’s barometric pressure/temperature
display, or after you enter the Altimeter Mode. After that, temperature
measurements are taken every five minutes.
• Temperature measurement data can be recalled along with altitude
measurement data.
Low Battery Indicator
This message indicates that battery power
is too low to preform the measurement. It
appears whenever battery power drops
below a certain level, or when you try to
use this watch under very cold conditions
(below about –10.0°C).
If the “BAT” message appears because of use under cold conditions, it
should clear (and normal operation should return) after the watch is brought
back to normal temperature.
If battery power is low (indicated “BAT” appears under normal temperatures),
you should have the batteries replaced as soon as possible. Note that
replacement of the batteries causes all memory contents to be cleared.
Understanding the temperature display
1. Use C to enter the Timekeeping Mode.
2. Press D to display the Barometric Pressure/Temperature Display.
B
Sensor Malfunction Indicator
hPa mb
C
This message indicates malfunction of
pressure sensor circuitry. Whenever a
sensor malfunction initially occurs, the
“ERR” messages flashes on the display and
a buzzer sounds for three seconds.
Note that calibrating the Digital Compass may cause the “ERR” message to
appear. In this case, the message does not indicate sensor malfunction,
and should be corrected if you re-calibrate the Digital Compass.
P
S
D
C
C
3. Each press of D increases the displayed
temperature by 0.1°C while pressing B
decreases it. Holding down either button
changes the value at high speed.
• Any time you calibrate the temperature, the message “TEMP ADJ”
appears on the display. This message remains on the display in any
mode in which the temperature is displayed.
• Pressing B and D at the same time returns to the “OFF” display.
THERMOMETER FUNCTIONS
A
hPa mb
TEMP ADJ
5. After calibrating the barometric pressure, press A to return to the
Barometric Pressure/Temperature Display.
• If you do not operate any button for a few minutes while the barometric
pressure digits are flashing, the flashing stops and the watch goes back
to the Barometric Pressure/Temperature Display.
Temperature
D
C
4. Each press of D increases the displayed barometric pressure by 1 hPa/
mb, while pressing B decreases it. Holding down either button changes
the value at high speed.
• Pressing B and D at the same time returns to the “OFF” display.
A
S
1. Display the Barometric Pressure/
Temperature Display.
2. Hold down A until the display clears.
“OFF” or the temperature value should
be flashing on the display.
• The “OFF” indicator appears when the
factory setting is being used for the
calibration.
E
[ Barometric Pressure/Temperature Display ]
• The display shows “– –. – °C” if a measured value falls outside the range
of –10.0°C to 60.0°C. The normal display will return as soon as the
temperature returns within the allowable range.
• For details on viewing the temperature in the Altimeter Mode, see
“Understanding the altimeter display”.
Important!
• If the sensor is malfunctioning when it comes time for an barometric
pressure measurement to be taken, the barometric pressure value
appears as “– – – –” on the display and the corresponding point on the
barometric pressure graph is left blank.
• There may be cases where the “ERR” or “BAT” message is cleared once
you change modes. In this case, you can continue using the watch
normally unless the error warning message reappears.
Calibrating the temperature measurement
The temperature sensor of this watch is calibrated at the factory before
shipment and further adjustment is normally not required. If noticeable error
is found in the temperature readings produced by the watch, you can adjust
it to correct the error.
Whenever there is a sensor malfunction, be sure to take the watch to an
authorized CASIO distributor or Service Center as soon as possible.
—8—
ALARM FUNCTIONS
Five independent daily alarms can be set.
Each alarm lets you set the hour and
minutes. When the Daily Alarm is on, the
alarm sounds for 20 seconds at the preset
time each day. Press any button to stop the
alarm after it starts to sound.
When the Hourly Time Signal is on, the
watch beeps every hour on the hour.
• The segments in the graphic display
create a rotational movement effect while
an alarm is sounding.
Mode indicator
Alarm No.
B
A
A
D
C
E
Hour Minutes
Graphic display
QUESTIONS & ANSWERS
Question: What causes incorrect direction readings?
Answer:
• Incorrect bidirectional calibration. Perform bidirectional calibration.
Remember that bidirectional calibration is required whenever batteries
are replaced.
• Nearby source of strong magnetism, such as a household appliance, a
large steel bridge, a steel beam, overhead wires, etc., or an attempt to
perform Digital Compass operation on a train, boat, etc. Move away
from large metal objects and try again. Note that digital compass
operation cannot be performed inside a train, boat, etc.
Question: What causes the Digital Compass to produce
different readings at the same location?
To set alarms
Alarm 1
Answer:
• Direction being measured is somewhere between two measurable
directions (N and NNW, for example). The Digital Compass is designed
to indicate any one of 16 different directions. If you move the 12 o’clock
position slightly to the left or right (to move it off of the point between
the two measurable directions), the Digital Compass should consistently
produce the same reading.
• Magnetism generated by nearby high-tension wires are interfering with
reception of terrestrial magnetism. Move away from the high-tension
wires and try again.
1. Use C to enter the Alarm Mode.
2. Press D to select Alarm 1 through 5.
Alarm on
indicator
Alarm 2
Alarm 3
Alarm 4
Hourly Time Signal
Alarm 5
3. After you select an alarm, hold down A until the hour digits flash on the
display. The hour digits flash because they are selected.
• At this time, the alarm is automatically switched on.
Question: What does it mean when “– – –” appears in place
of a direction?
4. Press C to change the selection in the following sequence.
Hour
Answer: This is the abnormal magnetic field indicator. It means that
strong magnetism is being generated nearby. Move away from the
source of strong magnetism and try again.
Minutes
Question: Why am I having problems performing Digital
Compass operations indoors?
5. Press D to increase the selected digits and B to decrease them.
Holding down either button changes the selection at high speed.
• The format (12-hour or 24-hour) of the alarm time matches the format you
selected for normal timekeeping.
• When setting the alarm time using the 12-hour format, take care to set
the time correctly as morning (no indicator) or afternoon (P).
Answer: TV, personal computer, speakers, or some other object is
interfering with terrestrial magnetism. Move away from the object
causing the interference or perform the Digital Compass operation
outdoors. Indoor Digital Compass operations are particularly difficult
inside ferroconcrete structures. Remember that you cannot perform
Digital Compass operations inside of trains, airplanes, etc.
6. After you set the alarm, press A to return to the Alarm Mode.
To switch an alarm or the Hourly Time Signal on and off
Question: How does the altimeter work?
1. In the Alarm Mode, press D to select an alarm or the Hourly Time Signal.
2. When the alarm or Hourly Time Signal you want to is selected, press B
to switch it on and off.
Answer: Generally, atmospheric pressure and temperature decrease
as altitude increases. This watch is equipped with a pressure sensor
and bases its altitude measurements on International Standard
Atmosphere (ISA) values stipulated by the International Civil Aviation
Organization (ICAO), which define relationships between altitude,
atmospheric pressure, and temperature.
A
S
Indicates alarm is ON.
Indicates Hourly Time Signal is ON.
• If any alarm is on, the alarm on indicator ( A
when you change to another mode.
) is shown on the display
ALTITUDE
4000 m
To test the alarm
3500 m
3000 m
Hold down D while in the Alarm Mode to sound the alarm.
2500 m
2000 m
1500 m
1000 m
STOPWATCH FUNCTIONS
Graphic
display
A
Mode indicator
1/100 second
B
A
0m
616 hPa/mb
About 8 hPa/mb per 100 m –11.0°C
701 hPa/mb
About 9 hPa/mb per 100 m
–4.5°C
795 hPa/mb
About 10 hPa/mb per 100 m
2.0°C
899 hPa/mb
About 11 hPa/mb per 100 m
8.5°C
About 12 hPa/mb per 100 m
15.0°C
1013 hPa/mb
E
Hours
Height of building
130m
(Relative altitude)
Sea
D
▼
▼
Re-start
Stop
A
D
▼
▼
D
Start
Example: To obtain readings that are close to absolute altitude.
When you are out hiking or mountain climbing, calibrate the altimeter using
an altitude value from another source (a signpost or map, for example). Do
this just before you start your altitude measurements.
Clear
Stop
(b) Split time measurement
Start
A
▼
▼
Split release
Split
A
D
▼
A
▼
D
Clear
Stop
(c) Split time and 1st-2nd place times
▼
Split
Stop
B
A
▼
A
D
▼
A
Start
▼
D
Rooftop at an altitude of 230m
above sea level
(Altitude above sea level)
Seconds
Minutes
(a) Elapsed time measurement
D
About 6.5°C
per 1000 m
There are two standard methods of expressing altitude: Absolute altitude
and Relative altitude. Absolute altitude expresses an absolute height above
sea level. Relative altitude expresses the difference between the height of
two different places.
D
C
TEMPERATURE
Source: International Civil Aviation Organization
The Stopwatch Functions let you measure
elapsed time, split times, and two finishes.
The range of the stopwatch is 23 hours, 59
minutes, 59.99 seconds.
Stopwatch functions are available in the
Stopwatch Mode, which you can enter
using C .
• In the Stopwatch Mode, the graphic
display indicates the counting of seconds.
S
500 m
ATMOSPHERIC PRESSURE
Split release
Clear
A
Record time of
First runner Second runner finishes.
Record time of first runner. second runner.
finishes.
400
1. At Point A, calibrate the altimeter to 400
meters.
2. Proceed from Point A to Point B, taking
altimeter measurements along the way.
• If you also have altitude data for Point B,
you should again calibrate the altimeter
there.
• Be sure to recalibrate at Point B if changing weather conditions produce
altitude reading errors.
• The following conditions will prevent you from obtaining accurate readings:
Atmospheric pressure changes because of changes in the weather
Extreme temperature changes
Subjecting the watch to strong impact
—9—
Question: What do the numbers on the watch mean?
330
30
N
E
0
30
W
90
E
270
90
60
N
N
0
W
0
21
S
180
150
0
12
W
S
SE
A
BEARING
240
P
Answer: The face of this watch is marked with
values that increase in a counterclockwise
direction. These values represent degrees.
When you take a direction reading, you can
use these values to find out how many
degrees the 12 o’clock position of this watch
(which is the direction indicated in the digital
display) differs from magnetic north.
For example, when the Magnetic North
Indicator is pointing at “90” on the watch’s
face, it means that the 12 o’clock position is
90 degrees from magnetic north (which
means that 12 o’clock is pointing due east).
S
Question: How does the barometer work?
Answer: Barometric pressure indicates changes in the atmosphere, and
by monitoring these changes you can predict the weather with reasonable
accuracy. Rising atmospheric pressure indicates good weather, while
falling pressure indicates deterioration weather conditions.
The atmospheric pressure that you see in the newspaper and on the TV
weather report are measurements corrected to values measured at 0 m
sea level.
Question: What should I do if I lose track of which mode I am
in or lose my way when making settings?
Answer: Hold down the C button for two or three seconds to return to
the Timekeeping Mode. Next, try performing the operation you want
again.
— 10 —