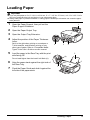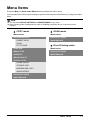
1
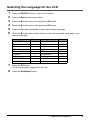
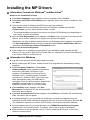
Quick Start Guide Table of Contents The following FINE Cartridges are compatible with this product. Introduction 1 How to Use the Documentation Provided 3 Preparing the Machine 4 Installing the MP Drivers 6 Reading the On-screen Manuals 8 Loading Paper 9 Operation Panel 10 Menu Items 11 Copying 13 Printing from a Memory Card 14 Printing from Your Computer 18 Scanning Images 20 Printing Photographs Directly from a Compliant Device 21 Replacing a FINE Cartridge 26 Specifications 28 www.canon-asia.com QT5-1235-V01 XXXXXXXX © CANON INC. 2007 PRINTED IN VIETNAM QT51235V01 Model Number: K10308 (MP228) Introduction This Quick Start Guide uses the following symbols to indicate important information. Always observe the instructions indicated by these symbols. Warning Instructions that, if ignored, could result in death or serious personal injury caused by incorrect operation of the equipment. These must be observed for safe operation. Caution Instructions that, if ignored, could result in personal injury or material damage caused by incorrect operation of the equipment. These must be observed for safe operation. Important Instructions that must be observed for safe operation. Trademark Notices z “Microsoft” is a registered trademark of Microsoft Corporation. z “Windows” is a trademark of Microsoft Corporation, registered in the U.S. and other countries. z “Windows Vista” is a trademark of Microsoft Corporation. z “Macintosh” and “Mac” are trademarks of Apple Inc., registered in the U.S. and other countries. z “MEMORY STICK”, “Memory Stick PRO”, “MEMORY STICK Duo” and “Memory Stick PRO Duo” are trademarks of Sony Corporation. z “xD-Picture Card” is a trademark of Fuji Film Co. Ltd. z “MultiMediaCard” is a trademark of the MultiMediaCard Association. z “SD Card”, “miniSD Card”, and “microSD Card” are trademarks of SD Association. © CANON INC. 2007 All rights reserved. No part of this publication may be transmitted or copied in any form whatsoever without the express written permission. Introduction 1 Exif Print This machine supports ExifPrint. Exif Print is a standard for enhancing the communication between digital cameras and printers. By connecting to an Exif Print-compliant digital camera, the camera’s image data at the time of shooting is used and optimized, yielding extremely high quality prints. International ENERGY STAR® Program As an ENERGY STAR® Partner, Canon Inc. has determined that this product meets the ENERGY STAR® guidelines for energy efficiency. Power Requirements Never use a power supply voltage other than that supplied in the country of purchase. Using the incorrect voltage could cause a fire or electric shock. The correct power supply voltages and frequencies are as follows: AC 100-240V, 50/60Hz About Consumables Consumables (ink tanks / FINE Cartridges) are available for 5 years after production has stopped. Safety Precautions Warning z Never attempt to plug the power cord into the power outlet or unplug the power cord when your hands are wet. z Never damage, modify, stretch, or excessively bend or twist the power cord. Do not place heavy objects on the power cord. z Never use any power supply other than the standard power supply available in the country of purchase. Using the incorrect voltage and frequency could cause a fire or electric shock. z Always push the plug all the way into the power outlet. Caution z For safety reasons, store FINE Cartridges out of the reach of small children. z Do not drop or shake FINE Cartridges as this may cause the ink to leak out and stain your clothes and hands. . Also read the Safety Precautions in the User’s Guide on-screen manual. Observe the warnings and cautions to avoid personal injury or damage to the machine. 2 Introduction How to Use the Documentation Provided Printed Documentation Setup Sheet Be sure to read this sheet first. This sheet includes instructions for setting up your machine and getting it ready for use. Quick Start Guide (This guide) Read this guide when starting to use the machine. After following instructions in your setup sheet, we recommend you read this guide to familiarize yourself with the basic operation of some of the main functions that can be performed on your machine. On-screen Manuals User’s Guide Read this guide when starting to use the machine. If the Quick Start Guide does not provide you enough information please refer to the User’s Guide which can be installed from the Setup CD-ROM. This guide provides detailed instructions for: z copying z printing from a memory card z printing from your computer z scanning Additional guides are also available for advanced features. Scanning Guide Refer to this guide for full instructions on scanning operation and settings. PC Printing Guide Refer to this guide for full instructions on printer driver setting. PC Photo Printing Guide Refer to this guide for instructions on using the various application software included on the Setup CD-ROM. How to Use the Documentation Provided 3 Preparing the Machine Be sure to read your setup sheet first for setting up your machine and getting it ready for use. Unpack the machine Please confirm the included items against the illustration printed on the lid of the packing box. Important A USB cable is necessary to connect the machine with your computer. 1 Turn on the machine. Caution Be sure to remove the tapes and protective material before you turn on the machine. Note z The tape or the protective material position is subject to change. z If an unintended language is displayed on the LCD, press the Back button to return to the LANGUAGE SETTING screen. 2 Prepare the FINE Cartridges. Caution z Do not touch internal parts other than the FINE Cartridge Holder. z Do not drop or shake FINE Cartridges as this may cause the ink to leak out and stain your clothes and hands. Important z If the Scanning Unit (Printer Cover) is left open for more than 10 minutes, the FINE Cartridge Holder moves to the right side. Close and reopen the Scanning Unit (Printer Cover) to return the holder to the left. z Do not touch the electrical contacts or Print Head Nozzles on a FINE Cartridge. The machine may not print out properly if you touch it. z Do not reattach the protective tape once it has been removed. z Handle the removed protective tape carefully to avoid getting your hands dirty or staining surrounding work area. 3 Install the FINE Cartridges. Be sure to use the machine with both Black and Color FINE Cartridges. Otherwise, the machine cannot print. When either of ink runs out while printing, you can select to use either Color or Black ink as a printer driver setting. However you must use the machine with both Black and Color FINE Cartridges installed regardless of the printer driver setting. Important z Make sure that all the FINE Cartridges are installed in the correct position. The machine cannot be used unless all the FINE Cartridges are installed. z Once you have installed the FINE Cartridges, the message “CART. RETURN” is displayed on the LCD. Wait until the copy standby screen is displayed before proceeding. It takes about one to two minutes. Note An error message will be displayed on the LCD if a FINE Cartridge is not installed properly. Open the Scanning Unit (Printer Cover) and make sure that position of all the FINE Cartridges is appropriate. 4 Preparing the Machine Selecting the Language for the LCD 1 2 3 4 5 6 Press the ON/OFF button to turn on the machine. Press the Menu button seven times. Press the ] button twice, then press the OK button. Press the ] button twice, then press the OK button. Press the [ button repeatedly to select the leftmost language. Press the ] button the number of times in the following table according to your desired language. Language 7 Time(s) Language Time(s) JAPANESE 0 SWEDISH 9 ENGLISH 1 DANISH 10 GERMAN 2 FINNISH 11 FRENCH 3 RUSSIAN 12 ITALIAN 4 CZECH 13 SPANISH 5 HUNGARIAN 14 DUTCH 6 POLISH 15 PORTUGUESE 7 SLOVENE 16 NORWEGIAN 8 TURKISH 17 Press the OK button. The desired language is displayed on the LCD. 8 Press the Stop/Reset button. Preparing the Machine 5 Installing the MP Drivers Information Common to Windows® and Macintosh® Notes on the Installation Process z If the Select Language screen appears, select a language, then click Next. z If the Select Your Place of Residence screen appears, select your place of residence, then click Next. z There are two ways of installing the MP Drivers and other software*: Easy Install: the items included on the Setup CD-ROM are installed automatically Custom Install: you can select particular items to install * The available software programs included on the Setup CD-ROM may vary depending on the country or region of purchase. z When the User Registration screen appears, click Next. If your computer is connected to the Internet, the on-screen instructions to register your product will appear. Registration can also be performed from the icon on the desktop after installation is completed. The User Registration screen will only be displayed when Europe, Middle East, Africa is selected on the Select Your Place of Residence screen. Notes on the Print Head Alignment z If the straight line is misaligned or print quality is not satisfactory after installing the MP Drivers, you may need to align the Print Head. Refer to “Aligning Print Head on the Machine” in the User’s Guide on-screen manual. Information for Windows z Log into a user account with the administrator privilege. z Before installing the MP Drivers, disable all anti-virus programs and automatically loading programs. z If the Found New Hardware or Found New Hardware Wizard screen appears automatically, remove the USB cable connected to your computer. Click Cancel to quit the screen. In Windows Vista™ operating system (hereafter referred to as “Windows Vista”), the screen may close automatically when the USB cable is unplugged. Then turn off the machine and start the installation process again. For details on the installation process, refer to your setup sheet. z If the AutoPlay screen appears, click Run Msetup4.exe. In Windows XP and Windows 2000, this screen will not appear. z If the User Account Control screen appears, click Continue. In Windows XP and Windows 2000, this screen will not appear. z A message asking for your confirmation to restart your computer may appear during the installation process. If this message is displayed, follow the on-screen instructions and click OK. The installation resumes from where it left off when your computer has been restarted. z We would appreciate it if you would take part in the PIXMA Extended Survey Program regarding the use of Canon printers. For details, refer to the on-screen instructions. z If the connection is not recognized, refer to “Cannot Install the MP Drivers” in the User’s Guide on-screen manual. 6 Installing the MP Drivers Users in Asia z Scan Soft OmniPage SE can be installed only on an English operating system. Information for Macintosh z Since Mac® OS 9, Mac OS X Classic environments, or Mac OS X v.10.2.7 or earlier are not supported, do not connect the machine to these. z Do not remove or insert the USB cable during installation, as this may result in the computer or machine not operating normally. z Before installing the MP Drivers, disable all anti-virus programs and automatically loading programs or remove them from your system folder. When using Mac OS X v.10.2.8 to v.10.3.x: z Before using the Operation Panel on the machine to save originals scanned from the Platen Glass to the computer, it is necessary to select MP Navigator EX 1.0 or MP Navigator EX 1 as the launch application on Image Capture under Applications. For details, refer to “Scanning Images” in the User’s Guide on-screen manual. When using Mac OS X v.10.2.8 to v.10.3.3: z Restarting the computer while connected to the machine may cause the machine not to be detected. To resolve this, either unplug the USB cable then plug it back in again, or turn the machine off then back on again. Users in Asia z To install the User’s Guide on-screen manual in a language other than the installed one, double-click the Manual folder in the Setup CD-ROM, Canon folder, and then copy a language folder to your hard disk. Installing the MP Drivers 7 Reading the On-screen Manuals For detailed instructions on installing the on-screen manuals, refer to your setup sheet. You can view the on-screen manuals in the following way: To view the on-screen manual, double-click the XXX On-screen Manual shortcut icon on the desktop, or click Start > All Programs (or Programs) > Canon XXX Manual > XXX On-screen Manual (where “XXX” is your machine’s name). System Requirements Browser: Windows HTML Help Viewer Note z Microsoft® Internet Explorer 5.0 or later must be installed. z The on-screen manual may not be displayed properly depending on your operating system or Internet Explorer version. We recommend that you keep your system up to date with Windows Update. To view the on-screen manual, double-click the XXX On-screen Manual alias (where “XXX” is your machine’s name) on the desktop. Note Users in Asia If you installed the User’s Guide from the Manual folder in the Setup CD-ROM, open the folder in which you copied the User’s Guide and double-click top.htm. System Requirements Browser: Help Viewer Note z The on-screen manual may not be displayed properly depending on your operating system. We recommend that you keep your system up to date. z We recommend using Safari as your Web browser to view the HTML format on-screen manuals. If Safari is not installed on your computer, download it from Apple Inc. website and install it. 8 Reading the On-screen Manuals Loading Paper Important z If you cut plain paper to 4" x 6" / 101.6 x 152.4 mm, 5" x 7" / 127.0 x 177.8 mm, or 2.13" x 3.39" / 54.0 x 86.0 mm (credit card-size) for a trial print, it can cause paper jams. z Always load paper in portrait orientation. Loading paper in landscape orientation can cause the paper to be jammed. 1 2 3 4 Open the Paper Support, then pull out the Paper Support Extension. Open the Paper Output Tray. Open the Output Tray Extension. Adjust the position of the Paper Thickness Lever. Set it to the right when printing on envelopes or T-shirt transfers, and left when printing on any other type of paper. Refer to “Compatible Media Types” in the User’s Guide on-screen manual. 5 1 3 4 Load the paper in the Rear Tray with the print side facing UP. 2 5 (A) Do not load higher than the Load Limit Mark (A). 6 7 6 Align the paper stack against the right side of the Rear Tray. 7 Pinch the Paper Guide and slide it against the left side of the paper stack. Loading Paper 9 Operation Panel (1) (2) (3) (1) ON/OFF button / Power lamp Turns the machine on and off. Lights or flashes green to indicate the power status. Before turning on the machine, make sure the Document Cover is closed. (2) LCD (Liquid Crystal Display) Displays messages, menu selections, and the operational status. (14) (3) Alarm lamp Lights or flashes orange when an error, such as paper-out or ink-out, occurs. (13) (4) (12) (5) (4) MEMORY CARD button Switches the machine to memory card mode. (11) (10) (6) (5) Photo Index Sheet button Switches the machine to Photo Index Sheet mode. See “Printing by Using the Photo Index Sheet” on page 17. (7) (6) OK button Finalizes your selection for the menu or setting item. Dismisses the error message and resumes the machine’s normal operation after resolving a printing error or removing jammed paper. (9) (8) (7) Stop/Reset button Cancels operations or a print job in progress. (8) Color button Starts color copying, photo printing, or scanning. (9) Black button Starts black & white copying or scanning. (10) Back button Returns the LCD to the previous screen. (11) [ (-) and ] (+) buttons Scroll through menu selections, and increase or decrease the number of copies or the image file number. (12) Menu button Accesses the settings to customize operation of your machine. (13) COPY button Switches the machine to copy mode. (14) SCAN button Switches the machine to scan mode. In scan mode, the machine scans a document to your computer according to the settings selected. To use this button, the machine must be connected to a computer. For details, refer to the Scanning Guide on-screen manual. 10 Operation Panel Menu Items Press the Menu or Photo Index Sheet button to display the menu items. You can specify the various print settings or perform the machine maintenance by using these menu items. Note z You can select DEVICE SETTINGS and MAINTENANCE in any mode. z Direct Printing mode is displayed only when a PictBridge compliant device is connected to the machine. z COPY mode z SCAN mode Menu button Menu button ENLARGE/REDUCE DEVICE SETTINGS PRESET RATIO MAINTENANCE ZOOM FIT-TO-PAGE z Direct Printing mode PAGE SIZE Menu button MEDIA TYPE DEVICE SETTINGS INTENSITY MAINTENANCE IMAGE QUALITY SPECIAL COPY FRAME ERASE STICKER COPY BORDERLESS COPY IMAGE REPEAT DEVICE SETTINGS MAINTENANCE Menu Items 11 z MEMORY CARD mode Menu button MEMORY CARD MODE INDEX PRINT ALL PHOTOS SELECT PHOTO SELECT RANGE STICKR DPOF PAGE SIZE MEDIA TYPE PRINT QLTY BORDERLESS PRINT PRINT DATE FILE NO. PRINT IMAGE ENHANCEMENT DEVICE SETTINGS DEVICE SETTINGS and MAINTENANCE under each mode contains the following menu items. z DEVICE SETTINGS PRINT SETTINGS EXTENDED AMOUNT PICTBRIDGE SET PAGE SIZE MEDIA TYPE PRINT QLTY BORDERLESS PRINT IMAGE ENHANCEMENT OTHERS DATE DISPLAY READ/WRITE ATTRB LANGUAGE SETTING QUIET MODE RESTORE DEFAULT MAINTENANCE Photo Index Sheet button z MAINTENANCE PRINT NOZZLE CHECK PRINT ALL PHOTOS CLEANING LAST PHOTO DEEP CLEANING SELECT RANGE ALIGN PRINT HEAD SCAN HEAD ALIGN PRINT ROLLER CLEANING BOTTOM CLEANING 12 Menu Items Copying Making Copies This section describes the basic procedure to make copies. 1 2 3 4 5 Turn on the machine. Press the COPY button. Load paper. Load the original on the Platen Glass. Specify the copy settings. (1) Press the [ or ] button to specify the number of copies (max. 99 copies). (2) Press the Menu button to adjust the settings as necessary. For details, refer to “Changing the Copy Settings” in the User’s Guide on-screen manual. 6 Press the Color button for color copying, or the Black button for black & white copying. Using Useful Copy Functions For details, refer to “Using Useful Copy Functions (MP220 series)” in the User’s Guide on-screen manual. Reducing or Enlarging a Copy (ENLARGE/REDUCE) Copying on Stickers (STICKER COPY) Platen Glass Copying Thick Originals Such as Books (FRAME ERASE) Copying without Borders (BORDERLESS COPY) 16 stickers Repeating an Image on a Page (IMAGE REPEAT) Copying 13 Printing from a Memory Card Inserting the Memory Card 1 2 3 Turn on the machine. Open the Card Slot Cover. Insert one and only one memory card into the Card Slot. Card Type Inserting Card z Compact Flash (CF) card z Microdrive z xD-Picture card* Insert into the left Card Slot. Lights up z SD Secure Digital memory card z SDHC memory card z miniSD Card* z microSD Card* Insert into the right Card Slot. z MEMORY STICK z MEMORY STICK PRO Lights up z MEMORY STICK Duo* z MEMORY STICK PRO Duo* z MultiMediaCard z RS-MMC* * Be sure to attach the memory card to the special adapter before inserting it into the Card Slot. 4 5 14 Confirm that the Access lamp has lit up. Close the Card Slot Cover. Printing from a Memory Card Removing the Memory Card 1 2 3 Open the Card Slot Cover. Make sure that the Access lamp is lit, then remove the memory card. Close the Card Slot Cover. Printing an Index of All Photos (INDEX) 1 Prepare for printing. (1) Turn on the machine. (2) Load paper. 2 Insert the memory card. (1) Press the MEMORY CARD button. (2) Insert the memory card into the Card Slot. See “Inserting the Memory Card” on page 14. 3 Select the print menu. (1) Press the Menu button to display MEMORY CARD MODE. (2) Press the [ or ] button to select INDEX, then press the OK button. (3) Adjust the print settings as necessary. Pressing the OK button displays the next setting item. For details, refer to “Print Settings” in the User’s Guide on-screen manual. 4 Press the Color button to start printing. After printing an index of all photos stored on a memory card, you can select the following print options: z To print all photos, select PRINT ALL PHOTOS, or z To print selected photos, select SELECT PHOTO, SELECT RANGE, STICKR, or DPOF as the memory card mode. Printing from a Memory Card 15 Using Useful Printing Functions Printing All Photos (PRINT ALL PHOTOS) Prints all photos saved on the memory card. Printing Selected Photos (SELECT PHOTO) Specifies how may copies to print for each photo. Printing A Range Of Photos (SELECT RANGE) Prints a range of photos in sequence on a memory card. Printing on Stickers (STICKR) Prints your favorite photo with a frame on Canon Photo Stickers. Printing According to DPOF Settings (DPOF) Prints according to the Digital Print Order Format (DPOF) settings on your digital camera, if you have specified them. 16 Printing from a Memory Card Printing by Using the Photo Index Sheet 1 2 Turn on the machine, and load A4 or Letter-sized white paper. Insert a memory card into the Card Slot. See “Inserting the Memory Card” on page 14. 3 4 Press the Photo Index Sheet button. Make sure that PRINT is selected, then press the OK button. z If the memory card contains 36 or less images, printing of the Photo Index Sheet starts. Proceed to step 6. z If the memory card contains 37 or more images, proceed to step 5. 5 Press the [ or ] button to select a range of images to include in the Photo Index Sheet. z If you select PRINT ALL PHOTOS: (1) Press the OK button. z If you select LAST PHOTO: (1) Press the OK button (2) Press the [ or ] button to select how many recent photographs to print, then press the OK button. z If you select SELECT RANGE: 6 7 8 (1) Press the OK button. (2) Press the [ or ] button to select the first recorded date of photographs you want to print, then press the OK button. (3) Press the [ or ] button to select the last recorded date of photographs you want to print, then press the OK button. Fill in the appropriate circles in the Photo Index Sheet. Load paper as you specified in the Photo Index Sheet. Place the Photo Index Sheet face-down on the Platen Glass. 9 Press the Photo Index Sheet button. 10 Press the [ or ] button to select SCAN, then press the OK button. Printing from a Memory Card 17 Printing from Your Computer This section describes procedure for basic printing. Printing with Windows Note Depending on your application program, operations may differ. For details, refer to the instruction manual of your application. The steps described in this section are for printing in Windows Vista. 1 2 3 4 5 Turn on the machine and load the paper in the machine. Create a document or open a file to print using an appropriate application software. Select Print on the application software’s File menu. Make sure that Canon XXX Printer (where “XXX” is your machine’s name) is selected in Select Printer, and click Preferences (or Properties). Specify the required settings and click OK. Note For details on the printer driver functions, click Help or Instructions to view the online help or the PC Printing Guide on-screen manual. Instructions is only displayed when the on-screen manuals are installed. 6 18 Click Print (or OK). Printing from Your Computer Printing with Macintosh Note Depending on your application program, operations may differ. For details, refer to the instruction manual of your application. The steps described in this section are for printing in Mac OS X v.10.4.x. 1 2 3 4 5 6 7 8 9 Turn on the machine and load the paper in the machine. Create a document or open a file to print using an appropriate application software. Select Page Setup on the application software’s File menu. Make sure that your machine’s name is selected in Format for. Select the page size of the loaded paper in Paper Size. Click OK. Select Print on the application software’s File menu. Select Quality & Media in the pop-up menu. Specify the required settings. Note For details on the printer driver functions, click to view the PC Printing Guide on-screen manual. If the on-screen manuals are not installed, the PC Printing Guide on-screen manual is not displayed even if is clicked. 10 Click Print. Printing from Your Computer 19 Scanning Images You can scan images from the machine to a computer without printing them and save them in popular image types such as JPEG, TIFF, bitmaps, or PDF. If you are scanning printed text, you can use the OCR (Optical Character Recognition) software to convert it to text data. Scanning Methods You can select from the various scanning methods. z If You Want to Edit or Print the Scanned Images MP Navigator EX enables you to edit the scanned images, such as optimizing or trimming. You can also start application software from MP Navigator EX to edit or print the scanned images. For detailed operations of MP Navigator EX, refer to the Scanning Guide on-screen manual. You can also use the Operation Panel to open MP Navigator EX as well as open it using the computer. See “Opening MP Navigator EX using the Operation Panel” on page 20. z If You Want to Scan Originals with Advanced Settings ScanGear enables you to scan originals with advanced settings such as the resolution. For detailed operations of ScanGear, refer to the Scanning Guide on-screen manual. Besides the above-mentioned methods, you can use a TWAIN- or WIA- (Windows Vista and Windows XP only) compliant application software and the Control Panel (Windows Vista and Windows XP only) to scan originals with this machine. For detailed operations, refer to the Scanning Guide on-screen manual. Opening MP Navigator EX using the Operation Panel 1 2 3 4 20 Turn on the machine. Load the original document on the Platen Glass. Press the SCAN button. Press the Color or Black button. Scanning Images Printing Photographs Directly from a Compliant Device You can connect a PictBridge compliant device such as a digital camera, camcorder, or mobile phone using a USB cable recommended by the device’s manufacturer, and print recorded images directly without using a computer. z Connectable Devices PictBridge is an industry standard enabling a range of digital photo solutions, including the direct printing of photos from a digital still camera, camcorder or mobile phone* without the need to use a computer. A device can be connected to this machine for direct printing regardless of the manufacturer or the model as long as it complies with the PictBridge standard. * PictBridge compliant digital still cameras, digital camcorders, and camera-equipped mobile phones are hereafter collectively referred to as “PictBridge compliant device”. A device with this mark is PictBridge compliant. z Printable Image Data Format This machine prints images taken with a DCF (Design rule for Camera File system) ver. 1.0/2.0compatible digital camera (Exif ver. 2.2/2.21 compliant), as well as PNG files. Printing Photographs Directly from a Compliant Device To connect a PictBridge compliant device to this machine, use a USB cable recommended by the device’s manufacturer. Caution Do not connect any equipment other than PictBridge compliant devices to the Direct Print Port of the machine. If you do so, electric shock, fire, or damage to the machine could result. Important Never disconnect the USB cable during printing unless when explicitly allowed to by the PictBridge compliant device. When disconnecting the USB cable between the PictBridge compliant device and machine, follow the instructions given in the device’s instruction manual. Note When printing photos with the PictBridge compliant device connected to the machine, we recommend the use of the AC adapter supplied with the device. If you are using the device battery, be sure to charge it fully. 1 Prepare for printing. (1) Turn on the machine. (2) Load paper. Printing Photographs Directly from a Compliant Device 21 2 Connect the PictBridge compliant device to the machine. Note Depending on the model or brand of your device, you may have to select a print mode compliant with PictBridge before connecting the device. You may also have to turn on the device or select Play mode manually after connecting the device to the machine. Perform necessary operations on the PictBridge compliant device before connecting it to this machine according to instructions given in the device’s instruction manual. (1) Make sure that the PictBridge compliant device is turned off. (2) Connect the PictBridge compliant device to the machine using a USB cable recommended by the manufacturer of the device. The device turns on automatically. If your device does not turn on automatically, turn it on manually. (3) Set up the PictBridge compliant device for direct printing. will appear on the LCD of the device when the machine is correctly connected. 3 (2) Specify the print settings such as paper type and layout. See “About PictBridge Print Settings” on page 23. You can make settings using the menu on the LCD of your PictBridge compliant device. Select the size and type of paper that you loaded in the machine. If your PictBridge compliant device does not have setting menu, change the setting from the machine. For details, see “Setting on the Machine” on page 24. 4 22 Start printing from your PictBridge compliant device. Printing Photographs Directly from a Compliant Device About PictBridge Print Settings Settings on a PictBridge Compliant Device This section describes the print settings on a PictBridge compliant device. When operating the device, be sure to follow the instructions given in the instruction manual of your PictBridge compliant device. Note z In the following description, names of setting items are given according to those used in Canonbrand PictBridge compliant devices. Setting item names may be different depending on the brand or model of your device. z Some setting items explained below may not be available on some devices. In this case, the settings made on the machine are applied. Also, when some items are set to Default on a PictBridge compliant device, the machine settings for these items are applied. For details, see “Setting on the Machine” on page 24. z Paper Size and Paper Type Settings The following sizes and types of printing paper can be used when printing from a PictBridge compliant device. z Paper size 4" x 6" / 101.6 x 152.4 mm, 5" x 7" / 127.0 x 177.8 mm*1, Credit card, 8" x 10" / 203.2 x 254.0 mm, A4, Letter, Wide*1 z Paper type Paper Type Setting Plain Paper*2 Photo Loadable Paper*3 Super White Paper or other plain paper Photo Paper Plus Glossy Glossy Photo Paper Glossy Photo Paper “Everyday Use” Photo Paper Glossy Photo Paper Plus Semi-gloss*4 Photo Stickers*5 Fast Photo Photo Paper Pro The available page sizes vary depending on the media type. For details, visit our website. *1 Can be selected only on certain Canon-brand PictBridge compliant devices. *2 Plain Paper can be selected for Paper type only when Paper size is set to A4 or 8.5" x 11" (Letter). When Paper type is set to Plain Paper, borderless printing will be disabled even when Layout is set to Borderless. *3 You may not be able to purchase some Canon genuine papers depending on the country or region of purchase. *4 When printing on Photo Paper Plus Semi-gloss 8" x 10" / 203.2 x 254.0 mm (SG-201), select 20 x 25 cm/8" x 10" for Paper size and Default for Paper type. * Select PHOTO PAPER PLUS for MEDIA TYPE in the PICTBRIDGE SET setting on the machine. See “Setting on the Machine” on page 24. *5 Exclusively used to print photo stickers. When printing on sticker paper, select 10 x 15 cm/ 4" x 6" in Paper size and Photo for Paper type. Do not set Layout to Borderless. Printing Photographs Directly from a Compliant Device 23 z Layout Setting Various layout options are available. z Bordered/Borderless: You can select whether or not to print an image with a border. z N-up: You can use this option when printing on sticker paper, or A4- or Letter-sized paper. Sticker paper: When you select 10 x 15 cm/4" x 6" for Paper size, you can print 16 images on a single sheet of paper. A4- or Letter-sized paper: When you select A4 or 8.5" x 11" (Letter) for Paper size, you can print 4 images on a single sheet of paper. Besides the above options, you can also specify to print an index of images in the DPOF* print settings menu. * DPOF (Digital Print Order Format) is a standard format to record the specified information regarding images, such as which image or number of copies to print. z Date/File No. Print Setting You can specify whether the date and/or file number will be printed. Note z If the images already have dates superimposed when shot, set this PictBridge setting item to Off. If you select Date, File No., or Both, the date and/or file number will be printed over the date printed by the device’s function. z Depending on the paper size and layout, the date will only be printed even when Both is selected. z Image Optimize Setting You can select the optimization method to obtain high print quality. When you select On, the shooting information is used to print the optimized image. If you are using a Canon-brand PictBridge compliant device, the following additional options may be available, depending on the model. – – – – VIVID makes green and blue more lively. NR (Noise Reduction) reduces the noise on blue areas like the sky as well as on black areas. Face brightens a darkened face on the photo taken against the light. Red-Eye corrects red eyes in portraits caused by flash photography. z Trimming Setting You can select an area to print. Setting on the Machine This section describes the PictBridge print settings on the machine. Set the print settings to Default on the PictBridge compliant device when you want to print according to the settings on the machine. z Displaying the PictBridge Settings Screen and Specifying the Settings (1) Turn on the machine. (2) Press the Menu button repeatedly until DEVICE SETTINGS appears. (3) Press the [ or ] button to select PICTBRIDGE SET, then press the OK button. (4) Press the [ or ] button to specify the setting item, then press the OK button. (5) Repeat step (4) to specify each setting item as necessary. 24 Printing Photographs Directly from a Compliant Device z Setting Items Setting Item Description Corresponding Setting of PictBridge Compliant Devices* PAGE SIZE Select the page size, when printing directly from a PictBridge compliant device. Paper size MEDIA TYPE Select the media type, when printing directly from a PictBridge compliant device. Paper type PRINT QLTY Select the print quality, when printing directly from a PictBridge compliant device. – BORDERLESS PRINT Select bordered or borderless print. IMAGE ENHANCEMENT Selects whether to optimize photos with the functions below or not. When SET is selected, you can configure the following. VIVID Makes green and blue more lively. POP Automatically optimizes brightness and tone of a photo. REMOVE NOISE Reduces the noise on blue areas like the sky as well as on black areas. FACE BRIGHT Brightens a darkened face on the photo taken against the light. RED EYE CORR Corrects red eyes in portraits caused by flash photography. Layout Image optimize * Set the items in this column to Default on the PictBridge compliant device when you want to make settings on the machine. Printing Photographs Directly from a Compliant Device 25 Replacing a FINE Cartridge When FINE Cartridges run out of ink, replace them using the following steps. 1 2 Open the Paper Output Tray. Make sure that the machine is turned on, lift the Scanning Unit (Printer Cover), then pull the Scanning Unit Support (A) down into place. (A) 3 Push down the FINE Cartridge. 4 Remove the FINE Cartridge. 5 Unpack a new FINE Cartridge and remove the orange protective tape (A) gently. Important z Handle FINE Cartridges carefully to avoid staining your clothes or surrounding work area. z Do not touch the electrical contacts or Print Head Nozzles on a FINE Cartridge. The machine may not print out properly if you touch it. (A) 26 Replacing a FINE Cartridge 6 Insert a new FINE Cartridge all the way into the appropriate slot. B C The Black FINE Cartridge should be installed into the left slot ( B ) and the Color FINE Cartridge should be into the right slot ( C ). 7 8 Push up the FINE Cartridge until it clicks into place. Lift the Scanning Unit (Printer Cover) slightly to set the Scanning Unit Support back to its original position, and then gently close the Scanning Unit (Printer Cover). Note If a print job has not been done yet, press the OK button to resume printing. Replacing a FINE Cartridge 27 Specifications General Specifications Printing resolution (dpi) 4800 (horizontal)* x 1200 (vertical) * Ink droplets can be placed with a pitch of 1/4800 inch at minimum. Interface USB 2.0 High Speed* * A computer that complies with USB 2.0 Hi-Speed standard is required. Since the USB 2.0 Hi-Speed interface is fully upwardly compatible with USB Full-Speed (USB 1.1), it can be used at USB Full-Speed (USB 1.1). Print width 8 inches / 203.2 mm max. (for Borderless Printing: 8.5 inches / 216 mm) Acoustic noise level Approx. 42.5 dB (A) * When printing in the highest print quality mode on Photo Paper Pro. Operating environment Temperature: 5 to 35°C (41 to 95°F) Humidity: 10 to 90% RH (no condensation) Storage environment Temperature: 0 to 40°C (32 to 104°F) Humidity: 5 to 95% RH (no condensation) Power supply AC 100-240 V, 50/60 Hz Power consumption Printing (Copy): Approx. 13 W Standby (minimum): Approx. 1.9 W OFF: Approx. 1.0 W External dimensions Approx. 17.7 (W) x 13.9 (D) x 6.7 (H) inches / Approx. 451 (W) x 353 (D) x 169 (H) mm * With the Paper Support and Paper Output Tray retracted. Weight Approx. 6.1 kg (Approx. 13.3 lb.) * With the FINE Cartridges installed. Canon FINE Cartridges Nozzles: Black: 320 nozzles Cyan/Magenta/Yellow: 384 x 3 nozzles Multiple copy 1 - 99 pages Intensity adjustment 9 positions, Auto intensity (AE copy) Zoom 25% - 400% (1% unit) Scanner driver TWAIN / WIA (Windows Vista and Windows XP only) Maximum scanning size A4/Letter, 8.5" x 11.7" / 216 x 297 mm Scanning resolution Optical resolution (horizontal x vertical) max: 1200 dpi x 2400 dpi Interpolated resolution max: 19200 dpi x 19200 dpi Gradation (Input/Output) 16bit/8bit 48bit/24bit (RGB each 16bit/8bit) Copy Specifications Scan Specifications 28 Specifications Camera Direct Print (PictBridge) Paper size 4" x 6" / 101.6 x 152.4 mm, 5" x 7" / 127.0 x 177.8 mm*, Credit card, 8" x 10" / 203.2 x 254.0 mm, A4, Letter, Wide* * Can be selected only on certain Canon-brand PictBridge compliant devices. Paper type Default (Selections based on the machine setting), Photo (Photo Paper Plus Glossy, Glossy Photo Paper, Glossy Photo Paper “Everyday Use”, Photo Paper Glossy, Photo Paper Plus Semi-gloss, Photo Stickers), Fast Photo (Photo Paper Pro), Plain Paper (A4/ Letter only) Layout Default (Selections based on the machine setting), Borderless, Bordered, N-up (2, 4, 9, 16)* * Layout compatible with Canon-brand sticker above. Refer to "Printing Media" in the User's Guide on-screen manual. Image optimize Default (Selections based on the machine setting), On, Off, “VIVID”*, “NR” (Noise Reduction)*, “Face”*, “Red eye”* * If using a Canon PictBridge compliant camera, you can select it. Print data & file no. Default (Off: No printing), Date, File No., Both, Off Trimming Default (Off: No trimming), On (follow camera’s setting), Off Minimum System Requirements Note Conform to the operating system’s requirements when higher than those given here. Operating System Processor RAM Windows Vista Pentium II (including compatible processors) 300 MHz 128 MB Windows XP SP1, SP2 Pentium II (including compatible processors) 300 MHz 128 MB Windows 2000 Professional SP2, SP3, SP4 Pentium II (including compatible processors) 300 MHz 128 MB Note; Operation can only be guaranteed on a PC preinstalled Windows Vista, XP or 2000. Mac OS X v.10.4 Intel processor PowerPC G3 256 MB Mac OS X v10.2.8 - v10.3 PowerPC G3 128 MB Note; Mac OS Extended(Journaled), Mac OS Extended Browser Internet Explorer 6.0- Safari Hard Disk Space 800 MB Note; For bundled software installation. 450 MB Note; For bundled software installation. CD-ROM Drive Required Other restrictions XGA 1024 x 768 z OmniPage SE: Windows 2000 Professional SP2 and SP3 not supported z MP Navigator EX: QuickTime v6.4 or later is needed (Macintosh only) z Some functions may not be available with Windows Media Center z To upgrade from Windows XP to Windows Vista, first uninstall software bundled with the Canon inkjet printer. Users in Asia z ScanSoft OmniPage SE (OCR software) can work only with English operating system. Specifications 29 Additional System Requirements for On-Screen Manuals Browser: Windows HTML Help Viewer Note: Microsoft Internet Explorer 5.0 or later must be installed. The on-screen manual may not be displayed properly depending on your operating system or Internet Explorer version. We recommend that you keep your system up to date with Windows Update. Browser: Help Viewer Note: The on-screen manual may not be displayed properly depending on your operating system or Help Viewer version. We recommend that you keep your system up to date with Software Update. Specifications are subject to change without notice. 30 Specifications 31 32 Quick Start Guide Table of Contents The following FINE Cartridges are compatible with this product. How to Use the Documentation Provided 2 Reading the On-screen Manuals 3 Preparing the Machine 4 Installing the MP Drivers 6 Introduction 8 Loading Paper 9 Operation Panel 10 Menu Items 11 Copying 13 Printing from a Memory Card 14 Printing from Your Computer 18 Scanning Images 20 Printing Photographs Directly from a Compliant Device 21 Replacing a FINE Cartridge 26 Specifications 28 www.canon-asia.com QT5-1235-V01 XXXXXXXX © CANON INC. 2007 PRINTED IN VIETNAM QT51235V01