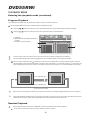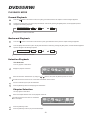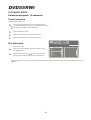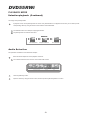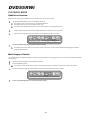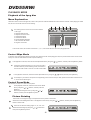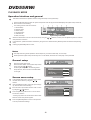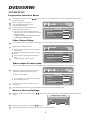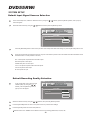
1
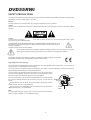
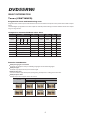
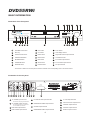
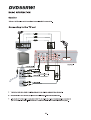
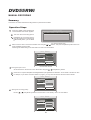
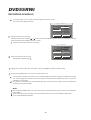
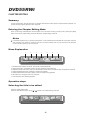
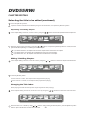
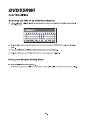
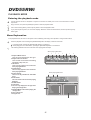
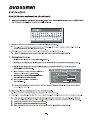
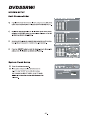
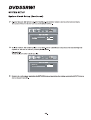
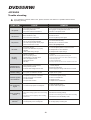
DVD55RWi
DVD Recorder
Owners' Manual
DVD55RWi
Contents
Safety Precautions............................................................................................ 1
Basic Information.............................................................................................. 4
System Connections.......................................................................................... 12
Monitoring Mode................................................................................................ 15
Recording Mode
............................................................................................ 16
Manual Recording............................................................................................. 17
Recording schedule........................................................................................... 20
Chapter Editing................................................................................................. 22
Disc Operation.................................................................................................. 25
Playback MODE ............................................................................................... 27
System Setup ................................................................................................... 37
Appendix............................................................................................................ 49
DVD55RWi
SAFETY PRECAUTIONS
For safety reasons please read the following instructions and the enclosed Important Safety Information carefully before
attempting to connect your DVD player to the mains.
Warning
To reduce the risk of fire or electric shock, do not expose this appliance to rain or moisture.
Caution
Use of controls or adjustments or performance of procedures other than those specified may result in hazardous radiation
exposure.
Caution
To reduce the risk of electric shock, do not remove cover (or back). There are no user-serviceable parts inside. Please
refer all servicing to a qualified engineer.
The lightning flash with the arrowhead symbol within an equilateral triangle is intended to alert the user to
the presence of uninsulated 'dangerous voltage' within the product's enclosure that may be of
sufficient magnitude to
constitute a risk of electric shock to persons.
The exclamation point within an equilateral triangle is intended to alert the user to the presence of important
operating and maintenance (servicing) instructions in the literature accompanying the appliance.
This product complies with European Low Voltage (73/23/EEC) and Electromagnetic Compatibility
(89/336/EEC) Directives when used according to this instruction manual.
Plug Fitting Instructions (UK only)
The cord supplied with this appliance is factory fitted with a 13A mains plug fitted with a 3A fuse inside. If it is necessary to
change the fuse, it is important that a 3A one is used.
If the plug needs to be changed because it is not suitable for your socket, or becomes damaged, it should be cut off and an
appropriate plug fitted following the wiring instructions below.
The plug must then be disposed of safely, as insertion into a 13A socket is likely to
cause an electrical hazard. Should it be necessary to fit a 3-pin BS mains plug to
the power cord the wires should be fitted as shown in this diagram.
The colours of the wires in the mains lead of this appliance may not correspond with
the coloured markings identifying the terminals in your plug. Connect them as
follows:-
FUSE
BLUE
N
The wire which is coloured BLUE must be connected to the terminal which is
marked with the letter 'N' or coloured BLACK.
The wire which is coloured BROWN must be connected to the terminal which is
marked with the letter 'L' or coloured RED.
Note
If a 13 Amp (BS 1363) type of plug is used a 3 Amp or 5 Amp fuse must be fitted,
either in the plug or adaptor, or on the distribution board.
1.
L
BROWN
CORD
GRIP
DVD55RWi
SAFETY PRECAUTIONS
Read Instructions - All the safety and operating instructions should be read before the product is operated
Retain Instructions - The safety and operating instructions should be retained for future reference.
Heed Warnings - All warnings on the product and the operating instructions should be adhered to.
Follow instructions - All operating and use instructions should be followed.
Cleaning - Unplug this product from the wall outlet before cleaning. Do not use liquid cleaners or aerosol cleaners. Use a
damp cloth for cleaning.v
Attachments - Do not use attachments not recommended by the product manufacturer as they may cause hazards.
Water and Moisture - Do not use this product near water - for example, near a bath tub, wash bowl or kitchen sink; in a wet
basement, or near a swimming pool etc.
Accessories - Do not place this product on an unstable surface, stand, bracket or table. The product may fall, causing
serious injury to child or adult, and serious damage to the product. Use only a surface, stand bracket or table recommended
by the manufacturer, or sold with the product. Any mounting of the product should follow the manufacturer's instructions,
and should use a mounting accessory recommended by the manufacturer.
A product and stand combination should be moved with care. Quick stops, excessive force, and uneven surfaces may
cause the combination to overturn.
Ventilation - Slots and openings in the cabinet are provided for ventilation and to ensure reliable operation of the product
and to protect it from overheating, and these openings must not be blocked or covered. The openings should
never be blocked by placing the product on a bed, sofa, rug, or other similar surface. This product should not be placed
in a built-in installation such as a bookcase or rack unless proper ventilation is provided or the
manufacturer's instructions have been adhered to.
Power Sources - This product should be operated only from the type of power source indicated on the marking label. If you
are not sure of the type of power supply to your home, consult your product dealer or local power company. For products
intended to operate from battery power, or other sources, refer to the operating instructions.
Grounding or Polarization - In some countries this product may be equipped with a polarized alternating-current line plug
(a plug having one pin wider than the other). This plug will fit into the power outlet only one way. This is a safety feature. If
you are unable to insert the plug into the outlet, try reversing the plug. If the plug still does not fit, contact your electrician to
replace your obsolete outlet. Do not defeat the safety purpose of the polarized plug.
Power-Cord Protection - Power supply cords should be routed so that they are not likely to be walked on or pinched by
items placed upon or against them, paying particular attention to cords at plugs, convenience receptacles, and point where
they exit from the product.
Lightning - For added protection for this product during a lightning storm, or when it is left unattended and unused for long
periods of time, unplug it from the wall outlet and disconnect the antenna or cable system. This will prevent damage to the
product due to lightning and power-line surges.
2.
DVD55RWi
SAFETY PRECAUTIONS
Overloading - Do not overload wall outlets, extension cords, or integral convenience receptacles as this can result in a risk
of fire or electric shock.
Object and Liquid Entry - Never push objects of any kind into this product through openings as they may touch dangerous
voltage points or short-out parts that could result in a fire or electric shock. Never spill liquid of any kind on the product.
Servicing - Do not attempt to service this product yourself as opening or removing covers may expose you to dangerous
voltage or other hazards. Refer all servicing to qualified service personnel.
Damage Requiring Service - Unplug this product from the wall outlet and refer servicing to qualified service personnel
under the following conditions:
a) When the power-supply cord or plug is damaged.
b) If liquid has been spilled, or objects have fallen onto the product.
c) If the product has been exposed to rain or water.
d) If the product does not operate normally by following the operating instructions. Adjust only those controls that are
covered by the operating instructions as an improper adjustment of other controls may result in damage and will often
require extensive work by a qualified technician to restore the product to its normal operation.
e) If the product has been dropped or damaged in any way.
f) When the product exhibits a distinct change in performance - this indicates a need for service.
Replacement Parts - When replacement parts are required, be sure the service technician has used replacement parts
specified by the manufacturer or have the same characteristics as the original part. Unauthorised substitutions may result in
fire, electric shock, or other hazards.
Safety Checks - Upon completion of any service or repairs to this product, ask the service technician to perform safety
checks to determine that the product is in proper operating condition.
Heat - The product should be situated away from heat sources such as radiators, heat registers, stoves, or other products
(including amplifiers) that produce heat.
3.
DVD55RWi
BASIC INFORMATION
Introduction
DVD is well known for its extraordinarily large capacity and outstanding audio-video effects. Its capacity is as high as 4.7-17 GB
(approximately 7-26 times the capacity of CD). With 500-line horizontal resolution of picture and Dolby Digital 5.1 Channel
surround sound, it brings a new era to audio visual entertainment .
Ter ms
DVD + R
This means DVD+Recordable. These Discs can be recorded and finalized only once.
DVD + RW
This means DVD+ReWritable. These Discs can be recorded repeatedly.
Erasing a disc
Erase the recorded contents on the disc. Only applicable to DVD+RW discs.
Finalizing a disc and making a disc compatible
Process the directory information of a disc, so that it can be played in the normal DVD players. A disc that is not finalized or
made compatible can only be played in this unit. Finalizing a disc refers to the operation to DVD+R disc and making compatible
refers to the operation to DVD+RW.
Recording preparations
The preparations before recording, including checking whether the disc is up to standard, or the recording format is valid,
making necessary optics correction and pre-writing the directory zones.
Recording quality
According to the different compress degree, there are four recording qualities to DVD+R/RW discs with 4.7GB
(12CM single side) .
SLP: general resolution, a single-side DVD disc can record about 6 hours program.
EP: good resolution, a single-side DVD disc can record about 4 hours program.
SP: better resolution, a single-side DVD disc can record about 2 hours program.
HQ: best resolution, a single-side DVD disc can record about 1 hour program.
Title
The longest section of a picture or a music piece on a DVD; a movie, etc., for a picture piece on video software; or an album
etc., for a music piece on audio software. Each title is assigned a title number enabling you to locate the title you want.
Chapter
Sections of a picture or a music piece on a DVD that are smaller than titles. A title is composed of several chapters. Each
chapter is assigned a chapter number enabling you to locate the chapter.
4.
DVD55RWi
BASIC INFORMATION
Ter ms (CONTINUED)
Progressive scan and Interlacing scan
Progressive scan creates a picture with double the scan lines of traditional component video pictures and creates a sharper
image.
The advantages of progressive scan video output are reduced picture flickering and motion artifacts as well as a sharper
image on large screens.
Comparison between DVD and other discs
DVD
Singlesided
1 layer
4.7G
Capacity
Playback time
LD
Singlesided
2 layers
8.5G
Doublesided
1 layer
9.4G
Digital/MPEG2 Digital/MPEG1
Doublesided
2 layers
17G
133min. 242min. 266min. 484min.
650MB
45min.
74min.
12CM/8CM
12CM/8CM
12CM/8CM
30CM/20CM
Horizontal
Resolution
500 lines or more
430 lines or more
Aspect Ratio
Multiple
One
Subtitle
32 types
Max. 16 types
Dolby Digital/Linear PCM
Linear PCM
FM modulation
48KHz,96KHz/16,20,24bit
44.1KHz/16bit
Sound Quality
650MB
1 side 60min.
2 sides 120min.
Disc Diameter
Audio
VCD
Super VCD
Analog
Digital/MPEG2
Recording Method
CD
CDROM
Digital
Digital
650MB
650MB
74min.
12CM/8CM 12CM/8CM
350 lines or more 250 lines or more
Linear PCM
44.1KHz
44.1KHz/16bit
Note : This player does not support Super VCD or VCD
Function Introduction
Multiple languages and subtitles
DVD disc can support as many as 8 dubbing languages and 32 subtitle languages.
Multiple angles
DVD disc may support as many as 9 camera angles.
Multiple story plots
Users can select to play desired plots (the beginning, development or ending) of the same disc.
Multiple aspect ratios
Multiple aspect ratios support various TV screens.
TV Screen
4:3
Disc Pictures
16:9
Pan-Scan
Letterbox
4:3
16:9
5.
DVD55RWi
BASIC INFORMATION
Illustration of the front panel
3
2
4
5 6
OPEN CLOSE
SEARCH
7
8
11
CH+
SOURCE
DVD55RWi
STANDBY / ON
PROGRESSIVE SCAN DVD RECORDER
PREV
DV
S-VIDEO
VIDEO
L
audio
r
PLAY
PAUSE
STOP
NEXT
RECORD
COMPACT
DIGITAL AUDIO
VIDEO
CH-
21
20 19 18 17
15 14 13 12 10
16
STANDBY/ON button
8
CH+ button
15
PLAY button
2
Disc tray
9
CH- button
16
VFD display window
3
Infrared remote sensor
10 PREV button
17
Right audio channel input terminal
4
OPEN/CLOSE button
11 NEXT button
18
Left audio channel
5
REVERSE button
12 REC button
19
Front Video input terminal
6
FORWARD button
13
20
Front S-Video input terminal
7
SOURCE button
14 PAUSE button
21
DV input terminal
STOP button
9
The function of buttons on the front panel is the same with that of the corresponding ones on the remote control.
Illustration of the rear panel
INPUTS
AUDIO OUT
VIDEO OUT
COMPONENT
Y
TV 75
ANTENNA
R
FRONT
R
SURR
L
2-CH OUT
CAUTION
IN
L
VIDEO
2-CH AUDIO IN
VIDEO
Cb/Pb
RISK OF ELECTRIC SHOCK
DO NOT OPEN
DVD55RWi DVD RECORDER
L
SCART OUT
This product complies with DHHS rules 21 CFR,
Chapter 1, Subchapter J, Part 1040 at date of
manufacture
Power Rating: 100-240V AC
50-60Hz
Max Power Consumption: 30W
(COMPOSITE/RGB)
R
L
OUT
Apparatus claims of US patent nos. 4,631,603;
4,577,216; 4,819,098; and 4,907,093 licensed
for limited viewing only
Cr/Pr
"DTS" and "DTS Digital Out" are trademarks of
Digital Theater Systems Inc.
R
S-VIDEO
S-VIDEO
CENTRE
SUB
COAXIAL
Manufactured under license from Dolby
Laboratories. "Dolby" and the double - D
symbol are trademarks of Dolby Laboratories.
Confidential Unpublished Works. c 1992 1997 Dolby Laboratories. All rights reserved
OPTICAL
CLASS 1 LASER PRODUCT
LUOKAN 1 LASERLAITE
KLASS 1 LASERAPPARAT
POWER
AC
2
www.cambridge-audio.co.uk
PCM/DTS/DOLBY DIGITAL
2
3 4 5
6
7
8
9 10 11 12
TV TUNER input terminal
13
5
L/R channel audio input terminals
6
COMPOSITE VIDEO output terminal
7
S-VIDEO output terminal
8
COMPONENT VIDEO output terminal
9
5.1 CH output terminals
10
L/R channel audio output terminal
11
COAXIAL output terminal
12
OPTICAL output terminal
13
SCART output terminal
The antenna cable plug is inserted here
2 TV TUNER output terminal
This terminal is directly connected with
the TV TUNER Input Terminal
3 Rear Video input terminal
4
Rear S-Video input terminal
6.
DVD55RWi
BASIC INFORMATION
Display
1
REPEATALLA-B
P N
MP3
DVD
2
CHANNEL
3
4
DIGITAL
PBC
1 Channel
2 DTS
3 Dolby Digital
4
Record
5
ANGLE PROGRAM
RANDOM
Su Mo Tu We
Th Fr Sa
L/R
5
Angle
When the unit is switched on, information about the working status will be shown on the FL display.
The relation between the VFD items' lighting and unit's working status is shown as the following table:
Lighting
VFD items
Light on condition
The contents in this area are different in different
working status. When playing, the area 1 shows
the track (chapter) number, the area 2 shows the
elapsed time of the track (chapter).
In any working status
1
2
REPEAT
If this unit is in repeat playback mode
ALL
If this unit is in repeat disc playback mode
A-B
If this unit is in repeat AB playback mode
MP3
SVCD
DVD
Remarks
When this unit is in the status of
playing a disc
PROGRAM
When this unit is in program playback mode
RANDOM
When this unit is in random playback mode
Su Mo Tu We
Th Fr Sa
When this unit is in the standby mode
According the media of the played
disc, one of them will light.
According to what day today is,
one of them will light.
When the system has one or more timer
recording tasks
CHANNEL
The channel number will be shown
below the item "CHANNEL"
When receiving the TV signal.
REC
When recording.
When playing the DVD with
function
DIGITAL
When playing the DVD with
dolby digital sound
When playing
When pausing
PBC
ANGLE
P N
When the PBC function is on
When playing the DVD with multi-angle options
When the output video system is PAL,
The item P lights, otherwise, N lights.
In any working status
7.
DVD55RWi
BASIC INFORMATION
Basic Operations
- Display or hide the control menu bar through the [NAVIGATION] button.
- Select the submenu or other control through the [CURSOR] buttons.
- Perform the current control function or enter the sub menu through the [SELECT] button.
- Return to the previous menu, or cancel the current operation by using the [RETURN] button.
- Add/Clear contents to the list window or clear the wrong inputted characters in the edit window through the
[ADD/CLEAR] button.
OSD Menu Illustration
The illustration below is the OSD menu to play.
TITLE
CH001
CH001
SP
SP
STOP
07
07
Here is the position of information text
01
01
01:16:13
Warning
Here will be the window of setting or list track
1. Control menu bar
Control bar is a collection of icons. Those icons are presentations of commands or information
that needed to finish a function.
2. Icons explanation area
When highlighting the icon in the control menu bar by using [ ] and [ ] buttons, the information
about the icon will appear here.
3. Warning information area
When performing the operation that cannot be performed, "INVALID" will appear here.
4. The setup window will be displayed here when performing the system setting. The list window
will be displayed when making the program playback or playing CD-DA MP3 and JPEG.
9.
DVD55RWi
BASIC INFORMATION
Connecting to the Amplifier with DTS or Dolby Digital Decoders
Rear Panel
Optical Cable
Coaxial Cable
Connect One of the two Cables
Video Out
Video In
Video Cable
Coaxial In Optical In
Amplifier with Dolby Digital or DTS digital decoder
Please set DIGITAL OUTPUT to LPCM (Please refer to "System setup Playback settings Digital audio out setup"for details)
11.
DVD55RWi
SYSTEM CONNECTIONS
Connecting to the Amplifier with 5.1CH Audio Input
Rear Panel
Front
Subwoofer Surround
Video In
Centre
Amplifier with 5.1CH Audio Input
12.
DVD55RWi
RECORDING MODE
Summary
This unit has various external input signal terminals including S-video input, Composite video input, TV tuner input, DV input and
Stereo audio input.
The recordable discs of this unit are DVD+RW and DVD+R. There are four recording qualities to be selected, including SLP (6 hours),
EP (4 hours), SP (2 hours) and HQ (1 hour).
Entering the Recording Mode and Menu Explanation
The way to enter the recording mode is as follows:
When not in the erasing or writing a disc mode, press the [SOURCE] button to enter the monitoring mode.
When the recording time is scheduled, the system will automatically enter the recording mode.
For the recording time, please refer to Record Schedule for details.
Press the [NAVIGATION] button in the recording mode, the recording control menu bar will appear or disappear.
The meaning of each icon in the recording control menu bar is as follows:
1. Disc type. It must be DVD+R/RW.
2. Record Input Source.
1
2
3
4
P001
SP
STOP
5
6
7
3. Recording Quality.
4. Recording Process Control.
5. The number of the recorded titles.
DVD+RW
TITLE
6. The number of the recorded chapters.
07
07
01
01
the recording control menu bar
7. The surplus recordable time of the disc.
General Steps
The general steps of recording external signals are as follows:
Connect the system.
Load the usable DVD+R/RW disc.
Select the desired source to be recorded.
Display the recording control menu bar.
Select recording quality.
Start recording.
Stop recording.
16.
01:16:13
DVD55RWi
MANUAL RECORDING
To start recording
Connect the system (please refer to "System Connections-System Connection of recording external signals" for details).
Please ensure the source equipment is working properly.
Turn on, load the blank DVD+R or DVD+RW disc, then press the [SOURCE] button to enter the monitoring mode, and
press the [NAVIGATION] button to display the recording control menu bar.
Select the correct input source.
TITLE
CH001
CH001
CH001
SP
STOP
07
07
01
01
01:16:13
In the recording control menu bar, select the Recording Quality item using the [
], [
] buttons and then press the
[SELECT] button. Select the recording quality using the [
], [
] buttons, and then press the [SELECT] button to
confirm.
TITLE
P001
CH001
SP
SP
STOP
07
07
01
01
01:16:13
In the recording control menu bar, select the Recording Process Control item using the [ ], [ ] buttons and press the
[SELECT] button. Select "RECORD" using the [ ], [ ] buttons, and then press the [SELECT] button to confirm.
TITLE
P001
CH001
SP
RECORD
STOP
07
07
01
01
01:16:13
Recording starts after the above five steps.
Recording Process Control
Move the cursor using the [ ], [ ] buttons to select the Recording Process Control item . Press the [SELECT] button
and select a certain value using the [ ], [ ] buttons, and then press the [SELECT] button.
You can change the operations of record,
pause recording and stop recording using
this menu.
TITLE
P001
CH001
17.
SP
STOP
STOP
07
07
01
01
01:16:13
DVD55RWi
MANUAL RECORDING
To start recording (Continued)
Using the corresponding function buttons [RECORD],[PAUSE/STEP] and [STOP] on the remote control also can make the recording
process switch between record , pause and stop .
When you perform the stopping operation, the system will store some information into the disc, so the system will display Please
wait a moment on the Icons Explanation Area. The system will not respond no matter which buttons you press.
The system will add a new title when you record again after stopping the operation. If you record a disc continuosly, the entire disc
only has one title.
One Touch Recording (OTR)
This function allows you set the end time of the recording during the normal recording . When the time is up, the system will stop
recording automatically.
Enter the recording mode and start recording.
According to the desired time, press the [RECORD] button once or more.
Press the [RECORD] button once, and the length of the recording time will extend for 30 minutes. When it exceeds the disc
recordable time, the recording will be switched into normal recording.
If the OTR process is paused or stopped, the system will cancel the OTR.
How to Control the DV Camera Recorder
This unit may control the DV camera recorder through the 1394 serial interface, when using DV as an input source, you may fulfill the
operations of playback, pause, etc. to the DV through the remote control of this unit .
Please ensure the DV camera
is properly connected (Please refer to "System Connection of Recording External Signals" for details).
.
Then set the Input Source item in the control menu bar to DV.
When pressing the [STOP] button, if is in recording mode, the recording will stop and the DV camera can not be controlled.
Pressing the [PLAY] button controls the DV camera to switch to normal playback.
When pressing the [PAUSE / STEP] button, if is in recording mode, the recording will pause and the DV camera can not be
controlled.
When pressing the [REV] button, the DV will play fast backward. If is in recording mode, the recording will pause this unit.
When pressing the [FWD] button, the DV camera will play fast forward. If is in recording mode, the recording will pause this
unit.
Notes
Do not shake or unplug it when recording.
A finalized DVD+R disc cannot be used to record.
If you want to play the recorded disc in normal player, you should perform the operation of Finalizing or Making Compatible.
Please refer to "Disc Operation" for details.
Exiting Recording Mode
Press the [SOURCE] button to exit this mode.
18.
DVD55RWi
MANUAL RECORDING
Summary
This function can make scheduled recordings based on preset times and dates.
Operation Steps
Press the [ TIMER ] button to display the
record scheduler menu shown opposite.
Record scheduler
NO .
Quality
Source
Date
Start
End
1
This menu has 20 recording options.
2
3
Highlighting any non-empty notes by
the cursor buttons, then pressing the
[ADD/CLEAR] button, you can delete
it.
4
5
6
the record schedule menu
Select one of the notes in the record scheduler menu using the [ ], [ ] buttons. Then press the [SELECT] button and the TV
screen will display the Item Editor.
Performing the relative setting in this Item Editor can make a record scheduler.
Item Editor
Source
F-A/V
Quality
SP
Once
01/01/0 1
Start
12:10
End
12:40
Confirm
Cance l
the Item Editor window
Setting the input source:
Set the value of the "Source" item in the "Item Editor" using the [
], [
] and [SELECT] buttons.
Please refer to "System Setup/Record Settings/Default Input Signal/Sources Selection " for the values of the "Source" item.
For example, if you want to record the CH003 TV program, you may select the value of the Source item as Ch003.
Item Editor
Source
F-A/V
Quality
CH125
F-A/V
Once
Start
F-SV
R-A/V
End
12:40
Confirm
Cance l
Setting the recording quality:
Use the [
], [
] and [SELECT] buttons to set the value of the "Quality" item in the "Item Editor".
Item Editor
Source
F-A/V
Quality
SP
Once
SLP
EP
Start
End
SP
HQ
Confirm
Cance l
19.
DVD55RWi
RECORDING SCHEDULE
Setting the recording date
Move the cursor to select this line and press the [SELECT] button, a pop-up list will appear. It is shown as follows:
From this example, the menu has three options.
Item Editor
Weekly: record once per week
Daily: record once per day
Once: record at a certain time
Source
F-A/V
Quality
SP
Once
01/01/0 1
Once
12:10
Daily
12:40
Weekly
Confirm
Cancel
If you select "Weekly", please press the [SELECT] button, then move the cursor to the right side of the third line. Next,
press the [SELECT] button and the OSD will display a list of weekdays, so you can select what you need.
Item Editor
Source
F-A/V
Quality
SP
Weekly
STA
Start
WED
End
THU
FRI
SP
SAT
STA
Confirm
Cance l
If you select "Once", confirm by pressing the [SELECT] button. The right part of the third line will change into an Editor
window of the date. Highlight, then press the [SELECT] button. Input the date in the sequence of "date/month/year"
through the numberical buttons. Press the [SELECT] button to confirm.
Item Editor
Source
F-A/V
Quality
SP
Once
--/--/--
Start
12:10
End
12:40
Confirm
20.
Cance l
DVD55RWi
RECORDING SCHEDULE
If you select "Daily", you only need to press the [SELECT] button to confirm.
The TV screen will display as follows.
Item Editor
Source
F-A/V
Quality
SP
Daily
Daily
Start
12:10
End
12:40
Confirm
Cance l
Setting the start time of recording
Select the "Start" item by using the [ ], [ ] buttons then press the [SELECT] button; input your recording time between
00:00~23:59 and press the [SELECT] button to confirm.
This item is used to set the start time of recording.
Item Editor
Setting the finish time of recording
This operation is similar to step
Source
F-A/V
Quality
SP
Daily
Daily
Start
--:--
End
12:40
Confirm
Cance l
.
Highlight the "Confirm" button in the "Item Editor" , and press the [SELECT] button to finish the setup.
Pressing the [TIMER] button can exit the record schedule menu.
5 minutes before recording, if the unit is in use, a message dialogue will appear to notify you a scheduled recording is
due. Please highlight the "Confirm" button on the dialogue window and press the [SELECT] button to confirm the
cancellation of the recording.
If the system is in standby mode, it will automatically switch on and enter the recording mode in 2 minutes before
recording, and then start recording.
Notes
Before using the [TIMER] function, you must set the system time and date. Not doing so will result in errors implemented
by this section.
Please ensure all the given information is correctly entered to allow success of the "scheduled recording task".
Do not use the finalized DVD+R discs.
21.
DVD55RWi
CHAPTER EDITING
Summary
For the recorded disc, each title often has one chapter. Discs like this neither perform chapter selection playback, nor
perform random program playback to disc segments.
Entering the Chapter Editing Mode
When you are using a DVD+RW disc and the system is not in the mode of writing or erasing a disc, pressing the [EDIT]
button can enter the chapter editing mode and display the chapter editing control bar.
Notes
If "INVALID" appears when you press the [EDIT] button, it may indicate that the DVD+RW disc in the loader has been
write protected, or the system in current the mode can not enter the editing mode. You can perform the disc operation
to cancel the write protect or exit current mode.
Menu Explanation
1
2
3
4
CH
AP
TE
CH
AP
TE
RR
MARKER
01/ 01
Add
a ch
01/ 01
PLAY Y
PLA
NEW
NEW
NEW
5
6
7
CH
AP
TE
CH
AP
TE
RR
HIDE E
HID
h
n ihdi d
C-un
C-u
NEW
NEW
e
C-UNHIDE
T-ICON
T-ICO
00: 01: 01
apt
Add a chapter marker
1. Title Select item: Displays as follows: Current title number/total title No.
2. Chapter Select item: C=Displays as follow: Current chapter No./total chapter No.
3. Playback Process Control item: This icon's functionality is similar to the one featured within the playback control bar.
4. Chapter Divide/Combine item: separate or combine the chapters.
5. Chapter Hide/Unhide Control item: display or skip the chapter during playback.
6. Title Index item: change the index icon and name
7. Time Select item: time selecting playback.
Operation steps
Selecting the title to be edited
Enter the chapter editing mode
Select the Title Selection item by using [
], [
] buttons in the chapter editing control bar.
CH AP TE R
MARKER
01/ 01
Add
a ch
01/ 01
apt er
ma
Total titles: 1, playing now:1
PLA YY
NEW
NEW
NEW
CH
APTER
CH
AP TE R
HIDE
HID
EE
e e
h
n ihdi d
C-u
C-un
NEW
NEW
C-UNHIDE
rke r
22.
T-ICON N
T-ICO
00: 01: 01
DVD55RWi
CHAPTER EDITING
Selecting the title to be edited (continued)
Press the [SELECT] button.
Input the number of the title to be edited by using the number buttons, then press the [SELECT] button.
PLAY
P
L AY
Separating / Combining Chapter
In the chapter editing control bar, move the cursor by using the [
],[
] buttons to select the separate/combine chapter item.
Select the proper value of the item by using the [ ], [ ] buttons, and press the [SELECT] button to confirm, then the
system will start separating or combining the current chapter.
If you select "DELETE", this chapter and the former chapter will be combined to one chapter.
If you select "NEW", this chapter will be separated into two at the current location.
If you select "DEL-ALL", all chapters of this title will be combined into one chapter.
Hiding / Unhiding Chapter
In the chapter editing control bar, move the cursor by using the [
], [
] buttons to select the chapter hide/unhide item.
Press the [SELECT] button.
If the value is "C-hide", this chapter will be skipped when playing.
If the value is "C-unhide", this chapter will be played when playing.
Changing the Title Index
When playing the DVD title menu(Press the [TITLE] button when playing).
In the chapter editing control bar, move the cursor by using the [
], [
] buttons to select the Title Index item.
Select the item to be "T-ICON" by using [ ],[ ] buttons. When meeting the favorite picture, press the [SELECT] button
and this picture will become the index icon of this title.
23.
DVD55RWi
DISC OPERATION
Summary
The disc operations refer to some operations on the disc in the loader , including viewing the disc information, finalizing a disc,
erasing the disc content, erasing the last title, making compatible and write-protect.
Entering the Disc Operation Mode
When a disc in the loader is a DVD+R or DVD+RW, pressing the [DISC OPER] button will enter this mode.
When INVALID appears, it may indicate that the system in current mode can't enter the disc operation mode. Please
exit the current mode first.
Menu Explanation
1
INFO
2
FINAL
FINAL
3
4
T-DEL
5
ERASE
6
LOCK
COMP
the control bar of disc operation
1. Disc Information: shows the disc information.
2. Finalize a Disc: this function can make the DVD+R disc able to be played in normal players. If finalized,
the disc is unable to record new contents or modify contents.
3. Erase Last Title: if you feel the last recorded contents haven't been well recorded, you may erase them,
Only available for DVD+RW.
4. Disc Erase: once this function is performed, the disc contents will be completely erased.
5. Write-Protect: this operation protects the recorded contents from being erased.
6. Make Compatible: this function can make the well-recorded DVD+RW disc able to be played in the
normal DVD player.
Operation Steps
Viewing the Disc Information
INFO
Press the [DISC OPER] button to enter the
FINAL
T-DEL
ERASE
LOCK
COMP
Information of the disc
Disc Operation mode.
Disc Information
Disc type :
In the control bar of this mode, select the Disc
Information item by using [ ], [ ] buttons.
DVD+RW
:
Recorded time :
Remained time :
Disc status :
Title numbers
07
00:44:15
01:16:13(SP)
Finalized
Locked
Compatible
Finalizing a Disc
This operation is only available for the DVD+R disc.
INFO
In the control bar of this mode, select the
Finalize a Disc item by using the [
], [
]
buttons, and then press the [SELECT] button.
FINAL
FINAL
T-DEL
ERASE
LOCK
COMP
To finalize a DVD+R disc
Disc finalization
Warning:this operation will finalize the DVD+R disc in
loader, If finalized, the disc can be played in normal
player, but it can not record new content any more
Disc finalized 0%
0%
25.
DVD55RWi
DISC OPERATION
Erasing the last title
This operation is available for DVD+RW disc.
In the control bar of this mode, select the Erase Last Title item by using the [
[SELECT] button.
After this operation starts it cannot be
cancelled.
INFO
], [
T-PEL
T-DEL
FINAL
Deleting the last title
] buttons, and then press the
ERASE
LOCK
COMP
now
Delete title
Warning: this operation will delete the last title in the
DVD+RW disc in the loader and can not be restored later!
The last title erased 5%
Erasing Disc Contents
This operation is only available for DVD+RW disc.
In the control bar of this mode, select the Disc Erase item by using the [
then the system will start erasing disc contents.
This operation will take some time. When
erasing, any other operations can not be
done, including standby. Once the operation
starts, it cannot be cancelled midway.
INFO
], [
FINAL
] buttons, press the [SELECT] button,
T-DEL
ERASE
ERASE
LOCK
COMP
Erasing now
Erase disc
Warning: this operation will erase all contents on the
DVD+RW disc in the loader and can not be restored later!
Disc erased 5%
Write-protect
This operation will remove the write-protect of a protected disc and protect an unprotected disc.
It is available to DVD+RW disc.
In the control bar of this mode, select the write protect item by using the [
then the system will start erasing disc contents.
This operation will take some time. When
erasing, any other operations can not be
done, including standby. Once the operation
starts, it cannot be cancelled midway.
INFO
], [
FINAL
] buttons, press the [SELECT] button,
T-DEL
LOCK
LOCK
ERASE
COMP
Locking disc now
Disc protection
Warning: this operation will protect the disc from missdelete. It can be unlocked if you want to record new
content or make changes on a locked disc
Disc locked 5%
Making Compatible
This operation is available for DVD+RW disc.
In the control bar of this mode, select the Make Compatible item by using the [
[SELECT] button.
This operation makes the DVD+RW disc
able to be played in other DVD players.
If the disc has already been made
compatible, this item cannot be selected.
INFO
FINAL
Exiting
Press the [DISC OPER] button to exit this mode.
26.
T-DEL
], [
ERASE
] buttons, and then press the
LOCK
COMP
COMP
DVD55RWi
PLAYBACK MODE
Entering the playback mode
Connect this unit with the TV set (Refer to "System Connection" for details) Turn on the TV set and switch it to the AV
input mode.
Plug in the unit, then press the [standby/on] button to enter the playback mode.
If it's in other working status, press the [PLAY] button to enter the playback mode.
If you press the [PLAY] button, the TV Screen displays "INVALID". Please exit this mode first, and then press the [PLAY]
button again.
Menu Explanation
In the playback mode, the control of the system can be fulfilled by performing menu operation or using function buttons.
Enter the playback mode. Pressing the [NAVIGATION] button can display or hide the control bar.
In the Stop mode, pressing the [NAVIGATION] button is not effective.
When playing the menu of DVD disc, pressing the [NAVIGATION] button is not effective.
The following illustrations are the control bars when playing DVD and Mp3.
When playing DVD disc:
1. Playback Mode Control
This icon also displays the disc type.
2. Playback Process Control
This control can finish the following
operations: stop, slow, etc..
3. Title Select
This icon only exists in the control bar
when playing DVD disc.
4. Chapter Select
This icon only appears in the control bar
when playing DVD disc.
5. Angles Change
This icon is only available for some DVD
discs.
6. Audio Select
This icon exists in the menu when playing
DVD disc.
7. Subtitle Select
8. Time Select
9. This icon only displays the disc type when
Playing the file-type disc.
10.Playback Mode Control when playing the
File-type disc
11.Disc Content List
12.Program List
1
2
3
4
5
6
7
8
NORMAL
PLAY
05/17
11/27
01/01
01/01
01/02
OFF
00:43:03
NORMAL
Media and play mode
When playing MP3 disc:
9
10
2
FILE
AUDIO
AUDIO
NORMAL
STOP
STEREO
00:00:01
Audio file type
FILES&DIRECTORY
FAVORITE/PROGRAM
Car
butterily
cat
city
fish
forien
katong
landscape1
landscape2
11
12
27.
DVD55RWi
PLAYBACK MODE
Direct Playback
Press POWER switch.
Press EJECT button.
Disc tray ejects automatically, then place the disc with the label side face up.
Press EJECT button again, disc tray retracts.
Disc information is being read by your player.
Press PLAY button and playback automatically starts.
Press the STOP button to stop playing.
Pressing the STOP button for the first time, the player enters the pre-stop mode. In this mode, if you press the PLAY button,
the player will play the disc from the stop point. Press the STOP button a second time, and the player will enter the stop mode.
Pressing the STOP button when playing an MP3 disc, enters the stop mode directly.
Index Picture Screen
1.
2.
3.
4.
1.Title
01/01/04 - 12.14PM
SP 00.00.20
2.Title
01/01/04 - 12.14PM
HQ 00.00.20
3.Title
01/01/04 - 12.14PM
SLP 00.00.20
4.Title
01/01/04 - 12.14PM
HQ 00.00.20
1. Title
01/01/04 -12.14PM
SP 00:00:20
Description:
1. The name of the pre-recorded. The default is TITLE
2. The date and time of the record.
3. The quality.
4. Length of the record.
Notes
The titles menu of different DVD discs may be different.
Not all DVD discs have the titles menu. For some DVD discs without titles menu, pressing the [TITLE] button is not
effective.
Playback from the Menu Displayed
Press the [MENU] button.
The menu frame of the DVD disc is displayed on the TV screen.
For DVD discs, press the cursor buttons to select the chapter.
The chapter or track may be selected by the [ ], [ ] buttons for some discs.
Some discs may not be played until pressing the [SELECT] button.
Press the [RETURN] button during playback.
When PBC is switched on, this unit returns to the menu frame for SVCD and VCD2.0 discs. When the PBC is switched
off, it is ineffective.
28.
DVD55RWi
PLAYBACK MODE
Ending Playback
Notes
If the disc is loaded in the opposite side or badly damaged, the OSD will display "NO DISC".
Playback Mode Control
This unit has several playback modes: sequence playback, repeat playback, program playback and random playback.
The operation steps are as follows:
Sequence Playback
Display the control bar of the playback mode.
Select the first item of the control bar by using the [
NORMAL
NORMAL
PLAY
05/17
PBC OFF
STEREO
], [
] and [SELECT] buttons, then the screen displays as follows:
NORMAL
Media and play mode
Select the value of "NORMAL" by using the [
sequence playback mode.
], [
] buttons, press the [SELECT] button, and the system will enter the
Pressing the [PLAY] button can also enter the sequence playback mode.
Repeat Playback
This unit has many repeat modes: repeat title (only for DVD), repeat chapter (only for DVD), repeat entire disc (SVCD/VCD),
repeat all (DVD), repeat song and so on.
In the playback control bar, select the Playback Mode Control item by using the [
Select using the [
], [
], [
] and [SELECT] buttons.
] buttons, press the [SELECT] button and the system will play in the corresponding repeat mode.
If the selected value is "A-B", after pressing the [SELECT] button, the system will indicate that point A has been confirmed.
Press the [SELECT] button again to confirm the next point, i.e. point B..The unit repeats the chosen segment continuously
between points A and B.
This unit has many different playback functions, some of which may vary from disc to disc.
1. NORMAL Sequence Playback
2. A-B A-B Playback
3. C-RPT Segment Repeat Playback
4. T-RPT Title Repeat Playback
5. D-RPT Disc Repeat Playback
6. TR-RPT Track Repeat Playback
7. S-RPT Song Repeat Playback
8. PROG Program Playback
9. RANDOM Random Playback
29.
DVD55RWi
PLAYBACK MODE
Entering the playback mode (continued)
Program Playback
This mode allows the system play any desired title, chapter or track in the chosen sequence.
Set the Playback Mode Control item to PROG and press the [SELECT] button.
Using the [
],[
] buttons can make the cursor move between the Disc Content window and the Program list window.
Using the [
],[
] buttons can make the cursor move up and down within a selected window.
1. Disc/folder
2. Selected tracks are displayed within these
windows.
3. Disc table of contents window.
NORMAL
PROG
PLAY
05/17
PBC OFF
STEREO
00:00:01
Select favorite to play
FAVORITE/PROGRAM
TRACK
TRACK
TRACK
TRACK
TRACK
TRACK
TRACK
TRACK
TRACK
TRACK
TRACK
01
02
03
04
05
06
07
08
09
10
Press the cursor buttons to move the cursor in the Disc Content List window to highlight your favorite item.
Press the [ADD/CLEAR] button and the highlighted item will immediately appear in the Program List window.
If the item that you selected in step has sub items, such as a title of the DVD disc or a folder of the file-type disc, press the
[SELECT] button and its sub items will appear in the Disc Content List window. If you select the first item (..) in this window, and
press the [SELECT] button and the content in the window will go back to the original one. The operation details are as follows:
TITLE
TITLE
TITLE
TITLE
TITLE
TITLE
TITLE
TITLE
TITLE
TITLE
TITLE
01
02
03
04
05
06
07
08
09
10
CHAPTER OF TITLE 01
Press the [SELECT] button
Unfold the content of "TITLE 01"
CHAPTER
CHAPTER
CHAPTER
CHAPTER
CHAPTER
CHAPTER
CHAPTER
CHAPTER
CHAPTER
01
02
03
04
05
06
07
08
09
Press the [SELECT] button
Go back to the previous window
Select an item in the program List window by using the cursor buttons, by pressing the [ADD/CLEAR} button you can delete it.
After finishing adding the desired items to the Program List window, move the cursor to the Program List window, and press the
[SELECT] button, and the system will start playing the items in the Program list window one by one.
Random Playback
Set the Playback Mode Control item to "RANDOM", and then the system will start random playback.
In this mode, the system will randomly play the chapters or tracks on the disc.
30.
DVD55RWi
PLAYBACK MODE
Foward Playback
Press the [
] button on the remote control, the system goes forward into the next chapter or track and begins playback.
Pressing the [FWD] button, the system plays fast forward. Continuously pressing the [FWD] button, the fast playback speed is
changed in the following sequence:
Normal Speed Playback
FF2
......
FF4
FF32
This operation is invalid on a MP3 disc.
Backward Playback
Press the [
] button on the remote control and the system goes backward into the previous chapter and begins playback.
Press the [REV] button and the system will play fast backward. Continuously pressing the [REV] button, the fast backward playback
speed is changed in the following sequence:
Normal Speed Playback
FR2
......
FR4
FR32
This operation is invalid on a MP3 disc.
Selection Playback
Title Selection
This only applies to DVD discs.
Display the playback control bar
NORMAL
PLAY
01/04
05/17
01/04
11/27
01/01
01/01
01/02
OFF
00:43:03
NORMAL
Total tities:4 playing now:1
Select the third item "Title Selection" by using the [
], [
] buttons, then press the [SELECT] button to confirm.
Numbers below the icons shown as: current title number/total number of titles.
Use the numerical keys to input the desired title.
Press the [SELECT] button to start playing the selected title.
Chapter Selection
This only applies to DVD discs.
Select the Chapter Selection item on the playback control bar.
Numbers below the icons show as: current/total
No. Of chapters.
NORMAL
PLAY
Total chapters:
Press the [SELECT] button.
Press the [SELECT] button to play the selected chapter.
31.
05/17
01/04
27 playing n
now:11
11/27
11/27
01/01
01/01
01/02
OFF
00:43:03
NORMAL
DVD55RWi
PLAYBACK MODE
Selection playback (Continued)
Track selection
This feature is available to CD..
Choose the Track Selection item on the playback control bar.
The numbers below the icons show as: current/total track number..
This feature is unavailable with DVD playback
Press the [SELECT} button.
Use the numerical keys to input the desired track no.
Press the [SELECT] button to start playing the track
FILE
File Selection
AUDIO
AUDIO
NORMAL
STOP
STEREO
00:03:03
Select to expand directory
Contents list window
FILES&DIRECTORY
Move the cursor into the Disc Content List window by using
the [ ] [ ] buttons.
Highlight a file by using the [ ], [ ] buttons, then press the
[SELECT] button and the system will play the selected file.
FAVORITE/PROGRAM
Car
butterily
cat
city
fish
forien
katong
landscape1
landscape2
If the selected item in step 2 is a folder, after pressing the [SELECT] button, the Disc Content List window will display the files of the
folder.
32.
DVD55RWi
PLAYBACK MODE
Selection playback (Continued)
The usage of the [GOTO] Button
In playback mode, use the [GOTO] button to confirm every Selected item in the playback control bar. you can then input the
corresponding values by using the remote control with the method aforesaid.
The illustration below is an example of playing DVD discs.
The [GOTO] button is invalid to some discs.
00:4 3:03
01/04
Title
Selection
7
Chapter11/2Selection
Time Selection
Audio Selection
This operation is avaliable to non-DVD discs and Mp3
Select the Audio Output item in the playback control bar.
The numbers below the icons show as: current total mode number.
NORMAL
PLAY
05/17
01/04
11/27
01/01
01/02
01/01
01/02
OFF
00:43:03
NORMAL
Please select audio stream(1-2)
Press the [SELECT] button.
Input the number by using the remote control, and then press the [SELECT] button to confirm.
33.
DVD55RWi
PLAYBACK MODE
Subtitle selection
Some discs have many output subtitles and you can select one of them as the output.
Choose the subtitle selection item in the playback control bar
The numbers below the icons show as: current/total subtitle No.
The default value can be set in the system setup menu.
If the word “OFF” appears below the icon you can set this option in the system setup menu.
Press the [SELECT] button to make the Subtitle Selection item change into the input mode.
Input the value using the numerical keys then press the [SELECT] button to confirm.
NORMAL
PLAY
05/17
01/04
11/27
01/01
01/01
01/02
OFF
00:43:03
NORMAL
Total subtitles:3, playing now:2 (OTH)
Using the [SUBTITLE] button can switch subtitles directly.
The default option of this item can be set in the system setup menu. You can set the default subtitle language to avoid the
frequent subtitle selection.
Multi Angles Switch
The scenes viewed from different angles are recorded in some DVD discs. When playing the disc, you can view the scenes from different
camera angles.
Select the Angle Change item in the playback control bar
Press the [SELECT] button.
The right side of the numbers below the icon is the total angle number of this disc; the left is the current angle number.
Input the numbers by using the number buttons, and then press the [SELECT] button to confirm.
NORMAL
PLAY
05/17
01/04
11/27
01/04
01/01
Total angle s:4, playing no w:1
Tota
Pressing the [ANGLE] button can switch the angles directly.
34.
01/01
01/02
OFF
NORMAL
00:43:03
DVD55RWi
PLAYBACK MODE
Playback of the Jpeg disc
Menu Explanation
JPEG disc refers to a kind of file type disc, used to store pictures. JPEG file and MP3 file can be stored in one disc. When playing the JPEG
file, the menu control bar is shown in the following.
The meanings of the icons in the menu are as follows:
FILE
1. Disc Type
2. Playback Mode Control
3. Playback Process Control
4. Control Wipe Mode
5. Control Zoom Mode
6. Pictures Rotating Selection
7. Disc Contents List window
8. Program List window
VIDEO
NORMAL PAUSE
1 / 17
FilScr
Rot 0
Control play progress
FAVORITE/PR OGRAM
FILES&DIRECTORY
katona
landscape1
landscape2
landscape3
landscape4
model
ship
star
tibet
In the control menu, the functions of the items 1, 2, 3, 7 ,8 are similar with the ones when playing Mp3 disc.
Control Wipe Mode
In general, many pictures will be saved on the disc as a JPEG file format. When playing this disc, the pictures will be shown on the screen
one by one. You can select different modes of picture switching.
In the playback control bar, select the Control Wipe Mode item by using the [
Among the numbers below the icon, the one on the right is
the total number of picture switching modes; the left one is
the current mode number. There are 17 kinds of this modes.
], [
] buttons, and then press the [SELECT] button.
FILE
VIDEO
NORMAL PAUSE
1 / 17
FilScr
Rot 0
From top to down
In the playback control bar, select the Control Wipe Mode item by using the [
], [
] buttons,and then press [SELECT].
For example: if you want the next picture to be appearing on the screen from top to down, please set the value of this item to be
"1", shown as the above figure.
Control Zoom Mode
This function can zoom in or zoom out the picture.
In the playback control bar, select the Control Zoom Mode
item by using the [ ], [ ] buttons, and then press the
[SELECT].
Select the percentage of zoom by using the [ ], [ ]
buttons, and then press the [SELECT] button.
FILE
VIDEO
NORMAL PAUSE
1 / 17
FilScr
Rot 0
Control zoom mode
Picture Rotating
This function can change the angle of the placement of the picture on the screen.
Select the Picture Rotating Select item in the playback control bar by using the [
button to select mode.
], [
] buttons, and then press the [SELECT]
There are four kinds of rotating angles: 0 , 90 , 180 , 270
Select the desired angle by using the [
then press the [SELECT] button.
], [
] buttons and
FILE
VIDEO
Rotate
35.
NORMAL PAUSE
1 / 17
FilScr
Rot 0
DVD55RWi
PLAYBACK MODE
Operation Interface and general
This section introduces the operation interface and general steps of the system setup.
Press the [SETUP] button to enter the system setup mode. Now the top part of the OSD displays the system setup control bar,
which is shown in the following:
The meanings of the icons are as follows:
1. General Setup
2. Playback setup
3. Record setup
4. Language setup
5. Channel Scan
6. Date, Time setup
2
1
PLAY
PLAY
GNRL
GNRL
GNRL
4
3
5
6
CLOCK CLOCK
LANGLANGTUNERTUNER
REC
REC
General system setup
General
Setup
System Setup Control Bar
Select the desired item to be set on the control bar by using the [ ], [ ] buttons, and then press the [SELECT] button to enter the
setup submenu of this item.
In the submenu, operate the relative controllers by using the cursor buttons and the [SELECT] button to fulfill the corresponding
setup.
Pressing the [RETURN] button to return,
Notes
The steps above are general operations. Some setups may not need a certain step, or more steps
Please proceed to system setup with the tray out or no disc status, otherwise some setup may not be proceeded
General setup
Enter the system setup mode.
Select the item "GNRL" in the system setup control
bar by using the [ ],[ ] buttons.
Press the [SELECT] button to enter the general
setup submenu ,which is shown as the illustration
on the right:
GNRL
PLAY
PLAY
REC
REC
CLOCK CLOCK
LANGLANGTUNERTUNER
General
Setup
Screen saver
ON
Progressive/Interlace
Interlac e
Video output
RGB
Video output format
PAL
OK
Restore factory settings
Screen saver setup
In the general setup menu, move the cursor to select
the item "Screen saver" by using the [ ], [ ]
buttons.
Press the [SELECT] button, and a pop-up list will pop
up, which is shown in the following.
General Setup Menu
GNRL
GNRL
GNRL
PLAY
PLAY
REC
REC
General
Move the cursor up and down to select “ON" or "OFF"
Screen saver
by using the [
Progressive/Interlace
], [
CLOCK CLOCK
LANGLANGTUNERTUNER
Setup
ON
ON
] buttons.
Video output
Press the [SELECT] button to turn on or turn off the
Video output format
screen saver function.
Restore factory settings
- Pressing any button can exit the screen saver mode
after the screen saver picture appears.
Press the [RETURN] button to return to the previous
menu to proceed other settings.
36.
Interlac
OFF
PAL e
RGB
PAL
OK
DVD55RWi
SYSTEM SETUP
Progressive /Interlace Setup
In the general setup menu, use the [
pop-up list will pop up
],[
] buttons to select the “progressive/Interlace” item and press [SELECT] button, then a
Select "Progressive" or "Interlace”
Press the [SELECT] button to fulfill the
progressive/Interlace switch
Pressing the [IS/PS] button can proceed the
progressive/Interlace switch too.
GNRL
GNRL
GNRL
PLAY
PLAY
REC
REC
CLOCK CLOCK
LANGLANGTUNERTUNER
General
The value of this setting must accord with the
scanning mode of the TV, otherwise the TV screen
will display nothing.
If nothing is shown on the TV screen, you can
try pressing the [IS/PS] button.
Setup
Screen saver
ON
Progressive/Interlace
Video output
Interlace
Progressive
Interlace
RGB
PAL
Video output format
PAL
OK
Restore factory settings
Video Output Setup
In the general setup menu, highlight the "Video output", then press the [SELECT] button. A pop-up list will appear.
Select "YCbCr" or "RGB" in the list
When using the component video output, please
select "YCbCr".
When using the SCART output please select the
"RGB".
This setup does not affect the composite video
output.
Press the [SELECT button to confirm.
GNRL
GNRL
GNRL
PLAY
PLAY
REC
REC
CLOCK CLOCK
LANGLANGTUNERTUNER
General
Setup
Screen saver
ON
Progressive/Interlace
Interlace
Video output
RGB
YCbCr
RGB
PAL
Video output format
OK
Restore factory settings
Video output Format setup
This unit has two video output systems: PAL and NTSC. You can select one of them according to your TV set specs.
Highlight the “Video output format” in the general
setup menu and press the [SELECT] button.
GNRL
GNRL
GNRL
PLAY
PLAY
REC
REC
A pop-up menu will appear.
CLOCK CLOCK
LANGLANGTUNERTUNER
General
You can switch the TV output format by pressing
the [PAL/NTSC] button too.
Setup
Screen saver
ON
Progressive/Interlace
Interlace
Video output
RGB
Video output format
PAL
Restore factory settings
Select the correct option according to factual
requirements
NTSC
PAL
Press the [SELECT] button and the system will switch the output format to selected video output.
Restore Factory Settings
Select the “Restore factory setting” by the [
displays:
],[
] buttons in the general setup menu, press the [SELECT] button then the OSD
Restore factory settings
System will reset all the setup items to
default value, OK to confirm, Cancel to
discard
OK
Highlight “OK” in the menu by using the [
],[
] buttons.
Press the [SELECT] button to make all setup items restore the factory settings.
37.
Cancel
DVD55RWi
SYSTEM SETUP
Playback settings
Display the system setup control bar.
Move the cursor left and right by using the [
], [
] buttons to select the "PLAY" .
Press the [SELECT] button to enter the playback setup mode. The illustration below is the main menu of playback setup.
GNRL
GNRL
PLAY
PLAY
PLAY
REC
REC
CLOCK CLOCK
LANGLANGTUNERTUNER
Playback Setup
TV aspect ratio
Pan Scan
Rating level
OFF
Digital audio output
RAW
Closed captions
OFF
Analog audio output
5.1CH
TV Aspect Ratio
In the playback setup menu, select the item "TV aspect ratio" by using the [
and the pop-up menu will pop up, which is shown in the following.
PLAY
PLAY
PLAY
GNRL
GNRL
REC
REC
], [
] buttons, then press the [SELECT] button
CLOCK CLOCK
LANGLANGTUNERTUNER
Playback Setup
TV aspect ratio
Pan Scan
16:9
Rating level
Select the suitable option by using the [
Pan Scan
Digital audio output
Letter Box
Closed captions
OFF
Analog audio output
5.1CH
],[
] buttons and then press the [SELECT] button.
Press the [RETURN] button to return to the previous menu and proceed to other settings
Notes
If a disc is recorded in the aspect ratio OF 4:3, the ratio can only be 4:3, regardless to what screen setting is chosen
This setting should conform to the aspect ratio of the TV set.
38.
DVD55RWi
SYSTEM SETUP
Opening closing Caption
In the playback setup menu, select the "Closed captions" by the [
menu will pop up, which is shown in the following .
PLAY
PLAY
PLAY
GNRL
GNRL
REC
REC
], [
] buttons, and press the [SELECT] button, then a pop-up
CLOCK CLOCK
LANGLANGTUNERTUNER
Playback Setup
TV aspect ratio
Pan Scan
Rating level
OFF
Digital audio output
RAW
Closed captions
OFF
ON
5.1CH
OFF
Analog audio output
Select "ON" or "OFF" by using the [
], [
] buttons and press the [SELECT] button to confirm.
This setup is only valid to the TV sets and discs that support the Captions function.
Rating level setup
By setting this units authorization rating and password, some discs with control grade cannot be played without inputting the password.
In this way, you can control what rating is suitable for your children.
Enter Password
In the playback setup menu, move the cursor up and
down by pressing the [ ] , [ ] buttons to select the item
"Rating level", then press the [SELECT] button. The TV
screen displays:
OK
Cancel
Set Rating Level
Input the password and press the [SELECT] button. If the
password is right, the TV screen displays the window on
the right.
Set rating level
New password
New
OFF
OK
The default password is 3308.
Set Rating Level
Select the "Set rating level”, press the [SELECT] button
to display the pop-up list which is shown opposite:
Set rating level
OFF
OFF
8:Adult
Select the rating level by using the [
], [
New password
New
OK
] buttons, then press the [SELECT] button to confirm.
If you do not want to change the original password, highlight the "OK" in the menu using the cursor buttons, then press the
[SELECT] button.
39.
DVD55RWi
SYSTEM SETUP
Rating Level setup (continued)
To change the password, please highlight the “New” in the above figure below, then press the [SELECT] button. The TV screen
will display.
New Password
New password
OK
Confirm password
Cancel
Select the “New password” by using the cursor buttons then input the new password with the numerical keys.
Select “Confirm password” by using the cursor buttons and input this password again with the numerical keys.
The ‘New password’ must be re-entered within the ‘Confirm password’ window.
Highlight the “ok” by using the cursor buttons, then press the [SELECT] button.
After setting the rating level, playing a disc with a rating level higher than what you have set, you must input the password.
If you forgot the password, you may input the super password.
If you forget the password, you may enter the default password.
Digital Audio Output Setup
This unit has digital audio outpack jacks. So you can enjoy the higher quality audio with an amplifier with digital audio decoders.
Access the playback setup menu. Select the item “Digital audio output” by using the [
button. A pop-up menu will appear:
PLAY
PLAY
PLAY
GNRL
REC
REC
],[
] buttons, then press the [SELECT]
CLOCK CLOCK
LANGLANGTUNERTUNER
Playback Setup
TV aspect ratio
Pan Scan
Rating level
OFF
Digital audio output
RAW
RAW
Select the proper value by usingthe [
], [
Closed captions
OFF
LP
CM
Analog audio output
5.1CH
] buttons, then press the [SELECT] button.
Press the [RETURN] button to return to the previous menu and proceed with any other settings.
Analogue Audio Output Setup
This is used to select an analog audio output format between the 2 channel analogue audio output and the Dolby 5.1 Channel
analogue output.
Select the "Analogue audio output" item by the [ ],
[ ] buttons, then press the [SELECT] button. A
pop-up list will appear:
PLAY
PLAY
PLAY
GNRL
GNRL
Select the desired value by using the [ ], [
buttons then press the [SELECT] button.
Press the [RETURN] button to return to
the previous menu.
REC
REC
CLOCK CLOCK
LANGLANGTUNERTUNER
]
Playback Setup
TV aspect ratio
Pan Scan
Rating level
OFF
Digital audio output
RAW
Closed captions
OFF
Analogue audio output
5.1CH
2CH
5.1CH
40.
DVD55RWi
SYSTEM SETUP
Record Setup
After finishing the settings introduced within this chapter, the recording values you set will become the default system settings.
In the system setup control bar, select the item "REC' by using the [
the record setup menu. The screen displays:
PLAY
PLAY
GNRL
GNRL
REC
REC
], [
] buttons and then press the [SELECT] button to enter
CLOCK CLOCK
LANGLANGTUNERTUNER
Auto add chapter marker during recording.
Record Setup
Auto chapter marker
ON
Default source
TUNER
Default quality
SP
Auto chapter marker setup
In the record setup menu, select the item "Auto chapter marker" by using the [
pop-up menu will appear:
PLAY
PLAY
GNRL
GNRL
REC
REC
REC
], [
] buttons, then press the [SELECT] button. A
CLOCK CLOCK
LANGLANGTUNERTUNER
Auto add chapter marker during recording
Record Setup
Auto chapter marker
ON
ON
OFF
SP
Default source
Default quality
Select the desired value by using the [
], [
] buttons, then press the [SELECT] button to confirm.
Press the [RETURN] button to end this setup and return to the previous menu.
This setup is used to insert the chapter maker automatically when recording.
If selected to “ON”, the recorded contents will be automatically divided into two chapters with identical lengths.
41.
DVD55RWi
SYSTEM SETUP
Default Input Signal Sources Selection
In the record setup menu, select the "Default source" by using the [
menu will appear:
Select the desired value by using the [
], [
], [
] buttons, press the [SELECT] button, then a pop-up
] buttons and then press the [SELECT] button.
PLAY
PLAY
GNRL
GNRL
REC
REC
REC
CLOCK CLOCK
LANGLANG TUNERTUNER
Front A/V
Record Setup
Auto chapter marker
OFF
TUNER
Default source
F-A/V
F-SV
R-A/V
Default quality
Press the [RETURN] button to return to the previous menu and proceed with other settings or press the [SETUP] button to exit.
There are several kinds of input signal sources, they are as the follows. (Please refer to the "Basic Information Illustration of the
Front/Rear Panel " for their position on the unit).
R-A / V Rear panel composite video and audio inputs.
R-SV Rear panel S-video input.
TUNER Rear panel TV tuner input.
F-A/ V Front panel composite video and audio inputs.
F-SV Front panel S-video input.
DV Front panel DV input
Default Recording Quality Selection
In the record setup menu, select the item
"Default quality" by using the [ ], [ ]
buttons, press the [SELECT] button, a
pop-up menu will appear.
PLAY
PLAY
GNRL
GNRL
REC
REC
REC
CLOCK CLOCK
LANGLANGTUNERTUNER
Standard play, around 120 minutes in a blank disc
Record Setup
Auto chapter marker
OFF
Default source
F-A/V
Default quality
SP
SLP
EP
SP
HQ
Select the desired value by using the [
], [
] buttons, then press the [SELECT] button.
Press the [RETURN] button to return to the previous menu to proceed other settings.
Press the [SETUP] button to end the setup and exit.
Please refer to the "TERMS" for the difference of the four recording qualities: SP, SLP, EP, HQ.
42.
DVD55RWi
SYSTEM SETUP
Language Settings
To meet the needs of consumers in different regions, this unit is equiped with many kinds of operation interface languages for your selection.
Enter the system setup mode.
In the system setup control bar, move the cursor left and right by the [ ], [
[SELECT] button to enter the language setup menu. The screen displays:
GNRL
GNRL
PLAY
PLAY
REC
REC
] buttons. Select the item "LANG", and then press the
CLOCK CLOCK
LANGLANGTUNERTUNER
Language Setup
OSD language
English
Menu language
English
Subtitle language
OFF
Audio language
English
OSD language setup
In the language setup menu, select the item "OSD language" by using the [
menu will appear, which is shown as the following illustration:
Select your desired language by using the [
change correspondingly.
], [
], [
] buttons, press the [SELECT] button. A pop-up
] buttons, press the [SELECT] button to confirm and the OSD language will
GNRL
GNRL
PLAY
PLAY
REC
REC
CLOCK CLOCK
LANGLANGTUNERTUNER
LANG
Language Setup
English
OSD language
English
Spanish
French
German
Menu language
Subtitle language
Audio language
DVD Menu Language Setup
In the language setup menu, select the item "Menu language" by using the [
pop-up menu will appear.
Select your desired language by using the [
], [
If you play DVD discs that support the
selected language, the system will adopt
this language as the DVD menu language.
], [
] buttons, and then press the [SELECT] button. A
] buttons, then press the [SELECT] button.
GNRL
GNRL
PLAY
PLAY
REC
REC
CLOCK CLOCK
LANGLANGTUNERTUNER
LANG
Language Setup
If the disc does not support the selected
language, the system will use the default
language.
OSD language
English
Menu language
Norwegian
Subtitle language
Norwegian
Finnic
Audio language
Original
43.
DVD55RWi
SYSTEM SETUP
DVD subtitle Language Settings
Some DVD discs have many kinds of subtitle languages, this setup is used to set the default DVD subtitle language.
In the language setup menu, select the item "Subtitle language" by using the [
Select your desired language by using the [
], [
], [
] buttons, then press the [SELECT] button
] buttons, then press the [SELECT] button.
GNRL
GNRL
PLAY
REC
REC
CLOCK CLOCK
LANGLANGTUNERTUNER
LANG
Language Setup
OSD language
English
Menu language
Norwegian
Subtitle language
OFF
Audio language
OFF
English
Chinese
DVD AUDIO Language Setup
], [
In the language setup menu, select the item "Audio language" by using the [
] buttons, then press the [SELECT]
Button. A pop-up menu will appear.
Select your desired language by using the [
], [
] buttons, and press the [SELECT] button.
GNRL
GNRL
PLAY
PLAY
REC
REC
CLOCK CLOCK
LANGLANGTUNERTUNER
LANG
Language Setup
OSD language
English
Menu language
Norwegian
Subtitle language
OFF
Audio language
English
English
Chinese
Damish
Press the [RETURN] button to return to the previous menu and proceed other settings.
44.
DVD55RWi
SYSTEM SETUP
Channel Tuning
This unit is equipped with a TV tuner, by which you can receive TV signals. Before receiving TV signals, you must proceed with the
tuning operation. The result of the operation will be saved and will not be lost after the unit is switched off.
Auto Scan channels
This operation can tune the unit automatically to receive TV programs.
Highlight the item "TUNER" in the System Setup Control Bar.
GNRL
GNRL
GNRL
PLAY
PLAY
REC
REC
TUNERTUNER
CLOCK CLOCK
LANGLANGTUNER
Press the [SELECT] button and the TUNER menu will pop up, as shown in the following figure.
Highlight the item "Auto scan channels” and press the [SELECT], button to start channel scanning.
You can press the [STOP] button to stop the
scanning during the operation. The channel
information having been obtained during the
scannng can also be saved.
GNRL
GNRL
PLAY
PLAY
REC
REC
TUNERTUNER
CLOCK CLOCK
LANGLANGTUNER
Start auto scan channel.
TUNER
Auto scan channels:
SCAN
Modify channel information
EDIT
Sort channel order
SORT
Channel A
Tuner audio channel
Note:
Before the channel scan operation , you must connect the system properly to ensure the TV signals can enter the system
through the “TV TUNER input” . Please refer to “System connection-System Connection of recording external signals” for the
connection illustration.
Modify Channel Information
Here, you can name the channel after the corresponding program’s name or any other name you like, sort the channel order to
access the special channel easily, fine tune the channel and manual scan for channels.
SELECT to modify, CH+/CH- to shift channel,0~9 to jump channel
Channel Edit
Highlight the item "Modify channel information"
Channel No. & name
P089/CH089
in the "TUNER" menu, and press the [SELECT]
Frequency
46.25MHz
Tvsystem
PAL I
button, the "Channel Edit" menu will pop up
as shown in the opposite illustration:
Nicam
On
Skip
Yes
Fine tune
OK
Select the desired channel to be modified by pressing the [CH+] / [CH-] button.
45.
DVD55RWi
APPENDIX
Trouble shooting
If you experience problems with this unit, please check the chart below for a possible solutions before
requesting servicing
CAUSE
SYMPTOM
No power
No sound
REMEDY
1. The power plug not connected
2. Power plug and socket
3. The power socket not switched on
1. Connect the power plug into the wall outlet securely
2. Plug again or change another socket
3. Switch on the power socket
1. Cables not properly connected
1. Connect cables securely
2. Discs scratched or dirty
2. Clean the discs.
3. Press the [MUTE] button again
3. The unit is in the mute status
No picture
No color
No disc
reading
Instantaneous
function failure
Picture rolling
External signals
record failure
No monitoring
signal
Time recording
failure
Recording
abortion
1. Cables not properly connected
2. The TV set not properly adjusted
3. The video output system of this player
Does not match the TV input.
1. Connect cables securely
1. TV system not right
2. TV set's color saturation not properly
adjusted
3. Video output setting not right
1. Press the [IS/PS] button to reset the system
1. No disc in the drive
2. Disc not properly placed
3. Condensation on the laser head
4. Not in the playback mode
5. Wrong disc format
6. Disc dirty
1. Load a disc
2. Reset your TV set's AV/TV status
3. Press the [IS/PS] button
2. Readjust the TV set's saturation
3. Readjust video output settings
2. Reload the disc with the playback side facing down
3. Turn on the power for about 1 hour without a disc before playing
4. Press the [PLAY] button
5. Load the compatible discs
6. Carefully clean the disc with soft cloth outwards from the center
1. Disc information not well stored
2. Wrong buttons pressed
3. External static leakage into the cover
1. Wait for 5-10 seconds and this unit will restore
normal playback.
2. Press the right button
3. Restart playing after turning off this unit for 1-2 minutes
1. T V system not suitable for the disc
1. Adjust the TV system
1. The system not properly connected
1. Connect the system properly
2. No disc or the disc not recordable
2. Place a recordable disc
3. The disc finalized
3. Replace the disc
4. No space left in the disc
4. Replace the recordable disc
1. The input source is not correct
2. The video output system not adequate
1. Reset the signal source
1. Disc error
1. Reload new DVD+R, DVD+RW discs
2. Wrong time settings (system clock or recording
time)
3. The source not work properly when recording
4. Powered off
3. Ensure normal working of the source when recording
1. No space left in the recording disc
1. Reload a blank disc
2. Too bad quality of the recording disc
2. Use high quality recording disc
2. Switch video output system
49.
2. Reset time recording settings
4. Switch the unit to the standby mode
DVD55RWi
APPENDIX
Recommended Recording Discs
We cannot ensure that all the discs can be recorded successfully due to a large variety of different quality discs on the market. We
recommend that you buy quality discs to guarantee a higher successful recording rate. Meanwhile, we have also tested some
brands and the following discs have performed very well during our tests.
Because of the low quality of some players or the question of compatibility, we also can ensure that all the players will play the
recorded discs made on this unit. Newer high quality players are recommended.
Brand
Disc Style
Manufacturer
MCC
DVD+R 2.4x / DVD+RW 2.4x
MCC
CMC
DVD+R 2.4x
CMC
MAG
CMC
DVD+R 4x
CMC
MAG
Ritek
DVD+R 1-4x / DVD+RW 2.4x
RITEK
Ricoh
DVD+R 1-4x / DVD+RW 2.4x
RICOH JAPAN
Prodisc
DVD+R 2.4x
PRODISC
Sony
DVD+R 1-4x
SONY
Sony
DVD+RW 2.4x
RICOH JAPAN
Maxell
DVD+R 4x
MAXELL
Maxell
DVD+RW 2.4x
MCC
TY
DVD+R 4x
YUDEN000
TDK
DVD+R 1-4x / DVD+RW
TDK
OPTO
DVD+RW 2.4x
OPTODISC
Daxon
DVD+RW 2.4x
ODTC
DVD+RW 4x
PHILIPS
Note:
It is recommended that you use a DVD+R/RW of no higher than 4-speed to record.
Please keep the recording side of a DVD+R/RW clean and intact. Do not expose the disc to direct sunlight.
The performance of a DVD+RW worsens after many times recording. You can replace the disc to avoid the problem.
50.
DVD55RWi
APPENDIX
Specifications
DVD, DVD+R/RW, CD-DA,
Playable discs
Mixed CD-DA, Mp3, JPEG, DVD-R
Recordable discs
DVD+R
Recording formats
DVD
DVD+RW
MPEG II
SLP(Standard Long Play)
Recording quality
EP(Extend Play)
SP(Standard Play)
HQ .
Composite video input
S-video input(Y/C)
DV camera jack input(IEEE1394
RF input
Analog audio input
Input
i-Link)
Composite video output
S-video output(Y/C)
Component video output (Y Pb/Cb Cr/Pr)
SCART output
2CH analog mix audio output
5.1 CH analog output
Digital audio coaxial output
Digital audio optical output
Output
Composite video:
Output
S-video
NTSC/PAL system
Video amplitude 1.0 0.2Vp-p,75
Y output amplitude 1.0Vp-p,75
C output amplitude 0.286Vp-p,75
Video
characteristics
Composite video:
Input
S-video
Output
Audio
characteristics
Audio amplitude 2.0+0.2
-1.0 Vrms,10k
AF response 20Hz 20KHz( 1dB)
Signal/noise ratio 85dB
Audio distortion+noise -65dB(1KHZ)
Audio amplitude 2.0Vrms
Impedance 10K
Input
General
Specification
Power supply
100V- 240V 50Hz/60Hz
Power consumption
30W
Standby power consumption:
3W
Operating
temperature
5
Operation
humidity
NTSC/PAL system
Video amplitude 1.0 0.2Vp-p,75
Y input amplitude 1.0Vp-p,75
C input amplitude 0.286Vp-p,75
Dimension
430mm x 295mm x 65mm
Weight
Net weight
3.8 kg
Gross weight 5.0 kg
35
Relative humidity 15
75% No condensation
Design and specifications are subject to change without notice.
51.
DVD55RWi
APPENDIX
Limited Warrenty
CAMBRIDGE AUDIO warrants this product to be free from defects in materials and workmanship (subject to the
terms set forth below). CAMBRIDGE AUDIO will repair or replace (at CAMBRIDGE AUDIO's option) this
product or any defective parts in this product. Warranty periods may vary from country to country. If in doubt
consult your dealer and ensure that you retain proof of purchase
To obtain warranty service, please contact the CAMBRIDGE AUDIO authorised dealer from which you
purchased this product. If your dealer is not equipped to perform the repair of your CAMBRIDGE AUDIO
product, it can be returned by your dealer to CAMBRIDGE AUDIO or an authorised CAMBRIDGE AUDIO
service agent. You will need to ship this product in either its original packaging or packaging affording an equal
degree of protection.
Proof of purchase in the form of a bill of sale or receipted invoice, which is evidence that this product is within
the warranty period, must be presented to obtain warranty service.
This Warranty is invalid if (a) the factory-applied serial number has been altered or removed from this product
or (b) this product was not purchased from a CAMBRIDGE AUDIO authorised dealer. You may call
CAMBRIDGE AUDIO or your local country CAMBRIDGE AUDIO distributor to confirm that you have an
unaltered serial number and/or you purchased from a CAMBRIDGE AUDIO authorised dealer.
This Warranty does not cover cosmetic damage or damage due to acts of God, accident, misuse, abuse,
negligence, commercial use, or modification of, or to any part of, the product. This Warranty does not cover
damage due to improper operation, maintenance or installation, or attempted repair by anyone other than
CAMBRIDGE AUDIO or a CAMBRIDGE AUDIO dealer or authorised service agent, which is authorised to do
CAMBRIDGE AUDIO warranty work. Any unauthorised repairs will void this Warranty. This Warranty does not
cover products sold AS IS or WITH ALL FAULTS.
REPAIRS OR REPLACEMENTS AS PROVIDED UNDER THIS WARRANTY ARE THE EXCLUSIVE REMEDY
OF THE CONSUMER. CAMBRIDGE AUDIO SHALL NOT BE LIABLE FOR ANY INCIDENTAL OR
CONSEQUENTIAL DAMAGES FOR BREACH OF ANY EXPRESS OR IMPLIED WARRANTY IN THIS
PRODUCT. EXCEPT TO THE EXTENT PROHIBITED BY LAW, THIS WARRANTY IS EXCLUSIVE AND IN
LIEU OF ALL OTHER EXPRESS AND IMPLIED WARRANTIES WHATSOEVER INCLUDING, BUT NOT
LIMITED TO, THE WARRANTY OF MERCHANTABILITY AND FITNESS FOR A PRACTICAL PURPOSE.
Some countries and US states do not allow the exclusion or limitation of incidental or consequential damages
or implied warranties so the above exclusions may not apply to you. This Warranty gives you specific legal
rights, and you may have other statutory rights, which vary from state to state or country to country.
52.
This product complies with DHHS rules 21 CFR,
Chapter 1, Subchapter J, Part 1040 at date of
Apparatus claims of US patent nos. 4,631,603;
4,577,216; 4,819,098; and 4,907,093 licensed
"DTS" and "DTS Digital Out" are trademarks of
Digital Theater Systems Inc.
Manufactured under license from Dolby
Laboratories. "Dolby" and the double - D
symbol are trademarks of Dolby Laboratories.
Confidentials Unpublished Works. c 1992 1997 Dolby Laboratories. All rights reserved
This device complies with Part 15 of the FCC
Rules: Operation is subject to the following two
conditions:
1.This device may not cause harmful
interference, and
2.This device must accept any interference
received, Including interference that may cause
undesired operation
This product incorporates copyright protection
technology that is protected by method claims
of certain U.S. patents and other intellectual
property rights owned by Macrovision
Corporation and other rights owners. Use of
this copyright protection technology must be
authorized by Macrovision Corporation, and
is intended for home and other limited
viewing uses only unless otherwise
authorized by Macrovision Corporation.
For the latest information on Cambridge Audio products visit us at
www.cambridge-audio.co.uk
Made from recyclable material
© 2004
AP15535/1