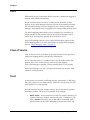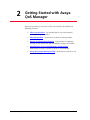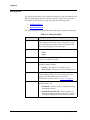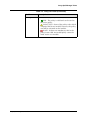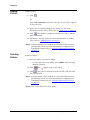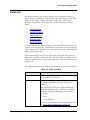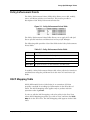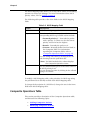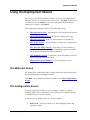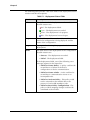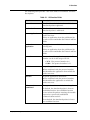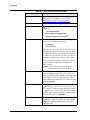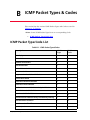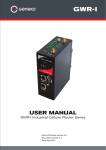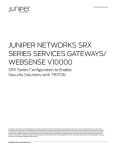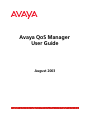
1
Avaya QoS Manager User Guide August 2003 Avaya QoS Manager 2.0 User Guide Copyright 2003 Avaya Inc. ALL RIGHTS RESERVED The products, specifications, and other technical information regarding the products contained in this document are subject to change without notice. All information in this document is believed to be accurate and reliable, but is presented without warranty of any kind, express or implied, and users must take full responsibility for their application of any products specified in this document. Avaya disclaims responsibility for errors which may appear in this document, and it reserves the right, in its sole discretion and without notice, to make substitutions and modifications in the products and practices described in this document. Avaya is a registered trademark and a trademark of Avaya Inc. © 2003 Avaya Inc. All rights reserved. All trademarks identified by the ® or are registered trademarks or trademarks, respectively, of Avaya Inc. All other trademarks are the property of their respective owners. Release 2.003 Table of Contents Preface . . . . . . . . . . . . . . . . . . . . . . . . . . . . . . . . . . . . . . . . . . . . . . . . . . vi The Purpose of This On-Line Help . . . . . . . . . . . . . . . . . . . . . . . . . . vi Who Should Use This On-Line Help . . . . . . . . . . . . . . . . . . . . . . . . . vi Chapter 1 Avaya QoS Manager Overview . . . . . . . . . . . . . . . . . . . 1 Overview . . . . . . . . . . . . . . . . . . . . . . . . . . . . . . . . . . . . . . . . . . . . . .1 Policy Overview . . . . . . . . . . . . . . . . . . . . . . . . . . . . . . . . . . . . . . . . .2 Rule Overview . . . . . . . . . . . . . . . . . . . . . . . . . . . . . . . . . . . . . . . . . .2 QoS Overview . . . . . . . . . . . . . . . . . . . . . . . . . . . . . . . . . . . . . . . . . . .3 DSCP . . . . . . . . . . . . . . . . . . . . . . . . . . . . . . . . . . . . . . . . . . . . . .4 Class of Service . . . . . . . . . . . . . . . . . . . . . . . . . . . . . . . . . . . . . .4 Trust . . . . . . . . . . . . . . . . . . . . . . . . . . . . . . . . . . . . . . . . . . . . . . .4 Chapter 2 Getting Started with Avaya QoS Manager . . . . . . . . . . 6 The User Interface . . . . . . . . . . . . . . . . . . . . . . . . . . . . . . . . . . . . . . . .7 Toolbar . . . . . . . . . . . . . . . . . . . . . . . . . . . . . . . . . . . . . . . . . . . . .7 Tree View . . . . . . . . . . . . . . . . . . . . . . . . . . . . . . . . . . . . . . . . . . .8 Table View . . . . . . . . . . . . . . . . . . . . . . . . . . . . . . . . . . . . . . . . . .9 Form View . . . . . . . . . . . . . . . . . . . . . . . . . . . . . . . . . . . . . . . . . .9 Status Line . . . . . . . . . . . . . . . . . . . . . . . . . . . . . . . . . . . . . . . . . .9 Tooltips . . . . . . . . . . . . . . . . . . . . . . . . . . . . . . . . . . . . . . . . . . .10 Managing Tables . . . . . . . . . . . . . . . . . . . . . . . . . . . . . . . . . . . . . . . .10 Saving Configuration Changes . . . . . . . . . . . . . . . . . . . . . . . . . . . . .11 Running Changes . . . . . . . . . . . . . . . . . . . . . . . . . . . . . . . . . . .11 Committed Changes . . . . . . . . . . . . . . . . . . . . . . . . . . . . . . . . .11 Searching for Avaya QoS Manager Components . . . . . . . . . . . . . . .12 Using Avaya QoS Manager Help . . . . . . . . . . . . . . . . . . . . . . . . . . .12 Opening the Help to the Contents Page . . . . . . . . . . . . . . . . . .12 Opening the Help to a Topic of Interest . . . . . . . . . . . . . . . . . . .12 Chapter 3 Avaya QoS Manager Views . . . . . . . . . . . . . . . . . . . . . 14 Avaya QoS Manager Views Overview . . . . . . . . . . . . . . . . . . . . . . .14 Using the Tree View . . . . . . . . . . . . . . . . . . . . . . . . . . . . . . . . . . . . .15 Using the Table View . . . . . . . . . . . . . . . . . . . . . . . . . . . . . . . . . . . .16 Device List . . . . . . . . . . . . . . . . . . . . . . . . . . . . . . . . . . . . . . . . .16 WAN Interfaces . . . . . . . . . . . . . . . . . . . . . . . . . . . . . . . . . . . . .17 Policy List . . . . . . . . . . . . . . . . . . . . . . . . . . . . . . . . . . . . . . . . . .18 Adding Policies . . . . . . . . . . . . . . . . . . . . . . . . . . . . . . . . . .20 Avaya QoS Manager User Guide iii Table of Contents Deleting Policies . . . . . . . . . . . . . . . . . . . . . . . . . . . . . . . . .20 Rules List . . . . . . . . . . . . . . . . . . . . . . . . . . . . . . . . . . . . . . . . . .21 Adding Rules . . . . . . . . . . . . . . . . . . . . . . . . . . . . . . . . . . . .25 Modifying Rules . . . . . . . . . . . . . . . . . . . . . . . . . . . . . . . . .25 Copying Rules . . . . . . . . . . . . . . . . . . . . . . . . . . . . . . . . . . .25 Moving Rules . . . . . . . . . . . . . . . . . . . . . . . . . . . . . . . . . . .26 Deleting Rules . . . . . . . . . . . . . . . . . . . . . . . . . . . . . . . . . . .26 Policy Enforcement Points . . . . . . . . . . . . . . . . . . . . . . . . . . . . .27 DSCP Mapping Table . . . . . . . . . . . . . . . . . . . . . . . . . . . . . . . . .27 Composite Operations Table . . . . . . . . . . . . . . . . . . . . . . . . . . .28 Adding Composite Actions . . . . . . . . . . . . . . . . . . . . . . . . .29 Modifying Composite Actions . . . . . . . . . . . . . . . . . . . . . .29 Deleting Composite Actions . . . . . . . . . . . . . . . . . . . . . . . .31 Device Configuration/Configuration . . . . . . . . . . . . . . . . . . . . .31 Device Configuration . . . . . . . . . . . . . . . . . . . . . . . . . . . . .31 Policy List Configuration . . . . . . . . . . . . . . . . . . . . . . . . . .32 Using Address Wildcards . . . . . . . . . . . . . . . . . . . . . . . . . . . . . . . . .34 Chapter 4 Applications Editor Tool . . . . . . . . . . . . . . . . . . . . . . . . 36 Applications Editor Overview . . . . . . . . . . . . . . . . . . . . . . . . . . . . . .36 Using the Applications Editor . . . . . . . . . . . . . . . . . . . . . . . . . . . . . .37 Adding Application Protocols . . . . . . . . . . . . . . . . . . . . . . . . . .37 Modifying an Application Protocol . . . . . . . . . . . . . . . . . . . . . .38 Deleting an Application Protocol . . . . . . . . . . . . . . . . . . . . . . . .38 Applying Changes . . . . . . . . . . . . . . . . . . . . . . . . . . . . . . . . . . .38 Reports . . . . . . . . . . . . . . . . . . . . . . . . . . . . . . . . . . . . . . . . . . . . . . .38 Chapter 5 Deployment Wizard . . . . . . . . . . . . . . . . . . . . . . . . . . . 40 Deployment Wizard Overview . . . . . . . . . . . . . . . . . . . . . . . . . . . . .40 Using the Deployment Wizard . . . . . . . . . . . . . . . . . . . . . . . . . . . . .41 The Welcome Screen . . . . . . . . . . . . . . . . . . . . . . . . . . . . . . . . .41 The Configuration Screen . . . . . . . . . . . . . . . . . . . . . . . . . . . . .41 The Source Screen . . . . . . . . . . . . . . . . . . . . . . . . . . . . . . . . . . .42 The Target Screen . . . . . . . . . . . . . . . . . . . . . . . . . . . . . . . . . . .42 The Activate Policy Screen . . . . . . . . . . . . . . . . . . . . . . . . . . . .43 The Summary Screen . . . . . . . . . . . . . . . . . . . . . . . . . . . . . . . .43 Deployment Status Window . . . . . . . . . . . . . . . . . . . . . . . . . . .43 Chapter 6 IP Simulate . . . . . . . . . . . . . . . . . . . . . . . . . . . . . . . . . . . 45 IP Simulate Overview . . . . . . . . . . . . . . . . . . . . . . . . . . . . . . . . . . . .45 Using IP Simulate . . . . . . . . . . . . . . . . . . . . . . . . . . . . . . . . . . . . . . .46 Appendix A Menus . . . . . . . . . . . . . . . . . . . . . . . . . . . . . . . . . . . . . 50 File Menu . . . . . . . . . . . . . . . . . . . . . . . . . . . . . . . . . . . . . . . . . . . . .50 Edit Menu . . . . . . . . . . . . . . . . . . . . . . . . . . . . . . . . . . . . . . . . . . . . .50 View Menu . . . . . . . . . . . . . . . . . . . . . . . . . . . . . . . . . . . . . . . . . . . .51 Actions Menu . . . . . . . . . . . . . . . . . . . . . . . . . . . . . . . . . . . . . . . . . .51 iv Avaya QoS Manager User Guide Table of Contents Tools Menu . . . . . . . . . . . . . . . . . . . . . . . . . . . . . . . . . . . . . . . . . . . .51 Help Menu . . . . . . . . . . . . . . . . . . . . . . . . . . . . . . . . . . . . . . . . . . . .52 Appendix B ICMP Packet Types & Codes . . . . . . . . . . . . . . . . . . . . 53 ICMP Packet Type/Code List . . . . . . . . . . . . . . . . . . . . . . . . . . . . . . .53 Index . . . . . . . . . . . . . . . . . . . . . . . . . . . . . . . . . . . . . . . . . . . . . . . . . . . 56 Avaya QoS Manager User Guide v Preface Welcome to Avaya QoS Manager. This section provides an introduction to this on-line help. It includes the following sections: The Purpose of This On-Line Help - A description of the goals of this on-line help. Who Should Use This On-Line Help - The intended audience of this on-line help. The Purpose of This On-Line Help This on-line help contains the information needed to use Avaya QoS Manager efficiently and effectively. Who Should Use This On-Line Help This guide is intended for use by network managers familiar with network management and its fundamental concepts. Avaya QoS Manager User Guide ICMP Packet Types & Codes- All ICMP Packet Types and corresponding Codes as used by Avaya QoS Manager. vi 1 Avaya QoS Manager Overview This topic provides an overview of terms and concepts used in Avaya QoS Manager. It includes the following sections: Overview - A general overview of Avaya QoS Manager. Policy Overview - A description of the composition and function of policies. Rule Overview - A description of the rules that comprise policies. QoS Overview - A description of Quality of Service (QoS), including DSCP and DSCP mapping, Class of Service (CoS) and Trust in Avaya QoS Manager. Overview Policy Management is used by Network managers to control network traffic by applying rules to packets. The rules are based on the packets' classification, application, source, and destination. Policy Management allows network managers to implement forwarding and routing based on policies and rules, and focus on Quality of Service (QoS). For example, you can define a set of rules that states, packets from the R&D department to the marketing department are forwarded with a lower priority than packets from the R&D department to the development team. Avaya QoS Manager provides an efficient method for you to determine network priorities using policies and rules. Rules are listed in the tables and are implemented in the order that they appear, with precedence given to mandatory rules. This allows you to determine the order in which rules are applied. Avaya QoS Manager is an SNMP based application using MIBs to interact with Avaya Devices. Avaya QoS Manager provides QoS and access control management for small to medium sized networks operating in a LAN. Avaya QoS Manager User Guide 1 Chapter 1 Policy Overview Policies determine the actions taken on network traffic entering a module. A policy is a set of rules governing the forwarding of information packets in Avaya device modules. Avaya QoS Manager provides you with a Policy List that displays available policies, their statuses, and whether or not changes have been made to specific policies. Multiple policies can be created for a module, but only one policy can be active on a module at a time. Active policies appear in green in the Tree View. Policies can contain invalid rules. However, a policy that contains an invalid mandatory rule cannot be activated. For more information on viewing and using policies, refer to Policy List on page 18. Policies can be activated on individual modules. The Deployment Wizard provides a simple method for activating a policy on a group of modules. For more information on the Deployment Wizard, refer to Chapter 5, Deployment Wizard. Rule Overview Rules are the building blocks of policies. Rules provide the information about how the module forwards a defined data packet. A module can forward packets with a priority of 0 to 7, permit the packets to pass as is, or block the passage of the packet, optionally sending a message to the module's manager. A rule includes the following information: A description of the packets to which the rule applies. The action to perform on the described packets. Whether or not the rule is mandatory. For example, you can define a rule as FTP packets from IP address 143.32.1.2 to subnet 145.7.0.0 must be forwarded with a priority 4. 2 Packet Description - FTP packets from IP address 143.32.1.2 to subnet 145.7.0.0. Mandatory - Must be. Action - Forwarded with Priority Level 4. Avaya QoS Manager User Guide Avaya QoS Manager Overview Each packet entering a module is matched to the active policy rules in the following order: All mandatory rules in the order of their appearance in the Rules List. All non-mandatory rules in the order of their appearance in the Rules List. The first rule matched to the packet is applied. Therefore, the order of the rules in the table is important. Rules can be viewed, created, modified, and deleted using the Rules List. For more information on viewing and configuring rules, refer to Rules List on page 21. QoS Overview QoS is a scheme that enables network managers to improve the flow of important traffic on their networks. Higher priority packets are given precedence on being moved through the network. For example: In order to ensure better network service you can specify that information packets from the accounting department are forwarded immediately, while the marketing department is restricted from accessing the Internet. Avaya QoS Manager supports two QoS schemes: DSCP Class of Service (CoS) Avaya QoS Manager uses Trust to determine which QoS scheme is used to forward packets. The following topics are discussed in this section: DSCP Class of Service Trust Avaya QoS Manager User Guide 3 Chapter 1 DSCP Differential Service Code Point (DSCP) provides a method of tagging IP packets with priority information. A DSCP value between 0 and 63 is added to the IP header of data packets. Avaya QoS Manager supports 8 levels of forwarding priorities. The 64 DSCP priority levels are mapped to the 8 levels in Avaya QoS Manager. Each DSCP value is mapped to its corresponding priority level. The DSCP Mapping table allows you to configure the correlation of DSCP priorities to the priority levels in Avaya QoS Manager. DSCP values 0-63 are assigned a priority level between 0 and 7. Avaya QoS Manager allows you to assign DSCP priority values in the DSCP Mapping table. For more information on using DSCP mapping, refer to DSCP Mapping Table on page 27. Class of Service Class of Service (CoS) is the 802.1p priority scheme used to provide a method of tagging packets with priority information. A CoS value between 0-7 is added to the Layer II header of the data packets. Zero is the lowest priority and seven is the highest. Avaya QoS Managers priority scheme parallels that of CoS priority. Avaya QoS Manager can use CoS tags to determine the priority with which to forward packets. Trust A data packet can contain conflicting priority information. A DSCP tag may give a packet a very high priority, while the CoS tag may give the same packet a very low priority. Trust determines the QoS scheme used by Avaya switches for packets entering a module. There are four possible Trust settings: 4 DSCP Value - Avaya switches use only the packet's DSCP tag. If a packet entering a module matches no rules, or matches a rule with a permit operation, the packet will be forwarded with a priority based on the DSCP Mapping of the packet's DSCP tag. Avaya QoS Manager User Guide Avaya QoS Manager Overview CoS Priority - Avaya switches use only the packets CoS tag. If a packet entering a module matches no rules, or matches a rule with a permit operation, the packet will be forwarded with the priority in the packet's CoS tag. Untrust - Avaya QoS Manager ignores both DSCP tags and CoS priority tags. If a packet entering a module matches no rules, or matches a rule with a permit operation, the packet will be forwarded with the default priority. Both - Avaya QoS Manager uses DSCP tag and CoS priority tags. If a packet entering a module matches no rules, or matches a rule with a permit operation, the packet's DSCP priority (based on the DSCP Mapping table) and the packet's CoS are compared. The packet is forwarded with the higher of the two priorities. Avaya QoS Manager User Guide 5 2 Getting Started with Avaya QoS Manager This topic provides an overview of the user interface It includes the following sections: The User Interface - An introduction to the user interface, including using the toolbar. Managing Tables - Instructions on how to manage tables. Saving Configuration Changes - Instructions for applying changes to the Policy List and committing changes to modules. Searching for Avaya QoS Manager Components Instructions on how to search for devices and modules. Using Avaya QoS Manager Help - Instructions on how to use the on-line help. Avaya QoS Manager User Guide 6 Getting Started with Avaya QoS Manager The User Interface The user interface consists of the following elements: Menu Bar - Menus for accessing functions. For a full listing of all the menus, refer to Appendix A, Menus. Toolbar - Toolbar buttons for accessing Avaya QoS Manager functions. Tree View - A hierarchical view of the network and the policies created for specific modules. Table View - A window where tables open and where policies and rules can be added, managed, modified, and deleted. Form View - A re-sizeable window where the IP Simulate form opens. Status Line - An area at the bottom of the screen that displays the IP of the device where the currently selected list in the Tree View is applied, and the list number. The status line also displays a progress bar when the Avaya QoS Manager opens, and when a Refresh Discovery process is implemented, by selecting the Network icon and refreshing the screen. There is also an icon in the right corner of the Status Line displaying if a policy is read only or read/write. Tooltips - Tooltips for viewing information about policies and rules. Toolbar The toolbar provides shortcuts to Avaya QoS Managers main functions. The table below describes the buttons on the toolbar and gives the equivalent menu options. Table 2-1. Toolbar Buttons Buttons Avaya QoS Manager User Guide Description Menu Item Creates an ASCII report of the Table View. File > Report Prints the active view. File > Print Refreshes the Table View and discards any changes that have not been applied. Edit > Revert 7 Chapter 2 Table 2-1. Toolbar Buttons (Continued) Buttons Description Menu Item Adds a new QoS or ACL policy or rule. File > New List > QoS List, ACL List, or Combined List Deletes a policy or rule. Edit > Delete Opens the Find dialog box. Edit > Find Applies the changes in a table to the device. Refreshes the Tree View. View > Refresh Saves policies to the module. File > Commit Opens IP Simulate. Actions > Simulate Activates the Deployment Wizard. Actions > Deployment Wizard Provides context-sensitive on-line help. Help > Help On When you place the cursor on a toolbar button for one second, a tooltip appears with the name of the button. Tree View The Tree View is a hierarchical representation of the network structure and the policies created for modules in the network. To select modules and policies, click their icons in the Tree View. You can alternate the Tree View to display the following: Inventory - All policies are displayed in the Tree View. There are four levels in the hierarchy. Active Policies - Only the active policies are displayed. There are six levels in the hierarchy, as each policy list is displayed under the interface and direction that it is active. Alternate these displays using the option buttons at the bottom of the Tree View pane. 8 Avaya QoS Manager User Guide Getting Started with Avaya QoS Manager The highest level of the Tree View represents the entire network. The lower levels represent stacks, devices, modules, and policies. For more information on viewing information in the Tree View, refer to Using the Tree View on page 15. Table View The Table View displays information associated with the item selected in the Tree View. For example, if you select a device in the Tree View, the policy lists associated with the device, and device configuration properties appear in the Table View. To select items in the Table View, click a row of the table. For more information on viewing information in the Table View, refer to Using the Table View on page 16. Form View The area below the Table View is where IP Simulate and the Deployment wizard open. This area is resized by dragging the horizontal splitter bar with the mouse. When IP Simulate or the Deployment Wizard are not open, the Form View disappears and the Table View expands to take its place. For more information on IP Simulate, refer to Chapter 6, IP Simulate. For more information on the Deployment Wizard, refer to Chapter 5, Deployment Wizard. Status Line The Status Line shows the IP of the device where the currently selected list in the Tree View is applied, and the list number. The status line also displays a progress bar when the Avaya QoS Manager opens, and when a Refresh Discovery process is implemented by selecting the Network icon and refreshing the screen. There is also an icon in the right corner of the Status Line displaying if a policy is read only or read/write. The table below shows the possible read/write statuses with their corresponding graphics, and gives a short explanation for each status. Table 2-2. Read/Write Statutes Graphic Avaya QoS Manager User Guide Status Description Read/Write The policy is not currently active and can be modified. 9 Chapter 2 Table 2-2. Read/Write Statutes Graphic Status Description Read Only The policy cannot be modified. Possible causes for this are: The policy is currently active. Avaya Policy Manager is managing the module. Tooltips Tooltips provide information about a policy or rule. If the cursor is placed on a policy, a tooltip appears with detailed information about the policy, including if the policy is active. If the cursor is placed on a rule, a tooltip appears with detailed information about the rule including the rule definition. If the rule is invalid, then the tooltip displays an error message, stating the reason for the rule not being valid. Managing Tables The Avaya QoS Manager interface displays the status of each row in a table. The following table shows symbols that appear at the start of a row, with their corresponding explanations. Table 2-3. Row Status Symbol Explanation The row is a new entry. The row is to be deleted. The row has been modified. To undo all the changes made to a table, click . When all changes are finalized, click to apply the changes. After you have applied the changes the table is refreshed. 10 Avaya QoS Manager User Guide Getting Started with Avaya QoS Manager Saving Configuration Changes Policies are stored on the modules for which they were created. There are two levels of applying policy changes to Avaya QoS Manager: Running Changes - Changes are applied to the Policy, but are not saved. Committed Changes - Changes are saved to the module. Running Changes After finalizing all changes to the Policy, the changes must be applied to the Policy List. To apply the changes to the module, click changes are applied to the module. . The configuration The changes will remain in effect until the module is reset. When the module is reset, it is configured with the last saved configuration. All changes that are applied, but not saved, are lost. Committed Changes To make configuration changes permanent, the changes must be committed (saved) to the module. To commit the configuration to the module: Click . Or Select File > Commit. The changes are saved to the module. * Note: The commit operation may take up to 20 seconds. Avoid running other operations while committing polices to the module. * Note: Commit can only be used when a specific module is selected in the Tree View. Avaya QoS Manager User Guide 11 Chapter 2 Searching for Avaya QoS Manager Components Avaya QoS Manager allows you to search for devices and modules in the Tree View. To search for an Avaya QoS Manager component: 1. Enter the IP address of the device for which to search. 2. Click Find. Avaya QoS Manager searches for the item. If the requested device or module is found, the view with the desired element is opened and the element is selected in the Tree View. If there is no reaction to the search then the requested device or module was not found. Using Avaya QoS Manager Help This section explains how to use the on-line help in Avaya QoS Manager, and contains the following sections: Opening the Help to the Contents Page Opening the Help to a Topic of Interest The on-line help can be opened to the contents page or directly to a topic of interest. Opening the Help to the Contents Page To open the help to the contents page, select Help > Contents. The on-line help opens to the contents page. Opening the Help to a Topic of Interest To open the help directly to a topic of interest: 1. Click . Or Select Help > Help On. The cursor changes to the shape of an arrow with a question mark. 2. Click on a point of interest in Avaya QoS Manager. The help opens to a topic explaining the clicked feature. 12 Avaya QoS Manager User Guide Getting Started with Avaya QoS Manager Avaya QoS Manager User Guide 13 3 Avaya QoS Manager Views This topic describes the views in Avaya QoS Manager and how to use them to add, modify, and delete policies and rules. It includes the following sections: Avaya QoS Manager Views Overview - An overview of the different views in Avaya QoS Manager. Using the Tree View - A detailed description of the Tree View including how to navigate between the different levels of the tree. Using the Table View - A detailed description of the Table View including a description of the table fields, instructions on adding, modifying, and deleting policies and rules, and a description of the different tabs and options. Using Address Wildcards - A description of address wildcards, and instructions on how to use them in Avaya QoS Manager. Avaya QoS Manager Views Overview Avaya QoS Manager has two main views. These views provide you with information about the network, as well as, an area for managing policies and rules. Avaya QoS Managers two main views are: The Tree View - Provides a hierarchical view of the device types in the network, the IP addresses of the devices in the network, the modules in the devices, and the existing policies. This view is discussed in Using the Tree View on page 15. The Table View - Provides information about the contents of the elements in the Tree View. You can add, modify, and delete policies, composite actions, and rules in the Table View. In addition, for X330WAN expansion modules, the Table View displays interfaces. This view is discussed in Using the Table View on page 16. Avaya QoS Manager User Guide 14 Avaya QoS Manager Views Using the Tree View This section provides an explanation of the Tree View hierarchy and how to use it. You can select between the following Tree Views using the Option buttons at the bottom of the Tree View: Inventory - Displays all policy lists associated with each device, whether the lists are active or not. Active Policies - Displays only the active policy lists associated with each device. The levels in the Tree View are: Network - All supported devices in the network. When the Network icon is selected, a list of all the supported devices in the network with their active lists appears in the Table View, as well as a Policy Enforcement Points tab. For X330WAN expansion modules and for Router devices, the modules interfaces appear on a separate tab in the Table View. * Note: Only devices that are listed in the Network Map appear in the Table View. Device - IP addresses of devices. When a device is selected, the Policy Enforcement Points, Policy Lists, DSCP Map, and Device Configuration tabs appear in the Table View. Modules - The names and IP addresses of the modules. When a module is selected in the Tree View, tabs of the policy lists and device configuration for that module appear in the Table View. Lists - When a list is selected in the Tree View, the ACL, QoS, or Combined Lists, DSCP Map, Composite Operations, and Configuration tabs appear in the Table View. The list name appears in the tree with the list ID in parentheses. To expand the view of a contracted element in the tree or to contract an expanded element in the tree: Double-click the element you want to expand or contract. Or Click the handle next to the element. Avaya QoS Manager User Guide 15 Chapter 3 Using the Table View The Table View provides the following tables on individual tabs, depending on the entity selected in the Tree View: Device List - Appears on a tab labeled Router/Multilayer. WAN Interfaces - Appears on a tab labeled WAN. Policy List - Appears on a tab labeled Policy Lists. Rules List - Appears on a tab labeled Combined Rules, IP ACL Rules, or IP QoS Rules. Policy Enforcement Points - Appears on a tab labeled Policy Enforcement Points. DSCP Mapping Table - Appears on a tab labeled DSCP Map. Composite Operations Table - Appears on a tab labeled Composite Operations. Device Configuration/Configuration - Appears on a tab labeled Device Configuration or Configuration. Device List The device list provides a list of modules in supported devices in the network, their active policy, module number, and scope. The following table lists the fields in the device list and their descriptions: Table 3-1. Device List - Router/Multilayer Fields Field Description Master IP The IP address of the stack. Num The number of the module in the stack. Device Name The devices name. Device IP The device's IP address. Type The type of device. Active Policy The name of the policy active on the device. You can change the active policy by clicking in the cell and selecting from the pull-down list. 16 Avaya QoS Manager User Guide Avaya QoS Manager Views To select the active policy or change from the Device List: 1. Use the pull-down list in the modules row to change the properties of the active policy on the module. 2. Click . The changes are activated on the module. 3. To make the change permanent, click . Or Select File > Commit. The changes are saved to the module. WAN Interfaces To view or edit a WAN interfaces table, select the Network icon, or the X330WAN expansion modules icon in the Tree View. The WAN interfaces table appears in the Table View in the WAN tab. The WAN interfaces table allows you to define and modify the active policy and manager for each direction, for each interface, on an X330WAN expansion module. The following table provides the fields in the WAN interfaces table and their descriptions: Table 3-2. WAN Interfaces Table Fields Fields Description Device Name The devices name. Device IP The device's IP address. Num The slot number of the module in the device. Type The type of device. Interface The interfaces name. Direction The direction of the packets upon which the Active Policy applies. Possible values are: In - Inbound packets. Out - Outbound packets. Active Policy The name of the policy active on the module. You can change the active policy by clicking in the cell and choosing from the pull-down list. Avaya QoS Manager User Guide 17 Chapter 3 Policy List The Policy list provides a list of policies created for a selected module and displays information about each of the policies. This section provides a description of the Policy list, and discusses the following topics: Adding Policies Deleting Policies The following table lists the fields in the Policy list and their descriptions: Table 3-3. Policy List Fields Field Description Name The user defined policy name. The user defined name appears in the Tree View as the policy name. You can change the policy name by clicking in the table cell and typing in the new name. Type The type of list. Possible values are: ACL QoS. Owner The defined owner of the policy. Usually the last person to modify the policy. Active Whether or not the policy is active on the module. Possible statuses include: Active - The policy is currently active. Not Active - The policy is not currently active. Trusted Fields Indicates the configured usage of DSCP and CoS tags in forwarding packets. You can change the Trust setting using the pull-down list. For more information on Trust, refer to Trust on page 4. Scope Defines on which packets the policy is activated. Possible values are: Forward - Activate policy on packets passing through the device. Forward and Control - Activate policy on packets passing through the device, as well as on packets addressed to the host device itself. 18 Avaya QoS Manager User Guide Avaya QoS Manager Views Table 3-3. Policy List Fields (Continued) Field Description Validity The status of the policy. Possible statuses are: Valid - The policy is valid and can be used as the active policy. Partially Valid - Some of the policy rules which comprise this list are invalid, however, the policy can still be activated on the module. Invalid - At least one mandatory rule in the policy is not valid. An invalid policy cannot be made active on a module. Avaya QoS Manager User Guide 19 Chapter 3 Adding Policies To add a policy: 1. Click . Or Select File > New List and choose a list type. A new policy appears in the policy list. 2. Define the user defined fields in the Policy List. For more information on the Policy fields, refer to Policy List on page 18. 3. Click . The module is updated with the new policy, and the table is refreshed. 4. Add rules to the new policy. For more information on adding rules, refer to Adding Rules on page 25. * Note: Commit changes to the module to ensure that all changes are permanently saved. For more information on applying and committing changes refer to Saving Configuration Changes on page 11. Deleting Policies To delete a policy: 1. Select the policy you want to delete. To select more than one policy, press SHIFT while selecting additional policies. 2. Click . An appears next to the policy. 3. Click . The policy is deleted from the module, and the Table View is refreshed. * Note: Commit changes to the module to ensure that all changes are permanently saved. For more information on applying and committing changes refer to Saving Configuration Changes on page 11. * Note: You cannot delete the active policy. 20 Avaya QoS Manager User Guide Avaya QoS Manager Views Rules List The Rules list allows you to add, modify, move, and delete rules in a policy. Rules are applied to packets in the order they appear in the table, therefore the order of rules in the table is important. This section provides a description of the Rules list, and discusses the following topics: Adding Rules Modifying Rules Copying Rules Moving Rules Deleting Rules To view the Rules list, select the policy in the Tree View whose rules you wish to view, and then the Combined Rules, IP ACL Rules, or IP QoS Rules tab in the Table View. If the Rules list is not in the active policy, the Rules list appears in the Table View. If the selected Rules list is in the active policy, the Rules list appears as Read-only.. To edit an active Rules list, activate a different policy on that interface and direction, and deactivate the policy with the Rules list you wish to edit. The following table lists the fields in the Rules list and their descriptions: Table 3-4. Rules List Fields Field Description Src IP Address Source Address. The source address of the packet being matched by the rule. Src Wildcard Source Address Wildcard. A wildcard that can modify the definition of the specified source address. You can change the Source Address Wildcard using the pull-down list or enter a user defined wildcard. Possible SrcAddWild values include: Host Any User Defined For more information about using wildcards, refer to Using Address Wildcards on page 34. Avaya QoS Manager User Guide 21 Chapter 3 Table 3-4. Rules List Fields (Continued) Field Description Not Logical not. This enables all but the address listed in the following Dst IP Address field. Dst IP Address Destination Address. The destination address of the packets matched by this rule. Dst Wildcard Destination Address Wildcard. A wildcard that can modify the definition of the destination addresses of the information that this rule applies. You can change the Destination Address Wildcard using the pull-down list or enter a user defined wildcard. Possible DestAddrWild values include: Host Any User Defined For more information about using wildcards, refer to Using Address Wildcards on page 34. Not Logical not. This enables all but the protocol listed in the following Protocol field. Protocol Protocol. The protocol of the packets to which this rule applies. Not Logical not. This enables all but the application listed in the following Src Application field. Src Application Source Application. The source application protocol of the packets to which this rule applies. Select an application from the pull-down list. You can customize application protocols using the Application Protocols Tool. For more information on customizing applications protocols, refer to Chapter 4, Applications Editor Tool. Not Logical not. This enables all but the application listed in the following Dst Application field. Dst Application Destination Application. The destination application protocol of the packets to which this rule applies. Select an application from the pull-down list. You can customize application protocols using the Application Protocols Tool. For more information on customizing applications protocols, refer to Chapter 4, Applications Editor Tool. 22 Avaya QoS Manager User Guide Avaya QoS Manager Views Table 3-4. Rules List Fields (Continued) Field Description Established The type of session to which the rule applies. An established session occurs when the packets entering the module respond to a previously established communications session. The possible options include: Checked - This rule only applies to information packets from a previously established session. Unchecked - The rule applies to packets from a previously established or new session. Not Logical not. This enables all but the addresses listed in the following Dst IP Address field. ICMP code/type ICMP code or type. Relevant when ICMP protocol is selected in the Protocol field. Operation The action to be applied to the packet. Possible actions include: Forward priority X - Forwards the packet with a priority X, where X is a number between 0 and 7. Zero has the lowest priority and seven has the highest. Permit - Forwards the packet as is. Deny - Does not forward the packet. Deny and Notify - Does not forward the packet and sends a trap to the manager of the module. Custom - Manually defined actions listed in the Composite Table. For information regarding the Composite Table, refer to Composite Operations Table on page 28. Mandatory Indicates whether or not a rule is mandatory. Options include: Mandatory - The rule must be applied. If a Mandatory rule is not valid, then the entire policy is invalidated. Not mandatory - The rule is not mandatory. If a Not mandatory rule is not valid, the policy remains valid. Avaya QoS Manager User Guide 23 Chapter 3 Table 3-4. Rules List Fields (Continued) Field Description Validity The validity of the rule. Possible values are: Applicable - The rule is valid and can be applied to packets. Best Effort - The rule may or may not be applied to packets. Not Applicable - The rule contains invalid values or conflicts with other rules. Unknown - The rule status is unknown. The rule status is unknown if changes have been made but not applied. 24 Avaya QoS Manager User Guide Avaya QoS Manager Views Adding Rules To add a new rule to a policy: 1. Click . Or Select Edit > Add. The new rule appears in the Rules List. 2. Define the fields in the table cells. For more information on the Rules fields refer to Rules List on page 21. 3. Click . The policy is updated with the added rule, and the Table View is refreshed. * Note: A mandatory but invalid rule is highlighted in red. Modifying Rules To modify a rule: 1. Click on the rule you want to modify. 2. Define the fields in the table cells. For more information on the Rules fields refer to Rules List on page 21. 3. Click . The policy is updated with the modified rule, and the Table View is refreshed. * Note: Modifying a rule may invalidate other rules. Copying Rules You can copy a rule to a different position in the Rules List or to a different policy. To copy a rule: 1. Select the rule from the Rules List. To select more than one rule, press SHIFT while selecting additional rules. 2. Select Edit > Copy. The selected rule is copied to the clipboard. 3. If you want to copy the rule to a different policy, select the policy to which you want the copied rule pasted. 4. Select the rule above which you want the copied rule to be pasted. If a rule is not selected, the copied rule will be added to the bottom of the table. 5. Select Edit > Paste. The rule is pasted above the selected rule. 6. Click . The policy is updated with the copied rule, and the Table View is refreshed. Avaya QoS Manager User Guide 25 Chapter 3 Moving Rules You can move a rules position in a policy or move it from one policy to another. To move a rule: 1. Select a rule from the Rules List. To select more than one rule, press SHIFT while selecting additional rules. 2. Select Edit > Cut. The selected rule is cut to the clipboard. 3. If you want to copy the rule to a different policy, select the policy to which you want the copied rule pasted. 4. Select the rule above which you want to move the rule. If a rule is not selected, the moved rule will be added to the bottom of the table. 5. Select Edit > Paste. The rule is inserted into the policy above the highlighted rule. 6. Click . The module is updated with the moved rule, and the Table View is refreshed. Deleting Rules To delete a rule: 1. Select a rule from the Rules List. To select more than one rule, press SHIFT while selecting additional rules. 2. Click . The rule is marked for deletion, and an next to the rule. appears 3. Click . The rule is deleted from the policy, and the Table View is refreshed. * Note: Commit changes to the module to ensure that all changes are permanently saved. For more information on applying and committing changes refer to Saving Configuration Changes on page 11. 26 Avaya QoS Manager User Guide Avaya QoS Manager Views Policy Enforcement Points The Policy Enforcement Points (PEPs) table allows you to add, modify, move, and delete policies to an interface. This section provides a description of the Policy Enforcement Points list. Figure 3-1. Policy Enforcement Points Table The Policy Enforcement Points Table allows you to apply ACL and QoS lists to specific interfaces and directions in Avaya QoS Manager. The following table provides a list of the fields in the Policy Enforcement Points Table: Table 3-5. Policy Enforcement Points Fields Fields Description Interface The interface name and description. Direction The direction the lists apply to on the interface. Active ACL The Access Control List active on this interface and direction. Active QoS The QoS list active on this interface and direction. To modify a Policy Enforcement Points table, select policies for interfaces and directions using the pull-down list in the Active ACL and Active QoS fields. DSCP Mapping Table DSCP (Differential Service Code Point) is an extension of IP that provides a method of encoding QoS information in the IP header of traffic. The DSCP Mapping value applies only to packets with the operation value of permit. To view or edit the DSCP mapping, select the policy in the Tree View whose DSCP Mapping properties you wish to view, and then the DSCP Map tab in the Tree View. The DSCP Mapping table appears in the Table View. Avaya QoS Manager User Guide 27 Chapter 3 The DSCP Mapping Table allows you to map DSCP values to forwarding priorities in Avaya QoS Manager. For more information about DSCP priority values, refer to DSCP on page 4. The following table provides a list of the fields in the DSCP Mapping Table: Table 3-6. DSCP Mapping Fields Fields Description DSCP DSCP value being mapped. Map to The action to be taken on a packet with the corresponding DSCP tag. Possible actions include: Forward priority X - Forwards the packet with a priority X, where zero has the lowest priority and seven has the highest. Permit - Forwards the packet as is. Custom - Manually defined actions listed in the Composite Table. For information regarding the Composite Table, refer to Composite Operations Table on page 28. You can change this value by clicking in the cell and choosing from the pull-down list. * Note: For WAN modules this column displays the Composite Operation name. Name The user defined name given to the DSCP value of the DSCP priority level. You can change the name by clicking in the cell and typing a new name. To modify a DSCP Mapping table, select priorities for DSCP tags using the pull-down list in the Map to field of the DSCP Mapping table. To change the description of a DSCP level, change the text in the Name field in the DSCP Mapping table. Composite Operations Table This section provides a description of the Composite Operations table, and discusses the following topics: 28 Adding Composite Actions Modifying Composite Actions Avaya QoS Manager User Guide Avaya QoS Manager Views Deleting Composite Actions To view or edit a Composite table, select the policy in the Tree View whose Composite Operations properties you wish to view, and then the Composite Operations tab in the Table View. The Composite Operations table appears in the Table View. The Composite Operations table allows you to define and modify individual actions for Rules Lists and DSCP Tables. The following table provides the fields in the Composite Operations table and their descriptions: Table 3-7. Composite Operations Table Fields Adding Composite Actions Fields Description Id The identification number of the composite action. Name The user defined name given to the composite action. Priority The packets forwarding priority. Packets are forwarded with a priority determined by a number between 0 and 7. Zero has the lowest priority and seven has the highest. DSCP The DSCP value that is applied to packets that match this rule. Possible values are between 0 and 63. To add a composite action: 1. Click . Or Select Edit > Add. A new row appears in the Composite Operations table. 2. Define the user defined fields in the Composite Operations table. For more information on the Composite Table fields, refer to Composite Operations Table on page 28. 3. Click . The Composite Operations table is updated with the new actions, and the table is refreshed. Modifying Composite Actions To modify a composite action: 1. Click on the composite action you want to modify. Avaya QoS Manager User Guide 29 Chapter 3 2. Define the user defined fields in the Composite Operations table. For more information on the Composite Operations table fields, refer to Composite Operations Table on page 28. 3. Click . The Composite Operations table is updated with the modified composite action, and the Composite Operations table is refreshed. 30 Avaya QoS Manager User Guide Avaya QoS Manager Views Deleting Composite Actions To delete a composite action: 1. Select a composite action from the Composite Operations table. To select more than one action, press SHIFT while selecting additional actions. 2. Click . The action is marked for deletion, and an next to the action. appears 3. Click . The action is deleted from the table, and the Table View is refreshed. Device Configuration/Configuration The Device Configuration/Configuration tabs perform the following functions: Device Configuration Device Configuration - This tab appears in the Table View when any of the devices in the Tree View are selected, and enables setting the devices policy configuration attributes. Policy List Configuration - This tab appears in the Table View when a policy list is selected, and viewing and enables setting the policy lists configuration attributes. To view the Device Configuration form, select the device whose configuration form you wish to view from the Tree View, and then the Device Configuration tab in the Table View. The Device Configuration form appears. The Device Configuration form allows you to define and modify individual policy properties for selected devices. Avaya QoS Manager User Guide 31 Chapter 3 The following table provides the fields in the Device Configuration form and their descriptions: Table 3-8. Device Configuration Fields Fields Description Policy Manager Indicates if Avaya QoS Manager is the active policy management system. The possible options are: Local - Avaya QoS Manager Policy Server - Avaya Policy Manager You can change the Policy Management system using the pull-down list. * Note: If the Avaya Policy Manager is the policy management system, all of the policies in the device are read-only. Trusted Fields Indicates the configured usage of DSCP and CoS tags in forwarding packets. You can change the Trusted Fields setting using the pull-down list. For more information on Trust, refer to Trust on page 4. Active Policy The name of the policy active on the device. You can change the active policy using the pull-down list. After changing any of the fields click Apply to implement the changes, or Cancel to revert to the previous values. Policy List Configuration To view the Policy List Configuration form, select the policy list whose configuration form you wish to view from the Tree View, and then the Configuration tab in the Table View. If you select an ACL Policy, the Policy List Configuration form for an ACL Policy appears. The Policy List Configuration form for ACL Policy allows you to define and modify individual policy properties for selected ACL policy lists. The following table provides the fields in the Policy List Configuration form for ACL Policy and their descriptions: Table 3-9. Policy List Configuration Fields - ACL Policy 32 Field Description Id The identification number of the policy list. Name The user defined policy name. The user defined name appears in the Tree View as the policy name. Avaya QoS Manager User Guide Avaya QoS Manager Views Table 3-9. Policy List Configuration Fields - ACL Policy (Continued) Field Description Type The type of policy list. For an ACL policy, this field always returns a value of ACL. Owner The defined owner of the policy. Usually the last person to modify the policy. Active Whether or not the policy is active on the module. Possible statuses include: Active - The policy is currently active. Not Active - The policy is not currently active. Ingress IP Fragments Operation Whether fragmented packets should be permitted or not. Ingress IP Options Operation The operation to be performed on packets with IP Options enabled on them. If you select a QoS Policy, the the Policy List Configuration form for a QoS Policy appears. Figure 3-2. Policy List Configuration Form - QoS Policy The Policy List Configuration form for QoS Policy allows you to define and modify individual policy properties for selected QoS policy lists. Avaya QoS Manager User Guide 33 Chapter 3 The following table provides the fields in the Policy List Configuration form for QoS Policy and their descriptions: Table 3-10. Policy List Configuration Fields - QoS Policy Field Description Index The identification number of the policy list. Name The user defined policy name. The user defined name appears in the Tree View as the policy name. Type The type of policy list. For a QoS policy, this field always returns a value of QoS. Owner The defined owner of the policy. Usually the last person to modify the policy. Active Whether or not the policy is active on the module. Possible statuses include: Active - The policy is currently active. Not Active - The policy is not currently active. Pre Classification Pre-classification queuing method to be applied to packets qualifying for this QoS policy in order to prioritize packets in a high-traffic situation. Possible values include: cos-dscp - Apply CoS-DSCP queuing to packets qualifying for this QoS policy. dscp - Apply DSCP queuing to packets qualifying for this QoS policy. none - Do not pre-classify packets qualifying for this QoS policy. After changing any of the fields click Apply to implement the changes, or Cancel to revert to the previous values. Using Address Wildcards Wildcards are used to mask all or part of a source or destination IP address. Using wildcards, you can create filters for IP addresses. A wildcard can also be used to mask specific bits of an IP address. This mask is used to specify which bits are used and which bits are ignored. If you specify Host, the wildcard is set to 0.0.0.0, and the entire address is used. If you specify Any, the wildcard is set to 255.255.255.255, and the IP address is ignored. You can also specify a custom wildcard to mask part of the IP address. 34 Avaya QoS Manager User Guide Avaya QoS Manager Views Examples: If the source IP address is 149.36.184.189, and the wildcard is 255.0.255.255 the rule will apply to all packets, where the second byte of the IP address is 36. The 255 in the first, third, and fourth bytes allow any value in the corresponding bytes of the source address to match this rule. If the destination address is 149.36.184.189, and the destination wildcard is 255.255.127.0, the rule will only apply to traffic directed to IP addresses whose third byte is between 128-255, and whose fourth byte is 189. Avaya QoS Manager User Guide 35 4 Applications Editor Tool This topic provides instructions on how to use the Application Protocols Tool and how to customize application protocols. It contains the following sections: Applications Editor Overview - An overview of the Applications Editor. Using the Applications Editor - Detailed instructions on how to use the Applications Editor including adding, modifying, and deleting application protocols and creating ASCII reports. Reports - Detailed instructions on how to create an ASCII report of the application protocols listed in the Applications Editor. Applications Editor Overview Avaya QoS Manager allows you to specify application protocols by selecting an application name that represents protocol and port number information. The mapping of the application name to the information it represents is managed by the Applications Editor. Using the Applications Editor you can add, modify, and delete custom application protocols. Default application protocols cannot be modified or deleted. You can also create ASCII reports of the applications listed in the Applications Editor. Avaya QoS Manager User Guide 36 Applications Editor Tool Using the Applications Editor This section provides a description of the Applications Editor, and discusses the following topics: Adding Application Protocols Modifying an Application Protocol Deleting an Application Protocol Applying Changes The following table provides a list of the fields in the Application Editor and a description of each field: Table 4-1. Applications Editor Fields Field Description Name The name of the application protocol. Type The application type. Possible types are: TCP UDP * (other protocols) Min Port The low end of the range of ports for this protocol. Max Port The high end of the range of ports for this protocol. Notes A user defined description of the protocol. Adding Application Protocols To add a new application protocol: 1. Click . Or Select Edit > Add. A new protocol appears in the Application Protocols Tool. 2. Define the application protocol using the fields in the table. Avaya QoS Manager User Guide 37 Chapter 4 Modifying an Application Protocol To modify an application protocol: 1. Select the application protocol you want to modify. 2. Edit the application protocol's fields in the table. Deleting an Application Protocol To delete an application protocol: 1. Select the application protocol you want to delete. 2. Click . Or Select Edit > Delete. An appears next to the protocol. Applying Changes When Avaya QoS Manager is updated with the changes to the Applications Editor table, the pull-down list in the Rules List is updated. Added protocols appear in the Application pull-down list, and deleted applications no longer appear in the Application pull-down list. To update Avaya QoS Manager with the changes to the Applications Editor table, click . The Application pull-down list in the Rules List is updated. Reports You can create an ASCII report of the application protocols listed in the Applications Editor. The report is a text file with the information in each column separated by tabs. To create an ASCII report of the Applications Editor table: 1. Click . Or Select File > Report. The Save dialog box opens. 38 Avaya QoS Manager User Guide Applications Editor Tool 2. Select a directory for the report. 3. Enter a name for the report. 4. Click Save. The report is saved to the specified file. Avaya QoS Manager User Guide 39 5 Deployment Wizard This topic provides instructions on activating and using the Deployment Wizard. It contains the following sections: Deployment Wizard Overview - An overview of deploying policies and DSCP mapping to modules using the Deployment Wizard. Using the Deployment Wizard - Instructions for using the Deployment Wizard to send policies and DSCP mappings to modules. Deployment Wizard Overview The Deployment Wizard applies lists and DSCP mappings to selected modules. This allows you to apply a policy across your network, and provide consistent behavior among the devices in your network. The Deployment Wizard also allows you activate policies and DSCP mapping on deployment. You can deploy a policy list from devices with new embedded software only on devices with new embedded software. However, you can deploy a Rules List from a module with older embedded software on devices with new embedded software. In this situation, the policy on newer modules includes the deployed Rules List, default DSCP and Composite tables, and default Trust settings. * Note: DSCP Mappings can only be deployed on the modules using older embedded software. Configurations deployed using the Deployment Wizard are committed and do not need to be committed to the modules individually. Avaya QoS Manager User Guide 40 Deployment Wizard Using the Deployment Wizard This section provides detailed information on each of the Deployment Wizards screens. To continue to the next screen, click Next. To return to an earlier screen, click Back. To exit the Deployment Wizard without making any changes, click Cancel. The Deployment Wizard consists of the following screens: The Welcome Screen - Introduction to the Deployment Wizard. The Configuration Screen - Define the configuration type. The Source Screen - Select a configuration to be deployed. The Target Screen - Select modules to which the configuration will be deployed. The Activate Policy Screen - Determine on what interfaces and which directions of an Avaya X330WAN expansion module the deployed configuration will be activated. The Summary Screen - A summary of the information entered in the Deployment Wizard Screen. Deployment Status Window - View the progress of the deployment. The Welcome Screen The Deployment Wizard provides a simple method for deploying policies and DSCP Mappings to multiple modules. Click Next. The Deployment Wizard continues with The Configuration Screen. The Configuration Screen Using the Deployment Wizard, you can deploy a policy or a DSCP Mapping Table. The Configuration screen allows you to define the type of configuration you want to deploy. Select the type of configuration you want to deploy: Avaya QoS Manager User Guide Policy List - Deploy the Rules List, DSCP Mapping Table and Composite Table. 41 Chapter 5 DSCP Mapping - Deploy the DSCP Mapping list. You can only select a DSCP Mapping list from modules using older embedded software. DSCP Mappings can only be deployed on the modules using older embedded software. When you finish selecting a configuration type, click Next. The Deployment Wizard continues with The Source Screen. The Source Screen The Source screen allows you to select a configuration to deploy. The source consists of the stack IP address that contains the module and slot number under which the policy or DSCP mapping was created, and the name of the policy. Click the configuration that you want to deploy in the Tree View. The selected configuration appears in the Source field. To create a new copy of the ACL with a different name, enter the name of the new ACL in the Name field. The content of the new ACL will be exactly the same as the old ACL. * Note: If you select a configuration from a module with a new embedded software version, you will be able to deploy the configuration only to modules with a new software version. When you finish selecting a source, click Next. The Deployment Wizard continues with The Target Screen. The Target Screen The Target Screen allows you to select modules to which the configuration will be deployed. A target consists of the stack IP address of the module and slot number. The IP address of the module is displayed in parentheses. Click the module to which you want to deploy the configuration in the Tree View. The target module appears in the target list. You can define more than one module as a target. To remove a module from the target list, select the module to be removed on the target list and press Delete on the keyboard. The module is removed from the target list. When you finish selecting targets, click Next. The Deployment Wizard continues with The Activate Policy Screen. 42 Avaya QoS Manager User Guide Deployment Wizard The Activate Policy Screen The Activate Policy screen allows you to select the interfaces and directions on which to activate a policy. The table in the Activate Policy screen provides a list of the interfaces on the target modules and the direction of the traffic for each interface. To activate the policy on an interface, check the Activation checkbox next to the interface on which you want the policy to be activated. When you are finished selecting the interfaces and directions on which the policy will be deployed, click Next. The Deployment Wizard continues with The Summary Screen. The Summary Screen The Summary screen summarizes the information entered in the previous screens and allows you to review the deployment information. To make any changes to the summary information: 1. Click Back until you reach the screen you want. 2. Change the deployment parameters. 3. Click Next until you reach the Summary screen. To deploy the configuration, click Finish. The Deployment Wizard continues with the Deployment Status Window. Deployment Status Window The Deployment Status window shows you the status of the configuration being deployed on each of the target modules. Avaya QoS Manager User Guide 43 Chapter 5 The following table provides a list of the fields in the Deployment Status window and their descriptions: Table 5-1. Deployment Status Fields Field Description Indicator The indication of the deployment on the module. Possible statuses are: Red - The deployment failed. Green - The deployment succeeded. Yellow - The deployment is in progress. Blue - The deployment has not begun. Target The IP address and slot number of the module to which the configuration is being deployed and the name of the configuration. Progress A progress bar showing the progression of the deployment. Status The final status of the deployment of the configuration. Possible statuses are: Success - The deployment succeeded. Failed - The deployment failed. If the deployment failed, one of the following error messages appears in the Status line: Failed to Create Policy - A policy could not be created due to a failure in the device configuration or device communication. Failed to Create a Rule - A rule could not be created due to communication errors or an incompatible rule. Failed to Activate Policy - This policy could not be activated on the module due to the presence of an invalid mandatory rule. Failed to Save Policy Configuration - The policy or DSCP mapping changes could not be committed to the module. 44 Avaya QoS Manager User Guide 6 IP Simulate This topic provides instructions on activating and using the IP Simulate function to simulate the effect of rules on information packets. It contains the following sections: IP Simulate Overview - An overview of the IP Simulate function. Using IP Simulate - Instructions for using the IP Simulate function to simulate the actions of a policy on defined packets. IP Simulate Overview The IP Simulate function allows you to view the results of a policy on a simulated packet. The IP Simulate function tests a simulated packet against the rules in a policy. The rules are applied to the simulated packets in the order they appear in the Rules List, and the resulting operation is reported in the Result field of the IP Simulate dialog box. The rule that matched the packet is highlighted in the Rules List. This enables you to view the outcome of a policy before activating it. It also eases the editing of rules in a policy to provide the desired results. * Note: IP Simulate only operates on saved policies. Ensure that any changes to the policy have been applied before testing packets. * Note: IP Simulate can only be used when a specific Rules List is selected in the Tree View. Avaya QoS Manager User Guide 45 Chapter 6 Using IP Simulate To analyze the results of a policy on simulated packets: 5. Define a simulated packet using the fields in the IP Simulate dialog box. For more information on the fields in IP Simulate, refer to the table below. 6. Click Test. The effect of the policy on the simulated packet appears in the Result field and the matching rule is highlighted in the Rules Table. 46 Avaya QoS Manager User Guide IP Simulate The following table provides a list of the fields in IP Simulate and their descriptions: Table 6-1. IP Simulate Fields Field Description Source IP The IP address of the device from which the simulated packet originated. Destination IP The IP address of the device to which the simulated packet is addressed. Source Application The application from which the simulated packet was sent. Select an application from the pull-down list or select custom and define the Protocol and Port fields. Destination Application The application to which the simulated packet is being sent. Select an application from the pull-down list or select custom and define the Protocol and Port fields. Protocol The number of the application protocol. The number can be in the range of 0-255. TCP - The protocol number is 6. UDP - The protocol number is 17. Src. Port A specific application source. When combined with the protocol number this identifies the application from which the packet was sent. Dst. Port A specific application destination. When combined with the protocol number, this identifies the application to which the packet was sent. TCP connection established The type of session to which the rule applies. If checked, the simulated packet is from an established session. An established session occurs when the packets entering the module respond to a previously established communications session. If unchecked, the simulated packet is from a not established session. Avaya QoS Manager User Guide 47 Chapter 6 Table 6-1. IP Simulate Fields (Continued) Field Description ICMP type/code Type of ICMP packet to be used in this simulation. For possible values, refer to Appendix B, ICMP Packet Types & Codes. IP Option Enables setting of IP Fragmentation options. IP fragments Options for IP packet fragmentation. Possible values are: Not fragmented First packet fragmented Packet fragmented non-l4 Use QoS parameters Enables QoS parameters for forwarding the packet. The possible options are: Checked Unchecked If the Use QoS Parameters box is checked the IP simulate function uses the values in the DSCP and 802.1p fields in determining the action to be taken on the simulated packet. The DSCP and 802.1p fields must contain valid values. If the Use QoS Parameters is unchecked, the IP simulate function ignores the DSCP and 802.1p fields. * Note: This field does not appear if the simulation is based on an ACL. 48 DSCP The value of the DSCP tag on the simulated packet. Valid values are 0-63. The value of * indicates that this field should be ignored. This value affects the forwarding priority of the packet when the operation to be taken on the packet is permit. 802.1p Priority The value of the CoS tag on the simulated packet. The tag value of CoS runs from 0-7. The value of * indicates that this field should be ignored. This value affects the forwarding priority of the packet when the operation to be taken on the packet is permit. Interface - dir The interface and direction on an X330WAN expansion module for which the rule applies. Select an interface and direction using the pull-down list. Avaya QoS Manager User Guide IP Simulate Table 6-1. IP Simulate Fields (Continued) Field Description Result The operation that would be carried out on the simulated packet, if the selected policy was active. Avaya QoS Manager User Guide 49 A Menus This section gives the menu structure of Avaya QoS Manager. File Menu Edit Menu View Menu Actions Menu Tools Menu Help Menu File Menu Table A-1. File Menu Item Description New List > QoS List Adds a new QoS list rule to the Policy list. New List > ACL List Adds a new ACL list rule to the Policy list. New List > Combined List Adds a new Combined (QoS and ACL) list rule to the Policy list. Commit Saves policies to the module. Report Creates an ASCII report of the Table View. Print Prints the active view. Exit Exits the Avaya QoS Manager application. Edit Menu Table A-2. Edit Menu Item Description Revert Refreshes the table view and discards any changes that have not been applied. Avaya QoS Manager User Guide 50 Menus Table A-2. Edit Menu (Continued) Item Description Add Adds a new policy or rule. Cut Cuts the selected rules to the clipboard. Copy Copies the selected rules to the clipboard. Paste Pastes the rules from the clipboard into the open policy above the selected rule. Delete Deletes the selected rules or policies. Select All Selects all the devices, policies, or rules that appear in the Table View. Find Opens the Find dialog box. View Menu Table A-3. View Menu Item Description Tooltip Enables the tooltip throughout the application. Refresh Refreshes the Tree View. Actions Menu Table A-4. Actions Menu Item Description Deployment Wizard Activates the Deployment Wizard. Simulate Opens IP Simulate. Tools Menu Table A-5. Tools Menu Item Description Applications Editor Opens the Applications Editor tool. Avaya QoS Manager User Guide 51 Appendix A Help Menu Table A-6. Help Menu 52 Item Description Contents Opens the help module contents page for information. Help On Activates context-sensitive help. About Avaya QoS Manager Copyright and version information about Avaya QoS Manager. Avaya QoS Manager User Guide B ICMP Packet Types & Codes This section lists the various ICMP Packet Types and Codes as used in Chapter 6, IP Simulate. * Note: Some ICMP Packet Types have no corresponding Code. ICMP Packet Type/Code List ICMP Packet Type/Code List Table B-1. ICMP Packet Types/Codes Description ICMP Type ICMP Code Echo Reply 0 0 Unreachable 3 -- Network Unreachable 3 -- Host Unreachable 3 1 Protocol Unreachable 3 2 Port Unreachable 3 3 Fragmentation Needed but DF Bit Set 3 4 Source Route Failed 3 5 Destination Network Unknown 3 6 Destination Host Unknown 3 7 Destination Network Administratively Prohibited 3 9 Network Unreachable for TOS 3 11 Host Unreachable for TOS 3 12 Communication Administratively Prohibited by Filtering 3 13 Host Precedence Violation 3 14 Precedence Cutoff in Effect 3 15 Source Quench 4 0 Avaya QoS Manager User Guide 53 Appendix B Table B-1. ICMP Packet Types/Codes (Continued) 54 Description ICMP Type ICMP Code Redirect 5 -- Redirect for Network 5 0 Redirect for Host 5 1 Redirect for Type-of-Service and Network 5 2 Redirect for Type-of-Service and Host 5 3 Echo Request 8 0 Router Advertisement 9 0 Router Solicitation 10 0 Time Exceeded 11 -- Time-to-Live Equals 0 During Transit 11 0 Time-to-Live Equals 0 During Reassembly 11 1 Parameters Problem 12 -- Bad IP Header 12 0 Required Option Missing 12 1 Timestamp Requested 13 0 Timestamp Reply 14 0 Address Mask Request 17 0 Address Mask Reply 18 0 Traceroute 30 -- Traceroute Outbound Packet Successfully Forwarded 30 0 Traceroute No Route for Outbound Packet 30 1 Conversion Errors 31 -- Mobile Host Redirect 32 -- IPv6 Where-Are-You 33 -- IPv6 I-Am-Here 34 -- Mobile Registration Request 35 -- Mobile Registration Reply 36 -- Domain Name Request 37 0 Avaya QoS Manager User Guide ICMP Packet Types & Codes Table B-1. ICMP Packet Types/Codes (Continued) Description ICMP Type ICMP Code Domain Name Reply 38 0 Skip Algorithm Discovery Protocol 39 0 Security Failure 40 -- Avaya QoS Manager User Guide 55 Index A Access levels 9 Actions menu 51 Activating deployment wizard 41 IP Simulate 46 Adding application protocols 37 composite actions 29 policies 20 rules 25 Address wildcards 34 Application Protocols adding 37 deleting 38 modifying 38 Applications editor, using 37 Applying changes 10 ASCII reports 38 Avaya QoS Manager concepts overview 1 getting started 6 help 12 main views 14 menus 50 overview 1 searching for components 12 user interface 7 views overview 14, 36 C Changes committed 11 running 11 Changing the active policy on a WAN interface 17 Class of Service overview 4 Committed changes 11 Committing changes 11 Composite actions adding 29 deleting 31 modifying 29 Composite table fields 28 Configuration form device 31 Avaya QoS Manager User Guide policy list 31 Configuration screen, deployment wizard 41 Copying rules 25 CoS, see Class of Service D Defining actions 28 the active policy on a WAN interface 17 Deleting application protocols 38 composite actions 31 policies 20 rules 26 Deployment status window 43 fields 43 Deployment wizard activating 41 configuration screen 41 interface screen 43 screens 41 source screen 42 starting 41 status window 43 summary screen 43 target screen 42 using 41 welcome screen 41 Device configuration form 31 Device list fields 16 DSCP mapping table fields 27 overview 4 E Edit menu 50 F Fields composite table 28 deployment status window 43 device list 16 DSCP mapping table 27 policy list 18 rules list 21 WAN interfaces table 17 56 Index File menu 50 Finding Avaya QoS Manager components 12 Form device configuration 31 policy list configuration 31 Form view 9 G Getting started with Avaya QoS Manager 6 H Help contents page 12 context sensitive 12 using 12 Help menu 52 How to activate a policy 18 activate IP Simulate 46 activate the deployment wizard 41 add composite actions 29 add policies 20 add rules to a policy 21, 25 analyze the results of a policy on an IP packet 46 change composite actions 29 change rules 25 change the active policy management system 16 change the active policy on a WAN interface 17 commit changes to the device 11 copy rules 25 define actions 28 delete composite actions 31 delete policies 20 delete rules 26 delete rules in a policy 21 deploy policies using the deployment wizard 40 edit the DSCP mapping table 27 find Avaya QoS Manager components 12 manage tables 10 modify actions 28 modify composite actions 29 modify rules 21, 25 modify the active policy on a WAN interface 17 move rules 21, 26 open a rules list 21 open context-sensitive help 12 open the help to a topic of interest 12 open the help to the contents page 12 save configuration changes 11 Avaya QoS Manager User Guide search for Avaya QoS Manager components 12 select the active policy 18 start IP Simulate 46 test policies on simulated packets 46 use address wildcards 34 use Avaya QoS Manager help 12 use IP Simulate 46 use the table view 16 use the tree view 15 view a list of devices 16 view a list of policies 18 view WAN interfaces 17 I ICMP packet types/codes 53 Interface screen, deployment wizard 43 IP Simulate 45 activating 46 area 9 overview 45 starting 46 L Levels, user access 9 M Managing tables 10 Menus 50 actions 51 edit 50 file 50 help 52 tools 51 view 51 Modifying actions 28 composite actions 29 the active policy on a WAN interface 17 Moving rules 26 N Network levels 8 O Overview Avaya QoS Manager 1 Avaya QoS Manager concepts 1 Avaya QoS Manager Views 14, 36 Class of Service 4 deployment wizard 40 DSCP 4 IP Simulate 45 policies 2 57 Index QoS 3 rules 2 trust 4 P Policies active 2 adding 20 deleting 20 overview 2 testing on simulated IP packets 46 tooltips 10 viewing a list of 18 Policy management 1 Policy list configuration form 31 Policy list fields 18 Preface vi Q QoS overview 3 R Reports 38 Rules adding 25 changing 25 copying 25 deleting 26 implemented 3 modifying 25 moving 26 overview 2 tooltips 10 Rules list fields 21 Running Changes 11 S Saving configuration changes 11 Screen configuration 41 interface 43 source 42 summary 43 target 42 welcome 41 Searching for Avaya QoS Manager components 12 Shortcuts 7 Simulating IP packets 45, 46 Source screen, deployment wizard 42 Status line 9 58 Summary screen, deployment wizard 43 T Table symbols 10 Table view overview 9 using 16 Target screen, deployment wizard 42 Testing rules 45 The purpose of this manual vi Toolbar overview 7 tooltips 8 Toolbar buttons apply 8 commit 8 Deployment Wizard 8 find 8 help on 8 IP Simulate 8 printing 7 refresh 8 reports 7 revert 7 Tools menu 51 Tooltips policies and rules 10 toolbar 8 Tree view 8 levels 15 using 15 Trust overview 4 U Updating changes 10 User access levels 9 User interface 7 Using Applications editor 37 Avaya QoS Manager help 12 deployment wizard 41 DSCP mapping 27 IP Simulate 46 table view 16 the tree view 15 Using address wildcards 34 V View menu 51 Views form 9 table 9 tree 8 Avaya QoS Manager User Guide Index W WAN Interfaces table fields 17 Avaya QoS Manager User Guide Welcome screen, deployment wizard 41 Wizard 40 59