1
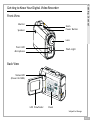
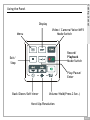
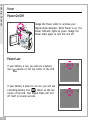
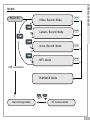
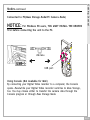
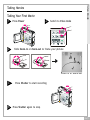
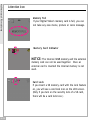
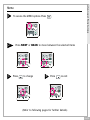
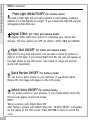
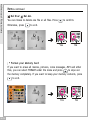
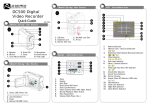
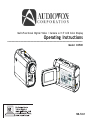
Multi-Functional Digital Video / Camera w/1.5" LCD Color Display
Operating Instructions
_____________________________________________________________________
Model: DC500
SET
128-7261
Table of Contents
Getting Started
Getting to Know Your Digital Video Recorder................................... 3
Using the Panel............................................................. .......... 5
Power...................................................................................6
Modes...................................................................................7
Video Mode
Taking Movies........................................................................11
Video Out............................................................................ 12
Camera Mode
Taking Pictures......................................................................13
Voice Record Mode
Recording Voice Messages........................................................ 15
MP3 Mode
Listening To MP3 Music............................................................ 17
PLAYBACK Mode
Basic Playback.......................................................................19
Advanced Playback................................................................. 21
Main Functions
Changing the Quality Setting.....................................................23
Using Self-timer......................................................................25
Using Guide Line/The LCD Display............................................... 26
Using Hold............................................................................ 27
Volume Adjust........................................................................27
Advanced Functions
Attention Icon...................................................................... 28
Menu.................................................................................. 29
Troubleshooting .................................................................... 37
HOW TO COPY FILES FROM THE UNIT TO YOUR COMPUTER ................ 38
HOW TO COPY MP3 FILES TO YOUR UNIT ...................................... 38
BASIC WINDOWS 98/2000/XP COPY AND PAST HELP ......................... 39
En 2
Front View
Shutter
Zoom
Power Button
Speaker
Getting Started
Getting to Know Your Digital Video Recorder
Lens
Front LED
Flash Light
Microphone
Back View
Status LED
(Power On/USB)
SET
LCD Viewfinder
Panel
Subject to Change
En 3
Getting Started
Getting to Know Your Digital Video Recorder-continued
Side View
SET
Battery/SD/MMC Cover
T
SE
Earphone jack
USB port
SD/MMC card Slot
AV out
Battery Slot
Subject to Change
En 4
Getting Started
Using the Panel
Display
Video / Camera/Voice/MP3
Mode Switch
Menu
Record/
Playback
Mode Switch
Exit/
Stop
Play/Pause/
Enter
Back/Down/Self-timer
Volume/Hold(Press 2 Sec.)
Next/Up/Resolution
En 5
Getting Started
Power
Power On/Off
SET
Nudge the Power slider to activate your
Digital Video Recorder. When Power is on, the
Power indicator lights up green. Nudge the
Power slider again to turn this unit off.
Power Low
If your battery is low, you will see a battery
icon (
)shown on the top center of the LCD.
If your battery is about to run out, you will see
a blinking battery icon (
) shown on the top
center of the LCD. Your Digital Video will turn
off itself in several seconds.
En 6
Power On
Video Record Mode
Getting Started
Modes
Camera Record Mode
Voice Record Mode
MP3 Mode
USB connected
PLAYBACK Mode
Mass Storage Mode
PC Camera Mode
En 7
Getting Started
Modes-continued
Video Mode/Camera Mode/Voice Mode/MP3 Mode/PLAYBACK Mode
There are four main modes and PLAYBACK mode in this Digital Video.
The four main modes are Video Mode, Camera Mode, Voice Mode and MP3
Mode.
1.Video Mode: take moving videos with sound
2.Camera Mode: take still pictures
3.Voice Mode: record voice messages.
4.MP3 Mode: listen to MP3 music.
You can switch among these four modes by pressing
. By pressing
, you can switch to PLAYBACK mode to review your videos, pictures
and voice messages. Video Mode/Camera Mode/Voice Mode shares the
same PLAYBACK mode. You can switch back to the previous mode by
pressing
again.
En 8
Connected to PC(Mass Storage Mode/PC Camera Mode)
NOTICE:
For Windows 98 users, YOU MUST INSTALL THE DRIVERS
first before connecting the unit to the PC.
Getting Started
Modes-continued
SE
T
USB Cable
USB port
Using Console (Not Available for MAC)
By connecting your Digital Video recorder to a computer, the Console
opens. Meanwhile your Digital Video recorder switches to Mass Storage,
too. You may choose either to transfer the camera data through the
Console program or through Mass Storage Mode.
En 9
Getting Started
Modes-continued
NOTICE:
Windows 98 users must first install the drivers on the PC
before connecting the DC500.
Mass Storage Mode
Connect your Digital Video recorder to a computer, it will turn to Mass
Storage Mode. In Mass Storage Mode, your Digital Video recorder acts
exactly like a hard disk. That means you can access it via the Windows
user interface. You can copy, move or delete files (pictures, movies,
voice messages or MP3 music) exactly the way you manipulate files under
Windows user interface.
Note:
1.Please do not copy any files into the DCIM folder of your Digital Video.
Otherwise it may cause Digital Video instability or unit might crash.
2.Remember to copy the MP3 files into the MP3 folder of your Digital Video.
PC Camera Mode
You can connect this Digital Video Recorder to a computer with its
supplied USB cable and use it as a PC camera.
After USB connecting, the screen will show as below.
By pressing
, it will turn to PC Camera Mode. With a compatible video
capture program (Not Supplied), you can capture movies.
MENU
En 10
MENU
Taking Your First Movie
1 Press Power
2
Switch to Video Mode
Video Mode
Taking Movies
SET
2
Slide Zoom-in or Zoom-out to frame your picture
Zoom in or Zoom out
3
Press Shutter to start recording
SET
4
Press Shutter again to stop
En 11
Video Mode
Taking Movies-continued
The recording timer
While you’re filming, the recording timer will be displayed on the LCD.
Before Recording
Total estimative
recordable time
While Recording
The recording time
Video Out
Video Out
This Digital Video can output analog video to a home TV set. To configure
the Digital Video, please refer to the section NTSC/PAL. (Page 32)
SE
T
En 12
Taking Your First Picture
1
2
Press Power
Switch to Camera Mode
Camera Mode
Taking Pictures
SET
3
Press Zoom-in or Zoom-out to frame your picture
Zoom in or Zoom out
4
Press Shutter to take a picture
SET
En 13
Camera Mode
Taking Pictures-continued
The Picture Counter
You can see the picture counter displayed on the top right corner of
your LCD. First, it will show the number of the total recordable files of
this unit.
Total estimative
recordable files
En 14
Voice Mode
Recording Voice Messages
Recording Your Voice Messages
1
2
Press Power
Switch to Voice Mode
SET
3
Press Shutter to start recording
SET
4
Press Shutter again to stop
En 15
Voice Mode
Recording Voice Messages-continued
The recording timer
While you are recording voice messages, the recording timer will show on
the top right corner of your LCD.
Before Recording
Total estimative
recordable time
While Recording
Total recording time
En 16
MP3 Mode
Listening To MP3 Music
Listening To MP3 Music
1
2
Press Power
Switch to MP3 Mode
SET
3
Press BACK or NEXT to select one track
4
Press
to play MP3 music
En 17
MP3 Mode
Listening To MP3 Music-continued
5
Press
to pause
6
Press
to stop
MP3 information
The title of the
selected track
En 18
The track number/
The total tracks
PLAYBACK Mode
Basic Playback for VIDEO / CAMERA / VOICE
Basic Playback
1
Switch to PLAYBACK mode
2
The information of the selected file will show on the LCD.
The Mode of the selected file
The selected file
number/ The total
files number
The time of the
selected file
3
Press BACK or NEXT to navigate
En 19
PLAYBACK Mode
Basic Playback-continued
The following step only works in Video and Voice files.
4
Press PLAY to start
5
Press PLAY again to pause
Blink
6
7
En 20
Press NEXT or BACK to fast-forward or fast-backward
Press STOP to stop
Preview in Multiple view/Single view or Hide the information
1
Press
to preview in Single view
2
Press
again to hide the information
3
Press
again to preview in Multiple view
PLAYBACK Mode
Advanced Playback
En 21
PLAYBACK Mode
En 22
Advanced Playback-continued
Quick Search (Back/Next)
1
Press
for a second to Quick Search backward
2
Press
for a second to Quick Search forward
Video
Record Mode
You can change the movie’s quality setting whenever you want.
1. In Video Mode, press the
button.
2. The LCD will display your current quality setting on the top left
corner. “ ” is fine quality, “ ” is normal quality and “ “ is economic
quality.
Fine quality
640x480
Normal quality
352x288
Main Functuions
Changing the Quality Setting
Economic quality
320x240
Camera
Record Mode
You can change the picture’s resolution setting whenever you want.
1. In Camera Mode, press the
button.
2. The LCD will display your current picture’s resolution setting on the
top left corner. “ ” is fine resolution, “ ” is normal resolution or
“ ” is economic resolution.
Fine resolution
2336x1752
(Hardware Enhanced)
Normal resolution
2048x1536
Economic resolution
1024x768
En 23
Main Functuions
Changing the Quality Setting-continued
Voice
Record Mode
You can change the quality setting of voice messages whenever you
want.
1. In Voice Mode, press the
button.
2. The LCD will display your current quality setting on the top left
corner. “ ” for standard quality, “ ” for Long Time.
Fine quality
En 24
standard Time
This Digital Video Recorder has a built-in 10 second self-timer.
1
Press Timer
2
Press Shutter to start
Main Functuions
Using Self-Timer (for Video and Camera mode)
SET
3
The timer starts to count down from 10 seconds.
This icon will blink
during count-down.
The count-down number
(Note: You could press any button to cancel self-timer during the countdown.)
En 25
Main Functuions
Using Guide Line/The LCD Display
Using Guide Line (for Video mode and Camera mode)
You can use guide line while taking movies or pictures. In Record Mode,
press the
button, the guide line will show on the LCD screen.
The LCD Display
To save energy, the unit allows you to switch off the LCD panel.
For Video and Camera mode (While pressing the
LCD On
Guide Line
For Voice and MP3 mode (While pressing the
LCD On
En 26
LCD Off
button repeatly)
LCD Off
LCD On
button repeatly)
LCD On
Using Hold (Press 2 Sec.)
By pressing
for 2 seconds, the buttons on the panel will be locked. The
Main Functions
Using Hold
buttons on the panel will not function while in HOLD. To cancel the HOLD
function, press
for 2 seconds.
buttons locked
Volume Adjust
You can adjust playback volume by using
HOLD button for 1 second.
or
after pressing the
En 27
Advanced Functions
Attention Icon
Memory Full
If your Digital Video’s memory card is full, you can
not take any new movie, picture or voice message.
Memory Card Indicator
NOTICE:
The internal 32MB memory and the external
memory card can not be used together. Once an
external card is inserted the internal memory is not
used.
Card Lock
If you insert a SD memory card with the lock feature
on, you will see a card lock icon on the LCD screen.
(Only if you turn on the security lock of a SD card,
there will be a card lock icon.)
En 28
Advanced Functuions
Menu
1
2
3
To access the MENU options Press
Press NEXT or BACK to move between the selected items
Press
to change
4
Press
to exit
(Refer to following pages for further details)
En 29
Advanced Functuions
Menu-continued
Flash Light ON/AUTO/OFF (for Camera mode)
The built-in flash light lets you take a picture in poor lighting conditions
whether it is in the daytime or at night. If you choose Flash Light ON, the icon
will appear on the LCD screen.
Digital Effect (for Video and Camera mode)
This Digital Video offers four options to customize your movies and
pictures. The four options are OFF (no effect), SEPIA, B&W and MOSAIC.
Night Shot ON/OFF (for Video and Camera mode)
Night Shot is long time exposure to let you take a movie or picture at
night or in dim light. If you choose Night Shot ON, the icon will appear on
the right corner of the LCD screen. (use tripod as image will become
blurry with movement)
Quick Review ON/OFF (for Camera mode)
You can have a quick review on your pictures. If you choose Quick
Review ON, the image will appear on the LCD screen.
Attach Voice ON/OFF (for Camera mode)
You can attach voices on your pictures. If you choose Attach Voice ON,
the icon will appear on the LCD screen.
NOTE:
Taking a picture with Attach Voice ON
After taking a picture with Attach Voice ON, “ATTACH VOICE!” will appear
on the center of the LCD screen. Press SHUTTER to start to record the
voice
En 30
message. Press SHUTTER again to stop the recording. Press
to exit.
Advanced Functuions
Menu-continued
Information ON/OFF (for Video and Camera mode)
You can choose show the information or hide the information.
Attach Date ON/OFF (for Camera mode)
If you choose Attach Date ON, date will be added on the picture that you
recorded.
Date
You could set the correct date for your unit. Press the PLAY/ENTER to
select and BACK or NEXT to make changes. Press PLAY/ENTER again to
move to the next section
Time
You could set the correct time for your digital video. use above procedure
to make edits
En 31
Advanced Functuions
Menu-continued
Beep On/OFF
If you choose Beep On, there will be beep sound when you press the button. If
you choose Beep Off, there will be soundless when you press the button.
Auto-Off ON/OFF
Under Auto-Off, if you leave your Digital Video unused for certain times, this
Digital Video will be auto-off. There are three options: 1 minute, 2 minutes
and 5 minutes. (Note: If you set Auto-off ON for 2 or 5 minutes; LCD will be
off first after 1 minute.)
NTSC/PAL
NTSC/PAL are two incompatiable analog TV signal formats. You can toggle
between NTSC and PAL to your TV set’s preference.
NTSC: North America and Japan
PAL: U.K. and Germany, France, Russia, certain European and African
countries
NTSC
PAL
SECAM
50Hz/60Hz
Match up with the frequency of the main power supply in your country.
Please refer to the following figures:
50 Hz : Europe, P.R.C.,Hong kong, Australia, New Zealand and South Africa.
60 Hz : America, Canada, Taiwan, Japan,and Korea.
En 32
Slide Show
You can choose to playback your movies, pictures, voice messages or
MP3 in Slide Show. The Slide Show playback time is 5 seconds for each
movie, picture, voice message or MP3.
Advanced Functions
Menu-continued
To exit, press STOP.
Repeat ON/OFF (only for MP3 files)
You can choose to playback your MP3 repeatedly. If you choose to Repeat
One, the selected track will playback repeatedly. If you choose to Repeat
All, the whole tracks will playback repeatedly.
repeat one
repeat all
Rotate ON/OFF (only for image files)
You can choose to rotate your pictures on your Digital Video. Pressing
, you can rotate the picture every 90 degree in counter-clock
direction.
En 33
Advanced Functuions
Menu-continued
Del One/
Del ALL
You can choose to delete one file or all files. Press
Otherwise, press
to confirm.
to exit.
Yes
No
Format your Memory Card
If you want to erase all movies, pictures, voice messages, MP3 and other
files, you can select FORMAT under the menu and press
to wipe out
the memory completely. If you want to keep your memory contents, press
to exit.
MENU
Yes
En 34
No
Specifications
Digital Still Camera
Digital Camcorder
Resolution:
Fine: 2336 x 1752
Fine: 640 x 480
(Hardware enchancement) (Hardware enchancement)
Normal: 2048 x 1536
Normal: 352 x 288
Low: 1024 x 768
Low: 320 x 240
Image Sensor:
3.1 Mega CMOS Sensor
Digital Zoom:
4X
Digital Effects:
B&W / Sepia / Mosaic
Display:
1.5” color TFT LCD
Internal Memory:
32 MB
External Memory:
SD / MMC (32MB to 1GB)
File Format:
JPEG/ASF(MPEG4 Compatible)/MP3/WAV
Lens:
Fixed (6 Glasses Lens) / 9 mm (Equivalent 49
mm for 135 camera)
Interface:
USB / AV out / Earphone
Self-timer:
10 seconds delay
Exposure Mode:
Auto
White Balance:
Auto
Flash Light (Mode):
SCR type (On / Auto / Off)
Microphone / Speaker:
Built-in
Television System:
NTSC / PAL
Shutter Speed:
1/15 to 1/2500 second
Power / Battery :
1.5V AA alkaline battery x 2
Dimensions (LxHxD):
3.54 x 2.65 x 1.57 Inches
Weight:
110g (battery not included)
En 35
System Requirements:
Mass Storage:
PC Camera Driver:
Pentium 500 MHz processor or higher
Microsoft Windows 98SE/Me/2000/XP
Available USB port
Media Player 7 (Recommended Media Player 9)
Super VGA card and color monitor
CD-ROM or DVD-ROM drive
At least 128 MB RAM
200MB available HD space
Windows, Mac, Linux
Win98se, Me, 2000, XP
USB device Unplugging Notice:
If you want to unplug the Digital Video from your computer, be sure to
stop the device before hand. To stop the DC500, follow the steps below:
Remove from PC: (For Windows Me/2000/XP)
1. Click on the device icon “
” located on the taskbar. Select the
device you want to stop (e.g. ‘Stop USB Mass Storage Device Drive(E:)).
2. Follow the on-screen instructions to safely remove the Digital Video.
Remove from Mac: (For Mac OS 9.X and 10.1 above )
1. Select the Digital Video icon (Shown as ‘NO_NAME’ or ‘untitled’ drive)
on the desktop.
2. Drag and drop the drive to the Trash.
En 36
Troubleshooting:
PC does not see UNIT
1) Power on unit
2) connect unit to PC via the USB (Verify LCD displays Mass Storage)
3) Open ‘MY COMPUTER’ and verify if there is a drive called “Removable
Disk” (ex Removable Disk (E:)).
4) Open the ‘Control Panel’ and double click the ‘SYSTEM’ icon (Start/
settings/Control Panel (Win98) - Start/Control Panel (Win2000 and XP)
5) Select the ‘DEVICE MANAGER’ tab. (In windows 2000 and XP you first
must select ‘HARDWARE’ then ‘DEVICE MANAGER’)
6) Look for a YELLOW EXCLAMATION POINT (!). This item may be
located under the ‘OTHER DEVICE’ category. Click the + sign to expand.
7) Right click and UNINSTALL or DELETE this item. (repeat steps 6&7 for
each item)
8) Press F5 on your keyboard and the screen will flicker and come back to
the last screen. Verify the yellow Exclamation did not return.
9) remove the unit from the USB cable.
10) install and complete the driver installation from the supplied CD-ROM.
11) repeat steps 1 and 2.
En 37
HOW TO COPY FILES FROM THE UNIT TO YOUR COMPUTER
1) power on the unit
2) connect the unit to the PC via the supplied USB cable
3) verify the MASS STORAGE is displayed on the LCD screen
4) Open ‘MY COMPUTER’ and look for the removable storage drive. (ex.
REMOVABLE STORAGE (e:)) (NOTE: the internal memory and the external
memory will have 2 separate drives created)
5) Double click on one of the REMOVABLE STORAGE drives.
6) Double click on the DCIM folder
7) Double click on the 100MEDIA folder
8) Use standard Copy and Paste techniques to copy the files to a location on
your computer. (see page 39 for basic windows commands)
HOW TO COPY MP3 FILES TO YOUR UNIT
1) power on the unit
2) connect the unit to the PC via the supplied USB cable
3) verify the MASS STORAGE is displayed on the LCD screen
4) Open ‘MY COMPUTER’ and look for the removable storage drive. (ex.
REMOVABLE STORAGE (e:)) (NOTE: the internal memory and the external
memory will have 2 separate drives created)
5) Double click on one of the REMOVABLE STORAGE drives.
6) Double click on the MP3 folder. (If there is no MP3 folder disconnect the unit
from the USB and power up the unit and access the MP3 mode to create the
folder automatically.
7) Copy your MP3 files from your computer to this folder, using standard Copy
and Paste windows procedures. (see page 39 for basic windows commands)
See the Quick Guide for more detail
En 38
BASIC WINDOWS 98/2000/XP COPY AND PASTE HELP
All files and folders can be viewed and changed using Windows Explorer.
(Do not confuse this with Internet explorer, a browser to view web
pages). Windows Explorer can be accessed by using the right mouse
button and clicking on the START button located on the lower left of your
windows desktop and left clicking on EXPLORER just below OPEN.
Windows Explorer is broken into 3 sections. The TOP section contains
the Address bar and commands. The LEFT section shows the folder
structure and drive information. The RIGHT side shows the contents of
the selected folder from the left side.
Below is a picture of the Windows Explorer interface. From this screen
you can select the files from the RIGHT side and click on EDIT in the top
left portion. EDIT will give you all of the commands you can do with that
file (Copy, Cut, Paste and select all). Once you made your selection you
can brown the LEFT section of Windows Explorer to the place where you
want to execute your command by selecting EDIT.
En 39