1
Model ACU-045
Big Brew Classic
Cafetera de acero inoxidable para 45 tazas
Manual de Instrucciones
Modelo: ACU-045
Instruction Manual
Big Brew Classic
45-Cup Coffee Urn
¡Felicidades!
Su
Big Brew Classic con toda seguridad se convertirá en uno
de los electrodomésticos más versátiles y prácticos de su hogar o su
oficina.
¡Disfrute de un buen café recién hecho a cualquier hora!
Sírvase leer las instrucciones con cuidado antes de usar el producto por
primera vez.
© 2005 Aroma Housewares Company All rights reserved.
Aroma Housewares Co.
6469 Flanders Drive
San Diego, CA 92121
U.S.A.
1-800-276-6286
www.aromaco.com
Published By:
Publicado por:
Aroma Housewares Co.
6469 Flanders Drive
San Diego, CA 92121
EE.UU.A.
www.aromaco.com
© 2005 Aroma Housewares Company
Please read the following instructions carefully before your first use.
Enjoy fresh brewed coffee anytime!
Your
Big Brew Classic will surely become one of the most practical
appliances in your home or office.
Congratulations!
15.
12.
13.
14.
8.
9.
10.
11.
7.
6.
5.
4.
1.
2.
3.
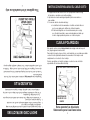
Basic safety precautions should always be followed when using electrical appliances,
including the following:
IMPORTANT SAFEGUARDS
1
Read all instructions before use.
Do not touch hot surfaces. Use handles or knobs.
To protect against electrical shock, do not immerse cord, plug or coffee maker in
water or any other liquid.
Close supervision is necessary when this appliance is used by or near children.
This appliance is not intended to be used by children.
Unplug from outlet when not in use and before cleaning. Allow to completely
cool before putting on or taking off any parts, and before cleaning.
Do not operate this appliance with a damaged cord or the plug or after the
appliance malfunctions or has been damaged in any manner. Return appliance
to the nearest authorized service facility for examination, repair or adjustment.
The use of accessory attachments not recommended by the appliance
manufacturer may cause injuries.
Do not use outdoors.
Do not let cord hang over edge of table or counter, or touch hot surfaces.
Do not place on or near a hot gas or electrical burner, or in a heated oven.
Extreme caution must be used when moving an appliance containing hot coffee
or any other hot liquids.
To disconnect, remove plug from wall outlet. Always hold the plug, never pull the cord.
Do not use appliance for other than intended use.
Make sure that the cover is securely in place before brewing and when serving
coffee. When placing the cover on the body of the coffee urn, make sure the
locking tabs are in the front and back of the handles. Grasp the knob carefully
and turn the cover clockwise until the locking tabs are fully engaged inside the
handles of the coffee urn.
Scalding may occur if the cover is removed during the brewing cycle. When
removing the cover from the body of the coffee urn, grasp the knob carefully
and turn the cover counter-clockwise to unlock the lid. Use extreme caution.
During and after brewing, the glass knob will be hot. Always use a pot holder or
oven mitt to remove or replace the cover.
INSTRUCCIONES PARA USAR EL CABLE CORTO
16.
GUARDE ESTAS INSTRUCCIONES
PARA USO COMERCIAL Y DOMÉSTICO
SAVE THESE INSTRUCTIONS
Siempre se deben seguir las precauciones de seguridad básicas al usar
electrodomésticos, incluidas las siguientes:
1. Lea todas las instrucciones antes de usar.
2. No toque las superficies calientes. Use las asas y perillas.
3. Para evitar los choques eléctricos, no sumerja el cable, el enchufe ni la cafetera
en agua ni en ningún otro líquido.
4. Cuando la cafetera sea usada por niños o cerca de ellos es necesario
supervisarlos cuidadosamente.
5. Desenchúfela del tomacorriente cuando no esté en uso y antes de limpiarla. Espere a
que se enfríe por completo antes de retirar o colocar piezas, y antes de limpiarla.
6. No la use si el cable o el enchufe están dañados, si no ha funcionado bien o ha
tenido alguna avería. Devuelva la cafetera al agente de servicio técnico
autorizado más cercano para que la examinen, reparen o ajusten.
7. El uso de accesorios no recomendados por el fabricante puede provocar lesiones.
8. No la use al aire libre.
9. No permita que el cable cuelgue de la mesa o del mesón, ni que toque superficies calientes.
10. No la coloque cerca de una hornilla de gas o eléctrica caliente, ni en un horno caliente.
11. Se debe tener sumo cuidado al trasladar la cafetera con café u otros líquidos calientes.
12. Para desconectar, desenchúfela del tomacorriente. Siempre tire del enchufe,
nunca del cable.
13. No la use para otra cosa que no sea el uso previsto.
14. Asegúrese de que la tapa esté bien asentada antes de preparar o servir café.
Cuando coloque la tapa sobre el cuerpo de la cafetera, asegúrese de que las
aletas de traba se encuentren delante y detrás de las asas. Agarre la perilla con
cuidado y gire la tapa hacia la derecha hasta que las aletas de traba estén bien
encajadas dentro de las asas de la cafetera.
15. Se pueden sufrir quemaduras si se quita la tapa durante el ciclo de preparación.
Al quitar la tapa del cuerpo de la cafetera, agarre la perilla con cuidado y gire la
tapa hacia la izquierda para destrabarla.
16. Durante y después de preparar el café, la perilla de vidrio estará caliente.
Siempre use una agarradera o un guante de cocina para quitar o colocar la tapa.
FOR COMMERCIAL AND
1 HOUSEHOLD USE
IMPORTANTES INSTRUCCIONES DE SEGURIDAD
INSTRUCCIONES PARA USAR EL CABLE CORTO
1. Se proporciona un cable eléctrico corto con el propósito de reducir el riesgo
de tropezarse o enredarse con un cable más largo.
2. Hay cables de extensión más largos disponibles y deben ser usados co
sumo cuidado.
3. Si se usa un cable de extensión más largo:
a. La clasificación eléctrica marcada en el cable de extensión debe ser
por lo menos igual que la clasificación eléctrica del aparato.
b. El cable más largo debe ser colocado de manera que no cuelgu
por el borde del mostrador o mesa en donde pudiera ser jalado por
un niño o alguien pudiera tropezarse con el cable sin querer.
2
This appliance is for household use only.
KEEP AWAY
FROM CHILDREN !
CLAVIJA POLARIZADA
Este aparato cuenta con una clavija polarizada (una espiga es más ancha que la
otra); siga las siguientes instrucciones:
Para reducir el riesgo de choque eléctrico, esta clavija debe ser conectada a una salida
o enchufe eléctrico polarizado solamente de una manera. Si la clavija no entra
completamente en el enchufe, voltee la clavija.
Si aún no queda bien en el enchufe, póngase en contacto con un electricista
especializado. No trate de modificar la clavija.
¡NO DEJE QUE EL CABLE CUELGUE!
This appliance has a polarized plug (one blade is wider than the other); follow the
instructions below:
To reduce the risk of electric shock, this plug is intended to fit into a polarized outlet
only one way. If plug does not fit fully into the outlet, reverse the plug. If it still does
not fit, contact a qualified electrician. Do not attempt to modify the plug in any way.
POLARIZED PLUG
¡MANTENGASE
LEJOS DE LOS
NINOS!
Este aparato fue diseñado
Solamente para Uso Doméstico.
2
1. A short power-supply cord is provided to reduce risk resulting from becoming
entangled in or tripping over a longer cord.
2. Longer extension cords are available and may be used if care is exercised.
3. If a longer extension cord is used:
a. The marked electrical rating of the extension cord should be at least as great as
the electrical rating of the appliance.
b. The longer cord should be arranged so that it will not drape over the counter top
or tabletop where it can be pulled by children or tripped over unintentionally.
SHORT CORD INSTRUCTIONS
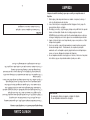
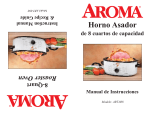
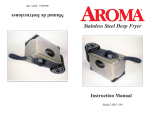
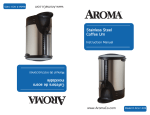
IDENTIFICACIÓN DE LAS PARTES
7
6
8
4
5
5
9
4
9
8
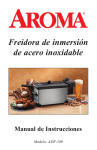
PARTS IDENTIFICATION
1
3
Pico vertedor antigoteo
Vástago
Resorte del vástago
Grifo de agua
Aletas para trabar la tapa
Tapa de la canasta de filtrado
2
8.
9.
10.
11.
12.
13.
13
Perilla fría al tacto
Tapa de acero inoxidable
Canasta de filtrado
Asas
Exterior de acero inoxidable
Luz indicadora de encendido
Luz indicadora de Listo
3
1.
2.
3.
4.
5.
6.
7.
11
6
10
7
12
10
Non-drip Dispensing Spout
Stem
Stem Spring
Water Dispensing Spout
Brew Basket Lid
Lid Locking Tabs
3
8.
9.
10.
11.
12.
13.
11
Cool-Touch Knob
Stainless Steel Lid
Brew Basket
Handles
Stainless Steel Exterior
Power Indicator Light
Ready Indicator Light
13
1.
2.
3.
4.
5.
6.
7.
12
2
3
1
CÓMO USARLA
Antes de usar por primera vez:
1. Lea todas las instrucciones y precauciones importantes.
2. Retire todos los materiales de embalaje; asegúrese de que todos los artículos
recibidos estén en buenas condiciones.
3. Lave el jarro de la cafetera y todos los accesorios con agua jabonosa y una
esponja o trapo.
4. Enjuague a fondo para eliminar todo resto de jabón.
5. Limpie el cuerpo con un paño húmedo.
No use limpiadores abrasivos ni estropajos.
No sumerja la cafetera, el cable ni el enchufe en agua.
Para preparar el café:
1. Coloque la cafetera en una superficie plana, seca y firme.
2. Tenga a mano café molido grueso.
3. Retire todas las piezas internas, luego llene el jarro con agua FRÍA según la
cantidad de café a preparar. Vea la tabla para medir el café en la página 5.
4. Apoye el vástago dentro del calentador en el fondo del jarro y luego coloque la
canasta de filtrado sobre el vástago (verifique que el resorte esté sobre el
vástago). Esparza la cantidad de café recomendada en la canasta (consulte la
tabla de referencia en la página 5 para ver las medidas aproximadas). No use
café para cafeteras por goteo o muy fino ya que se puede inundar la canasta.
5. Moje la canasta para evitar que las partículas pequeñas de café pasen a través.
Use una taza medidora común (de 250 ml) para medir el café. Ajuste la cantidad
de café al gusto individual. Para preparar té, siga las mismas instrucciones y use
té al granel o en saquitos en vez de café y agregue agua hasta el nivel deseado.
Coloque la tapa a la canasta de filtrado.
6. Vuelva a colocar la tapa de acero inoxidable y ajústela girándola hacia la
derecha hasta que las aletas se traben en las ranuras de las manijas.
7. Enchufe la cafetera. Se encenderá la luz indicadora de "Encendido" ("On") y el
café se empezará a colar.
8. Cuando el café esté listo para servir, se encenderá la luz indicadora de "Listo"
("Ready") y el café se mantendrá caliente. Antes de servir, use una agarradera
o guantes de cocina para destrabar la tapa y retire con sumo cuidado la canasta
de filtro y el vástago del receptáculo.
9. Para preparar más café, enjuague el receptáculo y las piezas con agua fría y
repita los pasos anteriores.
PRECAUCIÓN:
• Tenga sumo cuidado: la canasta, el vástago y la borra pueden estar muy calientes.
• Nunca abra la tapa mientras el café esté en el proceso de hervir en el jarro.
• No toque el exterior de la cafetera mientras esté en uso.
4
4
• Use extreme caution: the basket, stem and ground coffee are very hot.
• Never open the lid while the coffee urn is in brewing process.
• Do not touch the coffee urn exterior while in use.
CAUTION:
To Make Coffee:
1. Place the appliance upright on a dry, sturdy and flat surface.
2. Set coarsely ground coffee aside. Do not use drip or finely ground coffee as flooding of
the basket may occur.
3. Remove all inside parts, then fill the urn with the appropriate amount of COLD water
depending on the amount of coffee desired. See coffee measuring chart on page 5.
4. Place stem into heating unit at the bottom of the coffee urn. Then put brew basket on stem,
making sure that the spring is on the stem. Spread the recommended amount of ground
coffee evenly into the basket. See coffee measuring chart on page 5 for approximate
measurements.
5. Wet brew basket to prevent small particles of coffee from sifting through. Use
standard measuring cup (250ml) to measure coffee. Adjust the amount of coffee
depending on individual preference. To make tea, follow the same instructions and
substitute tea or tea bags instead of coffee in basket and add water to desired level.
Replace brew basket lid.
6. Replace stainless steel lid and secure in position by turning cover clockwise until lid
locking tabs fit into the handle slots.
7. Plug in the coffee urn. The "Power" indicator light will be illuminated and the coffee
urn will start brewing coffee.
8. When coffee is ready to serve, the "Ready" indicator light will illuminate and keep
coffee warm. Before serving, use a protective hot pad or wear mitts to unlock lid and
carefully remove brew basket and stem from coffee urn.
9. To make additional coffee, rinse the coffee urn and parts with cold water and repeat steps.
Before First Use:
1. Read the instructions and important safeguards.
2. Remove all packaging materials; make sure all your items are received in good condition.
3. Wash the inside of the coffee urn and all the accessories with warm soapy water using a
sponge or dishcloth.
4. Rinse thoroughly to remove soapy residue.
5. Wipe body clean with a damp cloth.
Do not use abrasive cleaners or scouring pads.
Do not immerse the appliance, cord or plug in water at any time.
HOW TO USE
HOW TO USE
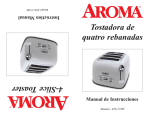
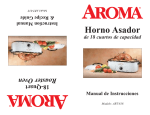
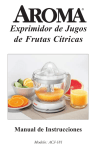
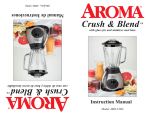
Measuring Chart
Cups To Be Brewed
20
Amount Of Coffee To Be Used
2 cups
3 1/4 cups
45
2 1/2 cups
30
40
3 cups
1 cup of brewed coffee = 2/3 cup
* Use standard measuring cup
Note: This chart is for reference only.
Slightly adjust the amount of coffee as needed.
CAUTION:
28
• Do not plug in and turn on the product when there is NO water inside.
• Never open the lid of the coffee urn while it is in use.
• Turn off the coffee urn and unplug from electrical outlet when there is less
than 2 cups of coffee remaining.
• The coffee urn must be cleaned after each use. Improper cleaning will
affect the performance of the product or may cause the unit to stop
percolating.
• Do not brew less than 20 cups of coffee.
• Do not overfill or underfill
30
12
20
NOTE:
Cantidad de café a usar
• Ground coffee in basket has to be removed promptly after coffee is
made to prevent the bitter oil of ground coffee from dripping into coffee.
• To preserve taste, it is not recommended to reheat coffee.
5
• La borra se debe sacar de la canasta enseguida de haber preparado el
café para evitar que los aceites amargos de la borra caigan en el café
recién hecho.
• Para que el café conserve el sabor, se recomienda no recalentarlo.
NOTA:
• NO enchufe y encienda la cafetera VACÍA.
• Nunca abra la tapa de la cafetera mientras esté funcionando.
• Apague la cafetera y desenchúfela del tomacorriente cuando queden
menos de 2 tazas de café.
• Se debe limpiar el jarro de la cafetera después de cada uso. Una
limpieza inadecuada afectará el rendimiento de la cafetera y podría
hacer que deje de colar café.
• No prepare menos de 20 tazas de café.
• No la llene de más ni de menos.
PRECAUCIÓN:
Nota: Esta tabla es sólo a modo de referencia.
Ajuste ligeramente la cantidad a gusto.
1 taza de café colado = 2/3 taza
* Use una taza medidora común
24
45
22
40
Tazas a preparar
Tabla de medidas
CÓMO USAR SU CAFETERA
5
LIMPIEZA
Siempre desenchufe la unidad y espere que se enfríe por completo antes de
limpiarla.
1. Quite la tapa y todas las piezas internas con cuidado. Las piezas, la borra y el
resto de café podrían aún estar calientes.
2. Lave el interior del jarro con agua jabonosa tibia. Enjuague a fondo y seque. No
sumerja la base del jarro en líquido.
3. El vástago (con resorte), el grifo de agua y la tapa con la perilla fría al tacto pueden
lavarse en el lavavajillas. Cuando lave el vástago, asegúrese de que la
ARANDELA en la parte inferior quede floja. Si queda atrapada borra en esta zona,
sostenga el vástago bajo un chorro de agua o use un mondadientes para retirarla.
4. Limpie el exterior del jarro con un trapo húmedo y seque con un paño seco. Quite
la tapa antes de guardar.
5. Con el uso repetido, se pueden formar manchas y acumular aceites que pueden
dar un sabor amargo al café. Periódicamente, use un producto para quitar
manchas de café o un limpiador especial y siga las instrucciones de limpieza que
vienen en el envase. Enjuague bien después de la limpieza.
6. No use limpiadores abrasivos ni estropajos en el exterior, el interior ni en las piezas
de la cafetera, ya que esto produciría arañazos y haría que se dañe.
PRECAUCIÓN:
• No sumerja la cafetera en agua ni en ningún otro líquido.
• No use limpiadores abrasivos ni estropajos.
6
6
CAUTION:
• Do not immerse the appliance in water or any liquid.
• Do not use abrasive cleaners or scouring pads.
1. Remove lid and all internal parts carefully. Parts, coffee grounds and remaining
coffee may still be hot. Do not clean until unit has cooled completely.
2. Wash the inside of the coffee urn and the parts with warm, soapy water. Rinse and
dry thoroughly. Do not immerse the base of the coffee urn in any liquid.
3. The stem (with spring), water spout and lid with cool-touch knob may be washed in
the dishwasher. When washing the stem, make sure that the WASHER on the
bottom remains loose. If coffee grounds are trapped in this area, hold the stem
under running water or use a wooden tooth pick to remove built up grounds.
4. Wipe the outside of the coffee urn with a damp cloth and dry with a towel. Remove
lid before storing.
5. After repeated use, coffee stains and accumulation of oils that may cause a bitter
taste may develop. Periodically, use a coffee-stain remover or special cleaner and
follow package directions for cleaning. Rinse well after cleaning.
6. Do not use abrasive cleaners or pads on the outside, inside or any parts of the
coffee urn as scratching will occur and damage the coffee urn.
Always unplug and allow unit to cool completely before cleaning.
HOW TO CLEAN
7
GARANTÍA LIMITADA
Aroma Housewares Company garantiza que este producto esté libre de
defectos de fabricación y en los materiales durante un período de un año de la
fecha comprobable de compra dendro de Los Estados Unidos.
Aroma Housewares Company warrants this product free from defects in material
and workmanship for one year from provable date of purchase in the continental
United States.
LIMITED WARRANTY
7
Within this warranty period, Aroma Housewares Company will repair or replace, at
its option, defective parts at no charge, provided the product is returned, freight
prepaid with proof of purchase and U.S. $8.00 for shipping and handling charges
payable to Aroma Housewares Company. Before returning an item, please call the
toll free number below for return authorization number. Allow 2-4 weeks for return
shipping.
AROMA HOUSEWARES COMPANY
6469 Flanders Drive
San Diego, California 92121
1-800-276-6286
L-V, 8:30 AM - 5:00 PM, Tiempo del Pacífico
Sitio Web: www.aromaco.com
This warranty does not cover improper installation, misuse, abuse or neglect on the
part of the owner. Warranty is also invalid in any case that the product is taken
apart or serviced by an unauthorized service station.
Esta garantía le ofrece derechos legales específicos, los cuales podrán variar
de un estado a otro y no cubre fuera de Los Estados Unidos.
This warranty gives you specific legal rights which may vary from state to state and
does not cover areas outside the United States.
Esta garantía no cubre la instalación incorrecta, uso indebido, maltrato o
negligencia por parte del usuario. La garantía también es inválida en caso de
que el aparato sea desarmado o se le dé mantenimiento por un centro de
servicio no autorizado.
AROMA HOUSEWARES COMPANY
6469 Flanders Drive
San Diego, California 92121
1-800-276-6286
M-F, 8:30 AM - 5:00 PM, Pacific Time
Website: www.aromaco.com
Dentro de este período de garantía, Aroma Housewares Company, a su
opción, reparará o reemplazará gratuitamente cualquier parte que resulte
defectuosa, siempre y cuando el producto sea devuelto a Aroma Housewares
Company, con porte pagado y comprobante de compra y U.S. $8.00 para
gastos de envío y manejo. Sírvase llamar al número telefónico gratuito
que se menciona abajo para obtener un número de autorización de
devolución. Espere entre 2-4 semanas para recibir el aparato
nuevamente.