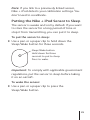
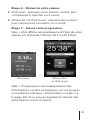
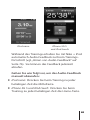
1
Nike + iPod Sensor KKApple Inc. © 2009 Apple Inc. All rights reserved. Apple, the Apple logo, iPod, iPod nano, iPod touch, and iTunes are trademarks of Apple Inc., registered in the U.S. and other countries. iPhone is a trademark of Apple Inc. iTunes Store is a service mark of Apple Inc., registered in the U.S. and other countries. NIKE and the Swoosh Design are trademarks of NIKE, Inc. and its affiliates, and are used under license. The Nike + iPod Sport Kit is covered by one or more of U.S. patent numbers 6,018,705, 6,052,654, 6,493,652, 6,298,314, 6,611,789, 6,876,947, and 6,882,955, either alone or when used in combination with a Nike + iPod enabled iPod media player or iPhone. Mention of third-party products is for informational purposes only and constitutes neither an endorsement nor a recommendation. Apple assumes no responsibility with regard to the performance or use of these products. All understandings, agreements, or warranties, if any, take place directly between the vendors and the prospective users. Every effort has been made to ensure that the information in this manual is accurate. Apple is not responsible for printing or clerical errors. 2 Contents 4 4 5 11 11 14 14 14 15 16 16 17 18 18 19 20 22 23 24 25 26 28 Welcome to Nike + iPod Your Personal Workout Assistant Quick Start Using Nike + iPod Calibrating Nike + iPod Setting the Units of Distance Entering Your Weight Locking Your Device During a Workout Getting Spoken Feedback Using a PowerSong Pausing a Workout Receiving Calls During a Workout Changing Music During a Workout Sending Workouts to Nikeplus.com Reviewing Workouts on Your Device Creating Custom Workout Shortcuts Purchasing Nike+ Workouts Using a Nike+ Compatible Remote Linking to Another Sensor Putting the Nike + iPod Sensor to Sleep Important Safety Information Learning More, Service, and Support 3 Welcome to Nike + iPod Your Personal Workout Assistant Nike + iPod is a workout partner and coach all in one. Select the type of workout you want— open-ended, distance, time, or calorie-burning— choose music to keep you motivated, and then keep track of your progress every step of the way with spoken and onscreen feedback. Upload your workout data to nikeplus.com, where you can set goals and monitor your improvement from workout to workout. Join the world’s largest online running community, participating in challenges with runners from across the globe. Nike + iPod is supported by iPhone 3G S, all iPod nano models, and iPod touch (2nd generation). iPod nano (all models) 4 iPod touch (second generation) iPhone 3G S Quick Start Follow these instructions to get started using Nike + iPod right away. Step 1: Enable Nike + iPod on your device. mm iPod nano: Attach the Nike + iPod receiver to iPod nano. Nike + iPod appears in the main menu. mm iPhone 3G S and iPod touch: Choose Settings > Nike + iPod and set it to On. A Nike + iPod icon appears on the Home screen. Note: iPhone 3G S and iPod touch have an internal receiver; no externally attached receiver is required. Step 2: Make sure you have the latest iPod and iTunes software. 1 Download and install the latest iTunes software to your computer from www.apple.com/itunes. You need iTunes 8 or later. 2 Connect the device to your computer, then select it in the iTunes sidebar and click Summary. 5 3 If iTunes indicates your iPod needs an update, click Update and follow the onscreen instructions. Step 3: Insert the Nike + iPod Sensor in your Nike+ ready shoe. mm Lift the insole of the left shoe, remove the foam insert from the pocket underneath, and replace it with the sensor. Lift the insole and place the sensor in the pocket, flat side up. You can leave the sensor in your shoe when you aren’t working out, but if you plan to wear your shoes for a long time without working out, replace the sensor with the foam insert to save battery life. The battery in the sensor is not user-replaceable. 6 Step 4: Choose a type of workout. An open-ended workout ÂÂ iPod nano: Choose Nike + iPod > New Workout > Basic. ÂÂ iPhone 3G S and iPod touch: Choose Nike + iPod > Basic. A workout with a time goal ÂÂ iPod nano: Choose Nike + iPod > New Workout > Time. ÂÂ iPhone 3G S and iPod touch: Choose Nike + iPod > Time. A workout with a distance goal ÂÂ iPod nano: Choose Nike + iPod > New Workout > Distance. ÂÂ iPhone 3G S and iPod touch: Choose Nike + iPod > Distance. A workout with a calorie burning goal ÂÂ iPod nano: Choose Nike + iPod > Settings > Weight and enter your weight. Then click the Menu button and choose Nike + iPod > New Workout > Calorie. ÂÂ iPhone 3G S and iPod touch: Choose Settings > Nike + iPod > Weight and enter your weight. Then press the Home button and choose Nike + iPod > Calorie. Note: You need to enter your weight only the first time you start a calorie burning workout. 7 Step 5: Choose music to accompany your workout. To play Do this A Nike+ Workout mix Choose the mix (see page 22). The currently playing song Choose Now Playing. Songs from a playlist Choose Playlists and then choose a playlist. Songs in random order Choose Shuffle Songs. No music Choose None. Step 6: Start your workout. mm iPod nano: Press the Center button and begin walking or running. mm iPhone 3G S and iPod touch: Tap Play and begin walking or running. Step 7: Monitor your progress. Nike + iPod automatically displays your workout status on the iPhone 3G S or iPod screen. 8 iPod nano iPhone 3G S and iPod touch Nike + iPod automatically gives you spoken feedback on your progress during your workout (see “Getting Spoken Feedback” on page 15). You can also get feedback whenever you want it. To get spoken feedback manually: mm iPod nano: Press the Center button at any time during your workout. mm iPhone 3G S and iPod touch: Press the Home button at any time during your workout. Note: iPhone 3G S and iPod touch must be locked to get spoken feedback manually (see “Getting Spoken Feedback” on page 15). 9 Step 8: End your workout. You can end your workout at any time. If you continue working out after you reach your time, distance, or calorie goal, your progress continues to be monitored. To end your workout: mm iPod nano: Press the Play/Pause (’) button to pause your workout. Then press the Menu button and choose End Workout. mm iPhone 3G S and iPod touch: Tap End Workout. If the device is locked, press the Home button and tap Pause. Then drag the slider and tap End Workout. Your most recent workout data is stored for future reference. Step 9: Track your progress at nikeplus.com. At nikeplus.com you can track your progress over time, view a record of all of your past workouts, set and monitor goals, and compare your results with others. You can even compete with other online Nike + iPod users in workout challenges. To send your workout data to nikeplus.com: 1 Make sure your computer is connected to the Internet, and then connect iPhone 3G S or iPod to your computer. 10 2 Click Send in the dialog that asks if you want to send your workout data to nikeplus.com. You can do it later if you don’t want to do it now. 3 Click Visit in the dialog that asks if you want to go to nikeplus.com. The nikeplus.com website opens with your most recent workout graphed on the homepage. 4 Click Save Your Runs, then click Sign Me Up and follow the onscreen instructions. See “Sending Workouts to Nikeplus.com” on page 18 for more information. Using Nike + iPod Follow these instructions to get the most out of Nike + iPod. Note: Some features are new with iPod nano (4th generation) and iPhone 3G S. Calibrating Nike + iPod The default calibration for Nike + iPod is accurate for many users. You can improve the accuracy by calibrating Nike + iPod to your natural running and walking style. 11 To calibrate Nike + iPod for running and walking: 1 iPod nano: Choose Nike + iPod > Settings > Sensor > Calibrate. iPhone 3G S and iPod touch: Choose Nike + iPod > Calibration. 2 Choose Run or Walk and enter a distance. Note: You must enter at least a quarter of a mile for calibration to be successful. 3 Choose music to accompany your calibration workout. 4 iPod nano: Press the Center button. iPhone 3G S and iPod touch: Tap Play. Then run or walk the set distance at a steady, natural pace. 5 iPod nano: Press the Menu button and choose Done Calibrating. iPhone 3G S and Pod touch: Tap End Workout, and then tap Done. A message lets you know if the calibration was successful. If you want to calibrate for both running and walking, repeat steps 1–5. Note: Even after calibrating, the accuracy of the distance measurements may vary depending on gait, running surface, incline, and temperature. 12 You can also calibrate Nike + iPod using the workout you just finished. This is useful if you’ve traveled a known distance that doesn’t match the summary distance displayed on your device. To calibrate using your latest completed workout: mm iPod nano: Choose End Workout, and then choose Calibrate. Set the correct distance you walked or ran, and press the Center button. mm iPhone 3G S and iPod touch: Tap End Workout, then tap Calibration and set the correct distance you walked or ran. Tap Save, then tap Done. The device senses whether the workout was a walk or run and correctly uses the new calibration to override the existing one. To reset Nike + iPod calibration to the default setting: mm iPod nano: Choose Nike + iPod > Settings > Sensor > Calibrate > Reset Walk or Reset Run. mm iPhone 3G S and iPod touch: Choose Nike + iPod > Calibration > Run or Walk, and then choose “Reset to Default.” 13 Setting the Units of Distance You can set Nike + iPod to measure your workouts in either miles or kilometers. To set the units of distance: mm iPod nano: Choose Nike + iPod > Settings, and set Distances to Miles or Kilometers. mm iPhone 3G S and iPod touch: Choose Settings > Nike + iPod > Distances, and then choose Miles or Kilometers. Entering Your Weight To enter your weight: mm iPod nano: Choose Nike + iPod > Settings > Weight, and then enter your weight. mm iPhone 3G S and iPod touch: Choose Settings > Nike + iPod > Weight, and then enter your weight. For better accuracy in calculating calories burned, update your weight if it changes. Locking Your Device During a Workout You can lock iPod touch so that its controls can’t be accidentally activated during a workout. To lock iPhone 3G S and iPod touch: mm Press the Sleep/Wake button. To unlock, press the Sleep/Wake button or the Home button and drag the slider. 14 Getting Spoken Feedback As you work out, Nike + iPod periodically gives spoken feedback on your status. You can choose a female or male voice, or turn off feedback. To set the voice type or turn spoken feedback off: mm iPod nano: Choose Nike + iPod > Settings, and then set Spoken Feedback to Male, Female, or Off. mm iPhone 3G S and iPod touch: Choose Settings > Nike + iPod > Spoken Feedback, and then choose Male, Female, or Off. If spoken feedback is turned off, you can still get spoken feedback manually. To get spoken feedback manually: mm iPod nano: Press the Center button at any time during your workout. mm iPhone 3G S and iPod touch: Press the Home button while the device is locked. Note: On iPod nano, spoken feedback is available in some languages besides English. If you set your iPod to one of these languages and connect your iPod to your computer (which must be connected to the Internet), iTunes prompts you to download feedback in that language. On iPod nano, you can have only one non-English version of spoken feedback on your iPod at a time. 15 On iPhone 3G S and iPod touch, all spoken feedback languages are supported automatically. Using a PowerSong Choose a song that motivates you and make it your PowerSong. You can switch quickly to it at any time during your workout. To choose a PowerSong: mm iPod nano: Choose Nike + iPod > Settings > PowerSong, and then choose a song. mm iPhone 3G S and iPod touch: Choose Settings > Nike + iPod > PowerSong, and then choose a song. To play your PowerSong: mm iPod nano: Hold down the Center button during a workout. After a short pause, the song plays. mm iPhone 3G S and iPod touch: Tap PowerSong on the workout screen. Or, if the device is locked, press the Home button twice, and then tap PowerSong. Pausing a Workout You can pause your workout, temporarily stopping music and data collection, and resume the workout later without losing any data. To pause or resume a workout: mm iPod nano: Press the Play/Pause (’) button. 16 mm iPhone 3G S and iPod touch: Tap Pause. Or, if the device is locked, press the Home button once and then tap Pause. Tap Play to resume your workout. Receiving Calls During a Workout You can use iPhone 3G S to answer calls as usual during your workout. When you receive a call, your workout is automatically paused when you answer. To answer a call: mm Tap Answer, or press the mic button if you’re wearing the stereo headset. If iPhone 3G S is locked, drag the slider to unlock it. To silence a call: mm Press the Sleep/Wake button or either volume button. You can still answer the call after silencing it, until it goes to voicemail. To decline a call: mm Tap Decline, or hold down the mic button on the headset for about two seconds, then release it. Two low beeps confirm that the call was declined. Pressing the lock button to dismiss a call silences the ringer but the music doesn’t resume until the call has gone to voicemail; the workout continues in the background. To resume your workout after a call: mm Tap Play. 17 Changing Music During a Workout You can change your music during a workout without losing your workout data. Your workout is paused during the music transition. To change music during a workout: 1 iPod nano: Press the Menu button and choose Change Music. Your workout pauses. iPhone 3G S and iPod touch: If the device is not locked, tap Pause. If it is locked, press the Home button, drag the slider to unlock, and tap Pause. Finally, tap Change Music. 2 iPod nano: Choose new music. Your workout resumes automatically. iPhone 3G S and iPod touch: Choose new music. Tap the top of the music screen to return to your workout, then tap Play. Sending Workouts to Nikeplus.com You can set iTunes to automatically send your workout data to nikeplus.com over the Internet whenever you connect iPhone 3G S or iPod to your computer. To send workouts to nikeplus.com: 1 Make sure your computer is connected to the Internet and then connect iPhone 3G S or iPod to your computer. 18 2 Open iTunes on your computer, click Nike + iPod, and then select “Automatically send workout date to nikeplus.com.” 3 Click “Visit nikeplus.com” below the checkbox or click Visit in the dialog that appears if you’ve already set your workout to be sent automatically. The nikeplus.com website opens with your most recent workout graphed on the homepage. 4 Click Save Your Runs and log in, or register if you haven’t already done so. When your device isn’t connected to your computer, you can go to www.nikeplus.com and enter your Login ID and password. Go to the nikeplus.com website to read Nike’s privacy policy and terms and conditions. Reviewing Workouts on Your Device Your iPhone 3G S or iPod saves the date, time, duration, distance, pace, and calories burned for up to your last one-thousand workouts. To review recent workouts on your device: mm iPod nano: Choose Nike + iPod > History. mm iPhone 3G S and iPod touch: Choose Nike + iPod, and then tap History at the bottom of the screen. 19 To erase a single workout session: 1 Choose Nike + iPod > History and choose a workout session. 2 iPod nano: Choose a workout session, click the Center button, and then choose Delete. iPhone 3G S and iPod touch: Tap Edit, choose a workout session, and then tap Delete. On iPhone 3G S and iPod touch, you can delete all workout sessions from History by tapping Clear at the top of the History screen. Creating Custom Workout Shortcuts Custom workout shortcuts let you easily choose and repeat a workout. iPod nano (4th generation only) automatically saves your completed workouts as shortcuts, and iPhone 3G S and iPod touch let you create custom workout shortcuts. To create a custom workout shortcut on iPhone 3G S or iPod touch: 1 Choose Nike + iPod, and then tap My Workouts at the bottom of the screen. 2 Tap Plus (+), and then choose the type of workout and the workout goal. 3 Choose music, enter a name for the workout, and then tap Save. 20 Note: You can create custom workout shortcuts only on iPhone 3G S and iPod touch (2nd generation). To delete a custom workout shortcut on iPhone 3G S and iPod touch: mm Choose Nike + iPod, and then tap My Workouts. Tap Edit, choose a shortcut, and then tap Delete. Finally, tap Done. To choose a custom workout shortcut on your device: mm iPod nano: Choose Nike + iPod, and then choose a shortcut. Shortcuts are named according to the type of workout and music. They can’t be deleted. mm iPhone 3G S and iPod touch: Choose Nike + iPod, and then tap My Workouts. Shortcuts are listed by the name you specified when you created the workout. Your most recent custom workout shortcut appears at the top of the list. 21 Purchasing Nike+ Workouts You can purchase and download Nike+ Workouts featuring continuous music mixed with professional coaching. When you purchase a Nike+ Workout, you get a single workout track with music and voiceover, and you also get all the individual songs in the mix. Choose mixes for your level and style of workout. To purchase a Nike+ Workout: 1 Open iTunes and click iTunes Store on the left side of the window, then type “Nike Sport Music” in the iTunes search field. 2 Click the Buy button next to the Nike+ Workout of your choice. 3 Follow the onscreen instructions to complete the purchase. The download begins automatically. 4 Connect the device to your computer and load the workout onto the device. Note: The iTunes Store is available only to people age 13 or older, in the U.S. and many other countries; for a list of countries, go to: www.apple.com/itunes/download. Terms apply. You must have Internet access (fees may apply) to use the iTunes Store. 22 Using a Nike+ Compatible Remote You can use a Nike+ compatible remote (sold separately) to control Nike + iPod wirelessly while you work out. Before using a remote for the first time, you must link it to your iPod nano receiver, iPhone 3G S, or iPod touch. To link to a Nike+ compatible remote (sold separately): mm iPod nano: Connect your Nike + iPod receiver to your iPod nano, choose Nike + iPod > Settings > Sensor > Link, and then follow the onscreen instructions. mm iPhone 3G S and iPod touch: Choose Settings > Nike + iPod > Remote, and then follow the onscreen instructions. To turn remote functionality on or off: mm iPod nano: Choose Nike + iPod > Settings > Remote, and then set Remote to On or Off. mm iPhone 3G S and iPod touch: Unlink the remote. To unlink a remote: mm iPod nano: Choose Nike + iPod > Settings > Remote > Unlink, and then follow the onscreen instructions. mm iPhone 3G S and iPod touch: Choose Settings > Nike + iPod > Remote and then tap Unlink. 23 Linking to Another Sensor You can use your iPod nano, iPhone 3G S, or iPod touch with more than one Nike + iPod Sensor. Each time you use an iPhone 3G S or iPod with a different sensor, you must link to that sensor. You may want to do this, for example, if there’s more than one person in your family with a sensor and Nike+ ready shoes. If you connect an iPod nano external receiver to a different iPod and use it with the same sensor, the receiver stores your settings, your workout history, and your workout shortcuts. You don’t need to relink or recalibrate. To link to another sensor: 1 iPod nano: Connect the receiver to your iPod nano. 2 Put on the shoes with the new sensor, and make sure there is no other Nike + iPod Sensor nearby. Walk around to activate the sensor so that your receiver (internal or external) can detect it. 3 iPod nano: Choose Nike + iPod > Settings > Sensor > Link and follow the onscreen instructions. A message indicates iPod is now linked to the new sensor. iPhone 3G S and iPod touch: Choose Settings > Nike + iPod > Sensor, tap Link New, and then follow the onscreen instructions. 24 Note: If you link to a previously linked sensor, Nike + iPod detects your calibration settings. You don’t need to recalibrate. Putting the Nike + iPod Sensor to Sleep The sensor is awake and on by default. If you want to store the sensor for a long period of time or stop it from transmitting, you can put it to sleep. To put the sensor to sleep: mm Use a pen or a paper clip to hold down the Sleep/Wake button for three seconds. Sleep/Wake button Hold down for three seconds to put to sleep. Press to wake. Important: To comply with applicable government regulations, put the sensor to sleep before taking it on an aircraft. To wake the sensor: mm Use a pen or a paper clip to press the Sleep/Wake button. 25 Important Safety Information WARNING: Failure to follow these safety instructions could result in injury or damage. Exercising Before starting any exercise program, you should have a complete physical examination by your physician. Do a warmup or stretching exercise before beginning any workout. Be careful and attentive while exercising. Slow down, if necessary, before adjusting your device while running. Stop exercising immediately if you feel pain, or feel faint, dizzy, exhausted, or short of breath. By exercising, you assume the risks inherent in physical exercise, including any injury that may result from such activity. Choking hazard The receiver and sensor are potential choking hazards. Keep them away from children under three years of age. 26 Avoid hearing damage Permanent hearing loss may occur if earphones are used at high volume. Set the volume to a safe level. You can adapt over time to a higher volume of sound that may sound normal but can be damaging to your hearing. If you experience ringing in your ears or muffled speech, stop listening and have your hearing checked. The louder the volume, the less time is required before your hearing could be affected. Hearing experts suggest that to protect your hearing: ÂÂ Limit the amount of time you use the earphones at high volume. ÂÂ Avoid turning up the volume to block out noisy surroundings. ÂÂ Turn down the volume if you can’t hear people speaking near you Disassembling the sensor Do not attempt to open the sensor, disassemble it, or remove the battery. No user-serviceable parts are inside. Do not use the receiver, iPhone, or iPod in or near water or wet locations. 27 Learning More, Service, and Support Answers to frequently asked questions about Nike + iPod Go to www.apple.com/support/nikeplus. Service and support for the Nike + iPod Sensor and Receiver Go to www.apple.com/support/nikeplus. Service and support for Nike+ ready shoes or the nikeplus.com website Go to www.nikeplus.com. Information about using iTunes Open iTunes and choose Help > iTunes Help. Information about using iPod Go to www.apple.com/support/ipod. Information about using iPhone 3G S Go to www.apple.com/support/iphone. 28 Table des matières 31 31 32 40 40 42 43 43 44 45 46 47 48 49 50 51 53 54 Bienvenue sur Nike + iPod Votre assistant personnel d’entraînement Démarrage rapide Utilisation de Nike + iPod Étalonnage de Nike + iPod Réglage des unités de distance Saisie de votre poids Verrouillage de votre dispositif pendant une séance d’entraînement Informations vocales Utilisation d’un morceau PowerSong Suspension d’une séance d’entraînement Réception d’appels pendant une séance d’entraînement Changement de musique durant une séance Envoi de séances d’entraînement à Nikeplus.com Visionnage de séances d’entraînement sur votre dispositif Création de raccourcis personnalisés vers des séances d’entraînement Achat de séances d’entraînements Nike+ Utilisation d’une télécommande Nike+ 29 55 Jumelage avec un autre capteur 57 Mise en veille du capteur Nike + iPod 58 Informations importantes sur la sécurité 60 Informations supplémentaires, service et assistance 30 Bienvenue sur Nike + iPod Votre assistant personnel d’entraînement Nike + iPod est à la fois votre partenaire d’entraînement et votre entraîneur. Sélectionnez le type d’entraînement souhaité (séance ouverte, distance, temps ou dépense calorique), choisissez une musique qui vous motive, puis suivez votre progression grâce aux informations vocales ou affichées à l’écran. Téléchargez les données d’entraînement sur nikeplus.com, afin de définir des objectifs et surveiller votre évolution d’une séance à l’autre. Rejoignez la plus grande communauté de coureurs du monde en participant à des défis avec des coureurs du monde entier. Nike + iPod est pris en charge par l’iPhone 3G S, tous les modèles iPod nano et iPod touch (2ème génération). 31 iPod nano iPod touch (tous les modèles) (2ème génération) iPhone 3G S Démarrage rapide Les instructions ci-dessous vous permettront d’utiliser Nike + iPod immédiatement. Étape 1 : Activez Nike + iPod sur votre dispositif. mm iPod nano : connectez le récepteur Nike + iPod à votre iPod nano. Nike + iPod apparaît dans le menu principal. 32 mm iPhone 3G S et iPod touch : choisissez Réglages > Nike + iPod et définissez-le sur Activé. Une icône Nike + iPod apparaît dans l’écran d’accueil. Remarque : l’iPhone 3G S et l’iPod touch sont équipés d’un récepteur interne, aucun récepteur externe n’est nécessaire. Étape 2 : Assurez-vous d’avoir installé les logiciels iPod et iTunes les plus récents. 1 Téléchargez et installez le logiciel iTunes le plus récent depuis www.apple.com/fr/itunes. iTunes 8 ou ultérieur est requis. 2 Connectez le dispositif à votre ordinateur, puis sélectionnez-le dans la barre latérale iTunes, puis cliquez sur Résumé. 3 Si le logiciel iTunes vous informe que votre iPod a besoin d’être mis à jour, cliquez sur Mettre à jour et suivez les instructions à l’écran. Étape 3 : Insérez le capteur Nike + iPod dans votre chaussure compatible Nike+. mm Soulevez la semelle de votre chaussure gauche, enlevez la pièce en mousse de la poche située sous la semelle et remplacez-la par le capteur. 33 Soulevez la semelle et placez le capteur dans la poche, le côté plat tourné vers le haut. Vous pouvez laisser le capteur dans la chaussure lorsque vous ne vous entraînez pas. Il est cependant conseillé de remplacer le capteur par la pièce en mousse pour économiser la charge de la batterie si vous comptez porter longtemps vos chaussures sans vous entraîner. La batterie contenue dans le capteur ne peut pas être remplacée par l’utilisateur. 34 Étape 4 : Choisissez un type de séance d’entraînement. Une séance ouverte ÂÂ iPod nano : choisissez Nike + iPod > Nouvelle séance > Standard. ÂÂ iPhone 3G S et iPod touch : choisissez Nike + iPod > Standard. Une séance avec objectif de temps ÂÂ iPod nano : choisissez Nike + iPod > Nouvelle séance > Temps. ÂÂ iPhone 3G S et iPod touch : choisissez Nike + iPod > Durée. Une séance avec objectif de distance ÂÂ iPod nano : choisissez Nike + iPod > Nouvelle séance > Distance. ÂÂ iPhone 3G S et iPod touch : choisissez Nike + iPod > Distance. 35 Une séance avec objectif de dépense calorique ÂÂ iPod nano : choisissez Nike + iPod > Réglages > Poids, puis saisissez votre poids. Cliquez ensuite sur le bouton Menu, puis choisissez Nike + iPod > Nouvelle séance > Calories. ÂÂ iPhone 3G S et iPod touch : choisissez Réglages > Nike + iPod > Poids et saisissez votre poids. Appuyez ensuite sur le bouton principal, puis choisissez Nike + iPod > Calories. Remarque : vous ne devez saisir votre poids que lorsque vous débutez votre toute première séance de dépense de calories. Étape 5 : Choisissez la musique qui accompagnera votre séance. 36 Pour écouter : Procédez ainsi : Un mix de séance Nike+ Sélectionnez le mix (voir page 53). Le morceau en cours de lecture Choisissez En lecture. Des morceaux d’une liste de lecture Choisissez Listes de lecture et sélectionnez une liste de lecture. Des morceaux dans un ordre aléatoire Choisissez Mix de morceaux. Aucune musique Choisissez Aucune. Étape 6 : Démarrez votre séance. mm iPod nano : appuyez sur le bouton central, puis commencez à marcher ou à courir. mm iPhone 3G S et iPod touch : sélectionnez Lecture, puis commencez à marcher ou à courir. Étape 7 : Suivez votre progression. Nike + iPod affiche automatiquement l’état de votre séance sur l’écran de l’iPhone 3G S ou de l’ iPod. iPod nano iPhone 3G S et iPod touch Nike + iPod propose automatiquement des informations vocales périodiques sur vos progrès (consultez la rubrique « Informations vocales » à la page 44). Vous pouvez également obtenir des informations à tout moment. 37 Pour obtenir manuellement des informations vocales : mm iPod nano : appuyez sur le bouton central au cours de votre séance. mm iPhone 3G S et iPod touch : appuyez sur le bouton principal au cours de votre séance. Remarque : l’iPhone 3G S et l’iPod touch doivent être verrouillés pour que vous puissiez obtenir des informations vocales manuellement (consultez la rubrique « Informations vocales » à la page 44). Étape 8 : Terminez votre séance. Vous pouvez arrêter votre séance d’entraînement à tout moment. Si vous continuez à vous entraîner après avoir atteint votre objectif de temps, de distance ou de calories, vos progrès continuent à être suivis. Pour arrêter votre séance d’entraînement : mm iPod nano : appuyez sur le bouton Lecture/Pause (’) pour suspendre votre séance. Appuyez ensuite sur le bouton Menu, puis choisissez Arrêter la séance. mm iPhone 3G S et iPod touch : sélectionnez Terminer. Si le dispositif est verrouillé, appuyez sur le bouton principal puis sélectionnez Pause. Faites ensuite glisser le curseur, puis sélectionnez Terminer. 38 Les données de vos séances les plus récentes sont stockées afin que vous puissiez les consulter ultérieurement. Étape 9 : Suivez le détail de votre progression sur nikeplus.com. Sur nikeplus.com, vous pouvez suivre le détail de votre progression avec le temps, afficher les données relatives à toutes vos séances passées, définir des objectifs et les surveiller et comparer vos résultats avec d’autres coureurs. Vous pouvez même participer à des défis d’entraînement avec d’autres utilisateurs en ligne de Nike + iPod. Pour envoyer vos données d’entraînement à nikeplus.com : 1 Assurez-vous que votre ordinateur est connecté à Internet, puis connectez votre iPhone 3G S ou votre iPod à votre ordinateur. 2 Cliquez sur Envoyer dans la zone de dialogue qui vous demande si vous souhaitez envoyer vos données d’entraînement à nikeplus.com. Vous pouvez effectuer cette opération ultérieurement, si vous ne souhaitez pas l’exécuter maintenant. 3 Cliquez sur Aller dans la zone de dialogue qui vous demande si vous souhaitez accéder à nikeplus. com. Vos données d’entraînement les plus récentes sont représentées graphiquement sur la page d’accueil du site web nikeplus.com. 39 4 Cliquez sur Mes courses, puis sur S’inscrire et suivez les instructions à l’écran. Consultez la rubrique « Envoi de séances d’entraînement à Nikeplus.com » à la page 49 pour en savoir plus. Utilisation de Nike + iPod Suivez ces instructions pour profiter au mieux de Nike + iPod. Remarque : certaines fonctionnalités sont nouvelles sur l’iPod nano (4e génération) et l’iPhone 3G S. Étalonnage de Nike + iPod Nike + iPod est suffisamment précis pour la plupart des utilisateurs. Vous pouvez améliorer cette précision en étalonnant Nike + iPod selon votre style naturel de course et de marche. Pour étalonner Nike + iPod pour la course et la marche : 1 iPod nano : choisissez Nike + iPod > Réglages > Capteur > Étalonner. iPhone 3G S et iPod touch : choisissez Nike + iPod > Étalonnage. 2 Choisissez Course ou Marche, puis saisissez une distance. 40 Remarque : vous devez saisir au moins 400 mètres pour que l’étalonnage réussisse. 3 Choisissez la musique qui accompagnera votre séance d’étalonnage. 4 iPod nano : appuyez sur le bouton central. iPhone 3G S et iPod touch : sélectionnez Lecture. Courez ou marchez ensuite sur la distance définie à un rythme constant et naturel. 5 iPod nano : appuyez ensuite sur le bouton Menu, puis choisissez Étalonnage terminé. iPhone 3G S et iPod touch : sélectionnez Arrêter la séance, puis sélectionnez Terminé. Un message vous indique si l’étalonnage s’est effectué correctement. Si vous souhaitez effectuer un étalonnage pour la course et pour la marche, répétez les étapes 1–5. Remarque : même après l’étalonnage, la précision de mesure des distances peut varier selon l’allure, la surface de course, la pente et la température. Vous pouvez également calibrer Nike + iPod à l’aide de la séance d’entraînement que vous venez de terminer. Cette opération est utile si vous avez parcouru une distance connue qui ne correspond pas à la distance affichée sur votre dispositif. 41 Pour effectuer un étalonnage à partir de votre dernière séance : mm iPod nano : choisissez Arrêter la séance, puis choisissez Étalonner. Définissez la distance réellement parcourue, puis appuyez sur le bouton central. mm iPhone 3G S et iPod touch : sélectionnez Arrêter la séance, puis sélectionnez Étalonnage et indiquez la distance réellement parcourue. Tapotez sur Enregistrer, puis sur Terminé. Le dispositif détecte le type de séance d’entraînement (marche ou course) et remplace correctement l’ancien étalonnage par le nouveau. Pour rétablir le réglage par défaut de l’étalonnage Nike + iPod : mm iPod nano : choisissez Nike + iPod > Réglages > Capteur > Étalonner > Réinitialiser marche ou Réinitialiser course. mm iPhone 3G S et iPod touch : choisissez Nike + iPod > Étalonnage > Course ou Marche, puis choisissez Réinitialiser par défaut. Réglage des unités de distance Vous pouvez configurer Nike + iPod pour que vos séances d’entraînement soient mesurées en milles ou en kilomètres. 42 Pour régler les unités de distance : mm iPod nano : choisissez Nike + iPod > Réglages, puis réglez Distances sur Milles ou Kilomètres mm iPhone 3G S et iPod touch : choisissez Nike + iPod > Réglages > Distances, puis choisissez Milles ou Kilomètres Saisie de votre poids Pour saisir votre poids : mm iPod nano : choisissez Nike + iPod > Réglages > Poids, puis saisissez votre poids. mm iPhone 3G S et iPod touch : choisissez Réglages > Nike + iPod > Poids, puis saisissez votre poids. Pour une plus grande précision de calcul des calories dépensées, actualisez votre poids au fur et à mesure de ses variations. Verrouillage de votre dispositif pendant une séance Vous pouvez verrouiller l’iPod touch de sorte que ses commandes ne soient pas activées accidentellement au cours d’une séance. Pour verrouiller l’iPhone 3G S et l’iPod touch : mm Appuyez sur le bouton Mettre en veille/Réactiver. Pour déverrouiller l’iPod, appuyez sur le bouton Mettre en veille/Réactiver ou sur le bouton principal et faites glisser le curseur. 43 Informations vocales Pendant vos séances d’entraînement, Nike + iPod vous donne périodiquement des informations vocales sur vos progrès. Vous pouvez choisir une voix de femme ou d’homme, ou désactiver les informations vocales. Pour régler le type de voix ou désactiver les informations vocales : mm iPod nano : choisissez Nike + iPod > Réglages, puis réglez Informations vocales sur Masculines, Féminines ou Désactivées. mm iPhone 3G S et iPod touch : choisissez Réglages > Nike + iPod > Informations vocales, puis choisissez Masculines, Féminines ou Désactivées. Vous pouvez toujours obtenir des informations vocales à la demande, même si l’option est désactivée. Pour obtenir manuellement des informations vocales : mm iPod nano : appuyez sur le bouton central au cours de votre séance. mm iPhone 3G S et iPod touch : appuyez sur le bouton principal lorsque le dispositif est verrouillé. 44 Remarque : sur l’iPod nano, les informations vocales sont disponibles dans certaines langues autres que l’anglais. Si vous avez réglé votre iPod sur une de ces langues et que vous le branchez sur l’ordinateur (connecté à Internet), iTunes vous demandera de télécharger une version des informations vocales dans cette langue. Vous ne pouvez disposer que d’une seule version autre que la version anglaise sur votre iPod nano. Sur l’iPhone 3G S et l’iPod touch, toutes les langues sont prises en charge automatiquement pour les informations vocales. Utilisation d’un morceau PowerSong Choisissez un morceau qui vous motive et faitesen votre PowerSong. Vous pouvez la sélectionner très rapidement à tout moment de votre séance. Pour choisir un morceau PowerSong : mm iPod nano : choisissez Nike + iPod > Réglages > PowerSong, puis choisissez un morceau. mm iPhone 3G S et iPod touch : choisissez Réglages > Nike + iPod > PowerSong, puis choisissez un morceau. Pour écouter votre morceau PowerSong : mm iPod nano : maintenez le bouton central enfoncé au cours d’une séance. Le morceau est lu après une courte pause. 45 mm iPhone 3G S et iPod touch : sélectionnez PowerSong sur l’écran de la séance. Si le dispositif est verrouillé, vous pouvez également appuyer sur le bouton principal à deux reprises, puis sélectionner PowerSong. Suspension d’une séance d’entraînement Vous pouvez suspendre votre séance d’entraînement à tout moment, ce qui suspend également la lecture de musique et le recueil des données, et la reprendre plus tard sans en perdre les données. Pour suspendre ou reprendre une séance d’entraînement : mm iPod nano : appuyez sur le bouton Lecture/ Pause (’). mm iPhone 3G S et iPod touch : sélectionnez Pause. Si le dispositif est verrouillé, vous pouvez également appuyer une fois sur le bouton principal, puis sélectionner Pause. Tapotez sur Lecture pour reprendre votre séance. 46 Réception d’appels pendant une séance d’entraînement Vous pouvez utiliser l’iPhone 3G S pour répondre à des appels comme d’habitude, pendant votre séance. Lorsque vous recevez un appel, votre séance est immédiatement suspendue dès vous répondez. Pour répondre à un appel : mm Sélectionnez Répondre ou appuyez sur le bouton micro si vous portez le casque. Si l’iPhone 3G S est verrouillé, faites glisser le curseur pour le déverrouiller. Pour couper le son d’un appel : mm Appuyez sur le bouton de marche/veille ou sur le bouton du volume. Vous pouvez toujours répondre à l’appel après avoir coupé le son, jusqu’à ce qu’il soit dirigé sur la messagerie vocale. Pour refuser un appel : mm Sélectionnez Refuser, ou maintenez le bouton micro du casque enfoncé pendant environ deux secondes, puis relâchez-le. Deux longs signaux sonores confirment que l’appel a été refusé. 47 Le fait d’appuyer sur le bouton de verrouillage pour refuser un appel coupe le son de la sonnerie mais la musique ne reprend pas tant que l’appel n’a pas été transféré sur la messagerie vocale ; la séance continue en arrière-plan. Pour suspendre votre séance d’entraînement à l’issue d’un appel : mm Sélectionnez Lecture. Changement de musique durant une séance Vous pouvez changer de musique en cours de séance sans pour autant perdre de vos données. Votre séance est suspendue pendant la transition musicale. Pour changer de musique durant une séance : 1 iPod nano : appuyez ensuite sur le bouton Menu, puis choisissez Changer de musique. Votre séance est suspendue. iPhone 3G S et iPod touch : si le dispositif n’est pas verrouillé, sélectionnez Pause. S’il est verrouillé, appuyez sur le bouton principal, faites glisser le curseur pour déverrouiller, puis sélectionnez Pause. Enfin, sélectionnez Changer la musique. 2 iPod nano : choisissez un autre morceau. Votre séance reprend automatiquement. 48 iPhone 3G S et iPod touch : choisissez un autre morceau. Tapotez en haut de l’écran de musique pour retourner à votre séance, puis tapotez sur Lecture. Envoi de séances d’entraînement à Nikeplus.com Vous pouvez configurer iTunes pour qu’il transmette vos données d’entraînement à nikeplus.com via Internet, à chaque fois que vous connectez l’iPhone 3G S ou l’iPod à votre ordinateur. Pour envoyer des séances vers nikeplus.com : 1 Assurez-vous que votre ordinateur est connecté à Internet, puis connectez votre iPhone 3G S ou votre iPod à votre ordinateur. 2 Ouvrez iTunes sur votre ordinateur, cliquez sur Nike + iPod, puis sélectionnez « Envoyer automatiquement les données de séance vers nikeplus.com ». 3 Cliquez sur « Visiter nikeplus.com » en dessous de la case ou cliquez sur Visiter dans la zone de dialogue qui apparaît si vous avez déjà configuré votre séance pour qu’elle soit envoyée automatiquement. 49 Vos données d’entraînement les plus récentes sont représentées graphiquement sur la page d’accueil du site web nikeplus.com. 4 Cliquez sur Mes courses, puis connectez-vous ou inscrivez-vous si vous ne l’avez pas déjà fait. Lorsque votre dispositif n’est pas connecté à votre ordinateur, vous pouvez vous rendre sur www.nikeplus.com et y saisir votre identifiant et votre mot de passe. Consultez la politique de respect de la vie privée et les conditions générales de Nike accessible sur le site web nikeplus.com. Visionnage de séances d’entraînement sur votre dispositif Votre iPhone 3G S ou votre iPod enregistre la date, l’heure, la durée, la distance, le rythme et les calories dépensées des mille dernières séances d’entraînement. Pour consulter les séances d’entraînement récentes sur votre dispositif : mm iPod nano : choisissez Nike + iPod > Historique. mm iPhone 3G S et iPod touch : choisissez Nike + iPod, puis sélectionnez Historique dans le bas de l’écran. Pour effacer une seule séance d’entraînement : 1 Choisissez Nike + iPod > Historique, puis sélectionnez une séance d’entraînement. 50 2 iPod nano : choisissez une session d’entraînement, cliquez sur le bouton central, puis choisissez Supprimer. iPhone 3G S et iPod touch : sélectionnez Modifier, choisissez une session d’entraînement, puis sélectionnez Supprimer. Sur l’iPhone 3G S et l’iPod touch, vous pouvez supprimer toutes les sessions d’entraînement de l’Historique en sélectionnant Effacer dans le haut de l’écran Historique. Création de raccourcis personnalisés vers des séances d’entraînement Les raccourcis vers des séances personnalisées vous permettent de choisir et de recommencer une séance. iPod nano (4ème génération uniquement) enregistre automatiquement vos séances terminées sous forme de raccourcis, et l’iPhone 3G S et l’iPod touch vous permettent de créer des raccourcis vers des séances personnalisées. Pour créer un raccourci vers une séance personnalisée sur un iPhone 3G S ou un iPod touch : 1 Choisissez Nike + iPod, puis sélectionnez Mes séances dans le bas de l’écran. 51 2 Sélectionnez Plus (+), puis choisissez le type de séances et l’objectif de la séance. 3 Choisissez la musique, saisissez le nom de la séance, puis sélectionnez Enregistrer. Remarque : vous ne pouvez créer de raccourcis de séances personnalisés que sur l’iPhone 3G S et l’iPod touch (2ème génération). Pour créer un raccourci personnalisé vers une séance sur un iPhone 3G S ou un iPod touch : mm Choisissez Nike + iPod et sélectionnez Mes séances. Sélectionnez Modifier, choisissez un raccourci, puis sélectionnez Supprimer. Enfin, sélectionnez Terminé. Pour choisir un raccourci de séance personnalisé sur votre dispositif : mm iPod nano : choisissez Nike + iPod et choisissez un raccourci. Les raccourcis sont nommés selon le type de séance et de musique. Il n’est pas possible de les supprimer. mm iPhone 3G S et iPod touch : choisissez Nike + iPod et sélectionnez Mes séances. Les raccourcis sont classés en fonction du nom que vous avez choisi au moment de les créer. Le raccourci de séance personnalisé le plus récent figure au début de la liste. 52 Achat de séances d’entraînements Nike+ Vous pouvez acheter et télécharger des séances d’entraînement Nike+. Ces séances contiennent de la musique en continu ainsi que des conseils d’entraînement professionnels. Lorsque vous achetez une séance d’entraînement Nike+, vous obtenez une seule piste d’entraînement avec de la musique et des commentaires vocaux, ainsi que tous les morceaux de musique qui composent cette piste. Choisissez des morceaux selon votre niveau et votre style d’entraînement. Pour acheter une séance d’entraînement Nike+ : 1 Ouvrez iTunes, puis cliquez sur iTunes Store du côté gauche de la fenêtre, puis tapez « Musique Nike Sport » dans la zone de recherche iTunes. 2 Cliquez sur le bouton Acheter en regard de la séance d’entraînement Nike+ de votre choix. 3 Suivez les instructions à l’écran pour terminer l’achat. Le téléchargement commence immédiatement. 4 Connectez le dispositif à votre ordinateur et chargez la séance sur le dispositif. 53 Remarque : l’iTunes Store n’est disponible que pour les personnes de 13 ans ou plus aux ÉtatsUnis et dans beaucoup d’autres pays. Pour obtenir la liste de ces pays, rendez-vous sur www.apple.com/fr/itunes/download. L’utilisation du site est soumise à certaines conditions. Vous devez disposer d’un accès à Internet (éventuellement payant) pour utiliser l’iTunes Store. Utilisation d’une télécommande compatible Nike+ Vous avez la possibilité d’utiliser une télécommande compatible Nike+ (vendue séparément) pour contrôler sans fil le système Nike + iPod au cours de votre séance d’entraînement. Avant d’utiliser une télécommande pour la première fois, vous devez la jumeler à votre récepteur iPod nano, iPhone 3G S, ou iPod touch. Pour jumeler une télécommande compatible Nike+ (vendu séparément) : mm iPod nano : connectez votre récepteur Nike + iPod à votre iPod nano, choisissez Nike + iPod > Réglages > Capteur > Jumeler, puis suivez les instructions à l’écran. mm iPhone 3G S et iPod touch : choisissez Réglages > Nike + iPod > Télécommande, puis suivez les instructions à l’écran. 54 Pour activer ou désactiver la fonction télécommande : mm iPod nano : choisissez Nike + iPod > Réglages > Télécommande, puis réglez l’option sur Activé ou Désactivé. mm iPhone 3G S et iPod touch : déjumeler la télécommande. Pour déjumeler une télécommande : mm iPod nano : choisissez Nike + iPod > Réglages > Télécommande > Déjumeler, puis suivez les instructions à l’écran. mm iPhone 3G S et iPod touch : choisissez Réglages > Nike + iPod > Télécommande, puis sélectionnez Déjumeler. Jumelage avec un autre capteur Vous pouvez utiliser votre iPod nano, iPhone 3G S ou votre iPod touch avec plusieurs capteurs Nike + iPod. Chaque fois que vous utilisez un iPhone 3G S ou un iPod avec un capteur différent, vous devez le jumeler au capteur. Cela peut être utile si, par exemple, plusieurs membres de votre famille possèdent un capteur et des chaussures compatibles Nike+. 55 Si vous branchez un récepteur externe pour iPod nano sur un autre iPod et si vous l’utilisez avec le même capteur, le récepteur en question stocke vos réglages, l’historique de vos séances et vos raccourcis aux séances. Il est inutile de rétablir le jumelage ou de l’étalonner à nouveau. Pour jumeler le récepteur avec un autre capteur : 1 iPod nano : connectez le récepteur à votre iPod nano. 2 Enfilez les chaussures dotées du nouveau capteur et assurez-vous qu’il n’y a aucun autre capteur Nike + iPod à proximité. Commencez à marcher pour activer le capteur et permettre ainsi au récepteur (interne ou externe) de le détecter. 3 iPod nano : choisissez Nike + iPod > Réglages > Capteur > Jumeler, puis suivez les instructions à l’écran. Un message indique que l’iPod est maintenant jumelé avec le nouveau capteur. iPhone 3G S et iPod touch : choisissez Réglages > Nike + iPod > Capteur, sélectionnez Autre, puis suivez les instructions à l’écran. Remarque : si vous jumelez le récepteur avec un capteur ayant déjà été jumelé, Nike + iPod détecte vos réglages d’étalonnage. Il est inutile de l’étalonner à nouveau. 56 Mise en veille du capteur Nike + iPod Le capteur est éveillé et activé par défaut. Si vous souhaitez stocker le capteur pendant une période prolongée ou l’empêcher de transmettre, mettez-le en veille. Pour mettre en veille le capteur : mm Utilisez un stylo ou un trombone pour maintenir enfoncé le bouton de marche/ veille pendant trois secondes. Bouton Mettre en veille/Réactiver Maintenez le bouton enfoncé pendant trois secondes pour mettre en veille. Appuyez pour réactiver. Important : mettez le capteur en veille avant de l’emporter à bord d’un avion, conformément à la réglementation en vigueur. Pour réactiver le capteur : mm Utilisez un stylo ou un trombone pour appuyez sur le bouton de veille/réactivation. 57 Informations importantes sur la sécurité ATTENTION : le non-respect de ces instructions de sécurité peut provoquer des dommages physiques ou corporels. Pratique d’exercices physiques Avant de commencer un programme d’exercices, demandez à votre médecin de réaliser un examen clinique complet. Effectuez des exercices d’échauffement ou d’étirement musculaire avant de commencer votre séance d’entraînement. Soyez prudent et attentif pendant vos exercices physiques. Ralentissez, le cas échéant, avant de régler votre dispositif pendant la course. Arrêtez immédiatement de courir en cas de douleur, de faiblesse, d’étourdissement, d’épuisement ou d’essoufflement. En pratiquant un exercice physique, vous assumez les risques inhérents à ce type d’activités, y compris les blessures qui pourraient en résulter. Danger de suffocation Le récepteur et le capteur peuvent présenter un risque de suffocation. Gardez-les hors de portée des enfants de moins de trois ans. 58 Prévention des troubles auditifs Vous risquez une perte auditive irréversible si vous utilisez un casque ou des écouteurs à un volume sonore élevé. Réglez le volume sur un niveau raisonnable. Il est possible de s’habituer petit à petit à un volume sonore élevé qui, s’il peut sembler normal, risque néanmoins d’entraîner des troubles auditifs. Si vos oreilles bourdonnent ou si les sons vous semblent étouffés, arrêtez l’écoute et faites vérifier votre audition par un spécialiste. Plus le volume est élevé, plus vous risquez d’abîmer rapidement votre audition. Les spécialistes de l’audition recommandent de prendre les précautions suivantes : ÂÂ Limitez la durée d’utilisation d’écouteurs à volume sonore élevé. ÂÂ Évitez d’augmenter le volume pour vous isoler du bruit ambiant. ÂÂ Diminuez le volume si vous n’entendez plus les personnes qui parlent autour de vous. Démontage du capteur N’essayez pas d’ouvrir le capteur, de le démonter ou de retirer la batterie. L’appareil ne contient pas de pièces pouvant être réparées par l’utilisateur. N’utilisez pas le récepteur ou l’iPhone ou l’iPod dans ou près de l’eau ou dans tout autre lieu humide. 59 Informations supplémentaires, service et assistance Les réponses aux questions fréquemment posées sur Nike + iPod Rendez-vous sur www.apple.com/fr/support/nikeplus. Le service et l’assistance pour le capteur et le récepteur Nike + iPod Rendez-vous sur www.apple.com/fr/support/nikeplus. Le service et l’assistance pour les chaussures compatibles Nike+ ou le site web nikeplus.com Rendez-vous sur www.nikeplus.com. L’utilisation d’iTunes Ouvrez iTunes et choisissez Aide > Aide iTunes. L’utilisation de l’iPod Rendez-vous sur www.apple.com/fr/support/ipod. Informations sur l’utilisation de l’iPhone 3G S Rendez-vous sur www.apple.com/fr/support/iphone. 60 Inhalt 63 63 64 72 72 75 75 76 76 78 79 79 81 82 83 84 86 87 Willkommen bei Nike + iPod Ihr persönlicher Fitnesstrainer Einführung Verwenden von Nike + iPod Kalibrieren von Nike + iPod Festlegen der Maßeinheit für die Strecke Eingeben des Gewichts Sperren Ihres Geräts beim Trainieren Hören von Audio-Feedback Verwenden von PowerSongs Unterbrechen des Trainings Empfangen von Anrufen beim Trainieren Wechseln der Musik beimTrainieren Senden von Trainingsdaten an Nikeplus.com Anzeigen von Trainingsdaten auf Ihrem Gerät Erstellen und Auswählen eigener Trainingskurzbefehle Kaufen von Nike+ Workout-Trainingsmusik Verwenden einer Nike+ kompatiblen Fernbedienung 61 89 Herstellen der Verbindung zu einem anderen Sensor 90 Aktivieren des Ruhezustands für den Nike + iPod-Sensor 92 Wichtige Sicherheitsinformationen 94 Weitere Informationen, Service und Support 62 Willkommen bei Nike + iPod Ihr persönlicher Fitnesstrainer Nike + iPod ist Trainingspartner und Trainer in einem. Wählen Sie die gewünschte Trainingsart aus – normales Training ohne besonderes Ziel, Training mit Streckenvorgabe, Training mit Zeitvorgabe oder Training mit Kalorienver brauchsvorgabe – wählen Sie eine Musik zur Motivationsunterstützung aus und verfolgen Sie dann Ihren Trainingsfortschritt mithilfe des audio-visuellen Feedbacks. Senden Sie Ihre Trainingsdaten an nikeplus.com, hier können Sie Ihr persönliches Trainingsziel angeben und Ihren Leistungsfortschritt von Training zu Training überwachen. Sie können auch Mitglied in der weltweit größten Online-Joggergemeinschaft werden und an Wettkämpfen mit anderen Joggern auf dem ganzen Globus teilnehmen. Nike + iPod wird vom iPhone 3G S, allen iPod nano-Modellen und iPod touch (2. Generation) unterstützt. 63 iPod nano (alle Modelle) iPod touch (2. Generation) iPhone 3G S Einführung Befolgen Sie die nachstehenden Anleitungen, um Ihren Nike + iPod sofort zu verwenden. Schritt 1: Aktivieren Sie Nike + iPod auf Ihrem Gerät. mm iPod nano: Schließen Sie den Nike + iPod-Empfänger an den iPod nano an. Nike + iPod wird im Hauptmenü angezeigt. 64 mm iPhone 3G S und iPod touch: Wählen Sie „Einstellun gen“ > „Nike+iPod“ und dann „Ein“ aus. Auf dem Home-Bildschirm wird ein Nike + iPod-Symbol angezeigt. Hinweis: iPhone 3G S und iPod touch besitzen einen internen Empfänger, daher ist es nicht nötig, einen externen Empfänger anzuschließen. Schritt 2: Vergewissern Sie sich, dass Sie die neuste iPod- und iTunes-Software verwenden. 1 Laden Sie die neuste iTunes-Software von der Website www.apple.com/de/itunes auf Ihren Computer und installieren Sie sie. Sie benötigen iTunes 8 oder neuer. 2 Verbinden Sie Ihr Gerät mit Ihrem Computer, wählen Sie es in der iTunes-Seitenleiste aus und klicken Sie auf „Übersicht“. 3 Wird die Meldung angezeigt, dass Ihr iPod aktualisiert werden muss, klicken Sie auf „Aktualisieren“ und befolgen Sie die Anleitungen auf dem Bildschirm. Schritt 3: Legen Sie den Nike + iPod-Sensor in Ihren Nike+ kompatiblen Schuh. mm Heben Sie hierfür die Innensohle Ihres linken Schuhs an, entfernen Sie die Schaumstofffüllung aus der Aussparung und legen Sie dort den Sensor hinein. 65 Heben Sie die Innensohle an und platzieren Sie den Sensor mit der flachen Seite nach oben in der Aussparung. Sie können den Sensor in Ihrem Schuh lassen, auch wenn Sie nicht trainieren. Wenn Sie jedoch die Schuhe längere Zeit ohne Training tragen, tauschen Sie den Sensor wieder durch die Schaumstofffüllung aus, um die Batterielebens dauer zu verlängern. Die Batterie im Sensor kann nicht durch den Benutzer ausgewechselt werden. Schritt 4: Wählen Sie die gewünschte Trainingsart bzw. Option. Normales Training ohne besonderes Ziel ÂÂ iPod nano: Wählen Sie „Nike+iPod“ > „Neues Training“ > „Normal“. ÂÂ iPhone 3G S und iPod touch: Wählen Sie „Nike+iPod“ > „Normal“. 66 Training mit Zeitvorgabe ÂÂ iPod nano: Wählen Sie „Nike+iPod“ > „Neues Training“ > „Zeit“. ÂÂ iPhone 3G S und iPod touch: Wählen Sie „Nike+iPod“ > „Zeit“. Training mit Streckenvorgabe ÂÂ iPod nano: Wählen Sie „Nike+iPod“ > „Neues Training“ > „Strecke“. ÂÂ iPhone 3G S und iPod touch: Wählen Sie „Nike+iPod“ > „Strecke“. Training mit Kalorienverbrauchsvorgabe ÂÂ iPod nano: Wählen Sie „Nike+iPod“ > „Einstellungen“ > „Gewicht“ und geben Sie Ihr Gewicht ein. Drücken Sie dann die Taste „Menu” und wählen Sie „Nike+iPod“ > „Neues Training“ > „Kalorien“. ÂÂ iPhone 3G S und iPod touch: Wählen Sie „Einstellungen“ > „Nike+iPod“ > „Gewicht“ und geben Sie Ihr Gewicht ein. Drücken Sie dann die Home-Taste und wählen Sie „Nike+iPod“ > „Kalorien“. Hinweis: Ihr Gewicht müssen Sie nur ein Mal eingeben, wenn Sie das erste Mal ein Training mit Kalorienver brauchsvorgabe beginnen. 67 Schritt 5: Wählen Sie die Begleitmusik für Ihr Training. Für folgende Musik Wählen Sie Nike+ WorkoutTrainingsmusik die Trainingsmusik (vgl. Seite 86). Musiktitel, der ggf. gerade spielt die Option „Sie hören“. Titel von einer Wiedergabeliste die Option „Wiedergabe listen“ und dann die gewünschte Liste aus. Titel in beliebiger Reihenfolge die Option „Zufällige Titel“. Keine Musik die Option „Nichts“. Schritt 6: Beginnen Sie Ihr Training. mm iPod nano: Drücken Sie die Mitteltaste und gehen oder laufen Sie. mm iPhone 3G S und iPod touch: Tippen Sie auf „Start“ und gehen oder laufen Sie. Schritt 7: Beobachten Sie Ihren Trainingsfortschritt. Nike + iPod zeigt Ihnen auf dem iPhone 3G S- oder iPod-Bildschirm den Trainingsstatus an. 68 iPod nano iPhone 3G S und iPod touch Während des Trainings erhalten Sie mit Nike + iPod automatisch Audio-Feedback zu Ihrem Trainings fortschritt (vgl. „Hören von Audio-Feedback” auf Seite 76). Sie können das Feedback jederzeit abrufen. Gehen Sie wie folgt vor, um das Audio-Feedback manuell abzurufen: mm iPod nano: Drücken Sie beim Training zu jeder beliebigen Zeit die Mitteltaste. mm iPhone 3G S und iPod touch: Drücken Sie beim Training zu jeder beliebigen Zeit die Home-Taste. 69 Hinweis: iPhone 3G S und iPod touch müssen gesperrt sein, damit Sie das Audio-Feedback manuell abrufen können (vgl. „Hören von Audio-Feedback” auf Seite 76). Schritt 8: Beenden Sie Ihr Training. Sie können Ihr Training jederzeit beenden. Wenn Sie Ihr Training fortsetzen, nachdem Sie Ihre Zeit-, Strecken- oder Kalorienvorgabe erreicht haben, wird Ihr Trainingsfortschritt weiterhin aufgezeichnet. Gehen Sie wie folgt vor, um Ihr Training zu beenden: mm iPod nano: Drücken Sie die Taste „Start/Pause“ (’), um Ihr Training zu unterbrechen. Drücken Sie die Taste „Menu“ und wählen Sie „Training Aus“. mm iPhone 3G S und iPod touch: Tippen Sie auf „Training Aus“. Wenn das Gerät gesperrt ist, drücken Sie die Home-Taste und tippen Sie auf „Pause“. Schieben Sie den Pfeil mit dem Finger nach rechts und tippen Sie auf „Training Aus“. Ihre neusten Trainingsdaten werden für spätere Vergleiche gespeichert. 70 Schritt 9: Verwalten Sie Ihre Trainingsdaten bei nikeplus.com. Auf nikeplus.com com können Sie Ihren Leistungs fortschritt in einem bestimmten Zeitraum überprüfen, Ihre Trainingseinheiten ansehen, Zielvorgaben festlegen bzw. überprüfen und Ihre Ergebnisse mit anderen Benutzern vergleichen. Sie können sogar mit anderen Nike + iPod-Online-Benutzern Wettkämpfe veranstalten. Gehen Sie wie folgt vor, um Ihre Trainingsdaten an nikeplus.com zu senden: 1 Stellen Sie sicher, dass Ihr Computer mit dem Internet verbunden ist, und schließen Sie Ihr iPhone 3G S oder Ihren iPod an den Computer an. 2 In einem Dialogfenster werden Sie gefragt, ob Sie die Trainingsdaten an nikeplus.com senden wollen. Klicken Sie auf „Senden“. Wenn Sie Ihre Trainingsdaten jetzt nicht senden wollen, können Sie das später nachholen. 3 In einem weiteren Dialogfenster werden Sie gefragt, ob Sie die Verbindung zu nikeplus.com herstellen wollen. Klicken Sie auf „Verbinden“. Die Website „nikeplus.com“ wird geöffnet und Ihre neusten Trainingsdaten werden auf der Startseite angezeigt. 71 4 Klicken Sie auf die Option zum Sichern Ihrer Läufe und dann auf „Registrieren“. Befolgen Sie die angezeigten Anleitungen. Weitere Informationen hierzu finden Sie im Abschnitt „Senden von Trainingsdaten an Nikeplus.com“ auf Seite 82. Verwenden von Nike + iPod Befolgen Sie die nachstehenden Anleitungen, um möglichst viel Nutzen und Freude mit Nike + iPod zu haben. Hinweis: Einige Funktionen sind mit dem iPod nano (4. Generation) und dem iPhone G3 S neu hinzugekommen. Kalibrieren von Nike + iPod Die Standardkalibrierung für Nike + iPod ist für die meisten Benutzer ausreichend genau. Sie können die Genauigkeit verbessern, indem Sie Nike + iPod auf Ihr persönliches Gehen und Laufen kalibrieren. Gehen Sie wie folgt vor, um Nike + iPod fürs Gehen oder Laufen zu kalibrieren: 1 iPod nano: Wählen Sie „Nike+iPod“ > „Einstellun gen“ > „Sensor“ > „Kalibrieren“. iPhone 3G S und iPod touch: Wählen Sie „Nike+iPod“ > „Kalibrierung“. 72 2 Wählen Sie „Laufen“ oder tippen Sie auf die Fußgängertaste legen Sie eine Strecke fest. Hinweis: Sie müssen mindestens etwa 400 m eingeben, damit die Kalibrierung erfolgreich ist. 3 Wählen Sie eine Begleitmusik für das Kalibrierungstraining. 4 iPod nano: Drücken Sie die Mitteltaste. iPhone 3G S und iPod touch: Tippen Sie auf „Start“. Laufen oder gehen Sie die gewählte Strecke in einem gleichmäßigen natürlichen Tempo. 5 iPod nano: Drücken Sie die Mitteltaste und wählen Sie „Kalibrieren fertig“. iPhone 3G S und Pod touch: Tippen Sie auf „Training Aus“ und dann auf „Fertig“. Auf dem Bildschirm sehen Sie, ob die Kalibrierung erfolgreich war. Wiederholen Sie die Schritte 1-5, wenn Sie die Kalibrierung für Ihr Lauf- und Gehtempo vornehmen wollen. Hinweis: Auch nach dem Kalibrieren kann die Genauigkeit von Streckenmessungen je nach Gangart, Beschaffenheit des Weges, Steigung oder Temperatur unterschiedlich ausfallen. Sie können Nike + iPod mit den Daten Ihrer soeben abgeschlossenen Trainingseinheit kalibrieren. Dies ist nützlich, wenn Sie eine Strecke gelaufen sind, die nicht der auf dem Gerät angezeigten Gesamtstrecke entspricht. 73 Gehen Sie wie folgt vor, um die Kalibrierung mit den Daten Ihres letzten abgeschlossenen Trainings vorzunehmen: mm iPod nano: Wählen Sie „Training Aus“ und dann „Kalibrieren“. Geben Sie die korrekte Strecke ein, die Sie gelaufen oder gegangen sind. Drücken Sie dann die Mitteltaste. mm iPhone 3G S und iPod touch: Tippen Sie auf „Training Aus“ und dann auf „Kalibrierung“. Geben Sie dann die korrekte gelaufene oder gegangene Strecke an. Tippen Sie auf „Sichern“ und dann auf „Fertig“. Das Gerät erkennt, ob die Strecke gelaufen oder gegangen wurde. Es verwendet dann die neue Kalibrierung und überschreibt die vorhandene. Gehen Sie wie folgt vor, um die Nike + iPod-Kalibrierung auf Standardwerte zurückzusetzen: mm iPod nano: Wählen Sie „Nike+iPod“ > „Einstellun gen“ > „Sensor“ > „Kalibrieren“ > „Gehen zurück setzen“ oder „Laufen zurücksetzen“. mm iPhone 3G S und iPod touch: Wählen Sie „Nike+iPod“ > „Kalibrierung“ > „Laufen“ oder „Gehen“ und dann „Auf Standard zurücksetzen“. 74 Festlegen der Maßeinheit für die Strecke Mit Nike + iPod können Sie Ihre Trainingsstrecke in Kilometern oder in Meilen messen. Gehen Sie wie folgt vor, um die Maßeinheit für die Strecke festzulegen: mm iPod nano: Wählen Sie „Nike+iPod“ > „Einstellun gen“ und für „Strecke“ entweder „Kilometer“ oder „Meilen“. mm iPhone 3G S und iPod touch: Wählen Sie „Einstellun gen“ > „Nike+iPod“ > „Strecke“ und dann „Meilen“ oder „Kilometer“. Eingeben des Gewichts Gehen Sie wie folgt vor, um Ihr Gewicht einzugeben: mm iPod nano: Wählen Sie „Nike+iPod“ > „Einstellun gen“ > „Gewicht“ und geben Sie Ihr Gewicht ein. mm iPhone 3G S und iPod touch: Wählen Sie „Einstellun gen“ > „Nike+iPod“ > „Gewicht“ und geben Sie Ihr Gewicht ein. Damit der Kalorienverbrauch präzise errechnet werden kann, sollten Sie mit steigender Fitness die Gewichtsangabe aktualisieren. 75 Sperren Ihres Geräts beim Trainieren Sie können den iPod touch sperren, sodass die Bedienelemente während des Trainings nicht versehentlich aktiviert werden können. Gehen Sie wie folgt vor, um iPhone 3G S und iPod touch zu sperren: mm Drücken Sie die Standby-Taste. Zum Aufheben der Sperre drücken Sie die Standby-Taste bzw. die Home-Taste und schieben den Regler mit dem Finger nach rechts. Hören von Audio-Feedback Während Sie trainieren, hören Sie, wie Nike + iPod Ihnen regelmäßig Audio-Feedback zu Ihrem Trainingsstatus gibt. Sie können zwischen einer Frauen- oder Männerstimme wählen oder das Feedback deaktivieren. Gehen Sie wie folgt vor, um die Stimme für das Audio-Feedback festzulegen bzw. um das AudioFeedback zu deaktivieren: mm iPod nano: Wählen Sie „Nike+iPod“ > „Einstellun gen“ und stellen Sie „Audio-Feedback“ auf „Männ lich“, „Weiblich“ oder „Aus“. mm iPhone 3G S und iPod touch: Wählen Sie „Einstellun gen“ > „Nike+iPod“ > „Audio-Feedback“ und wählen Sie „Männlich“, „Weiblich“ oder „Aus“. 76 Wenn die Option „Audio-Feedback“ ausgeschaltet ist, können Sie das Audio-Feedback weiterhin manuell abrufen. Gehen Sie wie folgt vor, um das Audio-Feedback manuell abzurufen: mm iPod nano: Drücken Sie während des Trainings zu jeder beliebigen Zeit die Mitteltaste. mm iPhone 3G S und iPod touch: Drücken Sie die HomeTaste auf dem gesperrten Gerät. Hinweis: Auf dem iPod nano steht die Funktion „Audio-Feedback“ außer in Englisch auch in einigen anderen Sprachen zur Verfügung. Wenn Sie für Ihren iPod eine Sprache festgelegt haben, in der diese Funktion verfügbar ist, und Sie den iPod an Ihren Computer (der mit dem Internet verbunden sein muss) anschließen, werden Sie von iTunes aufgefordert, die Feedback-Funktion in dieser Sprache zu laden. Auf Ihrem iPod nano kann immer nur eine nichtenglische Version für das Audio-Feedback installiert sein. Auf dem iPhone 3G S und iPod touch werden alle Feedback-Sprachen automatisch unterstützt. 77 Verwenden von PowerSongs Sie können einen Musiktitel wählen, der Sie besonders motiviert und diesen als PowerSong festlegen. Sie können jederzeit während Ihres Trainings schnell zu diesem Musiktitel wechseln. Gehen Sie wie folgt vor, um einen PowerSong festzulegen: mm iPod nano: Wählen Sie „Nike+iPod“ > „Einstellun gen“ > „PowerSong“ und dann den gewünschten Titel aus. mm iPhone 3G S und iPod touch: Wählen Sie „Einstellun gen“ > „Nike+iPod“ > „PowerSong“ und dann den gewünschten Titel aus. Gehen Sie wie folgt vor, um Ihren PowerSong zu hören: mm iPod nano: Drücken Sie während des Trainings die Mitteltaste. Nach einer kleinen Pause wird Ihr PowerSong-Titel gespielt. mm iPhone 3G S und iPod touch: Tippen Sie auf dem Trainingsbildschirm auf „PowerSong“. Ist das Gerät gesperrt, drücken Sie die Home-Taste zweimal und tippen Sie dann auf „PowerSong“. 78 Unterbrechen des Trainings Sie können eine Trainingspause einlegen – wobei die Musik und die Datenaufzeichnung ebenfalls pausieren – und das Training dann später fortsetzen, ohne Ihre Trainingsdaten zu verlieren. Gehen Sie wie folgt vor, um eine Pause einzulegen oder das Training fortzusetzen: mm iPod nano: Drücken Sie die Taste „Start/Pause“ (’). mm iPhone 3G S und iPod touch: Tippen Sie auf „Pause“. Ist das Gerät gesperrt, drücken Sie einmal die Home-Taste und tippen Sie dann auf „Pause“. Tippen Sie auf „Start“, um das Training fortzusetzen. Empfangen von Anrufen beim Trainieren Mit Ihrem iPhone 3G S können Sie auch während des Trainings wie gewohnt Anrufe annehmen. Erhalten Sie einen Anruf, wird Ihr Training automatisch gestoppt, sobald Sie den Anruf annehmen. Gehen Sie wie folgt vor, um einen Anruf anzunehmen: mm Tippen Sie auf „Antworten“ oder drücken Sie die Mikrofontaste, wenn Sie das Stereo-Headset verwenden. Wenn das iPhone 3G S gesperrt ist, schieben Sie den Regler mit dem Finger nach rechts, um die Sperrung aufzuheben. 79 Gehen Sie wie folgt vor, um einen Anruf stumm zu schalten: mm Drücken Sie die Standby-Taste oder eine Lautstärketaste. Auch nach dem Stummschalten können Sie Anrufe annehmen, solange die Voicemail noch nicht eingeschaltet ist. Gehen Sie wie folgt vor, um einen Anruf abzulehnen: mm Tippen Sie auf „Ablehnen“ oder halten Sie die Mikrofontaste am Headset ungefähr 2 Sekunden lang gedrückt und lassen Sie sie dann los. Zwei leise Piepstöne bestätigen, dass der Anruf abgelehnt wurde. Durch das Drücken der Taste zum Ablehnen eines Anrufs wird der Klingelton abgestellt, die Musik wird jedoch erst fortgesetzt, wenn der Anruf an Voicemail übergeben wurde. Das Training wird im Hintergrund weiter aufgezeichnet. Gehen Sie wie folgt vor, um Ihr Training nach einem Anruf fortzusetzen: mm Tippen Sie auf „Start“. 80 Wechseln der Musik beim Trainieren Sie können Ihre Musik jederzeit beim Trainieren wechseln, ohne Ihre Trainingsdaten zu verlieren. Das Training ist während des Musikwechsels gestoppt. Gehen Sie wie folgt vor, um die Musik beim Trainieren zu wechseln: 1 iPod nano: Drücken Sie die Taste „Menu“ und wählen Sie „Musik wechseln“. Ihr Training wird gestoppt. iPhone 3G S und iPod touch: Ist das Gerät nicht gesperrt, tippen Sie auf „Pause“. Ist das Gerät gesperrt, drücken Sie die Home-Taste, bewegen Sie den Regler mit dem Finger nach rechts, um die Sperre aufzuheben, und tippen Sie dann auf „Pause“. Tippen Sie danach auf „Musik wechseln“. 2 iPod nano: Wählen Sie die neue Musik aus. Ihr Training wird automatisch fortgesetzt. iPhone 3G S und iPod touch: Wählen Sie die neue Musik aus. Tippen Sie oben auf den Musikbild schirm, um zum Training zurückzukehren. Tippen Sie dann auf „Start“. 81 Senden von Trainingsdaten an Nikeplus.com Sie können iTunes so konfigurieren, dass Ihre Trainingsdaten automatisch über das Internet an nikeplus.com gesendet werden, wenn Sie Ihr iPhone 3G S oder Ihren iPod an Ihren Computer anschließen. Gehen Sie wie folgt vor, um Ihre Trainingsdaten an nikeplus.com zu senden: 1 Stellen Sie sicher, dass Ihr Computer mit dem Internet verbunden ist, und schließen Sie Ihr iPhone 3G S oder Ihren iPod an den Computer an. 2 Öffnen Sie iTunes auf Ihrem Computer, klicken Sie auf „Nike + iPod“ und wählen „Trainingsdaten automatisch an nikeplus.com senden“. 3 Klicken Sie auf „nikeplus.com Webseite öffnen“ unter dem Markierungsfeld. Klicken Sie im angezeigten Dialogfenster auf „Verbinden“, wenn Sie bereits festgelegt haben, dass Ihre Trainingsdaten automatisch gesendet werden. Die Website „nikeplus.com“ wird geöffnet und Ihre neusten Trainingsdaten werden auf der Startseite angezeigt. 4 Klicken Sie auf die Option zum Sichern Ihrer Läufe und melden Sie sich an oder registrieren Sie sich, falls noch nicht geschehen. 82 Auch wenn Ihr Gerät nicht an Ihrem Computer angeschlossen ist, können Sie die Website www.nikeplus.com besuchen und Ihre Anmelde-ID sowie Ihr Kennwort eingeben. Informationen zum Datenschutz bei Nike („Privacy Policy“) sowie die Nike Nutzungsbedingungen („Terms & Conditions“) finden Sie auf der Website nikeplus.com. Anzeigen von Trainingsdaten auf Ihrem Gerät Ihr iPhone 3G S oder iPod sichert Datum, Uhrzeit, Dauer, Strecke, Tempo und Kalorienverbrauch Ihrer bis zu eintausend letzten Trainingseinheiten. Gehen Sie wie folgt vor, um die letzten Trainings einheiten auf Ihrem Gerät anzuzeigen: mm iPod nano: Wählen Sie „Nike+iPod“ > „Übersicht“. mm iPhone 3G S und iPod touch: Wählen Sie „Nike+iPod“ und tippen Sie dann unten auf dem Bildschirm auf „Übersicht“. Gehen Sie wie folgt vor, um eine einzelne Trainingseinheit zu löschen: 1 Wählen Sie „Nike+iPod“ > „Übersicht“ und wählen Sie eine Trainingseinheit aus. 2 iPod nano: Wählen Sie eine Trainingseinheit aus und klicken Sie auf die Mitteltaste. Wählen Sie dann „Löschen“. 83 iPhone 3G S und iPod touch: Tippen Sie auf „Bear beiten“, wählen eine Trainingseinheit und tippen auf „Löschen“. Auf einem iPhone 3G S und iPod touch können Sie alle Trainingseinheiten löschen, indem Sie oben auf dem Bildschirm „Übersicht“ auf „Löschen“ tippen. Erstellen und Auswählen eigener Trainingskurzbefehle Mithilfe eigener Trainingskurzbefehle können Sie Trainingseinheiten schnell und einfach aus wählen und wiederholen. Der iPod nano (nur 4. Generation) sichert alle abgeschlossenen Trainingseinheiten automatisch als Kurzbefehle. Mit einem iPhone 3G S und iPod touch können Sie eigene Trainingskurzbefehle erstellen. Gehen Sie wie folgt vor, um auf einem iPhone 3G S oder iPod touch einen eigenen Trainingskurzbefehl zu erstellen: 1 Wählen Sie „Nike+iPod“ und tippen Sie dann unten auf dem Bildschirm auf „Meine Trainings“. 2 Tippen Sie auf das Pluszeichen (+) und wählen die Trainingsart und das Trainingsziel aus. 3 Wählen Sie eine Musik aus, geben einen Namen für die Trainingseinheit ein und tippen auf „Sichern“. 84 Hinweis: Eigene Trainingskurzbefehle können Sie nur auf einem iPhone 3G S und einem iPod touch (2. Generation) erstellen. Gehen Sie wie folgt vor, um einen eigenen Trainingskurzbefehl von einem iPhone 3G S oder iPod touch zu löschen: mm Wählen Sie „Nike+iPod“ und tippen Sie auf „Meine Trainings“. Tippen Sie auf „Bearbeiten“, wählen Sie einen Kurzbefehl aus und tippen Sie auf „Löschen“. Tippen Sie dann auf „Fertig“. Gehen Sie wie folgt vor, um einen eigenen Trainingskurzbefehl auf Ihrem Gerät auszuwählen: mm iPod nano: Wählen Sie „Nike+iPod“ und einen Trainingskurzbefehl. Kurzbefehle werden entsprechend der gewählten Trainingsart und Musik benannt. Sie können nicht gelöscht werden. mm iPhone 3G S und iPod touch: Wählen Sie „Nike+iPod“ und tippen Sie auf „Meine Trainings“. Kurzbefehle werden nach dem Namen aufgelistet, den Sie beim Erstellen der Trainingseinheit gewählt haben. Der zuletzt von Ihnen erstellte Kurzbefehl wird oben in der Liste angezeigt. 85 Kaufen von Nike+ WorkoutTrainingsmusik Sie können Nike+ Workout-Trainingsmusik kaufen und über das Internet laden. Nike+ Workout-Titel bieten Musik ohne Unterbrechung, die mit Kom mentaren von professionellen Trainern gemischt ist. Wenn Sie eine Nike+ Workout-Trainingsmusik kaufen, erhalten Sie zunächst eine Audioaufnahme mit Musik und gesprochenen Kommentaren. Darüber hinaus erhalten Sie auch alle einzelnen Musiktitel, die in der Trainingsmusik enthalten sind. Wählen Sie die Trainingsmusik, die zu Ihrem Trainingsstil und zu Ihrem Leistungsniveau passt. Gehen Sie wie folgt vor, um eine Nike+ WorkoutTrainingsmusik zu kaufen: 1 Öffnen Sie iTunes und klicken Sie links im Fenster auf „iTunes Store“. Geben Sie „nike+ sport music“ in das iTunes-Suchfeld ein. 2 Klicken Sie neben der gewünschten Nike+ Workout-Trainingsmusik auf „Kaufen“. 3 Befolgen Sie die angezeigten Anleitungen, um den Kauf abzuschließen. Die Musik wird automatisch geladen. 4 Verbinden Sie Ihr Gerät mit Ihrem Computer und laden Sie die Trainingsmusik auf das Gerät. 86 Hinweis: In den USA sowie in vielen anderen Län dern müssen Kunden des iTunes Store mindestens 13 Jahre alt sein. Eine Liste dieser Länder finden Sie unter: www.apple.com/de/itunes/download. Bitte beachten Sie die Geschäftsbedingungen. Sie benötigen einen Internetzugang (Gebühren können anfallen), um den iTunes Store verwenden zu können. Verwenden einer Nike+ kompatiblen Fernbedienung Sie können eine Nike+ kompatible Fernbedienung (separat erhältlich) verwenden, um Nike + iPod während Ihres Trainings drahtlos zu steuern. Bevor Sie die Fernbedienung zum ersten Mal verwenden, müssen Sie den iPod nano-Empfänger, das iPhone 3G S oder den iPod touch mit der Fernbedienung verbinden. Gehen Sie wie folgt vor, um eine Verbindung zur Nike+ kompatiblen Fernbedienung (separat erhältlich) herzustellen: mm iPod nano: Schließen Sie den Nike + iPod-Emp fänger an Ihren iPod nano an. Wählen Sie dann „Nike+iPod“ > „Einstellungen“ > „Sensor“ > „Verbinden“ und befolgen Sie die angezeigten Anleitungen. 87 mm iPhone 3G S und iPod touch: Wählen Sie „Einstellun gen“ > „Nike+iPod“ > „Fernbedienung“ und befolgen Sie die angezeigten Anleitungen. Gehen Sie wie folgt vor, um die Funktion für die Fernbedienung ein- oder auszuschalten: mm iPod nano: Wählen Sie „Nike+iPod“ > „Einstellun gen“ > „Fernbedienung“ und legen Sie für „Fern bedienen“ die Option „Ein“ oder „Aus“ fest. mm iPhone 3G S und iPod touch: Trennen Sie die Ver bindung zur Fernbedienung. Gehen Sie wie folgt vor, um die Verbindung zu einer Fernbedienung zu trennen: mm iPod nano: Wählen Sie „Nike+iPod“ > „Einstellun gen“ > „Fernbedienung“ > „Verbindung trennen“ und befolgen Sie die angezeigten Anleitungen. mm iPhone 3G S und iPod touch: Wählen Sie „Einstellun gen“ > „Nike+iPod“ > „Fernbedienung“ > und tippen Sie auf „Verbindung trennen“. 88 Herstellen der Verbindung zu einem anderen Sensor Sie können Ihren iPod nano, Ihr iPhone 3G S oder Ihren iPod touch mit mehr als nur einem Nike + iPod-Sensor verwenden. Jedes Mal, wenn Sie ein iPhone 3G S oder einen iPod mit einem anderen Sensor verwenden, müssen Sie das Gerät mit dem jeweiligen Sensor logisch verbinden. Dies ist praktisch, wenn es z. B. in Ihrer Familie mehrere Personen mit eigenem Sensor und Nike+ kompatiblen Schuhen gibt. Wenn Sie einen externen iPod nano-Empfänger an einen anderen iPod anschließen, ihn jedoch mit demselben Sensor verwenden, speichert der Empfänger Ihre Einstellungen, Ihre Trainings einheiten und Ihre Kurzbefehle. Sie müssen die logische Verbindung nicht erneuern und Ihren Sensor auch nicht erneut kalibrieren. Gehen Sie wie folgt vor, um einen Empfänger mit einem anderen Sensor logisch zu verbinden: 1 iPod nano: Schließen Sie den Empfänger an einen iPod nano an. 2 Ziehen Sie die Schuhe mit dem neuen Sensor an und stellen Sie sicher, dass sich kein anderer Nike + iPod-Sensor in der Nähe befindet. Laufen Sie ein paar Schritte, um den Sensor zu aktivieren, damit Ihr Empfänger (intern oder extern) ihn erkennen kann. 89 3 iPod nano: Wählen Sie „Nike+iPod“ > „Einstel lungen“ > „Sensor“ > „Verbinden“ und befolgen Sie die angezeigten Anleitungen. Eine Meldung wird auf Ihrem iPod angezeigt, wenn der neue Sensor logisch verbunden ist. iPhone 3G S und iPod touch: Wählen Sie „Einstel lungen“ > „Nike+iPod“ > „Sensor“. Tippen Sie dann auf die Option für die erneute Verbindung und befolgen Sie die angezeigten Anleitungen. Hinweis: Falls Sie eine Verbindung für einen Sensor herstellen, der schon einmal mit dem Empfänger verbunden war, erkennt Nike + iPod Ihre vorherigen Kalibrierungseinstellungen. Sie brauchen den Sensor nicht erneut zu kalibrieren. Aktivieren des Ruhezustands für den Nike + iPod-Sensor Der Sensor ist standardmäßig eingeschaltet und in Betrieb. Sie können den Ruhezustand aktivieren, wenn Sie den Sensor für längere Zeit nicht einsetzen möchten oder wenn er keine Signale aussenden soll. 90 Gehen Sie wie folgt vor, um den Ruhezustand des Sensors zu aktivieren: mm Drücken Sie mithilfe eines Kugelschreibers oder einer Büroklammer die Taste „Ruhezustand/ Betrieb“ und halten Sie diese 3 Sekunden lang gedrückt. Ruhezustand/Betrieb Drücken Sie diese Taste 3 Sekunden lang, um den Ruhezustand zu aktivieren. Drücken Sie diese Taste erneut, um den Sensor wieder zu aktivieren. Wichtig: Den geltenden gesetzlichen Vorschrif ten entsprechend müssen Sie den Sensor in den Ruhezustand schalten, bevor Sie damit in einem Flugzeug reisen. Gehen Sie wie folgt vor, um den Sensor wieder zu aktivieren: mm Drücken Sie mithilfe eines Kugelschreibers oder einer Büroklammer die Taste „Ruhezustand/ Betrieb“. 91 Wichtige Sicherheitsinformationen ACHTUNG: Bei Nichtbeachtung dieser Sicher heitsinformationen kann es zu Verletzungen oder zur Beschädigung von Komponenten kommen. Training Bevor Sie ein Trainingsprogramm beginnen, sollten Sie sich von Ihrem Arzt gründlich untersuchen lassen. Machen Sie vor jedem Trainingsbeginn Aufwärm- und Dehnübungen. Seien Sie beim Sport stets vorsichtig und aufmerksam. Verringern Sie wenn nötig Ihr Tempo, bevor Sie beim Laufen Einstellungen an Ihrem Gerät ändern. Beenden Sie Ihr Training sofort, wenn Sie Schmerzen haben oder sich schwach, schwindelig oder erschöpft fühlen oder wenn Sie außer Atem sind. Wenn Sie Sport treiben, sind Sie für sämtliche Risiken selbst verantwortlich, die mit körperlichen Betätigungen einhergehen, einschließlich evtl. hierdurch verursachter Verletzungen. Erstickungsgefahr Empfänger und Sensor sind für Kinder unter drei Jahren nicht geeignet, da solche Kleinteile verschluckt werden oder in die Atemwege gelangen können. Achten Sie darauf, dass Kleinkinder keinen Zugang zu diesen Komponenten haben. 92 Vermeiden von Hörschäden Das Verwenden von Ohrhörern mit hoher Lautstärke kann eine dauer hafte Schädigung des Gehörs zur Folge haben. Stellen Sie die Lautstärke nicht zu hoch ein. Sie gewöhnen sich mit der Zeit zwar an höhere Laut stärken, sodass diese für Sie normal erscheinen mögen, Ihre Hörfähigkeit kann dadurch jedoch beeinträchtigt werden. Falls Sie in Ihren Ohren ein Klingeln wahrnehmen oder Gespräche gedämpft hören, sollten Sie die Verwendung einstellen und ggf. einen Ohrenarzt aufsuchen. Je höher Sie die Lautstärke einstellen, desto schneller kann Ihr Gehör geschädigt werden. Experten empfehlen, das Gehör wie folgt zu schützen: ÂÂ Benutzen Sie Ohrhörer bei hohen Lautstärken nur für eine begrenzte Dauer. ÂÂ Vermeiden Sie es, die Lautstärke zu erhöhen, um Umgebungsgeräusche zu übertönen. ÂÂ Reduzieren Sie die Lautstärke, wenn Sie nicht hören können, was Personen in Ihrer Nähe sprechen. Öffnen des Sensors Versuchen Sie nicht, den Sensor zu öffnen, auseinanderzubauen oder die Batterie zu entfernen. Es befinden sich keinerlei Teile im Sensor, die vom Benutzer gewartet werden könnten. Verwenden Sie den Empfänger, das iPhone bzw. den iPod nicht im Wasser bzw. in der Nähe von Wasser oder in feuchten Umgebungen. 93 Weitere Informationen, Service und Support Antworten auf häufig gestellte Fragen über Nike + iPod Besuchen Sie die folgende Website: www.apple.com/de/support/nikeplus. Service & Support für den Nike + iPod-Sensor und -Empfänger Besuchen Sie die folgende Website: www.apple.com/de/support/nikeplus. Service & Support für Nike+ kompatible Schuhe bzw. die nikeplus.com-Website Besuchen Sie die folgende Website: www.nikeplus.com. Verwenden von iTunes Öffnen Sie iTunes und wählen Sie „Hilfe“ > „iTunes-Hilfe“. Verwenden des iPod Besuchen Sie die folgende Website: www.apple.com/de/support/ipod. Verwenden des iPhone 3G S Besuchen Sie die folgende Website: www.apple.com/de/support/iphone. 94 Contenuto 97 Benvenuto in Nike + iPod 97 L'assistente personale per le sessioni di allenamento 98 Guida rapida 105Usare Nike + iPod 105 Calibrare Nike + iPod 107 Impostare le unità di distanza 107 Inserire il peso 108 Bloccare il dispositivo durante una sessione 108 Ottenere informazioni vocali 110 Usare una PowerSong 110 Mettere in pausa una sessione 111 Ricevere chiamate durante una sessione 112 Cambiare la musica nel corso di una sessione 113 Inviare sessioni a Nikeplus.com 114 Riesaminare le sessioni sul dispositivo 115 Creare scorciatoie di sessione personalizzate 116 Acquistare sessioni Nike+ 117 Utilizzare un telecomando compatibile con Nike+ 118 Collegamento a un altro sensore 120 Mettere in stop il sensore Nike + iPod 95 121 Informazioni importanti sulla sicurezza 123Ulteriori informazioni, servizio e supporto 96 Benvenuto in Nike + iPod L'assistente personale per le sessioni di allenamento Nike + iPod è un compagno di sessioine e un allenatore, tutto in uno. Seleziona il tipo di sessione desiderato - senza limiti precisi, basato sulla distanza o sul tempo, per bruciare calorie seleziona la musica giusta che ti da una marcia in più, quindi tieni traccia dei tuoi progressi lungo tutto il percorso grazie alle informazioni vocali e su schermo. Carica i dati della sessione su nikeplus. com, dove puoi impostare i tuoi obiettivi e verificare i tuoi miglioramenti da una sessione all'altra. Entra a far parte della più grande comunità online di runner del mondo e partecipa alle gare con giocatori provenienti da ogni angolo del web. Nike + iPod è supportato da iPhone 3G S, da tutti i modelli di iPod nano e iPod touch (seconda generazione). 97 iPod nano (tutti i modelli) iPod touch (2ª generazione) iPhone 3G S Guida rapida Segui queste istruzioni per iniziare a usare subito Nike + iPod. Passo 1: abilita Nike + iPod sul dispositivo. mm iPod nano: collega il ricevitore Nike + iPod a iPod nano. “Nike + iPod“ appare nel menu principale. mm iPhone 3G S e iPod touch: scegli Impostazioni > Nike + iPod e impostalo su Attivo. Nella schermata Inizio compare l'icona Nike + iPod. 98 Nota: iPhone 3G S e iPod touch dispongono di un ricevitore interno; non è richiesto l'utilizzo di ricevitori esterni. Passo 2: assicurati di disporre del software iPod e iTunes più recente. 1 Scarica l'ultima versione del software iTunes da www.apple.com/it/itunes e installala sul computer. È necessario iTunes 8 o versione successiva. 2 Collega il dispositivo al computer, quindi selezionalo nella barra laterale di iTunes e fai clic su Riepilogo. 3 Se iTunes comunica che iPod deve essere aggiornato, fai clic su Aggiorna e segui le istruzioni su schermo. Passo 3: inserisci il sensore Nike + iPod nella scarpa Nike+. mm Solleva la soletta della scarpa sinistra, togli l'inserto in gomma situato sotto la tasca e sostituiscilo con il sensore. 99 Solleva la soletta e inserisci il sensore nella tasca, con il lato piatto rivolto verso l'alto. Quando non ti alleni puoi lasciare il sensore nella scarpa, ma se prevedi di indossare a lungo le scarpe senza allenarti, sostituisci il sensore con l'inserto in gomma per risparmiare la batteria. La batteria del sensore non è sostituibile dall'utente. Passo 4: scegli un tipo di sessione. Una sessione senza limiti precisi ÂÂ iPod nano: scegli Nike + iPod > Nuova sessione > Base. ÂÂ iPhone 3G S e iPod touch: scegli Nike + iPod > Base. Una sessione con limite di tempo ÂÂ iPod nano: scegli Nike + iPod > Nuova sessione > Tempo. ÂÂ iPhone 3G S e iPod touch: scegli Nike + iPod > Tempo. 100 Una sessione con limite di distanza ÂÂ iPod nano: scegli Nike + iPod > Nuova sessione > Distanza. ÂÂ iPhone 3G S e iPod touch: scegli Nike + iPod > Distanza. Una sessione con l'obiettivo di bruciare calorie ÂÂ iPod nano: scegli Nike + iPod > Impostazioni > Peso e inserisci il tuo peso. Quindi, fai clic sul pulsante Menu e scegli Nike + iPod > Nuova sessione > Calorie. ÂÂ iPhone 3G S e iPod touch: scegli Impostazioni > Nike + iPod > Peso e inserisci il tuo peso. Quindi, premi il pulsante Home e scegli Nike + iPod > Calorie. Nota: devi inserire il peso solo la prima volta che inizi una sessione per bruciare calorie. Passo 5: scegli la musica per accompagnare la sessione. Per riprodurre Procedi così Un mix per sessione Nike+ Scegli il mix (vedi a pagina 116). Il brano in riproduzione Scegli “In riproduzione“. I brani di una playlist Scegli Playlist, quindi scegli una playlist. Brani in ordine casuale Scegli “Brani casuali“. Senza musica Scegli Nessuno. 101 Passo 6: inizia la sessione. mm iPod nano: premi il pulsante centrale e inizia a camminare o a correre. mm iPhone 3G S e iPod touch: tocca Riproduci e inizia a camminare o a correre. Passo 7: monitorare i progressi. Nike + iPod mostra automaticamente lo stato della sessione sullo schermo di iPhone 3G S o iPod. iPod nano iPhone 3G S e iPod touch Nike + iPod fornisce automaticamente informazioni vocali sui tuoi progressi durante la sessione di allenamento (consulta “Ottenere informazioni vocali“ a pagina 108). Inoltre, puoi avere un feedback quando lo desideri. 102 Per ottenere manualmente informazioni vocali: mm iPod nano: premi il pulsante centrale in qualsiasi momento durante la sessione. mm iPhone 3G S e iPod touch: premi il pulsante Home in qualsiasi momento durante la sessione. Nota: per ottenere manualmente informazioni vocali, iPhone 3G S e iPod touch devono essere bloccati (consulta “Ottenere informazioni vocali“ a pagina 108). Passo 8: concludi la sessione. Puoi concludere la sessione in qualsiasi momento. Se continui ad allenarti anche dopo aver raggiunto l'obiettivo di tempo, distanza o calorie, i tuoi progressi continuano a essere monitorati. Per concludere la sessione: mm iPod nano: premi il pulsante Riproduci/Pausa (’) per mettere in pausa la sessione. Quindi premi il pulsante Menu e scegli “Termina sessione“. mm iPhone 3G S e iPod touch: tocca “Termina sessione“. Se il dispositivo è bloccato, premi il pulsante Home e tocca “Metti in pausa“. Quindi trascina il cursore e tocca “Termina sessione“. I dati della sessione più recente vengono memorizzati come riferimento futuro. 103 Passo 9: tieni traccia dei tuoi progressi su nikeplus.com. Su nikeplus.com puoi tenere traccia dell'andamento dei tuoi progressi, visualizzare un record di tutte le sessioni passate, impostare e monitorare gli obiettivi e confrontare i tuoi risultati con gli altri. Puoi anche gareggiare con altri utenti online di Nike + iPod in sfide di allenamento. Per inviare i dati delle tue sessioni di allenamento a nikeplus.com: 1 Assicurati che il computer sia connesso a Internet, quindi collega iPhone 3G S o iPod al computer. 2 Nella finestra di dialogo che appare per l'invio dei dati della tua sessione a nikeplus.com, fai clic su Invia. Se lo desideri, puoi effettuare questa operazione in un secondo momento. 3 Nella finestra di dialogo che appare per visitare nikeplus.com, fai clic su Visita. Si apre il sito web nikeplus.com e nella homepage viene visualizzato un grafico con i dati relativi alla tua sessione più recente. 4 Fai clic su “Registra le corse“, quindi fai clic su Iscrivimi e segui le istruzioni su schermo. Per ulteriori informazioni, consulta “Inviare sessioni a Nikeplus.com“ a pagina 113. 104 Usare Nike + iPod Segui queste istruzioni per ottenere il massimo da Nike + iPod. Nota: alcune funzionalità sono nuove in iPod nano (quarta generazione) e iPhone 3G S. Calibrare Nike + iPod La calibrazione di default di Nike + iPod è valida per molti utenti. Puoi ottimizzare il livello di precisione calibrando Nike + iPod per il tuo stile naturale di corsa e camminata. Per calibrare Nike + iPod per la corsa e la camminata: 1 iPod nano: scegli Nike + iPod > Impostazioni > Sensore > Calibra. iPhone 3G S e iPod touch: scegli Nike + iPod > Calibrazione. 2 Scegli Corsa o Passo e inserisci una distanza. Nota: affinché la procedura di calibrazione sia corretta, devi inserire almeno 400 metri. 3 Scegli la musica per accompagnare la sessione di calibrazione. 4 iPod nano: premi il pulsante centrale. iPhone 3G S e iPod touch: tocca Riproduci. A questo punto corri o cammina per la distanza impostata ad un passo costante e naturale. 105 5 iPod nano: premi il pulsante Menu e scegli “Calibrazione terminata“. iPhone 3G S e Pod touch: tocca “Termina sessione“, quindi tocca Fine. Un messaggio comunica che la calibrazione è riuscita. Per calibrare sia la corsa che la camminata, ripeti i passi 1–5. Nota: anche dopo la calibrazione, la precisione delle misurazioni della distanza può variare in funzione dell'andatura, della superficie su cui si corre, dell'inclinazione e della temperatura. Inoltre, puoi calibrare Nike + iPod servendoti della sessione appena conclusa. Questo risulta utile se hai percorso una distanza che conosci e che non corrisponde al riepilogo della distanza mostrata dal dispositivo. Per calibrare usando l'ultima sessione completata: mm iPod nano: scegli “Termina sessione“, quindi scegli Calibra. Imposta la distanza esatta percorsa correndo o camminando e premi il pulsante centrale. mm iPhone 3G S e iPod touch: tocca “Termina sessione“, quindi tocca Calibrazione e imposta la distanza esatta percorsa correndo o camminando. Tocca Registra, quindi tocca Fine. 106 Il dispositivo rileva se si è trattato di una sessione di corsa o camminata e usa correttamente la nuova calibrazione per sostituire quella esistente. Per ripristinare le impostazioni di default della calibrazione di Nike + iPod: mm iPod nano: scegli Nike + iPod > Impostazioni > Sensore > Calibra > Reimposta passo o “Reimposta corsa“. mm iPhone 3G S e iPod touch: scegli Nike + iPod > Calibrazione > Corsa o Passo, quindi scegli Reimposta su default Impostare le unità di distanza Puoi impostare Nike + iPod in modo che misuri le sessioni in miglia o chilometri. Per impostare le unità di distanza: mm iPod nano: scegli Nike + iPod > Impostazioni e imposta Distanze su Miglia o Chilometri. mm iPhone 3G S e iPod touch: scegli Impostazioni > Nike + iPod > Distanze, quindi scegli Miglia o Chilometri. Inserire il peso Per inserire il tuo peso: mm iPod nano: Scegli Nike + iPod > Impostazioni > Peso, quindi inserisci il tuo peso. 107 mm iPhone 3G S e iPod touch: scegli Impostazioni > Nike + iPod > Peso, quindi inserisci il tuo peso. Per migliorare la precisione del calcolo delle calorie bruciate, aggiorna il peso se cambia. Bloccare il dispositivo durante una sessione Puoi bloccare iPod in modo da impedire l'attivazione accidentale dei comandi durante una sessione. Per bloccare iPhone 3G S e iPod touch: mm Premi il pulsante Pausa/Riattiva. Per sbloccarlo, premi il pulsante Pausa/Riattiva o il pulsante Home e trascina il cursore. Ottenere informazioni vocali Quando ti alleni, Nike + iPod fornisce periodicamente informazioni vocali sul tuo stato. Puoi scegliere una voce femminile o maschile oppure disattivare il feedback. Per impostare il tipo di voce o disattivare le informazioni vocali: mm iPod nano: scegli Nike + iPod > Impostazioni, quindi imposta “Feedback parlato“ su Uomo, Donna o Disattivato. 108 mm iPhone 3G S e iPod touch: scegli Impostazioni > Nike + iPod > Feedback parlato, quindi scegli Uomo, Donna o Disattivato. Se le informazioni vocali sono disattivate, puoi comunque ottenere le informazioni vocali manualmente. Per ottenere manualmente informazioni vocali: mm iPod nano: premi il pulsante centrale in qualsiasi momento durante la sessione. mm iPhone 3G S e iPod touch: premi il pulsante Home mentre il dispositivo è bloccato. Nota: su iPod nano, il feedback parlato è disponibile in alcune lingue oltre alla lingua inglese. Se imposti iPod su una di queste lingue e lo colleghi al computer (che deve essere connesso a Internet) iTunes ti chiede di scaricare le informazioni in quella lingua. In iPod nano è possibile disporre di volta in volta di una sola versione non in inglese delle informazioni vocali. In iPhone 3G S e iPod touch, tutte le lingue delle informazioni vocali sono supportate automaticamente. 109 Usare una PowerSong Scegli un brano che ti dia la carica giusta e crea la tua PowerSong. In qualsiasi momento durante la sessione potrai ascoltare la tua powersong. Per scegliere una PowerSong: mm iPod nano: scegli Nike + iPod > Impostazioni > PowerSong, quindi scegli un brano. mm iPhone 3G S e iPod touch: scegli Impostazioni > Nike + iPod > PowerSong, quindi scegli un brano. Per riprodurre la PowerSong: mm iPod nano: tieni premuto il pulsante centrale durante una sessione. Il brano viene riprodotto dopo una breve pausa. mm iPhone 3G S e iPod touch: tocca PowerSong nella schermata della sessione. Oppure, se il dispositivo è bloccato, premi il pulsante Home due volte, quindi tocca PowerSong. Mettere in pausa una sessione Puoi mettere in pausa una sessione, arrestando temporaneamente la musica e la raccolta di dati e riprendere la sessione in un secondo momento senza perdere alcun dato. Per mettere in pausa o riprendere una sessione: mm iPod nano: premi il pulsante Riproduci/Pausa (’). 110 mm iPhone 3G S e iPod touch: tocca “Metti in pausa“. Oppure, se il dispositivo è bloccato, premi il pulsante Home una volta, quindi tocca “Metti in pausa“. Tocca Riproduci per riprendere la sessione. Ricevere chiamate durante una sessione Puoi utilizzare iPhone 3G S per rispondere normalmente alle chiamate anche durante una sessione. Quando ricevi una chiamata, la sessione viene automaticamente messa in pausa quando rispondi. Per rispondere a una chiamata: mm Tocca Rispondi oppure premi il tasto microfono se stai utilizzando la cuffia auricolare stereo. Se iPhone 3G S è bloccato, trascina il cursore per sbloccarlo. Per silenziare una chiamata: mm Premi il pulsante Stop/Riattivazione o il pulsante del volume. Puoi sempre rispondere a una telefonata dopo averla silenziata, fino a quando non si attiva la segreteria. Per rifiutare a una chiamata: mm Tocca Rifiuta oppure tieni premuto il pulsante microfono sulla cuffia auricolare per circa due secondi, quindi rilascialo. Due leggeri bip confermano che la telefonata è stata rifiutata. 111 Se premi il pulsante blocco per ignorare una chiamata, la suoneria verrà disattivata e la musica non riprenderà fino a quando la chiamata non verrà trasferita alla segreteria; la sessione continua in background. Per ripristinare la sessione dopo una chiamata: mm Tocca Riproduci. Cambiare la musica nel corso di una sessione Durante una sessione, puoi cambiare musica senza perdere i dati della sessione. Mentre cambi musica, la sessione viene messa in pausa. Per cambiare la musica nel corso di una sessione: 1 iPod nano: premi il pulsante Menu e scegli “Cambia musica“. La sessione viene messa in pausa. iPhone 3G S e iPod touch: se il dispositivo non è bloccato, tocca “Metti in pausa“. Se è bloccato, premi il pulsante Home, trascina il cursore per sbloccarlo e tocca “Metti in pausa“. Infine, tocca “Cambia musica“. 2 iPod nano: scegli una nuova musica. La sessione riprende automaticamente. iPhone 3G S e iPod touch: scegli una nuova musica. tocca la parte superiore della schermata musica per tornare alla sessione, quindi tocca Riproduci. 112 Inviare sessioni a Nikeplus.com Puoi impostare iTunes per l'invio automatico dei dati relativi alla sessione a nikeplus.com via Internet, quando colleghi iPhone 3G S o iPod al computer. Per inviare sessioni a nikeplus.com: 1 Assicurati che il computer sia connesso a Internet, quindi collega iPhone 3G S o iPod al computer. 2 Apri iTunes sul computer, fai clic su “Nike + iPod“, quindi seleziona “Invia automaticamente i dati della sessione a nikeplus.com“. 3 Fai clic su “Visita nikeplus.com“ sotto il riquadro oppure fai clic su Visita nella finestra di dialogo che appare (se hai già impostato l'invio automatico della sessione). Si apre il sito web nikeplus.com e nella homepage viene visualizzato un grafico con i dati relativi alla tua sessione più recente. 4 Fai clic su “Registra le corse“ ed esegui il login oppure registrati se necessario. Quando il dispositivo non è collegato al computer, puoi visitare www.nikeplus.com e inserire ID e password di accesso. Per la Politica di tutela della privacy e i Termini e condizioni di utilizzo Nike, consulta il sito web nikeplus.com. 113 Riesaminare le sessioni sul dispositivo iPhone 3G S o iPod registrano data, ora, durata, distanza, passo e calorie bruciate per un massimo di mille sessioni precedenti. Per riesaminare sessioni recenti sul dispositivo: mm iPod nano: scegli Nike + iPod > Cronologia. mm iPhone 3G S e iPod touch: scegli “Nike + iPod“, quindi tocca Cronologia nella parte inferiore dello schermo. Per cancellare una singola sessione di allenamento: 1 Scegli Nike + iPod > Cronologia e scegli una sessione di allenamento. 2 iPod nano: scegli una sessione di allenamento, fai clic sul pulsante centrale, quindi tocca Elimina. iPhone 3G S e iPod touch: tocca Modifica, scegli una sessione di allenamento, quindi tocca Elimina. Su iPhone 3G S e iPod touch, puoi eliminare tutte le sessioni di allenamento dalla Cronologia, toccando Cancella nella parte superiore della schermata Cronologia. 114 Creare scorciatoie di sessione personalizzate Le scorciatoie di sessione personalizzate ti consentono di scegliere e ripetere una sessione. iPod nano (solo quarta generazione) registra automaticamente le sessioni completate come scorciatoie e iPhone 3G S e iPod touch ti consentono di creare scorciatoie di sessione personalizzate. Per creare una scorciatoia di sessione personalizzata su iPhone 3G S o iPod touch: 1 Scegli “Nike + iPod“, quindi tocca “Le mie sessioni“ nella parte inferiore della schermata. 2 Tocca Più (+), quindi scegli il tipo di sessione e il relativo obiettivo. 3 Scegli la musica, inserisci un nome per la sessione, quindi tocca Registra. Nota: puoi creare scorciatoie di sessione personalizzate solo su iPhone 3G S e iPod touch (seconda generazione). Per eliminare una scorciatoia di sessione personalizzata su iPhone 3G S e iPod touch: mm Scegli “Nike + iPod“, quindi tocca “Le mie sessioni“. Tocca Modifica, scegli una scorciatoia, quindi tocca Elimina. Infine, tocca Fine. 115 Per scegliere una scorciatoia di sessione personalizzata sul dispositivo: mm iPod nano: scegli “Nike + iPod“, quindi scegli una scorciatoia. Il nome assegnato alle scorciatoie varia in base al tipo di sessione e musica. Non è possibile eliminarle. mm iPhone 3G S e iPod touch: scegli “Nike + iPod“, quindi tocca “Le mie sessioni“. Le scorciatoie vengono elencate in base al nome specificato al momento della creazione. La scorciatoia di sessione personalizzata più recente compare in alto nell'elenco. Acquistare sessioni Nike+ Puoi acquistare e scaricare sessioni Nike+ contenenti un mix di musica continua e allenamento professionale. Quando acquisti una sessione Nike+, ricevi un'unica traccia di sessione con musica e voce, oltre a tutti i singoli brani presenti nel mix. Scegli mix per il tuo livello e stile di sessione. Per acquistare una sessione Nike+: 1 Apri iTunes e fai clic su “iTunes Store“ sul lato sinistro della finestra, quindi digita “Nike Sport Music“ nel campo di ricerca di iTunes. 2 Fai clic sul pulsante Acquista accanto alla sessione Nike+ di tua scelta. 116 3 Segui le istruzioni su schermo per completare l'acquisto. Il download inizia automaticamente. 4 Collega il dispositivo al computer e carica la sessione sul dispositivo. Nota: negli Stati Uniti e in molti altri paesi, iTunes Store non è disponibile per i minori di età inferiore a 13 anni; per un elenco completo dei paesi consulta il sito: www.apple.com/it/itunes/download. Soggetto a termini e condizioni. Per usare iTunes Store è necessario disporre di un accesso a Internet (potrebbe non essere gratuito). Utilizzare un telecomando compatibile con Nike+ Puoi utilizzare un telecomando compatibile con Nike+ (venduto a parte) per gestire Nike + iPod in modalità wireless durante l'allenamento. Prima di usare un telecomando per la prima volta, devi associare il ricevitore di iPod nano, iPhone 3G S o iPod touch al telecomando. Per associare un telecomando compatibile con Nike+ (in vendita separatamente): mm iPod nano: collega il ricevitore Nike + iPod a iPod nano, scegli Nike + iPod > Impostazioni > Sensore > Associa, quindi segui le istruzioni su schermo. 117 mm iPhone 3G S e iPod touch: scegli Impostazioni > Nike + iPod > Telecomando, quindi segui le istruzioni su schermo. Per attivare o disattivare la funzionalità telecomando: mm iPod nano: scegli Nike + iPod > Impostazioni > Telecomando, quindi imposta Telecomando su Attivato o Disattivato. mm iPhone 3G S e iPod touch: elimina l'associazione del telecomando. Per eliminare l'associazione di un telecomando: mm iPod nano: scegli Nike + iPod > Impostazioni > Telecomando > Elimina associazione, quindi segui le istruzioni su schermo. mm iPhone 3G S e iPod touch: scegli Impostazioni > Nike + iPod > Telecomando, quindi tocca “Elimina associazione“. Collegamento a un altro sensore Puoi usare iPod nano, iPhone 3G S o iPod touch con più sensori Nike + iPod. Ogni volta che usi un iPhone 3G S o un iPod con un sensore diverso, devi associarlo a tale sensore. Potresti farlo, ad esempio, se in famiglia c'è più di una persona con un sensore e scarpe Nike+ ready. 118 Se colleghi un ricevitore esterno iPod nano a un altro iPod e lo utilizzi con lo stesso sensore, il ricevitore archivia le impostazioni, la cronologia e le scorciatoie di sessione. Non è necessario eseguire nuovamente l'associazione o la calibrazione. Per creare un'associazione con un altro sensore: 1 iPod nano: collega il ricevitore a iPod nano. 2 Mettiti le scarpe con il nuovo sensore assicurandoti che nelle vicinanze non vi sia un altro sensore Nike + iPod. Cammina per attivare il sensore in modo che il ricevitore (interno o esterno) possa rilevarlo. 3 iPod nano: scegli Nike + iPod > Impostazioni > Sensore > Associa, quindi segui le istruzioni su schermo. Un messaggio indica che iPod è stato associato al nuovo sensore. iPhone 3G S e iPod touch: scegli Impostazioni > Nike + iPod > Sensore, tocca Nuovo, quindi segui le istruzioni su schermo. Nota: se effettui l'associazione con un sensore già associato in precedenza, Nike + iPod rileva le impostazioni di calibrazione. Non è necessario calibrare di nuovo. 119 Mettere in stop il sensore Nike + iPod Di default, il sensore è pronto e attivo. Se desideri conservare il sensore per un periodo di tempo prolungato o fare in modo che smetta di trasmettere, puoi metterlo in stop. Per mettere il sensore in stop: mm Usa una penna o una graffetta per tenere premuto il pulsante Pausa/Riattiva per tre secondi. Pulsante Pausa/Riattiva Mantieni premuto per tre secondi per mettere in pausa. Premi per riattivare. Importante: per il rispetto della normativa vigente, metti il sensore in stop prima di salire su un aereo. Per riattivare il sensore: mm Usa una penna o una graffetta per tenere premuto il pulsante Pausa/Riattiva . 120 Informazioni importanti sulla sicurezza ATTENZIONE: la mancata osservanza delle norme di sicurezza qui riportate può causare lesioni o danni. Esercizio fisico Prima di iniziare un programma di esercizio fisico, sottoporsi a un esame fisico completo da parte del medico. Prima di iniziare una sessione, praticare un esercizio di riscaldamento o stiramento. Praticare gli esercizi con precauzione e attenzione. Se necessario, rallenta prima di regolare il dispositivo mentre corri. Smettere immediatamente l'allenamento in caso di dolori, senso di debolezza, vertigine, spossatezza o respirazione affannosa. Quando si pratica esercizio fisico, ci si assumono i rischi inerenti a tale attività, comprese eventuali lesioni che possano derivarne. Rischio di soffocamento Il ricevitore e il sensore rappresentano un rischio di soffocamento potenziale. Mantenerli fuori della portata dei bambini di età inferiore a tre anni. 121 Evitare danni all'udito L'uso di auricolari a volume elevato può causare danni permanenti all'udito. Impostare il volume su un livello di sicurezza. Con il passare del tempo ci si può abituare a un volume più alto che può sembrare normale e danneggia invece l'udito. Se si sente un ronzio nelle orecchie o le voci giungono attutite, interrompere l'ascolto e farsi controllare l'udito. Più alto è il volume e più immediati i danni all'udito. Gli esperti suggeriscono di proteggere l'udito: ÂÂ Limitare la quantità di tempo in cui si usano auricolari a volume elevato. ÂÂ Evitare di aumentare il volume per isolarsi da un ambiente rumoroso. ÂÂ Abbassa il volume se non senti le persone che parlano nelle vicinanze. Smontare il sensore Non tentare di aprire il sensore, disassemblarlo o rimuoverne la batteria. Il sensore non contiene parti sostituibili dall'utente. Non usare il ricevitore, iPhone o iPod sotto la pioggia o in prossimità di bacini d'acqua o altri luoghi umidi. 122 Ulteriori informazioni, servizio e supporto Risposte a domande frequenti su Nike + iPod Vai su www.apple.com/it/support/nikeplus. Servizio e supporto per il sensore e il ricevitore Nike + iPod Vai su www.apple.com/it/support/nikeplus. Servizio e supporto per le scarpe Nike+ ready o il sito web nikeplus.com Vai su www.nikeplus.com. Informazioni sull'uso di iTunes Apri iTunes e scegli Aiuto > Aiuto iTunes. Informazioni sull'uso di iPod Vai su www.apple.com/it/support/ipod. Informazioni sull'utilizzo di iPhone 3G S Visita il sito www.apple.com/it/support/iphone. 123 Regulatory Compliance Information FCC Compliance Statement This device complies with part 15 of the FCC rules. Operation is subject to the following two conditions: (1) This device may not cause harmful interference, and (2) this device must accept any interference received, including interference that may cause undesired operation. See instructions if interference to radio or television reception is suspected. Radio and Television Interference This computer equipment generates, uses, and can radiate radio-frequency energy. If it is not installed and used properly—that is, in strict accordance with Apple’s instructions—it may cause interference with radio and television reception. This equipment has been tested and found to comply with the limits for a Class B digital device in accordance with the specifications in Part 15 of FCC rules. These specifications are designed to provide reasonable protection against such interference in a residential installation. However, there is no guarantee that interference will not occur in a particular installation. You can determine whether your computer system is causing interference by turning it off. If the interference stops, it was probably caused by the computer or one of the peripheral devices. 124 If your computer system does cause interference to radio or television reception, try to correct the interference by using one or more of the following measures: • Turn the television or radio antenna until the interference stops. • Move the computer to one side or the other of the television or radio. • Move the computer farther away from the television or radio. • Plug the computer into an outlet that is on a different circuit from the television or radio. (That is, make certain the computer and the television or radio are on circuits controlled by different circuit breakers or fuses.) If necessary, consult an Apple Authorized Service Provider or Apple. See the service and support information that came with your Apple product. Or, consult an experienced radio/television technician for additional suggestions. Changes or modifications to this product not authorized by Apple Inc. could void the EMC compliance and negate your authority to operate the product. This product was tested for EMC compliance under conditions that included the use of Apple peripheral devices and Apple shielded cables and connectors between system components. It is important that you use Apple peripheral devices and shielded cables and connectors between system components to reduce the possibility of causing interference to radios, television sets, and other electronic devices. You can obtain Apple peripheral devices and the proper shielded cables and connectors through an Apple Authorized Reseller. For non-Apple peripheral devices, contact the manufacturer or reseller for assistance. 125 Responsible party (contact for FCC matters only): Apple Inc. Corporate Compliance 1 Infinite Loop MS 26-A, Cupertino, CA 95014 Wireless Information FCC Wireless Compliance for the Nike + iPod Sensor. The antenna used with this transmitter must not be colocated or operated in conjunction with any other antenna or transmitter subject to the conditions of the FCC Grant. Industry Canada Statement This Class B device meets all requirements of the Canadian interference-causing equipment regulations. Cet appareil numérique de la Class B respecte toutes les exigences du Règlement sur le matériel brouilleur du Canada. European Wireless EU Declaration of Conformity This wireless device complies with the specifications EN 300 328, EN 301-489, EN 50371, and EN 60950 following the provisions of the R&TTE Directive. Industry Canada Statement Complies with the Canadian ICES-003 Class B, RSS 200 specifications. Cet appareil numérique de la classe B est conforme à la norme NMB-003 RSS 210 du Canada. European Community Complies with European Directives 72/23/EEC, 89/336/EEC, and 99/5/EEC. 126 Exposure to Radio Frequency Energy The radiated output power of the included devices is far below the FCC radio frequency exposure limits. Disposal and Recycling Information The Nike + iPod Sensor contains a battery. Dispose of your Nike + iPod Sensor according to local environmental laws and guidelines. When discarding shoes, remove the Nike + iPod Sensor and dispose of it properly. For information about Apple’s recycling program, go to www.apple.com/environment. California: The coin cell battery in your sensor contains perchlorates. Special handling and disposal may apply. Refer to www.dts.ca.gov/hazardouswaste/perchlorate. Deutschland: Dieses Gerät enthält Batterien. Bitte nicht in den Hausmüll werfen. Entsorgen Sie dieses Gerät am Ende seines Lebenszyklus entsprechend der maßgeblichen gesetzlichen Regelungen. Nederlands: Gebruikte batterijen kunnen worden ingeleverd bij de chemokar of in een speciale batterijcontainer voor klein chemisch afval (kca) worden gedeponeerd. Taiwan: 127 European Union—Disposal Information: The symbol above means that according to local laws and regulations your product should be disposed of separately from household waste. When this product reaches its end of life, take it to a collection point designated by local authorities. Some collection points accept products for free. The separate collection and recycling of your product at the time of disposal will help conserve natural resources and ensure that it is recycled in a manner that protects human health and the environment. Union Européenne : informations sur l’élimination Le symbole ci-dessus signifie que vous devez vous débarasser de votre produit sans le mélanger avec les ordures ménagères, selon les normes et la législation de votre pays. Lorsque ce produit n’est plus utilisable, portez-le dans un centre de traitement des déchets agréé par les autorités locales. Certains centres acceptent les produits gratuitement. Le traitement et le recyclage séparé de votre produit lors de son élimination aideront à préserver les ressources naturelles et à protéger l’environnement et la santé des êtres humains. Europäische Union – Informationen zur Entsorgung Das Symbol oben bedeutet, dass dieses Produkt entsprechend den geltenden gesetzlichen Vorschriften und getrennt vom Hausmüll entsorgt werden muss. Geben Sie dieses Produkt zur Entsorgung bei einer offiziellen Sammelstelle ab. Bei einigen Sammelstellen können Produkte zur Entsorgung unentgeltlich abgegeben werden. Durch das separate Sammeln und Recycling werden die natürlichen Ressourcen geschont und es ist sichergestellt, dass beim Recycling des Produkts alle Bestimmungen zum Schutz von Gesundheit und Umwelt beachtet werden. 128 Unione Europea: informazioni per l’eliminazione Questo simbolo significa che, in base alle leggi e alle norme locali, il prodotto dovrebbe essere eliminato separatamente dai rifiuti casalinghi. Quando il prodotto diventa inutilizzabile, portarlo nel punto di raccolta stabilito dalle autorità locali. Alcuni punti di raccolta accettano i prodotti gratuitamente. La raccolta separata e il riciclaggio del prodotto al momento dell’eliminazione aiutano a conservare le risorse naturali e assicurano che venga riciclato in maniera tale da salvaguardare la salute umana e l’ambiente. Europeiska unionen – uttjänta produkter Symbolen ovan betyder att produkten enligt lokala lagar och bestämmelser inte får kastas tillsammans med hushållsavfallet. När produkten har tjänat ut måste den tas till en återvinningsstation som utsetts av lokala myndigheter. Vissa återvinningsstationer tar kostnadsfritt hand om uttjänta produkter. Genom att låta den uttjänta produkten tas om hand för återvinning hjälper du till att spara naturresurser och skydda hälsa och miljö. Apple and the Environment At Apple, we recognize our responsibility to minimize the environmental impacts of our operations and products. For more information, go to www.apple.com/environment. 129 www.apple.com/ipod/nike www.apple.com/support/nikeplus ZM034-4945-A Printed in XXXX