1
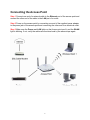
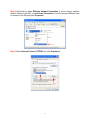
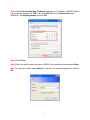
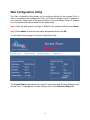
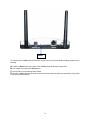
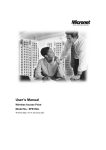
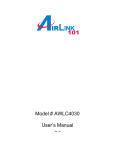
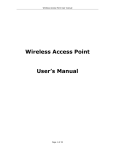
Model # AP411W User’s Manual Ver. 1A Table of Contents Package Contents ......................................................................................................... 3 Introduction ................................................................................................................... 3 Connecting the Access Point....................................................................................... 6 Establishing Wireless Connection............................................................................... 7 Configuring the Access Point (Optional) .................................................................... 7 Web Configuration Utility ........................................................................................... 12 Advanced Setup .......................................................................................................... 13 Statistics ...................................................................................................................... 26 Troubleshooting .......................................................................................................... 28 Technical Specifications............................................................................................. 31 Technical Support ....................................................................................................... 32 2 Package Contents • • • • • Wireless 108Mbps SuperG Access Point Power Adapter-DC 5V, 2.0A Quick Installation Guide Ethernet Cable One Set of SMA Antenna If any of the above items are missing, please contact your distributor. System Requirements for Configuration: • • Computers with Windows, Macintosh, or Linux-based, operating systems with an installed Ethernet adapter Internet Explorer version 6.0 or Netscape Navigator version 6.0 and above Introduction With the 108Mbps SuperG Wireless Access Point, bandwidth-intensive applications like graphics or multimedia will benefit significantly because large files are able to move across the network more quickly. The 108Mbps SuperG Wireless Access Point is capable of operating in one of 5 different modes to meet your wireless networking needs. The SuperG Access Point can operate as an access point, access point-to-access point bridging mode, access point-to-multipoint bridging mode, access point client mode, or as a repeater. The 108Mbps SuperG Wireless Access Point is an ideal solution for quickly creating and extending a wireless local area network (WLAN) in offices or other workplaces, trade shows, and special events. Unlike most access points, the SuperG Access Point provides data transfers at up to 108 Mbps in SuperG mode when used with other 108Mbps Wireless SuperG products. The 802.11g standard is backwards compatible with 802.11b devices. The 108Mbps SuperG Wireless Access Point has the newest, strongest, most advanced security features available today. Wi-Fi Protected Access (WPA) authorizes and identifies users based on a secret key that changes automatically at regular intervals. WPA uses TKIP (Temporal Key Integrity Protocol) to change the temporal key every 10,000 packets. This ensures greater security than the standard WEP security. (By contrast, the previous WEP encryption implementation required the keys to be changed manually.) 3 Connections Receptor for the Power Adapter Pressing the Reset Button restores the Access Point to its original factory default settings. The LAN Port is Auto-MDI/MDIX. You can insert either a straight-through or a crossover Ethernet cable in this port in order to connect the Access Point to the local network. LEDs Power: Solid green indicates power is on. LAN: Solid green indicates an established connection. Blinking green indicates activity on the Ethernet port. WLAN: Blinking green indicates wireless connection. 4 Wireless Basics Installation Considerations The 108Mbps SuperG Wireless Access Point lets you access your network, using a wireless connection, from virtually anywhere within its operating range. Keep in mind, however, that the number, thickness and location of walls, ceilings, or other objects that the wireless signals must pass through, may limit the range. Typical ranges vary depending on the types of materials and background RF (radio frequency) noise in your home or business. The key to maximizing wireless range is to follow these basic guidelines: A. Keep the number of walls and ceilings between the 108Mbps SuperG Wireless Access Point and other network devices to a minimum - each wall or ceiling can reduce your SuperG Wireless Access Point’s range from 3-90 feet (1-30 meters). Position your devices so that the number of walls or ceilings is minimized. B. Be aware of the direct line between network devices. A wall that is 1.5 feet thick (.5 meters), at a 45-degree angle appears to be almost 3 feet (1 meter) thick. At a 2-degree angle it looks over 42 feet (14 meters) thick! Position devices so that the signal will travel straight through a wall or ceiling (instead of at an angle) for better reception. C. Building materials can impede the wireless signal - a solid metal door or aluminum studs may have a negative effect on range. Try to position wireless devices and computers with wireless adapters so that the signal passes through drywall or open doorways and not other materials. D. Keep your product away (at least 3-6 feet or 1-2 meters) from electrical devices or appliances that generate RF noise. 5 Connecting the Access Point Step 1 Connect one end of a network cable to the Ethernet port of the access point and connect the other end of the cable to the LAN port of a router. Step 2 Power on the access point by connecting one end of the supplied power adapter to the power jack of the access point and connecting the other end to an electrical outlet. Step 3 Make sure the Power and LAN lights on the Access point are lit, and the WLAN light is blinking. If not, verify the cables are functional and try the above steps again. 6 Establishing Wireless Connection Below are the default wireless settings of the access point. You must configure your wireless network adapter to the same settings in order to establish a wireless connection with the access point. SSID: default Operating Mode: Infrastructure Authentication: Open System Encryption: disabled Restart your computer after establishing a signal strength/link quality with the access point. Configuring the Access Point (Optional) By default, the Access Point is set to function as an AP which bridges the wireless clients with the wired part of your network. If you need to use the Access Point other than as an AP, or if you want to enable encryption, you’ll need to configure it through its web configuration utility. To access the Access Point’s web configuration utility, you’ll need to assign a static IP address of 10.0.0.x (where x is any number between 2 - 254) to your computer. Please follow the steps below to assign a static IP address. Step 1 Right-click on My Network Places from your desktop and click on Properties. (For Windows 98, right-click on Network Neighborhood and click on Properties). 7 Step 2 Right-click on either Wireless Network Connection (if you’re using a wireless card to connect to the AP), or Local Area Connection (if you’re using an Ethernet card to connect to the AP) and click Properties. Step 3 Select Internet Protocol (TCP/IP) and click Properties. 8 Step 4 Select Use the following IP address and enter an IP address of 10.0.0.x (where x is any number between 2 - 254). Also enter 255.0.0.0 for the Subnet mask and 10.0.0.1 for the Default gateway and click OK. Step 5 Click Close. Step 6 Open the web browser and type in 10.0.0.1 in the address field and press Enter. Step 7 At the login screen, enter admin for both the user name and password, and click OK. 9 Step 8 To setup SSID and WEP encryption, click on the Setup Wizard link and click Next. Step 9 The default SSID is default and the default channel number is 6. You may enter any SSID and channel number to match your current wireless network. Click Next. 10 Step 10 Select to enable or disable WEP encryption and click Next. If you already have WEP encryption enabled for your existing wireless network, you must enter the identical encryption settings here. Step 11 Click Reboot to save and apply the settings. Note: Once you have configured the settings, you’ll need to change the TCP/IP settings back to dynamic IP. Follow steps 1 - 3 of this section and change the TCP/IP properties back to “Obtain an IP address automatically.” Restart your computer afterwards. For further configuration including WPA encryption, please use the Advanced Setup link. 11 Web Configuration Utility The Web configuration utility allows you to configure settings for the Access Point. In order to access the web configuration utility, you’ll need to assign a static IP address to your computer. Please refer to the previous section on how to assign a static IP address to your computer and then proceed with the steps below. Step 1 Open the web browser and type in 10.0.0.1 in the address field and press Enter. Step 2 Enter admin for both the user name and password and click OK. You will see the home page for the web configuration utility. The Current Status page shows the current IP Information and Wireless Settings of the Access Point. To change any of these settings, click on the Advanced Setup link. 12 Advanced Setup Use the list on the left side of the screen to navigate to the desired page. Configuration – IP Address MAC Address: Displays the Access Point’s MAC Address. This value cannot be changed. Get IP From-: Select Manual (Static IP) or DHCP (Dynamic IP) as the method you will use to assign an IP address to the Access Point. It is recommended that you keep this setting to the default (Manual). IP Address: The IP address of the Access Point. The default IP address is 10.0.0.1 Subnet Mask: The subnet mask of the Access Point. The default subnet mask is 255.0.0.0 13 Default Gateway: This field is optional. If you have a router on your network, enter the IP address of your router. Click Apply to save any changes. Configuration – Device Information Device Type: Displays the factory name for this device. MAC Address: Displays the MAC Address of the Access Point. Software Version: Displays the version number of the software used. System Name: Displays the name of the Access Point. You may enter any name you want. Note: this is NOT the SSID name for your wireless network. System Contact: Displays the name/person to contact for system support. You may enter any name you want. Click Apply to save any changes. 14 Configuration – AP Mode Settings Access Point: This is the default setting. It connects the wireless clients to the wired part of your network. PtP Bridge: This mode allows you to connect one Access Point to another Access Point of the same model, bridging two wireless LANs together. The two access points must share the same SSID and channel number. Click the radio button to enable this mode and enter the MAC address of the remote SuperG Access Point. PtMP Bridge: This mode allows you to connect the Access Point with multiple Access Points of the same model, bridging several wireless LANs together. All the access points must share the same SSID and channel number. Click the radio button to enable this mode and enter up to 8 MAC Addresses of the remote SuperG Access Points. AP Repeater: This mode allows you to repeat the wireless signal of the root Access Point or Wireless Router. All the access points must share the same SSID and channel number. Click the radio button to enable this mode and enter the MAC address of the root Access Point or Wireless Router. AP Client: This mode transforms the Access Point into a wireless adapter. Any IEEE 802.3 Ethernet device (e.g., a computer, game console, etc.) will be able to communicate wirelessly with the existing wired network via the Access Point set to this mode. You must have another Access Point that’s physically connected to the wired or wireless network serving as the root Access Point. All the access points must share the same SSID and channel number. Click to enable this mode and enter the MAC address of the root Access Point. Click Apply to save any changes. 15 Configuration – WLAN Parameter Settings Wireless Band: Select to set the signal to 802.11g or 802.11g/802.11b. SSID: The name designated for a specific Wireless Local Area Network (WLAN). The default SSID is default. You can enter any name to match your existing wireless network. All wireless devices must share the same SSID in order to connect to each other. SSID Broadcast: Select to Enable or Disable the broadcast of the SSID across the network. Radio Frequency The radio frequency will remain at 2.437 GHz. Channel: The default channel number is 6. All devices on your wireless network must use the same channel. You can select any number to match your existing wireless network. Data Rate: Select the data rate from Auto, 1Mbps, 2Mbps, 5.5Mbps, 6Mbps, 9Mbps, 11Mbps, 12Mbps, 18Mbps, 24Mbps, 36Mbps, 48Mbps, 54Mbps. It is recommended to keep this setting as Auto. Beacon Interval: Beacons are packets sent by an access point to synchronize a network. Specify a beacon interval value. The default (100) is recommended. DTIM (Delivery Traffic Indication Message): 3 is the default setting. DTIM informs clients of the next window for listening to broadcast and multicast messages. 16 Fragment Length: The fragmentation threshold, which is specified in bytes, determines whether packets will be fragmented. Packets exceeding the 2346 byte setting will be fragmented before transmission. 2346 is the default setting. RTS Length: This value should remain at its default setting of 2,346. If you encounter inconsistent data flow, only minor modifications to the value range between 256 and 2,346 are recommended. Transmit Power: Choose to transmit in full, half (-3dB), quarter (-6dB), eighth (-9dB), or minimum power. Super G Mode: Super G is a group of performance enhancement features that increase end user application throughput in an 802.11g network. Super G is backwards compatible to standard 802.11g devices. For top performance, all wireless devices on the network should be Super G capable. Select either Disabled, Super G without Turbo, Super G with Dynamic Turbo, or Super G with Static Turbo. Note: Super G without Turbo: Capable of Packet Bursting, Fast Frames, Compression, and no Turbo mode. Super G with Dynamic Turbo: Capable of Packet Bursting, Fast Frames, Compression, and Dynamic Turbo. This setting is backwards compatible with non-Turbo (legacy) devices. Dynamic Turbo mode is only enabled when all devices on the wireless network are configured with Super G with Dynamic Turbo enabled. Super G with Static Turbo: Capable of Packet Bursting, Fast Frames, Compression, and Static Turbo. This setting is not backwards compatible with non-Turbo (legacy) devices. Static turbo mode is always on and is only enabled when all the devices on the wireless network are configured with Super G with Static Turbo enabled. 802.11g Only: Disabled/Enabled. If enabled, data throughput will be set at 54 Mbps only. Radio On/Off: Turns the radio on or off. If set to off, no wireless connection can be established. Click Apply to save any changes. 17 Configuration – WLAN Partition Wireless Band: Select to set the signal to 802.11g or 802.11g/802.11b. Internal Station Connection: Check Enabled to allow internal wireless clients to connect to the Access Point. Ethernet to WLAN Access: Check Enabled to allow the wired part of your network to connect with the wireless clients. Click Apply to save any changes. Configuration – Access Control Settings 18 Control: • Disabled: disables the filter function • Accept: only accepts connection from the devices whose MAC Address are listed in the Access Control List • Reject: rejects any connection attempts from devices whose MAC address are listed in the Access Control List. Input MAC Address: enter the MAC address of the device you want to be included in the Access Control List and click Save. Access Control List: All the MAC addresses in this list can be granted or denied connection depending upon the Access Control selection. Configuration – Security Settings Authentication: Select from Open System, Shared Key, or WPA. (If you use WEP encryption, it is recommended that you use Open System). See the WPA mode section below for configuring WPA settings. Encryption: Select to Disable or Enable WEP encryption. 19 Key Type: For WEP encryption, select to use HEX (limited to 0-9, A-F) or ASCII (any number or letter). Key Size: 64 Bits: 10 HEX characters or 5 ASCII characters 128 Bits: 26 HEX characters or 13 ASCII characters 152 Bits: 32 HEX characters or 16 ASCII characters Valid Key: Select one key (1st – 4th) to be the active key. All devices must use the same key. Key Table: Input up to four keys for encryption. Enter the appropriate number of characters for your keys. Example: If you selected 128-bits with HEX as your key type, you would enter 26 HEX characters in each of the four keys. Click Apply to save any changes. 20 WPA Mode Select WPA as the Authentication and click Apply. Select PSK then enter the pass phrase in the Pass Phrase field. Note: Pass phrase must be between 8 – 63 characters in length. Leave the other settings as default and click Apply. 21 Additional WPA settings (RADIUS Server Required) If you have a RADIUS Server in your network, you may choose to use EAP as the WPA Mode. Domain Name Server IP address: Input the IP address of the DNS server. Domain Name Server: Enter the domain name of the DNS server. RADIUS Server: Enter the IP address of the RADIUS server. RADIUS Port: Enter the port on your AP dedicated to the RADIUS server. RADIUS Secret: Enter the secret phrase. Click Apply to save any changes. 22 Management – Administration User Name: Enter a user name for the login screen; admin is the default setting. Old Password: To change your password, enter your old password here. New Password: Enter your new password here. Confirm New Password: Enter your new password again for confirmation. Click Save to save your settings. 23 Management – Misc Telnet Service: Check Enabled to allow Telnet Service through the Access Point. Timeout: Select the timeout interval. Default is 3 minutes. Click Apply to save any changes. Maintenance – Update Firmware Firmware Version: Displays the current firmware version number. Update File: After downloading the updated firmware from the vendor’s web site, click on Browse to browse to the downloaded file, click OK to update the firmware. 24 Maintenance – Configuration File You can save your configurations to a file and upload the file later (i.e. after a factory reset so you don’t have to manually reconfigure the settings again). Update File: Browse to a previously saved configuration file and click OK to load the file. Download Configuration File: Click OK to save your current configuration as a file to your hard drive. Be sure to configure all the settings prior to saving the file. Maintenance – Restart System Restart System: Click on Restart to apply the settings and restart the Access Point. Restore System: Click on Restore to restore all the settings to factory default. 25 Statistics This window displays the statistics of the wireless local area network. Throughput: displays the throughput statistics. Transmitted Frames Count: displays the transmitted frames count. 26 Received Frame Count: displays the received frame count. WEP Frame Error: displays the WEP Frame Error. 27 Troubleshooting This section provides solutions to problems that can occur during the installation and operation of the 108Mbps SuperG Wireless Access Point. We cover various aspects of the network setup, including the network adapters. Please read the following if you are having problems. Note: It is recommended that you use an Ethernet connection to configure the Wireless Access Point. 1. The computer used to configure the 108Mbps SuperG Wireless Access Point cannot access the configuration menu. • Check that the LAN LED on the 108Mbps SuperG Wireless Access Point is ON. If the LED is not ON, check that the cable for the Ethernet connection is securely inserted. • Check that the Ethernet adapter is working properly. • Check that the IP address is in the same range and subnet as the 108Mbps SuperG Wireless Access Point. Note: The IP address of the 108Mbps SuperG Wireless Access Point is 10.0.0.1. All the computers on the network must have a unique IP address in the same range, e.g., 10.0.0.x. (where x is any number between 2 – 254). Any computer that has identical IP address will not be visible on the network. They must all have the same subnet mask, e.g., 255.0.0.0 2. The wireless client cannot access the Internet in Infrastructure mode. Make sure the wireless client is associated and connected to the correct access point. To check this connection: Right-click on the wireless network connection icon in the taskbar and select View Available Wireless Networks. The Connect to Wireless Network screen will appear. Please make sure you have selected the correct available network, as shown in the illustration below. 28 3. What variables may cause my wireless products to lose reception? Our wireless products let you access your network from virtually anywhere you want. However, the positioning of the products within your environment as well as the background RF noise will affect the actual wireless range. 4. Why does my wireless connection keep dropping? Antenna Orientation: Try different antenna orientations for the 108Mbps SuperG Wireless Access Point. Try to keep the antenna at least 6 inches away from the wall or other objects. If you are using 2.4GHz cordless phones, X-10 equipment or other home security systems, ceiling fans, and lights, your wireless connection will degrade dramatically or drop altogether. Try changing the channel on your router, access point and wireless adapter to a different channel to avoid interference. Keep your product away (at least 3-6 feet) from electrical devices that generate RF noise, like microwaves, monitors, electric motors, etc. When deploying several access points and wireless devices, please make sure that access points in close proximity do not have overlapping channels. Nearby access points should be assigned channels that are at least 4 channels apart to prevent interference. For example, with a group of 3 access points you could assign the first to channel 1, the second to channel 6, and the third to channel 11. 5. Why can’t I get a wireless connection? If you have enabled encryption on the 108Mbps SuperG Wireless Access Point, you must also enable encryption on all wireless clients in order to establish a wireless connection. The encryption settings are: 64-bits, 128-bits, or 152-bits. Make sure that the encryption bit level is the same on the access point and the wireless client. Make sure that the SSID on the access point and the wireless clients are exactly the same. If they are not, wireless connection will not be established. Move the 108Mbps SuperG Wireless Access Point and the wireless client into the same room and then test the wireless connection. Disable all security settings. (WEP, MAC Address Control) Turn off your 108Mbps SuperG Wireless Access Point and the client. Turn the 108Mbps SuperG Wireless Access Point back on again, and then turn on the client. Make sure that all devices are set to Infrastructure mode. 6. I forgot my encryption key. Reset the 108Mbps SuperG Wireless Access Point to its factory default settings and restore the other devices on your network to their default settings. You may do this by holding in the Reset button on the back of the unit for 10 seconds. You will lose the current configuration settings. 29 Reset To hard-reset the 108Mbps SuperG Wireless Access Point to the Factory Default Settings, please do the following: A. Locate the Reset button at the back of the 108Mbps SuperG Wireless Access Point. B. Use a paper clip to press the Reset button. C. Hold for about 10 seconds and then release. D. After the 108Mbps SuperG Wireless Access Point reboots (this may take a few seconds) it will be reset to the factory default settings. 30 Technical Specifications Standards IEEE 802.11g IEEE 802.11 IEEE 802.11b IEEE 802.3 IEEE 802.3u Device Management Web-Based Internet Explorer v6 or later; Netscape Navigator v6 or later; or other Java-enabled browsers DHCP Client _ Wireless Operating Range Indoors – up to 328 feet (100 meters) Outdoors – up to 1312 feet (400 meters) Temperature Operating: 32ºF to 149ºF (0ºC to 55ºC) Storing: 4ºF to 167ºF (-20ºC to 75ºC) Humidity: 95% maximum (non-condensing) Safety and Emissions: CE/FCC, UL Wireless Frequency Range: 2.4GHz to 2.4835GHz Wireless Data Rates with Automatic Fallback: 108Mbps(SuperG Mode) all wireless devices must have Super G enabled. 54 Mbps 48 Mbps 36 Mbps 24 Mbps 18 Mbps 12 Mbps 11 Mbps 9 Mbps 6 Mbps 5.5 Mbps 2 Mbps 1 Mbps 31 Receiver Sensitivity: 54Mbps OFDM, 10% PER, -68dBm 48Mbps OFDM, 10% PER, -68dBm 36Mbps OFDM, 10% PER, -75dBm 24Mbps OFDM, 10% PER, -79dBm 18Mbps OFDM, 10% PER, -82dBm 12Mbps OFDM, 10% PER, -84dBm 11Mbps CCK, 8% PER, -82dBm 9Mbps OFDM, 10% PER, -87dBm 6Mbps OFDM, 10% PER, -88dBm 5.5Mbps CCK, 8% PER, -85dBm 2Mbps QPSK, 8% PER, -86dBm 1Mbps BPSK, 8% PER, -89dBm Physical Dimensions: L = 5.6 inches (142mm) W = 4.3 inches (109mm) H = 1.2 inches (31mm) Security: WPA-WiFi Protected Access (64-bits,128-bits, 152-bits WEP with TKIP, MIC, IV Expansion, Shared Key Authentication) _ External Antenna Type: 0dBm gain with reverse SMA connector Modulation Technology: Orthogonal Frequency Division Multiplexing (OFDM) Complementary Code Keying (CCK) Media Access Control: CSMA/CA with ACK Power Input: Ext. Power Supply DC 5V, 2.0A Weight: 200 g Technical Support E-mail: [email protected] Toll-Free: 1-888-746-3238 Web Site: www.airlink101.com 32