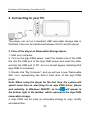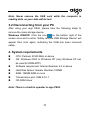
1
Model :P882 Serial V1.0 Note For your safe use and enjoyment of the aigo P882 player, please read the following carefully before use. Warning: Do not expose the player to extremely high or low temperatures. Do not expose the player to rain or other moist environments. Do not put the player close to magnetic objects. Do not drop or throw the player. Do not place under direct sun light or in very hot places (e.g. the trunk of a car on a hot day.It may damage the player or cause it to malfunction. Please use the enclosed power adaptor rather than another model. Do not clean the player with water or detergent, but use the enclosed cleaning cloth. Note Please keep the player clean and do not scratch the display. Do not use the player in dusty environments. Please do not put heavy items on top of the player. Please do not operate or use the player while driving. Please do not listen to loud music contiusoudly with earphones as your hearing may be damaged. While using earphones, be careful to not pull the cord as it may damage the earphones. Please do not disassemble the player yourself. Maintenance is limited to personnel authorized by the original manufacturer. 1 Freedom in Technology; Freedom in life Copyright statement To respect intellecutual property laws, please do not copy, exchange or share recorded content without authorization. Furthermore, please abide related copyright laws when recording music. 2 Table of Contents TABLE OF CONTENTS ....................................................3 Chapter I: Getting to know the P882 ................................ 5 1. Overview of the Player .................................................. 5 2. Charging the Battery ..................................................... 8 3. Connecting to your PC................................................ 10 4. System requirements .................................................. 11 CHAPTER II OPERATION ..............................................12 2-1. Precautions............................................................... 12 2-2.Film............................................................................. 13 2-3.Music .......................................................................... 17 2-4.Photo .......................................................................... 21 2-5. Voice Recorder ......................................................... 23 2-6.TV Encoder ................................................................ 25 2-7.E-book ........................................................................ 28 2-8.Setting ........................................................................ 32 2-8-1. Data Management ................................................. 33 2-8-2.System Status ........................................................ 35 2-8-3.Volume Adjustment ............................................... 35 2-8-4.LCD Contrast .......................................................... 35 2-8-5.Power Management ............................................... 36 2-8-6.Key Tone ................................................................. 37 2-8-7.NTSC/PAL ............................................................... 37 2-8-8.Menu Setting .......................................................... 37 2-8-9.Service Center ........................................................ 38 2-8-10.Time Setting.......................................................... 38 2-8-11.HDD Recovery ...................................................... 39 3 Freedom in Technology; Freedom in life 2-8-12.System Renewal................................................... 40 2-8-13.Video Display........................................................ 41 2-8-14.Desktop Setting.................................................... 41 2-8-15.MTV Backdrop ...................................................... 42 2-8-16.MTP Storage ......................................................... 42 CHAPTER III TROUBLESHOTING ...................................47 CHAPTER IV APPENDIX ...............................................53 Technical Specifications................................................. 53 Supported Files ............................................................... 55 Packing list ...................................................................... 56 4 Chapter I: Getting to know the P882 1. Overview of the Player Obverse side 1. Stop/Back Button: When you’re playing files, press it once to stop playing. When you’re viewing the File List, press it once to go back to the previous File List Page or return to the [Main menu].When you entered the [Sub menu] or [Effect Menu], press it to close the menu. Allows you to exit the [Sub menu] or [Effect Menu]. 5 Freedom in Technology; Freedom in life 2. Menu Button: Press it once to stop playing or return to the [Main Menu]. 3. Power Of/Off Button: Press and hold it for 2-3seconds to turn on the MP5 player, click it to power off. 4. Display Mode Swith Button: If you’ve connected the AV/OUT Cable to the AV/OUT jack, press the button to switch the display to the MP5 player screen content, and the video device will display aigo MP5 P882 pictures including user’s interfaces, a nd multimedia content. 5. Power light: Power on in green light and outer adapter in red light. 6. HD light:Orange light to show HD in use. 7. Select Button (Up): UP button to hightlight item. To selectfile or filoder or to select an item or adjust setting value. 8. OK Button: Press to play. During playback, press to pause/reverse/forward. 9. Select Button (Down): Down button to hightlight item. To selectfile or filoder or to select an item or adjust setting value. 10. LCD screen: Offers a user-friendly interface for multimedia and video. 11. HOLD Button: To inactivate the buttons during playing or carrying. When “HOLD” is in the locked out state, all function buttons are invalkid. To activate them, you only need to put “HOLD” up to unlocked state, slide the switch to the HOLD position. (The “LOCK” icon will appear in the display to remind you that you’ve locked the player. 12. RESET Jack: In some circumstances, when RESETING is 6 needed, please use a pin or pen point to insert to the resetting jack. Press RESET (the memory will be cleared and settings will restart and resume to the defaults). 13. DC 5V: When you plug in the Power Adaptor, the battery inside of the MP5 Player will automatically start to charge. Note: please do use the exclusive power adapter in the package to recharge! 14. USB 2.0 Port& OTG: Attach the small end (Type Mini-B) of the Mini-USB Cable here. Attach the large end (Type A) to your computer. If it is properly connected, and “USB” icon will be displayed on the screen, then you can move, copy, delete and manage files. 15. AV/IN Jack: Attach the AV out componement by AV cable, or attach the audio componement by Line in cable. 16. AV/OUT Jack: Attach the AV/OUT cable here when you’re connecting the MP5 player to an Audio/Video component, such as a stereo receiver, portable speaker, TV projector, etc. 17. Earphne Jack: For earphone. Note:The pixel of this device is 480×272 and the same is on TV. aigo P882 play videos in full screen automatically. 7 Freedom in Technology; Freedom in life Reverse side 1. Battery compartment: Included recharged lithium battery. 2. Bracket: A small shelf or shelves to support the MP5 player. 2. Charging the Battery The player uses emovable and rechargeable high capacity lithium battery. The battery can be recharged directly through the power adaptor. 8 1. When the player is out of power, recharge the battery with the power adaptor for about 3 hours. The LED indicator is red while recharging, after the battery is fully recharged the indiator turns out. 2. Please note the specifications of the power supply: output voltage: 5V, output current: 2A. Note: 1. Damage incurred by using other power adaptor that does not come with this device is not covered by our warranty. 2. For the initial use, please fully charge the battery. 3. If the screen of “Low Battery” appears repeatedly, this means the power is insufficient, please recharge the battery; if “The battery is critical low! Please plug in AC adapter.” appears on the screen, the device turns off automatically. 4. When power is insufficient, please turn off the device first and then plug in AC adaptor to recharge the battery. 5. Personal data will be retained even the device is out of power, but please remember to turn off the power before taking out the battery. 9 Freedom in Technology; Freedom in life 3. Connecting to your PC The player can act as a standard USB removable storage disk in Windows. Files can be transferred between the PC and the player. 3.1 Use of the player as Removable Storage Space 1. Start your computer. 2. Turn on the aigo P882 player, insert the smaller end of the USB line into the USB port of the aigo P882 player and insert the other end into the USB port of PC. An icon should appear indicating that aigo P882 is connected. 3. Double click “My Computer”, and you will see a new “Removable disk” icon, representing the built-in hard drive of the aigo P882 player. Note: When using the player for the first time, the system will spend some time on searching for an aigo P882 driver, please wait patiently. In Windows 2000/XP, an icon will appear in the bottom right in the taskbar, which represents the aigo P882 removable storage. 4. Aigo P882 can be used as removable storage to copy, modify and delete files. 10 Note: Never remove the USB cord while the computer is reading data, as your data will be lost. 3.2 Disconnecting from your PC After using your aigo P882, please take the following steps to remove the mass storage device. Windows 2000/XP: Click the icon on the bottom right of the screen once and a notice “Safely remove USB Storage Device” will appear then click again, indicating the USB has been removed safely. 4. System requirements CPU: Pentium III 500 MHz or above OS: Windows 2000 or Windows XP (only Windows XP can be used for DRM-MTP) Software requirement: Internet Explorer 4.0 or above Hard Disk Space: Greater thanthan 100MB RAM: 128MB RAM or more Transmission port: USB 2.0/1.1 CD-ROM driver Note: There is a built-in speaker in aigo P882. 11 Freedom in Technology; Freedom in life Chapter II Operation 2-1. Precautions ¾ Press and hold the the “POWER” button for three seconds to turn the machine on and press one second to turn the machine off. ¾ According to the resolution of the video file, there will be some difference in the size of the video displayed. ¾ Since the display panel useshighly luminous CCFL (Cold Cathode Fluorescent Lamp) back-light source, mild heat from the display surface is natural. ¾ When connecting the player to your computer via the USB 2.0 port, it is suggested you connect the player to a power source via the adaptor. ¾ As there are precise electronic components inside the player, please do not disassemble. ¾ If the battery icon indicates low power, charge for at least 3 hours to ensure the battery is fully charged. If multimedia video files are played while charging, more time is needed. 12 ¾ The aigo P882 couldn’t play the files including Error code or beyond the supported files. If insist to play may cause shut down abnormally to restart the unit. ¾ Aigo P882 is supported by most USB storage, but not supported card reader. 2-2.Film Allow to put your favorite films into video folder in the hard disk to broadcast the video by the player. 1. In main menu, double tap Film to access this function. the device will *Tap automatically search the data, and lists them in alphabetical order. *Tap to tick a file or or tap filename then tap to select the 13 Freedom in Technology; Freedom in life file. *Tap to delete the selected file or directory. to * Tap move the selected file to specified directory. 2. In file list menu, tap the selected 10 file then tap Playlists appear. *Tap any number of palylist to add the selected file then tap . *Tap to escape and return to previous screen. to add the *Or tap selected file into playlist. *Tap to finish adding into playlist then tap to check playlist or play playlist. Note: please do not add over 20 files in one palylist. 14 *To select a file and then tap to view all the functions. 3. If the subtitles of file appear the wrong code, tap to pick the correct coding. *Tap to return to main menu. 4. In file list menu, double tap the file name to play, the file will play in full screen automatically then tap anywhere on the screen turn to editing screen. *Tap to paly. *Tap to pause. *Tap to stop. *Tap to fast forward; tap , to fast rewind,(Provides forward speed1.5, 2, 4, 8, 16 times; rewind speed 2, 4, 8, 16 times) *Tap to stop the current file and jump to previous file. 15 Freedom in Technology; Freedom in life *Tap to stop the current file and jump to next file. to switch between normal and full screen. *Tap *Tap *Tap to repeat the current file. to set the current file A-B start bit/stop bit. Set the A start bit and the icon appear to set the stop bit.After setting, the section between A-B will be played repeatedly. to cancel the A-B section and play in normal mode. *Tap *Tap *Tap to mute and tap again to play in sound. to return to previous screen. 5. While palying files, tap escape and tap to to make a tag and play it next time from the end position. Note: While playing films, the software will find subtitles in the same directory. The file name of subtitles must be the same as film and the file extension name must be * .srt. For example: File name is ABC.avi, and the valid subtitles file name muse be ABC.srt. 16 2-3.Music Allow to put your favorite music into music folder in the hard disk to broadcast the music by the player. 1. In main menu, double tap Music to access this function. the device will *Tap automatically search the data, and lists them in alphabetical order. *Tap to tick a file or or tap filename then tap to select the file. *Tap ,to delete the selected file or directory. to move the selected file *Tap to specified directory. 17 Freedom in Technology; Freedom in life 2. In file list menu, tap the selected 10 file then tap Playlists will appear. *Tap any number of palylist to add the selected file then tap *Tap . to escape and return to previous screen. to add the selected *Or tap file into playlist. *Tap to finish adding into playlist then tap to check playlist or play playlist. Note: please do not add over 20 files in one palylist. 3. If the lyrics of music appear the wrong code, tap to pick the correct coding. 18 4. To select a file and then tap view all the functions. *Tap to to return to main menu. 5. In file list menu, double tap the file name to play. *Tap to repeat the current file. *Tap to set the current file A-B start bit/stop bit. Set the A start bit and the icon appear to set the stop bit.After setting, the section between A-B will be played repeatedly. to cancel the A-B section and play in normal mode. *Tap *Tap to select the sound mode(Provides normal, rock, jazz, pop, classical, dance, heavy, disco, soft, 3D Stereo/Live hall etc.) to stop *Tap *Tap *Tap to pause. to jump to play previous/next file. *Tap to play. *Tap to paly files randomly then tap agin to normal mode. to mute and tap again to play *Tap in sound. 19 Freedom in Technology; Freedom in life 6. While playing music, tap to close screen to save power then tap anywhere on the screen to normal mode. *Tap to play MTV, if lyrics are included, they show on the bottom of the MTV screen. *Music plays from beginning in MTV mode, the guide of MTV function please refers to P17. Note: While playing music, the software will find lyrics in root. The file name of lyrics must be the same as mp3 file and the file exentions name must be lrc. For example: mp3 file is ABC.mp3, and the effective lyrics file name must be ABC.mp3.lrc, otherwise the software could find the match file. Lyrics file is supported by Winamp plug-in flash lyrics, You may download the flash lyrics in the internet or make it by yourself. 20 2-4.Photo Allow to put your favorite photos into digiphoto folder in the hard disk to broadcast the photo by the player. 1. In main menu, double tap Photo to access this function. the device will *Tap automatically search the data, and lists them in alphabetical order. *Tap to delete the selected file. *Tap to show in filename list and filesize,tap to switch showing in minimized photos. *Tap to tick a file or or tap filename then tap to select the file. *Tap to select a file and then tap to view all the functions. 21 Freedom in Technology; Freedom in life *Tap to return to main menu. 2. Tap to set slide show period from1~9 seconds. *Tap to confirm. 3. Tap all photos show in full screen automatically. 4. In file list, double tap any photo to show in full screen and then tap anywhere on the screen to view the editing bar. *Tap *Tap to view previous/next photo. to enlarge the photo (while photo is bigger than 480 * 272). *Tap to view 1:1 ratio. 22 to zoom in/out photos. *Tap *Tap to turn 90 degrees. *Tap to link to music function and tap music files to play. to view in full screen automatically. *Tap *Tap *Tap to disable the editing bar. to return to previous screen. 2-5. Voice Recorder Providing Line_in recording function to record favorite files into music_recording_ file folder in the hard disk to broadcast the files by the player. 1. In main menu, double tap Voice Recorder to access this function. *Tap the device will automatically search the data, and lists them in alphabetical order. *Tap ,to delete the selected file. 23 Freedom in Technology; Freedom in life *Tap to tick a file or or tap filename then tap to select the file. Note: Before recording, attach the audio componement by line in cable and another side connect the player to an audio out component. 2. Tap to start recording, please make sure line in cable plugging into the jack. *Tap *Tap to pause. to continue recording. *Tap *Tap to save files. to stop stopping and return to previous screen. *In file list menu, pick a file and then tap or double tap files to play files. Playing time and file lenth show on the screen. to pause. *Tap *Tap to continue playing. 24 to set the file format *Tap as WAV or WMA. *Tap to select a file and then tap *Tap to view all the functions. to return to main menu. 2-6.TV Encoder Providing AV_in recording function to record favorite TV programs into tv_recording_file folder in the hard disk to broadcast the files by the player. 25 Freedom in Technology; Freedom in life 1. In main menu, double tap TV Encorder to access this function. *Tap to view “No signal”, please attach the AV_in cable and another side connect to an AV_out component. 2. Recording time show on the screen. *Tap *Tap *Tap tostop, to record, to save recorded file and return to list menu. 26 3. In recording menu,tap to file list menu, the device will *Tap automatically search the data, and lists them in alphabetical order. *Tap to tick a file or or tap filename then tap to select the file. to delete the selected *Tap file. to move the selected *Tap file to specified directory. *Double tap filename to play the file. *Tap to select a file and then tap to view all the functions. *Tap to return to main menu 4. In recording menu, tap to set the recording schedule of date, time, duration, once or weekly. *Tap *Tap schedule. to finish. to cancel the 27 Freedom in Technology; Freedom in life *Tap to tick a file or or tap filename then tap to select the file. to add new schedule *Tap recording. *Tap to modify the schedule recording. *Tap to delte the selected file. *Tap to select a file and then tap to view all the functions. *Tap to return to main menu Note: Schedule recording couldn’t work while recording. 2-7.E-book Allow to put your favorite file extension name pdf and txt into ebook folder in the hard disk to read by the player. 28 1. In main menu, double tap E-book to access this function. *Tap the device will automatically search the data, and lists them in alphabetical order. *Tap to tick a file or or tap filename then tap to select the file. *Tap to delete the selected file. *Tap to move the selected file to specified directory. *Tap to select a file and then tap to view all the functions. *Tap to return to main menu 2. Double tap filename to read the file, scrolling the bar to view up and down. *Tap to zoom in/out the content. *Tap to turn pages automatically and tap again to stop. 29 Freedom in Technology; Freedom in life *When it appears the message ”无法 辨识,请切换编码” on the screen, to select the correct please tap coding. to add the bookmark *Tap on the favorite section. to list all of the *Tap bookmarks and tap to select the favorite one. *Tap to set seconds of turnsing pages from 1~10. *Tap to jump to music function to play music with reading. *Tap to return to previous screen. 30 3. In file list menu, tap file extension name pdf file. *It appears the current page and totall pages on the bottom of screen. *Tap to select the best reading ratio, provides 10 types of ratio including 400%, 200%, 150%, 125%,100%, 50%, 25%, 12.5%, fit page( fit the size of screen), fit width (fit the width of screen). *Tap to turn previous/next page, *Tap to turn previous/next ten pages. *Tap to memorize previous action. *Tap right and bottom scrolling bar to view up and down. *Tap to return to previous screen. 31 Freedom in Technology; Freedom in life 2-8.Setting Setting Menu 1 Setting Menu 2 Provides functions of Data Management, System Status, Volume Adjustment, LCD Contrast, Power Management, Key Tone, NTSC/PAL, Menu Setting, Service Center, Time Setting, HDD Recovery, System Renewal, Video Display, Desktop Setting, MTV Backdrop, MTP Storage. 32 2-8-1. Data Management 1. Provides functions of folders, file items, file size, free space, Other memory, format (other memory) and delete, copy, move files. 2. Double tap any file to view in details of file name and size. *Tap then tap *Tap to tick a file or or tap filename to select the file. all files will be marked, *Tap to delete the selected file. *Tap to move the selected file to specified directory. *Tap to return to main menu 3. While shifting to other memory, attach the USB OTG to outer storage, and small end attaching USB port, the message “Searching device…” appears on the screen. 33 Freedom in Technology; Freedom in life 4. If the message“external storage found!” appears on the screen, it connects succeedly. 5.Tap to view the files between the main unit and external storage 6. Tap to view total capacity, free space, and the percentage of free space. *Tap to return to setting menu. Note: The funcion of format is only available on MPT storage. 34 2-8-2.System Status To view the status of volume, backlight, key tone, main memory space, font, power-off time and battery. *Tap screen. to return to previous 2-8-3.Volume Adjustment To adjust the volume and balance. *Tap to return to previous screen. 2-8-4.LCD Contrast 1. To adjust the backlight. 2. Tap the center of the circle for correction by turns of center, righttop, left-top, right-bottom, left-bottom. 35 Freedom in Technology; Freedom in life Æ Æ *Tap to confirm and return to previous screen. 2-8-5.Power Management To set the auto power-off time and power saving time. If time is up, the screen turns dim to save power. *Tap to return to previous screen 36 2-8-6.Key Tone To set the key tone off or on, tap “on” on sounds or tap “off” on mute. *Tap to confirm and return to previous screen 2-8-7.NTSC/PAL While attaching TV out cable, select NTSC or PAL mode by different area, the default is PAL mode. *Tap to confirm and return to previous screen 2-8-8.Menu Setting To view the current font, tap 1~3 to switch among Simplify Chinese, Traditional Chinese, or English, the default is simplify Chinese. *Tap to return to previous screen 37 Freedom in Technology; Freedom in life 2-8-9.Service Center Povides the information of A/S telephone number, fax number, website, system version, and machine version. *Tap to confirm and return to previous screen。 2-8-10.Time Setting To set the date and time. to set present year *Tap and date. to set present time. *Tap *Tap to return to previous screen. *Tap or to show setting colum. *Tap any digits on the light blue colum to tap numeral 1~0 key to set the present time. 38 *Tap *Tap to return to previous screen. to confirm. Note: If set the unreasonable digits, the message of “invalid time!” appears. 2-8-11.HDD Recovery 1. If data crashes, please read the warning and recover your hdd. *Tap to start recovering. Note: Please plug in ac adapter while recovering otherwise the icon of OK is not available. 2. Recovering finished, the message “Check Completely” appears and tap to confirm. 39 Freedom in Technology; Freedom in life 2-8-12.System Renewal 1. Tap “start to update” to update the unit system. 2. Please pulg in the adapter, if not the message “please insert adapter first” appears, and tap to confirm. 3. The process of updating appears on the on left-top side. 4. Updating finished, tap to shut down automatically. Note:Updating finished, the system updated message appeasrs on the bottom of screen, please press “back” and “power” at the same time to restart the unit. 40 2-8-13.Video Display Tap to select the video display mode of zooming or full screen. to return to previous screen. *Tap 2-8-14.Desktop Setting 1. Tap to select decided (the default picture) or voluntarily establishes. *Tap “Voluntarily establishes” and tap to set, 2.Pick one picture from all and tap to view or double tap one picure, 3.Tap menu to confirm. and return to main 41 Freedom in Technology; Freedom in life 2-8-15.MTV Backdrop 1.Tap ”Decided” to set the films on the folder of “MTV_Video” to be the MTV backdrop. 2.Tap ”Voluntarily establishes” to set the films on the folder of “MTV_ background “to be MTV backdrop. Note: MTV backdrop supported files are wmv, avi, mpeg, dat and mpg. 2-8-16.MTP Storage Provides function of transferring mutli-media files between computer to device aigo P882. 1. Double tap MTP storage,attaching the USB cable to the computer USB port and the other end to the aigo P882 USB port and start to connect with the PC. 42 2. From now on, all actions operate on the computer. Connect to the program Windows Media Player automatically and tap “OK” to transfer files. Note: Please do not plug out the USB cable while connecting preventing from data loss. 3.If use this function first time(all new WMP10), the message appears, recommend to select first option to search the available files to transfer with aigo P882 and select “Next” 43 Freedom in Technology; Freedom in life 4. After searching, numbers of media files( it differs from every user) have added to media box and select “Next”. 5. The computer can identify the aigo P882 as the mass storage (the message only appears on the first use) and select finish to confirm. 44 6.Media files automatically synchronize to aigo P882 storage and select the left side to check. 7. Since second time use, please select the second option to select desired media files to synchronize. 45 Freedom in Technology; Freedom in life 8. Click right mouse to add the synchronized files or drag the media files to list. 9. Synchronized media files would be listed on the right list, select to synchronize. 10. The synchronized precentage appears on the screen. 11. After operation, plugging out USB cable directly and aigo P882 returns to setting menu. 46 Chapter III Troubleshoting Q: The aigo P882 player is not responding to the Power button, why? 1. Before using for the first time, please check whether the “HOLD” button has been pushed to the right side (unlocked state). The factory default is in a locked state where all functional buttons will not respond. This guarantees safety of the player during transportation. Push “HOLD” to the right side, and press the POWER ON/OFF button to turn on the player. 2. Press and hold “POWER ON/OFF” button for 3 seconds, the player should turn on. Q: Is it necessary to charge the battery before using the aigo P882? Yes. The battery must be charged for at least 10 hours before the first use. Q: What is MPEG-4? MPEG-4 is a new multi-media format. It has been widely applied in portable multimedia devices and internet file transfer processes, etc. The advanced MPEG-4 compression technology compresses files to a greater 47 Freedom in Technology; Freedom in life degree by an object-oriented calculation method that still guarantees the picture and sound quality of the original video files. This method ensures fidelity even when compressing the file to less than 1/10 of its original size. Q: How can I convert DVDs to MPEG-4 files? DVDs are MPEG-1/ MPGE-2 files. Due to their large volume, it is difficult to save them on large-capacity hard disks for portable video display. However, in the current market, many producers have developed convenient and easy-to-use conversion software, ie.MPEG-4 coding software. Put your DVD into the DVD-ROM drive select MPEG-4 file specifications and the software automatically converts the videos into a MPEG-4 file. We recommend Dr DivX software for users of aigo P882. The software is developed by DivXNetworks company and maintains the quality and compatibility of converted files. (www.divx.com) Q: Can aigo P882 players play MPEG-2 files? Yes, they can. However, MPEG-1/MPEG-2 video files are very large. Only 6-8 files can be stored on the aigo 80GB hard drive. Aigo P882 is designed for portable video display and hence uses, they adopt advanced MPEG-4 decoding and coding technologies, allowing 60 to 80 MPEG-4 compressed video files to be stored. Aigo 882 users are recommended to use MPEG-4 files, 48 in order to take full advantage of the player. Q: What is the format of sound files recorded by the aigo P882? aigo P882 players record sound in the WMA(*.WMA) and WAV (*.WAV) format. For details, please refer to Technical specifications of aigo P882. Q: Why is the sound recording not working? In order to prevent overly-short audio files or cutting off of the recording because of insufficient hard disk space,audio recording rests when there is less less than 200MB of hard drive space. Q: What is the maximum length for a recorded audio file? The player can record a high quality sound file of 2 hours. Q: Are there any restrictions on file size for transfer to the aigo P882? aigo P882 uses FAT32 file storage, it is recommended that you limit each file to 4GB. 49 Freedom in Technology; Freedom in life Q: How long does it take to charge the aigo P882? The battery needs 3 hours to be fully charged. If you are playing multimedia while the player is charging, please charge for a longer period. Q: How do I reset the aigo P882? In case of system failure, use the end of a paper clip or a pen press the recessed Reset button found on the bottom of the player. The player should turn off. Q: In case of low power why might the player behave abnormally? As you use the player, the battery gradually ages and may cause the battery indicator to lose accuracy. You could try changing the battery or directly contacting our after-sale service staff. Q: Under a normal situation, why can’t I disconnect from the PC? “The universal storage device could not stopped at this time”continually appears. Please exit any programs that may be accessing the player, including WINDOWS Content Server. If it still doesn’t work, please close all programs and try to disconnect the player after 20 seconds. If it still fails, press the POWER button to turn off the player and 50 disconnect the USB cable. Q: Why can’t I connect the player to an un-powered removable hard drive via USB? Hard drives require a large amount of electric current. The aigo P882 only comes with a 5V power supply and hence can not be connected to a hard drive. Q: How can I create E-books? The player supports TXT text files, so you only need to download the text files to the E-book directory in the player. If you want to view the content of a website in the aigo P882 player, you need to save the website as TXT file. Q: Why can’t I connect the player via USB when the power is low? The USB connection consumes some energy, detects low power and kicks in its automatic restart function. Q: The removable disk is connected to the computer but I can’t find the movable disk, why? 1. Ensure that the player aigo P882 is on when connecting to the computer. If it is OFF, turn it ON. 51 Freedom in Technology; Freedom in life The player should enter the USB interface. 2. Make sure that the USB connection is secure. Otherwise, it is possible due to that the USB port has not been enabled in the BIOS settings in the system. Restart your computer and enter the BIOS settings and enable the USB port. 3. Check that the USB cable is functioning properly by attaching it to another device. 4. Check that theUSB driver has been installed in Win98. If not, install it. Q: Do videl files support subtitles? Yes. Subtitle files (.SRT) and corresponding video files of the same name are stored in the same directory. For example, for a movie titled“XXX.rmvb”, the player would first try to find “XXX.srt”. If these files can not found, subtitles for this video can not be used. 52 Chapter IV Appendix Technical Specifications Index Dimensions Weight LCD display Power supply HDD Transmit connector Audio output Video output Temperature scope Language Playing Time Parameters 125mm(L)x77mm(W)x29.9mm(H) 304g±10% (with battery) 4.3 inches TFT LCD, 480X272 pixels Rechargeable lithium cell. unloadable at 2300 mAh 2.5’’ HDD, 80GB-160GB Mini-USB connector USB2.0 compatible with 1.1, USB OTG Earphone output: 32 Ω left 40mW +right 40mW: (maximum volume) Built-in loudspeaker: 8 Ω 0.5 W x2 Supported video output: PAL,NTSC Composite video output Operating temperature: 0℃~40℃ Storage: -20℃~70℃ Simplify Chinese / Traditional Chinese / English Audio : MP3,128K,about 4 hours(Mpeg1.0 layer3,44KHz,128kbps,one file repreating, volume 50%,earpone ,screen off, other default) 53 Freedom in Technology; Freedom in life OperatingSystem Video:RM/RMVB, about 2.5 hours,RMVB, 480*272,587kbps,24fps,one file repeating,volume 50%,earphone,other default ) Computer configuration:Windows2000 / XP (only XP supportsDRM transfer) File system:FAT32 file system Note:The design or format may be changed without notice. Memory explanation: The HDD of this device is composed by 2GB and 72.5GB. The memory of 2GB is used by system and program and the other 72.5GB is for user. 10GB of 72.5GB is preserved DRM for MTP usage. User can view this space in the MTP of setting and put music or video files in this space. 72.5+2 = 74.5GB = 76288MB = 78118912KB = 79993765888B about 80G The bios system is saved in HDD so user can’t format by himself. 54 Supported Files Item Audio play Video play File types Bit rate File type DAT AVI RM / RMVB WMV9 MPG2 Description MP3, WAV, WMA, OGG 32Kbps~320 Kbps Video type: MPEG1 Audio type: MP3, AC3 Video frame rate: 30 fps Resolution rate:352x288 Code flow: 1.5Mbps Video type : MPEG4 SP, ASP, DivX4.x, DivX5.x, DivX6.x, Xvid Audio type: MP3, AC3 Video frame rate: 30 fps Resolution rate: 720x480 Code flow: 8Mbps Video type: RV 30, 40 Audio type: RA 10, 20 Video frame rate: 30 fps Resolution rate: 720x480 Code flow: 1.5Mbps Video type: WMV9 Audio type: WMA Video frame rate: 30 fps Resolution rate: 720x480 Code flow: 7Mbps Video type: MPG2 Audio type: MP@ML Video frame rate: 30 fps Resolution rate: 720x480 Code flow: 8Mbps 55 Freedom in Technology; Freedom in life Recording Subtitle File types Resolution File types E-book File types Photos *.SRT format JPEG, GIF, BMP, PNG, TIF Max support 8Mpixel (24bit) WAV (8KHz, 32Kbps) WMA (16KHz, 64Kbps) TXT (Max 2MB) PDF (Max 5MB) Packing list Thank you for buying an aigo P882 When you open the package, please check for the following items: Serial No. 1 2 3 4 5 6 7 8 9 Item Name Player AV-out cable USB cable USB-OTG adaptor Power adaptor Earphones LINE IN cable Li-ion battery User Manual 56 Quantity 1 1 1 1 1 1 1 1 1