1
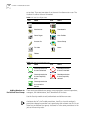
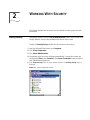
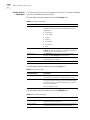
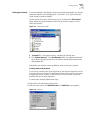
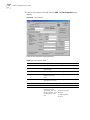
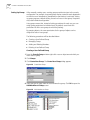
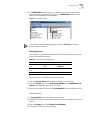
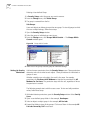
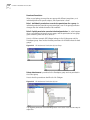
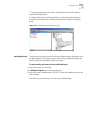
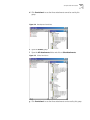
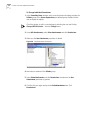
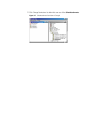
Communication Server Security Setup Guide CommWorks Ready Part Number 10031370 Communication Server Security Setup Guide CommWorks Ready Part No. 10031370-01 Published November 2000 3Com Corporation 5400 Bayfront Plaza Santa Clara, California 95052-8145 3COM CORPORATION (hereinafter 3Com) LIMITED USE SOFTWARE LICENSE AGREEMENT READ CAREFULLY: By exercising Licensees rights to make and use copies of the SOFTWARE (as may be provided for below), Licensee agrees to be bound by the terms of this license agreement. IF LICENSEE DOES NOT AGREE TO THE TERMS OF THIS AGREEMENT, PROMPTLY RETURN THIS PACKAGE TO THE PLACE FROM WHICH LICENSEE OBTAINED IT FOR A FULL REFUND. LICENSE AND PROTECTION LICENSE GRANT. 3Com grants to the End User (hereinafter Licensee) and Licensee accepts subject to the following terms and conditions, a nonexclusive, nontransferable right to use the accompanying copy of the Software limited to the number of communication ports licensed for fax or data exchange. A communication port can be accessed and used by only one network user at any one time; however, all network users have concurrent single user access. Should 3Com determine that Licensee is in Breach of said license, Licensee agrees to return the original and all other copies of the Software and Documentation to 3Com. 3Com reserves all rights not expressly granted to Licensee. PROTECTION OF SOFTWARE. Licensee agrees to take all reasonable steps to protect the Software and documentation from unauthorized copying or use. Without limiting any remedies or relief, which may be available to 3Com, Licensee agrees to pay 3Com for additional licenses if Licensee uses the Software on more than the licensed number of communication ports or in any way beyond the scope of this License. COPIES. All server and client executable files are contained on the single CD received with this License. Licensee may make one new copy of the client component of the software per client on the network provided that this new copy is created as an essential step in the deployment of the Software and is used in no other manner, or is for archival purposes only to backup use of the Software. All proprietary rights notices must be faithfully reproduced and included on such copies. Licensee may not copy the documentation unless for use by network clients as a step in the deployment of the Software, and for no other reason. OWNERSHIP. Ownership of, and title to the Software and Documentation (including any adaptation or copies) shall be held by 3Com. Copies are provided to Licensee only to allow Licensee to exercise its rights under the License. TRANSFER OF LICENSE. Licensee may transfer this License to another person or entity with the prior written approval of 3Com. 3Com shall not unreasonably withhold approval if Licensee advises 3Com in writing of the name and address of the proposed transferee and the transferee agrees to be bound by this Agreement. If the License transfer is approved, Licensee must transfer all copies of the Software and documentation including the original copies provided in this package and any copies Licensee has legally made. TERM. This Agreement is effective from the date Licensee opens this package, and shall remain in force until terminated. Licensee may terminate this License at any time by destroying the Documentation and the Software together with all copies. This Agreement shall also automatically terminate if Licensee breaches any of the terms or conditions of this Agreement. Licensee agrees to destroy the original and all copies of the Software and Documentation, or to return such copies to 3Com upon termination of this license. LICENSE AUTHENTICATION. Use of each Server license is authorized for an initial 30 calendar days providing all licenses are authenticated by 3Com to allow for continued operation beyond these initial 30 days. If the Server license is not authenticated within the initial 30 days of operation, on the 31st day, it will cease to transmit and cease to forward or print received faxes. License Authentication Procedure is described in the Getting Started Guide included with this CD. LIMITED WARRANTY AND LIMITED LIABILITY. Authentication. Licensee will automatically lose all rights under this Limited Warranty unless Licensee initiates and completes the License Authentication Procedure promptly, completely, and accurately and return it to 3Com within 30 days of installing and executing the Server Software. Compatibility. The Software is only compatible with certain personal computers. The Software may not be compatible with and is not warranted for non-compatible systems. Call 3Com Customer Support for information on compatibility. Diskettes and Documentation. 3Com warrants that if the enclosed magnetic diskettes, CD-ROMs or other media or Documentation are in a damaged or physically defective condition at the time that the License is purchased and if they are returned to 3Com (postage prepaid) within 90 days of purchase, then 3Com will provide Licensee with replacements at no charge. Software. 3Com warrants that if the Software fails to substantially conform to the specifications in the Documentation and if the nonconformity is reported in writing by Licensee to 3Com within ninety (90) days from the date that the License is purchased, the 3Com shall use commercially reasonable efforts to remedy the nonconformity or at its option refund the purchase price. DISCLAIMER OF WARRANTIES. 3Com makes no warranty, representation or promise not expressly set forth in this agreement. 3Com disclaims and excludes any and all implied warranties of merchantability and fitness for particular purpose. 3Com does not warrant that the software or documentation will satisfy its requirements or that the software and documentation are without defect, omission or error or that the operation of the software will be uninterrupted. This limited warranty gives Licensee specific legal rights. LIMITATION OF LIABILITY. 3Coms aggregate liability arising from or relating to this agreement or the Software or documentation is limited to the total of all payments made by or for Licensee for the license. 3COM SHALL NOT IN ANY CASE BE LIABLE FOR ANY SPECIAL, INCIDENTAL, CONSEQUENTIAL, INDIRECT OR PUNITIVE DAMAGES EVEN IF 3COM HAS BEEN ADVISED OF THE POSSIBILITY OF SUCH DAMAGES. 3COM IS NOT RESPONSIBLE FOR LOST PROFITS OR REVENUE, LOSS OF USE OF THE SOFTWARE LOSS OF DATA COSTS OF RECREATING LOST DATA, THE COST OF ANY SUBSTITUTE EQUIPMENT OR PROBLEM, OR CLAIMS BY ANY PARTY OTHER THAN LICENSEE. SOLE REMEDY AND ALLOCATION OF RISK. Licensees sole and exclusive remedy is set forth in this agreement. This agreement defines a mutually agreed-upon allocation of risk and 3Coms prices and fees reflect such allocation of risk. GENERAL CONDITIONS. Governing Law. This agreement shall be governed by, and interpreted in accordance with the laws of the state of Illinois. Entire Agreement. This agreement sets forth the entire understanding and agreement between Licensee and 3Com and may be amended only in writing signed by both parties. No vendor, distributor, dealer, retailer, sales person or other person is authorized to modify this agreement or to make any warranty, representation or promise which is different than, or in addition to the representations or promises of this agreement. Waiver. No waiver of any right under this agreement shall be deemed effective unless contained in writing signed by a duly authorized representative of 3Com, and no waiver of any past or present right arising from any breach of or failure to perform shall be deemed to be a waiver of any future right arising under this agreement. Severability. If any provision in this agreement is invalid or unenforceable, that provision shall be construed, limited, modified or, if necessary severed, to the extent of necessary to eliminate its invalidity or unenforceability, and the other provisions of this agreement shall remain unaffected. DEFINITIONS. 3Com means 3Com Corporation and its subsidiaries, a company with offices in Mount Prospect, Illinois. Licensee means the person or business entity that purchased this license to use this software or for the end user for whom such license was purchased. Software means the computer programs provided in the accompanying package. Communication port means a single modem or serial port device attached to a personal computer serial port, the use of which is allowed through the network, by any other network node or machine, locally or remotely attached - and controlled by the software. Only one personal computer can access, load and execute the software at any given time for each licensed communication port. The software shall not be loaded on different/additional local area networks or internetworks. Different/additional networks must have separate additional licenses. Documentation means all guidebooks - either in printed or electronic format - and any other printed material provided by 3Com with the software. License means the license purchased and granted in this agreement. LICENSE AUTHENTICATION PROCEDURES are described in the Getting Started Guide accompanying this license. To protect our licenses and Licensees assurance of exceptional customer and technical services, each license on a machine running 3Com Server software must be authenticated. For Licensees convenience, Licensee can authenticate Licensees license via fax, phone or email. The information required for authentication is stored in the server in a file called REGISTER.TXT. Please allow five days for authentication. YEAR 2000 INFORMATION: For information on Year 2000 compliance and 3Com products, visit the 3Com Year 2000 web page: http:// www.3Com.com/products/yr2000.html CONTENTS ABOUT THIS GUIDE Conventions........................................................................................................................ ix Year 2000 Compliance ......................................................................................................... x 1 INTRODUCING SECURITY ......................................................................................................................Introduction1-1 The Nature of Objects ................................................................................................. 1-1 Accounts..................................................................................................................... 1-2 Groups........................................................................................................................ 1-2 Positive and Negative Security Permissions................................................................... 1-2 Security Glossary .............................................................................................................. 1-3 Adding Members to Pre-Defined User Groups ............................................................. 1-4 Pre-Defined User Groups ............................................................................................. 1-5 Security Objects and Permissions ................................................................................ 1-8 2 WORKING WITH SECURITY ............................................................................................................... Starting Security2-1 Sorting Security Information ........................................................................................ 2-2 Setting Up Accounts ................................................................................................... 2-3 Setting Up Groups....................................................................................................... 2-6 Setting Up Security Permissions ................................................................................... 2-8 Resetting Security...................................................................................................... 2-11 3 SECURITY PERMISSION EXAMPLES Sample Sales Permissions.................................................................................................. 3-1 INDEX viii ABOUT THIS GUIDE This chapter covers security issues over the network, assigning rights and permissions to users. If release notes are shipped with your product and the information there differs from the information in this guide, follow the instructions in the release notes. Most user guides and release notes are available in Adobe Acrobat Reader Portable Document Format (PDF) or HTML on the 3Com World Wide Web site: http://totalservice.3com.com/ Conventions Table 1 and Table 2 list conventions that are used throughout this guide. Table 1 Notice Icons Icon Notice Type Description Information note Information that describes important features or instructions Caution Information that alerts you to potential loss of data or potential damage to an application, system, or device Convention Description Screen displays This typeface represents information as it appears on the screen. Syntax The word syntax means that you must evaluate the syntax provided and then supply the appropriate values for the placeholders that appear in angle brackets. Example: To enable RIPIP, use the following syntax: SETDefault !<port> -RIPIP CONTrol = Listen In this example, you must supply a port number for <port>. Commands The word command means that you must enter the command exactly as shown and then press Return or Enter. Commands appear in bold. Example: To remove the IP address, enter the following command: SETDefault !0 -IP NETaddr = 0.0.0.0 The words enter and type When you see the word enter in this guide, you must type something, and then press Return or Enter. Do not press Return or Enter when an instruction simply says type. x CHAPTER : ABOUT THIS GUIDE Convention Description Keyboard key names If you must press two or more keys simultaneously, the key names are linked with a plus sign (+). Example: Words in italics Italics are used to: Press Ctrl+Alt+Del ■ ■ ■ Emphasize a point. Denote a new term at the place where it is defined in the text. Identify menu names, menu commands, and software button names. Examples: From the Help menu, select Contents. Click OK. Year 2000 Compliance For information on Year 2000 compliance and 3Com products, visit the 3Com Year 2000 Web page: http://www.3com.com/products/yr2000.html 1 INTRODUCING SECURITY This chapter explains how security works and what functions it performs. It also provides reference information on pre-defined user groups, all permissions and permission definitions. Introduction The organization of this guide follows the concepts and steps required to set up security. Follow the steps in this guide exactly to achieve the best results and ensure the fewest problems. After setting up the server and adding users, use the security module. Security works with the existing trustee hierarchy (server supervisors, account supervisors, administrators, managers and users) and allows you to specify permissions for individuals (users), accounts and groups. The Nature of Objects Documents are objects that are stored in the fax server that may be accessed by users for faxing. Cover pages, telephone lists and attachments are objects. User profiles and modems are also objects. Permissions and Objects Permissions determine who can do what to each object. The security permissions for server supervisors are fixed. You cannot change the permissions nor delete the user group. This ensures that the server always has someone that can work with users, Server Setup and Security permissions. When the server supervisor creates a new user, the user is assigned to an account under an account manager by the server supervisor. Once assigned to an account, the server supervisor assigns some control over the user to the account supervisor. Functions of Security Security allows you to: ■ ■ ■ Create accounts for users and objects (such as modems, cover pages and phonebooks) Create Groups of users and objects Set the permissions owned by users, user accounts and user groups, to access specific objects and object groups. Some examples of permissions to access a modem include: ■ Monitor the status of the modem ■ Reset the modem ■ Pause/Resume modem activity 1-2 CHAPTER 1: INTRODUCING SECURITY A complete description of all possible permissions appears in the Security Objects and Permissions section later in this chapter. A permission can be: ■ Grantedyou can do the action ■ Deniedyou cannot do the action ■ ■ Inheritedyou can or cannot do the action based on the permissions defined for your group Irrevocableyou can do the action and the permission cannot be denied. To learn more about the types of permissions, see Icon ListPermission Icons on page 1-4. Accounts An account does for CommWorks IP Fax Solutions roughly what a domain does for Windows NT. Here are some attributes of accounts: ■ Each account contains one or more users ■ Every user belongs to one account ■ ■ Groups Users have more rights to things that belong to their own account, than they do to things that belong to other accounts. For example, a user might have read-access to a public phonebook created by another user who belongs to the same account, but would have no access to phonebooks created by users who belong to a different account. Each account has its own administrator. Administrators have all-powerful privileges to things (e.g. end-users and fax-jobs) which belong to their own account, but no privileges to things that belong to another account. Setting up and managing security is easier when objects and users are grouped. Create groups of users to assign similar permissions. For example, you might have a Sales User group that has permission to use the same fax port device. Create groups of objects to assign users similar permissions to use tham. For example, a subset of modems called Sales might be accessable only by members of the Sales User group. Positive and Negative Security Permissions Grant permission to do something (positive) or deny permission to do something (negative). The following is an example of a negative permission: Assume that All Fax Users have permission to use and monitor fax port number 2. Sales users are to use this port, but are not to monitor it. In this Security Glossary 1-3 case, simply remove permission from the Sales User group to deny them access to monitoring feature of fax port 2. All other user groups, except those belonging to the sub-group Sales User, can still monitor the modem. This illustrates that user groups with similar permissions can be modified, allowing greater control. Security Glossary Irrevocable PermissionA permission that is granted to users because they belong to a pre-defined group with permissions that cannot be changed. The server supervisor, account supervisors, CommWorks IP Fax Solutions manager, CommWorks IP Fax user and Assistant groups all have irrevocable permissions. Default PermissionA permission that is granted to users because they belong to a pre-defined group with the permissions. The difference between default permissions and irrevocable permissions is that you can change Default Permissions. Owned By SelfAny object that users can create or is owned by them has a group labeled Owned By Self. This group gives the creator or owner of an object more permissions for objects they own than for objects that are owned by other people. Some objects that users create are faxes, attachments and cover pages. Some objects users own are received faxes and their user profile. MemberEach group of users or objects can have members. Members are individuals or sub-groups that belong to a group. ListUsers with the list permission can see that the object or user exists, although they may not be able to use it. Generally, the user or User group must have this permission before they are granted another permission for the object. For example, a user that has the Use Attachment permission without the List Attachment permission will never see the attachment to select it; therefore, the user cannot use the attachment. Account # Every user belongs to one account. Accounts are named using account numbers (Account #s). The Account # to which each user belongs is displayed in the User Properties dialog. Properties for these Account #s are also 1-4 CHAPTER 1: INTRODUCING SECURITY set up here. There are two states of an Account # in reference to a user. The Account # is either Active or Forwarded. Table 1-1 Icon ListObject Icons Icon Name Icon Name Server Modems Attachments Phonebooks Cover Pages User Profiles Account #’s Server Setup Fax Jobs Users Folders Table 1-2 Icon ListPermission Icons Icon Name Icon Name Granted permission that was inherited. Denied permission that was inherited. Granted permission that was explicitly given. Denied permission that was explicitly refused. Granted permission that cannot be denied. Adding Members to Pre-Defined User Groups There are six pre-defined user groups; server supervisors, account supervisors, managers, Fax Administrators, and CommWorks IP Fax users. Use the Security module to add, authenticate and define new users. Assistants also have irrevocable permissions, however, since the assistant's permissions depend on another users permissions the assistant user level is not listed as a pre-defined User group. Assistants have the same permissions to fax jobs as the user they assist. Security Glossary 1-5 If you are satisfied with the pre-defined User groups and their permissions, you may not need to use this security module at all (except to add new users). For more information on the permissions for pre-defined groups, see the following section, Pre-Defined User Groups. Pre-Defined User Groups There are six pre-defined User groups with default permissions. You cannot remove any of the pre-defined groups or change the irrevocable permissions. However, you can change the default permissions for any pre-defined User group. The only users without default permissions (they only have irrevocable permissions) are server supervisors, account supervisors and Assistants. Assistants can perform the same actions on fax jobs as the person they assist. They are not included in security because their permissions are completely dependent on the person they assist. Pre-defined User groups provide the structure for the security module. This section discusses the pre-defined User groups and explains their default and irrevocable permissions. If you want to add and remove members for the pre-defined User groups, you can do so using the User Properties dialog. In addition to the pre-defined groups and their permissions, you can add individual members to sub-groups and set up permissions for the sub-groups to meet your company specific requirements. For more information on sub-groups, see Chapter View/Edit Server SetupDisplay and change the Server Setup dialog and all its options. later in this guide. Irrevocable Permissions Members that belong to the following pre-defined groups have certain irrevocable permissions: ■ Server Supervisors ■ Account Supervisors ■ CommWorks IP Fax Managers ■ CommWorks IP Fax Users ■ Assistants Irrevocable permissions cannot be changed. Groups Server Supervisors Members of this group have all irrevocable permissions for all objects, including: ■ Add Users ■ Control server set up ■ Set up security 1-6 CHAPTER 1: INTRODUCING SECURITY Server supervisors cannot create fax jobs unless they also belong the Fax Users group. Account Supervisors Account supervisors are created to provide added security for individuals who need it. Defined properties of accounts might prevent server supervisors (who create users) from viewing faxes, which are created by users in a specific account. The account structure supports three scenarios: 1 Non-ISP and non-VFN (identical to previous versions of CommWorks IP Fax) One company owns the fax server, and all users of the server are employees of that company. In this case, you might have just one account (i.e. the default Account #1). All users belong to the one account and the server supervisor might be the same person as the account administrator. 2 One ISP with several corporate clients In this new scenario, the server is owned by an ISP. The ISP has several clients. Each client is a corporation with several users. 3 The server supervisor is an employee of the ISP and is able to create new accounts (i.e. add new corporate clients to the ISP's server). The server supervisor need not be an administrator in these new accounts. Therefore, the server supervisor would not need to view faxes owned by the various corporate client-accounts. 4 The account administrator for each account would be an employee of each corporate client. The account administrator would therefore be able to administer faxes, which are owned by that corporation, and able to administer the users which are employees of that corporation. Each account administrator has no authority over things, which belong to other accounts, nor authority over the global Server Setup settings. These would be controlled by the server supervisor. Each account administrator would also be responsible for adding new users to their own accounts. It is important that this job of adding extra users to the account should belong to the account administrator (an employee of the corporate client), and not to the server supervisor (an employee of the ISP). 5 One ISP with many individual (home/end-User) clients This scenario is similar to 2), except that each account contains only end-user. CommWorks IP Fax Managers Members of this group have all irrevocable permissions for all objects that are owned by the users that they manage, including: ■ Fax jobs ■ Attachments ■ Cover pages ■ Phonebooks ■ Folders ■ User profile definition Security Glossary 1-7 CommWorks IP Fax Users Members of this group have irrevocable permissions to create fax jobs. You must belong to this group to create fax jobs. Assistants Members of this group can do the same actions to fax jobs as the person they assist. Default Object Permissions This section lists the permissions, by object, which all users have by default. For more information on what each permission means, see Permission Definitions by Object later in this chapter. All Attachments All users can List, View and Use attachments. Users have all permissions to their own attachments (All Attachments Owned By Self). Although network attachments are controlled here, attachments saved into network subfolders are controlled by the Folder Permissions. All Cover Pages All users can List, View and Use cover pages. Users have all permissions to their own cover pages (All Cover Pages Owned By Self). All Fax Jobs All users can have their faxes paused for review by their manager when defined on the server (Authorize Send). Users have all permissions to their own fax jobs (All Fax Jobs Owned By Self). All Folders All users can list the folder as well as view faxes, add faxes and delete faxes from a folder. Users have all permissions to their own folders (All Folders Owned By Self). Attachments that are saved into network subfolders are controlled here instead of using Attachment Permissions. All Phonebooks All users can list and send a fax to a phonebook (either the entire phonebook or a phonebook recipient). All users can also view, edit, add and delete phonebook recipients. Users have all permissions to their own phonebooks (All Phonebooks Owned By Self). All User Profiles Users have no default permissions to All user Profiles. However, users can list and view their own user profile. Server Setup Users have no default permissions to Server Setup. All 'Objects' Owned By Self For each object, that users can create or own there is a pre-defined object group: ■ All Attachments Owned by 'Self' ■ All Cover Pages Owned by 'Self' ■ All Fax Jobs Owned by 'Self' ■ All Folders Owned by 'Self' ■ All Phonebooks Owned by 'Self' 1-8 CHAPTER 1: INTRODUCING SECURITY ■ User Profile Owned by 'Self' This group allows the creator of an object additional permissions for it. You can change these permissions as needed. For more information on the default permissions users have for objects Owned By Self, see the previous section. For an example of how to change permissions on an Owned by Self group, see Chapter 3 Security Permission Examples. Security Objects and Permissions The following lists each server object and the permissions you can set up for it. For each object type, you can have both groups and individual objects with their own security permissions. You can use this list when planning the type of security your company requires. Permission Dependencies Some permissions depend on other granted permissions before they can work. If you have a permission to use, edit or remove something, you require the appropriate List Permission before you can do so. The List Permission allows you to see that the object exists. For example, if you can Use all cover pages, but you do not have the List Permission for cover pages, there will never be a cover page visible to select. Another dependency appears when you want to view or change a dialog that is accessed from the User Properties dialog, such as User Preferences. You cannot access the User Properties dialog without the granted permission to View. Permission Definitions by Object This section lists actions that can be taken on objects and provides a brief definition. Permission is required before the action can be carried out. Attachment Permissions Attachment Permissions control attachments saved to the network folder. If the Attachment is saved to a network subfolder, you must use the Folder Permissions to control access. Delete AttachmentRemove an Attachment from a network location using the Attachments window. List AttachmentSee the Attachment in the list of existing attachments from the Attachments window and Fax Send dialog. Other Attachment Permissions are only useful when you have the List Permission. Use AttachmentSend the Attachment with outbound faxes on the Fax Send dialog. View AttachmentView the Attachment contents from the Attachments window. Cover Page Permissions Delete Cover PageRemove a cover page from the server location using the Fax Send dialog. Security Glossary 1-9 List Cover PageSee that the cover page exists in the list of cover pages using the Fax Send dialog. Other Cover Page Permissions are only useful when you have the List Permission. Use Cover PageSend the Cover Page with outbound faxes from the Fax Send dialog. View Cover PageView the Cover Page contents using the Cover Page Editor. Fax Job Permissions Authorize SendFaxes are automatically paused by the server if the Activate Manager Send option is enabled on the Server Dialing dialog and the user has a manager defined in the Manager field on the User Properties dialog. Copy to Another UserSend another user a copy of a received fax using the Move to User dialog. Delete Fax JobRemove a fax from the Send Log or Receive Log. List Fax JobsSee that the fax exists from the Send Log or Receive Log. Other Fax Job Permissions are only useful when you have the List Permission. Move to Another UserMove the fax to another user by changing the fax's owner or routing a received fax to another user. Pause Fax JobPause a fax from the Send Log. Purge Fax JobPermanently remove faxes marked as deleted from the Send Log or Receive Log. ResubmitChange and resend a fax from the Send Log or Receive Log. Unpause (Resume) Fax JobResume a fax that is currently paused from the Send Log. View All PagesView all pages of a fax in the Fax Image Viewer. View First PageView the first page of a fax in the Fax Image Viewer. Folder Permissions Folder Permissions also affect attachments when the attachment is saved into a network subfolder. Only attachments saved into the main network folder are controlled by Attachment Permissions. Add To FolderAdd a fax to a folder in the Send Log or Receive Log window. Delete Entire FolderRemove a folder and its contents from the Folder menu. Delete From FolderRemove a fax from a folder from the Folder menu. List FolderSee that the folder exists from the Send or Receive Logs. Other Folder Permissions are only useful when you have the List Permission. 1-10 CHAPTER 1: INTRODUCING SECURITY Rename FolderChange the folder's name from the Folder Properties dialog. View From FolderView a fax from the folder in the Fax Image Viewer. Phonebook Permissions Add to PhonebookAdd a recipient to a phonebook or phonebook group on the Phonebooks window. Delete Entire PhonebookRemove the phonebook and all its contents from the Phonebook window. This permission also allows you to Pack and Reindex the phonebook, purging all recipient's marked as deleted and allowing the program to read the phonebook faster. Delete Phonebook ItemRemove a recipient from the phonebook or phonebook group from the Phonebook window. Edit ContentsChange the recipient information for the phonebook or phonebook group using the Edit Recipient dialog. List PhonebookSee that the phonebook exists in the Phonebook window and Fax Send dialog. Other Phonebook Permissions are only useful when you have the List Permission. Rename PhonebookChange the name of the phonebook or phonebook group in the Phonebook window. Send To PhonebookUse the phonebook, phonebook group or individual phonebook recipients when addressing faxes using the Fax Send dialog. View ContentsView the detailed recipient information from the phonebook or phonebook group using the Edit Recipient dialog. User Profile Permissions Delete UserRemove a user from the server from the Security Setup window. Edit Pre-Defined GroupsChange someone's user level, meaning to add or remove the user to or from the following pre-defined groups: ■ Server Supervisor ■ Account Supervisor ■ Fax Manager ■ Fax Administrator ■ Fax User This permission also allows you to change a user's manager and define an Assistant. Edit User PreferencesChange the preferences for the user from the User Preferences dialog. Edit User ProfileChange the fields on the User Properties dialog for the user. Security Glossary 1-11 Edit User's Phonebook EntryChange the phonebook entry information for the user from the user's Phonebook Entry dialog. List UserSee that the user exists on the Authorized Users dialog. Other user permissions are only useful when you have the List Permission. View User ProfileView the user Properties dialog for the user. Server Setup Users with this permission can Edit Dialing RestrictionsChange the dialing restrictions for the user from the Dialing Restrictions dialog. Create New UsersAdd new users to the server using the Add Users dialog. Edit Auto-Routing TableCreate, change and remove entries on the Auto-Routing Table. Monitor Server StatusView the Fax Server Monitor dialog. Pause/Resume all Server ModemsPause and Resume all Fax modems on the server from the Fax Server Monitor dialog. View/Edit Security SetupDisplay and change groups and permissions using the Security module. server supervisors have irrevocable permissions to this option. If users or members of other pre-defined groups want to use this option, they can only change their own permissions or the permissions of those they manage (for Fax managers). View/Edit Server SetupDisplay and change the Server Setup dialog and all its options. 2 WORKING WITH SECURITY This chapter explains how to use the security module to create groups and edit permissions. Starting Security The example below will use the Server Administrator button menu to work with security features. Access is also available from the fax client screen. To start the Security Setup window, the fax server must be running. 1 From the Microsoft Start button, click Programs. 2 Click 3Com Corporation. 3 Click Server Administrator. 4 Connection to the fax server will begin automatically. If connection screens are configured to Show, press Connect in the Server Connection screen and sign in with administrator permissions. 5 Click Setup Security from the main options window. The Security Setup screen is displayed. Figure 2-1 Security Setup Main Screen 2-2 CHAPTER 2: WORKING WITH SECURITY Sorting Security Information The Security Setup screen has a command bar at the top. This section will address some of the commands found in this area. The table below describes commands under the Change item: Table 2-1 Change Commands Command Name Description Create New Group Create a new group from the list of group types. By default, Security is installed with the following types of object groups: ■ Attachments ■ Cover Pages ■ Folders ■ Modems ■ Phonebooks ■ User Profiles ■ Users Connect to Server This command will re-establish the link with the fax server. If Show connection is enabled, it is possible to connect to a different server by selecting from the list. Add New User The Add Users screen appears. Once the user name is entered, the User Properties screen appears. Cost Centers If using billing numbers for invoicing, this command will allow assignment of numbers. Exit Save all changes and close the Security Setup screen. The table below describes commands under the Sort item: Table 2-2 Sort Commands Command Name Description By Users Use this to view and edit permissions for all user groups and individual users in relation to the objects they are using. By Objects Use this to view and edit permissions for all managed object groups (for example, modem groups) and individual objects in relation to the user groups or individual users and how they use these objects. This is the default screen. The table below describes commands under the Window item: Table 2-3 Window Commands Command Name Description Tile Vertically When permissions are being changed, an new window is created next to the main screen. Tile Horizontally These two commands change the appearance of the screen to facilitate data manipulation by the administrator. Starting Security Setting Up Accounts 2-3 In a new installation, two default accounts are created automatically: the account names are reserved, and are displayed as Account #1 and System Account. These accounts cannot be deleted. To view the list of accounts, click the plus sign (+) to expand the All Accounts folder. Expand the account folders to view a list of account trustees, or users within that account. Figure 2-2 All Accounts Folder ■ ■ Account #1 is the default account, containing all existing users. The System Account is for User Records which are created automatically by the server, including accounts on the network that identify remote servers and database files. Subsequent new accounts can be established, when a new user is created. Creating Users and Accounts A new user is created by the Server Supervisor or the Accounts Supervisor. At the time when the user is created, it is associated with the same Account as its creator, or assigned to a new Account. As the first user in a new Account, this person would be the new Account Supervisor. To create users manually, follow these steps: 1 Right-click in the white space of the screen. 2 From the menu screen, click Add New User. The Add User screen appears: Figure 2-3 Add User 2-4 CHAPTER 2: WORKING WITH SECURITY 3 Enter the users name in the field and click Add. The User Properties screen appears: Figure 2-4 User Properties Fields for this screen are described below: Table 2-4 User Properties Fields Field Name Description Settings User Name User name appears automatically. No settings. Authentication Set in previous screen. No settings. Subdirectory A folder is created based on the users name. No settings. Unique ID # A unique number is No settings. generated for this user. Password/Confirm This can be set now or later. Users Machine Name Use this identification if the user will receive alert messages. Permissions Enable as many checkboxes as are appropriate. Even the Server Supervisor must be identified as a Fax User. User ID Server Supervisor Account Supervisor Manager Fax Administrator Fax User Starting Security Field Name Description Settings Account Status Active: All account rules apply to this user. Active is the default setting. 2-5 Forwarded: All inbound faxes and activity charges will be forwarded to the account named in the Forwarded To field below. Long Distance Use this optional section if special codes are needed to make long distance calls. Access: An account number or access number may be required by your long distance service provider. Prefix: Special commands to use specific hardware devices or to select outbound telephone lines. Suffix: Long distance account number identifier for group or user tracking. Cost Center Identify the cost center to which the new user belongs. By selecting <- New Account ->, a new Cost Center Account is created. The new user is established as the Account Administrator of this Initially, this drop-down new account. list contains two values: ■ ■ Account#1 (Server Supervisor belongs) <-New Account->. Manager Identify the new users manager, if listed. To make the new user the manager of this account, click the Manager checkbox in Permissions. The name will appear in the list for subsequent new users. Billing Code If billing code is used, it will appear here. SQL Phonebook Restrictions These fields will not be enabled if the server does not use MS SQL server as a database. Phonebook Details Click this button to inspect the Users Phonebook Entry screen. These details will appear in the internal phonebook for all users. User Preferences Click this button to inspect how the user has configured send priorities and notification methods. Dialing Restrictions If this user requires a restriction to be placed on certain telephone numbers, use the screen behind this button. ISDN Maximums Establish maximum number of pages or maximum size of file if large fax transmissions need to be restrained. 2-6 CHAPTER 2: WORKING WITH SECURITY Setting Up Groups After manually creating users, creating groups provides structure to the security configuration. For example, a separate group may be created for each department so that the use of attachments, phonebooks or port devices is restricted. Setting up groups prepares a default setting for each new user in that group. Exceptions only need individual configuration. Using groups means that, instead of setting permissions for each user, you can assign group permissions to individual users. By default, users inherit the permissions of all the user groups to which they belong. By grouping objects, the same permissions for the group of objects can be assigned to users or user groups. The following procedures will be described below: ■ Creating a User-Defined Group ■ Managing Groups ■ Adding and Deleting Members ■ Deleting a User-Defined Group Creating a User-Defined Group 1 From the Security Setup window right-click a user or object around which you want create a group. 2 Click Groups. 3 Click Create New Group. The Create New Group dialog appears. Figure 2-5 Create New Group 4 Select the type of group from the list and name the group. Click OK to open the Add Members to Group screen: Figure 2-6 Add Members to Group Starting Security 2-7 5 The Add Members screen opens in a window to the left of the main screen. Select users one-at-a-time or all at once. Click Add Member! and the names appear in the expanded groupname folder. Figure 2-7 Members Added If you select an inappropriate group type is selected, Security will make an automatic logic correction. Managing Groups At this point, it is important to distinguish the differences between pre-defined groups and user-defined groups. Table 2-5 Pre-Defined and User-Defined Add members at any time Pre-Defined Group User-Defined Group yes, with Auto-Add User yes, with Add Members! Delete members at any yes time yes Delete whole group yes no Add Members to an Established User-defined Group 1 From the Security Setup dialog, select the group you want to use. 2 From the Change menu, select Add Group Members. The Add Members to Group window appears, as in Figure 2-6, above. 3 Select the users from the list and click Add Member! to include them in the list. Deleting Members 1 In Security Setup, select the group you want to use. 2 Double-click the group to view its members and select the member you want to remove. 3 From the Change menu, click Delete Group Member. 4 The member is removed from the group. 2-8 CHAPTER 2: WORKING WITH SECURITY Deleting a User-defined Group 1 In Security Setup, select the group you want to remove. 2 From the Change menu, click Delete Group. 3 The group is removed from the list. Sub-Groups Users and objects can belong to more than one group. To view all groups to which the user or object belongs, follow these steps: 1 Open the Security Setup window. 2 Select the group or individual you want to use. 3 From the Change menu, click Groups Which Contain The Groups Which Contain window opens. Figure 2-8 Groups Which Contain 4 Make note of all groups selected group or individual belongs. Setting Up Security Permissions Add and remove permissions from the Security Setup screen. These permissions determine who can do what to each object. Create permissions for individuals or groups of users. Whether sorted by user or by object, the result is the same. For example, permissions for Fax Users to All Modems are identical to permissions for All Modems for Fax Users. The permission stays with the user, regardless of where the permission is created. The following example starts with the users screen. To view and edit permission values, follow these steps: 1 With administrator permissions, open the Security Setup window. Select Sort By Users. 2 Open a user-defined group folder. In the example, Developers. 3 Select an object or object group. In the example, All Fax Jobs. 4 Expand that folder to view all sub-groups. Click one of them. In the example All Fax Jobs Owned by Self was chosen. Starting Security 2-9 5 On the command bar, click Permissions. The Permissions window appears: Figure 2-9 Object Permissions by User Group 6 This screen shows that all inherited permissions have been transferred to all users in this group. Change one or two permissions to perform the next step. Figure 2-10 Changed Permissions 7 Close the Developers Permissions screen. 8 Change to Sort by Object. 9 Expand the All Fax Jobs group. 10 Expand the All Fax Jobs Owned by Self group. 11 Click Developers. 12 Click Permissions to open the Permissions screen. Figure 2-11 User Permissions by Object Group 13 The screen should be the same as the previous screen, when sorted by user. 2-10 CHAPTER 2: WORKING WITH SECURITY Dominant Permission When a user belongs to more than one group with different permissions, or is individually defined for specific objects, which permission is used? Rule 1. Individuals permissions overrule the permissions for a group. An individual permission overrides a group permission, even if the group permission changes after the individual member was modified. Rule 2. Explicit permission overrules inherited permission. So, what happens when a user belongs to more than one group, and the permissions of one group grant something while the other denies it? Here is a fictitious example: Bill Gallagan belongs to the JrSales group and the Developers group. Here are the inherited permissions for All Attachments for both groups: Figure 2-12 All Attachments Permissions by User Group Delete Attachments is permitted in the Developers group and not permitted in the JrSales group. Here is what the permissions look like for Mr. Gallagan: Figure 2-13 All Attachments Permissions by User The negative permission is an overriding factor in this case. There are two ways to adjust this: Starting Security 2-11 1. Change the permission in this screen. An explicit permission will override a group-inherited permission. 2. Make a specific group for Sales Attachments. These public attachments are accessible by all sales persons. Gallagan has permission to delete in this object group: Figure 2-14 All Attachments Permissions by User Resetting Security The entire security module can be re-set back to default settings. Resetting is an all or nothing option, so unless you want to return to the pre-defined settings, you should use the security module to make corrections. To reset security and return to the pre-defined setup 1 Stop the fax server if it is running. 2 In Windows Explorer, open the server directory. 3 One of the server's subdirectories is \SECURITY; delete this subdirectory and all the files it contains. The next time you run security it will uses the pre-defined setup. 3 SECURITY PERMISSION EXAMPLES This chapter shows two example procedures. These samples build on concepts discussed earlier in this guide. Sample Sales Permissions This sample uses a group of users called SrSales and a group of attachments called SalesAttachments. This sample explains how to change the permissions so that only members of the SrSales group can use the attachments in the Sales Attachments group. For more information on creating groups, see Chapter 2, Working With Security in this guide. Performing the example requires three steps: 1 Remove the SalesAttachments default user permission from the group. a On the Server Administrator button menu, click Setup Security. The Setup Security screen is displayed. b If Sorted by User is displayed, switch to Sorted by Objects. Figure 3-1 Sort By Objects c Click the plus sign (+) to the left of All Attachments to expand the folder. 3-2 CHAPTER 3: SECURITY PERMISSION EXAMPLES d Click SalesAttachments to expand the folder. Click Permissions! Figure 3-2 Default Permissions e The default permissions for Sales Attachments shows that no permissions are granted. 2 Grant the Developers group permission to use the attachments in the SalesAttachments group. a From the Sorted By Objects window, click SalesAttachments. b Double-click the group to display the users. Select the SrSales group. c Click Permissions!. Change the Use Attachment permission by clicking it and clicking Change Permission!. Figure 3-3 Permission Changed d The permission is now explicitly and exclusively granted to SrSales. 3 Inspect that permissions are assigned correctly. a In the Setup Security screen, select Sort by Users. b Open the Developers folder. c Open the All Attachments folder and click on SalesAttachments. Sample Sales Permissions 3-3 d Click Permissions! to see that these attachments cannot be used by this group. Figure 3-4 Development Permissions e Open the SrSales group. f Open the All Attachments folder and click on SalesAttachments. Figure 3-5 SrSales Permissions g Click Permissions! to see that these attachments can be used by this group. 3-4 CHAPTER 3: SECURITY PERMISSION EXAMPLES To Change Individual Permissions 1 In the Sorted by Users window, select a user that does not belong to either the SrSales group or the Server Supervisors pre-defined group. Double-click the user to display the objects. Check the groups to which a user belongs by selecting the user and clicking Groups Which Contain... from the Change menu. 2 Under All Attachments, select Sales Attachments and click Permissions. 3 Make sure the Use Attachment permission is denied. Figure 3-6 SalesAttachment Permissions 4 Now select a member of the SrSales group. 5 Select SalesAttachments and click Permissions to make sure the Use Attachment permission is granted. 6 Click the first user again and go to the SalesAttachment item. Click Permissions! 7 Click Change Permissions! to allow this user use of the SalesAttachments. Figure 3-7 SalesAttachment Permissions Changed 1 INDEX A Account # definition 1-3 Account #1 2-3 Account Status user properties 2-5 Accounts 1-2 creating 2-3 overview 1-2 Add New User 2-2, 2-3 Add To Folder definition 1-9 Add to Phonebook definition 1-10 Adding Users to pre-defined Groups 1-4 Adding Members to Pre-Defined User Groups 1-4 All 'Objects' Owned By Self 1-7 All Attachments permission definition 1-7 All Cover Pages permission definition 1-7 All Fax Jobs permission definition 1-7 All Folders permission definition 1-7 All Phonebooks permission definition 1-7 All User Profiles permission definition 1-7 Assistants Group definition 1-7 Attachment Permissions reference 1-8 Authentication user properties 2-4 Authorize Send definition 1-9 B Billing Code user properties 2-5 By Objects 2-2 By Users 2-2 C Change Permission! 3-2 Connect to Server 2-2 conventions notice icons, About This Guide ix Copy to Another User definition 1-9 Cost Center user properties 2-5 Cost Centers 2-2 Cover Page Permissions reference 1-8 Create New Group 2-2 Create New Users definition 1-11 Creating Users 2-3 D Default Object Permissions overview 1-7 Default Permission definition 1-3 Delete Attachment definition 1-8 Delete Cover Page definition 1-8 Delete Entire Folder definition 1-9 Delete Entire Phonebook definition 1-10 Delete Fax Job definition 1-9 Delete From Folder definition 1-9 Delete Phonebook Item definition 1-10 Delete User definition 1-10 Dependencies 1-8 Dialing Restrictions user properties 2-5 E Edit Auto-Routing Table definition 1-11 Edit Contents definition 1-10 Edit Dialing Restrictions definition 1-11 Edit Pre-Defined Groups definition 1-10 Edit User Preferences definition 1-10 Edit User Profile definition 1-10 Edit User's Phonebook Entry definition 1-11 Exit 2-2 F Fax Job Permissions reference 1-9 FAXport Managers Group definition 1-6 FAXport Users Group definition 1-7 Folder Permissions reference 1-9 G Group 1-2 adding 2-6 adding members 2-7 managing 2-6, 2-7 overview 1-2 removing 2-6, 2-8 setup 2-6 I Icon List_Object Icons 1-4 Icon List_Permission Icons 1-4 Introducing Security 1-1, 2-1 Irrevocable Permissions definition 1-3 overview 1-5 ISDN user properties 2-5 L List definition 1-3 owned by self Objects 1-7 List Attachment definition 1-8 List Cover Page definition 1-9 List Fax Jobs definition 1-9 List Folder definition 1-9 List Phonebook definition 1-10 List User definition 1-11 Long Distance user properties 2-5 M Manager user properties 2-5 Managing Groups 2-6, 2-7 Maximums user properties 2-5 Member adding to pre-defined User Groups 1-4 definition 1-3 Monitor Server Status definition 1-11 Move to Another User definition 1-9 O Object security Permissions defined 1-8 Object Icons common icons defined 1-4 Overview Accounts 1-2 Groups 1-2 2 owned by self 1-7 pre-defined User Groups 1-5 security 1-1, 2-1 Owned By Self definition 1-3 overview 1-7 Owned by Self Object list 1-7 P Password/Confirm user properties 2-4 Pause Fax Job definition 1-9 Pause/Resume all Server Modems definition 1-11 Permission default Object 1-7 modem list 1-1 Object Permissions defined 1-8 positive and negative 1-2 sample overview steps 3-1 sample procedure 3-1 setup 2-8 status list 1-2 viewing 2-8 Permission Dependencies 1-8 Permission Example verification procedure 3-4 Permission Icons common icons defined 1-4 Permissions user properties 2-4 Permissions! 3-2 Phonebook Details user properties 2-5 Phonebook Permissions reference 1-10 Positive and Negative Security Permissions 1-2 Pre-Defined User Groups 1-5 adding members 1-4 Purge Fax Job definition 1-9 R Rename Folder definition 1-10 Rename Phonebook definition 1-10 Resetting Security 2-11 Resubmit definition 1-9 S Sample Sales Permissions 3-1 Security overview 1-1, 2-1 return to original settings 2-11 sorting 2-2 starting 2-1 task list 1-1 Security Objects permission reference 1-8 Security Objects and Permissions 1-8 Security Permissions setup 2-8 Send To Phonebook definition 1-10 Server Setup permission definition 1-7 reference 1-11 Server Supervisors Group definition 1-5 Setting Up Groups 2-6 Setting Up Security Permissions 2-8 Sorting Security Information 2-2 SQL Phonebook Restrictions user properties 2-5 Starting Security 2-1 Subdirectory user properties 2-4 System Account 2-3 T Tile Horizontally 2-2 Tile Vertically 2-2 U Unique ID # user properties 2-4 Unpause (Resume) Fax Job definition 1-9 Use Attachment definition 1-8 Use Cover Page definition 1-9 User Groups pre-defined, overview 1-5 User ID user properties 2-4 User Name user properties 2-4 User Preferences user properties 2-5 User Profile Permissions reference 1-10 User Properties 2-4 Users Machine Name user properties 2-4 Users adding to pre-defined Groups 1-4 creating 2-3 Using Your Documentation 1-1 V View All Pages definition 1-9 View Attachment definition 1-8 View Contents definition 1-10 View Cover Page definition 1-9 View First Page definition 1-9 View From Folder definition 1-10 View User Profile definition 1-11 View/Edit Security Setup definition 1-11 View/Edit Server Setup definition 1-11 Viewing Permissions 2-8 3Com Corporation 5400 Bayfront Plaza P.O. Box 58145 Santa Clara, CA 95052-8145 ©2000 3Com Corporation All rights reserved Printed in the U.S.A. Part Number 10031370-01