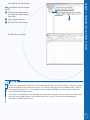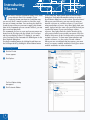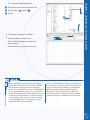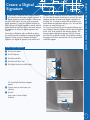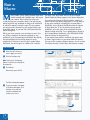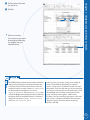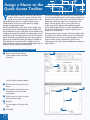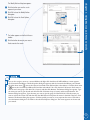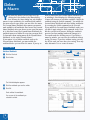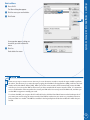
1
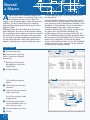
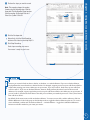
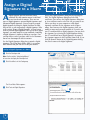
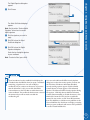
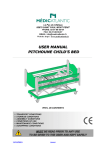
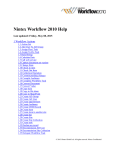
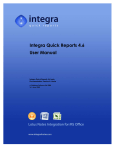
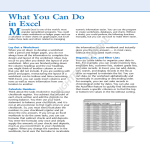
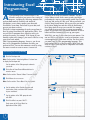
Introducing Excel
Programming
MA
Introducing Excel Programming
Note: See the section “Introducing Macros” to learn how
to display the Developer tab.
3
Click either of these Record Macro buttons to
record a macro.
RI
2
GH
Use the options in the Code group to automate
your tasks.
2
D
Click the Developer tab.
TE
1
With VBA, you can do more than just create macros. You
can use VBA to edit macros, create new functions, create
custom applications, and create add-ins. For these tasks,
you must learn the VBA programming language. This
book teaches VBA. It is based on Office 2010. Code you
write for Office 2010 may not be compatible with earlier
versions of Excel.
TE
VBA is a programming language; however, you do not
have to be a programmer to automate the tasks you
perform in Excel. You can also automate a task by using
the macro recorder to create a macro. A macro is a
AL
This book is about automating the tasks you perform in
Excel by using Visual Basic for Applications (VBA). You
can use VBA to automate those repetitive tasks you
perform frequently. For example, if the layout of your
monthly report rarely changes, you can use VBA to set up
your report each month.
recording of the steps you want to automate. You just
click a button to turn on the macro recorder and begin
performing the steps as you normally would. Excel records
each step and creates the VBA code. When you finish, you
click the Stop Record button. When you select your macro
in the Macro dialog box and then click the Run button,
Excel plays back the steps you recorded. For example, if
you record the steps necessary to set up your monthly
report, all you have to do each month thereafter is click a
button and Excel automatically sets up your report.
RI
A
s you probably know, Microsoft Excel is an
electronic worksheet you can use for a variety of
purposes, including the following: maintain lists;
perform mathematical, financial, and statistical
calculations; create charts; analyze your data with
PivotTables; locate data; find trends in your data; and
present your data to others.
3
Click Macros to run a macro.
PY
Note: See the section “Record a Macro” for more details.
CO
Note: See the section “Run a Macro” for more details.
•
Use the options in the Controls group to add
check boxes, fields, and other form controls
to your worksheet.
•
Use the options in the XML group to work
with XML.
4
Click Visual Basic or press Alt+F11.
Excel moves to the Visual Basic for
Applications Editor (VBE).
2
2
4
1
Note: See Chapter 2 to learn more about
the VBE.
5
Click the proper module to access
your macros or the VBA code you
have written.
6
7
Type or edit your code here.
5
6
Press Alt+F11 to return to Excel.
The VBE returns you to Excel.
Chapter 1: Using Macros and Form Controls
Use the VBE to write and edit code.
You can also use Microsoft Visual Studio Tools for the Microsoft Office System (Visual Studio) to develop programs
for Microsoft Office products. With Visual Studio, you can write in languages such as Visual Basic .NET, Visual C#,
and Managed Extensions for C++. Visual Studio is not part of Microsoft Office; you must purchase it. Microsoft
supports both VBA and Visual Studio.
Visual Studio is more difficult to learn than VBA, and setting up and using Visual Studio is much more difficult than
setting up and using VBA. However, Visual Studio offers better security, a more sophisticated development
environment, and built-in Web services.
3
Introducing
Macros
Y
ou can use macros to automate many of the tasks
you perform in Excel. For example, if you
frequently format your data in a particular way,
you can use Excel’s macro recorder to record the steps
you use to format your data. You can then play back the
recorded steps whenever you want to apply your format.
Most of the commands you can execute in Excel, you can
also record and play back.
The commands you use to create and execute macros are
located on the Developer tab. By default, the Developer
tab does not display in Excel. To display it, you must
select Developer in the Customize the Ribbon pane in the
Excel Options dialog box.
You begin recording macros by clicking Record Macro on
the Developer tab or by clicking the Record Macro button
on the status bar. Both options open the Record Macro
dialog box. For detailed instructions on how to use the
Record Macro dialog box, see the section “Record a Macro.”
When you record a macro, you can record it using an
absolute reference or a relative reference. If you record
using an absolute reference, when Excel plays back your
macro, it plays back the exact cells you clicked when you
recorded the macro. If you record using a relative
reference, Excel plays back the relative location of the
cells you used when you recorded your macro. Click Use
Relative References on the Developer tab to record using
a relative reference. To learn more about absolute and
relative references, see the section “Record a Macro.”
When you save a workbook that has macros, you must
save it as a macro-enabled workbook. Excel gives macroenabled workbooks an .xlsm extension.
Introducing Macros
1
Click the File tab.
1
A menu appears.
2
Click Options.
2
The Excel Options dialog
box appears.
3
4
Click Customize Ribbon.
3
4
5
6
Click the down arrow and then select Main Tabs.
Click Developer (
changes to
).
4
Click OK.
5
6
•
•
•
The Developer tab appears on the Ribbon.
•
Click Macro Security to change macro security.
Click Record Macro to record a macro.
Click Use Relative References to record with a
relative reference.
Because of problems with macro viruses, by default
Excel disables all macros when you open a workbook.
You can read the file, but you cannot execute the
macros. You can click Macro Security on the Developer
tab to change the default setting, or you can click the
Enable Content button that appears when you open the
workbook to enable the macros. To learn more about
macro security, see the sections “Set Macro Security,”
“Create a Digital Signature,” and “Assign a Digital
Signature to a Macro” in this chapter.
Chapter 1: Using Macros and Form Controls
The Customize the Ribbon pane appears.
To save a workbook that has macros, click the File tab.
A menu appears. Click Save As. The Save As dialog box
appears. Locate the proper folder. Type a filename in
the File Name field. Select Excel Macro-Enabled
Workbook (*.xlsm) in the Save As Type field. Click
Save. Excel saves your workbook as a macro-enabled
workbook and gives the workbook an .xlsm extension.
5
Set Macro
Security
B
ecause of increasing problems with computer
viruses, specifically macro viruses, the default
Excel macro security setting disables all macros
when you open a workbook and enables you to decide on
a case-by-case basis whether you want to enable them.
This is true whether you created the macros or someone
else created them. You can change the Excel macro
security by choosing one of four options.
the macro but you have not opted to trust the publisher,
you can enable the macro or trust the publisher. See the
Extra section of “Assign a Digital Signature to a Macro”
in this chapter to learn how to trust a publisher.
The Disable All Macros without Notification option
disables all macros. This option does not provide you
with any security alerts to let you know macros exist.
Changes you make to macro security in Excel do not
change the macro security in other Office programs.
The Disable All Macros with Notification option is the
default setting. It notifies you if macros are present so
you can enable them on a case-by-case basis.
The Disable All Macros except Digitally Signed Macros
option disables all macros except those digitally signed by
a trusted publisher. If the publisher has digitally signed
The Enable All Macros (Not Recommended; Potentially
Dangerous Code Can Run) option enables you to run all
macros. Because potentially dangerous code can run,
Microsoft does not recommend this option.
Macro creators use digital signatures to verify the safety
of the macros they create. You can create a digital
signature by using the Digital Certificate for VBA Projects
tool, or you can obtain a digital certificate from a
commercial certification authority. For more information
on the Digital Certificate for VBA Projects tool, see the
next section, “Create a Digital Signature.”
Set Macro Security
1
1
Click the Developer tab.
2
Note: See the section “Introducing Macros”
to learn how to display the Developer tab.
2
Click Macro Security.
The Trust Center dialog box appears.
3
Click a macro security setting
( changes to ).
4
Click OK.
3
Excel changes your macro security
setting.
6
4
I
f you create a workbook that contains macros,
you should consider using a digital signature. A
digital signature provides assurance that no one
has altered the macro. You can create a personal
digital signature by using the Digital Certificate for
VBA Projects tool. Digital signatures created with the
Digital Certificate for VBA Projects tool work only on
the computer on which the digital signature was
created.
If you plan to distribute your workbook to others,
you should consider acquiring a commercial digital
signature. When you use a commercial digital
signature, the digital ID attaches to the macro and
remains with it; if anyone alters the macro, Excel notifies
the user that the macro should not be trusted. The most
common provider of commercial digital certification is
VeriSign, Inc. To obtain a commercial certification, you
must submit an application and pay a fee. You can find
out more at www.verisign.com.
To view the certificates in your Personal Certificate store,
open Windows Internet Explorer. On the Internet Explorer
menu, click Tools and then click Internet Options. The
Internet Options dialog box appears. Click the Content
tab. Click the Certificates button. The Certificates dialog
box appears. Click the Personal tab. All of your personal
certificates appear.
Create a Digital Signature
1
2
3
4
5
Chapter 1: Using Macros and Form Controls
Create a Digital
Signature
Click the Start button.
Click All Programs.
Click Microsoft Office.
3
Click Microsoft Office Tools.
Click Digital Certificate for VBA Projects.
45
2
1
The Create Digital Certificate dialog box
appears.
6
Type the name you want to give your
certificate.
7
Click OK.
Excel creates a Personal Digital
Certificate.
6
7
7
Record
a Macro
A
macro enables you to automate common tasks.
You can use a macro to record most of the series
of commands you can execute in Excel. For
example, if you frequently apply a certain format to your
worksheet, you can record the steps for creating the
format and then play them back each time you want to
apply the format.
Clicking the Macro Recorder button opens the Record
Macro dialog box. You can use the Record Macro dialog
box to name your macro, assign your macro to a shortcut
key, and tell Excel where you want to store your macro.
You can name your macro anything you want; however,
the name must start with a letter; only contain letters,
numbers, and underscores; and not contain any spaces.
You can assign any upper- or lowercase letter to act as
the shortcut key.
In the Record Macro dialog box, the Store Macro In field
tells Excel where to store your macro. You can choose to
store your macro in the Personal Macro Workbook, a New
Workbook, or This Workbook. Use the Personal Macro
Workbook option if you want to make your macro
available to all Excel files. After you have stored at least
one macro in the Personal Macro Workbook, the
workbook opens whenever you open an Excel file. Use
the New Workbook option if you have specialized macros
that you want to use with multiple files. If you store your
macro in a New Workbook, you can use the macros
whenever that workbook is open. Use the This Workbook
option if you want to store your macro in the workbook
in which you are currently working.
Record a Macro
1
Click the Developer tab.
1
2
Note: See the section “Introducing
Macros” to learn how to display the
Developer tab.
•
2
Alternatively, click the Record
Macro button on the status bar
and skip Step 2.
Click Record Macro.
The Record Macro dialog box
appears.
3
Type the name you want to give
your macro.
4
Type the shortcut key you want to
assign to your macro.
3
4
Press Shift as you type to assign
an uppercase key.
5
6
7
8
Click the down arrow and then
select the workbook in which you
want to store your macro.
Type a description of your macro.
Click OK.
7
5
6
Perform the steps you want to record.
Note: This example changes the number
format using the following steps. Click the
Home tab. Click the Number Group launcher.
Click Accounting. Set Decimal Place to 0.
Select $ as Symbol. Click OK.
9
•
0
Click the Developer tab.
8
0
9
Alternatively, click the Stop Recording
button on the status bar and skip Step 10.
Click Stop Recording.
Excel stops recording your macro.
Your macro is ready for you to use.
Chapter 1: Using Macros and Form Controls
8
A macro you create in Excel can have a relative, an absolute, or a mixed reference. If you use a relative reference,
Excel performs the macro based on a relative location. For example, suppose you move up two cells from cell A3 to
cell A1 when creating your macro. When you run your macro, if you are in cell C3, Excel moves up two cells from
cell C3 to cell C1. If you use an absolute reference, however, Excel performs the macro based on the exact cell
addresses. For example, suppose again that you move up two cells from cell A3 to A1. When you run your macro, if
you are in cell C3, Excel moves from there to the cells you used when you recorded your macro. That is, Excel moves
from cell A3 to cell A1.
By default, Excel creates macros with an absolute reference. To create a macro with a relative reference, click Use
Relative References in the Code group on the Developer tab to toggle the relative reference option on. To create a
macro with both a relative and an absolute reference — a mixed reference — toggle the Use Relative References
button on and off as needed as you create your macro.
9
Assign a Digital
Signature to a Macro
A
digital signature provides assurance that a
workbook file that contains macros is valid and
no one has altered the macros. There are two
types of digital signatures: personal digital signatures and
commercial digital signatures. You can create a personal
digital signature by using the Digital Certificate for VBA
Projects tool, or you can purchase a digital signature. Refer
to the section “Create a Digital Signature” to learn how to
create a personal digital signature. After you create a digital
signature, you must attach it to your workbook. Attaching
a digital signature is similar to sealing an envelope. If an
envelope arrives sealed, you have some level of assurance
that no one has tampered with its contents.
Use the Digital Signature dialog box to attach a digital
signature. The Visual Basic Editor (VBE) is a separate
Excel module that you can use to edit your macros.
Access the Digital Signature dialog box by opening the
VBE. The Digital Signature dialog box lists valid
certificates. You can use the Digital Signature dialog box
to view certificates and to select the one you want to use.
Unless you have on your computer a valid digital
signature certificate for the signature used to sign a
macro, Excel removes the digital signature when you
modify a macro and you must reattach it. If you are not
sure if a workbook has a digital signature, you can check
the signature by reviewing the Digital Signature dialog
box. If a workbook has a digital signature, the name of
the signature appears in the Certificate Name field. If you
click the Remove button in the Digital Signature dialog
box, Excel removes the digital signature.
Assign a Digital Signature to a Macro
1
Click the Developer tab.
1
2
Note: See the section “Introducing Macros”
to learn how to display the Developer tab.
2
Click Visual Basic in the Code group.
The Visual Basic Editor appears.
3
3
Click Tools ➔ Digital Signature.
3
10
4
Click Choose.
4
The Select Certificate dialog box
appears.
Note: See the section “Create a Digital
Signature” to learn how to create a
digital signature.
5
Click the signature you want to
apply.
6
Click OK to close the Select
Certificate dialog box.
7
Click OK to close the Digital
Signature dialog box.
5
6
Chapter 1: Using Macros and Form Controls
The Digital Signature dialog box
appears.
Excel attaches the digital signature
to your workbook.
Note: To return to Excel, press Alt+Q.
7
If you have Macro Security enabled, Excel displays the
Trust Bar below the Ribbon when you open a workbook
containing a signed macro. You can modify the
workbook, but you cannot use the macros. If you trust
that the document is safe, you can click the Enable
Content button on the Trust Bar to enable the macros
in the workbook. The workbook then becomes a trusted
document and you will not need to enable the
workbook again.
You can use the Microsoft Office Security Options
dialog box to select the security option you want. On
the Trust Bar, click Macros Have Been Disabled.
Security warning options appear. Click the Enable
Content button. A menu appears. Click Advanced
Options. The Microsoft Office Security Options dialog
box appears. Click Help Protect Me from Unknown
Content (Recommended) to disable the macros; click
Enable the Content for This Session to enable the
macros for one session; or click Trust All Documents
from This Publisher to add the macro publisher to the
Trusted Publisher list. Excel does not display a warning
when you open workbooks with macros if the publisher
is on the Trusted Publisher list.
11
Run a
Macro
M
acros enable you to quickly perform tasks that
would normally take multiple steps. When you
run a macro, Excel replays the steps you
recorded when you created the macro. You can run any
macro located in any workbook as long as the workbook
in which the macro is located is open. To run a macro,
you can press the shortcut key you assigned when you
created the macro, or you can select the macro from the
Macro dialog box.
When you create a macro, you can choose to store it in
one of three locations: the current workbook, a new
workbook, or the Personal Macro Workbook. By default,
the Macro dialog box lists all the macros in open
workbooks. If a macro is stored in the Personal Macro
Workbook, the macro opens as a hidden file each time
you open a file. By default, the files in the Personal
Macro Workbook always appear in the Macro dialog box.
You can use the Macros In field to limit the number of
macros listed in the Macro dialog box. To see the macros
in any open workbook, including the Personal Macro
Workbook, select All Open Workbooks from the Macros
In drop-down list. To see the macros from a specific
workbook, select the name of the workbook from the
Macros In drop-down list. To see global macros stored in
the Personal Macro Workbook, select PERSONAL.XLSB
from the Macros In drop-down list.
To run macros from another workbook, the macro must
be from a signed source or you must enable the macros.
You can set the security setting for macros. See the section
“Set Macro Security” to learn more about macro security.
Run a Macro
1
Select the cells where you
want to apply your macro.
2
Click the Developer tab.
3
2
Note: See the task “Introducing
Macros” to learn how to display the
Developer tab.
3
1
Click Macros.
Alternatively, press Alt+F8.
The Macro dialog box appears.
4
If your macro does not appear
in the Macro dialog box, click
the down arrow and then
select the workbook that
contains your macro.
4
12
Click the name of the macro
you want to run.
6
Click Run.
5
•
6
Excel runs the macro.
You can also run your macro
by pressing the shortcut key
you assigned when you
created the macro.
Excel differentiates between macros listed in the Macro
dialog box by placing the name of the workbook that
contains the macros in front of the macro name. For
example, Excel lists a macro named Sum_Expenses in
the Personal Macro Workbook as PERSONAL.
XLSB!Sum_Expenses. If the macro Sum_Cells exists
in both the Budget.xlsm and Expenses.xlsm workbooks,
Excel treats them as two different macros. The Macro
dialog box lists them as Budget.xlsm!Sum_Cells
and Expenses.xlsm!Sum_Cells.
Chapter 1: Using Macros and Form Controls
5
Unless you have your macro settings set to enable all
macros, Excel checks all documents you open for
macros. See the section “Set Macro Security” for more
information. If you have files that you do not want Excel
to check, you can store them in a trusted location. Click
the Developer tab. Click Macro Security in the Code
group. The Trust Center appears. Click Trusted
Locations. The Trust Location pane appears. Click Add
New Location. The Microsoft Office Trusted Location
dialog box appears. Enter the path to the trusted
location. Click OK.
13
Create and Launch a
Keyboard Shortcut
A
keyboard shortcut is a combination of keys you
press to execute a command. You can use a
keyboard shortcut to launch an Excel macro
command. You can assign an upper- or lowercase key to
a macro when you create it or assign one later by using
the Macro Options dialog box. You execute a macro
keyboard shortcut by pressing the Ctrl key along with the
assigned upper- or lowercase key. Refer to the section
“Record a Macro” to learn how to create a macro.
Keyboard shortcuts are case sensitive. For example, Excel
interprets a lowercase m and an uppercase M as two
different keys. To execute a macro you have assigned to
a lowercase letter, press Ctrl plus the letter; for example,
Ctrl+m. To execute a macro you have assigned to an
uppercase letter, press Ctrl and Shift plus the letter; for
example, Ctrl+Shift+M.
If you give the same keyboard shortcut to macros in two
different workbooks, you may execute the wrong macro if
you use the shortcut while you have both workbooks
open. Excel cannot discern from which workbook you want
the macro. You can use the Macro Options dialog box to
reassign one of the conflicting macros to a new key.
You should also be careful not to assign the macro to a
keyboard shortcut that Excel uses. If you do, Excel
executes your macro instead of the command it created.
For example, by default, Ctrl+o opens the Open dialog
box. If you assign o to a macro, your macro overrides
Excel’s assignment.
Create and Launch a Keyboard Shortcut
Create a Keyboard Shortcut
1
Press Alt+F8.
2
The Macro dialog box appears.
2
3
Click the desired macro.
3
Click the Options button.
The Macro Options dialog box
appears.
4
4
Type the desired shortcut key.
Press Shift as you type to
assign an uppercase key.
5
6
Type a description.
7
Click Close to close the Macro
dialog box.
5
6
Click OK to close the Macro
Options dialog box.
14
7
1
Select the cells where you want
the macro to execute.
2
Press Ctrl and the shortcut key.
1
•
3
The macro executes.
Repeat Steps 1 and 2 to execute
the macro again.
Note: In this example, the macro
removes the decimal places.
If you do not use a macro shortcut
frequently, it is easy to forget the
keyboard shortcut you assigned
to your macro. If you forget your
keyboard shortcut, you can view it
in the Macro Options dialog box.
Chapter 1: Using Macros and Form Controls
Launch a Keyboard Shortcut
You can execute a macro by assigning the macro to a picture, clip art, a
shape, or smart art. For example, if you want to assign a macro to a
picture, you start by inserting the picture into your worksheet by clicking
the Insert tab and then clicking Picture. The Insert Picture dialog box
appears. In the Look In field, select the folder in which you stored the
picture you want to insert. The pictures in that folder appear. Click the
picture you want to insert and then click the Insert button. The picture
appears in the worksheet. Click and drag the picture to place it where you
want it and then double right-click the picture. A menu appears. Click
Assign Macro. The Assign Macro dialog box appears. Click the macro you
want to assign to the picture and then click OK. Excel assigns the macro to
the picture. Click the picture when you want to execute the macro.
15
Assign a Macro to the
Quick Access Toolbar
Y
ou can assign a macro to the Excel Quick Access
toolbar. You can execute macros assigned to the
Quick Access toolbar using a shortcut key or the
Macro dialog box; however, using the Quick Access
toolbar means you can access the macros by simply
clicking the appropriate button.
When you add a button to the Quick Access toolbar, you
can specify whether it should appear on the toolbar of all
Excel workbooks or only on the Quick Access toolbar in the
workbook you specify. By default, the button appears in all
workbooks. If you have placed your macro in the Personal
Macro Workbook, you probably want your macro button to
appear in all workbooks because the macro is available to
all workbooks. If your macro will be available only to a
single workbook, your macro button should appear only on
the Quick Access toolbar for that workbook.
You use the Customize the Quick Access Toolbar page of
the Excel Options dialog box to add a macro button to the
Quick Access toolbar. You can use the Modify button to
specify the button you want to use to represent your
macro. You can specify where on the Quick Access
toolbar your button appears and whether the Quick
Access toolbar appears above or below the Ribbon. You
can click the Reset button to return the Quick Access
toolbar to its default state.
Deleting a macro does not remove the macro button from
the Quick Access toolbar. When you press the button for
a deleted macro, you receive an error message. Use the
Remove button on the Customize the Quick Access
Toolbar page of the Excel Options dialog box to remove a
macro button.
Assign a Macro to the Quick Access Toolbar
1
Click the Customize Quick Access
Toolbar button and then select More
Commands.
1
1
The Excel Options dialog box appears.
2
Click the down arrow and then select
Macros.
3
Click the down arrow and then select
the workbook in which the button
should appear.
4
Click the macro you want to assign to
the Quick Access toolbar.
5
Click Add.
•
6
2
5
The macro appears in the box on the
right.
Click Modify.
16
3
4
6
Chapter 1: Using Macros and Form Controls
The Modify Button dialog box appears.
7
Click the button you want to use to
represent your macro.
8
Click OK to close the Modify Button
dialog box.
9
Click OK to close the Excel Options
dialog box.
7
8
9
•
0
The button appears on the Quick Access
toolbar.
Click the button to execute your macro.
Excel executes the macro.
0
You can also assign a macro to a custom Ribbon tab. Right-click the Microsoft Office Ribbon. A menu appears.
Click Customize the Ribbon. The Excel Options dialog box appears with the Customize the Ribbon pane selected.
Click the down arrow ( ) next to the Choose Commands From field and then select Macros. Click the down arrow
( ) next to the Customize the Ribbon field and then select Main Tabs. Click the New Tab button. Excel creates a
new tab and a new group. Click New Tab (Custom) and then click Rename. The Rename dialog box appears. Type
the name you want to give the tab and then click OK. Click New Group (Custom) and then click Rename. The
Rename dialog box appears. Type the name you want to give the group and then click OK. Click the macro you
want to add to the custom Tab and then click the Add button. Excel places the macro in the Main Tabs box. Click
Rename. The Rename dialog box appears. Click the symbol you want to use to represent the macro. Click OK to
close the Rename dialog box. Click OK to close the Excel Options dialog box. The macro appears on the new tab
you created.
17
Delete
a Macro
Y
ou can delete macros you no longer need by
clicking the Delete button in the Macro dialog
box. Because the Macro dialog box only displays
macros in open workbooks, the workbook that contains
the macro must be open before you can delete the macro.
The Personal Macro Workbook stores macros you want to
make available to all workbooks. Excel creates the Personal
Macro Workbook when you choose to store your first macro
in it. After Excel creates the Personal Macro Workbook, the
workbook opens as a hidden file every time you open Excel.
To learn more about storing macros in the Personal Macro
Workbook, see the section “Record a Macro.”
If your macro is in a hidden workbook such as the
Personal Macro Workbook, you must unhide the
workbook before you can delete the macro. If you try to
delete a macro from the Personal Macro Workbook prior
to unhiding it, Excel displays the following message:
“Cannot edit a macro on a hidden workbook. Unhide the
workbook using the Unhide command.” You unhide the
Personal Macro Workbook and other hidden workbooks
by executing the Unhide command on the View tab.
If you unhide the Personal Macro Workbook, make sure
you hide it again using the Hide command on the View
tab after you delete the macros. Hiding the workbook
prevents you from making inadvertent changes to it.
You cannot undo the deletion process. If you delete a
macro by mistake, you can close the workbook without
saving. Of course, if you close without saving, you will
lose all the work you have done since saving. Your only
other alternative is to re-create the macro.
Delete a Macro
1
Unhide a Workbook
1
2
2
Click the View tab.
Click Unhide.
The Unhide dialog box appears.
3
4
Click the workbook you want to unhide.
Click OK.
Excel unhides the workbook.
You are now in the workbook you
selected to unhide.
3
4
18
1
Press Alt+F8
The Macro dialog box appears.
2
3
2
Click the macro you want to delete.
Click Delete.
3
A message box appears, asking you
to confirm you want to delete the
macro.
4
Click Yes.
4
Chapter 1: Using Macros and Form Controls
Delete a Macro
Excel deletes the macro.
There are two ways to create a macro. One way is to use the macro recorder to record the steps needed to perform
the action. The other way is to create the steps by typing the Visual Basic for Applications (VBA) code into the Code
window of the Visual Basic Editor (VBE). When you use the macro recorder, Excel automatically creates the VBA
code for you. You can use the VBE to edit macros you have created with the macro recorder. Often, it is convenient
to use a combination of the two methods to create your VBA code: You record part of the VBA code, and then you
use the VBE to augment or modify your code.
To activate the VBE, you can press Alt+F11 while in Excel or click the Visual Basic button on the Developer tab. If
you create your macros using the macro recorder, Excel defines each macro you create as a procedure and stores
each procedure in a module. The VBE lists modules in the Project Explorer under the workbook in which they are
located.
19
Add a Form Control
to a Worksheet
Y
ou can add controls to a worksheet to make it
easier to enter data. Form controls can aid users
who are not familiar with Excel and can increase
the accuracy of data entry by limiting the options a user
has. For example, you can add check boxes to your
worksheet so your worksheet looks like a paper form.
You can also add a combo box from which users can
select an entry.
Excel provides nine controls you can add to a worksheet.
You add controls by selecting the control you want from
the Form Controls menu. After you add a control, you can
adjust its size by dragging the side or corner handles.
When you add a control or when you right-click a control
twice and then click the control, you are in Design mode.
In Design mode, you can modify the properties and size
of the control, but you cannot test its functionality.
When you place a control on a worksheet, it sits on top of
the worksheet. You can size it so it appears to be located
in a cell, but controls are separate from cells. You can
place controls anywhere on the worksheet. A control can
cover any portion of a cell or range of cells.
After you add a control to a worksheet, you can assign it
values. See the next section, “Assign Values to a Form
Control,” to learn how. Form control options are located
on the Developer tab. See the section “Introducing
Macros” in this chapter to learn how to display the
Developer tab.
Add a Form Control to a Worksheet
1
2
Click the Developer tab.
1
2
3
Click Insert.
The Form Controls menu appears.
3
Click to select the control you want.
4
Click and drag the mouse pointer to
create the control.
5
Click and drag the handles on the
sides and corners to adjust the size.
5
20
4
7
Place your mouse pointer on the control
and when the mouse pointer turns into a
four-sided arrow drag the control to
change the location.
6
Right-click the control twice and then
click it to place it in Design mode.
To cancel Design mode, click any cell in
the worksheet.
7
To remove a control, place it in Design
mode and then press Delete.
Chapter 1: Using Macros and Form Controls
6
You can add the controls listed in the following table to your worksheets.
CONTROL
CONTROL NAME
DESCRIPTION
Button
Runs an associated macro when clicked
Combo box
A menu that displays a list of items
Check box
Selects or deselects an option
List box
Displays a list of items for selection
Radio button
Selects one of a group of items
Group box
Groups related controls, such as radio buttons, together
Label
Provides information about an associated control
Scroll bar
Increases or decreases a value when the user clicks the arrows or drags the bar
Spinner
Scrolls up and down through a list of numeric values
21
Assign Values to
a Form Control
A
fter you add a control to a form, you can assign
values to it. For example, if your worksheet
contains a combo box, you can assign the list of
values that appear when users access the combo box.
Some controls enable you to define a range of valid
numeric values for the control. For example, if you use a
spinner, you can define the starting value and the
maximum value for the control. For combo boxes and list
boxes, you can place the options associated with the
control in a range of cells. For example, if you use a
combo box, you tell Excel the list of values used by the
control by entering the range of cells containing the
values. The values can be located on another worksheet
or even in another workbook, as long as Excel can access
the workbook when users view the worksheet that
contains the control.
You can link a cell to a control. If you link a cell to a
control, whatever value users select when utilizing the
control becomes the value in the linked cell. If you use a
combo box control or list box control, the value in the
linked cell is a number that represents the user’s
selection. Excel assigns the number based on the position
of the selected value in your list. If the list is Computer,
Monitor, Keyboard, and the user selects Monitor, the
linked cell receives the value 2, because Monitor is
second in the list.
With a control, such as a check box, you can tell Excel
whether you want the option initially selected or
unselected. Both options — selected and unselected —
have an associated value.
Assign Values to a Form Control
1
Right-click the control twice.
A menu appears.
2
Click Format Control.
2
1
The Format Object dialog box appears.
3
Click the Control tab.
The available fields depend on the control
type. This example uses a combo box.
4
5
6
Enter the range that lists the valid values.
Enter a cell to assign a linked cell.
Enter the number of items in your
drop-down list.
The value associated with your selection
appears in the linked cell.
7
45
Click OK.
22
6
7
3
Click the down arrow and then
select the desired control value.
8
8
•
Excel selects the value and places a
numeric value representing the
control selection in the linked cell.
Chapter 1: Using Macros and Form Controls
8
When working with a value selected from a list box or combo box control, you may want to use the value in the
linked cell to set the value of another cell. For example, assume you have the following Excel list in cells H2:I4:
Example:
Computer
Monitor
Keyboard
$1295
$995
$55
You can use the INDEX function to determine the price based on the equipment selection. For example, if the user
selects Monitor from the control, Excel places a value of 2 in the linked cell. If you want users to find the cost of the
selection, you type a formula similar to the following, assuming that C2 is the linked cell:
Example:
=INDEX($H$2:$1$4,C2,2)
When the user selects Monitor, the INDEX function returns $995. The INDEX function actually creates an array of
the Excel list and uses the control selection to determine which element in the array to return. The function uses
three arguments: Array, Row_num, and Column_num. See the file Form Control Example.xlsm, which you can
download from the Web site for this book to see an example.
23
Add a Macro to
a Form Control
Y
ou can use macros to automate the tasks you
perform in Excel. You can assign a macro to any
form control on a worksheet. For example, if a
user clicks a button control, you can have Excel execute a
macro.
You can create one macro for each control on a worksheet.
You create a macro either by recording a series of
keystrokes or by writing a Visual Basic for Applications
(VBA) procedure. When you select the Assign Macro
menu option, Excel automatically creates a new macro
name by using the name of the control followed by an
underscore and an event name, such as _Click. Excel
assigns the control name to the control when you add it to
a worksheet. For example, the first OptionButton control
that you add to a worksheet is named OptionButton1. If
you create a macro for the option button, Excel gives the
macro the name OptionButton1_Click. Every time you
add a new control, Excel gives the control a unique name
by adding a sequential number to OptionButton; for
example, OptionButton2_Click, Option Button3_
Click, and so on.
The portion of the macro name following the underscore
character corresponds to an action, commonly referred to
as an event. For example, with an OptionButton control,
the user clicks the radio button to select the option, so the
event is Click. If you create a macro for a combo box
control, Excel assigns Change to the name of the event
because you want to execute the macro when the value
of the control changes. The event extension tells Excel to
monitor the control and execute the macro whenever a
user clicks the control.
Add a Macro to a Form Control
1
Right-click your control
twice.
3
A menu appears.
2
Click Assign Macro.
The Assign Macro dialog
box appears.
•
3
Excel assigns a default
macro name for the
selected control.
1
2
Click Record.
The Record Macro dialog
box appears.
4
5
Click OK.
Record your macro.
Note: See section “Record a
Macro” to learn how to record
a macro.
24
4
Click the control with the
assigned macro.
6
Excel executes the associated macro.
•
In the example, Excel assigns postage
to the invoice.
To assign a macro to a button, create the macro, and
then click the Developer tab. Click Insert in the Controls
group. A menu appears. Select the button control and
then click and drag to create a button. The Assign Macro
dialog box appears. Click the macro you want to assign
and then click OK. Right-click the button twice and then
click Edit Text on the menu that appears. Type the name
you want to give the button. You can now click the
button to execute the macro.
Chapter 1: Using Macros and Form Controls
6
If you no longer want a macro to be assigned to a control,
you can right-click the control twice and then click the
Assign Macro option. In the Assign Macro dialog box,
delete the macro name from the Macro Name field and
then click OK. Excel removes the macro assignment from
the control, but the macro remains as part of the
workbook. To remove the macro from the workbook,
click the View tab. Click Macros in the Macros group.
Click View Macros. The Macro dialog box appears. Select
the macro you want and then click Delete.
25