1
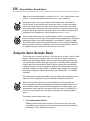
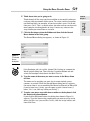
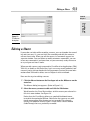
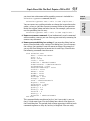
Chapter 1: Recording and
Using Macros
AL
In This Chapter
✓ Recording a macro
RI
✓ Running a macro
✓ Editing a macro
TE
✓ Using auto macros
MA
A
GH
TE
D
macro is a sequence of commands or keystrokes that Word records
and lets you play back at any time. Macros allow you to create your
own customized shortcuts for tasks you do repeatedly. For example, Word
comes with built-in keyboard shortcuts to make text bold (Ctrl+B) or italic
(Ctrl+I), but no built-in shortcut exists to make text bold and italic all at the
same time. To perform that formatting task, you have to press Ctrl+B and
then press Ctrl+I. If you do that a million times a day, pretty soon that extra
keystroke becomes bothersome. Wouldn’t having a shortcut for bold-italic
be nice? With Word’s macro recorder, you can create one.
PY
RI
This chapter shows you how to record and play back simple macros. It
doesn’t show you how to create complex macros by using Word’s macro
programming language, Visual Basic for Applications. That’s the topic of the
remaining chapters in this minibook.
CO
Where Do All the Macros Go?
You can store macros in documents or in templates. When you create a
macro, you have three choices for where to store the macro:
✦ The current document: The best place to create macros that you will
use in only a single document.
✦ The template that’s attached to the current document if it’s macroenabled: The best place to create macros that you want to use in a
large number of similar documents. Then the macros are available to
any document you create from the template.
✦ The Normal.dotm template: The place to create macros that you want
to be available all the time, no matter which document you’re working on.
528
Doing the Macro Recorder Dance
Note: If the current document is based on Normal.dotm, you have only two
choices — the current document or the Normal.dotm template.
When you create a macro, you need to think about when you’ll want to
run the macro. If you need to run it only from within a specific document,
create the macro in that document. If you want the macro to be available
only to documents based on a particular template, create the macro in that
template. But if you want the macro to always be available no matter which
document you’re working on, store the macro in Normal.dotm.
You can also store macros in a global template, which is a useful place to
create a library of macros that are available to all your documents. For more
information about using global templates, turn to Book I, Chapter 3. Note:
To create or edit macros in a global template, you must open the template.
After you create macros in a template, you can close the template, attach it
as a global template, and then run any macros it contains.
Doing the Macro Recorder Dance
The easiest way to create a macro is to use the macro recorder, which is kind
of like a videocassette recorder. After you turn on the macro recorder, it
follows you around and makes a precise record of everything you do until
you turn off the recorder. Well, not everything — the Word macro recorder
records only the stuff you do in Word. It doesn’t notice when you dribble
coffee down your chin or sneeze on the monitor. But when you turn on the
recorder, anything you do in Word — whether you’re typing text, applying
formatting, calling up a command, or filling out a dialog box — is carefully
recorded.
Then when you turn off the recorder, you can replay the recorded macro to
repeat the exact sequence of steps that Word recorded in the macro.
About the only things that are not recorded by the macro recorder are
mouse movements within the document. The macro recorder records buttons or Ribbon choices you click, but Word doesn’t let you navigate your
document or select text with the mouse while the macro is recording. As a
result, use the keyboard for navigating or selecting text while recording a
macro.
To record a macro, follow these steps:
1. Try to talk yourself out of it.
Fiddling around with macros can be a bit of a time-waster. Ask yourself whether you truly will use the macro after you go to the trouble of
recording it. If not, go directly to Step 12.
Doing the Macro Recorder Dance
529
2. Think about what you’re going to do.
3. Click the Developer tab on the Ribbon and then click the Record
Macro button in the Code group.
The Record Macro dialog box appears, as shown in Figure 1-1.
Figure 1-1:
The Record
Macro
dialog box.
If the Developer tab isn’t visible, choose File➪Options to summon the
Word Options dialog box. Then click the Customize Ribbon tab and
select the Developer check box in the Main Tabs list.
4. Type the name of the macro you want to create in the Macro Name
text box.
The name can be anything you want, but it cannot include spaces,
commas, or periods. When the Record Macro dialog box first appears,
the macro name is set to something like Macro1 or Macro2 (or Macro783
if you’ve been busy). Surely, you can come up with a better name. (I
know: “Yes, I can, and stop calling me Shirley.”)
5. To make your macro accessible from a toolbar or the keyboard, click
the Button or Keyboard button.
If you click the Keyboard button, the dialog box shown in Figure 1-2
appears. Type the shortcut key combination you want to assign to the
macro (in this case, I pressed Alt+Ctrl+B), click the Assign button, and
then click Close.
Recording and
Using Macros
Think through all the steps you have to follow to accomplish whatever
task you want to automate with a macro. To create a macro that makes
text bold and italic, for example, all you have to do is press Ctrl+B and
then press Ctrl+I. That’s a simple macro, but other macros can be much
more complex, involving dozens of steps. If necessary, rehearse the
steps before you record them as a macro.
Book IX
Chapter 1
530
Doing the Macro Recorder Dance
Figure 1-2:
Assigning
a macro to
a keyboard
shortcut.
If you click the Button button instead, the Word Options dialog box
appears with the Quick Access Toolbar tab selected. Then you can
create a button on the Quick Access toolbar to run the macro. For more
information, refer to Book VIII, Chapter 1.
6. Set the Store Macro In drop-down list to the location where you want
to store the macro.
The default setting stores the recorded macro in the Normal.dotm
template so that it’s always available. The other choices available in this
drop-down list are storing the macro in the document that you were
working on when you started the macro recorder or storing the macro
to the template that the document is based on (if it is based on a template other than Normal.dotm).
7. Type the keystrokes and click the Ribbon commands you want to
record in the macro.
8. Type the keystrokes and Ribbon commands you want to record in the
macro.
To record the BoldItalic macro, for example, press Ctrl+B and then
press Ctrl+I.
9. If you have to stop recording temporarily, click the Pause button.
Click it again to resume recording.
You might forget how to do something, for example, especially if you
skipped Step 2. If you click the Pause button, you can call up Word’s Help
command, look up and read the procedure for whatever task you forgot,
dismiss Help, and click the Pause button again to resume recording.
10. After you finish recording the macro, click the Stop Recording button.
Word adds the macro to the template or document. You’re almost done.
Macro Recording Tips
531
11. Test the macro.
12. You’re finished.
Congratulate yourself.
If the function of the macro isn’t obvious from the macro name, type a more
elaborate description of the macro in the Description field of the Record
Macro dialog box. You’ll thank yourself later when you forget what the
macro does.
Macro Recording Tips
Here are some tips to keep in mind as you record macros:
✦ You can open the Record Macro dialog box directly by clicking the
Record Macro button on the status bar. It appears as a little red dot.
✦ If the macro doesn’t work, you might have made a mistake while recording it. If the macro is short enough, the best thing to do is to record the
macro again. If the macro is long and you have nothing important to do,
try editing the macro to expunge the problem. See the section “Editing a
Macro,” later in this chapter.
✦ Macros are normally stored in the global Normal.dotm template. To
store a macro in the template attached to the current document, change
the setting of the Record Macro dialog box’s Store Macro In drop-down
list.
✦ Don’t make any assumptions about where the insertion point will be
when you run the macro. If necessary, begin the macro with a positioning command by moving the insertion point to the beginning of the
document, the beginning of the line, or the beginning of a word. (Not all
macros require a positioning command. But if your macro depends in
any way on the position of the insertion point, this step is a must.)
✦ Don’t use the mouse to select text or navigate the document. Word
doesn’t record these mouse actions. You can use the mouse to select
Ribbon commands but not to move the insertion point.
✦ Use Ctrl+Home or Ctrl+End to move to the beginning or end of a document. Don’t use repeated Page Up or Page Down keys for this purpose.
Pressing Page Up three times might move you to the top of your document when you record the macro, but when you run the macro, it might
not. Similarly, use the Home and End keys, rather than the left or right
arrow keys, to move to the start or end of a line.
Recording and
Using Macros
If you assigned the macro to a keyboard shortcut, use the shortcut now
to see whether the macro works. Otherwise, follow the steps in the later
section “Running a Macro.”
Book IX
Chapter 1
532
Running a Macro
Avoiding unexpected side effects
Sometimes a macro has unexpected side
effects. Suppose that rather than record the
keystrokes Ctrl+B and Ctrl+I for the BoldItalic
macro, you decide to record these steps:
Font dialog box command when you recorded
the macro was 10-point Times New Roman
font, every time you apply the macro, the font
switches to 10-point Times New Roman.
1. Click the Font group button to display the
Font dialog box.
You can avoid these side effects in two ways:
2. Choose Bold Italic as the font style.
3. Click OK.
The macro seems to work, but sooner or later
you discover that in addition to recording the
Bold Italic font style, the macro recorded other
character attributes — such as the font, size,
and effects. If the text to which you applied the
✓ Avoid recording dialog boxes in macros
whenever a keyboard shortcut or a Ribbon
button can do the trick. Whenever you
record a dialog box in a macro, you record
all the dialog box settings.
✓ Fix the macro later by editing it and remov-
ing the extraneous information. See the
later section “Editing a Macro.”
✦ If you use the Find or Replace commands, be sure to move to the beginning of the document first.
✦ Avoid any commands that depend on the contents of a document that’s
active when you record the macro. If your macro is based on information that will never be replicated, it’s a useless macro.
Running a Macro
If you assigned a macro to the Quick Access toolbar or a keyboard shortcut,
you can run the macro by clicking the Quick Access Toolbar button or pressing the keyboard shortcut. If you didn’t, you can run it by following these
steps:
1. Select the Developer tab on the Ribbon and then click the Macros
button in the Code group.
The Macros dialog box, shown in Figure 1-3, appears.
For a shortcut, you can press Alt+F8.
2. If the macro you want to run isn’t already selected, select it now. If the
macro you want doesn’t appear, try changing the Macros In setting.
The macro might be in a different template.
3. Click Run.
Editing a Macro
533
Book IX
Chapter 1
Recording and
Using Macros
Figure 1-3:
The Macros
dialog box.
Editing a Macro
If you make a mistake while recording a macro, you can abandon the recording and start over. Or, you can finish the recording and edit the macro to
correct the mistake. When you edit the macro, its commands appear in a
separate window. You can delete or modify erroneous commands, you can
insert new commands if you know how, or you can merely study the macro
to try to figure out how it works.
When you edit a macro, you’re exposed to Visual Basic for Applications (VBA).
VBA isn’t as deadly as the Ebola virus, but it can cause severe headaches and
nausea if you’re not inoculated with the Programmer Vaccine. For more information about VBA and its editor, turn to Chapter 2 of this minibook.
Here are the steps for editing a macro:
1. Click the Macros button on the Developer tab on the Ribbon or on the
status bar.
The Macros dialog box appears. (Refer to Figure 1-3.)
2. Select the macro you want to edit and click the Edit button.
Word launches the Visual Basic editor, with the macro you selected visible in its own window. See Figure 1-4.
Notice that the Visual Basic editor uses good old-fashioned menus
instead of the newfangled Ribbon. Notice also that you may see additional macros other than the one you just recorded. For example,
besides the BoldItalic macro, Figure 1-4 also shows a macro named
StrikeThrough that was previously recorded.
534
Simple Macro Edits That Don’t Require a PhD in VBA
Figure 1-4:
Editing a
macro.
3. Make whatever changes are necessary to the macro.
Correct misspelled words, delete extraneous commands, and, if you’re
brave, add more commands.
4. Choose File➪Save Normal to save your changes.
Note that if you are editing a macro in a template other than Normal, the
name of the template will be listed in the Save command. For example, if
the template is named MyTemplate, you will use the Save MyTemplate
command to save your edits.
5. Choose File➪Close and Return to Microsoft Word to close the macro
window.
Simple Macro Edits That Don’t Require a PhD in VBA
Before you make massive changes to a macro, you need a good level of
knowledge about VBA. However, you can make certain types of changes
without knowing much about VBA. Here’s a sampling:
✦ Correct spelling errors. If you inserted text into a document and misspelled it, don’t hesitate to edit the macro to correct misspellings. Text
Simple Macro Edits That Don’t Require a PhD in VBA
535
you insert into a document while recording a macro is included in a
Selection.TypeText command, like this:
Book IX
Chapter 1
Selection.TypeText Text:=”This is some simple text.”
Selection.TypeText Text:=”This is some sample text.”
✦ Remove extraneous commands. If you inadvertently used a command
while recording a macro, you can clean up your macro by removing the
unnecessary command.
✦ Remove unwanted dialog box settings. If you record a dialog box in a
macro, Word includes every setting in the dialog box. You can remove
the settings that you don’t want the macro to change. For example, if
you use the Font dialog box to format text in small caps, Word inserts
the following commands into the macro:
With Selection.Font
.Name = “Times New Roman”
.Size = 9.5
.Bold = False
.Italic = False
.Underline = wdUnderlineNone
.UnderlineColor = wdColorAutomatic
.StrikeThrough = False
.DoubleStrikeThrough = False
.Outline = False
.Emboss = False
.Shadow = False
.Hidden = False
.SmallCaps = True
.AllCaps = False
.Color = wdColorAutomatic
.Engrave = False
.Superscript = False
.Subscript = False
.Spacing = 0.3
.Scaling = 100
.Position = 0
.Kerning = 0
.Animation = wdAnimationNone
End With
This command looks complicated at first, but if you study it, you see
that it’s little more than a list of all dialog box controls that appear in
the Font dialog box. The periods look strange appearing in front of each
command argument as they do, but they’re required. You can safely
Recording and
Using Macros
You can correct any spelling mistakes or change the inserted text altogether, as long as you take care not to remove either of the quotation
marks that appear before and after the text. For example, you can correct the preceding line this way:
536
Using Auto Macros
delete the lines that specify the dialog box controls you don’t want to
use so that the resulting command looks like this:
With Selection.Font
.SmallCaps = True
End With
With a little more VBA knowledge, you can also remove the With and
End With commands and substitute just the following line:
Selection.Font.SmallCaps = True
Using Auto Macros
An auto macro runs automatically whenever a key event happens, such as
when Word starts or a document closes. Word recognizes auto macros by
name. For example, a macro named AutoNew automatically runs when you
create a new document from a template, and a macro named AutoClose
automatically runs when you close a document.
To create an auto macro, you simply create a macro by using one of these
special macro names:
✦ AutoExec: Runs when Word starts. Store it in the Normal.dotm
template.
✦ AutoExit: Runs when Word exits. Store it in the Normal.dotm template.
✦ AutoNew: Runs whenever a new document is created by using the template that contains the AutoNew macro.
✦ AutoOpen: Runs whenever an existing document opens. You can create
an AutoOpen macro in the Normal.dotm template or in the template
that’s attached to the document or both.
✦ AutoClose: Runs whenever an open document closes. This macro can
reside in Normal.dotm or in the template attached to the document.
You can prevent any auto macro from executing by holding down the Shift
key while performing the action that otherwise triggers the macro. For example, holding down the Shift key while creating a new document prevents the
AutoNew macro from running.
Protecting Your Computer from Macro Viruses
537
Protecting Your Computer from Macro Viruses
✦ Click the Macro Security button on the Developer Ribbon tab, and then
set your macro security to Disable All Macros with Notification. You’re
then prompted before running macros.
✦ Avoid opening documents from people you don’t know or trust, especially documents that arrive as attachments in unsolicited e-mail
messages.
✦ Install an antivirus program. These programs sniff out and smash all
known macro viruses, as well as other, more common types of viruses
and worms.
Recording and
Using Macros
Computer viruses can exploit Word’s auto macro feature to infect your
computer. As a result, you should take steps to protect yourself from the
possibility of being hit by a macro virus. Here are some things you can do:
Book IX
Chapter 1
538
Book IX: Features for Developers