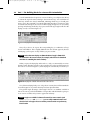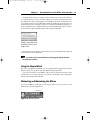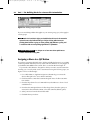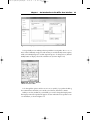
1
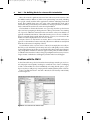
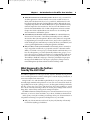
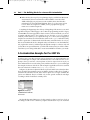
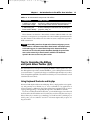
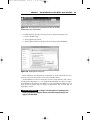
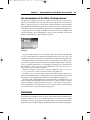
91118c01.qxd:WileyRedTight
11/28/07
7:33 PM
Page 1
Part
I
ED
MA
TE
RI
AL
The Building Blocks for a
Successful Customization
HT
In This Part
CO
PY
R
IG
Chapter 1: An Introduction to the Office User Interface
Chapter 2: Accessing the UI Customization Layer
Chapter 3: Understanding XML
Chapter 4: Introducing Visual Basic for Applications
Chapter 5: Callbacks: The Key to Adding Functionality to Your Custom UI
Chapter 6: RibbonX Basic Controls
Chapter 7: RibbonX Basic Container Controls
Chapter 8: Custom Pictures and Galleries
Chapter 9: Creating Menus
Chapter 10: Static and Dynamic Menus
Chapter 11: Making Use of Controls and Attributes to Help Your Users
91118c01.qxd:WileyRedTight
11/28/07
7:33 PM
Page 2
91118c01.qxd:WileyRedTight
11/28/07
7:33 PM
Page 3
CHAPTER
1
An Introduction to the
Office User Interface
When you open Office 2007, you are welcomed by a totally new user interface (UI).
Although the new UI brings immediate productivity improvements to new Office
users, it can take a few days or weeks for experienced Office users to adapt to and
become fluent with the new interface. But it is definitely worth the investment to get
up to speed with the new UI, particularly the Ribbon. Knowing what to expect and
understanding the logic behind the Ribbon will make life much easier.
This chapter is designed to familiarize you with the Ribbon so that you can understand
how to work with it from the perspective of an end user as well as from the perspective of
a power user and developer. There are such dramatic changes to the UI that we highly recommend that even power users and developers read through this introductory chapter. It
provides an important foundation, as it explains the Ribbon’s background.
As you are preparing to work through the examples, we encourage you to download the companion files. The source code and files for this chapter can be found on the
book’s web site at www.wiley.com/go/ribbonx.
What Is the Ribbon and Why Does It Exist?
Office 2007 has been given a face-lift! And what a makeover! For those who got used to
the old toolbars, the new UI can be a tremendous shock. However, as you learn the new
interface, you will start to appreciate its benefits and, hopefully, embrace it as we and
countless of others have done.
3
91118c01.qxd:WileyRedTight
4
Part I
■
11/28/07
7:33 PM
Page 4
The Building Blocks for a Successful Customization
Microsoft invested a significant amount of time and money in the creation of the
new Ribbon interface. Millions of dollars were spent tracking user trends, including
how people actually used the Office applications and their underlying hierarchical
menus. They studied where users were going, what commands they used, and in
which order. They even tracked eye movement to see where people tend to look first to
find a command. The results were used to develop the Ribbon.
The introduction of hierarchical menus was a great leap from the top-level menu
style. One factor prompting its development was that top-level menus were running
out of space for additional commands for the new features as they were added to an
application. With the introduction of hierarchical menus, more room was available for
the new commands being created. What this meant, of course, was an increase in the
number of features displayed from one version to another.
But just as there is no free lunch in economics, there is no free lunch with such an
approach. As the number of features increased, it became more difficult to actually find
them due to the increased complexity of the UI.
If you think back to the very first versions of Word, for example, there was really no
hierarchy as such. It had the top-level menu, and a user could quickly scan its contents
for the needed feature. By the time we reached Word 97, things had changed dramatically and problems with the UI started to appear. At this point, the future started to
look bleak for the hierarchical order. A change in paradigm became necessary. It was no
longer a matter of whether it would happen, but rather when it would happen.
Problems with the Old UI
As the UI moved from top-level to hierarchical menus, things started to get out of control and people were frequently searching for commands. It was often so challenging
to find a command that most users had difficulty in locating desired options, or perhaps worse, they would give up on trying to find something that they knew was there.
Take for example the Insert ➪ AutoText ➪ Header/Footer hierarchy in Word 2003,
shown in Figure 1-1.
Figure 1-1: Hierarchical menu in Word 2003
91118c01.qxd:WileyRedTight
11/28/07
7:33 PM
Chapter 1
Page 5
■
An Introduction to the Office User Interface
Chances are good that unless you’re very experienced with Word, you would have
never known that this option even existed. Hence, we end up with a huge dilemma on our
hands: We have a feature-rich application, but just a portion of these features are being
used because they are buried under extensive branching and a burdensome hierarchy.
Thus, not only are many features unused, but it also becomes cumbersome for experienced users to keep track of things under such scenarios. Users are all too familiar with
the frustration of wasting time hunting for the command to execute a needed feature.
Microsoft tried to address this issue when it became obvious back in Office 97. With
Office 2000, they introduced the concept of adaptive menus. The idea was that the top-level
menu would be shorter and only show the features that the user accessed most frequently.
This selection process would translate into a UI that reflected a user’s true daily needs
instead of presenting dozens of commands that he never used and did not care about.
For anyone who was a bit more fluent in the UI from Office 97, this new feature actually
became a hindrance. And for new users, it translated into frustration. Ultimately, a lot of
users were switching off this feature and leaving the menus to show in full instead of relying on the adaptive menus technology to figure out and create a UI tailored to their actions.
To make matters worse, the introduction of full menu customization meant that
users could move toolbars around, dock them in some silly place, float them on the
screen, close them altogether, and perform a whole bunch of other actions such as
adding and removing controls from the toolbars and menus at will. This may look
great from the point of view of a power user or programmer, but the world is not made
up of power users and programmers alone. Not everyone is technically savvy and this
had to be taken into account too.
As anyone who has had to work the help desk for Office applications knows, many
end users would close toolbars, never to find them again. In addition, users were prone
to float toolbars, impairing their ability to see the document. At that point, the user
would become frustrated and call the help desk with a complaint. Of course, the help
desk staff and many developers might be astounded that someone would do these
things — and then admit it. But we’ve all heard hilarious stories about the CD tray
breaking under the weight of a coffee cup, so as crazy as the stories sound, they’re true,
and they provide valuable information to developers — one of which is that features
need to be as clear and intuitive as possible.
Because of the confusion and difficulties the average user could experience, it was
obvious that something had to be done. The support calls and other challenges triggered
the overhaul of the UI as we knew it. A paradigm shift seemed more and more necessary.
With the release of Office 2007, the new Office Fluent UI was provided to address
such issues. However, as might be anticipated with such a dramatic change, it can be
met with resistance from those who are familiar and comfortable with the old ways. In
addition, it has created new challenges for power users and developers who want to
deliver a custom UI.
This book tackles the issues in a manner that will be comfortable for and will benefit
all levels of users and developers. If you are a beginner, you will love this book because
you learn the fundamentals and will be able to customize your own workspace. If you
are a power user, you will love this book because you will be able to work more efficiently by customizing and sharing your Ribbon components. And if you are a developer, you will also love this book because you will be able to leverage your custom
components, work across multiple applications, incorporate third-party tools, and
deploy contemporary solutions.
5
91118c01.qxd:WileyRedTight
6
Part I
■
11/28/07
7:33 PM
Page 6
The Building Blocks for a Successful Customization
So, it’s time to discuss the old issues addressed by the new UI as well as the new
issues that were created by it.
Issues Solved with the New UI
What came out of the massive budget and research on Microsoft’s part when it was
manifested in the Ribbon? Many painful problems in the old user interface were
solved, including the following:
■■
Lack of context: Wouldn’t it be nice to have the controls you need displayed
when you need them? That’s what contextual controls are all about. In the
older versions of the applications, all commands were buried somewhere —
but not necessarily where users would intuitively expect them to be. In addition, only a few features (Pivot Tables and Charts in Excel, for example,) had
contextual commands that would display when the feature was being used. In
the new UI format, Microsoft attempts to be much more contextual, and to present commands in a way that is consistent with what their research indicated
would be the next logical step. Contextual controls are discussed in Chapter 15.
■■
Command accessibility: Microsoft seems to have put in a huge amount of
effort to make the commands more “discoverable” to new and less familiar
users. In fact, even power users will discover commands that they didn’t know
existed in prior versions. Commands have been logically grouped together,
which was not always the case in the past. In addition, many features that used
to be buried and difficult to find have been moved to the front lines.
■■
Customizations left behind: One of the major pain points in Office 2003 and
prior versions was that a poorly designed customization could leave parts of
the UI customizations exposed when a file was closed. For example, they might
inadvertently change the default menu and toolbars for the user’s applications,
possibly hiding or removing commands and toolbars — and many users would
not know how to recover them. These problems are all gone now, thanks to the
new UI format. The customizations are specific to the container files. As soon as
you navigate away from a file that contains customization code, the customizations disappear in the UI. Close your file or even navigate to a new one and the
customizations are tossed until you return. While you can share customizations
across files via add-ins, global templates, and shared workspaces, the fundamental rule still remains that when that file is closed, the custom UI is unloaded
with it. Unlike prior versions, no hangovers are left behind to haunt users.
■■
Corrupted toolbars: By virtue of not having toolbars to customize, the whole
problem of corrupted toolbars has disappeared. The disappearance of this feature may seem like a curse for many, but in fact many of these files were quite
fragile and could cost users countless hours to rebuild. Because all customizations are now built right in to the file, they also go with the file when it is sent
to a new location, eliminating any worry about how the UI will be transferred
or shared. The secret to building your own custom UI for users everywhere
now becomes the task of building a much more stable add-in or global template, and that is what this book will teach you how to do.
91118c01.qxd:WileyRedTight
11/28/07
7:33 PM
Chapter 1
Page 7
■
An Introduction to the Office User Interface
Issues Created with the New UI
While the new user interface has undoubtedly solved many of the issues that were present in previous versions of Microsoft Office, it has naturally created some new ones
that we must deal with. But, hey, this is a new technology and as with any new technology it will need to be adapted and improved along the way.
One drawback (and the most immediately obvious one) about the Ribbon is that it
takes up a lot of screen space, which, in itself, can defeat the purpose of giving the user
a full experience of the Ribbon’s potential. Therefore, the higher the resolution of your
screen, the more you will enjoy and benefit from your experience with the Ribbon.
Figure 1-2 shows the Ribbon on a screen with a lower resolution. Some of the groups
are collapsed; therefore, it is not possible to know what commands these groups contain until they are expanded.
Figure 1-2: Lower resolutions or minimized windows force Ribbon groups to collapse.
N OT E Resizing the window to a smaller size will cause the groups to collapse.
The UI has four types of groups (large, medium, small, and collapsed) that
come into play when the window is resized or when you’re working in a lowerresolution environment.
A screen with a higher resolution, as shown in Figure 1-3, provides a greater visible
area of the Ribbon, so the groups are all nicely displayed (compare the Styles group in
Figure 1-2 and Figure 1-3).
Figure 1-3: Higher resolution allows for expanded groups.
Hence, the higher your monitor’s resolution, the more you will benefit from the Ribbon (the Ribbon is best visualized in a resolution of 1024 × 768 or higher). As you can
see, this first issue is a visual one — that is, you do not need to know anything about
the Ribbon to figure that out by yourself.
N OT E Although the Ribbon occupies a lot of space, you will notice that
compared to other versions, the actual document visibility is larger for out-ofthe-box installations compared to older versions, as you will not have items
such as horizontal scroll bars, and so on, showing up unnecessarily.
7
91118c01.qxd:WileyRedTight
8
Part I
■
11/28/07
7:33 PM
Page 8
The Building Blocks for a Successful Customization
Another visual issue relates to how much is actually available under each tab. You
may find yourself moving back and forth along the Ribbon to get certain tasks done.
The original goal was to make commands readily available, so this seems to defeat part
of the purpose. And what if the user minimizes the Ribbon? You gain visible screen
space, but you end up with something akin to the old menu hierarchy. As Figure 1-4
shows, minimizing the Ribbon gives the impression that you are still under the menu
hierarchy. We discuss later in this chapter the collapsing and expansion (minimization
and maximization) of the Ribbon.
Figure 1-4: Minimizing the Ribbon gives the impression you are
still under the menu hierarchy.
Following are some of the nonvisual issues with the new UI:
■■
Less efficient for power users: Although the Ribbon gives end users instant
access to the tools they need to perform their jobs more productively and professionally, it initially causes significant frustration among power users and
developers. The flexibility found in previous versions in terms of easy customization is now history. Some of the issues (such as ease of customization)
are already being addressed by Microsoft, but how far they will go only time
will tell. For now, we have to live with what we have and make the best use of
it. Power users and programmers will be happy to know that this book provides solutions to several of the issues, and it provides full examples of how
to create and incorporate customizations.
■■
Fewer commands on screen: The controls that were determined to be the most
frequently used are grouped and prominently displayed. As mentioned earlier,
screen resolution can play a positive or negative role here because groups will
collapse to fit into a smaller display. To make matters worse, you still need to
navigate between the tabs. In addition, many tasks may still require navigating
between tabs, such as when you need to validate data and then format your
work in Excel, and during any type of database design activities.
■■
Lack of “tear away” toolbars: This is both a blessing and a curse in disguise.
It is a blessing for beginners who will no longer suffer from misplaced toolbars
(the story of the disappearing toolbar). Conversely, it is a curse for power users
and developers who no longer have the flexibility to dock toolbars according to
a specific need, as well as for those users who want to put the tools closer to
their workspace to minimize mouse travel.
■■
Customization requires programming or third-party tools: This statement is
not entirely true if you could not care less about your productivity. You might sit
in front of your PC, open Notepad, and type away until you create an entirely
new UI. But if you are even a little concerned with productivity (as we assume
you must be), you will find that without a third-party customization tool your
life could quite easily become a living hell . . . and we do mean that, despite the
fact that this book will give you a taste of paradise and show you how to actually get there.
91118c01.qxd:WileyRedTight
11/28/07
7:33 PM
Chapter 1
Page 9
■
An Introduction to the Office User Interface
■■
Table-driven menus are not what they used to be: Previously, a custom UI for
an Office application could use external sources (such as tables in Access or
Word, and worksheets in Excel, etc.) to lay out the UI, and then the UI could
be loaded on-the-fly through a standard VBA procedure. Although this is not
completely impossible to do with the Ribbon, the scope has been dramatically
reduced compared to what it used to be. The reason for this limitation comes
from the fact that the Ribbon UI is loaded at design-time and not at run-time.
Chapter 14 includes a detailed discussion about how to do such things and
what circumstances will limit the options.
■■
Commands may not be in the order you need them: It’s estimated that many
Excel users know about 20% of its features, but that they each use a different
20% based on their jobs and experience. Because of this, Microsoft’s usage studies, despite being across many thousands of users, may not have captured your
needs. Plainly put, the commands may not always be where you need them, and
you may spend significant time searching through tabs to find them.
■■
Only one shot to create your UI structure: Unfortunately, there is currently no
way to repopulate an entire tab, or group with controls in a dynamic manner.
While you can hide or show groups (or enable/disable commands) that you’ve
lain out at design time, you cannot dynamically add new tabs, groups, or controls to those groups on-the-fly. It’s true that you can dynamically populate certain controls with content, but this is only one very small part of the new UI.
The inability to build tabs and groups on-the-fly is probably the largest piece
missing from the Ribbon from a developer’s perspective, and it prevents us
from building the truly fluent and rich UI that should be possible.
What Happened to the Toolbars
from My Pre-2007 Files?
It would be a nightmare to wake up to the new UI just to find that all your previous
work would be pretty much worthless. Although for some this may be partially true, it
is not necessarily the end of the world.
Being forced to live with the Ribbon glued firmly in one place may not meet the
unusually high standards and expectations of users who are accustomed to the docking capability. However, this “gluing” process is, in effect, quite sensible given that the
majority of users (not power users and developers) have had a tendency to wreak
havoc in the old UI by scattering toolbars all over the place, hiding toolbars and not
being able to retrieve them, and in general creating UI mayhem.
The Ribbon eliminates all that, but in the process it creates frustrations for more powerful users, as we have to learn new habits. As you know, old habits are hard to break.
At this point you may be wondering a few things about your old customization. It
is hoped that answering a few questions will dispel most of your doubts:
■■
Will your old customizations still work? Yes, they will, but they will certainly
not look like anything you had before.
9
91118c01.qxd:WileyRedTight
10
Part I
■■
■
11/28/07
7:33 PM
Page 10
The Building Blocks for a Successful Customization
Where do they show up? If you’re planning to deploy a full-blown VBA-based
customization, this new customization will be added to a new tab called
AddIn. Although your project may not be an add-in, that’s what the tab is
named and your UI can be filled with them. This is as good as it gets, at least
for now. There are exceptions to AddIns, such as pop-up menus (pop-up
menus are covered in Chapter 15).
Is anything else happening to the old way of doing things? The answer is a resounding YES! Developers will be happy to know that the programming model for legacy
CommandBars has been upgraded so that it contains some new methods you can use
to interact with the new UI. For example, we now have the GetImageMso function
(method), which enables you to capture the image of a control (such as HappyFace)
and place it somewhere else. This method is similar to the CopyFace method normally
used to copy the face of a button in the old UI. That may seem like Greek to a lot of you,
but rest assured that this book is designed with you in mind. It covers the fundamentals, explains the scenarios, and then steps through the examples so that not only will
you be able to incorporate them into your files and solutions, but you will also understand what you are doing and be able to create custom Ribbons tailored to your needs.
A Customization Example for Pre-2007 UIs
In order to give you an idea of what is going to happen to your old customization, we
will work through an example. This customization has a reasonable amount of complexity so that you can have a clearer picture of what to expect. Don’t worry if you
don’t understand how it works at this point; it will become clear as you work through
the examples in the rest of the book. (This example is applicable to Excel. You can find
the code on the book’s website at www.wiley.com/go/ribbonx.)
In Figure 1-5, the menu is dynamic. When an option from the list is selected, another
list is created for that particular option. In addition, if other workbooks are opened or
created in the same Excel session, these custom options are no longer available (the
options are disabled). They’re available only for this specific workbook and adapt
according to which worksheet is currently active.
Figure 1-5: How old
customization is built into
the new UI
We describe the entire VBA process for this example so that you can have a look at
how things would work on a relatively complex customization. If you are not fluent
91118c01.qxd:WileyRedTight
11/28/07
7:33 PM
Chapter 1
Page 11
■
An Introduction to the Office User Interface
with VBA, there is no need to panic. Chapters 4, 5, and 12 delve into the relevant
aspects of VBA and explain things in sufficient detail for you to understand and be confident in creating customizations.
For now, run this example and see how Excel 2007 handles a customization code
written for Excel 2003. This will help you understand some of the key differences
between the old way and the new way of doing things and it will make it easier for you
to visualize what we are working with as we progress in this book.
We describe below the steps you need to follow in order to implement this solution.
Keep in mind that you aren’t expected to complete this exercise at this time. Rather, it
is intended to give you the big picture and show you where you’re headed. You might
want to start by seeing what we’re creating. Just download this chapter’s files and
open Customization Old Style.xlsm.
As you go through the book, you will learn about each of the steps to create custom
add-ins as well as some VBA fundamentals, including how to create and work with
class modules. For now, it is probably easiest to just review the code in our files. Alternatively, if you feel you want to try it yourself, you can copy the code from the referenced Excel file (or from the chapter’s text file) and paste it in as instructed.
First, open ThisWorkbook and add the following code to the code window. (You do
so by pressing Alt+F11 to open the VBE (Visual Basic Editor). From there, double-click
on the ThisWorkbook object to open its code window.)
Private Sub Workbook_BeforeClose(Cancel As Boolean)
Call wsDeleteMenus
End Sub
Private Sub Workbook_Open()
Call wsBuildMenus
End Sub
Next, add a class module to your project. This is done from the Insert menu in the
VBE window (Insert ➪ Class Module).
N OT E Remember that this is just an example to give you the big picture
about what we’ll be covering and why. At this point, you aren’t expected to
understand everything or to be able to interpret all the code, but by the time
you finish this book, you will be proficient with these customizations and all
of their intricacies.
C R O S S-R E F E R E N C E Chapter 12 defines and shows you how to work with
class modules.
You can name the following class module whatever you like, but in this example we
use clsEvents, so be sure to refer to the correct module in your own code.
Public WithEvents appXL As Application
Public WithEvents drop As Office.CommandBarComboBox
11
91118c01.qxd:WileyRedTight
12
Part I
■
11/28/07
7:33 PM
Page 12
The Building Blocks for a Successful Customization
Private
Dim
Dim
Dim
Sub appXL_SheetActivate(ByVal Sh As Object)
ws
As Worksheet
wb
As Workbook
i
As Long
On Error GoTo Err_Handler
Set wb = ActiveWorkbook
If Not wb.Name = ThisWorkbook.Name Then Exit Sub
Set g_cmdbarcboBox = g_cmdBar.FindControl _
(Type:=msoControlDropdown, Tag:=”myList”)
g_cmdbarcboBox.Clear
For Each ws In Sh.Parent.Sheets
g_cmdbarcboBox.AddItem ws.Name
Next
For i = 1 To g_cmdbarcboBox.ListCount
If g_cmdbarcboBox.List(i) = Sh.Name Then _
g_cmdbarcboBox.ListIndex = i: Exit For
Next
Call drop_Change(g_cmdbarcboBox)
Exit Sub
Err_Handler:
ErrHandle Err
End Sub
Private Sub appXL_WorkbookActivate(ByVal wb As Workbook)
Set g_cmdbarcboBox = g_cmdBar.FindControl _
(Type:=msoControlDropdown, Tag:=”myList”)
If wb.Name = ThisWorkbook.Name Then
g_cmdbarcboBox.Enabled = True
appXL_SheetActivate wb.ActiveSheet
Else:
Call deleleteControls
g_cmdbarcboBox.Enabled = False
End If
Exit Sub
Err_Handler:
ErrHandle Err
End Sub
Public Sub setDrop(box As Office.CommandBarComboBox)
Set drop = box
End Sub
Private Sub drop_Change(ByVal Ctrl As Office.CommandBarComboBox)
91118c01.qxd:WileyRedTight
11/28/07
7:33 PM
Chapter 1
Page 13
■
An Introduction to the Office User Interface
Select Case UCase(Ctrl.Text)
Case “SUPPLIERS”
Call setMNUSUPPLIERS
Case “CUSTOMERS”
Call setMNUCUSTOMERS
Case “ACCOUNTS”
Call setMNUACCOUNTS
Case Else
Call deleleteControls
End Select
End Sub
Finally, add a standard module (in the VBE window select Insert ➪ Module) where
we will insert the following code:
Public
Public
Public
Public
Const
Const
Const
Const
gcstrCMDBARNAME
gcstrMNUSUPPLIERS
gcstrMNUCUSTOMERS
gcstrMNUACCOUNTS
Public
Public
Public
Public
Public
Public
g_cmdBar
g_cmdbarMenu
g_cmdbarBtn
g_cmdbarcboBox
gcls_appExcel
gcls_cboBox
As
As
As
As
String
String
String
String
=
=
=
=
“DYNAMIC MENU”
“Suppliers”
“Customers”
“Accounts”
As
As
As
As
As
As
CommandBar
CommandBarPopup
CommandBarButton
CommandBarComboBox
New clsEvents
New clsEvents
Sub wsBuildMenus()
Call wsDeleteMenus
On Error GoTo Err_Handler
Set g_cmdBar = CommandBars.Add(gcstrCMDBARNAME, msoBarFloating)
g_cmdBar.Width = 150
Set g_cmdbarcboBox = g_cmdBar.Controls.Add(Type:=msoControlDropdown)
With g_cmdbarcboBox
.Tag = “myList”
.OnAction = “selectedSheet”
.Width = 150
End With
Set g_cmdbarBtn = g_cmdBar.Controls.Add(Type:=msoControlButton)
With g_cmdbarBtn
.Caption = “Help”
.OnAction = “runHelp”
.Style = msoButtonIconAndCaption
.FaceId = 984
End With
13
91118c01.qxd:WileyRedTight
14
Part I
■
11/28/07
7:33 PM
Page 14
The Building Blocks for a Successful Customization
Set gcls_appExcel.appXL = Application
gcls_cboBox.setDrop g_cmdbarcboBox
With g_cmdBar
.Visible = True
.Protection = msoBarNoChangeDock + msoBarNoResize
End With
Exit Sub
Err_Handler:
ErrHandle Err
End Sub
Sub wsDeleteMenus()
On Error Resume Next
Application.CommandBars(gcstrCMDBARNAME).Delete
Set
Set
Set
Set
Set
Set
End Sub
g_cmdBar = Nothing
g_cmdbarMenu = Nothing
g_cmdbarBtn = Nothing
g_cmdbarcboBox = Nothing
gcls_appExcel = Nothing
gcls_cboBox = Nothing
Sub deleleteControls()
On Error Resume Next
g_cmdBar.Controls(gcstrMNUACCOUNTS).Delete
g_cmdBar.Controls(gcstrMNUCUSTOMERS).Delete
g_cmdBar.Controls(gcstrMNUSUPPLIERS).Delete
End Sub
Sub selectedSheet()
Dim g_cmdbarcboBox As CommandBarComboBox
On Error Resume Next
Set g_cmdbarcboBox = _
CommandBars.FindControl(Type:=msoControlDropdown, Tag:=”myList”)
ActiveWorkbook.Sheets(g_cmdbarcboBox.Text).Activate
End Sub
Sub setMNUACCOUNTS()
Call deleleteControls
On Error GoTo Err_Handler
Set g_cmdbarMenu = _
g_cmdBar.Controls.Add(Type:=msoControlPopup, BEFORE:=2)
g_cmdbarMenu.Caption = gcstrMNUACCOUNTS
Set g_cmdbarBtn = g_cmdbarMenu.Controls.Add(Type:=msoControlButton)
g_cmdbarBtn.Caption = “New Account”
91118c01.qxd:WileyRedTight
11/28/07
7:33 PM
Chapter 1
Page 15
■
An Introduction to the Office User Interface
Set g_cmdbarBtn = g_cmdbarMenu.Controls.Add(Type:=msoControlButton)
g_cmdbarBtn.Caption = “Delete account”
Exit Sub
Err_Handler:
ErrHandle Err
End Sub
Sub setMNUSUPPLIERS()
Call deleleteControls
On Error GoTo Err_Handler
Set g_cmdbarMenu = _
g_cmdBar.Controls.Add(Type:=msoControlPopup, BEFORE:=2)
g_cmdbarMenu.Caption = gcstrMNUSUPPLIERS
Set g_cmdbarBtn = g_cmdbarMenu.Controls.Add(Type:=msoControlButton)
g_cmdbarBtn.Caption = “New Supplier”
Set g_cmdbarBtn = g_cmdbarMenu.Controls.Add(Type:=msoControlButton)
g_cmdbarBtn.Caption = “Current data”
Exit Sub
Err_Handler:
ErrHandle Err
End Sub
Sub setMNUCUSTOMERS()
Call deleleteControls
On Error GoTo Err_Handler
Set g_cmdbarMenu = _
g_cmdBar.Controls.Add(Type:=msoControlPopup, BEFORE:=2)
g_cmdbarMenu.Caption = gcstrMNUCUSTOMERS
Set g_cmdbarBtn = g_cmdbarMenu.Controls.Add(Type:=msoControlButton)
g_cmdbarBtn.Caption = “New Customer”
Set g_cmdbarBtn = g_cmdbarMenu.Controls.Add(Type:=msoControlButton)
g_cmdbarBtn.Caption = “Outstanding pmts”
Exit Sub
Err_Handler:
ErrHandle Err
End Sub
Sub ErrHandle(ByVal objError As ErrObject)
MsgBox objError.Description, vbCritical, objError.Number
Call wsDeleteMenus
End Sub
You can now run the preceding code and see for yourself how it behaves in relation
to the new UI. Start by selecting the different worksheet tabs and then open/add new
workbooks to your working environment.
15
91118c01.qxd:WileyRedTight
16
Part I
■
11/28/07
7:33 PM
Page 16
The Building Blocks for a Successful Customization
Ribbon Components
This section provides a guided tour of the Ribbon components. This will help you
become familiar with the structure so that things will run more smoothly when you
begin XML coding of the UI.
The user interface in Office 2007 is made up of a number of components (or elements, if you prefer) that determine how you interact with the application, much in the
same way that the hierarchical approach had its own elements. These components are
listed in Table 1-1 and Table 1-2, and illustrated in Figure 1-6. (The numbers in the
tables correspond to the callout numbers in Figure 1-6.)
As previously mentioned, the idea is that this new UI will help users to get the job
done quicker, which should translate into higher productivity. However, before productivity increases, you need to familiarize yourself with these elements, especially if
your objective is to customize the Ribbon. The task of customizing the Ribbon will be
a whole lot easier once you understand the underlying logic of the XML code.
Table 1-1: The Three Basic Ribbon Components
COMPONENT
WHAT IT IS FOR
1. Tab
Each tab brings together core tasks that you perform. Tabs
bring together all these related tasks.
2. Group
In the same way that tabs bring together related tasks,
groups bring together related commands.
3. Command
A command represents an action that you want to
perform. It can appear packed in different forms, such as
buttons, galleries, menus, edit boxes, etc.
1
4
5
2
3
Figure 1-6: Ribbon components viewed from an Access
perspective
Figure 1-6 shows a total of five components (or elements). Numbers 1, 2, and 3 are
“basic” components; numbers 4 and 5 are not.
91118c01.qxd:WileyRedTight
11/28/07
7:33 PM
Chapter 1
Page 17
■
An Introduction to the Office User Interface
Table 1-2: The Two Non-Basic Components of the Ribbon
COMPONENT
WHAT IT IS FOR
4. Quick Access Toolbar
(better known as QAT)
A toolbar for adding commands that you want just a click
away. The QAT can take shared or document controls.
5. Office Menu (also
known as Office Button)
A menu containing file-related tasks such as printing, file
properties, saving, etc.
These elements are related in a hierarchical construct within the XML code. This
construct (or concept) serves to encapsulate each control within its parent element. The
way this structure works will become clear when we start to analyze the tags used to
build customization.
N OT E When adding controls to the QAT such as buttons and groups, you can
choose between a document control and a shared control. A document control,
as the name suggests, is a control that belongs to the document itself and
cannot be seen or accessed by another document that might be opened in the
same session. Conversely, a shared control is available to all documents
opened in the same session or any other session.
Tips for Navigating the Ribbon
and Quick Access Toolbar (QAT)
This section discusses some tips for navigating the Ribbon and the Quick Access Toolbar. Although these tips relate to the default Ribbon, you should keep them in mind for
your customization — especially the keytips accessible through the keyboard, as these
can be changed through XML code and will work with your own customization as well
as built-in tabs and controls.
Using Keyboard Shortcuts and Keytips
We start off with keyboard shortcuts and keytips. This is, simply put, the easiest, quickest, and generally most efficient way to access commands in any application. It
involves pressing a combination of keys that will perform some kind of action, such as
copying, cutting, pasting, or navigating through some of the Ribbon’s elements.
If you have used keyboard shortcuts before, you should be happy to know that old
shortcuts still work fine with the new UI (in fact, they work in exactly the same way as
before). Hence, if you need to copy something, you can still use Ctrl+c; similarly, if you
wish to paste, you can continue to use Ctrl+v. A shortcut requires that you press one
key plus another.
17
91118c01.qxd:WileyRedTight
18
Part I
■
11/28/07
7:33 PM
Page 18
The Building Blocks for a Successful Customization
You will remember that for previous versions of Office, you could press the Alt key
to activate the top-level menu (referring to the Accelerator key). You would then use
other keys (which were always underlined, indicating which key you should press
next) to get to the command you wanted. Office 2007 introduces an extension of the
Accelerator idea from previous versions of Office: keytips. Keytips are also accessed by
pressing and releasing the Alt key (if you press and hold long enough it will show the
keytips as well, as shown in Figure 1-7).
Figure 1-7: Keytips for an Access project
Next, all you have to do is press the corresponding key (or combination of keys)
shown in the Ribbon. This is slightly different from the shortcut approach, because
with keytips you first press one key and then you press another.
N OT E Notice that some keytips are dimmed. When a keytip is dimmed it is
not accessible in the current context (for example, undo will not be functional
until there is something that can be undone).
When you press the keytip key and it refers to a tab, you automatically move into
that tab context. This time around, you do not need to press Alt to reveal the keytips for
the controls. As shown in Figure 1-8, all the keytips are automatically revealed to you.
Figure 1-8: Keytips for controls under the Create tab in Access
Now, if the next keytip leads you to a drop-down or menu, these will be extended to
show the keytips for any controls that may have been placed in them.
The greatest single advantage of the keytip is that it is an attribute available in
almost all controls you find in the Ribbon. Compare this with the limited scope in previous versions of Office and you start to appreciate its beauty.
N OT E Keytips are available in almost all controls, but some controls (such
as the menuSeparator and labelControl) are not really command controls and
therefore have no keytips. These are auxiliary controls and do not perform any
kind of action.
91118c01.qxd:WileyRedTight
11/28/07
7:33 PM
Chapter 1
Page 19
■
An Introduction to the Office User Interface
Another benefit is that you can still use the Accelerator keys in the same manner as
you could in previous versions of Office. Suppose you want to open the Insert Function dialog box in Excel. Using keytips, you could press Alt+M+F. An alternative was
to use the Accelerator route in Office 2003, which just entailed pressing Alt+I+F. Now,
Excel 2007 keeps track of the keys you press to open the Insert Function dialog box, so
it will recognize the key combinations that were used in Office 2003. Figure 1-9 shows
the Accelerator sequence in Office 2007 for Alt+I+F from Office 2003.
Figure 1-9: Office 2007 will
recognize and respond to the
Accelerator sequences used
in Office 2003.
The Accelerator access mode is activated whenever you combine keys that made up
the Accelerator route in Office 2003.
T I P You can also press the F10 function key to bring up the keytips and start
an Accelerator sequence.
Using the Mouse Wheel
If you have your Ribbon maximized, you can navigate the tabs using the mouse wheel.
Just place the mouse pointer on top of the Ribbon and spin the wheel.
If you scroll towards you, the Ribbon will scroll along the tabs from left to right.
Conversely, if you scroll away from you, it will scroll from right to left along the tabs
until it reaches the first tab on the left.
Minimizing and Maximizing the Ribbon
If you feel the Ribbon is taking up too much space at the top of your screen you can
minimize it, as shown in Figure 1-10.
Chevron icon
Figure 1-10: Minimized Ribbon
19
91118c01.qxd:WileyRedTight
20
Part I
■
11/28/07
7:33 PM
Page 20
The Building Blocks for a Successful Customization
To minimize or maximize the Ribbon, you can do one of the following:
■■
Double-click on any tab.
■■
Click on the chevron-like icon and toggle Minimize the Ribbon button.
■■
Right-click anywhere on the QAT or tab strip, or on any group’s description
and choose Minimize Ribbon.
Once the Ribbon is minimized you will not be able to navigate the tabs using the
mouse wheel, and clicking on the tabs will only temporarily expand the Ribbon content for the selected tab. However, while the Ribbon has the focus, you will still be able
to choose other tabs and view the commands within any group under the chosen tab.
To expand the Ribbon back to the default display, merely follow one of the steps
listed for minimizing the Ribbon. Essentially, they work like a toggle to minimize/
maximize on demand.
Adding Commands to the QAT
If you use some controls more often than others (such as open/close), you can place
them on the Quick Access Toolbar (QAT) so that you have just that — quick access. The
QAT is the nearest you will get to toolbar-style customization. It works in pretty much
the same way that toolbars did in the past, by enabling you to place controls on a specific toolbar for ease of access.
Compared to what was previously possible, the QAT’s scope is rather limited, but
removing unwieldy customizations, such as the docking capability, also eliminated the
complexities and anxieties of managing the old toolbar.
It is remarkably easy to manually add commands to the QAT. Just use any one of the
following processes:
■■
Click on the chevron-like icon, and then select More Commands.
■■
Click the Office Menu and select (Application) Options ➪ Customize.
■■
Right-click anywhere on the QAT or tab strip, or on any group’s description,
and select Customize Quick Access Toolbar. When the Customize Quick Access
Toolbar options window is open, as shown in Figure 1-11, simply select the
commands you want to add to the QAT and click Add.
T I P To quickly add commands, right-click the command (Ribbon or Office
Menu) and choose Add to Quick Access Toolbar.
Note that under the Customize Quick Access Toolbar drop-down list, you will find
your XLSX, DOCX, ACCDB, and so on, files. This means the command you’re adding
to the QAT can be specific to the file or can be shared across all other open files. By
default, the customization is shared (for all files opened). If you want it to be file-specific,
then the icon will change to show this subtle difference, as shown in Figure 1-12.
91118c01.qxd:WileyRedTight
11/28/07
7:33 PM
Chapter 1
Page 21
■
An Introduction to the Office User Interface
Figure 1-11: Adding commands to the QAT in Word
Document control
Shared controls
Figure 1-12: Icons with a frame refer to document controls.
The little frame around the icon indicates that it is a document control rather than a
shared control. A shared control is available to all opened documents, whereas a document control is only available to the document to which it was added.
It all may look great to begin with, but as you might quickly realize, it is very easy
to burden the QAT with too many buttons; and even then there will be more commands that you’d like to add.
Thankfully, the QAT is quite versatile; in addition to being able to add buttons, you
can also add groups. The process is very simple and can be accomplished using one of
the following approaches:
■■
Open the application options. Under Choose Commands From, select the tab
that contains the group you are looking for. In the list, you will notice that some
have an icon with an arrow pointing down. This indicates it is a group.
■■
Right-click on the group name tab and then click on Add to Quick Access Toolbar.
Figure 1-13 shows the QAT in an Access project. In addition to buttons, this has the
Database Tools group.
21
91118c01.qxd:WileyRedTight
22
Part I
■
11/28/07
7:33 PM
Page 22
The Building Blocks for a Successful Customization
Figure 1-13: Adding groups to the QAT
If you are wondering whether this applies to your custom groups, yes, it does apply to
custom groups.
T I P Notice the icons! That’s right, you should look at the icons in the Customize
options because they indicate what type of object is being added. An arrow
pointing down indicates a group, an arrow pointing right indicates a gallery, and
a vertical bar with an arrow pointing right indicates a splitButton.
C R O S S-R E F E R E N C E See Chapter 14 to learn more about Quick Access
Toolbar customization using XML.
Assigning a Macro to a QAT Button
If you plan to customize the Quick Access Toolbar, probably the best way is to use XML
code. The problem with this, however, is that such customization can only happen if
you build the entire Ribbon from scratch. This is covered in detail in Chapter 14.
If you need to add a button to the QAT for which you want to attach certain functionality, you can easily make such a customization using the following steps (see
Figure 1-14 for a walk-through):
1. Go to Office Menu ➪ (Application) Options (alternatively, you can use the
chevron-like QAT icon to access More Commands).
2. Click Customize to enter the Customize the Quick Access Toolbar customization window.
3. From the drop-down Choose Commands From, select Macros to show a list of
available macros.
4. From the Customize Quick Access Toolbar drop-down, select the option you
want (such as the Current document or For all documents (default) option).
5. Select your macro from the list and click Add.
6. Click OK when you’re done.
91118c01.qxd:WileyRedTight
11/28/07
7:33 PM
Chapter 1
Page 23
■
An Introduction to the Office User Interface
Figure 1-14: Assigning a macro to the QAT
You’re probably now wondering what is up with the icon assigned to the HelloWorld
macro. That is definitely an ugly icon and one that you would certainly want to replace,
which conveniently brings us to another step in the process. To change an icon, click the
Modify button to display a list of the available icons (shown in Figure 1-15).
Figure 1-15: Choosing a different
icon for the macro button
Look through the options and choose an icon (or symbol, if you prefer the dialog
box nomenclature) and when you’ve made your selection, click OK to continue.
While you are at it (and before you click OK), you can also change the Display name.
The Display name is the tip that will appear onscreen when the mouse pointer hovers
over the button, as shown in Figure 1-16.
23
91118c01.qxd:WileyRedTight
24
Part I
■
11/28/07
7:33 PM
Page 24
The Building Blocks for a Successful Customization
Figure 1-16: Display name for
the macro button
Changing the QAT Location
By default the QAT is located above the Ribbon. You can change its location by either
of the following methods:
■■
Click the chevron-like icon and select Show Below the Ribbon.
■■
Right-click anywhere on the QAT or tab strip, or on any group’s description
and select Customize Quick Access Toolbar.
Preparing for Ribbon Customization
Developing Ribbon customizations involves several steps. The first stage works mostly
with structure and therefore involves XML; the second stage is functionality-related,
which involves VBA code (or some other programming language such as C#). Happily,
there are some fundamental components that are common to most customizations, so
you can create it once and then use it as the foundation for future projects.
The following sections describe some important preparations that will save you
valuable time throughout the customization process.
Showing the Developer Tab
As you work with VBA in this book, you may find it useful to have the Developer tab
active. The tab itself is not critical, as the keyboard shortcuts still exist and can be used
to access macro features for any work that you will do; but it will be useful to have the
development tools at hand, especially if you prefer using the mouse rather than keyboard shortcuts.
We recommend having the Developer tab active because after you have finished
your XML code you use VBA to add functionality to the UI, so it is convenient to have
the Developer’s tools at hand when you need them. Furthermore, the Developer’s
tools also provide an XML group, which is useful when inspecting the XML schema for
the Ribbon UI.
As shown in Figure 1-17, the Developer tab appears as the last tab in the standard
Ribbon.
91118c01.qxd:WileyRedTight
11/28/07
7:33 PM
Chapter 1
Page 25
■
An Introduction to the Office User Interface
Figure 1-17: The Developer tab is useful when it’s time to add VBA
functionality to your customization.
To enable the Developer tab, follow these steps (as illustrated in Figure 1-18):
1. Click on the Office logo.
2. Select (Application) Options.
3. Select Popular and choose the option Show Developer tab in the Ribbon.
Figure 1-18: Enabling the Developer tab
These instructions and illustrations are identical for Excel and Word. In Access,
however, you use the Create tab to access macro and VBA objects.
Another difference in Access is that it does not have certain features, such as macro
recording. Recording macros is a very handy feature that helps us to discover important information about objects. Nevertheless, you may find that recording macros in
Excel/Word can actually help you figure out information and processes that are
applicable to Access.
C R O S S-R E F E R E N C E See Chapter 4 for instructions on recording macros
and for programming techniques that are used in this book and that you can
apply to your daily work.
25
91118c01.qxd:WileyRedTight
26
Part I
■
11/28/07
7:33 PM
Page 26
The Building Blocks for a Successful Customization
Showing CustomUI Errors at Load Time
Before loading the UI into Excel, Access, or Word, you will always want to check your
XML consistency. To help with this, a few tools are discussed in Chapter 2. Despite all
good intentions, however, the UI may pass the test in these tools but fail when it loads.
Therefore, it is important to be familiar with some of the factors that might cause the
loading failure.
First, although each of these applications shares very similar XML code, they also
contain controls that are unique to that application. Therefore, if code including an
application-unique control were moved to a different application, the code would pass
the test on the tool but fail on load.
Second, you may also have less obvious problems. For example, you could assign an
idMso (we’ll discuss these more in Chapter 3) to a button when it actually belongs to a
toggleButton. Again, these may pass the first check, but will fail on load.
To ensure that consistency is also checked and that errors are displayed when the
CustomUI is loaded, you can use the following process:
1. Click Office Menu ➪ (Application) Options.
2. Select the Advance option and scroll to the General group.
3. Select the Show add-in user interface errors option.
Once you’ve made the selection, click OK to continue. The location for this option is
the same for Excel, Access, and Word.
As shown in Figure 1-19, when the document is loaded, if it contains an error it is
immediately reported, indicating the line and column in which the error is located
(including the file location).
Figure 1-19: Reporting error when loading UI
In this case, an error has occurred because the UI is being loaded in Word but it contains an attribute value that is specific to Excel (ConditionalFormatting).
Reviewing Office 2007 Security
If this is your first time working with Office, you may want to take a few minutes to
review Chapter 17. That chapter contains information about how to set up the Trust
Center, macro security, and digital signatures so that you aren’t constantly being
harassed about potentially dangerous files while you are developing. Making these
changes now will save you some time and frustration as you go through the exercises
in this book.
91118c01.qxd:WileyRedTight
11/28/07
7:33 PM
Chapter 1
Page 27
■
An Introduction to the Office User Interface
Has Customization of the Office UI Become Easier?
Our objective throughout this book is to modify and customize the work area (user
interface). Unfortunately, the task is relatively arduous with the new UI for Microsoft
Office as compared to previous versions. Moreover, the challenges are compounded by
the small differences between the applications, which means that we cannot rely 100%
on the XML code to be exchangeable and applicable across different Office applications.
Figure 1-20 shows an example of a Ribbon customization. This has an added tab and
a group containing a few command buttons. And, of course, it includes an action that
will be executed when the command button is clicked.
Figure 1-20: Customizing
the Ribbon
If you previously created a lot of custom menus and toolbars (whether through VBA
or not), you will probably have a hard time accepting the new UI. However, once you get
past that first encounter and resistance to change, things should start looking a bit rosier.
The biggest challenge with respect to the new UI is the XML code it contains; and a
custom UI can require more lines of code than you might currently imagine. Therefore,
for now, accept the guidance that a lot of planning is required prior to writing the first
line of XML for your new UI. Later, a few hundred lines into your code, you do not
want to be trying to find and fix something.
Furthermore, XML is case sensitive, so writing an attribute such as getVisible as
getvisible will cause a syntax error in the structure of the XML code.
In addition, now we need to create and work with callbacks. These take the arguments from the Ribbon objects. Fortunately, there’s the Custom UI Editor that can read
through your code and generate the callbacks for any attribute that requires one.
All of this might sound intimidating now, but by the time you finish this book, you
will be sailing through the Ribbon customization process. Obviously, this book cannot
contain everything you might possibly come across or want to know about, but it contains everything that you need to know for most common scenarios and it will help
you avoid a whole lot of pain during the learning process.
Conclusion
In explaining how the Ribbon came to be, we provided a little background and history of
the Microsoft Office UI. Now you can understand why it was necessary for a paradigm
change after so many years of relying on hierarchical menus. As with any change this dramatic, there can be a steep learning curve, but the benefits become evident very quickly.
27
91118c01.qxd:WileyRedTight
28
Part I
■
11/28/07
7:33 PM
Page 28
The Building Blocks for a Successful Customization
In this chapter you learned about the Quick Access Toolbar, shortcuts, and keytips.
You learned some basic customizations that can be done without any programming
and how those customizations can be incorporated into your UI as a document or as a
shared customization.
Although lengthy, and maybe a bit intimidating at this stage, you also saw a sample
of an old customization style so that you could try it for yourself. It is hoped that being
able to contrast the new with the old has added to your appreciation for what you will
soon be able to do.
In Chapter 2 we cover access to the UI customization layer, and from there on we
introduce the tools you need to successfully customize the new Office user interface.
Have fun.