1
PART I
USING POWERSHELL
WITH ACTIVE DIRECTORY
TE
D
X CHAPTER 1
MA
TE
RI
AL
Administering
Service Delivery
MANAGING DOMAIN AND FORESTS
X CHAPTER 3
MANAGING SITES AND REPLICATION
X CHAPTER 4
MANAGING DOMAIN CONTROLLERS
CO
PY
RI
GH
X CHAPTER 2
03
55
91
157
CHAPTER 1
Using PowerShell with
Active Directory
IN THIS CHAPTER, YOU WILL LEARN TO:
X UNDERSTAND THE BASICS OF POWERSHELL
4
Use the Shell . . . . . . . . . . . . . . . . . . . . . . . . . . . . . . . . . . . . . . . . . . . . . . . . .6
Use the Scripting Environment . . . . . . . . . . . . . . . . . . . . . . . . . . . . . . . .8
Understand Profiles . . . . . . . . . . . . . . . . . . . . . . . . . . . . . . . . . . . . . . . . . . .9
Work with Cmdlets . . . . . . . . . . . . . . . . . . . . . . . . . . . . . . . . . . . . . . . . . .11
Script Administration Tasks . . . . . . . . . . . . . . . . . . . . . . . . . . . . . . . . . . 19
X UNDERSTAND HOW POWERSHELL AND
ACTIVE DIRECTORY WORK TOGETHER
39
Interact with Active Directory Using PowerShell . . . . . . . . . . . . . . 39
Prepare Your Environment for the Active Directory Module. . . . 50
CHAPTER 1
S
ince the dawn of the information technology age, administrators have been
continually searching for ways to make their jobs easier. Rather than spending time
performing the same or similar tasks repeatedly, many administrators have taken to
adopting some form of automation. Throughout the years, you’ve witnessed many
advances in automation, from the early days of DOS batch files to VBScripts and
Windows Management Instrumentation (WMI). These advances come out of the
desire for things to happen on their own—to use the computing power available at
the fingertips of administrators to make their lives easier.
The next generation of automation technology was officially released for Windows
environments in 2006. PowerShell (formerly referred to as Monad in the beta release
years) promised to deliver an extremely powerful and flexible scripting environment complete with access to standard object models and programming interfaces.
PowerShell has certainly lived up to the promise over the years, but adoption by
Microsoft products has been slow. Until Windows Server 2008 R2, there was no
out-of-the-box PowerShell extension for Active Directory. However, the adoption of
PowerShell has now become mainstream, and Active Directory has a built-in
module for PowerShell. In this chapter, you’ll learn the basics of PowerShell and
understand how Active Directory and PowerShell work together.
Understand the Basics of PowerShell
PowerShell version 1 debuted as a web download and as part of Windows 2008,
although you had to install it through the Add Features Wizard in the Server
Manager. PowerShell v2 is installed by default in Windows Server 2008 R2. At its
core, PowerShell is a command interpreter. Much as with the command prompt,
you type in a command and press Enter, and the command executes. But beyond
that, PowerShell has some amazing scripting capabilities that really take it to the
next level in terms of administrative usefulness. Because of this, it’s becoming
increasingly more common to see people replacing the command prompt with
PowerShell. In fact, most of the things that you can do at a command prompt can
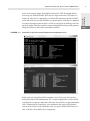
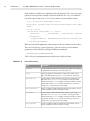
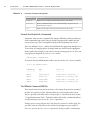
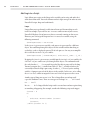
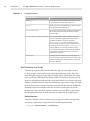
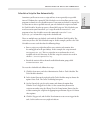
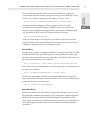
be done by default with PowerShell using the same commands. Figure 1.1 shows a
comparison of the dir command run in a traditional command prompt (top) and
PowerShell (bottom).
One of the things you’ll notice in Figure 1.1 is that the information PowerShell
exposes by default looks more structured. The entries in the output have headings
attached to them, similar to how a spreadsheet might look. This is because PowerShell
isn’t a text-based command interpreter like the Windows command prompt and other
command shells. Standard text-based interpreters can take a text string as input and
return a text string as output. PowerShell is based on the .NET Framework. Rather
than using text, PowerShell takes .NET objects as input and returns .NET objects as
output. So, when the dir command is run, PowerShell enumerates the files and folders on disk and treats each file and folder as a separate object. Each object is composed
of a variety of properties that describe it, which are exposed as the headings across the
top of the output. This object model is unique to PowerShell and is one of the primary
things that elevates it above other commonly used shells.
F I G U R E 1.1
PowerShell can do just about anything that the command prompt can do.
Before you begin using PowerShell to automate Active Directory, you must first
understand some of the fundamentals. The essential components are used as building blocks for creating the commands and scripts that you’ll use in your automation
tasks. Without this base knowledge, your commands and scripts will be limited,
and you won’t be able to take advantage of the true power of PowerShell. In this section, we’ll take a closer look at these components.
5
Administering
Service Delivery
U N D E R S TA N D T H E BA S I C S O F P O W E R S H E L L
PART I
6
CHAPTER 1
•
USING POWERSHELL WITH
ACTIVE DIRECTORY
Use the Shell
The shell is the primary way that you’ll interact with PowerShell. The shell is very
similar to the Windows command prompt. You can type in commands and have
some output returned to you. You can launch the shell by clicking the Start menu
and selecting All Programs ‚ Accessories ‚ Windows PowerShell ‚ Windows
PowerShell. If you’re on a 64-bit operating system, then you may notice that there are
two PowerShell options: Windows PowerShell and Windows PowerShell (x86). The
x86 version is the 32-bit version of PowerShell. Unless you need to run a command
in a 32-bit environment, we recommend using the 64-bit version of the shell. This
will allow you to use additional memory beyond 4 GB if you’re caching lots of data in
the shell. And with Active Directory, this could actually be a possibility if you have
a large forest. In Windows Server 2008 R2, PowerShell is pinned to the taskbar by
default, so you can launch it by clicking the PowerShell icon. You can also choose to
launch it by typing powershell.exe in the Run dialog or at the command prompt.
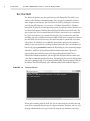
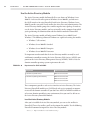
Sometimes, you’ll have to launch PowerShell in administrator mode. This may be
required when you’re making system-level changes through PowerShell. To use
PowerShell in administrator mode, you can right-click the PowerShell executable and
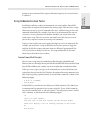
select Run As Administrator from the menu. Depending on your system’s configuration,
you may be prompted with a User Account Control dialog. If you’re prompted, click Yes
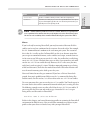
to continue. The shell will launch, and it will look similar to the window in Figure 1.2.
F I G U R E 1. 2
The PowerShell shell
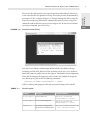
When you’re working with the shell, you can use some shortcuts to make your job
easier. Each command that you type in is kept in memory. Therefore, you can cycle
through commands that you typed earlier by using the up and down arrow keys.
You can use the right arrow key to retype the previous command one character at
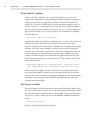
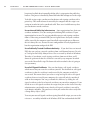
a time. You also have the option of accessing a list of the previous 50 commands by
pressing the F7 key, as shown in Figure 1.3. Navigate through this list by using the
arrow keys and pressing Enter on the command you want to execute, or type the
command number that you want to execute and press F9. To close the list without
executing a command, press the Esc key.
7
Administering
Service Delivery
U N D E R S TA N D T H E BA S I C S O F P O W E R S H E L L
PART I
F I G U R E 1. 3
PowerShell command history
One of the lesser-known customizations of PowerShell is the ability to change
the look at and feel of the shell itself. You can do this via the Get-Host cmdlet in
PowerShell (more on cmdlets later in this chapter). You modify certain components
of the shell by changing the properties in the console. For example, to change the
text color to green, you can use the following command:
(Get-Host).UI.RawUI.ForegroundColor = “Green”
Table 1.1 outlines some properties that you may want to change in the console.
TA B L E 1.1
Console Properties
Property
Description
Example Command
ForegroundColor
The color of the text
(Get-Host).UI.RawUI i
.ForegroundColor = “Green”
BackgroundColor
The color of the background
(Get-Host).UI.RawUI i
.BackgroundColor = “Black”
WindowTitle
The text that is displayed in the
title bar of the PowerShell window
(Get-Host).UI.RawUI.WindowTitle i
= “Ken’s PowerShell Window”
8
CHAPTER 1
•
USING POWERSHELL WITH
ACTIVE DIRECTORY
Use the Scripting Environment
PowerShell 2.0 provides a new Integrated Scripting Environment (ISE) for
writing PowerShell scripts with more ease. The ISE provides some great capabilities that are typically found in expensive development environments. Full
development environments offer additional features that justify the cost if you’ll
be writing a lot of code; but if you’re just looking for basic debugging and script
writing, you need look no further than the ISE.
The PowerShell ISE isn’t installed by default on Windows Server 2008 R2, so you’ll
need to add it if you want to use it. You can install the PowerShell ISE through
Server Manager, using the Add-WindowsFeature PowerShell cmdlet. This cmdlet
isn’t registered by default, so you must first import the Server Manager module in
PowerShell:
Import-Module ServerManager
After the module is imported, you have access to the Add-WindowsFeature cmdlet. You can run the following command to add the PowerShell ISE:
Add-WindowsFeature PowerShell-ISE
The 3.5.1 version of the .NET Framework is required for the ISE, so you may notice
that installing as well if it’s not already installed on your server. After you install
the ISE, you can launch it by clicking the Start menu and selecting All Programs ‚
Accessories ‚ Windows PowerShell ‚ Windows PowerShell ISE.
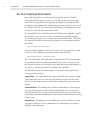
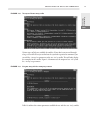
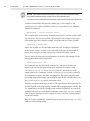
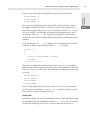
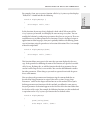
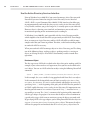
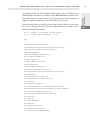
The ISE will be launched as shown in Figure 1.4. It consists of three panels that
assist you in writing scripts:
Script Editor The script editor is the top panel of the ISE. You can have multiple
scripts open at the same time, and each script will have its own tab in the editor.
You can run your script and test it in the editor by clicking the green arrow in the
toolbar.
Command Pane The bottom panel is called the command pane. This pane provides you with an interactive PowerShell command interface just as if you were
using the shell itself. You can type in commands freehand and see the results. This
is especially useful when determining the syntax of your command before inserting
it into a script.
Output Pane The output pane is the middle pane in the ISE. When you run the
script you’re writing or execute a command in the command pane, the output is
displayed in the output pane.
U N D E R S TA N D T H E BA S I C S O F P O W E R S H E L L
The PowerShell Integrated Scripting Environment
Administering
Service Delivery
F I G U R E 1. 4
9
PART I
Script editor
Output pane
Command pane
N O T E It’s important to understand that the ISE isn’t the only way to create PowerShell
scripts. PowerShell scripts can be created with any text editor, including built-in utilities
like Notepad and WordPad, along with third-party development environments.
Understand Profiles
PowerShell also has a concept of profiles. Profiles in PowerShell are similar to profiles
in Windows. When you log on to Windows, your user profile is loaded, which loads
all of your Windows customizations, such as your desktop items and wallpaper.
Likewise, PowerShell profiles save your PowerShell customizations. When you open
PowerShell, your profile will load, and your customizations will be loaded as well.
10
CHAPTER 1
•
USING POWERSHELL WITH
ACTIVE DIRECTORY
Profile Scripts
The PowerShell profile is really a script that runs automatically when you open
PowerShell. PowerShell scripts are covered in more detail later in this chapter, but for
now just know that you can execute various PowerShell commands, save variables, and
define functions in your PowerShell profile. For example, suppose you frequently put
your computer into Hibernate mode. You can create a custom function (functions are
also covered later in this chapter) that puts the computer in Hibernate mode by typing
in a simple command. To do this, add the following line to your PowerShell profile:
function hib { shutdown -h -t 0 }
This function tells PowerShell to run the shutdown command with the -h (hibernate) switch whenever you type in hib. Because your PowerShell profile is loaded
every time you open PowerShell, the hib command will always be available to you.
Creating a Profile
By default, you have a PowerShell profile defined, but the file doesn’t exist and therefore isn’t executed. You determine what your current profile script is by displaying
the contents to the profile variable. To see the profile variable, type the following command:
$profile
You can determine whether the profile script exists by the running the Test-Path
cmdlet, which returns true if the file exists and false if it doesn’t:
Test-Path $profile
If the profile script doesn’t exist, you can create it using any text editor, such as Notepad
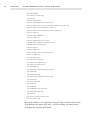
.exe. You can also run the New-Item command to create the profile script file:
PS C:\Users\Administrator> New-Item -Path $profile -ItemType File -Force
Directory: C:\Users\Administrator\Documents\WindowsPowerShell
Mode
----a---
LastWriteTime
Length Name
-------------
------ ----
11/29/2010
3:29 PM
0 Microsoft.PowerShell_profile.ps1
After the profile script is created, you can use Notepad to edit it:
PS C:\Users\Administrator> notepad.exe $profile
If you try to create a profile script now, you may receive the error shown next when
PowerShell attempts to load the profile script. This is a security measure put in place
U N D E R S TA N D T H E BA S I C S O F P O W E R S H E L L
11
Copyright (C) 2009 Microsoft Corporation. All rights reserved.
Administering
Service Delivery
by PowerShell to ensure that only trusted scripts are run. You’ll learn how to create
a trusted script later in this chapter in the “Create PowerShell Scripts” section:
File C:\Users\Administrator\Documents\WindowsPowerShell\Microso
PART I
Windows PowerShell
ft.PowerShell_profile.ps1 cannot be loaded because the executio
n of scripts is disabled on this system. Please see “get-help a
bout_signing” for more details.
At line:1 char:2
+ . <<<<
‘C:\Users\Administrator\Documents\WindowsPowerShell\M
icrosoft.PowerShell_profile.ps1’
+ CategoryInfo
: NotSpecified: (:) [], PSSecurity
Exception
+ FullyQualifiedErrorId : RuntimeException
Work with Cmdlets
In PowerShell, a cmdlet (pronounced command-let) is a small, lightweight command.
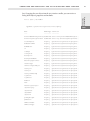
Each cmdlet is self-contained, meaning that you can run it by itself as its own command. For example, you can execute the get-process cmdlet, and it will return the
list of processes currently running on the computer, as shown in Figure 1.5.
FIGURE 1.5
Running the Get-Process cmdlet returns the list of processes currently running on the computer.
12
CHAPTER 1
•
USING POWERSHELL WITH
ACTIVE DIRECTORY
Cmdlets are precompiled and can be run from the PowerShell command interpreter
directly or be used in a script. They’re surprisingly flexible and can be used in a
variety of ways.
PowerShell has several cmdlets built in, and applications can provide their own cmdlets as well. For example, Active Directory adds 76 additional cmdlets to PowerShell
when the module is installed. In fact, anyone can write a cmdlet to be used in
PowerShell; the process for writing a cmdlet is well documented by Microsoft.
Execute Cmdlets
When it comes down to it, executing cmdlets is as easy as opening PowerShell and
typing in the name of the cmdlet, as was demonstrated in Figure 1.5.
Basic Cmdlet Structure
When you work with cmdlets long enough, you’ll start to notice some similarities
between them. Most cmdlets start with a verb, such as Get, Set, Add, or Remove.
Usually following the verb is a noun, such as Process. This common structure used
in cmdlets is referred to as a verb-noun pair. For example, in the Get-Process cmdlet,
the verb (Get) tells the cmdlet that it’s retrieving information for the noun (Process).
All cmdlets are singular, so you’ll never see a cmdlet called Get-Processes.
Executing a cmdlet is as simple as opening up PowerShell and running the cmdlet:
1. Open PowerShell by choosing Start ‚ All Programs ‚ Accessories ‚
Windows PowerShell ‚ Windows PowerShell.
You can also launch PowerShell by clicking the icon in the taskbar, as shown
in Figure 1.6. After PowerShell loads, you’re presented with the cursor, ready
to accept your command.
F I G U R E 1. 6
Launching PowerShell via the icon in the taskbar
2. Type in the cmdlet, and press Enter. For example, to get a list of the services
currently installed on the computer, you can run the Get-Service cmdlet.
Parameters
You can also feed a cmdlet parameters that influence the behavior of the cmdlet when it’s run. To specify a parameter, append it to the end of the cmdlet. For
example, if you want to get information about a specific service on your computer,
you can run the same Get-Service cmdlet that you just ran, but this time specify
the name of the service as a parameter. Figure 1.7 shows the output of the GetService cmdlet run against the Windows Update service.
F I G U R E 1. 7
Adding a parameter to a cmdlet
13
Administering
Service Delivery
U N D E R S TA N D T H E BA S I C S O F P O W E R S H E L L
PART I
The -Name parameter shown in Figure 1.7 is a positional parameter. This means you
don’t have to specify -Name when using the parameter. If you ran the same cmdlet
but didn’t include -Name in the command, the cmdlet would assume that the first
unnamed parameter was the -Name parameter. That makes the following two
commands identical:
Get-Service -Name “Windows Update”
Get-Service “Windows Update”
This next command is also identical to the first two:
Get-Service -ComputerName localhost “Windows Update”
In the previous command, the first parameter used (-ComputerName) is a named
parameter, because the parameter is specified by using -ComputerName in the
command, followed by the name of the computer (localhost in this case). The
second parameter wasn’t named. However, because it’s the first unnamed parameter
in the command, the cmdlet assumes that it’s the -Name parameter. It’s the same as
using the following command:
Get-Service -ComputerName localhost -Name “Windows Update”
You’ll learn how to find out which parameters are positional or named, along with
their default values, later in this chapter.
14
CHAPTER 1
•
USING POWERSHELL WITH
ACTIVE DIRECTORY
Each cmdlet has a different set of parameters that it recognizes. The -ComputerName
parameter in the previous example is only relevant for the Get-Service cmdlet. If
you tried to pass it into the Get-ChildItem cmdlet, an error would be thrown:
PS C:\> Get-ChildItem -ComputerName localhost
Get-ChildItem : A parameter cannot be found that matches parameter name ‘Comput
erName’.
At line:1 char:28
+ Get-ChildItem -ComputerName <<<<
+ CategoryInfo
localhost
: InvalidArgument: (:) [Get-ChildItem], ParameterB
indingException
+ FullyQualifiedErrorId : NamedParameterNotFound,Microsoft.PowerShell.Comm
ands.GetChildItemCommand
However, PowerShell implements some parameters that are common to all cmdlets.
These are referred to as common parameters. You can retrieve a list of common
parameters in PowerShell by running the following command:
Get-Help about_CommonParameters
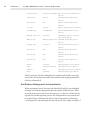
Table 1.2 lists the common parameters and describes what each does.
TA B L E 1. 2
Command Parameters
Name
Description
-Verbose
Includes detailed information in the output of the cmdlet. This is typically
in-depth information that may not be commonly used.
-Debug
Includes programmer-level detail in the output of the cmdlet. In most
day-to-day administration tasks, the -Debug parameter is rarely used.
-WarningAction
Specifies what the cmdlet should do if it encounters a warning. The possible values are SilentlyContinue (continue executing the cmdlet
without notification), Continue (display a notification and then continue
executing the cmdlet), Inquire (ask the user whether to stop or keep
going), and Stop (stop execution of the cmdlet).
-WarningVariable
Specifies a variable to which warning information can be written. You can
use this variable later in other commands or scripts.
-ErrorAction
Specifies what the cmdlet should do if it encounters an error. The possible values are SilentlyContinue (continue executing the cmdlet
without notification), Continue (display a notification and then continue
executing the cmdlet), Inquire (ask the user whether to stop or keep
going), and Stop (stop execution of the cmdlet).
-ErrorVariable
Specifies a variable to which error information can be written. You can
use this variable later in other commands or scripts.
Name
Description
-OutVariable
Specifies a variable to which you want to write the output objects.
-OutBuffer
Determines how many objects are in the output buffer before the objects
are passed through the pipeline. This is an advanced parameter that you
probably won’t use frequently, if at all.
15
Administering
Service Delivery
U N D E R S TA N D T H E BA S I C S O F P O W E R S H E L L
PART I
N O T E Cmdlets and their parameters aren’t case sensitive. However, it’s a good practice
to use capitalization for cmdlets that other people might read, such as when writing scripts.
This increases the readability of the command without affecting the syntax of the cmdlet.
Aliases
If you’ve already been using PowerShell, you may have noticed that not all of the
cmdlets you’ve run have conformed to the structure discussed earlier. For example,
the dir command doesn’t conform to the verb-noun pair syntax. The reason for
this is that dir is really an alias. In PowerShell, an alias is an alternate name that
you can give to command elements, such as cmdlets and scripts, to make them easier for users to run. When you execute the dir alias, the cmdlet that is really being
run is Get-ChildItem. You don’t have to use an alias; if you wanted to, you could
run the Get-ChildItem cmdlet directly. However, the dir alias saves you time;
and if you’re used to typing dir into a Windows command prompt to get a listing
of files and directories, then this alias makes PowerShell a little more intuitive and
uses the muscle memory you’ve built up over the years.
You aren’t limited to one alias per command. If you have a Unix or Linux background, then you’re probably more likely to use the ls command for listing files
and directories. For this reason, ls is also an alias to the Get-ChildItem cmdlet.
To create your own alias, you can run the New-Alias cmdlet. You’ll need to pass in
the name for the alias and the command element for which you’re creating the alias.
The following example creates an alias called d for the Get-ChildItem cmdlet. If
you create this alias, then you only need to type d instead of dir or ls to get a
listing of files and directories in PowerShell:
New-Alias -Name d -Value Get-ChildItem
Earlier in this chapter, you learned about using profiles to customize the PowerShell
environment for different users. You can add your commonly used aliases to your
profile so that your aliases are loaded every time you open PowerShell.
16
CHAPTER 1
•
USING POWERSHELL WITH
ACTIVE DIRECTORY
String Cmdlets Together
When used alone, a cmdlet can be a powerful tool. However, you can use
cmdlets more efficiently by stringing multiple cmdlets together using a process
called pipelining. When you pipeline two cmdlets, the results from the fi rst
cmdlet are fed into the second cmdlet. In order to perform a pipeline, you use
the pipe character (|). For example, if you want to kill every Internet Explorer
process running on your computer, you can use the Get-Process cmdlet and
pipe its output into the Stop-Process cmdlet. The command to accomplish
this looks like this:
Get-Process iexplore | Stop-Process
A pipelined cmdlet is also sometimes referred to as a one-liner. Some advanced
administrators pride themselves on the length of their one-liners. Some
consider a long one-liner that performs a complex task an administrative badge
of honor. One-liners can get complex, but when you start using PowerShell
regularly, they will become second nature. Some of the complex one-liners can
be good substitutes for administrative tasks that require multiple steps. For
example, the following one-liner will look in the Application Event Log, fi nd
all the error and warning events, put them in a CSV fi le, and then open the fi le
with Microsoft Excel:
Get-EventLog Application -EntryType Error | Export-Csv errors
.csv -NoTypeInformation | Start-Process excel.exe errors.csv
At first, it may seem complex, but you could easily create a function for this oneliner, put it in your profile, and have an easier and more flexible way to view your
critical system events. Or imagine running this command on each of your domain
controllers every day using the Task Scheduler and outputting your errors and
warnings into a shared folder.
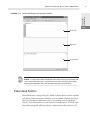
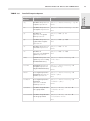
Get Help on a Cmdlet
You can get help executing any cmdlet by using a special PowerShell cmdlet called
Get-Help. When you execute Get-Help, you must specify the name of the cmdlet
that you want help on as the first parameter. For example, if you’re stuck on how to
use the Get-Process cmdlet, you can run the following command to learn how
to use it:
Get-Help Get-Process
Figure 1.8 shows the output of this command.
U N D E R S TA N D T H E BA S I C S O F P O W E R S H E L L
The output of the Get-Help cmdlet
Administering
Service Delivery
F I G U R E 1. 8
17
PART I
Various types of help are available for cmdlets. If you don’t want to read through
a large screen full of text just to find out the syntax for a particular command, you
can add the -Examples parameter to the Get-Help cmdlet. This will only display
the examples for the cmdlet. Figure 1.9 demonstrates the output of Get-Help with
the -Examples parameter.
F I G U R E 1. 9
Using Get-Help with the -Examples parameter
Table 1.3 outlines the various parameters available for use with the Get-Help cmdlet.
18
CHAPTER 1
•
TA B L E 1. 3
USING POWERSHELL WITH
ACTIVE DIRECTORY
Parameters for the Get-Help Cmdlet
Parameter
Description
-Examples
Displays various examples that demonstrate the use of the cmdlet
-Detailed
Displays detailed information on the cmdlet, including a description of each
parameter that is accepted
-Full
Displays the full output of the technical information for the cmdlet
Format the Output of a Command
Sometimes, when you run a command, the output is difficult to read or you don’t get
all the information you wanted. You can change the output of the cmdlets that you
run in various ways. This is accomplished using cmdlets beginning with Format-.
There are multiple Format- cmdlets that will format the output into multiple views.
To use them, you simply pipeline the output from one cmdlet into the appropriate
format cmdlet. For example, if you want to view the running processes as a list, you
can pipeline the output to the Format-List cmdlet:
Get-Process | Format-List
To view the list of available format cmdlets, you can run the Get-Command cmdlet:
PS C:\> Get-Command format-*
CommandType
Name
Definition
-----------
----
----------
Cmdlet
Format-Custom
Format-Custom [[-Property] <...
Cmdlet
Format-List
Format-List [[-Property] <Ob...
Cmdlet
Format-Table
Format-Table [[-Property] <O...
Cmdlet
Format-Wide
Format-Wide [[-Property] <Ob...
Test What a Command Will Do
There may be times when you just want to see the output of a particular command
to make sure you have it right, without making the actual change to the system.
This is especially useful when you’re writing scripts, as covered in the next section,
“Script Administration Tasks.” To find out what is affected by a command without
actually running it, you can use the -WhatIf parameter.
Perhaps you’re trying to figure out if you have the syntax of a cmdlet right, but
you don’t want to accidently run the cmdlet if you happen to get it right. In
this case, you can use the -Confirm parameter. Doing so adds a confi rmation
U N D E R S TA N D T H E BA S I C S O F P O W E R S H E L L
19
Script Administration Tasks
In addition to offering a robust environment for executing cmdlets, PowerShell
also provides an integrated environment for writing scripts. Like one-liners, scripts
allow you to execute a series of commands all at once, without having to enter each
command individually. For example, if you have a list of commands that you run
every time a server is promoted to a domain controller, you can put those commands into a script. Then, the next time you install Active Directory on a server,
you run the script once instead of executing each command.
Scripts are also useful if you want to apply some logic to a series of commands. For
example, you could write a script to determine the last time your users logged in
and then disable the accounts and move them to a different Organizational Unit
(OU) if it’s been over 90 days. In this case, the script would make the decisions
about what to do with the user accounts.
Create PowerShell Scripts
You can create a script using any standard text editor that you’re comfortable with.
However, there are advantages to using the built-in PowerShell ISE discussed earlier. If you
have the ISE available to you, it makes sense to use it rather than a standard text editor.
When you create scripts, you type in the commands just as you would if you were
typing them directly into the shell. You have the option of inserting comments into
your scripts by placing a pound symbol (#) in front of the comment, as shown in the
following snippet:
# This is a comment.
Get-Process
In PowerShell v2, you also have the ability to use block comments. This allows you
to comment out large portions of text in your script files. To use a block comment,
you start the comment with <# and end it with #>. Everything in between is considered a comment, as demonstrated in the following snippet:
<#
This is a block comment.
The next line of code will execute the Get-Process cmdlet
which will display a list of running processes on the screen
#>
Get-Process
Administering
Service Delivery
prompt to your command that requires additional input by the executor before
it continues.
PART I
20
CHAPTER 1
•
USING POWERSHELL WITH
ACTIVE DIRECTORY
When you’re done creating your script, save it with a .ps1 extension, and the script
will be executable in PowerShell.
Execution Policy
With great power comes great responsibility. Being the robust scripting environment that PowerShell is, its capabilities could potentially be misused. There has
been a lot of scripting misuse in the past with other scripting languages. Multiple
vulnerabilities, viruses, and malware have used script-based exploits to engrain
themselves on users’ machines. To prevent this from happening in PowerShell, an
execution policy defines if and how scripts can run.
By default, the execution policy is configured to not allow any scripts to run. This
security enhancement is meant as a failsafe to prevent users from accidently executing malicious code and isn’t intended as a fully vetted security architecture. Users
can easily overcome the limitations of the execution policy by manually typing the
script into PowerShell line by line or by copying and pasting it in.
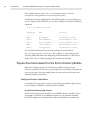
You can use six different settings for the PowerShell execution policy. Table 1.4
describes each of these settings.
TA B L E 1. 4
Execution Policy Settings
Setting
Description
Restricted (Default)
Prevents all scripts from executing.
AllSigned
Allows only scripts that are signed with a trusted certificate.
RemoteSigned
Allows scripts written locally to execute, but scripts downloaded from a
nonlocal source (such as a website or email) must be signed with a trusted
certificate.
Unrestricted
Allows unsigned scripts to execute but warns the user about scripts that
were not created from the local machine.
Bypass
No scripts are blocked, and no warnings are generated.
Undefined
No execution policy is specifically defined.
You can determine what the current execution policy is by running the
Get-ExecutionPolicy cmdlet:
PS C:\> Get-ExecutionPolicy
Restricted
If you’re running scripts that you wrote for computer administration, then using the
RemoteSigned setting will be ideal in most cases. However, you do have the option
of signing the scripts that you create for additional security. If you’re going to be
using PowerShell scripts for Active Directory administration and storing the scripts
on a network share or somewhere that other people may have write access to, then
it’s a good idea to sign the scripts. Signing the scripts will ensure that no one can
tamper with them. If you choose to sign the scripts that you write locally, then using
the AllSigned execution policy is recommended.
To configure the execution policy setting, use the Set-ExecutionPolicy cmdlet:
Set-ExecutionPolicy RemoteSigned
Script Signing
When you sign a script, you put a digital signature on the script that can be traced
back to the owner of the signature. The script is run through a mathematical algorithm that generates a unique value (called a hash) that is based on the contents of
the script. If the script is changed, a different hash value is generated. The process
that is executing the script can run the script through the same algorithm that was
used to sign it, and if the resulting hash value is different than the one the script is
signed with, the process knows the script has been tampered with.
This hash value isn’t stored in plain text, though, because someone could potentially
change the script and then change the hash value to reflect the script’s new hash. To
prevent this from happening, the hash value is encrypted with a public/private key
pair. The idea behind a public/private key pair is that data can be encrypted with
one of the keys and can only be decrypted using the other. When a user obtains a
Public Key Infrastructure (PKI) certificate, two keys are associated with the
certificate: the public key and the private key. The private key is only available to the
owner of the certificate. In fact, most of the time, this key is automatically generated and stored in a protected manner in the local certificate store of the computer.
The public key, however, is usually given to other people in a publically available
certificate.
To illustrate this, consider two people, Alice and Bob. Alice created a script, and
Bob is using it. When Alice signs the script that she created, the script’s hash gets
encrypted with Alice’s private key. When Bob uses the script, he decrypts the hash
with Alice’s public key before checking whether the hash is valid. By doing this, Bob
is assured that Alice really created the script, because she is the only person who has
21
Administering
Service Delivery
U N D E R S TA N D T H E BA S I C S O F P O W E R S H E L L
PART I
22
CHAPTER 1
•
USING POWERSHELL WITH
ACTIVE DIRECTORY
her private key. Bob doesn’t manually validate Alice’s script against her public key,
however. This process is handled by PowerShell when Bob attempts to run the script.
To be able to sign scripts, you first need to obtain a code-signing certificate with a
private key. This certificate must be trusted by the computer that the script is executing on in order for it to be considered valid. There are a few different ways that
you can obtain a trusted certificate:
Use an Internal Public Key Infrastructure Some organizations have their own
certificate authorities (CAs) for creating and validating PKI certificates. If your
organization has its own CA, you can probably request a code-signing certificate
from it. When using an internal PKI, you run a good chance that your certificate
will be trusted by the computers your PowerShell scripts might run on. However,
this isn’t always the case, because the trust configuration is heavily dependent on
how the organization configured the PKI.
Use a Publically Trusted Certificate Authority If you don’t have an internal
PKI, then you can buy a trusted certificate from a well-known Internet CA such
as VeriSign or Go Daddy. Many of these CAs are trusted by default in Windows.
Therefore, if you obtain a code-signing certificate from one of them, you’ll
almost be guaranteed that the certificate is trusted by any computer on which
you run the PowerShell script. The downside to this method is that it’s going to
cost you money.
Use a Self-Signed Certificate You can also obtain a self-signed certificate,
which means that you create the certificate yourself. The drawback to self-signed
certificates is that the certificate is only trusted by the computer on which it
was created. Th is means that if you create a script and sign it with a self-signed
certificate that was issued by one computer, the script will only be considered
valid on that computer. You can get around this, however, by adding the selfsigned certificate to the list of trusted certificates on your other computers. If you
decide to use a self-signed certificate for scripts that you use for Active Directory
administration, you should ensure that the self-signed certificate is trusted by
each domain controller. The good news is that you can do this rather easily with
a Group Policy Object (GPO).
To create your own self-signed certificate signing PowerShell scripts, you can use the
makecert.exe utility included in the Windows SDK. You can download this SDK
U N D E R S TA N D T H E BA S I C S O F P O W E R S H E L L
23
makecert.exe -r -pe -n “CN=PowerShell Signing Cert” -ss MY -a sha1 -eku i
1.3.6.1.5.5.7.3.3
You can then run the following PowerShell command to verify that the certificate
was successfully created:
PS C:\> Get-ChildItem cert:\currentuser\my -codesigning
Directory: Microsoft.PowerShell.Security\Certificate::currentuser\my
Thumbprint
Subject
----------
-------
DA747C75B468FCF2701FC844799B3DCE44B5F512
CN=PowerShell Signing Cert
Now that you’ve obtained your certificate, you can use the SetAuthenticodeSignature cmdlet to sign your PowerShell script. You’ll need
to pass the certificate object as a parameter in the cmdlet. You can do this by
assigning the certificate to a variable and then referencing the variable in the
Set-AuthenticodeSignature cmdlet. For example, if you wanted to sign
a script called UpdateSiteTopology.ps1, you would run the following
commands:
PS C:\> $certificate = Get-ChildItem cert:\currentuser\my -codesigning
PS C:\> Set-AuthenticodeSignature UpdateSiteTopology.ps1 $certificate
After you sign the script, you’ll notice that a signature block has been added to the
end of the file. This block represents the encrypted hash. If you modify the script, be
sure to re-sign it so this encrypted hash value is updated.
Use Variables in a Script
You could write scripts to execute one command after another, but PowerShell
scripts can be more than mere substitutes for batch files. In order to take your
scripting to the next level and write more powerful scripts, you need to learn some
of the basics of scripting, starting with variables.
Variables are nothing more than a way to temporarily store data for later use. In
PowerShell, variables are easy to work with because they can hold any type of data,
such as text, numbers, or whole objects.
Administering
Service Delivery
from http://msdn.microsoft.com/en-us/windows/bb980924.aspx. After
you install the SDK, use the following command to create a self-signed certificate:
PART I
24
CHAPTER 1
•
USING POWERSHELL WITH
ACTIVE DIRECTORY
N O T E Some other development languages require you to define what kind of data
your variables will hold up front, but this isn’t the case with PowerShell.
Variables in PowerShell all begin with a dollar sign ($). For example, if you
wanted to create a variable and hold a sentence in it, you would use the following
PowerShell command:
$MySentence = “Active Directory Rules!”
This example stores the text string “Active Directory Rules!” into the variable called
$MySentence. You can name variables anything you want, as long as they begin
with a dollar sign. Here’s another example, except this time we’ll store a number:
$MyInteger = 1234567890
Notice that we didn’t use the quotation marks this time. You only use quotation
marks for text strings—you have to use quotation marks for text so PowerShell
knows you’re using text and not trying to run a PowerShell cmdlet instead.
You can store data other than text and numbers in variables. For example, the following command is valid in PowerShell:
$DirectoryListing = dir
This command runs the PowerShell command dir, which lists the files and
folders in the current directory and stores the output in the variable called
$DirectoryListing. $DirectoryListing doesn’t contain the text of the
output from the dir command. Instead, $DirectoryListing stores each of the
files and folders as objects with their own properties. This allows you to do some
interesting things. For example, you could go through the file and folder objects in
the $DirectoryListing variable and rename them.
Variables can contain many types of objects. The type of object that is stored in the
variable depends on the output of the command that is populating the variable. The
dir command we used in the example works with files and folders, so it stored file
and folder objects. If you used another command, such as Get-Service, it would
store the objects that represent the computer’s services and their associated properties into the variable.
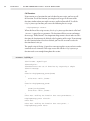
You can see what variables are currently being used by running the Get-Variable
cmdlet as shown in Figure 1.10.
U N D E R S TA N D T H E BA S I C S O F P O W E R S H E L L
Listing the currently used variables
Administering
Service Delivery
F I G U R E 1.10
25
PART I
In addition to variables that you define yourself, there are special variables called
shell variables built into PowerShell. Shell variables are automatically created
by PowerShell. An example of a shell variable is $null, which always means
that something has no value. For example, if you had an Active Directory user
object and you wanted to clear the Description attribute, you could set the
Description property to $null. This can be accomplished with the following
command:
Set-ADUser “Lincoln Alexander” -Description $null
There are many other shell variables in PowerShell. Table 1.5 lists some of the more
common shell variables you’ll encounter.
TA B L E 1. 5
Common Shell Variables
Variable
Description
$_
Refers to the current object that is being processed in a pipeline or a loop.
$Error
When an error is encountered in the command, the error is stored here.
$Home
The home directory of the current user.
$true
Represents the condition True.
$false
Represents the condition False.
$null
Represents a null entry, meaning the property is blank.
26
CHAPTER 1
•
USING POWERSHELL WITH
ACTIVE DIRECTORY
Add Logic to a Script
Logic allows your scripts to do things to the variables you’re using and make decisions about what to do. You need to know two basic logic concepts in order to write
PowerShell scripts: loops and conditionals.
Loops
Loops allow you to go through a collection of items and do something to each
item. For example, if you run the Get-Process cmdlet on one of your servers,
PowerShell displays a list of processes that are currently running on that server.
However, you can assign the output of Get-Process to a variable, using the
following command:
$RunningProcesses = Get-Process
In the $RunningProcesses variable, each process is represented by a different
object. You could loop through the objects in this variable and do something to
each object, such as display the process ID of each process. One way to accomplish
this is with the ForEach-Object cmdlet:
$RunningProcesses | ForEach-Object { Write-Host $_.Name : $_.Id }
By piping the $RunningProcesses variable into the ForEach-Object cmdlet, the
ForEach-Object cmdlet can cycle through all the objects. The command inside
the curly brackets ({...}) is executed for each of the objects processed by the loop.
You may recognize the $_ variable from Table 1.5. The $_ variable references the
current object that the loop is processing. So when $_.Id is used, you’re working
with the Id property on each of the objects in the variable. In this case, we’re calling
the Write-Host cmdlet to output the Name and Id of each process to the screen.
Another type of loop you can use is Do. The Do loop allows you to loop until
a specific condition is met. There are two types of Do loops: Do ... While and
Do ... Until.
In a Do ... While loop, a block of script code is executed over and over again as long
as something is happening. For example, consider the following script code snippet:
$counter = 0
Do
{
Write-Host “Current Number: $counter”
$counter++;
} While ($counter -lt 3)
U N D E R S TA N D T H E BA S I C S O F P O W E R S H E L L
27
Current Number: 0
Current Number: 1
Current Number: 2
The Do statement loops through the code inside the curly brackets for as long as
the condition specified in the While statement is valid. In this example, the Do
loop will keep going as long as the $counter variable is less than 3 (-lt 3). After
$counter reaches 3, the loop stops, and therefore only the numbers 0, 1, and 2
are displayed. With a Do ... While loop, the code inside the curly brackets is
executed first, and then the condition determining whether it should keep going is
evaluated.
On the other hand, a Do ... Until loop processes the condition first. To understand this, we’ll turn the previous code into a Do ... Until loop:
$counter = 0
Do
{
Write-Host “Current Number: $counter”
$counter++;
} Until ($counter -gt 3)
This time, the Do loop will continue to process until $counter is greater than 3.
Before the code in the Do loop is processed even once, the condition is evaluated to
make sure $counter is still 3 or less. The following is the output if this code is run
in a script:
Current Number: 0
Current Number: 1
Current Number: 2
Current Number: 3
After the script displays that the current number is 3, $counter is incremented
to 4. This causes the condition ($counter -gt 3) to be met because 4 is greater
than 3, and the Do loop is no longer processed.
Conditionals
In addition to loops, you can use conditionals to make decisions inside your scripts.
One conditional that you’ll probably use often is If ... Else. The If statement
tests whether something is true. If it is, it executes some code. If not, the If
Administering
Service Delivery
If you were to run this code in a PowerShell script, the output would read
PART I
28
CHAPTER 1
•
USING POWERSHELL WITH
ACTIVE DIRECTORY
statement can either end or test to see if something else is true. For example, consider the following If statement:
$RunningProcesses = Get-Process
$RunningProcesses | ForEach-Object {
$MemUsageMB = $_.PrivateMemorySize / 1024 / 1024
If ($MemUsageMB -lt 50)
{
Write-Host $_.Name “: Using less than 50MB of memory”
}
Else
{
Write-Host $_.Name “: Using “ $MemUsageMB “MB of memory”
}
}
If you execute this script, the output lists every running process and, if it’s using
more than 50 MB of memory, displays the amount of memory that the process is
using. The ForEach-Object command loops through all the processes. For each
process, the If statement is evaluated. The If statement checks to see whether the
amount of memory is less than 50. If so, it writes to the screen that the process is
using less than 50 MB of memory. If the process is using more than 50 MB, the
Else statement is executed, and instead, the script outputs to the screen the name
of the process and the amount of memory that it’s using.
The -lt parameter indicates that the If statement is checking whether
$MemUsageMB is less than 50. In typical programming languages, this is usually
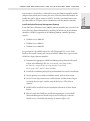
accomplished with the symbol <. Instead, PowerShell uses the comparison operators listed in Table 1.6.
In addition to the If statement, you can use the Where-Object command.
Where-Object evaluates the objects that are piped into it and filters out everything
that doesn’t meet the expression you set. For example, you can use the following
Where-Object command in a script to filter out all processes that are using less
than 50 MB of memory:
Get-Process | Where-Object { $_.PrivateMemorySize / 1024 / 1024 -gt 50 }
| ForEach-Object { Write-Host $_.Name }
In this command, the Where-Object cmdlet is passing through every process that
is using more than 50 MB of memory. The processes that are passed through the
filter are piped into the ForEach-Object cmdlet so they can be further processed,
and the information is displayed on the screen.
U N D E R S TA N D T H E BA S I C S O F P O W E R S H E L L
PowerShell Comparison Operators
Comparison
Operator
Description
Example
-eq
Determines if expression1
is equal to expression2
[PS] C:\> “Active Directory” -eq “AD”
False
Administering
Service Delivery
TA B L E 1. 6
29
Determines if expression1
isn’t equal to expression2
[PS] C:\> “Active Directory” -ne “AD”
PART I
Determines if
expression1 is greater
than expression2
[PS] C:\> 1000 -gt 50
Determines if expression1
is greater than or equal to
expression2
[PS] C:\> 1000 -ge 1000
Determines if expression1
is less than expression2
[PS] C:\> 1000 -lt 50
Determines if
expression1 is less than or
equal to expression2
[PS] C:\> 1000 -le 1000
Determines if expression1 is
equal to expression2 using
the wildcard character (*)
[PS] C:\> “Active Directory” i
-like “Act*”
Determines if expression1
isn’t equal to expression2
using the wildcard character (*)
[PS] C:\> “Active Directory” i
-notlike “Ac*ry”
Uses a regular expression to
determine if expression1
matches expression2
[PS] C:\> “Active Directory” i
-match “[abc]”
Uses a regular expression to
determine if
expression1 doesn’t
match expression2
[PS] C:\> “Active Directory” i
-notmatch “[abc]”
Determines if a specific item
is in a group of items
[PS] C:\> “AD DS”, “AD LDS” i
-contains “AD DS”
-ne
-gt
-ge
-lt
-le
-like
-notlike
-match
-notmatch
-contains
True
True
True
False
True
True
False
True
False
True
-notcontains
Determines if a specific item
isn’t in a group of items
[PS] C:\> “AD DS”, “AD LDS” i
-notcontains “AD FS”
True
30
CHAPTER 1
•
USING POWERSHELL WITH
ACTIVE DIRECTORY
Accept Script Parameters
When you write a PowerShell script, there are times when you may want the user to
feed some information into the script. There are two ways to handle this. The first
way is to allow the user to edit the script and add their information directly. If your
script was signed, however, this will break the signature. The second way is for your
script to accept command parameters.
Command parameters can be passed into the script when the user runs the script’s
command in PowerShell. For example, the following command uses a parameter to
tell the Get-Process cmdlet which computer to execute on:
Get-Process -ComputerName BAL-DC01
You’ll be working with two types of parameters in your PowerShell scripts:
positional parameters and named parameters. Positional parameters are used
based on where they show up in the command. For example, you could have a
positional parameter specified that uses the first parameter in the command as the
-FirstName parameter. The user can choose to run the script in one of the following ways. Both are functionally equivalent:
MyScript.ps1 -FirstName Brenna
MyScript.ps1 Brenna
Use Named Parameters
Named parameters, on the other hand, require that the user indicates the parameter name before specifying the value. If the FirstName parameter in the previous
example was a named parameter, the following command would be invalid:
MyScript.ps1 Brenna
When configuring your scripts to accept parameters, you must include some code at
the beginning of your script consisting of the keyword param, the type of parameter (for example, string), and the variable to which the parameter will be passed. By
default, the name of the variable becomes the name of the parameter, but without
the dollar sign that prefixes the variable name. Consider the following parameter
declaration in a script:
param([string]$FirstName)
This specifies that the script will accept a string parameter called -FirstName that
gets passed into the $FirstName variable inside the script. When the script is run,
the user executes it with the following command:
MyScript.ps1 -FirstName Brenna
Use Positional Parameters
When using a parameter as a positional parameter, you need to specify the parameter’s position in the parameter declaration. Expanding on the previous example, the
following command declares the FirstName parameter as a positional parameter
that is accepted as the first parameter in the script’s command:
param([Parameter(Position=0)][string]$FirstName)
When the user runs the script, the FirstName parameter can be specified as either
a positional or a named parameter. Because we included the name of the parameter
in addition to its position, both commands are valid.
Other Parameter Settings
You should be aware of a couple of other parameter settings. Optionally, you can
specify a default value for a parameter in case the user decides not to pass a value
in. The following parameter declaration assigns a default value of Ben to the
FirstName parameter:
param([string]$FirstName = “Ben”)
You can also decide whether a parameter is mandatory for the script or whether
it’s optional. To declare a parameter as mandatory, set the mandatory property
to $true in the script’s parameter declaration. The following example sets the
FirstName parameter as mandatory:
param([Parameter(Mandatory=$true)][string]$FirstName)
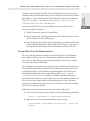
There are many other properties that you can set for a parameter as well. Table 1.7
describes some of the common properties that you might use when writing your
PowerShell Scripts.
31
Administering
Service Delivery
U N D E R S TA N D T H E BA S I C S O F P O W E R S H E L L
PART I
32
CHAPTER 1
•
TA B L E 1. 7
USING POWERSHELL WITH
ACTIVE DIRECTORY
Parameter Properties
Property Name
Purpose
Mandatory
A Boolean property that determines whether the parameter is mandatory in order for the script to run.
Position
An integer property that identifies the position in which a
positional parameter should appear.
ValueFromPipeline
A Boolean property that indicates whether this parameter
can accept an object that is pipelined in from another
script or cmdlet.
ValueFromPipelineByPropertyName
A Boolean property that indicates whether this parameter can accept data being pipelined in from another
command. The difference between this and the
ValueFromPipeline property is that this property
specifies that the parameter accepts a single parameter
from the pipelined command. The ValueFromPipeline
property applies to an entire object. If this property is
used, the parameter that is accepted from the pipelined
command is the parameter that uses the same name
defined in this command.
HelpMessage
A String property that allows you to specify a help message for a mandatory parameter. If the user runs the script
and doesn’t include the mandatory parameter, this help
message is displayed.
Use Functions in a Script
Functions give you the ability to take a block of script code and assign a name to
it. There are quite a few benefits to using functions inside your scripts. First, functions allow you to organize scripts into executable chunks, which makes the scripts
easier to edit and troubleshoot. By isolating a block of code into a function, you can
make sure that particular block of code works apart from the rest of your script code.
Another benefit of functions is that they sandbox the scope of your scripts. A variable
that is declared and used inside a function is only valid to that function. And finally,
functions let you write a block of code once and call it as many times as you like,
making your script code more reusable. Functions are very helpful, so you’ll notice
that throughout this book, we make generous use of them in our sample scripts.
Define Functions
To declare a block of code as a function, you can place the code between opening
and closing curly brackets and prefix it with the following declaration:
Function <FunctionName> (<Parameters>)
U N D E R S TA N D T H E BA S I C S O F P O W E R S H E L L
33
Function DisplayMessage ()
{
Write-Output “Hello, Ken!”
}
PART I
In this function, the message that is displayed is hard-coded. When you call the
DisplayMessage function, it will display the same message every time. You can
modify this behavior by configuring a parameter that the user can pass in. There are
two different ways to define parameters in functions. If you’ve developed scripts or
applications in other languages, then you’re probably familiar with defining parameters in functions using the parentheses in function declarations. Here’s an example
of how this might look:
Function DisplayMessage($name)
{
Write-Output “Hello, $name!”
}
This function allows you to pass in the name that you want displayed in the message. In the parentheses following the name of the function, we specified a variable
called $name. By doing this, we told the function that the first parameter that we
send to it will be kept in the $name variable. You can also add additional variables
for other parameters. When doing so, you need to separate them inside the parentheses with commas.
You can also specify parameters on functions using the same method that we
described for using parameters in scripts. Refer to the section “Accept Script
Parameters” earlier in this chapter to learn how to use this method. When you’re
defining parameters on functions with this method, you follow the same process,
but your parameter declaration happens on the first line of the function rather than
the first line of the script. For example, the following function uses this method and
is equivalent to the DisplayMessage function that we defined earlier:
Function DisplayMessage
{
param([string]$name)
Write-Output “Hello, $name!”
}
Administering
Service Delivery
For example, if you were to create a function called DisplayMessage that displays
“Hello, Ken!” it would look like the following:
34
CHAPTER 1
•
USING POWERSHELL WITH
ACTIVE DIRECTORY
Call Functions
If you want to use a function that you’ve defined in your script, you have to call
the function. To call the function, you simply need to type in the name of the
function, similar to how you might execute a cmdlet in PowerShell. To call the
DisplayMessage function, you can use the following line in a script:
DisplayMessage “Brenna”
When this line of the script executes, the DisplayMessage function is called and
“Brenna” is passed in as a parameter. The function will then execute and output
the message “Hello, Brenna!” One important thing to note is that in order to call a
function, the function must be defined at the beginning of the script. If you attempt
to call a function before it has been defined, you’ll receive an error because the
function doesn’t exist yet.
The sample script in Listing 1.1 puts these concepts together so you can better understand how to use a function. This script creates and calls the DisplayMessage
function used as an example throughout this section.
LISTING 1.1: SayHello.ps1
## File Name: SayHello.ps1
## Description:
## Demonstrates the use of functions by outputting a simple
## hello message.
##
Function DisplayMessage_Paren($name)
{
Write-Host "Hello, $name!"
}
Function DisplayMessage_Param
{
param([string]$name)
Write-Host "Hello, $name!"
}
Write-Host "Calling the function that uses parentheses..."
DisplayMessage_Paren "Lincoln"
Write-Host
Write-Host "Calling the function that uses param..."
DisplayMessage_Param "Nora"
U N D E R S TA N D T H E BA S I C S O F P O W E R S H E L L
35
When you write a .ps1 script, you can run that script anytime you’re in a
PowerShell session. But you can also run scripts without opening PowerShell manually. The process is similar to running a batch file outside of the command prompt.
You can double-click the script, and PowerShell will be automatically opened, your
script will run, and then PowerShell will close.
By default, when you double-click a PowerShell .ps1 script file, the file opens in
Notepad. You can use the following procedures to launch the file in PowerShell:
1. Browse to the PowerShell .ps1 script file that you want to launch.
2. Right-click the file, and select Run With PowerShell from the drop-down
menu as shown in Figure 1.11.
F I G U R E 1.11
Launching a PowerShell script outside of PowerShell
The PowerShell script will launch and run in PowerShell. PowerShell will be closed
when the script completes.
You can also change the file association to PowerShell instead of Notepad. This will
ensure that when you double-click the script, it opens in PowerShell automatically.
Administering
Service Delivery
Run a Script Outside of PowerShell
PART I
36
CHAPTER 1
•
USING POWERSHELL WITH
ACTIVE DIRECTORY
To change the .ps1 file association, do the following:
1. Open the Control Panel, and run the Default Programs applet.
2. When the Default Programs applet launches, select the option Associate A
File Type Or Protocol With A Program.
3. Scroll down to the .ps1 fi le extension, and click it to select it. Click the
Change Program button above the list of fi le types, as shown in Figure 1.12.
F I G U R E 1.12
Changing the default program for PowerShell scripts
4. When the Open With dialog opens, click the Browse button to locate the
PowerShell executable. This executable is stored at C:\Windows\System32\
WindowsPowerShell\v1.0\powershell.exe. Select the powershell
.exe file, and click Open to choose it.
5. Click OK in the Open With dialog to choose Windows PowerShell and set the
file association.
6. Close the Default Programs applet and any remaining windows. Now, when
you double-click a .ps1 file, it will launch with PowerShell instead of Notepad.
U N D E R S TA N D T H E BA S I C S O F P O W E R S H E L L
37
Sometimes you’ll want to create a script and have it run repeatedly at a specified
interval. Windows has a powerful Task Scheduler service that allows you to set up
programs to launch in a very flexible manner. If you want to schedule a script to run
at a later time or after a specified interval, you can schedule the script to run with
the Task Scheduler. In order to execute a PowerShell script via Task Scheduler, you
need to associate your PowerShell .ps1 script file with the PowerShell.exe
program or have the scheduler execute the command PowerShell.exe
MyScript.ps1 to launch the script in the scheduled task.
There are multiple ways to schedule a task with the Windows Task Scheduler. The
easiest way is to use the Task Scheduler snap-in. In this example, you’ll use the Task
Scheduler to create a task that does the following things:
▶
Runs a script every night that collects user statistics to determine who
has not logged on in the past 90 days. In this example, the script is named
GetLogonStats.ps1. This is a script that we created ourselves; it isn’t
installed with Active Directory. In the fake script, the statistics are saved in
the file C:\Stats\LogonStats.log.
▶
Emails the statistics file to the mail-enabled distribution group called
[email protected].
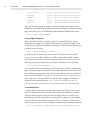
To create the scheduled task, follow these steps:
1. Click the Start menu, and select Administrative Tools ‚ Task Scheduler. The
Task Scheduler launches.
2. In the Action Pane on the right side of the Task Scheduler snap-in, choose the
option Create Task. The Create Task dialog box opens.
3. On the General tab, give the task a name, and choose the option Run
Whether User Is Logged On Or Not. Set the account that you want the
script to run under using the Change User Or Group button. Ensure that the
account running the script has the appropriate permissions. Figure 1.13 shows
these options.
4. Click the Triggers tab, and click the New button to create a new trigger for the
task. Set this task to run every night at 1:00 a.m.
Administering
Service Delivery
Schedule a Script to Run Automatically
PART I
38
CHAPTER 1
•
F I G U R E 1.13
USING POWERSHELL WITH
ACTIVE DIRECTORY
Selecting the appropriate permissions for scheduling a script
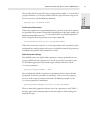
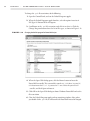
5. Click the Actions tab, and click the New button to create a new action for this
task to perform. In the Action drop-down list, choose Start A Program. In the
Program/script text box, type powershell.exe. In the Add Arguments text
box, type the location of the script:
C:\Scripts\GetLogonStats.ps1
These options are shown in Figure 1.14.
6. Click the OK button in the Edit Action dialog.
7. When you’re back on the Action tab, click the New button to add another
action. In the New Action dialog select Send An E-mail from the Action list.
Fill out the options for the email message. Type C:\Stats\LogonStats
.log in the Attachment text box, and enter your SMTP server name in the
SMTP Server text box. Click OK to add the action.
8. Back in the Create Task dialog, click OK to create the task. You may be
prompted to enter the password for the account under which the task
will run.
U N D E R S TA N D H O W P O W E R S H E L L A N D AC T I V E D I R E C T O RY WO R K T O G E T H E R
Selecting the appropriate action for running a PowerShell script
Administering
Service Delivery
F I G U R E 1.14
39
PART I
Understand How PowerShell and Active Directory
Work Together
Now that you have a basic understanding of PowerShell, let’s take a closer look at
how Active Directory and PowerShell work together. First we’re going to look at the
different ways you can interact with Active Directory using PowerShell, and then
we’ll discuss what you have to do to configure your environment so you can use the
scripts and techniques discussed in this book.
Interact with Active Directory Using PowerShell
Active Directory provides several different protocols and methods for users to
interact with it. Traditionally, when you used other scripting and programming
languages to interact with Active Directory, you had a choice of techniques. In
PowerShell, there are two ways to go about it: using the Active Directory Services
Interface or using the Active Directory module. Depending on your Active
Directory implementation, you may be limited to only one of the two ways.
40
CHAPTER 1
•
USING POWERSHELL WITH
ACTIVE DIRECTORY
Use the Active Directory Services Interface
Prior to Windows Server 2008 R2, if you wanted to manage Active Directory with
PowerShell, you were limited to using the Active Directory Services Interface
(ADSI). ADSI is a set of Common Object Model (COM) interfaces that allow you
to programmatically work with directory services such as Active Directory. ADSI
is very flexible, and once you get the hang of it, it’s actually quite easy to work with.
However, there is a learning curve involved, and sometimes your results can be
inconsistent depending on the environment you’re working in.
In Windows Server 2008 R2, you’re provided with the Active Directory module,
which simplifies a lot of tasks for which you previously needed ADSI. Even though
there are many new Active Directory cmdlets, ADSI will still be needed for more
complex tasks that you’ll want to perform. Therefore, a solid understanding of how
to work with ADSI is necessary.
When you work with ADSI to manage objects in Active Directory, you’ll be doing
one of the following things: reading an object, updating an object, creating an
object, or deleting an object. All of ADSI’s functionality revolves around these
operations.
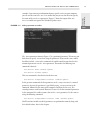
Retrieve an Object
The first step to any ADSI task is to bind to the object that you’re working with. For
example, if you want to read a user’s logon name, then you first need to bind to the
user’s object. You can use ADSI to bind to an object using the following PowerShell
command:
$user = [ADSI]”LDAP://cn=Nora Shea,cn=users,dc=contoso,dc=com”
In this example, the user variable is being populated with Nora Shea’s user object.
In this command, the distinguished name of Nora’s user object (cn=Nora Shea,
cn=users,dc=contoso,dc=com) is used to identify which object to retrieve. By
specifying LDAP:// at the beginning of the path, you tell ADSI that the provider is
an LDAP-capable directory service such as Active Directory. It’s important to note
that this provider name is case sensitive. If you used ldap:// instead of LDAP://,
you would get an error. The [ADSI] statement at the beginning of the command is
called a type adapter. Its purpose is to ensure that the object retrieved conforms to
a specific object type, which ensures consistency across the objects you work with.
By specifying ADSI as the type adapter, you’re telling PowerShell that the object is a
System.DirectoryServices.DirectoryEntry object. This means the object
will have the properties and methods that all DirectoryEntry objects have. In
U N D E R S TA N D H O W P O W E R S H E L L A N D AC T I V E D I R E C T O RY WO R K T O G E T H E R
41
Administering
Service Delivery
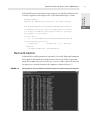
fact, if you pipe the user object into the Get-Member cmdlet, you can retrieve a
listing of the object’s properties and methods:
PS C:\> $user | Get-Member
TypeName: System.DirectoryServices.DirectoryEntry
Name
MemberType Definition
----
---------- ----------
ConvertDNWithBinaryToString CodeMethod static string ConvertDNWithBinaryToSt...
ConvertLargeIntegerToInt64
CodeMethod static long ConvertLargeIntegerToInt6...
accountExpires
Property
System.DirectoryServices.PropertyValu...
badPasswordTime
Property
System.DirectoryServices.PropertyValu...
badPwdCount
Property
System.DirectoryServices.PropertyValu...
cn
Property
System.DirectoryServices.PropertyValu...
codePage
Property
System.DirectoryServices.PropertyValu...
countryCode
Property
System.DirectoryServices.PropertyValu...
description
Property
System.DirectoryServices.PropertyValu...
distinguishedName
Property
System.DirectoryServices.PropertyValu...
dSCorePropagationData
Property
System.DirectoryServices.PropertyValu...
instanceType
Property
System.DirectoryServices.PropertyValu...
isCriticalSystemObject
Property
System.DirectoryServices.PropertyValu...
lastLogoff
Property
System.DirectoryServices.PropertyValu...
lastLogon
Property
System.DirectoryServices.PropertyValu...
lastLogonTimestamp
Property
System.DirectoryServices.PropertyValu...
logonCount
Property
System.DirectoryServices.PropertyValu...
logonHours
Property
System.DirectoryServices.PropertyValu...
memberOf
Property
System.DirectoryServices.PropertyValu...
name
Property
System.DirectoryServices.PropertyValu...
nTSecurityDescriptor
Property
System.DirectoryServices.PropertyValu...
objectCategory
Property
System.DirectoryServices.PropertyValu...
objectClass
Property
System.DirectoryServices.PropertyValu...
objectGUID
Property
System.DirectoryServices.PropertyValu...
objectSid
Property
System.DirectoryServices.PropertyValu...
primaryGroupID
Property
System.DirectoryServices.PropertyValu...
pwdLastSet
Property
System.DirectoryServices.PropertyValu...
sAMAccountName
Property
System.DirectoryServices.PropertyValu...
sAMAccountType
Property
System.DirectoryServices.PropertyValu...
PART I
42
CHAPTER 1
•
USING POWERSHELL WITH
ACTIVE DIRECTORY
userAccountControl
Property
System.DirectoryServices.PropertyValu...
uSNChanged
Property
System.DirectoryServices.PropertyValu...
uSNCreated
Property
System.DirectoryServices.PropertyValu...
whenChanged
Property
System.DirectoryServices.PropertyValu...
whenCreated
Property
System.DirectoryServices.PropertyValu...
You can work with any of those properties in PowerShell by referencing the object,
followed by a dot, followed by the property name. For example, if you want to view the
logon name of the user, run the following command in PowerShell and press Enter:
PS C:\> $user.samAccountName
Change Object Properties
After you bind to the object, you have a copy of it in PowerShell. If you were to
change any of the properties, it would change your local copy. For example, if you
change the user’s first name to Charlie, the change is made on the PowerShell object
but not in Active Directory:
PS C:\> $user.givenName = “Charlie”
In order to make the change take effect in Active Directory, you need to call the
CommitChanges method. When you call this method, PowerShell commits
the changes that you made on its local copy of the object into Active Directory. The
following command ensures that the user’s object is updated in Active Directory:
PS C:\> $user.CommitChanges()
The parentheses after the method name indicate that you’re calling a method rather
than referencing a property. Properties only contain data that you can read or write,
but a method actually executes some code. Because you know that the user object is
being used in PowerShell as a System.DirectoryServices.DirectoryEntry
object, you can see a listing of all the methods this object supports by looking at
Microsoft’s documentation online: http://msdn.microsoft.com/en-us/
library/system.directoryservices.directoryentry_methods.aspx.
Create New Objects
As shown earlier, when you want to work with an object via ADSI, you first have to
bind to it. But what do you do if the object doesn’t exist yet? Consider the situation
where you want to create an object in Active Directory. In this case, you’ll need to
bind to the parent of the object that you creating. When creating a user, for example,
the parent will either be an organizational unit (OU) or a container. Assuming that
you’re creating a user in the Users container, you bind using the following command:
PS C:\> $container = [ADSI]”LDAP://cn=users,dc=contoso,dc=com”
After you bind to the container, you can create the child object by calling the
Create method. For this example, you’ll pass in the type of the child object being
created (user) and the common name of the object (cn=Nora Shea):
PS C:\> $user = $container.Create(“user”, “cn=Nora Shea”)
In a manner similar to changing an object’s properties, this user is only
created locally in PowerShell’s memory. Therefore, you need to call the same
CommitChanges method as you did previously when you were modifying a property. This instructs ADSI to write the changes into Active Directory:
PS C:\> $user.CommitChanges()
If you were to now look in Active Directory, you would see Nora Shea’s account
created and in a disabled state. You’ll learn how to work with users in more detail
in Chapter 6, “Administering User and Group Accounts.”
Delete Objects
Deleting an object requires an approach similar to creating an object. You can’t bind
directly to the object that you’re deleting because after you delete it, it will be gone.
Therefore, you need to bind to the parent of the object. To delete the object that you
just created, first bind to the Users container:
PS C:\> $container = [ADSI]”LDAP://cn=users,dc=contoso,dc=com”
Then, call the Delete method and pass in the object type and the common name of
the object you’re deleting:
PS C:\> $container.Delete(“user”, “cn=Nora Shea”)
As in the past few examples, this object is only deleted from the local copy of the
object in PowerShell. Therefore, you need to call the CommitChanges method again
to make the change in Active Directory:
PS C:\> $container.CommitChanges()
Beyond the Basics
You now have an overview of the basics of using ADSI to manage Active Directory.
Throughout the remainder of this book, you’ll see many more examples using both
ADSI and the new Active Directory PowerShell module. If you understand the
basics as they’re outlined here (working with objects, properties, and methods) then
you’re well equipped to handle some of the more advanced ADSI operations discussed later.
43
Administering
Service Delivery
U N D E R S TA N D H O W P O W E R S H E L L A N D AC T I V E D I R E C T O RY WO R K T O G E T H E R
PART I
44
CHAPTER 1
•
USING POWERSHELL WITH
ACTIVE DIRECTORY
Use the Active Directory Module
The Active Directory module for PowerShell is a new feature of Windows Server
2008 R2. As discussed earlier, prior to Windows Server 2008 R2, you had to use
the ADSI interfaces for using PowerShell with Active Directory. Windows Server
2008 R2 provides you with several cmdlets for Active Directory administration. The
Active Directory module groups these cmdlets together into a package. In order to
use the Active Directory module, you have to install it on the computer from which
you’re performing the administration and then load the module in PowerShell.
The Active Directory module will only run on Windows Server 2008 R2 and
Windows 7. The following editions of Windows are capable of running the module:
▶
Windows 7 (all versions)
▶
Windows Server 2008 R2 Standard
▶
Windows Server 2008 R2 Enterprise
▶
Windows Server 2008 R2 Datacenter
It’s important to understand that the Active Directory module can only be used
with domain controllers running the Active Directory Web Services (ADWS) component or the Active Directory Management Gateway (ADMG). Table 1.8 lists the
domain controller operating system requirements for each.
TA B L E 1. 8
Requirements for ADWS and ADMG
Component
Domain Controller OS
Active Directory Web Services
Windows Server 2008 R2
Active Directory Management Gateway
Windows Server 2003 SP2
Windows Server 2003 R2
Windows Server 2008 SP2
These components provide a web services interface to Active Directory. The Active
Directory PowerShell module uses SOAP-based web services protocols to communicate with the domain controller. If you don’t have ADWS or ADMG installed on
at least one domain controller in your environment, then you won’t be able to use
the Active Directory PowerShell module.
Load the Active Directory Module
After you’ve installed the Active Directory module, you can use the cmdlets in
PowerShell. To use the cmdlets, you’ll need to import the module. Use the following
PowerShell command to import the Active Directory module:
PS C:\> Import-Module ActiveDirectory
As mentioned earlier, the AD PowerShell module requires either a Windows Server
2008 R2 domain controller or a Windows Server 2003/2008 domain controller running ADMG. If there are none available, you’ll receive an error when attempting to
import the module stating that a server with ADWS can’t be found.
After the module loads successfully, you can begin using the Active Directory cmdlets. To view a listing of the Active Directory cmdlets added by the module, run the
following PowerShell commands:
PS C:\> $module = Get-Module ActiveDirectory
PS C:\> $module.ExportedCmdlets | ft Key
Key
--Add-ADComputerServiceAccount
Add-ADDomainControllerPasswordReplicationPolicy
Add-ADFineGrainedPasswordPolicySubject
Add-ADGroupMember
Add-ADPrincipalGroupMembership
Clear-ADAccountExpiration
Disable-ADAccount
Disable-ADOptionalFeature
Enable-ADAccount
Enable-ADOptionalFeature
Get-ADAccountAuthorizationGroup
Get-ADAccountResultantPasswordReplicationPolicy
Get-ADComputer
Get-ADComputerServiceAccount
Get-ADDefaultDomainPasswordPolicy
Get-ADDomain
Get-ADDomainController
Get-ADDomainControllerPasswordReplicationPolicy
Get-ADDomainControllerPasswordReplicationPolicyUsage
Get-ADFineGrainedPasswordPolicy
Get-ADFineGrainedPasswordPolicySubject
Get-ADForest
Get-ADGroup
Get-ADGroupMember
Get-ADObject
Get-ADOptionalFeature
Get-ADOrganizationalUnit
Get-ADPrincipalGroupMembership
45
Administering
Service Delivery
U N D E R S TA N D H O W P O W E R S H E L L A N D AC T I V E D I R E C T O RY WO R K T O G E T H E R
PART I
46
CHAPTER 1
•
USING POWERSHELL WITH
ACTIVE DIRECTORY
Get-ADRootDSE
Get-ADServiceAccount
Get-ADUser
Remove-ADComputer
Remove-ADComputerServiceAccount
Remove-ADDomainControllerPasswordReplicationPolicy
Remove-ADFineGrainedPasswordPolicy
Remove-ADFineGrainedPasswordPolicySubject
Remove-ADGroup
Remove-ADGroupMember
Remove-ADObject
Remove-ADOrganizationalUnit
Remove-ADPrincipalGroupMembership
Remove-ADServiceAccount
Remove-ADUser
Rename-ADObject
Reset-ADServiceAccountPassword
Restore-ADObject
Search-ADAccount
Set-ADAccountControl
Set-ADAccountExpiration
Set-ADAccountPassword
Set-ADComputer
Set-ADDefaultDomainPasswordPolicy
Set-ADDomain
Set-ADDomainMode
Set-ADFineGrainedPasswordPolicy
Set-ADForest
Set-ADForestMode
Set-ADGroup
Set-ADObject
Set-ADOrganizationalUnit
Set-ADServiceAccount
Set-ADUser
Uninstall-ADServiceAccount
Unlock-ADAccount
Most of the cmdlets are self-explanatory. If you can’t figure out what some of them
do by looking at the names, don’t worry—you’ll be working with many of them
throughout the remainder of this book.
U N D E R S TA N D H O W P O W E R S H E L L A N D AC T I V E D I R E C T O RY WO R K T O G E T H E R
47
In addition to providing the Active Directory cmdlets, the Active Directory module
for PowerShell also provides a new drive called the AD drive. With the AD drive,
you can navigate Active Directory in a manner similar to the way you would navigate the file system on your hard drive. To use the AD drive, first make sure the
Active Directory module is loaded, and then run the following command:
PS C:\> cd AD:
Th is changes the working context of your PowerShell session to the Active
Directory drive. The default location is the rootDSE, which is the top-level
entry in the domain controller itself. A listing of the objects in the default path
is as follows:
PS AD:\> dir
Name
ObjectClass
DistinguishedName
----
-----------
-----------------
contoso
domainDNS
DC=contoso,DC=com
Configuration
configuration
CN=Configuration,DC=contoso,DC=com
Schema
dMD
CN=Schema,CN=Configuration,DC=contoso,DC=com
DomainDnsZones
domainDNS
DC=DomainDnsZones,DC=contoso,DC=com
ForestDnsZones
domainDNS
DC=ForestDnsZones,DC=contoso,DC=com
From here, you can change the path just as you would change directories in the filesystem. To do so, you can use the cd command followed by the distinguished name
of the path. To navigate to the contoso.com domain, use the following command:
PS AD:\> cd “dc=contoso,dc=com”
PS AD:\dc=contoso,dc=com> dir
Name
ObjectClass
DistinguishedName
----
-----------
-----------------
Builtin
builtinDomain
CN=Builtin,DC=contoso,DC=com
Computers
container
CN=Computers,DC=contoso,DC=com
Contacts
organizationalUnit
OU=Contacts,DC=contoso,DC=com
Domain Controllers
organizationalUnit
OU=Domain Controllers,
DC=contoso,DC=com
ForeignSecurityPr... container
CN=ForeignSecurityPrincipals,
DC=contoso,DC=com
Administering
Service Delivery
Use the Active Directory Drive
PART I
48
CHAPTER 1
•
USING POWERSHELL WITH
Infrastructure
ACTIVE DIRECTORY
infrastructureUpdate CN=Infrastructure,DC=contoso,
DC=com
Jenny Smith
contact
CN=Jenny Smith,DC=contoso,
DC=com
Jim Johnson
user
CN=Jim Johnson,DC=contoso,
Joe User
contact
CN=Joe User,DC=contoso,DC=com
LostAndFound
lostAndFound
CN=LostAndFound,DC=contoso,
DC=com
DC=com
Managed Service A... container
CN=Managed Service Accounts,
DC=contoso,DC=com
NTDS Quotas
msDS-QuotaContainer
Program Data
container
CN=NTDS Quotas,DC=contoso,
DC=com
CN=Program Data,DC=contoso,
DC=com
Sara Smith
user
CN=Sara Smith,DC=contoso,
DC=com
Sara Smith2
user
CN=Sara Smith2,DC=contoso,
Sara Smith3
user
System
container
CN=System,DC=contoso,DC=com
temp
organizationalUnit
OU=temp,DC=contoso,DC=com
Template
user
CN=Template,DC=contoso,DC=com
Users
container
CN=Users,DC=contoso,DC=com
DC=com
CN=Sara Smith3,DC=contoso,
DC=com
You’ll be using the AD drive throughout the remainder of this book, so you may
want to take a few minutes now and become familiar with navigating around the
AD drive in PowerShell.
Use Windows Management Instrumentation
When you automate Active Directory with PowerShell, you’ll use one additional
technique: the Windows Management Instrumentation (WMI) interface. WMI
isn’t used for interacting with Active Directory per se; rather, it’s used for interacting with the Windows operating system. This is important because you may have
to do some things to Windows that affect its interaction with Active Directory,
even though you’re not touching Active Directory itself. For example, in Chapter 5,
U N D E R S TA N D H O W P O W E R S H E L L A N D AC T I V E D I R E C T O RY WO R K T O G E T H E R
49
WMI Basics
WMI provides an object-oriented way to manage Windows. WMI uses the concept of classes, which define different types of objects that WMI can interact with.
Similar to how .NET classes work, WMI provides methods (pieces of executable
code) and properties.
Windows provides a series of classes out of the box for interacting with core Windows
components. For example, the Win32_Service class provides a way to interact
with Windows services. The methods in the class allow you to do things like start
or stop a service, while the properties define the different attributes of the service,
such as its name.
Several classes are packaged together to form namespaces. Namespaces can
be provided by both Microsoft applications and third-party applications. Th is
speaks to the extensibility of WMI and is one of the reasons why WMI is so
widely used not only in PowerShell scripting, but in other scripting languages
as well. The Windows operating system places its core classes in the namespace
root\cimv2.
WMI also uses instances. An instance is an instantiation (an actual object) of a
class. For example, if you have 20 services running on your computer, then you have
20 instances of the Win32_Service class. You can connect to each instance (each
service) and modify it or perform one of its methods.
Another thing you should know about WMI is that there is a query language built
around it. You can use this WMI Query Language (WQL) to search for WMI
instances. Without WQL, you would have to list the instances of a class and then
enumerate through each instance to find the one you want. With WQL, you can
search for that particular instance and work with it directly.
WMI PowerShell Cmdlets
PowerShell can interact with WMI in a couple of different ways. Similar to
how PowerShell uses ADSI to interact with Active Directory, there is a WMI provider. Th is allows you to use the following method of interacting with WMI:
$objReg = [WMICLASS]”\\.\root\cimv2:StdRegProv”
Administering
Service Delivery
“Configuring Active Directory Dependencies,” we’ll look at how to automate DNS.
The majority of the ways you’ll interact with DNS will use WMI.
PART I
50
CHAPTER 1
•
USING POWERSHELL WITH
ACTIVE DIRECTORY
This example connects to the root\cimv2 namespace and uses the class
StdRegProv, which provides access to the system’s registry.
In addition to using the WMI provider, PowerShell provides a series of cmdlets you
can use to interact with WMI. You can view these cmdlets by running the following
command:
PS C:\> get-command -Noun *wmi*
CommandType
Name
Definition
-----------
----
----------
Cmdlet
Get-WmiObject
Get-WmiObject [-Class] ...
Cmdlet
Invoke-WmiMethod
Invoke-WmiMethod [-Clas...
Cmdlet
Register-WmiEvent
Register-WmiEvent [-Cla...
Cmdlet
Remove-WmiObject
Remove-WmiObject [-Clas...
Cmdlet
Set-WmiInstance
Set-WmiInstance [-Class...
The two WMI cmdlets you’ll be primarily working with in this book are
Get-WmiObject and Set-WmiObject. These cmdlets are respectively used for
retrieving WMI information and configuring WMI information. We’ll be discussing how to use these cmdlets throughout the remainder of this book.
Prepare Your Environment for the Active Directory Module
Before you can begin using the Active Directory module to manage Active
Directory, you’ll need to take some steps to prepare the environment. Depending on
your current Active Directory configuration, you may need to make changes on a
domain controller in your forest.
Configure Domain Controllers
As mentioned in the previous section, the Active Directory module requires that at
least one domain controller be running ADWS or ADMG.
Install Active Directory Web Services
ADWS will run only on your Windows Server 2008 R2 domain controllers. When
you promote a Windows Server 2008 R2 member server to a domain controller,
the ADWS component is automatically installed and enabled. One situation you
may encounter is that if there is a firewall between your domain controller and the
computer from which you’re running the Active Directory PowerShell module, the
module may not be able to connect to ADWS. To fix this, you should ensure that
you allow traffic on TCP port 9389 to communicate with the domain controller.
Install the Active Directory Management Gateway
If you don’t have a Windows Server 2008 R2 domain controller, you can still use the
Active Directory PowerShell module by installing ADMG on one of your domain
controllers. ADMG is supported on the following domain controller operating
systems:
▶
Windows Server 2003 SP2
▶
Windows Server 2003 R2
▶
Windows Server 2008 SP2
As a prerequisite, the ADMG requires the .NET Framework 3.5 Service Pack 1.
You’ll need to install it before you can install ADMG. Follow these steps to install
ADMG on a legacy domain controller:
1. Download the appropriate ADMG installation package from the Microsoft
website at the following URL: www.microsoft.com/downloads/
en/details.aspx?displaylang=en&FamilyID=0089
40c6-0296-4597-be3e-1d24c1cf0dda.
2. Launch the installation package that you downloaded to start the installation.
3. On the opening screen of the installation wizard, click the Next button.
4. On the License Agreement screen, read the license and then choose I Agree
(assuming that you agree with the terms of the license). Click Next to
continue.
5. ADMG will be installed. After the installation is finished, click the Finish
button.
6. You can verify that ADMG was installed by opening the Services MMC
(Microsoft Management Console) snap-in and checking to see that the
ADWS service is installed and running, as shown in Figure 1.15.
51
Administering
Service Delivery
U N D E R S TA N D H O W P O W E R S H E L L A N D AC T I V E D I R E C T O RY WO R K T O G E T H E R
PART I
52
CHAPTER 1
•
F I G U R E 1.15
USING POWERSHELL WITH
ACTIVE DIRECTORY
ADWS Running on a Windows 2003 domain controller
Use Windows 7 or Windows Server 2008 R2 for Administration
When you promote a Windows Server 2008 R2 server to a domain controller, the
Active Directory module is installed by default. Therefore, you can use the Active
Directory PowerShell module on the domain controller without additional configuration. However, if you want to use PowerShell to administer Active Directory with
the Active Directory module from Windows Server 2008 R2 member servers or
Windows 7 workstations, you’ll need to install the modules separately.
The Active Directory module is included in the Remote Server Administration
Tools (RSAT). In Windows Server 2008 R2, this doesn’t require a separate download. You can install the Active Directory module by running the following series of
commands in PowerShell:
PS C:\> Import-Module ServerManager
PS C:\> Add-WindowsFeature RSAT-AD-PowerShell
One of the prerequisites for using the Active Directory module is version 3.5.1 of the
.NET Framework. Therefore, if you don’t already have the .NET Framework 3.5.1
installed, it will be installed automatically when the Active Directory module is
installed.
Windows 7 doesn’t include the RSAT feature by default. Therefore, you’ll need to
download and install these tools before you can enable the Active Directory module
on Windows 7. You can download RSAT from Microsoft’s website at the following
URL: www.microsoft.com/downloads/en/details.aspx?FamilyID=
7d2f6ad7-656b-4313-a005-4e344e43997d.
After you install RSAT, you can use the following steps to install the Active
Directory module in Windows 7:
1. Click the Start menu, and select Control Panel.
2. In the Control Panel, click Programs and then Turn Windows Features On Or
Off. The Windows Features dialog opens.
3. In the Windows Features dialog, browse to Remote Server Administration Tools
‚ Role Administration Tools ‚ AD DS And AD LDS Tools. Select the Active
Directory Module For Windows PowerShell check box, and then click OK.
Use an Older Client for Administration
The Active Directory module can only be installed on Windows 7 and Windows
Server 2008 R2. However, because of the remoting capabilities in PowerShell v2,
you can use an older client operating system to manage Active Directory with the
Active Directory PowerShell module.
To accomplish this, you’ll still need a computer in the environment with the Active
Directory PowerShell module installed. On your older client machine, you’ll need
to install PowerShell 2.0 and Windows Remote Management 2.0, which you can
download from Microsoft’s website at the following URL: http://support
.microsoft.com/kb/968929. Establish a remote PowerShell session between
your older client and the server that has the Active Directory module installed, and
the Active Directory module cmdlets will be proxied on your client. This means
you’ll type the command into your client, but it will really execute on the computer
with the Active Directory module.
Follow these steps to administer Active Directory with an older client:
1. Create a remote session from your client by executing the following command:
$session = New-PSSession -ComputerName MgtServer01
2. Import the Active Directory module into the remote session:
Invoke-Command { Import-Module ActiveDirectory } -Session i
$session
53
Administering
Service Delivery
U N D E R S TA N D H O W P O W E R S H E L L A N D AC T I V E D I R E C T O RY WO R K T O G E T H E R
PART I
54
CHAPTER 1
•
USING POWERSHELL WITH
ACTIVE DIRECTORY
3. Export the AD cmdlets from the remote session into a local copy of the
module. The following example references all the cmdlets that contain -AD in
the name:
Export-PSSession -Session $session -CommandName *-AD* i
-OutputModule LocalADModule -AllowClobber
4. Import the local module that you just created:
Import-Module LocalADModule
After you follow these steps, you should be able to execute the Active Directory
cmdlets from your older Windows client. Remember, though, that the cmdlet itself
will really be run from the machine with which you establish the remote session.