1
Help.rtf
Page 1 of 270
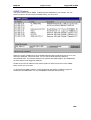
PageR Enterprise
CPL Systems
User Manual
Networks and Temperature Monitoring
www.pager-enterprise.com
(C) CPL Systems All Rights Reserved.
See Appendix for quick-start help notes
PageR Enterprise runs on Microsoft Windows Desktop or as a SERVICE and monitors
a list of MONITORED OBJECTS that you set up, such as Windows Event Logs, TCP/IP
clients, Windows Systems, SNMP, Discs and Temperature using ip hardware devices such
as Room Alert, TemPageR, TEMPer Gold, IT Watchdogs and many others.
PageR Enterprise checks each Monitored Object in turn and determines if an Alarm
condition exists ie if there is a problem. Alarms are posted to the PageR log window, disk log
file or Windows Event Log. Alarm notification can include EMAIL, SMS TEXT, VOICE CALL,
INSTANT MESSENGER, TWITTER etc and the triggering of external programs for
CORRECTIVE ACTION.
Monitored Objects
+
These are the items and events which we watch for problems. Click the new
icon to see
these. There is a huge choice from Event Logs to SNMP to WMI to monitor every
conceivable problem. Special objects are provided for Room Alert, TemPageR, TEMPer
Gold, IT Watchdogs, Temp Alert and many other temperature monitoring devices.
Monitored Objects each contain one or more ALARM OBJECTS.
Alarm Objects
These are the rules which govern alerting when a problem is detected and can include alert
escalation, task objects, problem correction, server shutdown etc. Alarm Objects each
contain one or more CONTACTS.
Contacts
These are the people we contact when there is an alert and contact also defines the
methodology of communication, eg email, SMS TEXT, Voice, Instant Message etc.
When first installing PageR we therefore recommend setting these three items up in reverse
order, since they depend on each other, ie (1) contacts, (2) alarm objects (3) monitored
objects.
On any screen in PageR Enterprise you can press the
F1 key for context help.
1
Help.rtf
PageR Enterprise
Page 2 of 270
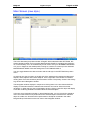
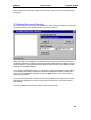
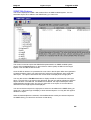
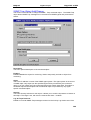
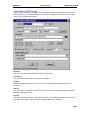
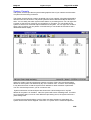
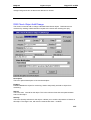
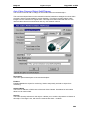
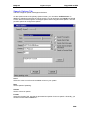
Main Screen (new style)
This is the Alternate (new) Main window of PageR. When selected under SETTINGS, this
window appears initially and is normally displayed while PageR is monitoring the network if
run on the Desktop. If run as a SERVICE you can view it from your INTERNET BROWSER
or if you run PageR on the desktop while running as a service it comes up in the restricted
MAINTENANCE MODE. All these settings are in OPTIONS/GLOBALS.
You can toggle between the above window and the old style in the SETTINGS drop down
menu.
An explorer tree view is shown on the left side of the window and organizes the Monitored
Objects, Alarm Objects and Contact Objects. On the right side of the window is a tabbed
viewing area. Each tab contains a particular kind of viewer. The primary viewer is the Activity
Log window and a Navigation window.
The Navigation window displays in response to clicking items in the tree view and allows
display of information about the selected tree view item and can be clicked for further
navigation. In either the tree view or Navigation window, clicking a specific object will display
a new tab containing detailed information about the selected object.
In the tree view, Navigation window or object Detail window, you can right click to display a
menu of functions that can be performed on the selected object. Note that if the selected
object is a folder, the functions will be performed on all objects contained in the folder.
Drag and Drop is allowed from the tree view to the Navigation window.
2
Help.rtf
PageR Enterprise
Page 3 of 270
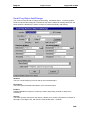
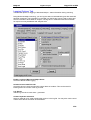
Monitored Objects Selection Screen
+
Click the blue
icon in the main screen to see the following Monitored Object types which
are available (double-click to open one for setup):
Press the
F1 key for help after choosing an object.
Monitored Objects are the heart of PageR Enterprise monitoring. These are the different
types of event we can watch out for, and there is a wide variety (over 50 types) available to
monitor all possible kind of problem.
Most popular Monitored Objects are 1)
PING
2) EVENT LOGS
3) WINDOWS SYSTEM
4) PERF QUERY (SNMP)
5) DISK FILE
6) WEB PAGE
7) Room Alert and TemPageR
8) WINDOWS SERVICE
9) DISK SPACE / DISK DRIVES
10) UNIX SYSLOG
3
Help.rtf
PageR Enterprise
Page 4 of 270
Operation
To operate PageR, you create a list of objects to monitor and one or more Alarm Objects.
Alarm Objects contain the CONTACTS who will be notified. An Alarm Object also defines the
actions to be taken.
A Contact Object contains a person or persons who receives alarm notifications. Each
Contact can have different notification options. One or more Contacts or Contact groups can
be associated with Alarm Objects. Contacts also support notification escalation schemes.
From scratch, we normally set up in REVERSE ORDER – (1) CONTACT OBJECT, (2)
ALARM OBJECT, (3) MONITORED OBJECT. If contact and alarm objects already exist go
straight to monitored object setup.
Once you have created one or more Monitored Objects, start monitoring by clicking the Main
Window button on the Main window tool bar. Monitoring begins and continues until you click
the Stop button or exit the program. You can set PageR to start minimized and begin
monitoring automatically.
PageR executes its tasks in the following order –
1) scan all MONITORED OBJECTS once
2) execute any ALARM OBJECTS which were triggered by the scan
3) repeat scan of MONITORED OBJECTS, and so on.
TRACE MODE
Trace mode creates a debug file which can be sent to your supplier for analysis if you
experience any problems with PageR.
4
Help.rtf
PageR Enterprise
Page 5 of 270
Monitored Object Types
Event Log
Detects new event records in the System, Application, Security or other
event logs on the local or any remote Windows system. Alerts are raised
based on the severity of the event or by keyword matching on the content of
the event record text.
Windows System
Checks any Windows system to determine if it is up. Alert is raised if the
Windows system does not respond to a probe. Supports Windows NT and
later. This object replaces the NT, 2000 and XP System objects described
above.
Windows Update
Checks any Windows 2000 or later system for updates available from
Windows/Microsoft Update service. Alert is raised if selected updates are
available and not applied to the system.
Disk Space
Monitors disk volume free space on Windows systems. Alert raised if free
space falls below a specified amount or percent of total space.
Disk Drives
Monitors the physical disk drives on Windows systems. Alert raised if
problems are found.
NetWare Server
Checks NetWare server to determine if it is up. Alert is raised if the server
does not respond to a probe.
PING TCP/IP Device (Ping)
Checks any device supporting TCP/IP by pinging it. Alert is raised if the
device does not respond to a ping.
5
Help.rtf
PageR Enterprise
Page 6 of 270
Host Process
Checks host system (via Telnet) for a list of processes expected to be
present. Alert is raised if a process is not present.
Host Volume
Checks host system (via Telnet) for disk volume free space. Alert is raised if
volume free space drops below a selected threshold.
Host Login
Checks availability of host systems and performs monitoring functions by
logging on to the host.
Disk File
Examines new records in disk files and checks for Alert conditions by
matching the files contents against a list of words or phrases.
Service
Checks Windows Services on the local or remote Windows system and
raises an Alert if the service is not running. Can attempt to restart failed
services.
Performance Counter Query
Checks Windows Performance Counters on the local or remote Windows
system and raises an Alert if counter values are out of tolerance.
Windows Process checking
Checks a list of processes on the local or remote Windows system to ensure
the processes are running. Raises an Alert if a process is not present.
Windows Management Instrumentation (WMI) Query
Checks WMI objects on the local or remote Windows system and raises an
Alert if WMI object values are out of tolerance.
6
Help.rtf
PageR Enterprise
Page 7 of 270
Windows Management Instrumentation (WMI) Events
Monitors the local or remote Windows system using WMI Event Reporting
and raises an Alert if WMI detects the defined events.
Domain Name System
Checks DNS servers and raises and Alert if the server does not respond or
incorrectly resolves sample requests.
SNMP Query
Checks SNMP Mib object values on SNMP agents and raises an Alert if
object values are out of tolerance.
TCP Services
Checks the availability of TCP Network Services (such as FTP, SMTP, HTTP
and more) on selected systems.
Web Page
Checks web servers by Downloading a specified web page from the server.
Raises an Alert if the page fails to download or takes too long.
Email Check
Reads email messages on mail server and scans them for text strings.
Generate Alert or execute Task if strings found.
Email Ping
Sends a unique mail message to a mail server and tries to read that
message back in a set time period to monitor timely mail delivery.
Bandwidth
Monitors network traffic on a target system's network interfaces. Generates
Alert if the traffic level exceeds preset thresholds.
Directory
Monitors a Windows disk directory and generates an Alert if total file size or
count exceeds preset thresholds.
7
Help.rtf
PageR Enterprise
Page 8 of 270
DialUp
Dial a modem number and test for successful connection in the allowed time.
SQL Query
Execute an SQL query against an SQL server and test for successful
completion.
MBSA
Execute a Microsoft Baseline Security Analyzer scan against a target system
and raise an alert if security issues are found.
Hosting System
When PageR is used with the Message Server device, the Message Server
can detect failure of the system to which it is attached and execute a page
notification.
Room Alert™ Environment Monitor
PageR can monitor a Room Alert environment monitoring device attached to
the com port of the Windows system where PageR is running. Using Room
Alert, PageR can detect a variety of environmental problems. The Room
Alert device and environmental sensors are available from CPL Systems Ltd.
Room Alert PLUS™ Environment Monitor
PageR can monitor a Room Alert PLUS environment monitoring device
attached to the com port of the system where PageR is running. Using Room
Alert PLUS, PageR can detect a variety of environmental problems. The
Room Alert PLUS device and environmental sensors are available from CPL
Systems Ltd.
TEMPer Environment Sensor Devices
PageR can monitor the TEMPer series of temperature and humidity sensing
devices.
8
Help.rtf
PageR Enterprise
Page 9 of 270
Server/Listener Objects create a service that waits for and responds to
external events directed to PageR.
Syslog Server
Receives Syslog logging messages from Unix systems and raises Alerts as
needed based on message severity or searching the message for specified
words or phrases. Allows PageR to monitor Unix host systems.
SNMP Trap Server
Receives SNMP Trap messages from SNMP agents and raises Alerts.
Allows PageR to handle SNMP Traps.
Axis Video Camera
Receives Motion Detection messages from Axis video camera and generates
Alerts. Can also capture and record images from cameras on a regular basis.
Utility/Action Objects are objects that perform some utility function on a
regular basis.
Email to Page
On a regular basis, examines messages in a mailbox and generates page
requests based on the messages. Allows users to page Contacts by sending
an email.
FTP File Get
On a regular basis, retrieves disk files from system supporting FTP. Used to
bring disk log files to the local system for examination by the Disk File
monitored object or to retrieve paging script files generated on other
systems.
Heart Beat
On a regular basis, generates a notification that tells the recipient that PageR
is running.
Task
A task object will execute a script, command file or program on a repetitive
basis or as part of an Alert response. Tasks can also be used to create user
defined monitored objects.
9
Help.rtf
PageR Enterprise
Page 10 of 270
Main Screen - Activity Log Window
The Activity Log area of the Main window displays a running log of PageR activity and
alarms. You can control the level of logging detail for non alarm activity on the Global
Options tab of the Options window.
All alarms and internal errors are logged to the window regardless of detail level setting.
Each line in the window has a severity symbol, date and time of the activity or alarm and a
description of the activity or alarm. The severity symbols are:
Informational message
Alert (internal errors, warnings)
Alarm notification
You can set the number of lines kept in the log window buffer on the Global Options tab of
the Options window. When the number of lines in the log window exceed this value, the
oldest line is deleted to make room for a new line.
By default, if the log window is scrolled to the bottom, new lines added to the window will
scroll the window down, keeping the newest line in view. However, if you scroll up, the
window will remain positioned at the point you have scrolled to, even when new lines are
added to the log window buffer. You can set the Auto Scroll Log Window option on the
Global Options tab to have the log window automatically repositioned to the bottom
whenever a new line is added.
Status Bar
A status bar is displayed at the bottom of the Main window. It shows current status
information:
Current Activity
Displays the current state of PageR.
Interval
Displays the current sleep Interval in seconds.
Current Alarms
Displays the current number of active alarms.
Time of Last Activity
Date and time of last activity (log window update).
10
Help.rtf
PageR Enterprise
Page 11 of 270
Main Window Drop Down Menus
The Main window has these pull down menus:
File Menu
Start Monitoring
Click to start network monitoring.
Stop Monitoring
Click to stop network monitoring.
Status
Display object status window.
Systems Console
Display the Systems Console.
Network Event Console
Display the Network Event Console.
Hide
Hide PageR from view, do not display in tool bar. You can access
PageR when it is hidden by left clicking tray icon (display main window )
or right clicking the tray icon (display task bar menu). Hiding is supported on
NT 4.0 and later.
Clear Log Window
Clear the activity log window.
Print Screen
Print the Main window. You may also press function key 12 (F12)
on any window to print that window.
Send a Manual Page
Display the Manual Paging window.
View Log File
Display the Disk Log File Viewer.
View Event Log
Display the Event Log Viewer.
Performance Monitor
Displays the Performance Monitor application.
Write test record to Event Log
Writes a record to the Application Event Log that simulates a
real error event. This can be used to test the Event Log Monitored
Object .
Exit
Click to shutdown PageR and exit the program.
11
Help.rtf
PageR Enterprise
Page 12 of 270
Settings Menu
Options
Display the Options (configuration) window.
More Options
Display the second Options (configuration) window.
Save Main Window Size and Location
Record the main window size and location and set that size and location
subsequent start ups.
Save Configuration to Registry
Save the configuration to the Registry immediately.
Backup Configuration when saved
Make a backup of the configuration to the file Backup.cfg in the install
directory when configuration is saved.
Export Configuration to disk file
Save the configuration to a disk file. The configuration is written to a
disk file with the .cfg extension in XML format. This file can serve as
a configuration backup, a debugging tool or to replicate configurations.
Contact tech support for assistance with importing a saved configuration.
Set Start Up Configuration
Select or type the name of the Configuration you wish to use the next
time PageR is started. It does not change the currently loaded
Configuration. See Managing Configurations for more information.
Help Menu
Display Help
Click to display the PageR help. Pressing function key one
(F1) on any screen will display help about that screen.
About
Click to display the About box.
Sending Alerts
The Notifications that can be made are:
Email
PageR can send an alarm notification via email using SMTP or MAPI protocols. MAPI
requires Microsoft Messaging on the system where PageR is executing. The recipient of
notification email can be set at a global level and by monitored object.
Paging and SMS TEXT
PageR can page a pager or cell phone using a modem attached to a com port of the system
12
Help.rtf
PageR Enterprise
Page 13 of 270
where PageR is executing. Paging is controlled by paging (.MSG) files. These files contain
the Alert Script.
Paging files are created by the user and stored in the Alerts directory. Sample paging files
can be found in the Sample directory.
Message Broadcast
You can send alarm messages to other Windows systems via the Windows Messenger
Service . Alarm messages can be sent to a specific system or to all systems in the Windows
domain. Such messages are displayed to the user of the target system in a popup window.
Execute External Applications
You can have PageR execute an external application when alarm events begin and when
they end. An external application can be a program or a batch/command file. This allows
PageR to interact with other applications, such as paging systems, fax systems, help desk
systems and others.
Instant Messaging
You can have PageR send activity logging and alarm messages to Instant Messaging
clients. This feature uses MSN Messenger and either the .Net or Ex change Messenger
Services.
Voice Call
Using a VOICE MODEM PageR can make a simulated voice call which uses the text in the
alarm settings.
Task Bar Tray Icon
When PageR is running its icon appears in the Task Bar Tray. This tray icon allows
access to PageR after it has been hidden from view. When PageR is running, it can have
three visual states. It can have one or more windows visible on the desktop, it can be
minimized to the Task Bar and it can be hidden.
You can hide PageR by clicking the Hide button on the Main window File menu. Once
hidden, PageR is executing but is not visible and does not appear in the Task Bar. When
hidden, PageR is accessed via the icon in the Task Bar Tray.
Place the mouse cursor over the icon to see the number of current alarms.
Right click the icon to see a more detailed status report and a menu of options.
Left click the icon to display the Main window. If alarms are posted while PageR is minimized
or hidden, the icon will change to the alarm symbol until you display the Main window and
view the alarm report in the log window.
13
Help.rtf
PageR Enterprise
Page 14 of 270
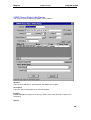
Options Window
The Options Window contains a series of tabs that give access to PageR's configuration
options. Click the main screen icon or go to SETTINGS/OPTIONS.
The Options window allows access to PageR configuration settings. The settings are
organized onto tabs. Switch between setting tabs by clicking on the appropriate tab.
The settings tabs are:
Monitored Objects Tab
Alarm Objects Tab
Contact Objects Tab
MSG Files Tab
14
Help.rtf
PageR Enterprise
Page 15 of 270
Search String Files Tab
Paging Notification Options Tab
email Notification Options Tab
Global Options Tab
More Global Options Tab
Logging Options Tab
Monitored Object Groups Tab
Click More Options button to see more.
After making changes to one or more tabs, you can click CANCEL to discard the changes
and return to the Main window or OK to accept all changes and return to the Main window.
Accepted changes are retained temporarily until saved to the Registry or until you exit
PageR. If there are unsaved changes at exit, you will be prompted to either keep the
changes to the Registry or discard them.
Note that the first time the Options tab is displayed in a PageR session, PageR scans your
network to build a list of systems. This network scan can take from a few seconds to a few
minutes depending on the complexity of your network.
15
Help.rtf
PageR Enterprise
Page 16 of 270
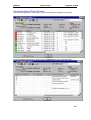
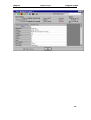
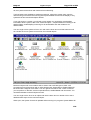
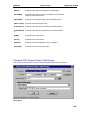
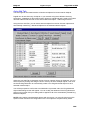
Monitored Object Status Window
This window displays the current status of the network objects that PageR is monitoring.
Here is the same screen with the object window shifted right to show more data fields.
16
Help.rtf
PageR Enterprise
Page 17 of 270
Tool Bar Buttons (left to right)
Enable/disable Auto Update
When enabled, the Status window is updated whenever any objects status changes.
All Objects / Alarms Only / Suspended & Disabled Only
Use these three buttons to control the objects shown. All objects, only objects with in
progress alarms, only objects that are suspended or disabled.
Sort by Object Type (alpha) or Severity
Use these two buttons to select the sort order of the objects displayed.
Display Help for this Window
Select Object Type
Use this drop down box to limit the objects displayed to a specific object type. You can also
limit the objects displayed to a specific Severity value.
Run Statistics
This information tells when PageR was started, when monitoring last started and when the
last scan of the monitored object list was started. It gives elapsed times for each of these in
days:hours:minutes format. It indicates the number of scans that have been performed since
monitoring last started and how many internal errors have occurred.
Alarms
Shows the total number of alarms detected since PageR was started and how many alarms
are currently in progress. Also shown is the number of pages executed since scanning
started.
The width of the columns in the monitored objects list box can be changed by placing the
cursor on the edge of a column header and dragging right or left.
Status/Type
Shows a status icon and Monitored Object type for each object in the Monitored Object List.
The default status icons are:
No alarm in progress for object
An alarm is in progress for the object
Monitoring is suspended for the object
Identifier
This is the unique identifier for the monitored object. You can click on the column header to
toggle this column to display the object description text.
Severity
This is the Severity value assigned to the monitored object. You can click on the column
header to sort the display by Severity.
You may click on the column header of any of the following columns to move that column to
be the next column after Severity. The first three columns cannot be moved. If you set a new
column to be first after Severity, this will be retained for the next time the Status Window is
17
Help.rtf
PageR Enterprise
Page 18 of 270
displayed.
Last Action
Time of last action on the object. An Action can be a scan, a page delivery, suspend/resume
or anything that changes the state of the object.
Alarms
Total number of alarms detected for this object since PageR started.
Last Alarm Start
Starting time of last alarm event for the object.
Alarm ID
Unique alarm identification number of the last alarm. A unique Alarm ID is assigned to
every alarm event.
Last Alarm End
Ending time of last alarm event for the object.
Last MSG File Sent
Time that the last paging file (page) was sent for the object.
Times
Number of times that the paging file (page) was sent for the current/last alarm.
Last Alarm Description
Description of the current/last alarm event for the object.
Object Pop-Up Menu
You may place the mouse cursor over the Status/Type text of an object and right click to
display the Popup Menu for the object. This menu allows you to suspend/resume monitoring
for the object, to clear the current alarm or to display a detailed list of the information PageR
knows about the Monitored Object.
The Monitored Object Attributes for an object is a list of the current values for all data
items PageR knows about a Monitored Object. After viewing the information, click anywhere
in the information window to return to the normal Status display.
18
Help.rtf
PageR Enterprise
Page 19 of 270
19
Help.rtf
PageR Enterprise
Page 20 of 270
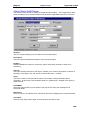
Global Options Tab
This tab contains option settings that control the overall operation of PageR.
Each option on this tab is explained below:
Configuration Name
Sets the name associated with the current Configuration. A "configuration" is all of the
settings currently in effect and visible in the various Options tabs. See Managing
Configurations for more information.
Interval
Sets the number of seconds PageR sleeps between scans of the monitored objects.
Auto Start Scanning
If set, PageR will begin scanning and minimize itself at start up. If not set, you must start
scanning manually via the Start tool bar button.
Activity Logging Level of Detail
Ranges from 0-3 and sets the level of detail logged to the Main window log window and the
disk activity log . 0 is least detail and 3 is most detailed. Normally, this should be set to 0. All
alarms and errors are logged regardless of the level of detail.
20
Help.rtf
PageR Enterprise
Page 21 of 270
Log to Disk
Enables activity logging to disk file PageR.log.
Append
Sets the activity disk log to append when starting PageR.
Log File Size
Sets the size of the disk activity log file before wrapping occurs. In K bytes.
Log to another System
Enables activity logging messages to be sent to another copy of PageR on another system.
System
Name of Windows system or NetWare server to log to. You can click the binoculars to
display the IP addressees Name Selection screen.
Receive Logging from another System
Enables PageR to receive log messages from another copy of PageR Enterprise on another
system and record them in the local logging environment.
Port
Sets the TCP/IP port number used for sending and receiving remote logging.
Log Window Size
Sets the number of lines of information in the Main window activity log buffer. Controls how
far back you can scroll the activity log.
Auto Scroll Log Window
If set, any new activity written to the Main window activity log will automatically scroll the
activity log to the bottom so that the new activity is visible. If not set and the log is scrolled
back, new activity is added to the log but the display is not repositioned.
Enable Alarm Broadcast
Globally enables sending of alarm messages to another system or logged on user on the
network via the Messenger Service . If set and a target system/user is defined at the
Contact level, alarms are sent to that target. If enabled and a target is not defined at the
Contact level, alarm messages are sent to the target defined as the default. The alarm
appears on the desktop of the target system in a popup box or in the WinPopUp utility. The
Messenger Service must be running on the local and target systems. You can select the
local Domain name in the drop down list to broadcast alarm messages to all systems in the
domain.
Log Alarms/errors to Event Log
If set, alarm messages and internal errors are logged to the Application Event Log on the
specified system. Leave the system box blank for the local system or type/select another
system to receive logged events.
Set Global Quiet Times
Quiet time is a period of time (start to stop) during the day where alarm paging is
suppressed. This is useful to prevent pages when you are on site or just do not want any
pages. You can define multiple quiet periods on the hour or Halfhour for each day of the
week. Click the button to display the Quiet Time Selection screen.
21
Help.rtf
PageR Enterprise
Page 22 of 270
Alarm on Processing Errors with Alarm Object
You can select an Alarm Object from the drop down list if you want to generate an alarm
notification when PageR encounters errors during execution. These are not Monitored
Object alarms, but errors preventing PageR from functioning normally.
Disk Log File View Window
This window allows you to view the PageR activity log file. The activity log file is a longer
term recording of the same information that appears in the Main window log box. Depending
on configuration, the activity log is restarted each time PageR is started or each new
executions log is appended to the previous one. The disk log file will wrap when its size
exceeds the configured maximum.
The Disk Log File View window displays a snapshot of the current contents of the activity log
file. You can refresh the display with the DISPLAY button or print the contents of the log
window with the PRINT button. Click the OK button when you are done viewing the log file.
22
Help.rtf
PageR Enterprise
Page 23 of 270
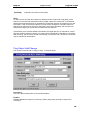
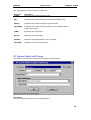
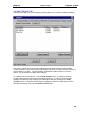
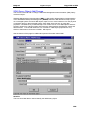
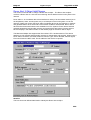
Paging Script (.MSG) Files Tab
This tab allows Alert Script , Message Server or Modem paging script files to be created or
modified.
The left pane displays a list of the .MSG files present in the Alerts directory. Click Show
Samples to display the files in the Samples directory. Click on a file to display its contents in
the right pane. You can edit the contents in the right pane and click SAVE to update the
paging file.
If you edit a file in the samples directory and click SAVE, the file will be saved in the Alerts
directory, thereby preserving the sample files.
Click NEW to create a new paging file.
Any text file with valid Alert Script, Message Server or Modem commands can be used as a
message file. The .MSG extension is a convention and is not required.
23
Help.rtf
PageR Enterprise
Page 24 of 270
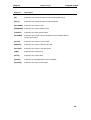
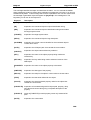
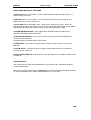
KEYWORDS
You can use substitution keywords in the paging file, which will be replaced with their run
time values when the paging file is processed. Keywords appear as [keyword] or
[keyword=defaultvalue] in the file text. The keywords you can use in paging files are:
Keyword
[TYPE]
Description
expands to the monitored object's type.
[ID]
expands to the monitored object's unique identification string.
[DESC]
expands to the monitored object's long description.
[ALARMID]
expands to the unique numeric identifier for the monitored object's
current alarm event.
[ALARM]
expands to the monitored object's alarm message text for the
current alarm (used for alphanumeric pagers).
[ALARMX]
expands to extended information about the current alarm (not
available on all objects).
[CONTACT]
expands to the name of the Contact being paged, if available.
[PHONE]
expands to the pager phone number defined for the Contact being
paged or the global pager phone number.
[PAGERID]
expands to the pager ID number defined for the Contact being
paged or the global pager ID number.
[TIME]
expands to the current time.
[DATE]
expands to the current date.
[AGENT]
expands to the the application name of "PageR".
[SYSTEM]
expands to the name of this system.
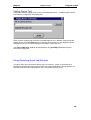
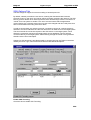
Search Strings Tab
This tab allows Search String files to be created or modified.
Various monitored objects allow the specification of search strings. Search strings are text
strings that are compared to textual representations of monitored object information to
deterine if alarm conditions exist. On the monitored object add/change screen you may
specify a list of search strings separated by semicolons or a disk file that contains a list of
search strings, one string to a record. Search strings contain one or more words and may
employ pattern matching or Visual Basic Script.
The Options screen contains a simple editor to create and update search string files.
24
Help.rtf
PageR Enterprise
Page 25 of 270
The left pane displays a list of the Search String files (.STR) present in the Search directory.
Click Show Samples to display the files in the Samples directory. Click on a file to display its
contents in the right pane. You can edit the contents in the right pane and click SAVE to
update the Search String file.
If you edit a file in the samples directory and click SAVE, the file will be saved in the Search
directory, thereby preserving the sample files.
Click NEW to create a new .STR file.
Search String files can be any text file. The .STR extension is just a convention.
Search String Details
Each line may contain one or more words and is treated as a unit when searching target text
for matches. Pattern matching is available. Enclose pattern match strings in quotes.
Examples:
A file with the strings:
Strings entered in the box on the MO:
TEST
TODAY IS MONDAY
"A?C"
"*IS*"
TEST;TODAY IS MONDAY;"A?C";"*IS*"
25
Help.rtf
PageR Enterprise
Page 26 of 270
These strings would match any target text containing the word TEST or the sequence of
words TODAY IS MONDAY, or any text that matches the wild card, Such as AXC or ABC.
The second pattern would match the target text TODAY IS MONDAY.
A match string can be prefixed with the ! character to invert or NOT the result of the string
match. Thus, the string set: !TEST;!"ABC" would match any target text that does not
contain the strings TEST or ABC.
String Matching with VB Script
You can write Visual Basic Script to perform more complex string matching tasks. VB Script
is enclosed in square brackets []. If script is entered in the search string box, each line of the
script is terminated with a semicolon. If script is entered in a file, each line of script is on a
separate line of the file, with the first line of script starting with a [ and the last line ending
with a ]. See the discussion of using scripts below for more information.
Pattern Matching
The pattern-matching features allow you to use wildcard characters, character lists, or
character ranges, in any combination, to match strings. The following table shows the
characters allowed in pattern and what they match:
Characters in pattern
?
*
#
[charlist]
[!charlist]
Matches in string
Any single character.
Zero or more characters.
Any single digit (0–9).
Any single character in charlist.
Any single character not in charlist.
A group of one or more characters (charlist) enclosed in brackets ([ ]) can be used to match
any single character in string and can include almost any character code, including digits.
Note: To match the special characters left bracket ([), question mark (?), number sign (#),
and asterisk (*), enclose them in brackets. The right bracket (]) can't be used within a group
to match itself, but it can be used outside a group as an individual character.
By using a hyphen (–) to separate the upper and lower bounds of the range, charlist can
specify a range of characters. For example, [A-Z] results in a match if the corresponding
character position in string contains any uppercase letters in the range A–Z. Multiple ranges
are included within the brackets without delimiters.
Other important rules for pattern matching include the following:
An exclamation point (!) at the beginning of charlist means that a match is made if any
character except the characters in charlist is found in string. When used outside brackets,
the exclamation point matches itself.
A hyphen (–) can appear either at the beginning (after an exclamation point if one is used) or
at the end of charlist to match itself. In any other location, the hyphen is used to identify a
range of characters.
When a range of characters is specified, they must appear in ascending sort order (from
lowest to highest). [A-Z] is a valid pattern, but [Z-A] is not.
26
Help.rtf
PageR Enterprise
Page 27 of 270
The character sequence [] is considered a zero-length string ("").
Using Scripts for string matching
You can write a VBScript function to perform complex pattern matching tasks. Your script
does not need a SUB, FUNCTION or END statements (unless you wish to end before the
final line of the script). Exposed to your script is a variable called teststr which contains the
text to be searched (provided by the monitored object). You indicate a match (which results
in an alarm being generated) by setting the variable match to true. The Script Globals object
and the monitored object that called for the string match, are also exposed through the SG
object reference.
Here is a sample script used with the Disk File Monitored Object. It simply looks in the disk
file record passed in the teststr variable for the presense of the string "error":
A file with the script:
[if instr(1, teststr, "error", 1) <> 0 then
match=true
end if]
Script entered in the search string box on the MO:
[if instr(1, teststr, "error", 1) <> 0 then;match=true;end if]
You can use all features of VB Script except for global variables and user written functions or
subroutines. Sample scripts are located in the \Search\Sampes directory.
27
Help.rtf
PageR Enterprise
Page 28 of 270
Paging Notifications Options Tab
This tab configures alarm notification by paging using a Message Server or Modem.
To enable paging with a Message Server or Modem, check the Enable Paging box.
If paging is enabled, select the device type as Message Server or Modem.
Select the appropriate baud rate, parity, data and stop bits and the com port that the
device is attached to.
Minimum Time Between Pages
Sets the minimum time in seconds that must elapse between page requests sent to the
device. This time can vary but should be at least two minutes for the Message Server.
Modem Hang Up Wait
Sets the amount of time in seconds that PageR waits after sending a page via a Modem
before forcing a Hangup of the modem. Usually 20-30 seconds.
Number of Times Page is Repeated
Sets the number of times that a page for an alarm event is repeated.
Page Repeat Delay
Sets the time in seconds between repeats of a page if the number of times to repeat is
28
Help.rtf
PageR Enterprise
Page 29 of 270
greater than 1.
Alert Script Paging
Check this box to enable Alert Script alphanumeric paging with a modem. See the
discussion of Alert Script for more information.
Pager Service Phone Number
This is the default pager phone number. This value is substituted for the [PHONE]
substitution parameter when it appears in a paging file. A phone number defined for a
Contact overrides this value. You may type a number in the box or select a number from the
drop down list of common pager services.
Pager ID
This is the default pager ID string. This value is substituted for the [PAGERID] substitution
parameter when it appears in a paging file. A pager ID defined for a Contact overrides this
value.
Send Paging files to SPIN directory on system
Check this box to send paging files to the SPIN directory on another system running PageR
instead of processing them locally. If this is checked, enter the name of the other system in
the system box.
Enable Message Server Polling
Click this box to have PageR send the POLL paging file to the Message Server on a regular
basis. The Message Server uses the regular arrival of the POLL file (or any other paging file)
to confirm that the local system is up.
Paging Device Test/Setup
Click this button to send a paging file to the Message Server or Modem to test the paging
function.
29
Help.rtf
PageR Enterprise
Page 30 of 270
E-Mail Notification Options Tab
This tab configures alarm notification via email.
Send Notification to (default recipient)
The is the name of the default email user that alarm notification email will be sent to. Used if
email recipient is not defined at the Contact level.
Enable Notification by email using MAPI
Check this box to send email notifications via the MAPI protocol. Requires access to a MAPI
capable mail client. If you enable MAPI, enter the profile name and password for access to
the mail client. If running in Service Mode, please see Running as a Windows Service for a
discussion of using MAPI mail under a Service mode process. Note that in some cases, the
MAPI mail client may have to be running in order for mail generated by PageR to be
delivered.
Enable Notification by email using SMTP
Check this box to send email notifications via the SMTP protocol. If enabled, enter the name
or IP address of the mail server. You must also enter a valid return email address known to
the mail server. This is typically the email address of the person responsible for PageR. If
the SMTP server requires authentication, enter the user name and password in the
Profile/Password boxes in the MAP section.
Use Alarm Text as Mail Subject
30
Help.rtf
PageR Enterprise
Page 31 of 270
Check this box to send the alarm notification message text as the email subject line.
Normally, the subject is a generic alarm annoucement and the actual alarm message text is
in the body of the mail message.
You may click the Send Test Mail button to send a test email.
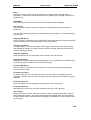
Monitored Objects Tab
This tab displays the current list of monitored objects and allows you to add, change and
delete the objects.
The window area displays the list of currently defined objects that PageR will monitor. Each
object has a type, identifier or name, a description and an enabled/disabled indicator.
To create a new object, click Add Object. A screen will display allowing you to select from
the list of available monitored object types. Select the desired object type and a new window
will display allowing you to configure the new object.
To modify an object on the list, place the cursor over the type of an existing object and
double click to display a dialog that will allow you to modify the attributes of that object.
31
Help.rtf
PageR Enterprise
Page 32 of 270
To copy an object on the list, place the cursor over an existing object and click once to
highlight the object, then click Copy Object.
To delete an object from the list, place the cursor over an existing object and click once to
highlight the object, then click Delete Object.
Click on the column headings to change the sort order of the list.
Check the Tree View box to display the Monitored Object List as a Tree View with the
Monitored Objects organized into trees for object type, severity and system. This view can
help manage large configurations.
Check the Monitor Spin Directory box to have PageR monitor the directory displayed for
paging files generated by other applications. The directory used can be changed by editing
the Registry .
32
Help.rtf
PageR Enterprise
Page 33 of 270
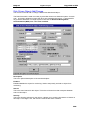
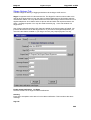
Event Log Object Add/Change
This screen is used to add or modify Windows Event Log monitored objects.
Description
This is an optional description of the monitored object .
Enabled
Enables/disables the object for monitoring. Used to temporarily exclude an object from
monitoring.
Interval
This is the scan interval for this object. This is the minimum time that must pass between
scans of this object.
Severity
This is the Severity indicator for this object. It allows you to rank the importance of alarms on
this object. The range is 0-9, with 0 as the most severe alarm condition.
System Name for Event Log
Enter or select the name of the Windows NT/2000/XP System where the Event Log file
resides. Press the drop down button for a list of available systems.
33
Help.rtf
PageR Enterprise
Page 34 of 270
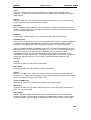
Event Log Type
Select the type of Event Log, System, Security, Application or other. If you wish to monitor
more than one log type, create a separate monitored object for each type.
Report All Informational Events
Check this box to generate an alarm when new informational event type record(s) are
added to the event log.
Report All Warning Events
Check this box to generate an alarm when new warning event type record(s) are added to
the event log.
Report All Error Events
Check this box to generate an alarm when new error event type record(s) are added to the
event log.
Apply Search Strings/File to Events and Report Matches
Enter a list of search strings or select a Search String File have the textual description of
each event record searched for any matches to the search strings. Any match generates and
alarm. More about Search Strings.
Alarm Object
Identifies the Alarm Object to be used for alarm notification when this monitored object
generates an alarm. The drop down list shows all available Alarm Objects.
An Alarm Object must be selected to perform paging, broadcasting or email of alarm events
for this object.
Alarm Text
When an alarm is generated for an object, a default alarm notification message is issued by
PageR. This message identifies the object and describes the alarm. You can override the
default alarm message by entering custom alarm notification message text in this box. You
can use substitution keywords in the message which will be replaced by their run time
values when the message is generated. Keywords appear as [keyword] in the message
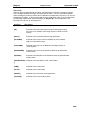
text. The keywords you can use for this object are:
Keyword
[TYPE]
Description
expands to the monitored object's type.
[ID]
expands to the monitored object's unique identification
string.
[DESC]
expands to the monitored object's long description.
[ALARMID]
expands to the unique numeric identifier for the monitored
object's current alarm event.
[EVENTLOG]
expands to event log name as defined for the MO.
[EVENT]
expands to the event log record description of the event.
[EVENTREC]
expands to the complete event log record formatted as a
string.
34
Help.rtf
PageR Enterprise
[EVENTTIME]
expands to the event record date and time.
[EVENTSYSTEM]
expands to the event record originating system.
[EVENTTYPE]
expands to the event record event record type.
[EVENTID]
expands to the event record event ID number.
[EVENTSOURCE]
expands to the event record source application.
Page 35 of 270
[EVENTCATEGORY expands to the event record event category.
]
[EVENTUSER]
expands to the event record user (account) name.
[TIME]
expands to the current time.
[DATE]
expands to the current date.
[AGENT]
expands to the the application name of "PageR".
[SYSTEM]
expands to the name of this system.
Event Log Record Object
When using scripts with the Event Log Monitored Object, either via a Task MO invoked by
the Alarm Object assigned to the Event Log MO or in a script executed for string matching
on Event Log record contents, the event log record currently being processed is available to
such scripts as an object. See Event Log Record Object Attributes for more information.
Notes
On the first scan of an event log, PageR only determines the current end of file (EOF) of the
event log. On the next and subsequent scans, PageR checks the current EOFof the event
log against the saved EOF and if they are different, PageR then extracts and examines the
new records.
35
Help.rtf
PageR Enterprise
Page 36 of 270
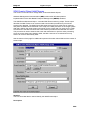
Disk File Object Add/Change
This screen is used to add or change Disk File monitored objects.
Description
This is an optional description of the monitored object .
Enabled
Enables/disables the object for monitoring. Used to temporarily exclude an object from
monitoring.
Interval
This is the scan interval for this object. This is the minimum time that must pass between
scans of this object.
Severity
This is the Severity indicator for this object. It allows you to rank the importance of alarms on
this object. The range is 0-9, with 0 as the most severe alarm condition.
Disk File
36
Help.rtf
Page 37 of 270
PageR Enterprise
Enter/Browse the name of the disk file to be monitored. Note that the disk file name is not
validated unless you click the Validate button. The disk file name can be a UNC name of a
file on another system.
Close file after scan
Normally, the disk file remains open after the first scan to save overhead on subsequent
scans. This can cause sharing problems. Select this option to close the file after a scan and
reopen it on the next scan.
Scan entire file
Normally, the examination of file's contents starts at the eof (end of file) found on the first
scan and proceeds forward as the file's size increases. Select this option to have the entire
file examined on each scan.
Use Ctrl-Z as Eof
Normally, the end of file is determined by the disk file size. However, some applications use
the Control-Z character as the end of file maker instead of the file size. Check this box to use
Control-Z as the eof marker.
Delete File after scan
Check this box to delete the disk file after it has been scanned.
Report All New Records
Check this box to generate an alarm when any new record is written to the disk file.
Report File Not Found
Normally, if the disk file is not found at scan time, a warning is logged to the activity log , but
no alarm is generated. If you set this option, an alarm will be generated if the disk file is not
present when scanned. This option is used for the case where the absence of the file
signifies an alarm condition.
Report File Found
If this option is enabled, an alarm will be generated if the file is present when scanned. This
option is used for the case where the presence of the disk file signifies an alarm condition.
Report on File Size
If this option is enabled, an alarm will be generated if the disk file size exceeds the size
criteria set. Select the appropriate size comparision operator from the drop down list and
enter the file size in bytes in the file size box.
Report on File Age
If this option is enabled, an alarm will be generated if th disk file age exceeds the age criteria
set. Select the approriate age comparision operator from the drop down list and enter the file
age in the file age box. Append a period letter code to the file age from the following list:
s = seconds (default)
w = weeks
m = months
n = minutes
h = hours
d = days
y = years
Note that the file age is computed as the time elapsed between the current time and the file's
last modified time. Files that are open may not have thier last modified time updated until the
file is closed.
37
Help.rtf
PageR Enterprise
Page 38 of 270
Stop on first match
Normally, all records are read from the current position of the file to the current end of the file
and all string matches are reported. Check this box to stop reading the file on the first string
match. The file position is left at the end of the record with the first match and reading will
resume there on the next scan (assming you are not reading the entire file). This option is
not compatible with the Report all new records option.
Advance to EOF
If the Stop on first match option is selected, you can check this box to have the file position
advanced to the current end of file after the first string match is found. The next scan will see
only new records.
Apply Search Strings/File to Disk File and Report Matches
Enter a list of search strings or select a Search String File to have each new disk file record
searched for any matches to the search strings. Any match generates an alarm. More about
Search Strings.
Alarm Object
Identifies the Alarm Object to be used for alarm notification when this monitored object
generates an alarm. The drop down list shows all available Alarm Objects. An Alarm Object
must be selected to perform paging, broadcasting or email of alarm events for this object.
Alarm Text
When an alarm is generated for an object, a default alarm notification message is issued by
PageR. This message identifies the object and describes the alarm. You can override the
default alarm message by entering custom alarm notification message text in this box. You
can use substitution keywords in the message which will be replaced by their run time
values when the message is generated. Keywords appear as [keyword] in the message
text. The keywords you can use for this object are:
Keyword
[TYPE]
Description
expands to the monitored object's type.
[ID]
expands to the monitored object's unique identification string.
[DESC]
expands to the monitored object's long description.
[ALARMID]
expands to the unique numeric identifier for the monitored object's
current alarm event.
[RECORD]
expands to the text of the disk file record.
[SIZEOP]
expands to the file size comparision operator.
[SIZEVAL]
expands to the file size comparision value (bytes).
[LASTSIZE]
expands to the last retrieved actual file size (bytes).
[TIME]
expands to the current time.
[DATE]
expands to the current date.
[AGENT]
expands to the the application name of "PageR".
38
Help.rtf
[SYSTEM]
PageR Enterprise
Page 39 of 270
expands to the name of this system.
Notes
On the first scan of a disk file, PageR only determines the current end of file (EOF) of the
disk file. On the next and subsequent scans, PageR checks the current EOF of the disk file
against the saved EOF and if they are different, PageR then extracts and examines any new
information. If the current EOF of the file is found to have changed to a smaller value than
that saved on the last scan, the file is assumed to have been recreated, and the new scan
starts at the begining of the file and proceeds up to the new EOF.
If the disk file name contains wildcard characters, the target directory is scanned for a list of
files that meet the selection criteria. The most recently created file is selected for processing.
After scanning, this file will be closed automatically. On the next scan, the same or a new file
may be selected for examination.
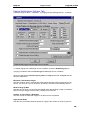
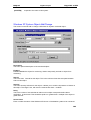
Ping Object Add/Change
This screen is used to add or change a Ping monitored object .
Description
This is an optional description of the monitored object.
Enabled
Enables/disables the object for monitoring. Used to temporarily exclude an object from
monitoring.
39
Help.rtf
PageR Enterprise
Page 40 of 270
Interval
This is the scan interval for this object. This is the minimum time that must pass between
scans of this object.
Severity
This is the Severity indicator for this object. It allows you to rank the importance of alarms on
this object. The range is 0-9, with 0 as the most severe alarm condition.
Delay
This is the number of seconds that an alarm on this object must persist before alarm
notification is performed. This should be equal to or greater than a multiple of the object or
global interval.
TTL
This is the Time-To-Live value that can be used in ping packets. When TTL is zero, ping
packets pass through routers or other packet forwarding devices until they reach the ping
target and are returned, or a time occurs indicating that the ping failed. When TTL is set, it
acts as a "hop" count and can be used to detect ping failure caused by the failure of a router
or intermediate device instead of at the target device. If you wish to use this feature, TTL
should be set to the appropriate number of hops (or devices) between the local system and
the target system. The Ping Mo will test each hop (intermediate device) until reaching the
target. If a hop fails, the Ping MO will report the IP address of the last successful hop
(device) allowing you to determine the intermediate point of failure. This scheme is
essentially the same as using Trace Route tools to locate the point of failure of a ping
travelling over multiple hops. A value of zero will disable use of TTL.
Schedule
Click to define a Schedule Object. The button label will be bold if a Schedule already exists
for this monitored object.
IP Address or Computer Name
This is the TCP/IP address or name of the system to be monitored via Ping. If a name is
used, it must appear in this systems hosts file. You can click the binoculars to display the IP
Address/Host Name Selection screen.
Time Out
This is the ping operation time out in seconds. This is how long the ping object waits for a
reply from the target computer before declaring the ping to have failed.
Retrys
This is the number of times a failed ping will be tried before an alarm is generated.
Alarm Object
Identifies the Alarm Object to be used for alarm notification when this monitored object
generates an alarm. The drop down list shows all available Alarm Objects. An Alarm Object
must be selected to perform paging, broadcasting or email of alarm events for this object.
Alarm Text
When an alarm is generated for an object, a default alarm notification message is issued by
PageR. This message identifies the object and describes the alarm. You can override the
default alarm message by entering custom alarm notification message text in this box. You
can use substitution keywords in the message which will be replaced by their run time
values when the message is generated. Keywords appear as [keyword] in the message
40
Help.rtf
PageR Enterprise
Page 41 of 270
text. The keywords you can use for this object are:
Keyword
[TYPE]
Description
expands to the monitored object's type.
[ID]
expands to the monitored object's unique identification string.
[DESC]
expands to the monitored object's long description.
[ALARMID]
expands to the unique numeric identifier for the monitored object's
current alarm event.
[TIME]
expands to the current time.
[DATE]
expands to the current date.
[AGENT]
expands to the the application name of "PageR".
[SYSTEM]
expands to the name of this system.
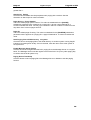
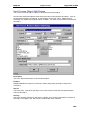
NT System Object Add/Change
This screen is used to add or change an NT System monitored object .
Description
This is an optional description of the monitored object.
41
Help.rtf
PageR Enterprise
Page 42 of 270
Enabled
Enables/disables the object for monitoring. Used to temporarily exclude an object from
monitoring.
Interval
This is the scan interval for this object. This is the minimum time that must pass between
scans of this object.
Severity
This is the Severity indicator for this object. It allows you to rank the importance of alarms on
this object. The range is 0-9, with 0 as the most severe alarm condition.
Delay
This is the number of seconds that an alarm on this object must persist before alarm
notification is performed. This should be equal to or greater than a multiple of the object or
global interval.
Server Name
Enter or select the name of the NT Server or Workstation system to be monitored.
Alarm Object
Identifies the Alarm Object to be used for alarm notification when this monitored object
generates an alarm. The drop down list shows all available Alarm Objects.
An Alarm Object must be selected to perform paging, broadcasting or email of alarm events
for this object.
Alarm Text
When an alarm is generated for an object, a default alarm notification message is issued by
PageR. This message identifies the object and describes the alarm. You can override the
default alarm message by entering custom alarm notification message text in this box. You
can use substitution keywords in the message which will be replaced by their run time
values when the message is generated. Keywords appear as [keyword] in the message
text. The keywords you can use for this object are:
Keyword
[TYPE]
Description
expands to the monitored object's type.
[ID]
expands to the monitored object's unique identification string.
[DESC]
expands to the monitored object's long description.
[ALARMID]
expands to the unique numeric identifier for the monitored object's
current alarm event.
[TIME]
expands to the current time.
[DATE]
expands to the current date.
[AGENT]
expands to the the application name of "PageR".
[SYSTEM]
expands to the name of this system.
42
Help.rtf
PageR Enterprise
Page 43 of 270
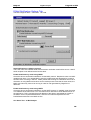
NetWare Server Object Add/Change
This screen is used to add or change a NetWare Server monitored object .
Description
This is an optional description of the monitored object.
Enabled
Enables/disables the object for monitoring. Used to temporarily exclude an object from
monitoring.
Interval
This is the scan interval for this object. This is the minimum time that must pass between
scans of this object.
Severity
This is the Severity indicator for this object. It allows you to rank the importance of alarms on
this object. The range is 0-9, with 0 as the most severe alarm condition.
Delay
This is the number of seconds that an alarm on this object must persist before alarm
notification is performed. This should be equal to or greater than a multiple of the object or
global interval.
Server Name
Enter or select the name of the NetWare Server to be monitored.
43
Help.rtf
PageR Enterprise
Page 44 of 270
Alarm on out of connections
Check this box to generate an alarm when the server is up but is out of connections.
Normally, out of connections does not generate an alarm because the server has been
confirmed to be up even if connections are not available. This is only supported when you
are using Novell's Client32 client software on the hosting system.
Alarm Object
Identifies the Alarm Object to be used for alarm notification when this monitored object
generates an alarm. The drop down list shows all available Alarm Objects.
An Alarm Object must be selected to perform paging, broadcasting or email of alarm events
for this object.
Alarm Text
When an alarm is generated for an object, a default alarm notification message is issued by
PageR. This message identifies the object and describes the alarm. You can override the
default alarm message by entering custom alarm notification message text in this box. You
can use substitution keywords in the message which will be replaced by their run time
values when the message is generated. Keywords appear as [keyword] in the message
text. The keywords you can use for this object are:
Keyword
[TYPE]
Description
expands to the monitored object's type.
[ID]
expands to the monitored object's unique identification string.
[DESC]
expands to the monitored object's long description.
[ALARMID]
expands to the unique numeric identifier for the monitored object's
current alarm event.
[TIME]
expands to the current time.
[DATE]
expands to the current date.
[AGENT]
expands to the the application name of "PageR".
[SYSTEM]
expands to the name of this system.
44
Help.rtf
PageR Enterprise
Page 45 of 270
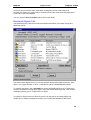
Paging Device Test
This screen allows a paging file to be sent to the Message Server or Modem paging device
to test device configuration and paging files.
Enter or Select a paging file to be sent to the Message Server or Modem configured as the
paging device. Press the SEND button to send the file to the device. The paging file will be
executed and any errors will be displayed in the Main window log area.
The Optional Message Text will be substituted for any [ALARM] substitution keyword
found in the paging file.
String Searching Event Log Records
In order to allow string searches of Event Logs, an event log record is converted into a
textual format before the search is performed. The event's attributes are strung together in a
keyword=value semicolon separated list. Thus, the following event record:
45
Help.rtf
PageR Enterprise
Page 46 of 270
Would be converted into the following format for string searching:
time=6/10/97 8:15:55 AM; system=RACNT; type=Information; source=LPDSVC;
id=4000; category=NONE; user=N/A; desc=LPD Service started successfully.
(there are no spaces after the semicolons and no line wrap. The spaces and line wrap
shown here are for readability only)
This allows string searches to be used to generate different alarms for particular error
numbers (id), user name, systems, applications (source) and event description content. See
Search Strings for more information about string searching.
Running as a Windows Service
Overview
46
Help.rtf
PageR Enterprise
Page 47 of 270
PageR can be run in two modes, as a normal Windows desktop application and as a Service
. PageR is initially installed only as a desktop application. To run as a Service, a second
installation step must be performed. After the Service install, PageR can be run as a desktop
application or as a Service, but not both at the same time.
When running as a desktop application, PageR is dependent on the current user login to the
Windows system. If this user logs out, PageR will be terminated along with all other desktop
applications. This does not allow for unattended operation with no user logged onto the
system.
Windows Services, on the other hand, run independent of the logged on user and can run at
all times the system is up, even when no user is logged on. This mode is better suited to
unattended operation.
Service Mode Installation
Running in Service Mode
Using M A P I Mail in Service Mode
Security Issues in Service Mode
Service Mode Installation
To enable PageR for Service Mode operation, go to the More Global Options tab. Enter an
appropriate user account and click the Install as a Service button.
To remove PageR from the Service Manager (disable Service Mode operation), go to the
More Global Options tab and click the Uninstall as a Service button.
When installed in the Service Manager, PageR is set up as Manually started, runs under
the user account you enter. Manually started means that you must go to the Service
Manager and select the PageR service and click the Start button to start PageR running as a
service. You can change this to Automatic Start to have PageR started whenever the
system is brought up.
Services don't run on the desktop, so do not have a security context provided by the user
login process. In order to have a security context, a Service is configured with a user
account and the Service Manager will start the Service as if it was logged on as that user.
You must select an appropriate user account and enter it in the boxes on the More Global
Options Tab before clicking the Install as a Service button. You can leave the user account
blank and the Service will be installed to run as the Local System Account. This account
has adequate security for local monitored objects but may not allow access to objects that
exist on other systems. See Security and Impersonation for more information.
47
Help.rtf
PageR Enterprise
Page 48 of 270
Running in Service Mode
When PageR is installed as a Service , it can be run in two ways. First, if PageR is not
already executing as a Service, you can run it normally, as a desktop application. If PageR
is not running on the desktop, you can go the Services Manager applet in the Control Panel
and start PageR running as a Service. PageR cannot be run as a Service and a desktop
application at the same time with the exception of Maintenance Mode (see below).
When run as a Service, PageR will automatically begin scanning the configured monitored
objects when started. No screens will be displayed. Alerts will be processed just as when
PageR is run as a desktop application, there is just no visible user interface. You can use the
Web Status feature or the Instant Messaging feature to monitor the PageR service.
You can use the Services Manager applet in the Control Panel to Pause the PageR Serivce.
If this case, scanning of monitored objects and alert processing is suspened. You can click
the Continue button to resume scanning and alert processing. You can shutdown the
PageR Service with the Stop button on the Services Manager.
When running in Service Mode, Alerts, errors or other important information are logged to
the Application Event Log on the local system as well as to the Web Status display and the
disk log file (if enabled).
It is recommended that the initial evaluation and configuration building be done running
PageR as a desktop application and then shift to running in Service Mode when the
configuration is stable.
If PageR is running as a Service and you run PageR on the desktop, the desktop PageR will
ask if you wish to enter Maintenance Mode. If you answer no, PageR will shutdown, as you
cannot run PageR as a Service and a desktop application at the same time. If you answer
yes, thereby entering Maintenance Mode, the desktop instance of PageR will continue to
execute, but will only allow changes to the configuration. No other operations can be
performed. If you save the configuration, when you exit, PageR will ask if you wish to restart
the PageR Service so the Service will load the changed configuration.
Using MAPI Mail in Service Mode
When running Service Mode, there are problems with using MAPI mail to deliver alarm
messages. Due to limitations in MAPI's design, it does not function well when used by a
Service Mode process. This section discusses these issues.
When running in Service Mode, the service process can place MAPI mail messages into a
MAPI mail box, but those messages will not be processed until a desktop MAPI application
(such as Exchange) is executed. You must be running Exchange (InBox) on the desktop to
have mail generated by PageR delivered immediately. This is not possible if there is no
desktop session logged on. If Exchange cannot be run while PageR is running, use SMTP
mail for mailing alarm messages.
48
Help.rtf
PageR Enterprise
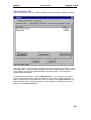
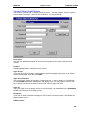
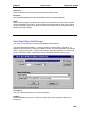
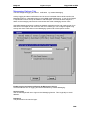
Page 49 of 270
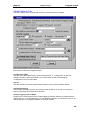
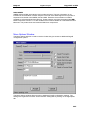
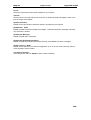
If you do use MAPI mail in Service Mode, MAPI requires special configuration for Service
Mode use. When running PageR in Service Mode, the first time mail is submitted to MAPI,
PageR will create a MAPI profile for its own use. When this occurs, you will see the following
message box:
Click OK. A file selection dialog will appear. It will list MAPI Post Office (.PST) files available
on the system. Select the .PST file used by an administrative user. The MAPI profile created
by PageR will be attached to this post office and MAPI messages generated by PageR will
be submitted to the administrative users outgoing mail folder. Exchange must be run for this
user to send the mail from the outgoing folder to the recipient.
NOTE: When using MAPI in Service Mode, the MAPI login user name that is entered on the
email Notification Options Tab should be PageR. No password should be used.
Microsoft expects to resolve the problems with MAPI mail in Service Mode with Windows NT
5.0.
49
Help.rtf
PageR Enterprise
Page 50 of 270
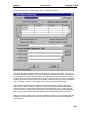
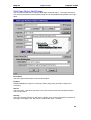
Global Options 2 Tab
This tab contains additional option settings that control the overall operation of PageR.
Each option on this tab is explained below:
Audible Alarms
Enables sounding of an audible alarm when an alarm is detected by PageR. Audible
alarms can be a sound file (.wav) or the name of a Windows NT System sound (such as
"Exclamation") or the word speak to have alarms spoken. You may browse for .wav files.
Several .wav files are included with PageR.
Icon Selection
You can select your own icons to be associated with messages and alarms. The default
icons are displayed and you can click on one of the icons to display a browse window. Use
the browse window to select an icon file to be used in place of the default.
Service Mode Operation
Use these items to configure PageR for use as an Windows Service. Click the Install as a
Service button to install PageR as a Service. Once installed, this button can be clicked
again to uninstall PageR as a Service. For some types of monitored objects, you may need
to identify a local or domain user for PageR to impersonate while running as a Service. If a
user is identified, PageR will logon as that user when running as a Service and obtain the
50
Help.rtf
PageR Enterprise
Page 51 of 270
users security credentials. This "impersonation" then allows PageR to access restricted
objects such as disk files on other systems and the Service Control Manager on other
systems. If you wish to use impersonation, enter the user account information before clicking
Install as a Service.
Web Status Service
The Web Status Service allows a web browser to be used to display PageR status
information from another system. You can also perform control tasks such as
starting/stopping monitoring, alarm resets and suspending/resuming monitoring of individual
objects. See the discussion of the Web Status Service for information on the use of the
service. In order to use the Web Status Service you must enable it here. If you already have
a web server running on your system, you can select an alternate TCP/IP port number to
use. You can define a user name and password that the browser user must supply to access
the Web Status Service.
Log Status Requests
Enables logging of Web Status requests serviced to the Activity log .
Disable Security Check on Manual Paging
If you apply security to Web Status by entering a user name and password, you can disable
security checking for the Web Status Manual Paging feature. This will allow any browser to
submit a manual page, but not access any other part of Web Status. In order to access the
Manual Paging feature directly, use the following URL in the browser:
http://ip address/name of system<:portnumber>/WebStatus5.html
Scan in Severity Order
Normally, Monitored Objects are scanned in the order they were created. Check this box to
scan the objects in Severity order, starting with Severity 0 and continuing through Severity 9.
Within a Severity level, objects are scanned in the sort order of their description text.
Scan Changed Only
If you check this option, then when you start scanning, only new or changed MOs will be
scanned. This allows you to more easily test changes to large configurations. This option is
not retained when you shutdown and restart.
Set Global Schedule
Click to define a global Schedule object . The global Schedule is applied to every monitored
object at scan time to determine if the MO should be scanned. Schedules at the MO level
are applied if the MO passes the global Schedule.
51
Help.rtf
PageR Enterprise
Page 52 of 270
Alarm Objects Tab
This tab shows the list of Alarm Objects, allowing them to be created, modified or deleted.
This screen shows a list of the Alarm Objects that have been defined. Alarms objects contain
alarm notification information that tells PageR what actions to take when an alarm occurs.
Alarm Objects are attached to Monitored Objects. An Alarm Object can be shared by
multiple Monitored Objects.
To create a new Alarm Object , click the Add Alarm button. To modify an existing Alarm
Object, double click the Alarm Object description. To copy an Alarm Object, highlight the
object by single clicking on the description and then clicking on the Copy Alarm button. To
delete an Alarm Object, highlight the object by single clicking on the description and then
clicking on the Delete Alarm button.
52
Help.rtf
PageR Enterprise
Page 53 of 270
Alarm Object Add/Change
This screen is used to add or change an Alarm Object . An Alarm Object defines the
notification actions to be taken for an alarm event. Alarm Objects are attached to Monitored
Objects, defining what notification actions will be taken for an alarm on that object.
Alarm objects can define a simple notification or a notification escalation schedule, which
allows for alarm notification to multiple contacts and alarm notification escalation. The screen
has a tab with two options, one for a simple alarm notification and one for an alarm
escalation schedule. Whichever tab is displayed, that is the notification type that will be
used.
Here is an example of a simple alarm notification:
Description
This is a user defined description of the Alarm Object.
Enabled
Enables/disables alarm notification by the Alarm Object.
53
Help.rtf
PageR Enterprise
Page 54 of 270
Paging (.MSG) File
If you wish to execute a page for the alarm, enter/select the appropriate paging file name. If
you wish to send an SNPP page, enter the word SNPP.
E-Mail Alarm Msg To
If you wish to send an email message for the alarm, enter the email recipients name.
Send Alarm Msg To
If you wish to send a broadcast message to another system for the alarm, enter/select the
target systems name.
When an alarm occurs, notification is not performed if the current time is in a Quiet Time .
Quiet times can be defined at the global level or at the Contact level.
Override Global Quiet Time
Perform alarm notification even during global quiet times.
Override Contact Quiet Time
Perform alarm notification even during Contact quiet times.
Notify on Alarm Cancel
Generates an alarm notification (but the object does not go into a new alarm state) when an
in progress alarm clears.
Repeat Escalation Schedule
When using an escalation notification schedule, check this box to have the shedule repeated
until the alarm clears. Normally, after the schedule is completed, no further notifications are
sent. For Persistent alarm type monitored objects, the escalation schedule repeat starts on
the next scan . For Discrete alarm type monitored objects, the escalation schedule repeat
starts on the next new alarm event detected by the monitored object.
Play Sound File
Plays sound when an alarm is detected. Sounds can be a sound file (.wav) or the name of a
Windows System sound (such as "Exclamation"). You may browse for .wav files. Several
.wav files are included in the \Sounds directory.
Execute Windows Command
Enter a program, batch or command file name and any parameters in the box to execute an
external application when an alarm event starts and/or when the event ends or is cancelled.
You can use substitution parameters on the command to pass information about the alarm to
the external application. The substitution parameters available are:
Keyword
[TYPE]
Description
expands to the monitored object's type.
[ID]
expands to the monitored object's unique identification string.
[DESC]
expands to the monitored object's long description.
[ALARMID]
expands to the unique numeric identifier for the monitored object's
current alarm event.
54
Help.rtf
PageR Enterprise
[ALARM]
expands to the monitored object's current alarm message.
[ALARMX]
expands to extended information about the current alarm (not
available on all objects).
[TIME]
expands to the current time.
[DATE]
expands to the current date.
[AGENT]
expands to the the application name of "PageR".
[SYSTEM]
expands to the name of this system.
Page 55 of 270
Execute Task
You can execute a Task Monitored Object on alarm start or end. The On Alarm Start Task is
executed when an alarm starts and on each redetection (escalation) of an alarm. The Start
Task is also executed when an alarm is cleared automatically (not by a user manually
clearing an alarm) and if the On Cancel Task is not defined. If an On Cancel Task is
selected, that Task will be executed on a manual or automatic alarm clear and the On Start
Task will not be executed.
55
Help.rtf
PageR Enterprise
Page 56 of 270
Here is an example of an alarm object with an escalation schedule:
The Alarm Escalation Schedule tab shows a matrix that controls notification. There are 20
notification periods, defined by rows. Each notification period can have up to 10 Contacts. A
Contact cell in a row can contain the name of an individual Contact, the name of a Contact
group or All for all contacts. Double click on a cell to change its value. A list box will appear
showing all Contacts and groups that are available. Select an item on the list to update the
cell. To delete a Contact in a cell, single click on the cell and press the DEL key.
The notification periods (rows) correspond to each scan interval (global or monitored
object) that an alarm persists for. When a scan is performed and an alarm detected for a
monitored object, the alarm object notifies the contacts defined on row 1. When the next
scan is performed, if the alarm is still in progress, the alarm object notifies the Contacts on
row 2. This proceeds until the alarm is cleared or all 20 periods have been processed.
When processing a period (row), all Contacts defined on that row, and all Contacts that are
members of any group defined on that row, are notified of the alarm (per configuration of
each Contact).
56
Help.rtf
PageR Enterprise
Page 57 of 270
Alarm notification processing is influenced by the Alarm Type of the monitored object being
processed.
IP Address/Host name Selection
This screen presents a list of known IP Addresses or Host names for selection. You can load
the list from a hosts file or auto discover IP hosts on the network.
When this screen is first displayed, the address list and host name boxes will be blank and
the starting and ending IP address range boxes will be prefilled with the IP address range of
the local network. You may enter/browse a hosts file name and then click Load to load that
hosts file into the address list box.
You may also click Discover to scan the network by pinging the IP address range defined
by the starting and ending IP addresses and build the address list based on replies to the
pings. If you click Discover, this button changes to Stop, which you can click to stop the
auto discovery process.
Once a list of host names or IP addresses have been loaded into the address list, this list is
retained and is displayed if you return to this screen at a later time. The host file name is
also retained.
Click on an address or host name to select it and close this screen.
57
Help.rtf
PageR Enterprise
Page 58 of 270
Service Object Add/Change
This screen is used to add or change a Windows Service monitored object .
Description
This is an optional description of the monitored object. If blank, it is set to the service Display
Name (long name, as appears in the Services control panel applet).
Enabled
Enables/disables the object for monitoring. Used to temporarily exclude an object from
monitoring.
Interval
This is the scan interval for this object. This is the minimum time that must pass between
scans of this object.
Severity
This is the Severity indicator for this object. It allows you to rank the importance of alarms on
this object. The range is 0-9, with 0 as the most severe alarm condition.
Delay
This is the number of seconds that an alarm on this object must persist before alarm
notification is performed. This should be equal to or greater than a multiple of the object or
global interval.
Server Name
Enter or select the name of the Windows NT/2000/XP Server or Workstation system where
58
Help.rtf
PageR Enterprise
Page 59 of 270
the service to be monitored is run.
Service Name
This is the Display Name of the Service to be monitored. The Display name is the name of
the service that appears in the Services control panel applet. You must select a service
name from the drop down box. Click the Load button after entering the Server Name to
retrieve a list of the services configured on that system. The Identifier for a service is the
service Service Name or short name. This name is not normally seen by users but is used
as the identifier due to its shorter length. The service name is combined with the system
name where the service is located to form the Monitored Object Identifier.
Alarm if never started
If a service being monitored is not running it generates an alarm. This excludes services that
have not been started since the last reboot of the system. A service would not be considered
to have failed if it had never been started. Check this box to have services that have not
been started to also generate an alarm.
Alarm if paused
Normally, paused services do not generate an alarm. Check this box to have paused
services generate an alarm.
If a service stops, either intentionally or by failure, two exit codes are available when the
alarm is generated. One is the Win32 Exit Code. This reflects an exit status code posted by
the Win32 Service Control Manager. The service itself may also post an exit code. These
codes are available to substitute into a custom alarm message (see below).
If an alarm is generated for a service, this means that the service is not running. That could
be because the service was stopped, paused or failed. If the service is restarted, the alarm
will be cleared automatically.
Attempt Restart
If this option is enabled, PageR will make one attempt to restart a failed service. If restart is
successful, the alarm is cleared. If the restart fails, an alarm is generated. In order to restart
a service while running PageR in Service Mode, you must have PageR impersonate an
Admin level user that allows access to the system where the service to be restarted resides.
Alarm on good restart
Normally, if Attempt Restart is selected, and the restart of the service is successful, an alarm
is not generated. Check this box to generate an alarm even if the service is successfully
restarted.
Alarm Object
Identifies the Alarm Object to be used for alarm notification when this monitored object
generates an alarm. The drop down list shows all available Alarm Objects.
An Alarm Object must be selected to perform paging, broadcasting or email of alarm events
for this object.
Alarm Text
When an alarm is generated for an object, a default alarm notification message is issued by
PageR. This message identifies the object and describes the alarm. You can override the
default alarm message by entering custom alarm notification message text in this box. You
can use substitution keywords in the message which will be expanded to their run time
values when the message is generated. Keywords appear as [keyword] in the message
text. The keywords you can use for this object are:
59
Help.rtf
PageR Enterprise
Keyword
[TYPE]
Description
expands to the monitored object's type.
[ID]
expands to the monitored object's unique identification string.
[DESC]
expands to the monitored object's long description.
[SVCNAME]
expands to the service name.
Page 60 of 270
[DISPNAME] expands to the service display name.
[TARGET]
expands to the target system name.
[ALARMID]
expands to the unique numeric identifier for the monitored object's
current alarm event.
[STATE]
expands to the service's current state.
[WINEXIT]
expands to the service's Win32 Exit Code.
[SVCEXIT]
expands to the service's own Exit Code.
[TIME]
expands to the current time.
[DATE]
expands to the current date.
[AGENT]
expands to the the application name of "PageR".
[SYSTEM]
expands to the name of this system.
60
Help.rtf
PageR Enterprise
Page 61 of 270
Contact Objects Tab
This tab shows the list of Contact Objects, allowing them to be created, modified or deleted.
This screen shows a list of the Contact Objects that have been defined. Contact objects
contain information about Contacts that tells PageR what actions to take when the Contact is
to be notified on an alarm . Contact Objects are attached to Alarm Objects. A Contact
Object can be shared by multiple Alarm Objects.
To create a new Contact Object , click the Add Contact button. To modify an existing
Contact Object, double click the Contact Object description. To copy an Contact Object,
highlight the object by single clicking on the description and then clicking on the Copy
Contact button. To delete an Contact Object, highlight the object by single clicking on the
description and then clicking on the Delete Contact button.
61
Help.rtf
PageR Enterprise
Page 62 of 270
Security and Impersonation
Security considerations when running in Service Mode.
When running as a desktop application, PageR uses the security context of the logged on
user account. All access to local and network resources are controlled by this context.
When running as a service, PageR by default runs under a special account called the Local
System Account. This account gives free access to local resources and some network
resources. In order to have greater access, it becomes necessary to have PageR
"impersonate" an actual user with the appropriate access. To do this, you supply PageR
with a valid user account name and password (done at Service Install). PageR running as a
service then performs a batch login to that user account and assumes the user security
context. This context now gives the PageR service access to all resources available to the
user.
Impersonation of a user with more access than Local System is required to access disk files
on other systems via a UNC file name. It is required for NT Performance Counter , NT
Service, WMI Query and Win32 Process MOs that target another system. Logging via
Instant Messaging also requires impersonation.
When impersonation is required, use an Admin level user on the local system, or in a domain
environment, on the primary domain controller.
The Admin user account you use for impersonation, or the Administrators group that it
belongs to, must be assigned two special user rights. Add the user rights "Logon as a Batch
Job" and "Act as Part of the Operating System" to the user or group with the User
Manager on the system where the account is located.
62
Help.rtf
PageR Enterprise
Page 63 of 270
Contact Object Add/Change
This screen is used to add or change a Contact Object . A Contact Object defines a person
to be notified of an alarm and how that notification is to be performed.
Description
This is a user defined description of the Contact. Normally it is the name of person to be
notified.
Enabled
Enables/disables alarm notification to the Contact.
Pager Script
If you wish to page the Contact, enter/select the appropriate paging file name. If you wish to
send an SNPP page, enter the word SNPP.
Pager Phone Number
This is the phone number of the pager or paging service to use for paging. It is substituted
for the [PHONE] substitution parameter in the paging script. You may type a number in the
box or select a number from the drop down list of common pager services.
Pager ID
This is the pager ID for a paging service to use for paging. It is substituted for the [PAGERID]
substitution parameter in the paging script.
BroadCast
If you wish to send a broadcast message to the Contact on another system, enter/select the
target systems name.
E-Mail Address
63
Help.rtf
PageR Enterprise
Page 64 of 270
If you wish to send an email notification to the Contact, enter the Contacts email address.
Paging Group
A Contact can optionally be in two paging groups. Enter any group name you wish to use.
Contacts with the same group names are automatically linked into the groups.
Quiet Time
Click the button to display the Quiet Time Selection screen to define quiet time periods for the
Contact.
Syslog Object Add/Change
This screen is used to add or change a Syslog monitored object . The Syslog object allows
Syslog messages to be received from Unix systems or other Syslog clients and processed for
alarms.
Description
This is an optional description of the monitored object.
Enabled
Enables/disables the object for monitoring. Used to temporarily exclude an object from
64
Help.rtf
PageR Enterprise
Page 65 of 270
monitoring.
System
Allows the monitored object to be associated with a specific host via host name or IP
address. Messages from the identified host will be processed only by this monitored object.
One Syslog monitored object can be defined with this field left blank. That monitored object
is the default Syslog monitored object and will process all syslog messages not handled by
Syslog monitored objects associated with specific systems.
Severity
This is the Severity indicator for this object. It allows you to rank the importance of alarms on
this object. The range is 0-9, with 0 as the most severe alarm condition.
Log All Messages Received
Enable to record all Syslog messages received on the Activity Log window even if the
messages do not result in an alarm.
Alarm on Message Level
Identify the Syslog message priority levels (0-7) that should generate an alarm.
Apply Search Strings/File to Messages and Alarm on Matches
Enter a list of search strings or select a Search S tring File to have each Syslog message
searched for any matches to the search strings. Any match generates an alarm. String
search is only performed if the message level does not generate an alarm. More about
Search Strings.
Alarm Object
Identifies the Alarm Object to be used for alarm notification when this monitored object
generates an alarm. The drop down list shows all available Alarm Objects. An Alarm Object
must be selected to perform paging, broadcasting or email of alarm events for this object.
Alarm Text
When an alarm is generated for an object, a default alarm notification message is issued by
PageR. This message identifies the object and describes the alarm. You can override the
default alarm message by entering custom alarm notification message text in this box. You
can use substitution keywords in the message which will be replaced by their run time
values when the message is generated. Keywords appear as [keyword] in the message
text. The keywords you can use for this object are:
Keyword
[TYPE]
Description
expands to the monitored object's type.
[ID]
expands to the monitored object's unique identification string. Will
be name or IP address of associated host system or blank for
default.
[IDX]
expands to the formatted identification string. Same as [ID] except
for the default Syslog MO. Then this expands to "Default".
[DESC]
expands to the monitored object's long description.
[ALARMID]
expands to the unique numeric identifier for the monitored object's
current alarm event.
65
Help.rtf
PageR Enterprise
[SENDER]
expands to the IP address of the sending system.
[LEVEL]
expands to the severity level code in the message.
[FACILITY]
expands to the facility code in the message.
[MSG]
expands to the text of the Syslog message.
[TIME]
expands to the current time.
[DATE]
expands to the current date.
[AGENT]
expands to the the application name of "PageR".
[SYSTEM]
expands to the name of this system.
Page 66 of 270
Notes
Syslog is a logging facility used on Unix and other systems. It is a central message logging
tool used by applications and operating systems. One of Syslog's features is the forwarding of
messages to other systems over the network. You can configure Syslog to forward messages
to the system on which PageR is running and this monitored object will receive and process
them. In this manner, PageR can be used to monitor Unix systems and other systems that
employ Syslog.
This monitored object is of the Server/listener type in that it does not perform any "scanning"
function. Instead, this object creates a server that listens on the network for Syslog messages
and processes them when they arrive. Only one default instance of the Syslog object can be
created.
66
Help.rtf
PageR Enterprise
Page 67 of 270
Web Page Object Add/Change
This screen is used to add or change a Web Page monitored object . This object monitors a
web server by determining if the specified page can be Downloaded and optionally how long it
takes.
Description
This is an optional description of the monitored object.
Enabled
Enables/disables the object for monitoring. Used to temporarily exclude an object from
monitoring.
Interval
This is the scan interval for this object. This is the minimum time that must pass between
scans of this object.
Severity
This is the Severity indicator for this object. It allows you to rank the importance of alarms on
this object. The range is 0-9, with 0 as the most severe alarm condition.
67
Help.rtf
PageR Enterprise
Page 68 of 270
Delay
This is the number of seconds that an alarm on this object must persist before alarm
notification is performed. This should be equal to or greater than a multiple of the object or
global interval.
Page URL
This is the URL (Universal Resource Locator) address of the web page to be Downloaded.
You can click on the Display button to test the URL (by Downloading and viewing the page
in the viewing box). An alarm is generated if the page fails to download at scan time.
Time Out
This is the amount of time allowed for the download. If the download takes longer than this
time, an alarm is generated. Set to zero to disable time out checking.
User Name
If the page or web server requires a user name for access, enter it here. Only "Basic" HTTP
authentication is supported.
Password
If the page or web server requires a password, enter it here.
Link Level
Controls how many levels of page links (HTML A tag) are downloaded below the target
page. Level 0 does not load any page links found on the target page. Frames are always
downloaded.
Check Images
Enables download of image files as part of the web page checking process.
Search Strings/File
Enter a list of search strings or select a Search String File to have the Web Page's HTML
text searched for any matches to the search strings. Any match generates an alarm. More
about search strings.
Alarm Object
Identifies the Alarm Object to be used for alarm notification when this monitored object
generates an alarm. The drop down list shows all available Alarm Objects. An Alarm Object
must be selected to perform paging, broadcasting or email of alarm events for this object.
Alarm Text
When an alarm is generated for an object, a default alarm notification message is issued by
PageR. This message identifies the object and describes the alarm. You can override the
default alarm message by entering custom alarm notification message text in this box. You
can use substitution keywords in the message which will be replaced by their run time
values when the message is generated. Keywords appear as [keyword] in the message
text. The keywords you can use for this object are:
Keyword
[TYPE]
Description
expands to the monitored object's type.
[ID]
expands to the monitored object's unique identification string.
[DESC]
expands to the monitored object's long description.
68
Help.rtf
PageR Enterprise
Page 69 of 270
[ALARMID]
expands to the unique numeric identifier for the monitored object's
current alarm event.
[TIME]
expands to the current time.
[DATE]
expands to the current date.
[AGENT]
expands to the the application name of "PageR".
[SYSTEM]
expands to the name of this system.
Notes
The Web Page monitored object relies on Microsoft's Wininet.dll for internet services.
Wininet.dll must be installed on your system in order to use the Web Page object. To install
Wininet.dll on NT 4.0 systems without Internet Explorer, execute the program
WintDist.exe in the install directory. On NT 3.51, execute the Wint351.exe program in all
cases. This will install and configure Wininet.dll for use.
Quiet Time Selection
This screen is used to set the Quiet Time periods for Contacts or globally.
The matrix on this screen shows the seven days of the week and the 24 hours of each day in
a 24 hour format. Each cell in the matrix represents one hour of the day. You can set a cell to
be quiet for the entire hour (cell is shown red), quiet for the first half of the hour (cell is shown
yellow) or quiet for the second half of the hour (cell shown purple).
To set quiet times, click (drag ok for block select) on a cell, then select the desired time range
from the menu:
69
Help.rtf
PageR Enterprise
Page 70 of 270
Entire hour - RED
Minutes 0-29 - YELLOW
Minutes 30-59 - PURPLE
In the example above, quiet times are:
Tuesday, 12:00 pm (noon) through 12:59 pm
Thursday, 4:30 am through 7:29 am
All day Saturday
You can press Clear to erase all quiet times defined.
70
Help.rtf
PageR Enterprise
Page 71 of 270
FTP File Get Object Add/Change
This screen is used to add or change an FTP File Get monitored object . This object is used
to retrieve disk files from other systems for local examination or delivery to the SPIN directory
for paging.
Description
This is an optional description of the monitored object.
Enabled
Enables/disables the object for monitoring. Used to temporarily exclude an object from
monitoring.
Interval
This is the scan interval for this object. This is the minimum time that must pass between
scans of this object.
Severity
This is the Severity indicator for this object. It allows you to rank the importance of alarms on
this object. The range is 0-9, with 0 as the most severe alarm condition.
Timeout
This is a timeout value in seconds that will be applied to communications with the remote
system.
71
Help.rtf
PageR Enterprise
Page 72 of 270
Remote Source defines the source location of the files(s) to be retrieved. You can enter the
information manually or click the binoculars to the right of the file box to invoke the FTP File
Explorer screen. The FTP File Explorer can be used to access the source system and
navigate its directories to locate the source file.
Host
Host name or IP address to get file from. Click the binoculars to see a list of available
hosts/addresses.
User
A valid user name on the source host system giving appropriate access.
Password
Password for the user name on the source host system.
Path
Directory path of the source file on the source host system.
File
File name of the file to be retrieved from the source system. May include wild cards
appropriate for the source system to retrieve all matching files in the directory defined by the
path.
Purge Source After Transfer
Check this option to purge the source file after transfer to the local system.
Local Target defines where on the local system the retrieved file(s) will be stored.
Path
This is the local directory path where the retrieved file will be stored. You can use the
directory explorer window to locate the desired directory.
File
This is the name of the file when stored locally. If no name is specified, the source file name
will be used. If you specify a name here and more than one file is retrieved from the source
system, the files will overlay each other unless you add an extension as discussed below.
Add Date/Time File Extension
Check this box to remove any extension on retrieved files and add an extension made up of
the date and time.
Ascii
Transfer the file in Ascii mode.
Binary
Transfer the file in Binary mode.
EBCDIC
Transfer the file as EBCDIC source and convert to Ascii.
Notes
On each scan, this object will attempt to retrieve the specified file(s) from the source
computer. If the files are not found, no action is taken. If the retrieved file has the same
72
Help.rtf
PageR Enterprise
Page 73 of 270
name as an existing local file, the local file is overlaid with the retrieved file. If the object
cannot gain access to the source host system, an error will be logged to the Activity Log .
FTP Explorer
This screen is used to explore other systems to locate source files for FTP retrieval.
Host
Host name or IP address to get file from. Click the binoculars to see a list of available
hosts/addresses.
User
A valid user name on the source host system giving appropriate access.
Password
Password for the user name on the source host system.
Path
Directory path of the source file on the source host system.
File
File name of the file to be retrieved from the source system. May include wild cards
appropriate for the source system to retrieve all matching files in the directory defined by the
path.
Enter the Host name, user name and password and an initial path and click Connect. You
will be connected via FTP to the host system and the contents of the initial path displayed in
the view box. If you enter a file name in the file box before connecting, the only files
73
Help.rtf
PageR Enterprise
Page 74 of 270
matching the file name will be shown in the view box.
Once connected to the host system and files or directories appear in the view box, you can
navigate the host by changing the path/file name or by clicking on directories in the view box.
When the desired file is located, you can type its name in the File name box or select a file
name in the view box by clicking it.
You can accept the Host, user, password, path and file name information and return it to the
FTP File Get Object Add/Change screen by clicking Accept.
Verbose
Enable this option to see a verbose directory list from the host system in the view box.
Web Status Service
The Web Status Service allows network users to use a Web Browser to access PageR over
the network for status information and some control functions.
When PageR is running as a Service, or you are working away from the system on which
PageR is running, you can use a web browser (Netscape 3.0 or later, Internet Explorer 3.0 or
later) to access PageR remotely and view global status information, monitored object status,
the Activity Log and perform some control functions.
To enable Web Status Service, you must check the appropriate box on the More Global
Options tab. Web Status service uses port number 1088 by default. If you wish to use another
port, enter that port number in the port number box. If you wish to restrict access to the Web
Status Service, enter a user name and optional password. The user name and password
must be entered by the browser user.
At your browser, enter one of the following URLs to access the Web Status Service:
http://ipaddress:port
or
http://systemname:port
Examples:
http://192.50.5.2:1088 or
http://mynt:1088
System name or ip address is of the system where PageR is running. You must include the
port number as shown. Once you have successfully accessed the Web Status Service,
bookmark the URL for future use.
The main status page shows global status information about the current state of PageR and a
list of monitored objects and their states. Objects in alarm state are shown in red. You can
click on an objects type field to see a more detailed view of object status.
On the main status page you can start/stop monitoring, enable/disable paging and display a
view of the PageR Activity Log. The main status page updates automatically on a period
slightly longer than the current scan Interval setting. Note that stopping scanning will stop
74
Help.rtf
PageR Enterprise
Page 75 of 270
all paging.
On the monitored object detail page, you can suspend/resume monitoring of the object and
clear any in progress alarm. This page updates automatically.
The Activity Log page shows the current PageR Activity Log, most recent entry first. This
page updates automatically.
Paging Queue
This window shows the Page Requests queued for processing.
When alarm notification includes paging, a Page Request is generated and added to the
Paging Queue. PageR processes the page requests in the queue by executing the first page
request in the queue that is not completed and not waiting for the delay between page
repeats.
You may delete a waiting page request by clicking on the Object type to select the request
and then pressing the DEL key.
Object
This is the object type of the monitored object that generated the page request.
Identifier
This is the unique identifier of the monitored object that generated the page request.
Alarm ID
Unique alarm ID number assigned to each alarm.
Type
75
Help.rtf
PageR Enterprise
Page 76 of 270
This is the type of page request:
Simple
A simple page request
Scheduled
Created from an escalation schedule
SPIN
From the SPIN directory
Note that the difference between Simple and Scheduled requests is in repeats of the page.
Simple requests will be repeated per the settings on the Paging Notification Options tab.
Scheduled pages are not repeated, since additional pages are defined by the schedule itself.
SPIN pages are treated like simple pages.
Status
This is the status of the page request:
New
A new request, not yet processed
Active
The request is being processed
Repeat(n)
Waiting to be repeated, n more times
Completed
Request Completed
Created
Date and time the page request was generated.
Last Paged
Date and time the page request was last executed.
Contact
The Contact (if any) that is the target of the page request.
Page File
The paging file that will be used for the page request.
Message
The alarm message text that will be sent by substituting for the [ALARM] substitution
keyword in the paging file.
Paging Overview
Paging is accomplished by copying a disk file to a com port on the system. The com port is
expected to be connected to a modem or Message Server . The disk file is expected to
contain commands for the modem or Message Server. This is a simple model with great
flexibility.
The disk file is called a Paging file and has the extension .MSG by convention (it is not
required). The file contains instructions for operating the modem or Message Server.
When doing simple numeric paging with a modem, the file contains the required modem
commands to cause the modem to dial the pager number and optionally supply numeric
information to the pager service .
76
Help.rtf
PageR Enterprise
Page 77 of 270
When using the Message Server, the file contains the Alert Script commands to direct the
Message Server to perform the desired alphanumeric page.
Finally, you can perform alphanumeric pages with a modem using Alert Script commands and
having PageR execute the commands in software, thereby emulating the Message Server.
As an alternative to modem based paging, you can send pages over the internet to a paging
service provider via the Simple Network Paging Protocol (SNPP).
Simple Modem Paging
Simple Modem paging is done by creating a msg file with modem commands that will cause
the modem to dial your pager service . The file is copied to the modem via the com port and
paging is the responsibility of the modem. There is no status checking or guarantee of page
delivery.
Select Modem as the Device Type on the Paging Notification Options tab but do not select
Alert Script Paging.
There are example paging files in the Samples directory.
Message Server Paging
Paging with a Message Server device is done by copying a file containing Alert Script
commands to the Message Server via a com port. The Alert Script commands direct the
Message Servers paging activity and paging is the responsibility of the Message Server.
While page delivery is very reliable with the Message Server, PageR is unable to verify
delivery of the page or report errors encountered by the Message Server.
Alert Script programming of the Message Server is covered in the Message Server
documentation.
Select Server as the Device Type on the Paging Notification Options tab and do not select
Alert Script Paging.
There are example paging files in the Samples directory.
77
Help.rtf
PageR Enterprise
Page 78 of 270
Alert Script Alphanumeric Paging
PageR emulates the Message Server in software and can execute Alert Script to perform
alphanumeric Paging with a modem. When using Alert Script to page, PageR can guarantee
delivery of the page to the pager service and report any errors detected in the process.
When using alphanumeric paging, extensive information about the alarm can be sent in the
page request using substitution parameters in the .msg file.
Select Modem as the Device Type and Alert Script Paging on the Paging Notification Options
tab.
PageR can execute a subset of the Alert Script language used by the Message Server. Any
Alert Script commands not supported by PageR are ignored. Here are the Alert Script
commands you can use for alpha numeric paging by PageR:
Command
!
Description
All characters on a line after the exclamation point are treated as
comments.
D [-]nn
Jump nn lines in the script file if DCD signal from modem is not
HIGH. If HIGH, continue with the next line.
E nn text
Error command. Script processing is terminated and error code nn
and the error message text is dislayed in the Activity Log
window. A value of 00 indicates successful completion of the
script.
F nn
For nn times, execute the next L command to create a for-loop.
L [-]nn
Jump nn lines until the loop count defined by the previous F
command is exhausted. If loop count exhausted, continue with
next line.
G [-]nn
Jump nn lines in the script file.
P b pr d s po
Configures modem port. Must be first non-comment line in .MSG
file. Overrides Paging Options Tab settings.
b = baud rate
pr = parity (NONE, EVEN, ODD)
d = data bits (7 or 8)
s = stop bits (1 or 2)
po = port (COM1, COM2 etc)
Example: P 9600 NONE 7 1 COM1
R tt/text1/text2
Wait for input from modem for tt seconds. If error or time out,
execute the next line in the script. If the input contains the string of
characters defined by text1, execute the second line after the R
command. If the input contains the string defined by text2, execute
78
Help.rtf
PageR Enterprise
Page 79 of 270
the third line after the R command. If input is received but the
string(s) are not matched, continue with the fourth line after the R
command (or third if only one string is specified).
S sendtext
Send text to modem. Text can contain special commands prefixed
by a tilde ~ character:
C
send a carriage return
D
pause .1 second
E
send ENQ character
L
send a line feed
S
pause 1 second
W text
Write text to Activity Log window.
V
Verbose operation. Logs all script activity to the Activity Log
window.
Here is a sample Alert Script page file that shows a complex paging sequence. The steps to
access the pager service are as follows:
Dial the Pager service.
When connected, type carriage returns until the ID= prompt from the service appears.
Type M in response to the ID= prompt (indicates you want to send a message).
The pager service prompts Pager ID for an account ID number.
Type the ID number in response.
If the ID is accepted, the service prompts Message:.
Type the desired message ending with a carriage return.
Disconnect from the paging service.
The Alert Script file to perform this paging sequence would be:
F
S
W
S
F
S
D
G
L
W
L
E
R
E
W
03
! Try dialing 3 times
~S~SAT~C~S~S
! Send ATcr with pauses
Dialing Pager Service at [PHONE]
ATDT[PHONE]~C
! Send modem dial command
20
! Loop wait for DCD, 20 times
~S
! Wait 1 second
02
! Go forward 2 lines if no DCD
05
! Go forward 5 lines
-03
! Loop back to wait for no DCD
Call did not complete, will retry
-09
! Loop back to retry dial
01 Call would not complete
20/CONNECT
! Dial ok, wait 20 sec for connect
02 Connect not detected
Connected
79
Help.rtf
F
S
R
G
G
L
E
S
R
E
S
W
R
E
S
W
S
W
S
W
E
PageR Enterprise
Page 80 of 270
10
! Loop until cr produces id= prompt
~C~S
! Cr to get id= prompt
01/ID=
! Check for id= prompt
02
! Time out
03
! Got id=
-04
! Loop back to cr
03 ID= prompt not detected
M~C
! Respond with M
30/Pager ID?
! Wait for pager id prompt
04 Pager ID? Prompt not detected
[PAGERID]~C~S
Pager ID [PAGERID] sent
30/Message:
! Wait for message prompt
05 Message: prompt not detected
[TYPE] [ID] [ALARM]~C
Message sent
~S~S+++~S~S
Disconnecting
ATH0~C~S
Page complete
00
There are example paging files in the Samples directory.
Monitored Object List
This is a complete list of the network objects supported by PageR Enterprise.
Monitored Objects are objects that are checked (probed/examined) by PageR on a regular
basis.
Event Log
Detects new event records in the System, Application, Security or other event logs on the
local or any remote NT/2000/XP system. Alarms are raised based on the severity of the event
or by keyword matching on the content of the event record text.
NT System
Checks NT system to determine if it is up. Alarm is raised if the NT system does not respond
to a probe.
Windows 2000 System
Checks 2000 system to determine if it is up. Alarm is raised if the 2000 system does not
respond to a probe
Windows XP System
Checks XP system to determine if it is up. Alarm is raised if the XP system does not respond
to a probe
Windows System
Checks any Windows system to determine if it is up. Alarm is raised if the Windows system
80
Help.rtf
PageR Enterprise
Page 81 of 270
does not respond to a probe. Supports Windows NT/2000/XP/2003/VISTA.
Disk Space
Monitors disk volume free space on Windows systems. Alarm raised if free space falls below
a specified amount or percent of total space.
Disk Drives
Monitors the physical disk drives on Windows systems. Alarm raised if problems are found.
NetWare Server
Checks NetWare server to determine if it is up. Alarm is raised if the server does not respond
to a probe.
TCP/IP Device (Ping)
Checks any device supporting TCP/IP by pinging it. Alarm is raised if the device does not
respond to a ping .
Host Process
Checks host system (via Telnet) for a list of processes expected to be present. Alarm is
raised if a process is not present.
Host Volume
Checks host system (via Telnet) for disk volume free space. Alarm is raised if volume free
space drops below a selected threshhold.
Host Login
Checks availability of host systems and performs monitoring functions by logging on to the
host.
Disk File
Examines new records in disk files and checks for alarm conditions by matching the files
contents against a list of words or phrases.
Service
Checks Windows Services on the local or remote NT/2000/XP system and raises an alarm if
the service is not running. Can attempt to restart failed services.
Performance Counter Query
Checks Windows Performance Counters on the local or remote NT/2000/XP system and
raises an alarm if counter values are out of tolerance.
Win32 Process checking
Checks a list of processes on the local or remote Windows 32 bit system to ensure the
processes are running. Raises an alarm if a process is not present.
Windows Management Instrumentation (WMI) Query
Checks WMI objects on the local or remote Windows system and raises an alarm if WMI
object values are out of tolerance.
Windows Management Instrumentation (WMI) Events
Monitors the local or remote Windows system using WMI eventing and raises an alarm if WMI
detects the defined events.
81
Help.rtf
PageR Enterprise
Page 82 of 270
Domain Name System
Checks DNS servers and raises and alarm if the server does not respond or incorrectly
resolves sample requests.
SNMP Query
Checks SNMP Mib object values on SNMP agents and raises an alarm if object values are
out of tolerance.
TCP Services
Checks the availability of TCP Network Services (such as FTP, SMTP , HTTP and more) on
selected systems.
Web Page
Checks web servers by Downloading a specified web page from the server. Raises an alarm
if the page fails to download or takes too long.
Email Check
Reads email messages on mail server and scans them for text strings. Generate alarm or
execute Task if strings found.
Email Ping
Sends a unique mail message to a mail server and tries to read that message back in a set
time period to monitor timely mail delivery.
Bandwidth
Monitors network traffic on a target system's network interfaces. Generates alarm if the traffic
level exceeds preset thresholds.
Directory
Monitors a Windows disk directory and generates an alarm if total file size or count exceeds
preset thresholds.
DialUp
Dial a modem number and test for successful connection in the allowed time.
SQL Query
Execute an SQL query against an SQL server and test for successful completion.
Hosting System
When PageR Enterprise is used with the Message Server device, the Message Server can
detect failure of the system to which it is attached and execute a page notification .
Room Alert Environment Monitor
PageR can monitor a Room Alert environment monitoring device attached to the com port of
the NT system where PageR is running. Using Room Alert, PageR can detect a variety of
environmental problems. The Room Alert device and environmental sensors are available
from CPL Systems.
Room Alert PLUS Environment Monitor
PageR can monitor a Room Alert PLUS environment monitoring device attached to the com
port of the system where PageR is running. Using Room Alert PLUS, PageR can detect a
variety of environmental problems. The Room Alert PLUS device and environmental sensors
are available from CPL Systems.
82
Help.rtf
PageR Enterprise
Page 83 of 270
Failsafe Server Environment Monitor
PageR can monitor the environmental sensor port of the Failsafe Server device attached to
the com port of the system where PageR is running. Using Failsafe Server, PageR can detect
a variety of environmental problems. The Failsafe Server and environmental sensors are
available from CPL.
Server/Listener Objects create a service that waits for and responds to external events
directed to PageR.
Syslog Server
Receives Syslog logging messages from Unix systems and raises alarms as needed based
on message severity or searching the message for specified words or phrases. Allows PageR
to monitor Unix host systems.
SNMP Trap Server
Receives SNMP Trap messages from SNMP agents and raises alarms. Allows PageR to
handle SNMP Traps.
Axis Video Camera
Receives Motion Detection messages from Axis video camera and generates alarms. Can
also capture and record images from cameras on a regular basis.
Utility/Action Objects are objects that perform some utility function on a regular basis.
ePage
On a regular basis, examines messages in a mailbox and generates page requests based on
the messages. Allows users to page Contacts by sending an email.
FTP File Get
On a regular basis, retrieves disk files from system supporting FTP. Used to bring disk log
files to the local system for examination by the Disk File monitored object or to retrieve paging
script files generated on other systems.
Heart Beat
On a regular basis, generates a notification that tells the recipient that PageR is running.
Task
A task object will execute a script, command file or program on a repetitive basis or as part of
an alarm response. Tasks can also be used to create user defined monitored objects.
83
Help.rtf
PageR Enterprise
Page 84 of 270
Select New Monitored Object
Allows selection of new object to be created.
Each Icon represents a Monitored Object Type. You can single click on an Icon to get an
extended description of the object displayed in the status area at the bottom of the window.
Double click an Icon to create a new instance of that object. The Object specific configuration
screen will then be displayed.
If a monitored object icon is grayed out, you have PageR Standard Edition and the grayed
object is not available in the Standard Edition. It can also mean that the MO is a server type
object (like Syslog for example) where only one instance of the object is allowed, and that
instance already exists
84
Help.rtf
PageR Enterprise
Page 85 of 270
Manual Page
Manually send a page, email or message to Contact(s).
You can use this screen to manually send a page, email or popup message to a Contact or
group of Contacts. The Contact's configuration provides the information needed to perform
paging, email or message delivery. Simply select a Contact from the list, select the desired
delivery method and type the message you would like sent.
When paging, the message text is substituted for the [ALARM] substitution keyword in the
paging (MSG) file configured for the Contact.
When paging, a page request is entered into the page queue and will be executed the next
time Alarm Notifications are processed. Scanning must be started.
The Web Status facility allows Manual Pages to be sent from your web browser.
85
Help.rtf
PageR Enterprise
Page 86 of 270
Performance Counter Query object Add/Change
This screen is used to add/change Windows Performance Counter Query objects.
Identifier
This is a short label that is used to identify this Windows Performance Query object .
Description
This is an optional description of the monitored object.
Enabled
Enables/disables the object for monitoring. Used to temporarily exclude an object from
monitoring.
Interval
This is the scan interval for this object. This is the minimum time that must pass between
scans of this object.
Severity
86
Help.rtf
PageR Enterprise
Page 87 of 270
This is the Severity indicator for this object. It allows you to rank the importance of alarms on
this object. The range is 0-9, with 0 as the most severe alarm condition.
Delay
This is the number of seconds that an alarm on this object must persist before alarm
notification is performed. This should be equal to or greater than a multiple of the object or
global interval.
System Name
Enter or select the name of the Windows Server or Workstation system on which the query
will be executed.
Performance Counters Defined for this Query
This grid list shows the Performance Counters that have been attached to the Query object.
The following attributes are defined for each counter:
Attribute
Path
Description
This is the "path" or full name of the counter.
Relop
This is the relational operator used to compare the counter value to
the test value.
Value
This is the test value. The counter value is compared to this value
to determine if an alarm is to be generated. If "countervalue relop
testvalue" is true, an alarm is generated. The test value is always
numeric.
On Error
Controls what happens if an error occurs while retrieving the
counter value. Can be one of:
Ignore = ignore the error, skip the counter
Alarm = generate an alarm indicating that the counter could not be
retrieved.
Alarm
Mode
Controls when alarms are generated for a "true" comparison of the
counter value and test value. Can be one of:
Each Time = generate an alarm on each scan that the comparison
is "true".
Average = generate an alarm when the average of the counter
value, over some number of consecutive scans, compares "true" to
the test value. The number of scans over wich to average is set in
Mode Value.
Persistent = generate an alarm when the counter value compares
"true" to the test value, for some number of consecutive scans. The
number of scans is set in Mode Value.
Disabled = counter value is retrieved but not tested.
Mode
Value
Sets the number of scans to average counter values on Average
Alarm mode or the number of scans of consecutive "true"
comparison of values on Persistent Alarm Mode.
87
Help.rtf
PageR Enterprise
Page 88 of 270
You can use the scroll bar to shift the columns left and right. To change a field, left click on it
and you will be presented with a drop down menu of choices for the field or a box in which to
enter numeric values.
You can click on a counter path name and the click Del to delete a counter or click Add to
add a new counter to the query.
Clicking Add displays the Performance Counter Explorer, which allows you to navigate the
performance counters defined for a system and select counters to add to the query. If the
query is for a different system than the one on which you are running this program, select
that system in the System Name box before clicking Add. This will cause the Performance
Counter Explorer to explore the counters defined on that system.
Evaluation Script File
Normally, this MO retrieves the Performance Counter values and then does the theshold
checking as defined for each counter. As an alternative, you can specify a file name
containing VB script that will be executed to evaluate the counters. In this mode, the counter
values are retrieved but no threshold processing is done. Instead, the named script file is
executed. That script can access all of the attributes for the Performance Counter Query MO
and the counter attributes and current values. Thus, you can write your own evaluation code
for the counter properties. There is an example script in
\Scripts\Samples\PerfCounterTest.txt.
Alarm Object
Identifies the Alarm Object to be used for alarm notification when this monitored object
generates an alarm. The drop down list shows all available Alarm Objects. An Alarm Object
must be selected to perform paging, broadcasting or email of alarm events for this object.
Alarm Text
When an alarm is generated for an object, a default alarm notification message is issued by
PageR. This message identifies the object and describes the alarm. You can override the
default alarm message by entering custom alarm notification message text in this box. You
can use substitution keywords in the message which will be expanded to their run time
values when the message is generated. Keywords appear as [keyword] in the message
text. The keywords you can use for this object are:
Keyword
[TYPE]
Description
expands to the monitored object's type.
[ID]
expands to the monitored object's unique identification string.
[IDX]
expands to the monitored object's identification string and includes
the target system name.
[TARGET]
expands to the target system name.
[DESC]
expands to the monitored object's long description.
[ALARMID]
expands to the unique numeric identifier for the monitored object's
current alarm event.
[PATH]
expands to the full counter path that caused the current alarm.
88
Help.rtf
PageR Enterprise
Page 89 of 270
[NAME]
expands to the counter name without it's object path.
[RELOP]
expands to the relop for the counter that caused the current alarm.
[TEST]
expands to the test value defined for the counter that caused the
current alarm.
[VALUE]
expands to the actual retrieved counter value for the counter that
caused the current alarm.
[COUNTER]
expands to a formatted string with full counter path, relop, test
value and current value giving a complete description of the
counter.
[COUNTERN same as [COUNTER] but with counter name instead of full path.
]
[DATE]
expands to the current date.
[AGENT]
expands to the the application name of "PageR".
[SYSTEM]
expands to the name of this system.
Notes
Here are some examples to help understand how the Performance Query object operates.
Lets say that a query contains two counter definitions:
CPU_BUSY% > 75
TOTAL_FREE_DISK% < 15
When the query is executed, the values for the two counters are retrieved and tested. If the
actual value of CPU_BUSY% is more than 75, an alarm will be generated. If the actual value
of TOTAL_FREE_DISK% is less than 15, an alarm will be generated. If a query has one or
more counters in alarm state, the query object is in the alarm state. If all counters that had
alarms come back into tolerance on a subsequent scan, the alarm state of the query object
will be cleared.
Now lets modify the examples:
CPU_BUSY% > 75 averaged 5
TOTAL_FREE_DISK% < 15 persistent 10
In this case, for CPU_BUSY%, five queries are executed and the values retrieved for the
counter and accumulated and then the average is compared to the test value. If the average
is greater than 75, an alarm is generated. Once five values have been accumulated, the
average is taken over the last five values on each subsequent scan.
For TOTAL_FREE_DISK%, ten queries are executed and if each query's retrieved value was
less than 15%, an alarm is generated. If any value is equal to or greater than 15, the
accumulation starts over. Only if the actual value is less than 15 on each of the last 10 scans
89
Help.rtf
PageR Enterprise
Page 90 of 270
is an alarm generated.
Please note that many Performance Counter values are already averaged or accumulated
over the time between scans. The average and persistent alarm modes are intended for
application over multiple scan periods. Be sure to read the counter description on the
Performance Counter Explorer screen carefully when setting up counters.
The Logical Disk Performance Counters are not enabled on Windows systems by default. To
use the Logical Disk counters you must open a DOS window and issue the command:
diskperf -y
Warning
If you create a new Performance Counter MO from one of the Pre-Defined monitored Objects,
the new MO will be pre-filled with counters appropriate to the area to be monitored. The
counter values can be customized or counters can be added or deleted as needed. Note that
the SQL 2000 (and later) pre-defined Performance Counter MO will not work as originally
setup when you add the MO. The counters in the pre-defined MO use the SQL Instance
name SQLServer. This works for pre-2000 versions of SQL. With SQL 2000 and later, SQL is
configured to have one or more user named Instances. There is no good way to determine
what Instance(s) exist on a system or if more than one Instance exists, which one you want to
monitor with the new MO. So, after adding an SQL 2000 (or later) pre-defined MO, you must
click the Add button and display the Performance Counter Explorer for the target system.
Then locate the SQL Instance you wish to monitor. An SQL Instance will appear as
MSSQL$InstanceName in the counter tree. Select some counter from the Instance you wish
to monitor. This can be a counter you are interested in or just any counter you select. Click
OK to return from the Explorer. The SQL Instance name you have selected will be
automatically detected and the default Instance name of SQLServer will be replaced by your
actual Instance Name. You can either keep or delete the counter you added to cause the
Instance name update.
90
Help.rtf
PageR Enterprise
Page 91 of 270
Performance Counter Explorer
This screen is used to explore the Performance Counters available on a Windows system and
add them to a Performance Counter Query object .
This screen allows you to explore the Performance Counters defined on a Windows System.
The left pane shows the counters on the system. The right page shows any counters selected
to be added the Performance Query object you came from.
Initially, the left pane shows the list of system "objects" for which counters are defined. You
can click on objects to expand them into lists of "instances" or "counters".
A counter path is the concatenation of the system object, instance (if applicable) and counter
names separated by Backslashes.
Simple objects, ones that have no "instances", will expand into a list of the performance
counters defined for the object. You can click on a counter name to see a description of the
counter displayed in the area at the bottom of the screen. You can double click a counter
name to add it to the list of counters selected to be added to the Query object. Selected
counters appear in the right pane. You may select a counter in the right pane and press the
DEL key to remove it from the selected counter list.
When you have selected all of the counters you want, click Accept to add the list of counters
to the Performance Query object. You will be returned to the Query object screen where you
can define the relops and test values for the counters just added.
91
Help.rtf
PageR Enterprise
Page 92 of 270
Complex system objects have "instances" of the object and each instance will expand into a
list of performance counters for that instance. An example of instances can be found under
the Logical Disk system object. There is an "instance Total" and then an instance for each
logical drive on the system, for example "instance C". So the value of counter "% Free Space"
can be retrieved for the C logical drive or the total of all logical drives.
Monitored Object Alarm Types
Monitored Objects have an attribute called Alarm Type. Currently there are two Alarm
types, Discrete and Persistent.
Discrete Alarms
This type of monitored object generates alarms that are "point" alarms. That is, each alarm
generated by the object is not connected to any other and typically these alarms do not
represent a "state" of the monitored object. The alarm is a "reporting" of an event that has no
time duration aspect.
An example of this is the Event Log Object. Each event record that is found to generate an
alarm, is processed and an alarm generated and processing continues.
Persistent Alarms
This type of object generates an alarm when It's state changes. An alarm begins when the
state changes and persists or continues until the state changes again.
An example of this is the Ping Object. When a system fails to respond to a ping, it enters the
alarm state and an alarm is generated. The system continues in alarm state (it is "down") until
the system responds to the ping, ending the alarm state (it is back "up").
Discrete Alarm Processing
When a Discrete alarm type monitored object reports It's first alarm, an alarm (notification
action) is generated and the object enters the "alarm" state. The alarm state is really just a
highlighting action that allows the user of PageR to see that the object has one or more
alarms in progress on the object status display screens. Any new alarm encountered while in
the alarm state generates a new alarm notification action and the object continues in the
alarm state. The alarm state for the Discrete alarm object continues until it is explicitly reset
by the user on the Status display screen or scanning stops and restarts.
Persistent Alarm Processing
When a Persistent alarm type monitored object encounters an alarm, an alarm is generated
and the object enters the alarm state. Once in the alarm state, the object is tested on each
scan to see if the alarm condition persists. If it does, this is logged to the Activity window but
no new alarm is generated. If on a subsequent scan, the alarm condition no longer exists, the
alarm state of the monitored object is cleared. The alarm state of a persistent object may be
reset by the user on the Status display screen. The alarm will be reset if scanning stops and
restarts.
Monitored Object Alarm Types
Discrete
Persistent
92
Help.rtf
PageR Enterprise
Event Log
NT System
Disk File Scan
NetWare Server
Syslog
Ping
SNMP Trap
Service
Host Login
Task
NT Performance Counter
Query
SNMP Query
Email Check
Failsafe Server
ePage
Disk Space
Heart Beat
WMI Query
Page 93 of 270
Room Alert
TCP Service
Web Page
UDP Service
DNS Check
Host Process
Host Volume
W2K System
XP System
EMail Ping
DialUp
Directory
Bandwidth
93
Help.rtf
PageR Enterprise
Page 94 of 270
SNMP Mib Explorer
This screen displays the SNMP Mib retrieved from an SNMP enabled system. You can
select Mib objects to be added to the SNMP Query you came from.
This screen is used to explore the SNMP Mib implemented in an SNMP enabled system
(agent). Click the System button on the tool bar to retrieve (walk) the Mib from the target
system. This can take several seconds.
Once the Mib is retrieved, it is presented in a tree view in the left pane. Mibs are organized in
a hierachial fashion. When you reach the end of a branch in the Mib tree, at an actual Mib
data object , the object's information and current value are displayed in the right pane.
You may also click the Full Mib List button to display the Mib in a full linear list in the right
pane. If you left click on an object in the right pane, the tree view will be adjusted to show the
object's location in the Mib tree. If available from a Mib file, the object's description will be
displayed below the right pane. Any time you right click on an object, It's current value to
retrieved from the target system and displayed.
You can left click an object in the right pane to select it to be added to the SNMP Query you
came from. A blue plus sign will display to show selected objects. You may left click again to
deselect an object.
When all desired objects are selected, click the Plus button to add your selected objects to
the SNMP Query you came from and return to that Query.
94
Help.rtf
PageR Enterprise
Page 95 of 270
SNMP Query Object Add/Change
This screen is used to add/change SNMP Query objects.
Identifier
This is a short label that is used to identify this SNMP Query object .
Description
This is an optional description of the monitored object.
Enabled
Enables/disables the object for monitoring. Used to temporarily exclude an object from
monitoring.
Interval
95
Help.rtf
PageR Enterprise
Page 96 of 270
This is the scan interval for this object. This is the minimum time that must pass between
scans of this object.
Severity
This is the Severity indicator for this object. It allows you to rank the importance of alarms on
this object. The range is 0-9, with 0 as the most severe alarm condition.
Delay
This is the number of seconds that an alarm on this object must persist before alarm
notification is performed. This should be equal to or greater than a multiple of the object or
global interval.
System Name
Enter or select the name or IP address of the system on which the query will be executed.
Click the ... button to select from a list of known SNMP systems on your network.
Community
Enter the community name to use on the query.
SNMP Objects Defined for this Query
This grid list shows the SNMP Object Ids that have been attached to the Query object. The
following attributes are defined for each object:
Attribute
Object ID
Description
This is the SNMP Object ID of the object to query.
Name
This is the textual name of the object. Only available if the object ID
is found in one of the installed Mib files.
Type
This is the object's SNMP data type.
Relop
This is the relational operator used to compare the object's value to
the test value.
Value
This is the test value. The object's value is compared to this value
to determine if an alarm is to be generated. If "objectvalue relop
testvalue" is true, an alarm is generated. The test value is always
numeric.
On Error
Controls what happens if an error occurs while retrieving the SNMP
object value. Can be one of:
Ignore = ignore the error, skip the object
Alarm = generate an alarm indicating that the object could not be
retrieved.
Alarm
Mode
Controls when alarms are generated for a "true" comparison of the
object value and test value. Can be one of:
Each Time = generate an alarm on each scan that the comparison
is "true".
Average = generate an alarm when the average of the object
value, over some number of consecutive scans, compares "true" to
the test value. The number of scans over wich to average is set in
Mode Value.
96
Help.rtf
PageR Enterprise
Page 97 of 270
Persistent = generate an alarm when the object value compares
"true" to the test value, for some number of consecutive scans. The
number of scans is set in Mode Value.
Disabled = object value is retrieved but not tested.
Mode
Value
Sets the number of scans to average object values on Average
Alarm mode or the number of scans of consecutive "true"
comparison of values on Persistent Alarm Mode.
You can use the scroll bar to shift the columns left and right. To change a field, left click on it
and you will be presented with a drop down menu of choices for the field or a box in which to
enter numeric values.
You can click on an object ID and then click Del to delete the object or click Add to add new
objects to the query. You can click on the Name of an object to enter your own name for
that object.
Clicking Add displays the SNMP Mib Explorer, which allows you to retrieve and explore the
SNMP Mib implemented on the target system and select objects to add to the query.
Evaluation Script File
Normally, this MO retrieves the SNMP object values and then does the theshold checking
as defined for each object. As an alternative, you can specify a file name containing VB
script that will be executed to evaluate the objects. In this mode, the object values are
retrieved but no threshold processing is done. Instead, the named script file is executed.
That script can access all of the attributes for the SNMP Query MO and the SNMP object
attributes and current values. Thus, you can write your own evaluation code for the objects.
There is an example script in \Scripts\Samples\SNMPObjectTest.txt.
Alarm Object
Identifies the Alarm Object to be used for alarm notification when this monitored object
generates an alarm. The drop down list shows all available Alarm Objects. An Alarm Object
must be selected to perform paging, broadcasting or email of alarm events for this object.
Alarm Text
When an alarm is generated for an object, a default alarm notification message is issued by
PageR. This message identifies the object and describes the alarm. You can override the
default alarm message by entering custom alarm notification message text in this box. You
can use substitution keywords in the message which will be expanded to their run time
values when the message is generated. Keywords appear as [keyword] in the message
text. The keywords you can use for this object are:
Keyword
[TYPE]
Description
expands to the monitored object's type.
[ID]
expands to the monitored object's unique identification string.
[IDX]
expands to the monitored object's unique indentification string
plus the target system.
[DESC]
expands to the monitored object's long description.
97
Help.rtf
PageR Enterprise
Page 98 of 270
[ALARMID]
expands to the unique numeric identifier for the monitored
object's current alarm event.
[TARGET]
expands to the target system name or IP address.
[OBJECT]
expands to the full description of the object that caused the
current alarm, including the relop, test value and current value.
[OBJNAME]
expands to the name of the object that caused the current alarm.
[COMMUNITY expands to the community name.
]
expands to the object ID of the object that caused the current
[OBJID]
alarm.
[RELOP]
expands to the relop for the objectr that caused the current alarm.
[TEST]
expands to the test value defined for the object that caused the
current alarm.
[VALUE]
expands to the actual retrieved object value for the object that
caused the current alarm.
[DATE]
expands to the current date.
[AGENT]
expands to the the application name of "PageR".
[SYSTEM]
expands to the name of this system.
Notes
SNMP enable systems (agents) expose a virtual data structure called a MIB or Management
Information Base. An SNMP management application (manager) like PageR can query
agents for the values of data items or objects, defined by the agent's Mib. The retrieved value
can be compared to a test value to determine if an alarm condition exists. Mib data items, or
objects, are assigned a unique indentifier called an object ID. The definiton of objects in a Mib
is defined in a schema, called a Mib file. The Mib file describes the Mib objects including thier
type and purpose. The agent inmplements the Mib schema on the agent's system and the
managment application uses the Mib file to determine what objects are available on the
agent.
PageR ships with a standard set of Mib files. If a device on your network is not covered by
one of the supplied Mib files, please contact tech support. In all likelyhood a Mib file for your
device can be obtained and processed for use with PageR.
You determine what Mib objects are available on an agent system and add them to an SNMP
Query by using the SNMP Mib Explorer.
Here are some examples to help understand how the SNMP Query monitored object
operates. Lets say that a query contains two SNMP objects:
CpuBusy > 75
98
Help.rtf
PageR Enterprise
Page 99 of 270
TotalFreeDisk < 15
When the query is executed, the values for the two objects are retrieved and tested. If the
actual value of CpuBusy is more than 75, an alarm will be generated. If the actual value of
TotalFreeDisk is less than 15, an alarm will be generated. If a query has one or more objects
in alarm state, the query object is in the alarm state. If all objects that had alarms come back
into tolerance on a subsequent scan, the alarm state of the query object will be cleared.
Now lets modify the examples:
CpuBusy > 75 averaged 5
TotalFreeDisk < 15 persistent 10
In this case, for CpuBusy, five queries are executed and the values retrieved for the object
and accumulated and then the average is compared to the test value. If the average is greater
than 75, an alarm is generated. Once five values have been accumulated, the average is
taken over the last five values on each subsequent scan.
For TotalFreeDisk, ten queries are executed and if each query's retrieved value was less than
15%, an alarm is generated. If any value is equal to or greater than 15, the accumulation
starts over. Only if the actual value is less than 15 on each of the last 10 scans is an alarm
generated.
Please note that many SNMP object values are already averaged or accumulated numbers.
The average and persistent alarm modes are intended for application over multiple scan
periods. Be sure to read the object description on the SNMP Mib Explorer screen carefully to
make sure the way you test an object is consistent with It's content.
99
Help.rtf
PageR Enterprise
Page 100 of 270
SNMP Systems
This screen shows a list of SNMP enabled systems detected on your network. You can
select a system to be returned to the SNMP Query you came from.
When this screen is displayed, a list of SNMP enabled systems (agents) known to be on your
network is displayed. If the list is blank, you can use the Auto Discovery feature to
automatically scan the network and discover systems with SNMP agents. One established,
the list is retained until PageR is shutdown.
Double click on the IP address of the desired system to select it and return to the SNMP
Query screen you came from.
To Auto Discover SNMP systems, modify the starting and ending IP address ranges as
needed and click Discover. You may click Stop to terminate auto discovery.
100
Help.rtf
PageR Enterprise
Page 101 of 270
SNMP Trap Object Add/Change
This screen is used to add or change the SNMP Trap monitored object . The SNMP Trap
object allows SNMP Trap messages to be received from SNMP Agents and processed for
alarms.
Description
This is an optional description of the monitored object.
Enabled
Enables/disables the object for monitoring. Used to temporarily exclude an object from
monitoring.
Agent
This is the IP address or name of the SNMP Agent system. The Agent system is the source
of SNMP traps. Only traps from the specified Agent will be processed by the monitored
object. You may create one Trap monitoroed object with a blank Agent field. That object is
the default trap monitored object and will handle all traps not processed by any Agent
specific monitored object.
Severity
This is the Severity indicator for this object. It allows you to rank the importance of alarms on
this object. The range is 0-9, with 0 as the most severe alarm condition.
Log All Traps Received
Enable to record all SNMP Trap messages received on the Activity Log window even if the
101
Help.rtf
PageR Enterprise
Page 102 of 270
messages do not result in an alarm.
Alarm on All Traps Received
Generate an alarm for all SNMP Traps received.
Apply Search Strings File to Messages and Alarm on Matches
Enter or select a Search String File name to have each trap message searched for any
matches to strings or words defined in the search string file. More about Search Strings. The
trap message is converted from the raw SNMP format to a formatted text string. This
formatted string is searched using the search string file.
Alarm Object
Identifies the Alarm Object to be used for alarm notification when this monitored object
generates an alarm. The drop down list shows all available Alarm Objects. An Alarm Object
must be selected to perform paging, broadcasting or email of alarm events for this object.
Alarm Text
When an alarm is generated for an object, a default alarm notification message is issued by
PageR. This message identifies the object and describes the alarm. You can override the
default alarm message by entering custom alarm notification message text in this box. You
can use substitution keywords in the message which will be replaced by their run time
values when the message is generated. Keywords appear as [keyword] in the message
text. The keywords you can use for this object are:
Keyword
[TYPE]
Description
expands to the monitored object's type.
[ID]
expands to the monitored object's unique identification string.
This is the value of the Agent field.
[DESC]
expands to the monitored object's long description.
[ALARMID]
expands to the unique numeric identifier for the monitored object's
current alarm event.
[SOURCE]
expands to the IP address or name of the sending system.
[TRAPTEXT]
expands to the formatted text of the trap message.
[SYSNAME]
expands to the name of the sending system, as retrieved from
that system.
[SYSIP]
expands to the IP address of the sending system.
[SYSDESC]
expands to the system description text retrieved from the sending
system.
[SYSLOC]
expands to the location text retrieved from the sending system.
[SYSCON]
expands to the contact name retrieved from the sending system.
[COMMUNITY expands to the community name under which the trap was sent.
]
102
Help.rtf
PageR Enterprise
Page 103 of 270
[TRAPOID]
expands to the trap's SNMP object ID.
[TRAPNUM]
expands the trap's number.
[TRAPNAME]
expands to the textual name of the trap if found in one of the
SNMP MIBs.
[STIME]
expands to the time the trap was generated. This is from the point
of view of the SNMP agent and is in clock ticks since the agent
was initialized.
[OID1]
expands to the object ID of the first additional SNMP object
returned in the trap message, if any.
[OIDNAME1]
expands to the name of the object ID described above.
[VAL1]
expands to the value of the object ID described above.
[TIME]
expands to the current time.
[DATE]
expands to the current date.
[AGENT]
expands to the the application name of "PageR".
[SYSTEM]
expands to the name of this system.
Notes
When systems with SNMP support (agents) experience events, they may send notification
messages or "traps" to an SNMP management application (manager). This monitored object
allows PageR to function as an SNMP manager, receiving and process SNMP traps to
perform an alerting function.
SNMP agents must be configured to send traps and the system on which PageR is running
must be configured as the trap destination.
In order to employ the textual name associated with an SNMP trap, the SNMP MIB file for the
agent must be installed in the Mibs directory of the PageR install directory. PageR is shipped
with a standard set of Mib files. If your agent's Mib file is not included, please contact tech
support. In all likelyhood, the Mib file for your agent can be obtained and processed for use
with PageR.
To enable string matching against trap messages, the raw SNMP trap message is formatted
into a text string. Each component of the message is identified with a keyword and value. An
example of a formatted trap message is:
time=6/10/97 8:15:55 AM; Name=RACNT; IP=161.208.12.33; Com=public;
TOid=1.3.6.1.2.1.11; TNum=2; TName=LinkDown ; TTime=1003466781; Desc=Exhange
Server; Loc=Computer Room; Con=John Doe; Oid=1.3.6.1.2.1.5.0; OidName=abc;
Val=165
103
Help.rtf
PageR Enterprise
Page 104 of 270
In this example, there are spaces after the semicolons. The spaces are shown to assit in
correct formatting by the Help system. These spaces are not present in an actual formatted
message string. The components of the formatted message are:
Keyword
time
Description
the time the trap message was received.
Name
the name retrieved from the sending system.
IP
the IP address of the sending system.
Com
the community name the trap was sent under.
TOid
the trap's SNMP object ID.
TNum
the trap number.
TName
the name of the trap retrieved from the agents Mib file.
TTime
the time of the trap in clock ticks at the sending system.
Desc
the system description text retrieved from the sending system.
Loc
the location text retrieved from the sending system.
Con
the contact name retrieved from the sending system.
Oid
the object ID of an SNMP object in the sending system's Mib that
is applicable to the trap. zero to n groups of Oid, OidName and
Val components may appear.
OidName
the object name of the object ID described above.
Val
the value of the object ID described above.
104
Help.rtf
PageR Enterprise
Page 105 of 270
Task Object Add/Change
This screen is used to add or change Task Monitored Objects. Task objects can be used to
perform functions on a scheduled basis or in response to alarms. Tasks can also be used to
create your own Monitored Objects.
Identifier
This is a short label that is used to identify this Task object .
Description
This is an optional description of the monitored object.
Enabled
Enables/disables the object for monitoring. Used to temporarily exclude the object from
monitoring.
Interval
This is the scan interval for this object. This is the minimum time (seconds) that must pass
between scans of this object.
Severity
This is the Severity indicator for this object. It allows you to rank the importance of alarms on
this object. The range is 0-9, with 0 as the most severe alarm condition.
105
Help.rtf
PageR Enterprise
Page 106 of 270
Delay
This is the number of seconds that an alarm on this object must persist before alarm
notification is performed. This should be equal to or greater than a multiple of the object or
global interval.
Time Out
This is the maximum number of seconds that the task is allowed to run. Zero sets no time
out.
Allow UI
Check this box to allow scripts run by this MO to display user interface elements, such as
message boxes. Note: If you allow user interface elements and set a timeout, if the script
times out, a message box is displayed by the script engine notifying the user of the timeout
and the user must click OK to continue execution. PageR will be stopped until this messge
box is cleared. Also note that user interface elements are never allowed when PageR is
running as a Service .
Task File
This is the disk file that contains the task to be performed. The task file may contain a script
written in VBScript or JScript, or the file may be an NT command file or program file to be
executed. You may click the Explore button to browse for the file.
Task File Type
Select the appropriate task file type for the task file contents.
Parameters
Enter any parameter data you want passed to the script, command file or program.
Parameters are delinmited by space, comma or semi-colon characters. Parameters with
embedded spaces can be enclosed in quotes. Substitution parameters will be replaced by
thier actual values before being passed.
Edit
Click this button to launch Notepad to edit the named task file or create a new task file. If you
create a new file, you will need to assign a name to it when you save it and then enter that
name in the task file box.
Validate
If the task file contains VBScript or JScript, you may click this button to perform a static
validation of script syntax. Any errors found will be displayed with the line and column where
the error was found in the script file.
Execute on Scan
Check this box to have PageR execute this task on each scan of the monitored objects,
subject to any schedule you may define.
Execute on Clock
Check this box to have PageR check this task for execution on each clock tick (one second)
to determine if the task should be executed per the schedule you define. A schedule must be
defined when using clock ticks to trigger task execution.
Schedule
Click this button to define a time schedule for task execution. If a schedule has been defined
for the task, the word Schedule on the button will appear in bold.
106
Help.rtf
PageR Enterprise
Page 107 of 270
Alarm Object
Identifies the Alarm Object to be used for alarm notification when this monitored object
generates an alarm. The drop down list shows all available Alarm Objects. An Alarm Object
must be selected to perform paging, broadcasting or email of alarm events for this object.
Alarm Text
When an alarm is generated for an object, a default alarm notification message is issued by
PageR. This message identifies the object and describes the alarm. You can override the
default alarm message by entering custom alarm notification message text in this box. You
can use substitution keywords in the message which will be expanded to their run time
values when the message is generated. Keywords appear as [keyword] in the message
text. The keywords you can use for this object are:
Keyword
[TYPE]
Description
expands to the monitored object's type.
[ID] or [IDX]
expands to the monitored object's unique indentification string.
[DESC]
expands to the monitored object's long description.
[ALARMID]
expands to the unique numeric identifier for the monitored
object's current alarm event.
[FILENAME]
expands to the task file name.
[INTERVAL]
expands to the Interval seconds.
[DELAY]
expands to the Delay seconds.
[SEVERITY]
expands to the Severity value.
[DATE]
expands to the current date.
[AGENT]
expands to the the application name of "PageR".
[SYSTEM]
expands to the name of this system.
Notes
The Task Monitored Object has many functions and details. In general, a task is a function
that is performed by a script, command or program file. Tasks can be executed on a repetitive
basis or in response to alarms.
Task Triggering
Tasks are executed in two ways, repetitively or in response to an alarm. For repetitive
execution, a task object is set to execute on each Scan or clock tick. At scan time for the task
or on each clock tick, the task is executed. However, if an interval value or schedule has been
defined, task execution may be deferred per the interval value or schedule. A schedule is
contained in a Schedule Object and can be attached to a task.
A task may also be attached to an Alarm Object to be executed when an alarm is processed
107
Help.rtf
PageR Enterprise
Page 108 of 270
by the Alarm object. When a task is executed by an Alarm object, any interval value or
schedule defined for the task is ignored.
Special Functions
When a Task executes a script, command or program file, information from PageR is made
available to the executing object. For scripts, a special object called SG (script globals) is
available in the script. This object has many properties and methods that a script can use to
obtain information about PageR and to control PageR's operation. For command and
program files, PageR provides extensive subsitution parameters that can be used after the
task file name to pass information to the command file or program.
For more information see Using Task Objects.
Notice
To use VBScript or JScript, you must install the Windows Scripting Host from Microsoft.
WSH is typically installed with Internet Explorer but is also available for download from the
Microsoft web site. See www.microsoft.com/scripting for downloads and documentation.
Using Scripts
Scripts written in VBScript or JScript, as supported by the Windows Scripting Host (WSH) can
be executed by Task objects. See www.microsoft.com/scripting for detailed information
about Microsoft's scripting tools. Sample scripts are provided in the \Scripts\Samples
directory.
Sub Main
Your script must have a Sub Main procedure. You can have any number of procedures and
global variables, but one procedure must be called Sub Main. This Sub Main procedure is
executed by the Task object to start your script. If you are passing parameters to the script,
you must add an array parameter to the Sub Main statement. Each passed parameter is
available in the array starting with array subscript zero (example: Sub Main( MyParms() ).
Script Globals Object
The Task object that hosts your script exposes an object for your use called the Script
Globals Object. This object is access in your script with the object name SG. There are an
extensive number of data attributes and functions exposed by SG. See below for details.
Accessing WSH Scripting Objects
Normally, WSH exposes the Wscript object to scripts. Wscript allows access to information
about WSH and to the CreateObject method. CreateObject is used to create all other types of
WSH or Scripting Run Time Library objects.
The Wscript object is not available in the Task object scripting environment. Instead, use the
Script Globals method CreateObject to create the objects normally available via Wscript.
Here is how you would gain access to the WSH Shell object:
Set SHO = SG.CreateObject("Wscript.Shell")
108
Help.rtf
PageR Enterprise
Page 109 of 270
Here is how you would access the FileSystemObject in the scripting run time library:
Set fso = SG.CreateObject("Scripting.FileSystemObject")
Script Directories
The PageR installation creates a Scripts directory in the PageR install directory to give you a
place to keep any scripts you create. Below Scripts is the Samples directory, which contains
sample scripts supplied with PageR.
Script Global Object Attributes
These are the data items exposed by the Script Globals object. Unless otherwise noted, all
attributes are readonly.
Attribute
AlarmSound
Description
Returns the sound file name for audible alarms.
AOValid
Returns "True" or "False". True indicates than there is an alarm
object available. See discussion below.
COCount
Returns the number of Contact objects defined.
CompanyName
Returns company information about the vendor of this product.
CurrentAlarms
Returns the number of alarms currently in progress.
DefMailTo
Returns the default email notification recipient.
DefMsgTo
Returns the default message broadcast target name.
ErrorCount
Returns the number of processing errors encounterd in the
current execution of PageR.
GlobalPagerID
Returns the global pager ID.
GlobalPhoneNumbe Returns the global pager phone number.
r
HostFileName
Returns the hosts file being used.
Interval
Returns the scan interval value.
LastAlarmID
Returns the last alarm ID number assigned.
LastAlarmStart
Returns the start date and time of the last alarm processed.
LastScanTime
Returns the date and time the last scan was performed.
LicenseeName
Returns the name of the entity to which PageR is licensed.
Major
Returns the major component of PageR's
version.
109
Help.rtf
PageR Enterprise
Page 110 of 270
Minor
Returns the minor component of Scramber's version.
MOCount
Returns the number of monitored objects defined.
MonitorStartTime
Returns the date and time the current monitoring run started.
MOValid
Returns "True" or "false". True if the monitored object that
triggered the task is available.
Name
Returns the name of this application.
NTBuild
Returns the Windows build number.
NTMajor
Returns the major component of the Windows version number.
NTMinor
Returns the minor component of the Windows version number.
NTNote
Returns the Windows version note. Typically shows the service
pack installed.
NumberOfScans
Returns the total number of scans since PageR was started.
PagesSent
Returns the total number of pages sent since PageR was
started.
PagingEnabled
Returns "True" or "False". True if paging is enabled.
Path
Returns directory path where Scramber is running.
Revision
Returns PageR revision number.
ServiceMode
Returns "True" or "False". True if PageR is operating as an
Windows Service.
SmtpHost
Returns the name of the SMTP mail server.
SmtpReturnAddres
s
SpinDirectory
Returns the SMTP mail return address.
StartUpTime
Returns the date and time this execution of PageR started.
SystemName
Returns this system's name.
Title
Returns the title of this application.
TotalAlarms
Returns the total number of alarms processed since PageR
started.
Returns the name of the Spin directory.
Here are some examples of accessing data attributes:
110
Help.rtf
PageR Enterprise
Page 111 of 270
msgbox "object count=" & SG.MOCount
if SG.TOValid = "True" msgbox "Task is available"
Script Global Object Methods
A Script Global Method that returns a value must have It's parameters enclosed in
parenthesis. Methods that do not return values should not use parenthesis. These are the
methods exposed by the Script Globals object:
Alarm Msg1, Msg2
Sets the Task object executing the script into alarm state. The alarm will be processed when
the script terminates. Alarm processing is controlled by the Alarm object attached to the
Task object. Msg1 is the alarm message and msg2 is for more detaled information about the
alarm. This function allows Task objects to function as user defined Monitored objects.
SG.Alarm "This is my alarm", "This alarm was triggered by a script"
AOGet(attrname)
Returns named data attribute value if an alarm object is available.
Msgbox = SG.AOGet("desc")
Clear
Clears persistent storage for the task.
SG.Clear
COFind(name)
Given a Contact object identifier or object id, returns the index of the Contact object in the
Contacts collection so that the Contact may be accessed via COGet or COSet.
idx = SG.COFind("John Doe")
COGet(attributename, index)
Given a Contact index (from COFind), get the value of the Contact object attribute
requested. Attributes objectid, enabled and desc are supported.
attrval = SG.COGet("desc", idx)
COSet(attributename, attributevalue, index)
Given a Contact Index (from COFind), set the name attribute to the given value. Attribute
enabled can be set.
SG.COSet("enabled", "true", idx)
CreateObject(objectname)
Creates named ActiveX object and returns a pointer to the object. Objects create with
CreateObject should be released with ReleaseObject.
111
Help.rtf
PageR Enterprise
Page 112 of 270
Set wsh = SG.CreateObject("Wscript.Shell")
ErrorLog Severity , Text
Write the text to the PageR log window as an error. Severity can be set with constant objects
SG.LogInfo, SG.LogWarn and SG.LogCritical.
SG.ErrorLog SG.LogWarn, "This is a warning from my script"
FormatSize(sizeinbytes)
Takes a file size in bytes and returns a string with the size formatted into bytes, Kbytes,
Mbytes or Gbytes as appropriate.
svar = FormatSize(filesize)
GetEventRecObj
Returns an object reference to an Event Log record Object. Can be used when a script is
executed by a Task invoked by an Event Log Monitored Object or by a script executed by an
Event Log MO for string matching. See Event Log Record Object Attributes for the list of
attributes exposed by this object.
Set evtobj = SG.GetEventRecObj
GetObj(name)
Returns an object reference from persistent storage. Object reference must have been saved
with PutObj.
Set myobj = SG.GetObj("myobj")
GetVar(name)
Returns the value of a variable from persistent storage. Variable must have been saved with
PutVar.
myvar = SG.GetVar("myvar")
MOGet(Attr)
Returns named data attribute value from the monitored object that executed the script or from
a specific object in the global collection of monitored objects. If you want to retrieve attributes
for a specific monitored object in the collection, specify the object's index number before the
attribute name. This index is the object position in the collection in the order the objects are
loaded at start up. The number of objects can be obtained from SG.MOCount, allowing you to
iterate the object list.
msgbox SG.MOGet("desc")
msgbox SG.MOGet("moidx=3:desc")
MOReset
Resets the alarm condition of the monitored object that triggered task execution. Can be used
to terminate alarm processing for the monitored object.
PutObj name, objref
Stores an object reference variable in persisten storage under the name specified.
112
Help.rtf
PageR Enterprise
Page 113 of 270
SG.PutObj "wsh", Wsh
PutVar name, variable
Stores a variable in persistent storage under the name specified.
SG.PutVar "myvar", myvar
ReBoot(system)
This function will initiate a shutdown and restart of the named Windows system. Specify an
empty string to reboot the local system. PageR will shutdown immediately in preparation for
system shutdown. To reboot a remote system, the user executing PageR or the
impersonation user must exist on the target system or as a domain user and have the Force
Shutdown From a Remote System User Right enabled. Returns a value of false if the
reboot cannot be executed.
SG.ReBoot("") or
SG.ReBoot("SYSX")
ReleaseObject Object
Used to release object pointers created with CreateObject. Failure to release objects may
cause memory leaks.
SG.ReleaseObject FSO
Reset
Resets the alarm condition on the Task object that is executing the script.
SendMail Recipient, Text, Subject, AttachmentFileName
Sends an email message via the PageR mail configuration. Email must be enabled.
SG.SendMail "[email protected]","Bob - call John right away"
SendNetMsg Target, Text
Sends a broadcast message (popup) to the target user/system if message broadcast is
enabled.
SG.SendNetMsg "Bob", "Bob, call John right away"
SendPage ContactName, Msg
Sends a page to the Contact named via the contact's configuration. Paging must be enabled.
SG.SendPage "Bob", "Bob, call office now"
StopScan
Causes PageR to stop scanning when the script terminates.
TOGet(Attr)
Returns the named data attribute value for the Task object that is executing the script.
msgbox SG.TOGet("desc")
113
Help.rtf
PageR Enterprise
Page 114 of 270
Trace Text
Write a message to PageR's internal tracing log.
SH.Trace "This is a trace message from my script"
WriteLog Level, Severity , Text
Write a message to the PageR Activity log window. Level is a number from 0-3 that indicates
the log level of the message. Severity can be set with the constants SG.LogInfo, SG.LogWarn
and SG.LogCritical.
SG.WriteLog 0, SG.LogWarn, "This is a message from my script"
Task, Alarm and Monitored Objects
When a script is executed, the attributes of the Task object that is executing the script are
available through the TOGet method. If the task is executed on behalf of an Alarm object, the
Alarm object's attributes available through the AOGet method and the Monitored object's (that
called the Alarm object) attributes are available through the MOGet method. Use the AOValid
and MOValid SG attributes to determine if the Alarm and Monitoried objects are available for
access. At all times, you may access the list of defined Monitored objects through MOGet
using the index number of the monitored object you wish to query.
For example, here is a script that iterates the Monitored object list and displays each object's
description:
Sub Main
set WSH = sg.CreateObject("Wscript.Shell")
i = sg.mocount
for j=1 to i
msg = "(" & j & ") " & sg.moget("moidx="&j&":desc")
i = wsh.popup(msg, 10, "Test", 33)
if i = 2 then exit for
next
End Sub
Persistent Storage
Task objects that execute scripts retain global variables during the scanning process. This
means the Task can retain data in global variables for the length of the scan run. However,
such global variables are lost when scanning stops. Thus data cannot be retained over
multiple starts and stops of the scanning process. However, the Script Global object provides
support for persistent data storage for a task. You can store and retrieve variables and object
references thereby persisting data over multiple scans. Persistent storage exists as long as
the product is executing.
114
Help.rtf
PageR Enterprise
Page 115 of 270
Using Task Objects
Task Monitored Objects are used to execute user written script, command or program files.
Much of the power of this function is in the information and functions that PageR makes
available to the script, command or program file.
Task Objects can be used in two ways. One is to use a Task to execute a function on a
repetitive basis or to create your own Monitored Object by writing a script and using a Task
to execute it on a repetitive basis. In this case, the Task is set to be run by the Scan process
each time a scan is performed (See the additional discussion later in this topic).
The second use of the Task Object is to perform a function in response to an Alarm . In this
case, the Task is NOT set to be run by the Scan process and is instead associated with an
Alarm Object . In this case, the Task is executed by the Alarm object when it processes an
Alarm.
Using Scripts
Beyond passing parameters to scripts, scripts have extensive access to information and
functions from within PageR, via the SG (script globals) object that PageR exposes to scripts.
Using this information and the extensive capability available to scripts via Windows Scripting
Host and the Scripting Run Time Library (SCRUN.DLL), there is practically no limit to what
can be done with scripts.
Using Scripts
Using Command or Program files
When a Task object executes a script, command or program file, you may enter substitution
parameters in the parameters box. These substitution parameters are replaced by the
appropriate values before executing the file. The command file or program can access these
parameters just as if the file had been executed from the Windows command prompt. This
scheme passes data into the command or program file, but does not provide a mechanisim
for the file to pass data back or to control PageR.
Using the Task Object to create your own Monitored Object
You can use the task object to create your own monitored object. You must use VBScript or
JScript to do this. You set up a Task to execute on scan (with optional schedule) and write a
script file to perform whatever monitoring function you wish. PageR exposes methods through
the Script Global object that allows your script to trigger an alarm, just like any other
Monitored Object. See the discussion on Using Scripts for more information.
Notice
To use VBScript or JScript, you must install the Windows Scripting Host from Microsoft.
WSH is typically installed with Internet Explorer but is also available for download from the
Microsoft web site.
115
Help.rtf
PageR Enterprise
Page 116 of 270
Command/Program file substitution parameters
When a Task object executes a Windows command or program file, substitution
parameters may be used in the Task object's file name box after the file name. The
parameters will be replaced by thier actual values before the command or program is
executed.
The substitution parameters are:
Attribute
[ALARMSOUND]
Description
Returns the sound file name for audible alarms.
[AOVALID]
Returns "True" or "False". True indicates than there is an alarm
object available. See discussion below.
[COMPANY]
Returns company information about the vendor of this product.
[CURRALARMS]
Returns the number of alarms currently in progress.
[DEFMAILTO]
Returns the default email notification recipient.
[DEFMSGTO]
Returns the default message broadcast target name.
[ERRORCOUNT]
Returns the number of processing errors encounterd in the
current execution of PageR.
[GLOBALPAGERID] Returns the global pager ID.
[GLOBALPHONE]
Returns the global pager phone number.
[HOSTFILE]
Returns the hosts file being used.
[INTERVAL]
Returns the scan interval value.
[LASTALARMID]
Returns the last alarm ID number assigned.
[LASTALARMSTAR
T]
Returns the start date and time of the last alarm processed.
[LASTSCANTIME]
Returns the date and time the last scan was performed.
[LICENSEE]
Returns the name of the entity to which PageR is licensed.
[MAJOR]
Returns the major component of PageR's
version.
[MINOR]
Returns the minor component of Scramber's version.
[MOCOUNT]
Returns the number of monitored objects defined.
[MONITORSTART]
Returns the date and time the current monitoring run started.
116
Help.rtf
PageR Enterprise
Page 117 of 270
[MOVALID]
Returns "True" or "false". True if the monitored object that
triggered the task is available.
[NAME]
Returns the name of this application.
[NTBUILD]
Returns the Windows build number.
[NTMAJOR]
Returns the major component of the Windows version number.
[NTMINOR]
Returns the minor component of the Windows version number.
[NTNOTE]
Returns the Windows version note. Typically shows the service
pack installed.
[NUMBERSCANS]
Returns the total number of scans since PageR was started.
[PAGESSENT]
Returns the total number of pages sent since PageR was
started.
[PAGINGENABLED] Returns "True" or "False". True if paging is enabled.
[PATH]
Returns directory path where Scramber is running.
[REVISION]
Returns PageR revision number.
[SERVICEMODE]
Returns "True" or "False". True if PageR is operating as an
Windows Service.
[SMTPHOST]
Returns the name of the SMTP mail server.
[SMTPRETURNADD
RESS]
Returns the SMTP mail return address.
[SPINDIRECTORY]
Returns the name of the Spin directory.
[STARTUPTIME]
Returns the date and time this execution of PageR started.
[SYSTEMNAME]
Returns this system's name.
[TITLE]
Returns the title of this application.
[TOTALALARMS]
Returns the total number of alarms processed since PageR
started.
Here is an example Task file name with substitution parameters:
C:\CMDFILES\MYCMD.CMD [SYSTEMNAME] [TITLE] [TOTALALARMS]
117
Help.rtf
PageR Enterprise
Page 118 of 270
Access to Task, Alarm and Monitored Object information
When a Task object executes a command or program file, information about the task object is
always available. If the Task was executed on behalf of an Alarm object , the Alarm object
and Monitored object that triggered the alarm, are also available.
In order to substitute data attributes from these objects, you must use the following syntax for
the
substitution parameters:
[TO:attrname]
[MO:attrname]
[AO:attrname]
In each case, the attrname is an attribute name exposed for the particular object. See the
attribute lists for Using Scripts objects and Pull Down Menus objects. An example of
substituting the Task object's description would be:
[TO:desc]
Alarm Object Attributes
These are the data attributes for Alarm objects that are available with the Script Globals
method AOGet(attrname).
Attribute
type
Description
Returns the object type. Will be "Alarm".
id
Returns unique alarm object identification number.
desc
Returns Alarm object description.
msgfile
Returns the paging file (.msg) defined for the Alarm.
msgto
Returns the broadcase message target for the Alarm.
mailto
Returns the email recipient for the Alarm.
startcmd
Returns the Windows command to be executed at Alarm start.
cancelcmd
Returns the Windows command to be executed at Alarm cancel.
notifytype
Returns the Alarm notification type. Will be "Simple" or
"Schedule".
An example of getting Alarm object data attributes in a script would be:
adesc = SG.AOGet("desc")
118
Help.rtf
PageR Enterprise
Page 119 of 270
Monitored Object Attributes
These are the data attributes for Monitored objects that are available with the Script Globals
method MOGet(attrname).
This is the list of attributes available for all Monitored Objects.
Attribute
type
Description
Returns the monitored object type.
objectid
Returns unique object identification number.
id
Returns identification string assigned by user or automatically
for some MOs.
idx
Returns extended indentification string. Typically is user
assigned id string and other pertient information about the MO
such as target system.
desc
Returns the MO description.
interval
Returns the MO scan interval (seconds).
delay
Returns the MO alarm delay period (seconds).
severity
Returns the MO severity level number.
alarminprogress
Returns "True" or "False". True if an alarm is in progress on the
MO.
alarmintervals
Returns the number of scans that the current alarm has
persisted.
alarmtype
Returns the MOs alarm type. Will be "Descrete" or "Persistent".
alarmid
Returns the unique alarm id number assigned to the last alarm
generated by the MO.
alarmmsg
Returns the last alarm message generated by the MO.
alarmmsg2
Returns the second level alarm message last generated by the
MO.
alarmtext
Returns the alarm message template defined for the MO.
lastaction
Returns the date and time of the last update to the MO.
119
Help.rtf
PageR Enterprise
Page 120 of 270
lastscan
Returns the date and time of the last scan of the MO.
alarmcount
Returns the number of alarms experienced by the MO.
scancount
Returns the number of times the MO has been scanned.
lastalarmstart
Returns the date and time of the start of the last alarm
experienced by the MO.
lastalarmend
Returns the date and time of the end of the last alarm
experienced by the MO.
Each Monitored object exposes additional attributes as listed below.
Bandwidth
These are the monitored object level attributes:
Attribute
Description
Returns the target system.
system
community
Returns the SNMP community string.
interfaces
Returns the number of network interfaces defined.
For each interface object defined, attributes may be retrieved using the special syntax shown
here:
ifenabled = SG.MOGet("interface=1:enabled")
The interface=n syntax indicates which interface object to retrieve the attribute for. The
attributes for an Interface object are:
Attribute
index
Description
Returns the interface index number.
enabled
Returns the enabled for monitoring flag (true/false as string).
desc
Returns the interface description string.
inthreshold
Returns alarm threshold value for input.
inpct
Returns true if threshold is a percent.
outthreshold
Returns alarm threshold value for output.
outpct
Returns True if threshold is a percent.
status
Returns last interface status. 1 = up, 2 = down.
speed
Returns actual speed of the interface in bits per second.
lastinoctets
Returns the last input byte count from the interface.
120
Help.rtf
PageR Enterprise
Page 121 of 270
lastinerrors
Returns the last input error count from the interface.
lastindiscards
Returns the last input discard count from the interface.
lastinbps
Returns the last input bandwith used in bits per second for the
last scan interval.
lastoutoctets
Returns the last output byte count from the interface.
lastouterrors
Returns the last output error count from the interface.
lastoutdiscards
Returns the last output discard count from the interface.
lastoutbps
Returns the output bandwidth used in bits per second for the
last scan interval.
Event Log
Attribute
eventlogtype
Description
Returns the event log type. "System", "Security" or "Application".
eventrecord
Returns the event log record as a formatted string.
systemname
Returns the name of the system where the event log is located.
GetEventRecObj
This is a standalone method that returns an object reference to
an event log record object for the current event log record.
Called as follows: Set evtobj = SG.GetEventRecObj
DialUp
Attribute
number
Description
Returns the phone number to be tested.
timeout
Returns the timeout value.
laststatus
Returns the status of the last dial up attempt.
lastconnect
Returns the date & time of last successful connection.
Directory
Attribute
dirpath
Description
Returns the directory path being monitored.
alarmonsize
Returns the alarm on size flag (true/false as string).
alarmonsizechange
Returns the alarm on size change flag.
size
Returns size threshold value.
121
Help.rtf
PageR Enterprise
sizeop
Returns size relative operator .
lastsize
Returns the last size value of the directory.
alarmonfiles
Returns the alarm on file count flag.
alarmonfileschange
Returns the alarm on file count change flag.
files
Returns the file count threshold value.
filesop
Returns the file count relative operator.
lastcount
Returns the last file count of the directory.
Disk File Scan
Attribute
record
Page 122 of 270
Description
Returns the disk file record as a string.
filename
Returns the disk file name.
sizeop
Returns the file size comparision operator.
sizeval
Returns the file size comparision value in bytes.
lastsize
Returns the last retrieved actual file size in bytes.
Disk Space
These are the monitored object level attributes:
Attribute
Description
Returns the target system.
sysname
volumes
Returns the number of disk volume objects defined.
For each Volume object defined, attributes may be retrieved using the special syntax shown
here:
volname = SG.MOGet("volume=1:name")
The volume=n syntax indicates which Volume object to retrieve the attribute for. The
attributes for a Volume object are:
Attribute
name
Description
Returns the volume name.
label
Returns the volume label.
fs
Returns the name of the volume's file system.
122
Help.rtf
PageR Enterprise
Page 123 of 270
size
Returns total size of the volume in bytes.
free
Returns the current actual free bytes for the volume.
pctfree
Returns the current percent of free space for the volume.
enabled
Returns the "True" if the volume is enabled for scanning, "False"
if not.
lasterror
Returns last error description encountered checking the volume.
alarm
Returns "True" or "False". True if the volume object is in the
alarm state.
thresholdtype
Returns the threshold measurement type. Blank for actual bytes,
"PCT" for percent free.
threshold
Returns the threshold value.
DNS Check
Attribute
request
Description
Returns the request string sent to the DNS server.
replytest
Returns the expect reply string.
reply
Returns the last reply string received from the server.
server1
Returns DNS server address.
server2
Returns DNS server address.
server3
Returns DNS server address.
lasterror
Returns the last error message generated by the MO.
timeout
Returns the time out value.
retry
Returns the number of retries value.
Email Check
Attribute
server
Description
Returns the mail server name/ip address.
protocol
Returns the mail protocol, "POP3" or "MAPI".
username
Returns the mail server login user name.
password
Returns the mail server login password.
123
Help.rtf
PageR Enterprise
examinesubject
Returns "true" or "false".
examinebody
Returns "true" or "false".
alarmanymessage
Returns "true" or 'false".
deleteallmessages
Returns "true" or "false".
Page 124 of 270
deletealarmmessage Returns "true" or "false".
s
subject
Returns the mail message subject.
body
Returns the mail message body.
from
Returns the mail message FROM field.
date
Returns the date the mail message was created.
sender
Returns the mail message SENDER field.
replyto
Returns the mail message REPLYTO field.
to
Returns the mail message TO field.
cc
Returns the mail message CC field.
mailer
Returns the mail message MAILER field.
organization
Returns the mail message ORGANIZATION field.
priority
Returns the mail message PRIORITY field.
Email Ping
Attribute
server
Description
Returns the mail server name/ip address.
protocol
Returns the mail protocol, "POP3" or "MAPI".
username
Returns the mail server login user name.
password
Returns the mail server login password.
recipient
Returns recipient of the mail ping message.
timeout
Returns the mail ping timeout value.
date
Returns the mail message create date.
124
Help.rtf
Ping
Attribute
name
address
PageR Enterprise
Description
Returns the name or address assigned by the user.
Returns ip address resolved if the user assigns a name instead
of address.
NT/2000/XP System
Attribute
system
Description
Returns the monitored system's name.
NetWare Server
Attribute
server
Description
Returns the monitored NeWare server's name.
providertype
FTPGet
Attribute
hostname
Page 125 of 270
Returns name of the network provider module used to reach the
NetWare server.
Description
Returns the host system name.
username
Returns the user name that will be used to login to the host
system.
hostdir
Returns the directory where the target file will be retrieved from
the host system.
hostfile
Returns the file name that will be retrieved from the host system.
localdir
Returns the local directory into which the retrieved file will be
placed.
localfile
Returns file name that will be assigned to the retrieved file.
Service
Attribute
system
Description
Returns the system name where the service is located.
service
Returns the service's unique name.
displayname
Returns the service's long display name.
laststate
Returns the last state code retrieved from the service.
lastwin32exitcode
If the service is terminated, returns the Win32 exit code.
lastserviceexitcode
If the service is terminated, returns the exit code set by the
125
Help.rtf
PageR Enterprise
Page 126 of 270
service.
Performance Query
These are the query level attributes:
Attribute
Description
Returns the target system.
system
counters
Returns the number of performance counters contained in the
query.
For each Counter object contained in the query, attributes may be retrieved using the special
syntax shown here:
snmpoid = SG.MOGet("counter=2:oid")
The counter=n syntax indicates which Counter object to retrieve the attribute for. The
attributes for a Counter object are:
Attribute
path
Description
Returns the Counter Path for the counter.
name
Returns the Counter name without path.
desc
Returns a formatted description of the Counter object including
name, relop and the current and test values.
descp
Returns same as desc but includes full counter path.
currval
Returns the last value retrieved from the target system for the
Counter object.
testval
Returns the test value defined for the Counter object.
relop
Returns the relative operator used to compare the current value
of the Counter object on the target system to the test value to
determine if an alarm condition exists.
alarm
Returns "True" or "False". True if the Counter object is in the
alarm state.
lasttest
Returns the date and time that the target system was queried
and the Counter object's current value was compared with the
test value.
Room Alert
Attribute
sensortype
sensornumber
Description
Returns the sensor type label.
Returns the sensor number on the Room Alert device .
126
Help.rtf
PageR Enterprise
Page 127 of 270
normalsignal
Returns the normal signal level (HI or LO) for the sensor.
comport
Returns the com port the Room Alert device is attached to.
Syslog
Attribute
sender
Description
Returns the system that last sent a syslog message.
msg
Returns the text of the last syslog message.
facility
Returns the facility code from the last syslog message.
level
Returns the message severity level from the last system
message.
SNMP Trap
Attribute
traptext
Description
Returns the trap message as a formatted string.
SNMP Query
These are the query level attributes:
Attribute
Description
Returns the target system.
system
community
Returns the SNMP community name.
objects
Returns the number of MIB objects contained in the query.
For each MIB object contained in the query, the following attributes may be retrieved using
the special syntax shown here:
snmpoid = SG.MOGet("object=2:oid")
The object=n syntax indicates which MIB object to retrieve the attribute for. The attributes for
a MIB object are:
Attribute
oid
Description
Returns the MIB object's SNMP object id.
name
Returns the MIB object's name.
desc
Returns a formatted description of the MIB object including the
current state of the object.
datatype
Returns the SNMP data type of the MIB object.
currval
Returns the last value retrieved from the target system's MIB for
the MIB object.
127
Help.rtf
PageR Enterprise
Page 128 of 270
testval
Returns the test value defined for the MIB object.
relop
Returns the relative operator used to compare the current value
of the MIB object on the target system to the test value to
determine if an alarm condition exists.
alarm
Returns "True" or "False". True if the MIB object is in the alarm
state.
lasttest
Returns the date and time that the target system was queried
and the MIB object's current value was compared with the test
value.
Task
Attribute
filename
language
Web Page
Attribute
errortext
Description
Returns the Task file name.
Returns the task file language.
Description
Returns the text of the last error encountered while downloading
the target web page.
Win32 Process
These are the query level attributes:
Attribute
Description
Returns the target system.
system
processes
Returns the number of process objects that are defined for the
MO.
For each process object contained in the query, attributes may be retrieved using the special
syntax shown here:
proc = SG.MOGet("process=2:name")
The process=n syntax indicates which process object to retrieve the attribute for. The
attributes for a process object are:
Attribute
name
Description
Returns the process name.
status
Returns the processes current status. Either "OK" or description
of current process alarm.
alarm
Returns "True" or "False". True if the process object is in the
alarm state.
128
Help.rtf
PageR Enterprise
Page 129 of 270
alarmcount
Returns the number of alarms detected for the process object
for the current alarm episode.
alarmtotal
Returns the total number of alarms detected for the process
object since scanning was started.
lastalarmstart
Returns the date and time of the start of the current alarm
episode for the process object.
lastalarmend
Returns the date and time of the end of the last alarm episode
for the process object.
lasttest
Returns the date and time that the target system was queried
and the process object was checked.
WMI Query
These are the query level attributes:
Attribute
Description
Returns the target system.
system
objects
Returns the number of WMI objects (properties) that are defined
for the query.
For each WMI object contained in the query, attributes may be retrieved using the special
syntax shown here:
wmipath = SG.MOGet("object=2:classpath")
The object=n syntax indicates which WMI object to retrieve the attribute for. The attributes for
a WMI object are:
Attribute
classpath
Description
Returns the object's Class Path. This is the class name,
property name, key name and key value that uniquely defines
the object instance and property identified by the object.
class
Returns the object's WMI class name only.
key
Returns the name of the object property used as a key to an
instance of the object.
keyvalue
Returns the key value used to select an instance of the object.
propertyname
Returns the object property name being returned for testing.
object
Returns a formatted description of the WMI object property
including name, relop and the current and test values.
objectp
Returns same as object but includes full WMI object path.
currval
Returns the last value retrieved from the target system for the
129
Help.rtf
PageR Enterprise
Page 130 of 270
WMI object property.
curvalvalid
Returns "true" if the current value was successfully retrieved on
the last scan of the MO. "false" if there was an error retrieving
the WMI object property value.
testval
Returns the test value defined for the WMI object property.
relop
Returns the relative operator used to compare the current value
of the WMI object property on the target system to the test value
to determine if an alarm condition exists.
alarm
Returns "True" or "False". True if the WMI object is in the alarm
state.
alarmcount
Returns the number of alarms detected for the WMI object
property for the current alarm episode.
alarmtotal
Returns the total number of alarms detected for the WMI object
property since scanning was started.
lastalarmstart
Returns the date and time of the start of the current alarm
episode for the WMI object property.
lastalarmend
Returns the date and time of the end of the last alarm episode
for the WMI object property.
lasttest
Returns the date and time that the target system was queried
and the WMI object property's current value was compared with
the test value.
Schedule Object Change
This screen is used to update the scan/execution schedule for a Monitored Object or
globally.
Monitored objects are normally executed or scanned on each scan interval . You can attach
a Schedule to a Monitored Object to further control when the object will be scanned. You
can also define a global Schedule. If a global schedule exists and the monitored object
passes that schedule, any schedule defined at the monitored object level is then applied.
130
Help.rtf
PageR Enterprise
Page 131 of 270
Never
When this option is selected, the schedule criteria are not applied and the Monitored Object is
scanned on each scanned interval.
One Time
When this option is checked, the MO will be scanned one time during the current scaning run.
When that single scan occurs can be controlled by selecting other scheduling options.
Every Scan
When this option is checked, the schedule will be checked on every scan of the Monitored
Object.
You must select Never, One Time or Every Scan. When One Time or Every Scan is selected,
the MO is considered scheduled to be scanned unless disqualified by any of the other
settings. If you configure a schedule, you can select Never to disable (but retain) the
schedule. If you click the Clear button and then click OK, the schedule will be completely
deleted.
Seconds
When scanning an MO more than once, scan only when this number of seconds has elapsed
since the last scan of the MO.
Intervals
When scanning an MO more than once, scan only when this number of scaning runs have
elapsed since the last scan of the MO.
Only on Days of Week
Only scan the MO on the selected days of the week.
Only on Days of Month
Only scan the MO on the selected days of the month.
131
Help.rtf
PageR Enterprise
Page 132 of 270
Only in These Time Ranges
Only scan the MO if the current time falls into any of the time ranges defined. You add a time
range by typing the range in the box below the list. Enter a starting time, starting time "to"
ending time or "to" ending time to create time ranges. To delete a range, click on it and press
the DEL key.
Depends on These Monitored Objects
You can defer the scanning of the MO if any other selected MO is in the alarm state. Click
Add to add MOs to the Dependancy list. Select an MO and press the DEL key to delete an
MO from the list. Monitored Object depandancy is not allowed on global Schedules.
Notes
When a schedule is checked for execution (One Time or Every Scan), each scheduling option
is checked and if none of the defined options disqualifies execution, the MO will be scanned.
For example:
If you check repeating every 360 seconds, on Tuesday, on the 5th of the month during the
hours of 8 AM to 5 PM...
The MO will be scanned every hour (approximate since scans are trigged by the global scan
timer) only if it is the 5th day of the month and that day is Tuesday and the current time is
between 7:59 AM and 5:00 PM.
Room Alert Object Add/Change
This screen is used to add or change a Room Alert object . The Room Alert object monitors a
Room Alert environment monitoring device attached to the local system.
Room Alert is a hardware device that interfaces a variety of environmental sensors (such as
temperature, water, smoke, power, etc) to a COM port on the local system. PageR can
monitor the Room Alert hardware device (called an ID box) via the COM port and generate
alarms when abnormal environmental conditions are detected. Room Alert and environmental
sensors are available from CPL Systems.
132
Help.rtf
PageR Enterprise
Page 133 of 270
Identifier
This is a short user defined label used to identify this Room Alert object.
Description
This is an optional description of the monitored object.
Enabled
Enables/disables the object for monitoring. Used to temporarily exclude an object from
monitoring.
Interval
This is the scan interval for this object. This is the minimum time that must pass between
scans of this object.
Severity
This is the Severity indicator for this object. It allows you to rank the importance of alarms on
this object. The range is 0-9, with 0 as the most severe alarm condition.
Delay
This is the number of seconds that an alarm on this object must persist before alarm
notification is performed. This should be equal to or greater than a multiple of the object or
global interval.
Com Port
Select the COM port that the Room Alert device is attached to.
Sensor Number
133
Help.rtf
PageR Enterprise
Page 134 of 270
Each Room Alert device supports 4 sensors. Select the sensor (number) that is to be
monitored.
Normal Signal
Set the signal level (LO or HI) that is returned by the attached sensor for NORMAL
conditions.
Sensor Type
Select or type a descriptive label that identifies the attached sensor.
Simulate RA Alarm
Check this box to test the MO without a Room Alert device attached to the system. Alarms
are simulated and cleared on alternating scans of this MO.
Alarm Object
Identifies the Alarm Object to be used for alarm notification when this monitored object
generates an alarm. The drop down list shows all available Alarm Objects. An Alarm Object
must be selected to perform paging, broadcasting or email of alarm events for this object.
Alarm Text
When an alarm is generated for an object, a default alarm notification message is issued by
PageR. This message identifies the object and describes the alarm. You can override the
default alarm message by entering custom alarm notification message text in this box. You
can use substitution keywords in the message which will be replaced by their run time
values when the message is generated. Keywords appear as [keyword] in the message
text. The keywords you can use for this object are:
Keyword
[TYPE]
Description
expands to the monitored object's type.
[ID]
expands to the monitored object's unique identification
string.
[DESC]
expands to the monitored object's long description.
[SENSORTYPE]
expands to the sensor type label.
[SENSORNUMBER expands to the sensor number.
]
[NORMALSIGNAL] expands to LO or HI, the normal signal value.
[COMPORT]
expands to the com port for the Room Alert device.
[ALARMID]
expands to the unique numeric identifier for the monitored
object's current alarm event.
[TIME]
expands to the current time.
[DATE]
expands to the current date.
[AGENT]
expands to the the application name of "PageR".
134
Help.rtf
[SYSTEM]
PageR Enterprise
Page 135 of 270
expands to the name of this system.
135
Help.rtf
PageR Enterprise
Page 136 of 270
TCP Services Object Add/Change
This screen is used to add or change a list of TCP Services which will be monitored on a
selected system.
Description
This is an optional description of the monitored object .
Enabled
Enables/disables the object for monitoring. Used to temporarily exclude an object from
monitoring.
Interval
This is the scan interval for this object. This is the minimum time that must pass between
scans of this object.
Severity
This is the Severity indicator for this object. It allows you to rank the importance of alarms on
this object. The range is 0-9, with 0 as the most severe alarm condition.
Delay
This is the number of seconds that an alarm on this object must persist before alarm
notification is performed. This should be equal to or greater than a multiple of the object or
136
Help.rtf
PageR Enterprise
Page 137 of 270
global interval.
System
Enter/select the host name or IP address of the system on which TCP Services will be
monitored.
Time Out
This is the number of seconds to wait for a connection response from a TCP Service before
posting an alarm.
Available TCP Services
This is a a list of known TCP Services. For each service, the name by which it is known and
the TCP port number it is assigned to are shown. You may add your own services to this list
by placing a list of those services into a disk file called LocalTcpSvcs.txt in the install
directory. The format of this file should follow the format of TcpSvcs.txt. Do not change
TcpSvcs.txt.
Monitored TCP Services
This is the list of the TCP Services selected to be monitored. You may add services by
selecting them in the Available Services box and clicking Add. You may remove services by
selecting them and clicking Remove.
Extension Script File
This field identifies a VBScript file that will be executed for a particular service once a
connection to the service has been established. Click on a serivce in the Monitored TCP
Services list to see the script file assigned to a service. See below for more information.
Extension Script Parameters
This field contains any parameters to be passed to the extension script (if any) for a service.
Alarm Object
Identifies the Alarm Object to be used for alarm notification when this monitored object
generates an alarm. The drop down list shows all available Alarm Objects. An Alarm Object
must be selected to perform paging, broadcasting or email of alarm events for this object.
Alarm Text
When an alarm is generated for an object, a default alarm notification message is issued by
PageR. This message identifies the object and describes the alarm. You can override the
default alarm message by entering custom alarm notification message text in this box. You
can use substitution keywords in the message which will be replaced by their run time
values when the message is generated. Keywords appear as [keyword] in the message
text. The keywords you can use for this object are:
Keyword
[TYPE]
Description
expands to the monitored object's type.
[ID]
expands to the monitored object's unique identification string, the
name or IP address of the target system.
[DESC]
expands to the monitored object's long description.
[ALARMID]
expands to the unique numeric identifier for the monitored object's
current alarm event.
137
Help.rtf
[SVCNAME]
PageR Enterprise
Page 138 of 270
expands to the name and port number of the TCP Service that has
failed testing.
[SVCERROR] expands to a description of the error when a service fails testing.
[TIME]
expands to the current time.
[DATE]
expands to the current date.
[AGENT]
expands to the the application name of "PageR".
[SYSTEM]
expands to the name of this system.
Notes
This monitored object verifies TCP Service availability by attempting to connect to each
service selected on the identified system. Any failed connection will generate an alarm.
You can extend TCP Service checking by associating a script file with a service. When a
service is selected in the Monitored Services List, you can set the script file and any require
parameters and this information will be retained for the service. Sample scripts are provided
in the \Scripts\Samples directory.
The purpose of extension scripts is to allow the user to program service checking beyond
simply establishing a connection. If a service has a script file defined, once a connection to
the service has been established, the script will be executed and the socket connection to the
service is exposed to the script in the socket object. This allows the script to communicate
with the service. The script can then make whatever tests of the service are appropriate.
The samples include a simple example that tests the TCP Echo (port 7) service by simply
sending data to the port and reading back the echo (TcpEchoCheck.txt). A much more
extensive example is provided for the DNS (port 53) service. This script will take a domain
name and expected IP address from the parameters field and perform an actual DNS name
resolution (TcpDnsCheck.txt).
138
Help.rtf
PageR Enterprise
Page 139 of 270
Failsafe Server Object Add/Change
This screen is used to add or change a Failsafe Server object . The Failsafe Server object
monitors the environment monitoring port of the Failsafe Server attached to the local system.
The Failsafe Server is a hardware device that interfaces to a variety of environmental
sensors (such as temperature, water, smoke, power, etc). PageR can communicate with the
Failsafe Server via a COM port on the local system. PageR can then generate alarms when
abnormal environmental conditions are detected by the server. The Failsafe Server and
environmental sensors are available from CPL Systems.
Identifier
This is a short user defined label used to identify this monitored object.
Description
This is an optional description of the monitored object.
Enabled
Enables/disables the object for monitoring. Used to temporarily exclude an object from
monitoring.
Interval
This is the scan interval for this object. This is the minimum time that must pass between
scans of this object.
Severity
This is the Severity indicator for this object. It allows you to rank the importance of alarms on
139
Help.rtf
PageR Enterprise
Page 140 of 270
this object. The range is 0-9, with 0 as the most severe alarm condition.
Delay
This is the number of seconds that an alarm on this object must persist before alarm
notification is performed. This should be equal to or greater than a multiple of the object or
global interval.
Com Port
Select the COM port that the Failsafe Server is attached to.
Sensor Number
Each Failsafe Server supports 5 sensors. Select the sensor (number) that is to be
monitored.
Normal Signal
Set the signal level (LO or HI) that is returned by the attached sensor for NORMAL
conditions.
Sensor Type
Select or type a descriptive label that identifies the attached sensor.
Simulate FS Alarm
Check this box to test the MO without a Failsafe Server attached to the system. Alarms are
simulated and cleared on alternating scans of this MO.
Alarm Object
Identifies the Alarm Object to be used for alarm notification when this monitored object
generates an alarm. The drop down list shows all available Alarm Objects. An Alarm Object
must be selected to perform paging, broadcasting or email of alarm events for this object.
Alarm Text
When an alarm is generated for an object, a default alarm notification message is issued.
This message identifies the object and describes the alarm. You can override the default
alarm message by entering custom alarm notification message text in this box. You can use
substitution keywords in the message which will be replaced by their run time values when
the message is generated. Keywords appear as [keyword] in the message text. The
keywords you can use for this object are:
Keyword
[TYPE]
Description
expands to the monitored object's type.
[ID]
expands to the monitored object's unique identification
string.
[DESC]
expands to the monitored object's long description.
[SENSORTYPE]
expands to the sensor type label.
[SENSORNUMBER expands to the sensor number.
]
[NORMALSIGNAL] expands to LO or HI, the normal signal value.
[COMPORT]
expands to the com port for the Failsafe Server.
140
Help.rtf
PageR Enterprise
Page 141 of 270
[ALARMID]
expands to the unique numeric identifier for the monitored
object's current alarm event.
[TIME]
expands to the current time.
[DATE]
expands to the current date.
[AGENT]
expands to the the application name of "PageR".
[SYSTEM]
expands to the name of this system.
Notes
To use this monitored object, you must set the Paging Options Tab fields shown below as
indicated:
Set the Device Type to
Set the Data Bits to
Set the Stop Bits to
Set the Speed to
Set the Parity to
SERVER
8
1
9600
NONE
You do not have to enable paging to use this object.
141
Help.rtf
PageR Enterprise
Page 142 of 270
Host Login Object Add/Change
This screen is used to add or change Host Login Monitored Objects. Host Login objects can
be used to perform host system availability checking and monitoring.
Identifier
This is a short label that is used to identify this object .
Description
This is an optional description of the monitored object.
Enabled
Enables/disables the object for monitoring. Used to temporarily exclude the object from
monitoring.
Interval
This is the scan interval for this object. This is the minimum time (seconds) that must pass
between scans of this object.
Severity
This is the Severity indicator for this object. It allows you to rank the importance of alarms on
this object. The range is 0-9, with 0 as the most severe alarm condition.
Delay
142
Help.rtf
PageR Enterprise
Page 143 of 270
This is the number of seconds that an alarm on this object must persist before alarm
notification is performed. This should be equal to or greater than a multiple of the object or
global interval.
Time Out
This is the time out used on communications with the host system. Zero sets no time out.
Allow UI
Check this box to allow scripts run by this MO to display user interface elements, such as
message boxes. Note: If you allow user interface elements and set a timeout, if the script
times out, a message box is displayed by the script engine notifying the user of the timeout
and the user must click OK to continue execution. PageR will be stopped until this messge
box is cleared. Also note that user interface elements are never allowed when PageR is
running as a Service .
Host Name
This is the name or IP address of the host system to be logged on to. You may click the
explore button to select a host from the hosts file or scan the network for systems.
User Name
This is the user name on the host system that will be used to log on to the host system. A
fully priviledged user is reccomended.
Password
This is the password for the user name specified above.
Login/Monitoring Script File
This is the disk file that contains the login script to be performed. The script file contains a
script written in VBScript that performs the host login, logout and optional monitoring. See
the notes section below for more details on this script. You may click the Explore button to
browse for the file.
Parameters
Enter any parameter data you want passed to the script. Parameters are delimited by space,
comma or semi-colon characters. Parameters with embedded spaces can be enclosed in
quotes. Substitution parameters will be replaced by thier actual values before being passed.
The acutal parameters used are dictated by the requirements of the script file selected. See
the notes section below for more details.
Edit
Click this button to launch Notepad to edit the named script file or create a new script file. If
you create a new file, you will need to assign a name to it when you save it and then enter
that name in the script file box.
Validate
You may click this button to perform a static validation of the script's syntax. Any errors
found will be displayed with the line and column where the error was found in the script file.
Alarm Object
Identifies the Alarm Object to be used for alarm notification when this monitored object
generates an alarm. The drop down list shows all available Alarm Objects. An Alarm Object
must be selected to perform paging, broadcasting or email of alarm events for this object.
Alarm Text
143
Help.rtf
PageR Enterprise
Page 144 of 270
When an alarm is generated for an object, a default alarm notification message is issued by
PageR. This message identifies the object and describes the alarm. You can override the
default alarm message by entering custom alarm notification message text in this box. You
can use substitution keywords in the message which will be expanded to their run time
values when the message is generated. Keywords appear as [keyword] in the message
text. The keywords you can use for this object are:
Keyword
[TYPE]
Description
expands to the monitored object's type.
[ID] or [IDX]
expands to the monitored object's unique indentification string.
[DESC]
expands to the monitored object's long description.
[ALARMID]
expands to the unique numeric identifier for the monitored
object's current alarm event.
[HOST]
expands to the host name.
[USER]
expands to the user name.
[SCRIPTFILE] expands to the script file name.
[INTERVAL]
expands to the Interval seconds.
[DELAY]
expands to the Delay seconds.
[SEVERITY]
expands to the Severity value.
[DATE]
expands to the current date.
[AGENT]
expands to the the application name of "PageR".
[SYSTEM]
expands to the name of this system.
Notes
The Host Login Monitored Object provides availability checking and monitoring functions. The
actual login and logout, and any monitoring functions are performed by the Login/Monitoring
script. This is a VBScript script designed to login to the host system, perform optional
monitoring tasks and then logout.
When the Host Login MO is scanned, it executes the Login() routine in the script. That
function petforms the login to the host, typically using the Telnet protocol provided by a
custom control (OCX). Successfully logging in to the host system confirms It's availability. If
the login is successful, the MO then calls the Monitor() routine in the script. If monitoring
functions are defined in the script, they will be performed and appropriate alarms, if any,
generated. Finally, the MO calls the Logout() routine in the script to close the connection to
the host.
Sample scripts are provided for popular host systems in the \Scripts\Samples directory.
These scripts must be edited by the user to tailor them to each host environment. For
144
Help.rtf
PageR Enterprise
Page 145 of 270
instance, the login prompt, user name prompt, password prompt and command prompt
employed by the target host must be defined in the script. Sometimes, due to special
circumstances or optional security programs, the scripts must be customized to respond
correctly to host prompts and complete the login.
Each sample script contains basic monitoring functions applicable to the host system. These
functions are commented out. The user must uncomment any desired functions and
customize parameters as needed. Additionally, the user is free to modify or expand the script
capabilities, following the pattern of host communication shown in the samples.
Any script selected from the \Scripts\Samples directory is saved into the Scripts to preseve
the samples in their original state.
Special Script Functions
When the Login script is executed, information from PageR is exposed to the script. A special
object called SG (script globals) is available in the script. This object has many properties and
methods that a script can use to obtain information about PageR and to control PageR's
operation.
For more information see Using Scripts
Notice
To use Login scripts (VBScript), you must install the Windows Scripting Host from
Microsoft. WSH is typically installed with Internet Explorer but is also available for download
from the Microsoft web site. See www.microsoft.com/scripting for downloads and
documentation.
145
Help.rtf
PageR Enterprise
Page 146 of 270
Room Alert PLUS Object Add/Change
This screen is used to add or change a Room Alert PLUS object . The Room Alert PLUS
object monitors a Room Alert PLUS environment monitoring device attached to the local
system.
Room Alert PLUS is a hardware device that interfaces a variety of environmental sensors
(such as temperature, water, smoke, power, etc) to a COM port on the local system. PageR
can monitor the Room Alert PLUS hardware device via the COM port and generate alarms
when abnormal environmental conditions are detected. Room Alert PLUS device and
environmental sensors are available from CPL Systems.
Identifier
This is a short user defined label used to identify this Room Alert PLUS object.
Description
This is an optional description of the monitored object.
Enabled
Enables/disables the object for monitoring. Used to temporarily exclude an object from
monitoring.
Interval
This is the scan interval for this object. This is the minimum time that must pass between
scans of this object.
146
Help.rtf
PageR Enterprise
Page 147 of 270
Severity
This is the Severity indicator for this object. It allows you to rank the importance of alarms on
this object. The range is 0-9, with 0 as the most severe alarm condition.
Delay
This is the number of seconds that an alarm on this object must persist before alarm
notification is performed. This should be equal to or greater than a multiple of the object or
global interval.
Com Port
Select the COM port that the Room Alert device is attached to.
Sensor Number
Each Room Alert device supports 3 user sensors. Select the sensor (number) that is to be
monitored.
Normal Signal
Set the signal level (LO or HI) that is returned by the attached sensor for NORMAL
conditions.
Sensor Type
Select or type a descriptive label that identifies the attached sensor.
Simulate RA+ Alarm
Check this box to test the MO without a Room Alert PLUS device attached to the system.
Alarms are simulated and cleared on alternating scans of this MO.
Flood
Check this box to enable monitoring of the built-in flood sensor. Flood sensor pick up must
be wired to the Flood sensor contacts on the Room Alert PLUS device.
Main Power
Check this box to enable monitoring of the power supply to the Room Alert PLUS device.
Power 2
Check this box to enable monitoring of the alternate power supply. Typically, the Main Power
sensor monitors output from a UPS system, and power 2 monitors the power input to the
UPS. This way if there is loss of power to the UPS, you can be alerted that the UPS is active
and you have x minutes of power left.
Dead Box
Check this box to monitor for loss of Main Power and battery backup or for disconnection of
box from local system.
Alarm Object
Identifies the Alarm Object to be used for alarm notification when this monitored object
generates an alarm. The drop down list shows all available Alarm Objects. An Alarm Object
must be selected to perform paging, broadcasting or email of alarm events for this object.
Alarm Text
When an alarm is generated for an object, a default alarm notification message is issued by
PageR. This message identifies the object and describes the alarm. You can override the
147
Help.rtf
PageR Enterprise
Page 148 of 270
default alarm message by entering custom alarm notification message text in this box. You
can use substitution keywords in the message which will be replaced by their run time
values when the message is generated. Keywords appear as [keyword] in the message
text. The keywords you can use for this object are:
Keyword
[TYPE]
Description
expands to the monitored object's type.
[ID]
expands to the monitored object's unique identification
string.
[DESC]
expands to the monitored object's long description.
[SENSORTYPE]
expands to the sensor type label.
[SENSORNUMBER expands to the sensor number.
]
[NORMALSIGNAL] expands to LO or HI, the normal signal value.
[COMPORT]
expands to the com port for the Room Alert device.
[ALARMID]
expands to the unique numeric identifier for the monitored
object's current alarm event.
[TIME]
expands to the current time.
[DATE]
expands to the current date.
[AGENT]
expands to the the application name of "PageR".
[SYSTEM]
expands to the name of this system.
148
Help.rtf
PageR Enterprise
Page 149 of 270
Email Check Object Add/Change
This screen is used to add or change an Email Check Monitored Object . Email Check
Objects read email messages and scan the message content, generating alarms when
defined search strings are found.
Identifier
This is a unique identifying name or title for the monitored object.
Description
This is an optional extended description of the monitored object.
Enabled
Enables/disables the object for monitoring. Used to temporarily exclude an object from
monitoring.
Severity
This is the Severity indicator for this object. It allows you to rank the importance of alarms on
this object. The range is 0-9, with 0 as the most severe alarm condition.
Delay
This is the number of seconds that an alarm on this object must persist before alarm
149
Help.rtf
PageR Enterprise
Page 150 of 270
notification is performed. This should be equal to or greater than a multiple of the object or
global interval .
POP3/MAPI
Select the mail protocol to use to attach to the mail server where the messages to be
examined reside.
Mail Server
Enter the name or IP address of the mail server where the messages to be examined reside.
User Name
Enter the user name used to logon to the mail server and retrive mail.
Password
Enter the password for the user name entered in the previous field.
Recipient
Only messages addressed to this email address will be examined.
Alarm Any Message
Generate an alarm when any mail message is found.
Examine Subject
Examine the subject of mail messages for the search strings.
Examine Body
Examine the body of mail messages for the search strings.
Delete All Messages
Delete all mail messages found.
Delete Alarm Messages
Delete only mail messages that result in an alarm.
Paging Mode
Check this box to enable Paging Mode. In this mode, email messages selected for
processing (only Recipient is considered to filter messages) are expected to have a list of
Contact names in the message subject line. Contact names are separated by semicolons.
The first 80 characters of the message body will be sent to each Contact via paging, per the
paging options setup for the Contacts. Can be used to send pages to PageR Contacts by
sending an email message to be found and processed by PageR.
Apply Search Strings/File/script to Messages and Report Matches
Enter a list of search strings or select a Search String/Script File to have the subject and/or
body of each mail message searched for any matches to the search strings. Any match
generates and alarm. More about Search Strings.
Alarm Object
Identifies the Alarm or Task Object to be used for alarm notification when this monitored
object generates an alarm. The drop down list shows all available Alarm and Task Objects.
An Alarm Object must be selected to perform paging, broadcasting or email of alarm events
for this object.
150
Help.rtf
PageR Enterprise
Page 151 of 270
Alarm Text
When an alarm is generated for an object, a default alarm notification message is issued by
PageR. This message identifies the object and describes the alarm. You can override the
default alarm message by entering custom alarm notification message text in this box. You
can use substitution keywords in the message which will be replaced by their run time
values when the message is generated. Keywords appear as [keyword] in the message
text. The keywords you can use for this object are:
Keyword
[TYPE]
Description
expands to the monitored object's type.
[ID]
expands to the monitored object's unique identification
string.
[DESC]
expands to the monitored object's long description.
[ALARMID]
expands to the unique numeric identifier for the monitored
object's current alarm event.
[SERVER]
expands to the name/IP address of the mail server.
[SUBJECT]
expands to the SUBJECT field of the mail message.
[BODY]
expands to the body of the mail message.
[FROM]
expands to the FROM field of the mail message.
[SENDER]
expands to the SENDER field of the mail message.
[TO]
expands to the TO field of the mail message.
[CC]
expands to the CC field of the mail message.
[REPLYTO]
expands to the REPLY-TO field of the mail message.
[MSGID]
expands to the unique mail message identfier assigned by
the mail server.
[MAILER]
expands to the name of the mail client that created the
message.
[ORG]
expands to the name of the organization that owns the mail
server.
[TIME]
expands to the current time.
[DATE]
expands to the current date.
[AGENT]
expands to the the application name of "PageR".
[SYSTEM]
expands to the name of this system.
151
Help.rtf
PageR Enterprise
Page 152 of 270
Email Ping Object Add/Change
This screen is used to add or change an Email Ping Monitored Object . Email Ping object
sends a unique mail message to a mail server then tries to read that message back from the
server within the alloted time. Used to monitor successful and timely mail delivery.
Identifier
This is a unique identifying name or title for the monitored object.
Description
This is an optional extended description of the monitored object.
Enabled
Enables/disables the object for monitoring. Used to temporarily exclude an object from
monitoring.
Severity
This is the Severity indicator for this object. It allows you to rank the importance of alarms on
this object. The range is 0-9, with 0 as the most severe alarm condition.
152
Help.rtf
PageR Enterprise
Page 153 of 270
Delay
This is the number of seconds that an alarm on this object must persist before alarm
notification is performed. This should be equal to or greater than a multiple of the object or
global interval .
POP3/MAPI
Select the mail protocol to use to send and retrieve the ping mail messages.
Mail Timeout
Enter the maximum time in seconds for ping mail message retrieval before an alarm is
generated.
You can define separate systems for mail submission and mail delivery. This allows pinging
of mail relays.
Outgoing Mail Server
Enter the name or IP address of the POP3 (SMTP) mail server where the ping messages will
be sent. Defaults to the Incoming mail server. Not used for MAPI .
Outgoing User Name
For POP3 (SMTP), enter the user name used to logon to the mail server to send the ping
mail message (if needed). For MAPI, enter the mail client profile name that will be used to
send the mail ping message.
Outgoing Password
Enter the password for the user/profile name entered in the previous field.
Outgoing Recipient
Mail address to which the ping mail message will be sent. This address must be delivered to
the incoming mail box. Defaults to the Incoming Recipient.
Incoming Mail Server
Enter the name or IP address of the POP3 mail server where the ping messages will be
read. Not used for MAPI.
Incoming User Name
For POP3, enter the user name used to logon to the mail server and read the ping mail
message. For MAPI, enter the mail client profile name that will be used to read the ping mail
message.
Incoming Password
Enter the password for the user/profile name entered in the previous field.
Incoming Recipient
Mail address from which the ping mail message will be read. This is optional.
Alarm Object
Identifies the Alarm or Task Object to be used for alarm notification when this monitored
object generates an alarm. The drop down list shows all available Alarm and Task Objects.
An Alarm Object must be selected to perform paging, broadcasting or email of alarm events
for this object.
153
Help.rtf
PageR Enterprise
Page 154 of 270
Alarm Text
When an alarm is generated for an object, a default alarm notification message is issued by
PageR. This message identifies the object and describes the alarm. You can override the
default alarm message by entering custom alarm notification message text in this box. You
can use substitution keywords in the message which will be replaced by their run time
values when the message is generated. Keywords appear as [keyword] in the message
text. The keywords you can use for this object are:
Keyword
[TYPE]
Description
expands to the monitored object's type.
[ID]
expands to the monitored object's unique identification
string.
[DESC]
expands to the monitored object's long description.
[ALARMID]
expands to the unique numeric identifier for the monitored
object's current alarm event.
[SERVER]
expands to the name/IP address of the mail server.
[RECIP]
expands to the recipient of the ping mail message.
[TIMEOUT]
expands to the ping timeout value.
[TIME]
expands to the current time.
[DATE]
expands to the current date.
[AGENT]
expands to the the application name of "PageR".
[SYSTEM]
expands to the name of this system.
Event Log Record Object Attributes
These are the data attributes exposed by the Event Log Record object .
When an Event Log Monitored Object reads an event log record from It's specified Event Log,
that record is stored in an Event Log Record Object. This object is available to scripts
executed by the Event Log monitored object for string matching or as an Alarm Task .
To access the Event Log Record Object, a script must execute the following Script Globals
method call to obtain an object reference:
Set evtobj = SG.GetEventRecObj
The object reference then exposes a set of data attributes that describe the event log record.
154
Help.rtf
PageR Enterprise
Page 155 of 270
The script would access the attributes in the following manner:
evtdesc = evtobj.description
That would return the event log record's event description text in the string variable evtdesc.
The attributes are:
Attribute
Code
Description
Returns the event code/ID number.
When
Returns the date and time of the event as a string.
EventType
Returns the event type as a string, one of "Success", "Error",
"Warning", "Informational", "Success Audit" or "Failure Audit".
Category
Returns event category title or "None".
Source
Returns the name of the module that generated the event record.
Computer
Returns the name of the computer on which the event record was
found.
User
Returns the name of the user if the event was generated under a
specific user's credentials or "N/A".
Description
Returns the formatted event description text or "description not
found" if the event description cannot be located.
155
Help.rtf
PageR Enterprise
Page 156 of 270
Disk Space Object Add/Change
This screen is used to add or change Disk Space monitored objects.
Disk Space monitored objects check the free space on Windows (Win32) disk volumes and
alarm if free space falls below a specified level.
Description
This is an optional description of the monitored object .
Enabled
Enables/disables the object for monitoring. Used to temporarily exclude an object from
monitoring.
Interval
This is the scan interval for this object. This is the minimum time that must pass between
scans of this object.
Severity
This is the Severity indicator for this object. It allows you to rank the importance of alarms on
this object. The range is 0-9, with 0 as the most severe alarm condition.
Delay
This is the number of seconds that an alarm on this object must persist before alarm
notification is performed. This should be equal to or greater than a multiple of the object or
global interval.
156
Help.rtf
PageR Enterprise
Page 157 of 270
Schedule
Click to define an optional schedule for scanning of this monitored object.
System Name
Enter or select the name of the Windows (Win32) system on which the query will be
executed. Click the scan button to search the network for systems.
Scan Volumes
Scans the target system for disk volumes which are displayed in the Available Volumes list.
Can used to update an existing list of volumes when changing an existing Disk Space object.
Available Volumes
This is a list of volumes that can be monitored on the target system. Click on a volume to
display It's attributes and monitoring status in the Volume Information area.
Volume Information
This area displays the attributes and monitoring status of the selected disk volume.
Monitor Free Space
Check this box to monitor the selected disk volume's free space.
Minimum Free
Enter the minimum free space level. Actual free space below this level will generate an
Alarm. Enter an actual free space amount in bytes or as a number followed by a percent sign
to set minimum percent free space.
Alarm Object
Identifies the Alarm Object to be used for alarm notification when this monitored object
generates an alarm. The drop down list shows all available Alarm Objects. An Alarm Object
must be selected to perform paging, broadcasting or email of alarm events for this object.
Alarm Text
When an alarm is generated for an object, a default alarm notification message is issued.
This message identifies the object and describes the alarm. You can override the default
alarm message by entering custom alarm notification message text in this box. You can use
substitution keywords in the message which will be replaced by their run time values when
the message is generated. Keywords appear as [keyword] in the message text. The
keywords you can use for this object are:
Keyword
[TYPE]
Description
expands to the monitored object's type.
[ID]
expands to the monitored object's unique identification string.
[DESC]
expands to the monitored object's long description.
[ALARMID]
expands to the unique numeric identifier for the monitored
object's current alarm event.
[SYSNAME]
expands to the system being monitored.
[VOLNAME]
expands to the disk volume name.
157
Help.rtf
PageR Enterprise
[VOLLABEL]
expands to the disk volume label.
[VOLFS]
expands to the disk volume file system name.
[VOLSIZE]
expands to the disk volume size in bytes.
[VOLFREE]
expands to the current disk volume free space in bytes.
Page 158 of 270
[THRESHTYPE expands to the free space threshold type, blank=actual bytes,
"PCT"=percent free.
]
[THRESHOLD]
expands to the free space threshold value.
[TIME]
expands to the current time.
[DATE]
expands to the current date.
[AGENT]
expands to the the application name of "PageR".
[SYSTEM]
expands to the name of this system.
158
Help.rtf
PageR Enterprise
Page 159 of 270
WMI Query Object Add/Change
This screen is used to add or change a Windows Management Instrumentation (WMI) Query
monitored object .
Windows Management Instrumentation (WMI ) is Microsoft's Win32 platform implementation
of the Web Based Enterprise Management (WBEM) standard. WMI defines an object space
on a managed system and each WMI object maps to one or more instances of a real physical
or software object on that managed system. Each WMI object has one or more data
properties. The WMI Query monitored object can retrieve one or more WMI objects and their
property values from a target system and test those values against specified test values and
raise an alarm if the actual values are out of tolerance. WMI object properties are very
similar to Performance Counters or SNMP Mib objects.
See the bottom of this page for additional important information about WMI.
Identifier
This is a short label that is used to identify this WMI Query object.
159
Help.rtf
PageR Enterprise
Page 160 of 270
Description
This is an optional description of the monitored object.
Enabled
Enables/disables the object for monitoring. Used to temporarily exclude an object from
monitoring.
Interval
This is the scan interval for this object. This is the minimum time that must pass between
scans of this object.
Severity
This is the Severity indicator for this object. It allows you to rank the importance of alarms on
this object. The range is 0-9, with 0 as the most severe alarm condition.
Delay
This is the number of seconds that an alarm on this object must persist before alarm
notification is performed. This should be equal to or greater than a multiple of the object or
global interval.
Schedule
Click to define an optional schedule for scanning of this monitored object.
System Name
Enter or select the name or IP address of the Windows system on which the WMI query will
be executed. Click the ... button to scan your network and populate the drop down list.
User Name
When accessing remote systems, it may be necessary to supply a user name for access to
the WMI objects desired. If no user name is entered, the local user credentials under which
you are executing will be used.
Password
If a user name is specifed above, the corresponding password must be entered.
Add
Click to invoke the WMI Object Explorer to navigate the WMI object data base on the target
system and select WMI objects to add to this query.
Del
Select a WMI object on the object list and click this button to delete that object from the list.
WMI Objects Defined for this Query
This grid list shows the WMI object properties that have been attached to the Query object.
The following attributes are defined for each:
Attribute
Object
Path
Description
This is the "path" or full name of the object including a key that
selects a specific instance of the object to be retrieved.
Property
This is the name of the data property of the WMI object retrieved
whose value is to be tested.
160
Help.rtf
PageR Enterprise
Page 161 of 270
Type
This is the data type of the property.
relop
This is the relational operator used to compare the property value
to the test value.
Value
This is the test value. The property value is compared to this value
to determine if an alarm is to be generated. If "propertyvalue
relop testvalue" is true, an alarm is generated. The test value may
be numeric or string.
On Error
Controls what happens if an error occurs while retrieving the
property value. Can be one of:
Ignore = ignore the error, skip the property
Alarm = generate an alarm indicating that the property could not be
retrieved.
Alarm
Mode
Controls when alarms are generated for a "true" comparison of the
property value and test value. Can be one of:
Each Time = generate an alarm on each scan that the comparison
is "true".
Average = generate an alarm when the average of the property
value, over some number of consecutive scans, compares "true" to
the test value. The number of scans over which to average is set in
Mode Value.
Persistent = generate an alarm when the property value compares
"true" to the test value, for some number of consecutive scans. The
number of scans is set in Mode Value.
Mode
Value
Sets the number of scans to average counter values on Average
Alarm mode or the number of scans of consecutive "true"
comparison of values on Persistent Alarm Mode.
You can use the scroll bar to shift the columns left and right. To change a field, left click on it
and you will be presented with a drop down menu of choices for the field or a box in which to
enter numeric values.
Evaluation Script File
Normally, this MO retrieves the WMI object property values and then does the theshold
checking as defined for each object property. As an alternative, you can specify a file name
containing VB script that will be executed to evaluate the object properties. In this mode, the
object properties are retrieved but no threshold processing is done. Instead, the named
script file is executed. That script can access all of the attributes for the WMI Query MO and
the WMI object property attributes and current values. Thus, you can write your own
evaluation code for the object properties. There is an example script in
\Scripts\Samples\WMITest.txt.
Alarm Object
Identifies the Alarm Object to be used for alarm notification when this monitored object
generates an alarm. The drop down list shows all available Alarm Objects. An Alarm Object
must be selected to perform paging, broadcasting or email of alarm events for this object.
Alarm Text
When an alarm is generated for an object, a default alarm notification message is issued.
161
Help.rtf
PageR Enterprise
Page 162 of 270
This message identifies the object and describes the alarm. You can override the default
alarm message by entering custom alarm notification message text in this box. You can use
substitution keywords in the message which will be expanded to their run time values when
the message is generated. Keywords appear as [keyword] in the message text. The
keywords you can use for this object are:
Keyword
[TYPE]
Description
expands to the monitored object's type.
[ID]
expands to the monitored object's unique identification string.
[IDX]
expands to the monitored object's identification string and includes
the target system name.
[TARGET]
expands to the target system name.
[DESC]
expands to the monitored object's long description.
[ALARMID]
expands to the unique numeric identifier for the monitored object's
current alarm event.
[PATH]
expands to the full object path that caused the current alarm.
[OBJECT]
expands to the object name without key selection.
[KEY]
expands to the name of the object property being used as an
instance key.
[KEYVAL]
expands to the key value being used to select an instance of the
WMI object.
[PROPERTY expands to the name of the object property to be tested.
]
[CIMTYPE]
expands to the data type of the property.
[RELOP]
expands to the relop for the object's current value to the test value.
[TEST]
expands to the test value defined for the object.
[VALUE]
expands to the actual retrieved property value for the object that
caused the current alarm.
[FOBJECTP] expands to a formatted string with full object path, property, relop,
test value and current value giving a complete description of the
property.
[FOBJECT]
same as [FOBJECTP] but with property name only instead of full
path.
[DATE]
expands to the current date.
162
Help.rtf
PageR Enterprise
[AGENT]
expands to the the application name of "PageR".
[SYSTEM]
expands to the name of this system.
Page 163 of 270
Notes
Here are some examples to help understand how the WMI Query monitored object operates.
Lets say that a query contains an object property test definition:
Win32_LogicalDisk.DeviceID="C:":FreeSpace < 1000000
When the query is executed, the value for the property FreeSpace for the
Win32_LogicalDisk object instance defined by It's DeviceID property being equal to "C:" is
retrieved. The property's value is compared to the test value. If the actual value is less than
one million bytes, an alarm will be generated.
If a query has one or more properties in alarm state, the query object is in the alarm state. If
all properties that had alarms come back into tolerance on a subsequent scan, the alarm state
of the query object will be cleared (Persistent alarm type).
Now lets modify the example:
Win32_LogicalDisk.DeviceID="C:":FreeSpace < 1000000 averaged 5
Win32_LogicalDisk.DeviceID="D:":FreeSpace < 1000000 persistant 10
In this case, for DeviceID "C:" five queries are executed and the values retrieved for the
property and accumulated and then the average is compared to the test value. If the average
is less than one million bytes, an alarm is generated. Once five values have been
accumulated, the average is taken over the last five values on each subsequent scan.
For DeviceID "D:", ten queries are executed and if each time the property's retrieved value
was less than one million bytes, an alarm is generated. If any value is equal to or greater than
one million, the accumulation starts over. Only if the actual value is less than one million on
each of the last 10 scans is an alarm generated.
More about WMI
Windows Management Instrumentation is the Microsoft implementation of the WBEM systems
monitoring and management standard. The WBEM standard defines an object model for
managed systems called the Common Information Model (CIM). Systems that implement
WBEM expose a standard object model describing system components to WBEM
management tools. The CIM schema defines a standard object model that all WBEM
implementions are expected to expose populated with object instances and property values
appropriate to the target system. Implementations may define extensions to the schema as
appropriate. For more information, see the WMI Object Explorer.
DISCLAIMER
WBEM, CIM and WMI are extensive and complex subjects. This help information is not
intended as documentation of these subjects. The user of the WMI support in this product is
expected to be familiar with WBEM, CIM and WMI. Extensive documentation on WMI is
available as a free download from Micrsoft. Target systems must have the appropriate WMI
Core components version 1.5 or later installed. This is also available as a free download from
Microsoft. This product does not install the WMI Core components.
163
Help.rtf
PageR Enterprise
Page 164 of 270
WMI Object Explorer
This screen is used to explore the Windows Management Instrumentation (WMI) objects on a
system and select object properties to be added to a WMI Query monitored object.
This screen allows you to explore the WMI object space defined on a Win32 WMI enabled
System. The left pane is a tree in which the WMI object space is displayed and can be
navigated. The right pane also follows the left pane during navigation and be used to navigate
as well. When an object instance is selected, the right pane will show the object's property list
and current property values. You may display the description of a property by left clicking on
the property name. Right click on a property to select (or deselect) the object instance and
property name to be added to the WMI Query MO you came from. A + identifies selected
properties. When all desired properties have been selected, click on the + (add to query) tool
bar button to close the explorer and add the selected properties to the WMI Query.
The WMI Name Space
WBEM defines several Name Spaces under which CIM classes are defined. Currently, the
explorer only supports the root\CIMV2 name space. Nearly all classes of interest are defined
in this name space.
The WMI Object Tree
Objects exposed by a WBEM implementation (such as WMI) are stored in an object space or
164
Help.rtf
PageR Enterprise
Page 165 of 270
tree called the Common Information Model or CIM. CIM defines object classes for hardware
devices or software or settings and then subclass these classes to create more specific
classes and eventually an instance of a class (an object) with a list of properties. CIM classes
have CIM_ prefixed to the class name. Where Microsoft has chosen to implement a CIM
class, the CIM class is further subclassed by a class that has Win32_ prefixed to the class
name.
When the Explorer opens, it attaches to the target system and loads the CIM object space
into the left pane. You can navigate the CIM object tree eventually arriving at Win32_ classes
and then a list of instances (objects) of such classes. If you select an instance, the instance's
properties and values will be displayed in the right pane.
Note that when you expand some class names or instance lists, the list may take a significant
amount of time to load. Please be patient. During a long operation, the STOP tool bar button
will be enabled and you can click it to cancel long running retrievals.
Win32 Associations
In addition to the CIM object space, Microsoft has employed a feature of the CIM schema
called Associations. This allows an implementation of WBEM to create alternate object
spaces (trees) by relating classes to each other. Microsoft has done this and created a more
flat and focused object tree containing only the Win32_ named classes. Associations are
loaded by a serial scan and this can take some time. Accordingly, when the explorer loads,
the Win32 Association tree is not loaded. If you click on Win32 Associations in the left pane,
the Win32 object tree will be loaded at that time. This typically takes about 30-60 seconds.
Once loaded, you can navigate this view of the object space, locating classes and instances
of interest. Both the Win32 Associations tree and the CIM tree describe the same classes,
just with different organizations.
165
Help.rtf
PageR Enterprise
Page 166 of 270
Win32 Process Object Add/Change
This screen is used to add or change a Win32 Process Monitored Object . The Win32
Process MO monitors a Windows 32-bit system for a list of process names to make sure the
processes are running.
The Win32 Process MO is used to monitor running processes on a Windows 32-bit system. A
list of process names are defined for the target system. On each scan of the MO, this list of
process names is compared to the currently running processes on the target system and an
alarm is generated for any process not found. The target system must have the Windows
Management Instrumentation (WMI) Core 1.5 or later installed.
Description
This is an optional description of the monitored object.
Enabled
Enables/disables the object for monitoring. Used to temporarily exclude an object from
monitoring.
Interval
This is the scan interval for this object. This is the minimum time that must pass between
scans of this object.
Severity
166
Help.rtf
PageR Enterprise
Page 167 of 270
This is the Severity indicator for this object. It allows you to rank the importance of alarms on
this object. The range is 0-9, with 0 as the most severe alarm condition.
Delay
This is the number of seconds that an alarm on this object must persist before alarm
notification is performed. This should be equal to or greater than a multiple of the object or
global interval.
System
Enter/select the host name or IP address of the Win32 system on which the processes will
be monitored. Leave blank for the local system.
User Name
When accessing remote systems, it may be necessary to supply a user name for access to
the WMI objects desired. If no user name is entered, the local user credentials under which
you are executing will be used.
Password
If a user name is specifed above, the corresponding password must be entered.
Available Processes
This is a list of the processes currently executing on the system identified above. The list is
refreshed whenever the System is changed.
Approved
If checked, the list of monitored processes becomes an approved process list. In this case,
an alarm is generated if processes are found that are NOT on the list of monitored
processes.
Monitored Processes
This is the list of the processes selected to be monitored. You may add processes by
selecting them in the Available processes box and clicking Add. You may remove services
by selecting them and clicking Remove.
Alarm Object
Identifies the Alarm Object to be used for alarm notification when this monitored object
generates an alarm. The drop down list shows all available Alarm Objects. An Alarm Object
must be selected to perform paging, broadcasting or email of alarm events for this object.
Alarm Text
When an alarm is generated for an object, a default alarm notification message is issued.
This message identifies the object and describes the alarm. You can override the default
alarm message by entering custom alarm notification message text in this box. You can use
substitution keywords in the message which will be replaced by their run time values when
the message is generated. Keywords appear as [keyword] in the message text. The
keywords you can use for this object are:
Keyword
[TYPE]
Description
expands to the monitored object's type.
[ID]
expands to the monitored object's unique identification string, the
name or IP address of the target system or blank for local system.
167
Help.rtf
PageR Enterprise
Page 168 of 270
[DESC]
expands to the monitored object's long description.
[ALARMID]
expands to the unique numeric identifier for the monitored object's
current alarm event.
[SYSNAME]
expands to the name or IP address of the target system or "Local
System".
[PROCESS]
expands to the name of the process that has generated the current
alarm.
[STATUS]
expands to the description of the problem with the current process.
[TIME]
expands to the current time.
[DATE]
expands to the current date.
[AGENT]
expands to the the application name of "PageR".
[SYSTEM]
expands to the name of this system.
Alarm Message Text
Each Monitored Object generates an Alarm Notification Message when the MO detects an
alarm event. The content of this message iscontrolled by the Alarm Text field on each MO's
Add/Change screen. The Alarm Text field on each MO contains a default message. You may
change the Alarm Text field to modify the default message or create an entirely different
message.
Each MO supports a set of substitution parameters that can be used in the Alarm Text field.
These parameters will be replaced by their actual values when the message is generated at
alarm detection time. The parameters available for each MO are listed on the MO's
Add/Change screen.
An Alarm Notification Message has four basic components. They are the Prefix, the Alarm
Message, the Extended Alarm Message and the Alarm Clear Message.
Alarm messages appear in two contexts. In the first context, there is no information beyond
the message to identify the MO that generated the message. So, the Prefix portion of the
message is displayed to identify the MO. The Prefix can be thought of as a label or title for the
alarm message. The Prefix is used on the Main Window Log Screen, in email notifications, in
broadcast notifications, paging notifications, Event Log and the disk log file.
A second context is where the screen being displayed explicitly identifies the MO and the
alarm message is a field of data being displayed for the MO. In this case, including the Prefix
with the message would be redundant and so the Prefix is removed. The Status screen and
Web Status display are examples of this context.
168
Help.rtf
PageR Enterprise
Page 169 of 270
Finally, MOs have three types of alarm message content available. The Alarm Message, the
Extended Alarm Message and the Alarm Clear Message. The Alarm Message combined
with the Prefix (where appropriate) is the main communication of alarm information. However,
some MO's may present additional alarm information in the Extended Alarm Message. This
message appears on the Main Window Log Screen, Status Screen, Web Status display,
Event Log and disk log file. The Extended Alarm Message is not shown in pages or
broadcasts due to space limitations. The Alarm Clear Message is used for Alarm Notifications
generated when Alarms clear (end).
The format of the Alarm Text field is as follows:
{Prefix-text\p}Alarm-Message-Text{\xExtended-Message-Text}{\cClearMessage-text}
So you can see that the Prefix, Extended Alarm Message and Alarm Clear Message are
optional. The Prefix is all text up to the first \p in the message text. The Extended Alarm
Message is all text after the first \x encountered in the message text up to the first \c (if
present). The Alarm Clear Message is all text after the first \c encountered.
Finally, you can insert line breaks into an Alarm Message by using the \n formatting
sequence. This sequence will be replaced by a carriage return line feed pair when the
message is written to the disk log file, email, broadcast or Event Log. In all other locations the
message appears this sequence will be replaced by a single space character.
Network Event Console
This screen displays a history of events aggregated from multiple sources and systems.
The Network Event Console collects events from Event Log , Syslog and SNMP Trap
Monitored Objects.
The Event Log MO sees all events recorded in the monitored Event Log even if events do not
generate alarms. In the same fashion, the Syslog and SNMP Trap monitored objects see all
Syslog messages and Traps sent, even if alarms are not generated. If event collection is
enabled, these raw events are recorded in a history stack that can be viewed with the Event
Console screen. Thus, the Event Console presents a centralized, aggregate event log for all
monitored event sources.
Note that you can create monitored objects that are enabled but do not have any alerting
selected. This type of object will not generate any alarms but will collect event information
which is then posted to the Network Event Console if event collection is enabled.
The Network Event Console features multiple sorting and filtering options to facilitate viewing
the event history.
169
Help.rtf
PageR Enterprise
Page 170 of 270
The tool bar buttons on the Network Event Console screen control all Event Console and
history functions.The tool bar buttons are (left to right):
Enable Event Collection
Latch this button to enable event collection. You can close the Event Console after enabling
event collection and events are collected as they occur and will be presented when the
Event Console is next displayed. If you enable event collection and then exit the program,
when you restart the program, event collection will remain enabled. In fact, all settings on the
Event Console screen are saved when the program shuts down and reused when the
program restarts.
Refresh the Event History Display
Clears the screen and reloads the current event history.
Enable Auto Update of screen
If this button is selected, events will be added to the screen as they occur. This can cause
the screen to be repositioned while you are looking at it. If you are scrolling back through the
event history, you may wish to disable auto update. You can turn Auto Update back on or
click the Refresh button to update the display.
Include System Event Log
If this button is selected, events generated by NT/2000 System Event Logs will be included
in the display.
170
Help.rtf
PageR Enterprise
Page 171 of 270
Include Application Event Log
If this button is selected, events generated by NT/2000 Application Event Logs will be
included in the display.
Include Security Event Log
If this button is selected, events generated by NT/2000 Security Event Logs will be included
in the display.
Include Syslog Messages
If this button is selected, Syslog messages will be included in the display.
Include SNMP Traps
If this button is selected, SNMP Trap messages will be included in the display.
All events from all sources are classified by Severity as Informational, Warning or Error
events. You can include/exclude by severity with the next 3 buttons:
Include Informational Events
If this button is selected, Infomrational events will be included in the display.
Include Warning Events
If this button is selected, Warning events included in the display.
Include Error Events
If this button is selected, Error events will be included in the display.
Show Local System Events Only
Select this button to display only events whose source system is the local system.
Clear Event History
Click this button to clear the Event History.
Help
Click this button for help.
Browse for Filter File
Click this button to browse for Filter script files.
Filter
This box can contain the name of a disk file that contains a list of Filter words or a VB Script
routine used to filter the Event History for display. Using this feature allows you to customize
the Events displayed on the screen in just about any way imaginable. You can type a script
file name in the box or use the Browse button to explore for script files. If the file you want to
use is in the \Search sub directory of the install directory, a path is not needed. If you use the
Browse button to select a script file, the display will be updated automatically. If you type a
script file name, you must click the refresh button to update the display. Filter word lists or
scripts are the same as Search Strings/scripts. However, you cannot enter a word list or script
in the Filter box, it must contain a file name. The Filter script is executed for each Event
History record that is to be displayed on the screen and the script decides if the record should
be included or not. The script can access the Event History record via the SG.GetEventObj
method. See the FilterEvents.str sample file in \Search\Samples for more information.
171
Help.rtf
PageR Enterprise
Page 172 of 270
Max Number of Events
This box contains the size of the Event History. You can change it at any time.
The Network Event Console display is initially sorted by the event Date & Time. You may click
on any column header to sort the display on that column in ascending order. The column
controlling the sort will be noted with >> in the column label.
You may rearrange the order of the columns by clicking on a column header to select it for
sorting. Then click on the border area around the Event list box to move that column to be the
first column. After setting the new column, the display will be sorted by that column. You can
sort on a different column by clicking on that column label. The new column setting will be
retained for the next time the Event Console is displayed.
172
Help.rtf
PageR Enterprise
Page 173 of 270
Logging Options Tab
This tab sets options for logging of Monitored Object status information during scanning.
Duing Monitored Object scanning, you can log the status of selected MO types after each MO
has been examined. This information is recorded in a disk file and can be used to collect and
archive information about MOs for analysis. The log file is in a delimited text format suitable
for import into many databases and analysis tools.
Enable Logging of Monitored Object Scans
Check this box to enable logging.
Include Column Label Records
Check this box to include records with column labels or headers. This can be useful in
learning about the content of the log records.
Log Alarms
Include log records for each alarm generated.
Column Separator Character
Select a character to be used to delimit the columns in the log file. You may also use the word
TAB to select the tab character as the delimiter.
173
Help.rtf
PageR Enterprise
Page 174 of 270
Log File Overflow
Select an option to control log file size. If No Overflow, a new log file is opened each time
scanning is started and grows until scanning is stopped. If New File On size is selected, log
files will be close when the reach the specified size and a new file opened.
Log File Extension
Select the log file extension. The log file is called SCANLOG and can have an extension
which is a 3 digit number, one higher that the highest existing log file, or an extension made
up of the date and time the file was opened. The log file is created in the install directory.
Persist Downtime tracking information
Each Monitored Object tracks the total time that the object is monitored (scanned) and the
total time that the object is down (in alarm state). This information is displayed on the Object
Details view of the Status screen and Web Status. This information is used to calcuate the %
Downtime displayed on the Status screen and Web Status. By default, this data is reset to
zero on each start up. So the information only represents the period since PageR was last
started. You can check this box to have this information persisted at shutdown and reloaded
at start up. Then, the downtime tracking data represents the cumulative monitoring and alarm
time since this option was enabled.
Log Alarm Notifications to a file
Enable to have alarm notification actions logged in the disk file Notify.log in the install direc
tory.
Monitored Objects to Log
Select the Monitored Objects to be logged.
174
Help.rtf
PageR Enterprise
Page 175 of 270
System Console
The System Console provides a system based graphical view of your network and the status
of systems that are being monitored.
The System Console shows a map or graphical view of your network. All systems detected by
network scans can be shown or only those systems that have Monitored Objects defined for
them. You can easily see which systems have alarms or processing errors. You can right click
a system to view a menu of actions you can perform on a system. You can double click a
system to see a list of monitored objects defined for that system. You can right click an MO to
see a menu of actions you can perform on an MO and you can double click an MO to see a
detailed MO status display.
When the System Console is displayed, systems are shown if they have monitored objects
defined or if the system was detected by any of the network scan functions. On first display,
it may take some time to load the systems as IP address to name resolution is performed.
You can click the Stop button if you do not want to wait.
Systems with active monitored objects are shown with a white background. If any MO
defined for a system is in the alarm state, the system will have a red background. If no MOs
are in the alarm state, but one or more MOs have processing errors, the system will have a
yellow background.
If a system has monitored objects, but all of them are either disabled or suspended, the
system will be shown with a diagonal cross hatch. If a system has no monitored objects at
175
Help.rtf
PageR Enterprise
Page 176 of 270
all, the system will be shown with horizontal cross Hatching.
Tool bar buttons are available to start/stop monitoring, refresh the system map, scan the
network using one of the three scanning techniques available and to limit the display to only
systems that have monitored objects defined.
If you right click on a system, you will see a menu where you can display more detailed
information about a system, add a new monitored object , suspend/resume monitoring for all
attached MOs, enable/display monitoring for all attched MOs and clear all alarms for
attached MOs.
You can single click a system to focus on it and use the down arrow tool bar button as well
as a double click on a system to see it's list of monitored objects.
Monitored objects with current alarms will be shown with a red background, MOs with
processing errors will be shown with a yellow background. Suspended or disabled MOs will
be shown with a diagonal cross hatch. You can right click an MO to see a menu of actions
you can perform on the MO, such as suspend/resume, enable/disable and clear alarm. You
can add and delete monitored objects as well.
You can single click to focus on an object and use the down arrow or double click to see a
detailed status report for the monitored object.
When open, the System Console is updated while scanning is in progress. Systems/MOs will
176
Help.rtf
PageR Enterprise
Page 177 of 270
change background color as alarms are detected or cleared.
DNS Check Object Add/Change
This screen is used to add or change a Domain Name Server object . DNS servers are
monitored by sending a DNS resolution request to the server and checking the reply.
Description
This is an optional description of the monitored object.
Enabled
Enables/disables the object for monitoring. Used to temporarily exclude an object from
monitoring.
Interval
This is the scan interval for this object. This is the minimum time that must pass between
scans of this object.
Severity
This is the Severity indicator for this object. It allows you to rank the importance of alarms on
this object. The range is 0-9, with 0 as the most severe alarm condition.
177
Help.rtf
PageR Enterprise
Page 178 of 270
Delay
This is the number of seconds that an alarm on this object must persist before alarm
notification is performed. This should be equal to or greater than a multiple of the object or
global interval.
Request
Enter the request string that will be sent to the DNS server for resolution. For instance, to
test IP address to host name resolution, enter the IP address to be resolved in this box.
Time Out
This is the number of seconds to wait for a connection response from the server before
posting an alarm.
Response
This is an optional search string that will be compared to the response from the DNS server.
An alarm is generated if the response from the server does not match this string. An
example would be for IP address to host name resolution check: the expected host name
Would be entered in this box.
Retrys
Enter the number of times failed resolution (no response) will be retried.
DNS Type
Select the desired type of DNS resolution to be used. Typically, this is Host Name, where an
IP address in the Request box should return the host name in the Response box.
DNS Server Addresses
Enter at least one IP address for the DNS server(s) that the resolution Request will be sent
to.
Test
Click the test button to perform the specified DNS resolution to check your setup.
Alarm Object
Identifies the Alarm Object to be used for alarm notification when this monitored object
generates an alarm. The drop down list shows all available Alarm Objects. An Alarm Object
must be selected to perform paging, broadcasting or email of alarm events for this object.
Alarm Text
When an alarm is generated for an object, a default alarm notification message is issued by
PageR. This message identifies the object and describes the alarm. You can override the
default alarm message by entering custom alarm notification message text in this box. You
can use substitution keywords in the message which will be replaced by their run time
values when the message is generated. Keywords appear as [keyword] in the message
text. The keywords you can use for this object are:
Keyword
[TYPE]
[ID]
Description
expands to the monitored object's type.
expands to the monitored object's unique identification string,
the Request string.
178
Help.rtf
PageR Enterprise
[DESC]
expands to the monitored object's long description.
[ALARMID]
expands to the unique numeric identifier for the monitored
object's current alarm event.
[REQUEST]
expands to the Request string sent to the DNS server.
Page 179 of 270
[REPLYTEST] expands to expected reply string.
[LASTREPLY] expands to the last reply received from the DNS server.
[LASTERROR expands to the last error posted by this monitored object.
]
[TIME]
expands to the current time.
[DATE]
expands to the current date.
[AGENT]
expands to the the application name of "PageR".
[SYSTEM]
expands to the name of this system.
Windows 2000 System Object Add/Change
This screen is used to add or change a Windows 2000 System monitored object .
Description
179
Help.rtf
PageR Enterprise
Page 180 of 270
This is an optional description of the monitored object.
Enabled
Enables/disables the object for monitoring. Used to temporarily exclude an object from
monitoring.
Interval
This is the scan interval for this object. This is the minimum time that must pass between
scans of this object.
Severity
This is the Severity indicator for this object. It allows you to rank the importance of alarms on
this object. The range is 0-9, with 0 as the most severe alarm condition.
Delay
This is the number of seconds that an alarm on this object must persist before alarm
notification is performed. This should be equal to or greater than a multiple of the object or
global interval.
Server Name
Enter or select the name of the Windows 2000 Server or Workstation system to be
monitored.
Alarm Object
Identifies the Alarm Object to be used for alarm notification when this monitored object
generates an alarm. The drop down list shows all available Alarm Objects.
An Alarm Object must be selected to perform paging, broadcasting or email of alarm events
for this object.
Alarm Text
When an alarm is generated for an object, a default alarm notification message is issued by
PageR. This message identifies the object and describes the alarm. You can override the
default alarm message by entering custom alarm notification message text in this box. You
can use substitution keywords in the message which will be replaced by their run time
values when the message is generated. Keywords appear as [keyword] in the message
text. The keywords you can use for this object are:
Keyword
[TYPE]
Description
expands to the monitored object's type.
[ID]
expands to the monitored object's unique identification string.
[DESC]
expands to the monitored object's long description.
[ALARMID]
expands to the unique numeric identifier for the monitored object's
current alarm event.
[TIME]
expands to the current time.
[DATE]
expands to the current date.
[AGENT]
expands to the the application name of "PageR".
180
Help.rtf
[SYSTEM]
PageR Enterprise
Page 181 of 270
expands to the name of this system.
Windows XP System Object Add/Change
This screen is used to add or change a Windows XP System monitored object .
Description
This is an optional description of the monitored object.
Enabled
Enables/disables the object for monitoring. Used to temporarily exclude an object from
monitoring.
Interval
This is the scan interval for this object. This is the minimum time that must pass between
scans of this object.
Severity
This is the Severity indicator for this object. It allows you to rank the importance of alarms on
this object. The range is 0-9, with 0 as the most severe alarm condition.
Delay
This is the number of seconds that an alarm on this object must persist before alarm
notification is performed. This should be equal to or greater than a multiple of the object or
global interval.
Server Name
Enter or select the name of the Windows XP Server or Workstation system to be monitored.
181
Help.rtf
PageR Enterprise
Page 182 of 270
Alarm Object
Identifies the Alarm Object to be used for alarm notification when this monitored object
generates an alarm. The drop down list shows all available Alarm Objects.
An Alarm Object must be selected to perform paging, broadcasting or email of alarm events
for this object.
Alarm Text
When an alarm is generated for an object, a default alarm notification message is issued by
PageR. This message identifies the object and describes the alarm. You can override the
default alarm message by entering custom alarm notification message text in this box. You
can use substitution keywords in the message which will be replaced by their run time
values when the message is generated. Keywords appear as [keyword] in the message
text. The keywords you can use for this object are:
Keyword
[TYPE]
Description
expands to the monitored object's type.
[ID]
expands to the monitored object's unique identification string.
[DESC]
expands to the monitored object's long description.
[ALARMID]
expands to the unique numeric identifier for the monitored object's
current alarm event.
[TIME]
expands to the current time.
[DATE]
expands to the current date.
[AGENT]
expands to the the application name of "PageR".
[SYSTEM]
expands to the name of this system.
182
Help.rtf
PageR Enterprise
Page 183 of 270
Host Process Object Add/Change
This screen is used to add or change Host Process monitored objects.
Host Process monitored objects check the process list on Host Systems and alarm if any of
the specifed processes are missing. A Host System can be Unix, Linux, VMS and more.
Practically any system that supports Telnet or SNMP can have it's processes monitored with
this object .
Description
This is an optional description of the monitored object.
Enabled
Enables/disables the object for monitoring. Used to temporarily exclude an object from
monitoring.
Interval
This is the scan interval for this object. This is the minimum time that must pass between
scans of this object.
Severity
This is the Severity indicator for this object. It allows you to rank the importance of alarms on
this object. The range is 0-9, with 0 as the most severe alarm condition.
183
Help.rtf
PageR Enterprise
Page 184 of 270
Delay
This is the number of seconds that an alarm on this object must persist before alarm
notification is performed. This should be equal to or greater than a multiple of the object or
global interval.
Schedule
Click to define an optional schedule for scanning of this monitored object.
System
Enter the name or IP address of the system which will be monitored. Click the scan button to
search the network for systems.
Type
Select the type of Host system that resides at the name/address specified above. The
selected host is accessed by Telnet unless otherwise specified.
Time Out
Enter the time out in seconds that will be applied to the Telnet communication with the Host
system.
User Name
Enter the user name to be used to logon to the Host system. Not needed for SNMP access.
Password
Enter the password for the user name specified above. For SNMP access, this is the
community name.
Prompt
Enter the prompt displayed by the Host system when ready to accept a command. Not
needed for SNMP access.
Load
Downloads a process list from the Host system, which is displayed in the Available
Processes list. System, User name, Password and Prompt must be defined first.
Available Processes
This is a list of processes that are running on the Host system.
Monitored Processes
This is the list of processes that will be monitored. Select processes in the Available list and
click the Add button to add processes to the monitored list. Select processes in the
Monitored list and click the Remove button to remove them from the Monitored list.
Alarm Object
Identifies the Alarm Object to be used for alarm notification when this monitored object
generates an alarm. The drop down list shows all available Alarm Objects. An Alarm Object
must be selected to perform paging, broadcasting or email of alarm events for this object.
Alarm Text
When an alarm is generated for an object, a default alarm notification message is issued.
This message identifies the object and describes the alarm. You can override the default
alarm message by entering custom alarm notification message text in this box. You can use
substitution keywords in the message which will be replaced by their run time values when
184
Help.rtf
PageR Enterprise
Page 185 of 270
the message is generated. Keywords appear as [keyword] in the message text. The
keywords you can use for this object are:
Keyword
[TYPE]
Description
expands to the monitored object's type.
[ID]
expands to the monitored object's unique identification string.
[DESC]
expands to the monitored object's long description.
[ALARMID]
expands to the unique numeric identifier for the monitored
object's current alarm event.
[SYSNAME]
expands to the system being monitored.
[PROCESS]
expands to the process name that has generated the alarm.
[STATUS]
expands to the status message for the process that has
generated the alarm.
[TIME]
expands to the current time.
[DATE]
expands to the current date.
[AGENT]
expands to the the application name of "PageR".
[SYSTEM]
expands to the name of this system.
Note that this monitored object uses Telnet or SNMP to access the target system.
For systems accessed with Telnet, this monitored object requires a Telnet server on the Host
system and a login user with appropriate privilege to display a list of all processes.
For systems accessed with SNMP, the target system must expose an SNMP agent and you
must provide the appropriate community name.
The host systems supported and the information about each that allows this object to connect
and obtain the list of processes are defined in the disk file HostTypes.txt.
185
Help.rtf
PageR Enterprise
Page 186 of 270
Host Volume Object Add/Change
This screen is used to add or change Host Volume monitored objects.
Host Volume monitored objects check the free space on Host System disk volumes and alarm
if free space falls below a specified threshold. A Host System can be Unix, Linux, VMS and
more. Practically any system that supports Telnet or SNMP can have it's volumes monitored
with this object .
Description
This is an optional description of the monitored object.
Enabled
Enables/disables the object for monitoring. Used to temporarily exclude an object from
monitoring.
Interval
This is the scan interval for this object. This is the minimum time that must pass between
scans of this object.
Severity
This is the Severity indicator for this object. It allows you to rank the importance of alarms on
this object. The range is 0-9, with 0 as the most severe alarm condition.
186
Help.rtf
PageR Enterprise
Page 187 of 270
Delay
This is the number of seconds that an alarm on this object must persist before alarm
notification is performed. This should be equal to or greater than a multiple of the object or
global interval.
Schedule
Click to define an optional schedule for scanning of this monitored object.
System
Enter the name or IP address of the system which will be monitored. Click the scan button to
search the network for systems.
Type
Select the type of Host system that resides at the name/address specified above. The
selected host is accessed by Telnet unless otherwise specified.
Time Out
Enter the time out in seconds that will be applied to the Telnet communication with the Host
system.
User Name
Enter the user name to be used to logon to the Host system. Not needed for SNMP access.
Password
Enter the password for the user name specified above. For SNMP access, this is the
community name.
Prompt
Enter the prompt displayed by the Host system when ready to accept a command. Not
needed for SNMP access.
Load
Downloads a volume list from the Host system, which is displayed in the Available Volumes
list. System, User name, Password and Prompt must be defined first.
Available Volumes
This is a list of disk volumes that can be monitored on the Host system. The list shows
information about each volume and it's current free space. To monitor a volume, check the
box next to the volume name. If you check or click on a volume, the cursor will move to the
Minimum Free(%) box where you enter the free space threshold to be used for monitoring. If
you enter a number in this box, that is the minimum free blocks for the volume. If you enter a
number followed by a % sign, the number is the minimum percent free for the volume. Press
the Return or Enter key to save the value in the box. It will appear in the volume display.
Alarm Object
Identifies the Alarm Object to be used for alarm notification when this monitored object
generates an alarm. The drop down list shows all available Alarm Objects. An Alarm Object
must be selected to perform paging, broadcasting or email of alarm events for this object.
Alarm Text
When an alarm is generated for an object, a default alarm notification message is issued.
This message identifies the object and describes the alarm. You can override the default
187
Help.rtf
PageR Enterprise
Page 188 of 270
alarm message by entering custom alarm notification message text in this box. You can use
substitution keywords in the message which will be replaced by their run time values when
the message is generated. Keywords appear as [keyword] in the message text. The
keywords you can use for this object are:
Keyword
[TYPE]
Description
expands to the monitored object's type.
[ID]
expands to the monitored object's unique identification string.
[DESC]
expands to the monitored object's long description.
[ALARMID]
expands to the unique numeric identifier for the monitored
object's current alarm event.
[SYSNAME]
expands to the system being monitored.
[VOLNAME]
expands to the disk volume name.
[VOLLABEL]
expands to the disk volume label.
[VOLFS]
expands to the disk volume file system name.
[VOLSIZE]
expands to the disk volume size.
[VOLFREE]
expands to the current disk volume free space.
[THRESHTYPE expands to the free space threshold type, blank=actual size,
"PCT"=percent free.
]
[THRESHOLD]
expands to the free space threshold value.
[TIME]
expands to the current time.
[DATE]
expands to the current date.
[AGENT]
expands to the the application name of "PageR".
[SYSTEM]
expands to the name of this system.
Note that this monitored object uses Telnet or SNMP to access the target system.
For systems accessed with Telnet, this monitored object requires a Telnet server on the Host
system and a login user with appropriate privilege to display a list of all volumes.
For systems accessed with SNMP, the target system must expose an SNMP agent and you
must provide the appropriate community name.
The host systems supported and the information about each that allows this object to connect
and obtain the list of volumes are defined in the disk file HostTypes.txt.
188
Help.rtf
PageR Enterprise
Page 189 of 270
Monitored Object Groups Tab
This tab allows Monitored Objects to be organized into user defined groups for easier viewing
on the Status and Web Status displays.
On this tab you can define your own groupings of Monitored Objects to make it easier to view
MO status on the Status screen and Web Status displays by using Groups to subset the
objects displayed.
To add a new Group, type the name of the Group in the New Groups box and click Add
Group. Once the Group appears in the tree view, you can select the Group and then click
Add Mos to select Monitored objects to be added to the Group. Once added, the Mos will
appear below the Group in the tree view.
You can select a Monitored Object or a Group and click Remove to remove the object or
Group. Note that removing an object or Group does not delete the Monitored Object(s) from
your configuration. They are only removed from the grouping scheme.
189
Help.rtf
PageR Enterprise
Page 190 of 270
Once Groups are created, the appear in the MO Subset drop down lists on the Status and
Web Status displays. You can select the Group from the list and only the Monitored Objects in
that Group will be displayed.
190
Help.rtf
PageR Enterprise
Page 191 of 270
UDP Services Object Add/Change
This screen is used to add or change a list of UDP Services which will be monitored on a
selected system.
Description
This is an optional description of the monitored object .
Enabled
Enables/disables the object for monitoring. Used to temporarily exclude an object from
monitoring.
Interval
This is the scan interval for this object. This is the minimum time that must pass between
scans of this object.
Severity
This is the Severity indicator for this object. It allows you to rank the importance of alarms on
this object. The range is 0-9, with 0 as the most severe alarm condition.
Delay
This is the number of seconds that an alarm on this object must persist before alarm
notification is performed. This should be equal to or greater than a multiple of the object or
191
Help.rtf
PageR Enterprise
Page 192 of 270
global interval.
System
Enter/select the host name or IP address of the system on which UDP Services will be
monitored.
Time Out
This is the number of seconds to wait for a connection response from a UDP Service
before posting an alarm.
Available UDP Services
This is a a list of known UDP Services. For each service, the name by which it is known and
the UDP port number it is assigned to are shown. You may add your own services to this list
by placing a list of those services into a disk file called LocalTcpSvcs.txt in the install
directory. The format of this file should follow the format of TcpSvcs.txt. Do not change
TcpSvcs.txt.
Monitored UDP Services
This is the list of the UDP Services selected to be monitored. You may add services by
selecting them in the Available Services box and clicking Add. You may remove services by
selecting them and clicking Remove.
Alarm Object
Identifies the Alarm Object to be used for alarm notification when this monitored object
generates an alarm. The drop down list shows all available Alarm Objects. An Alarm Object
must be selected to perform paging, broadcasting or email of alarm events for this object.
Alarm Text
When an alarm is generated for an object, a default alarm notification message is issued by
PageR. This message identifies the object and describes the alarm. You can override the
default alarm message by entering custom alarm notification message text in this box. You
can use substitution keywords in the message which will be replaced by their run time
values when the message is generated. Keywords appear as [keyword] in the message
text. The keywords you can use for this object are:
Keyword
[TYPE]
Description
expands to the monitored object's type.
[ID]
expands to the monitored object's unique identification string, the
name or IP address of the target system.
[DESC]
expands to the monitored object's long description.
[ALARMID]
expands to the unique numeric identifier for the monitored object's
current alarm event.
[SVCNAME]
expands to the name and port number of the UDP Service that has
failed testing.
[SVCERROR] expands to a description of the error when a service fails testing.
[TIME]
expands to the current time.
192
Help.rtf
PageR Enterprise
[DATE]
expands to the current date.
[AGENT]
expands to the the application name of "PageR".
[SYSTEM]
expands to the name of this system.
Page 193 of 270
Notes
This monitored object verifies UDP Service availability by attempting to send a UDP message
to each service selected on the identified system. Active services should discard that
message. Inactive services will generate an alarm.
This Monitored Object is only supported when PageR is running on Windows 2000 and
Windows XP. If PageR is running on Windows NT, UDP services will always be reported as
active.
193
Help.rtf
PageR Enterprise
Page 194 of 270
Auto Add Tab
This tab supports automated creation of Monitored Objects for known network Objects.
PageR can do auto discovery of objects on your network using three different discovery
techniques. A database of discovered (known) objects is maintained and is used to fill system
name/IP address selection lists on the various Monitored Object Add/Change screens.
Using the Auto Add Tab, you can select network objects from the list of known objects and
automatically create Ping Monitored Objects for the selected network objects.
When the Auto Add Tab is displayed, the list of known network objects is displayed. You can
select objects by clicking and using the shift or ctrl keys to select multiple objects. Then click
the Create Ping MO button to automatically create a new Ping Monitored Object for each
selected network object.
You will be prompted to confirm the Auto Add before it proceeds. Next, the Ping Monitored
Object Add/Change screen will appear. You can modify the attributes of the Ping Monitored
Object on this screen and your settings will be applied to all of the automatically created Ping
Monitored Objects.
NOTE: After creating new Monitored Objects with this screen, you must click Accept on the
Options screen and save the configuration for the new objects to be permanently saved.
194
Help.rtf
PageR Enterprise
Page 195 of 270
You can perform initial or refresh network scans by clicking the appropriate button:
Ping
Performs simple ICMP ping on a range of IP addresses.
SNMP
Performs an SNMP agent detection on a range of IP addresses. If an agent is detected,
additional information is retrieved.
Windows
Uses Windows Networking to detect systems.
Fields on the Network Object List:
IP Address/Name
This is the IP address of objects detected by Ping or SNMP or the name of objects detected
via Windows Networking.
Doman/Node Name
For objects detected via Windows Networking, this is the domain or workgroup name (if it is
known to Windows). For objects detected via SNMP, this is the node name returned by the
object.
Provider
This is the discovery means that provided the information.
Description
For objects detected by Windows or SNMP, this is the description string returned by the
object.
195
Help.rtf
PageR Enterprise
Page 196 of 270
ePage Object Add/Change
This screen is used to add or change an ePage Monitored Object . The ePage Object reads
email messages from a specified mailbox and generates Pager/SMS requests for Contacts.
Identifier
This is a unique identifying name or title for the monitored object.
Description
This is an optional extended description of the monitored object.
Enabled
Enables/disables the object for monitoring. Used to temporarily exclude an object from
monitoring.
Severity
This is the Severity indicator for this object. It allows you to rank the importance of alarms on
this object. The range is 0-9, with 0 as the most severe alarm condition.
Delay
This is the number of seconds that an alarm on this object must persist before alarm
notification is performed. This should be equal to or greater than a multiple of the object or
global interval .
POP3/MAPI
Select the mail protocol to use to attach to the mail server where the messages to be
examined reside.
Mail Server
Enter the name or IP address of the mail server where the messages to be examined reside.
User Name
Enter the user name used to logon to the mail server and retrive mail.
196
Help.rtf
PageR Enterprise
Page 197 of 270
Password
Enter the password for the user name entered in the previous field.
Recipient
Only messages addressed to this email address will be processed (optional).
Notes
When a mail message is processed, the subject line is expected to contain a list of Contact
names separated by semicolons. A page request will be generated for each Contact found
using the Contact's paging information. The first 80 characters of the message body will be
used as the page message.
Heart Beat Object Add/Change
This screen is used to add or change Heart Beat Monitored Objects.
The Heart Beat Monitored object is used to generate a regular "alarm" notification by
PageR whose purpose is to verify that PageR is running. This monitored object executes It's
Alarm object on every scan , subject to the Interval value and Schedule constraints set
up for it. That Alarm object determines how the heart beat notification will be made.
Description
This is an optional description of the monitored object.
Enabled
Enables/disables the object for monitoring. Used to temporarily exclude an object from
monitoring.
197
Help.rtf
PageR Enterprise
Page 198 of 270
Interval
This is the scan interval for this object. This is the minimum time that must pass between
scans of this object.
Severity
This is the Severity indicator for this object. It allows you to rank the importance of alarms on
this object. The range is 0-9, with 0 as the most severe alarm condition. Severity has no
meaning for this Monitored object, but can be set to control the display sorting of this object
on the various status displays.
Alarm Object
Identifies the Alarm Object to be used for alarm notification when this monitored object
generates an alarm. The drop down list shows all available Alarm Objects. An Alarm Object
must be selected to perform paging, broadcasting or email of alarm events for this object.
Alarm Text
When an alarm is generated for an object, a default alarm notification message is issued by
PageR. This message identifies the object and describes the alarm. You can override the
default alarm message by entering custom alarm notification message text in this box. You
can use substitution keywords in the message which will be replaced by their run time
values when the message is generated. Keywords appear as [keyword] in the message
text. The keywords you can use for this object are:
Keyword
[TYPE]
Description
expands to the monitored object's type.
[ID]
expands to the monitored object's unique identification string.
[DESC]
expands to the monitored object's long description.
[ALARMID]
expands to the unique numeric identifier for the monitored object's
current alarm event.
[TIME]
expands to the current time.
[DATE]
expands to the current date.
[AGENT]
expands to the the application name of "PageR".
[SYSTEM]
expands to the name of this system.
198
Help.rtf
PageR Enterprise
Page 199 of 270
Messaging Options Tab
This tab configures logging and alarm notification by Instant Messaging.
Activity logging and alarm notifications can be sent to interested clients via Microsoft's .Net
Messaging Service Messaging Service using MSN Instant Messenger. A user ID for PageR
is required and can be set up on HotMail or .Net Passport. This user ID allows PageR to
attach to the messging service and communicate with other messaging service users.
Use MSN Messenger directly to select the desired messging service and create a user ID on
that service for PageR to use. Once the user ID is created, you can configure PageR to log
activity and alarm notifications on the Messaging Options Tab of the Options screen:
Enable logging and alarm notification by Messenger Service
Check this box to turn on logging and alarm notification by Instant Messaging.
Service Logon
User ID that PageR will use to logon to the Messaging Service. This is typically an email
address.
Password
The password for the service logon.
199
Help.rtf
PageR Enterprise
Page 200 of 270
Detail Level
Ranges from 0-3 and sets the level of detail logged to messaging clients. 0 is least detail and
3 is most detailed. Normally, this should be set to 0. All alarms and errors are logged
regardless of the level of detail.
Auto Create Sessions
Check this box to create a new session for every online user that is on the PageR user Ids
contact or buddy list.
Include Date/Time in messages
Check this box to have the date and time of messages (on the local system) included in the
messages sent to IM clients.
Notes
In order to receive messages from PageR, messaging clients must add the PageR user ID to
thier contact/buddy lists. Doing this connects the clients to PageR and makes them visible to
PageR. If you Auto Create sessions, PageR will open a session for any online client and
begin sending messages as appropriate. If you do not Auto Create Sessions, clients must
explicitly open a session window to the PageR user ID in order to receive messages.
200
Help.rtf
PageR Enterprise
Page 201 of 270
Bandwidth Object Add/Change
This screen is used to add/change Bandwidth Monitored objects.
Bandwidth monitoring is done by measuring the network traffic on a systems network
interfaces and comparing that traffic (measured in bits per second) to the interface's
maximum speed. Information for the systems network interfaces is retrived with SNMP .
Identifier
This is a short label that is used to identify this Bandwidth object .
Description
This is an optional description of the monitored object.
Enabled
Enables/disables the object for monitoring. Used to temporarily exclude an object from
monitoring.
Interval
201
Help.rtf
PageR Enterprise
Page 202 of 270
This is the scan interval for this object. This is the minimum time that must pass between
scans of this object.
Severity
This is the Severity indicator for this object. It allows you to rank the importance of alarms on
this object. The range is 0-9, with 0 as the most severe alarm condition.
Delay
This is the number of seconds that an alarm on this object must persist before alarm
notification is performed. This should be equal to or greater than a multiple of the object or
global interval.
System Name
Enter or select the name or IP address of the system on which bandwidth monitoring will be
executed. Click the ... button to select from a list of known SNMP systems on your network.
Community
Enter the community name to use on the SNMP queries.
Scan Button
One the system name and community have been entered, click the Scan Button to read the
target system's network interfaces. These interfaces will be listed in the Interface list box.
Click on an Interface to display It's detailed information and monitoring status.
Type
This is an interface type description as retrieved from the interface.
MTU
This is the media size or maximum packet size set for the interface.
Speed
This is the speed of the interface in bits per second.
Phy Addr
This is the physical hardware address of the interface. Only interfaces with a physical
address can be monitored.
Status
This is the current operational status of the interface and will be UP or DOWN.
Monitor this Interface
Select this box to enable monitoring of the selected interface.
Alarm on Errors/Discards
Generate an alarm if the number of errors or discards on an interface changes from one
scan to the next.
Input Threshold
This is the input bandwidth alarm threshold for the interface. It can be a specific bits per
second value or it can be a percent of the interface speed. Enter a number for specific bits
per second or enter a number followed by a % sign for a percent of interface speed.
Output Threshold
202
Help.rtf
PageR Enterprise
Page 203 of 270
This is the output bandwidth alarm threshold for the interface. It can be a specific bits per
second value or it can be a percent of the interface speed. Enter a number for specific bits
per second or enter a number followed by a % sign for a percent of interface speed.
Aggregate Threshold
This is the combined (input+output) bandwidth alarm threshold for the interface. It can be a
specific bits per second value or it can be a percent of the interface speed. Enter a number
for specific bits per second or enter a number followed by a % sign for a percent of interface
speed.
Alarm Object
Identifies the Alarm Object to be used for alarm notification when this monitored object
generates an alarm. The drop down list shows all available Alarm Objects. An Alarm Object
must be selected to perform paging, broadcasting or email of alarm events for this object.
Alarm Text
When an alarm is generated for an object, a default alarm notification message is issued.
This message identifies the object and describes the alarm. You can override the default
alarm message by entering custom alarm notification message text in this box. You can use
substitution keywords in the message which will be expanded to their run time values when
the message is generated. Keywords appear as [keyword] in the message text. The
keywords you can use for this object are:
Keyword
[TYPE]
Description
expands to the monitored object's type.
[ID]
expands to the monitored object's unique identification
string.
[IDX]
expands to the monitored object's unique indentification
string plus the target system.
[DESC]
expands to the monitored object's long description.
[ALARMID]
expands to the unique numeric identifier for the monitored
object's current alarm event.
[TARGET]
expands to the target system name or IP address.
[COMMUNITY]
expands to the community name.
[ELAPSEDSEC]
expands to the number of seconds elapsed since the last
scan.
[IFINDEX]
expands to the index of the interface in the system's MIB.
[IFDESC]
expands to the interface description.
[IFPHYADDR]
expands to the actual retrieved object value for the object
that caused the current alarm.
[IFSPEED]
expands to the max speed of the interface in bits per
second.
203
Help.rtf
PageR Enterprise
Page 204 of 270
[IFOPSTATUS]
expands to the operational status of the interface, either UP
or DOWN.
[IFxTHRESHOLD]
expands to the threshold value. x is one of IN, OUT, AGG.
[IFxBPS]
expands to the measured bandwidth for the scan period in
BPS.
[IFxBPSPCT]
expands to the percent of interface speed represented by
the value of IFxBPS.
[DATE]
expands to the current date.
[AGENT]
expands to the the application name of "PageR".
[SYSTEM]
expands to the name of this system.
Notes
This monitored object retrieves the bytes sent and received by a network interface and based
on the time between scans, converts the number of bytes to bits per second representing
bandwidth used. This value is compared to the literal or percent of interface speed threshold
value and an alarm is generated if the threshold is exceeded.
An alarm is generated if the interface is not UP.
If requested, an alarm is generated if the number of errors or discards for either input or ouput
increases from scan to scan.
204
Help.rtf
PageR Enterprise
Page 205 of 270
Directory Object Add/Change
This screen is used to add or change Directory Monitored Objects.
The Directory Monitored Object monitors the size and/or file count of a directory and
generates an alarm if the directory size or file count exceeds preset thresholds. The MO can
also generate an alarm if the directory size or file count changes.
Description
This is an optional description of the monitored object.
Enabled
Enables/disables the object for monitoring. Used to temporarily exclude an object from
monitoring.
Interval
This is the scan interval for this object. This is the minimum time that must pass between
scans of this object.
Severity
This is the Severity indicator for this object. It allows you to rank the importance of alarms on
this object. The range is 0-9, with 0 as the most severe alarm condition.
205
Help.rtf
PageR Enterprise
Page 206 of 270
Delay
This is the number of seconds that an alarm on this object must persist before alarm
notification is performed. This should be equal to or greater than a multiple of the object or
global interval.
Schedule
Click to define an optional schedule for scanning of this monitored object.
Directory
This is the path to the directory to be monitored. You can type a path or click the Browse
button to browse file system for directory paths. Click the Validate button to verify access to
the selected directory.
Alarm if directory size
Check this box to monitor the total disk space occupied by the files in the target directory.
Select the test operator and size threshold (in bytes).
Alarm on size change
Check this box to alarm if the directory size changes from one scan to the next.
Alarm if file count
Check this box to monitor the number of files in the target directory. Select the test operator
and file count threshold.
Alarm on file count change
Check this box to alarm if the directory file count changes from one scan to the next.
Include sub directories in file count
Check this box to include sub directories as well as files in the file count for the target
directory.
Recurse sub directories
Normally, only the files in the target directory are examined. Check this box to include the
files in any sub directory of the target directory, thereby applying the size and file count
threholds to the entire directory tree at and below the target directory.
Alarm Object
Identifies the Alarm Object to be used for alarm notification when this monitored object
generates an alarm. The drop down list shows all available Alarm Objects. An Alarm Object
must be selected to perform paging, broadcasting or email of alarm events for this object.
Alarm Text
When an alarm is generated for an object, a default alarm notification message is issued.
This message identifies the object and describes the alarm. You can override the default
alarm message by entering custom alarm notification message text in this box. You can use
substitution keywords in the message which will be replaced by their run time values when
the message is generated. Keywords appear as [keyword] in the message text. The
keywords you can use for this object are:
Keyword
[TYPE]
[ID]
Description
expands to the monitored object's type.
expands to the monitored object's unique identification string.
206
Help.rtf
PageR Enterprise
Page 207 of 270
[DESC]
expands to the monitored object's long description.
[ALARMID]
expands to the unique numeric identifier for the monitored
object's current alarm event.
[ALARMMSG]
expands to the message generated when an alarm occurs.
[ALARMMSG2] expands to the extended message generate when an alarm
occurs.
[SIZEOP]
expands to the size relative operator.
[SIZEVAL]
expands to the size threshold value.
[LASTSIZE]
expands to the last size of the directory.
[FILEOP]
expands to the file count relative operator.
[FILEVAL]
expands to the file count threshold value.
[LASTCOUNT]
expands to the last file count for the directory.
[TIME]
expands to the current time.
[DATE]
expands to the current date.
[AGENT]
expands to the the application name of "PageR".
[SYSTEM]
expands to the name of this system.
Note
If the directory path ends in an actual file name, only that specific file will be monitored and
only the size threshhold and size change tests will apply.
207
Help.rtf
PageR Enterprise
Page 208 of 270
DialUp Object Add/Change
This screen is used to add or change DialUp Monitored Objects.
The DialUp Monitored Object tests a dial up modem by dialing the modem's phone number
and determining if the modem connects successfully in the time allowed.
Description
This is an optional description of the monitored object.
Enabled
Enables/disables the object for monitoring. Used to temporarily exclude an object from
monitoring.
Interval
This is the scan interval for this object. This is the minimum time that must pass between
scans of this object.
Severity
This is the Severity indicator for this object. It allows you to rank the importance of alarms on
this object. The range is 0-9, with 0 as the most severe alarm condition.
Delay
This is the number of seconds that an alarm on this object must persist before alarm
notification is performed. This should be equal to or greater than a multiple of the object or
global interval.
Schedule
Click to define an optional schedule for scanning of this monitored object.
Phone Number
This is the phone number that will be dialed. Enter a phone number to dial directly via
modem. Select a Windows Phone Book entry from the drop down list to connect via
208
Help.rtf
PageR Enterprise
Page 209 of 270
Windows Dial UpNetworking (RAS).
Timeout
This is the number of seconds allowed for a successful connection.
Alarm Object
Identifies the Alarm Object to be used for alarm notification when this monitored object
generates an alarm. The drop down list shows all available Alarm Objects. An Alarm Object
must be selected to perform paging, broadcasting or email of alarm events for this object.
Alarm Text
When an alarm is generated for an object, a default alarm notification message is issued.
This message identifies the object and describes the alarm. You can override the default
alarm message by entering custom alarm notification message text in this box. You can use
substitution keywords in the message which will be replaced by their run time values when
the message is generated. Keywords appear as [keyword] in the message text. The
keywords you can use for this object are:
Keyword
[TYPE]
Description
expands to the monitored object's type.
[ID]
expands to the monitored object's unique identification string.
[DESC]
expands to the monitored object's long description.
[ALARMID]
expands to the unique numeric identifier for the monitored
object's current alarm event.
[LASTSTATUS expands to a message describing the resiult of the last dialup
attempt.
]
[TIME]
expands to the current time.
[DATE]
expands to the current date.
[AGENT]
expands to the the application name of "PageR".
[SYSTEM]
expands to the name of this system.
Note
The modem dialup is made through the COM port and settings specified on the Paging
Options Tab. The modem dialup test is made by executing the AN script file DialUpTest.msg.
This script is normally located in the Alarms\Samples directory. If you need to customize the
script, copy it to the Alarms directory and modify it there. The MO looks in Alarms and then
Alarms\Samples for the script file.
209
Help.rtf
PageR Enterprise
Page 210 of 270
SNPP Paging Notification Options Tab
This tab configures alarm notification by paging using the SNPP protocol to a paging
service provider.
SNPP or Simple Network Paging Protocol allows connection to a paging provider over the
internet. SNPP can be used as an alternative or in conjunction with modem paging via the
TAP protocol. TAP is being replaced with SNPP by some service providers and SNPP can
be quicker and more reliable (subject to network connection reliability) than TAP.
Enable Paging using a Simple Network Paging Protocol Service Provider
Check this box to enable or disable send pages with SNPP. On Alarm or Contact objects
that you wish to page via SNPP, the paging script file name must be replaced with the word
SNPP.
Server Name
Enter the name or IP address of your service provider's SNPP server.
Port
Enter the port number of your service provider's SNPP server.
Logon
210
Help.rtf
PageR Enterprise
Page 211 of 270
Enter the logon name used to access your service provider.
Password
Enter any password needed to access your service provider.
Pager/SMS ID
Enter the default identification for your pager or cell phone.
You can click the Test button to send a page and test your settings. The Main window will be
displayed so you may observe the results of the paging test logged in the log window. When
the test is completed, the Options tab will be redisplayed.
Note: SNPP pages are queued and processed after a scan is completed in the same way
TAP pages are processed. Page repeat and retry options as set on the Paging Options Tab
apply.
211
Help.rtf
PageR Enterprise
Page 212 of 270
Room Alert 2 Object Add/Change
This screen is used to add or change a Room Alert 2 object . The Room Alert 2 object
monitors a Room Alert 2 environment monitoring device attached to the local system or the
network.
Room Alert 2 is a hardware device that interfaces a variety of environmental sensors (such
as temperature, water, smoke, power, etc) to a COM port on the local system or over the
network. PageR can monitor the Room Alert 2 hardware device via the COM port or network
and generate alarms when abnormal environmental conditions are detected. Room Alert 2
device and environmental sensors are available from CPL Systems. Room Alert 2 features
onboard temperature and humidity sensors and reports the actual values of these sensors
back for display in the Status window or Web Status page for the Room Alert 2 object.
This Monitored Object also supports the Room Alert LITE hardware device. This device
attaches to your network and has built-in sensors for temperature and humidity. When using a
Room Alert LITE device, the fields COM Port, Sensor Type, Sensor Number, Normal Signal,
Flood and Power are NOT used. The IP address of the device is required.
Identifier
This is a short user defined label used to identify this Room Alert 2 object.
212
Help.rtf
PageR Enterprise
Page 213 of 270
Description
This is an optional description of the monitored object.
Enabled
Enables/disables the object for monitoring. Used to temporarily exclude an object from
monitoring.
Interval
This is the scan interval for this object. This is the minimum time that must pass between
scans of this object.
Severity
This is the Severity indicator for this object. It allows you to rank the importance of alarms on
this object. The range is 0-9, with 0 as the most severe alarm condition.
Delay
This is the number of seconds that an alarm on this object must persist before alarm
notification is performed. This should be equal to or greater than a multiple of the object or
global interval.
Com Port
Select the COM port that the Room Alert 2 device is attached to, if using serial connection.
IP Addr or Name
Optional support for Room Alert 2 with network interface. Enter the IP address or name
assigned to the Room Alert 2 device you wish to use followed by a colon and then the port
number assigned. This defaults to 10001. If an address is entered in this box, the COM port
selection is ignored.
Sensor Type
Select or type a descriptive label that identifies the attached sensor.
Sensor Number
Each Room Alert 2 device supports 3 user sensors. Select the sensor (number) that is to be
monitored.
Normal Signal
Set the signal level (LO or HI) that is returned by the attached sensor for NORMAL
conditions. LO=contact open, HI=contact closed.
Simulate Alarm
Check this box to test the MO without a Room Alert 2 device attached to the system. Alarms
are simulated and cleared on alternating scans of this MO.
Log Samples
Check this box to log each data sample read from the Room Alert 2 device to a disk file. This
file will be in the install directory and named RA2nn.log where nn is the internal object
number of the Monitored Object. This number is always the same for each MO instance.
Flood
Check this box to enable monitoring of the built-in flood sensor. Flood sensor pick up must
be wired to the Flood sensor contacts on the Room Alert 2 device.
213
Help.rtf
PageR Enterprise
Page 214 of 270
Power
Check this box to enable monitoring of the alternate power supply. Typically, the Power
sensor monitors the power input to a UPS and the RA2 box 's power cord is plugged into the
UPS output. This way if there is loss of power to the UPS, you can be alerted that the UPS is
active and you have x minutes of power left.
Dead Box
Check this box to monitor for loss of communication with the RA2 box.
Temperature
Set the temperature alert value for the onboard temperature sensor. Enter a numeric value
followed by F or C select the desired temperature scale. Defaults to F. Zero to disable.
Alarm generated if actual temperature is above the alert value. To alarm if actual
temperature is below the alert value, append the > character to the alert value.
%Humidity
Set the percent humidity alert value for the onboard humidity sensor. Zero to disable. Alarm
generated if actual humidity is above the alert value. To alarm if actual humidity is below the
alert value, append the > character to the alert value.
Correction
You may set a correction value + or - to be applied to the temperature or humidity values
read from the RA 2 box to correct for errors in the RA2 sensors.
Camera IP
Optional IP address or DNS name of Axis video camera to associate with this RA2 box. If
present, live video from the camera will be displayed on the Web Status page for this
monitored object.
Alarm Object
Identifies the Alarm Object to be used for alarm notification when this monitored object
generates an alarm. The drop down list shows all available Alarm Objects. An Alarm Object
must be selected to perform paging, broadcasting or email of alarm events for this object.
Alarm Text
When an alarm is generated for an object, a default alarm notification message is issued by
PageR. This message identifies the object and describes the alarm. You can override the
default alarm message by entering custom alarm notification message text in this box. You
can use substitution keywords in the message which will be replaced by their run time
values when the message is generated. Keywords appear as [keyword] in the message
text. The keywords you can use for this object are:
Keyword
[TYPE]
Description
expands to the monitored object's type.
[ID]
expands to the monitored object's unique identification
string.
[DESC]
expands to the monitored object's long description.
[SENSORTYPE]
expands to the sensor type label.
214
Help.rtf
PageR Enterprise
Page 215 of 270
[SENSORNUMBER]
expands to the sensor number.
[NORMALSIGNAL]
expands to LO or HI, the normal signal value.
[COMPORT]
expands to the com port for the Room Alert device.
[TEMPTHRESHOLD]
expands to the temperature alarm threshold value.
[TEMPERATURE]
expands to the last reported actual temperature value.
[HUMIDTYTHRESHOL
D]
expands to the % Humidity alarm threshold value.
[HUMIDITY]
expands to the last reported actual % humidty value.
[ALARMID]
expands to the unique numeric identifier for the
monitored object's current alarm event.
[TIME]
expands to the current time.
[DATE]
expands to the current date.
[AGENT]
expands to the the application name of "PageR".
[SYSTEM]
expands to the name of this system.
215
Help.rtf
PageR Enterprise
Page 216 of 270
SSH Options Tab
This tab configures support for secure tunneling of network protocols.
By default, network protocols are not secure, meaning the data transmitted via these
protocols is sent "in the clear" and can be read by an agent monitoring the network. The SSH
security protocol allows other network protocols to be routed through a secure connection or
"tunnel" from one system to another. The use of a tunnel means that the applications
communicating via a network protocol do not have to be changed and don't really know that
thier communications are being secured for them.
In order to secure these non-secure protocols, a request to connect to a remote system is
directed to a local IP address that is the local entrance to an SSH tunnel to the target system.
The tunnel sends the connection request to the SSH server on the target system, which
directs the connection request to the target system server application just as if we had
connected directly to the target system. Data traveling through the tunnel is encrypted and
therefore secure from interception.
Support for SSH tunneling is provided primarily to support securing the Telnet connections
used by the Host Login, Host Volume and Host Process Monitored Objects.
Enable SSH Tunneling
Check this box to enable SSH Tunneling.
216
Help.rtf
PageR Enterprise
Page 217 of 270
Server Port
Port number of the SSH protocol. Normally 22. All tunnels configured will use this port.
Timeout
Communications timeout value in seconds.
SSH Server Login
User name for login to the SSH server. This login name will be used for all tunnels configured.
Password
Password for login to the SSH server. This password will be used for all tunnels configured.
Tunnel List.
This is a list of tunnels that are currently defined. To delete a tunnel, you can single click the
local address to highlight the tunnel and then press the Delete Key. You can also double click
the local address to remove the tunnel.
Local Address
To add a new tunnel, enter the local IP address that will be the start of the tunnel. This must
be a local address or the form 127.0.n.n. A tunnel is defined by the local address and local
port pair. Typically, a single local address is mapped to a single remote address.
Local Port
This is the local port that combined with the local address defines the start of a tunnel. Use
port 23 to tunnel Telnet.
Remote Address
This is the remote name/address of the target system where the tunnel will end. Any
Monitored Object that is to use this tunnel must have it's target system name/IP address
exactly match the remote address of the tunnel. So if the tunnel remote address is the system
name "susie", then any MO that will is to be redirected to the tunnel must also use the name
"susie".
Remote Port
This is the remote port which combined with the remote address defines the end of a tunnel.
This is normally the same as the Local Port value.
To create a new tunnel, enter the local address and port and the remote address and port and
click the Add button.
To further understand tunnels and thier configuration, lets look at an example. I wish to use
Telnet from my system to two other systems, A and B. To do this, I would create a tunnel to
system A as follows:
Local Address = 127.0.0.5 Local Port = 23 Remote Address = A Remote Port = 23
Port 23 is the Telnet standard port. To create a tunnel to system B, I would create it as
follows:
Local Address = 127.0.0.6 Local Port = 23 Remote Address = B Remote Port = 23
To create a tunnel to system B for the SMTP (port 25) protocol, I would create it as follows:
217
Help.rtf
PageR Enterprise
Page 218 of 270
Local Address = 127.0.0.6 Local Port = 25 Remote Address = B Remote Port = 25
Finally, any Monitored Object that uses Telnet to system A must have A as it's host name.
The MO's host/server/system name is matched to the remote name in the tunnels to
determine if a tunnel should be used and which one. So if my Telnet MO has A for it's host
name, at Telnet connect time, the address used by Telnet will be changed to 127.0.0.5 and so
Telnet will connect via the tunnel to system A's Telnet service .
SQL Query Object Add/Change
This screen is used to add or change an SQL Query monitored object .
This monitored object uses ODBC to connect to an SQL database and execute a query. If
the connection to the database fails or the query returns no records, an alarm is generated.
This monitored object requires Microsoft Data Access Components 2.5 or later to be
installed.
Identifier
This is a unique name for the monitored object.
Description
218
Help.rtf
PageR Enterprise
Page 219 of 270
This is an optional description of the monitored object.
Enabled
Enables/disables the object for monitoring. Used to temporarily exclude an object from
monitoring.
Severity
This is the Severity indicator for this object. It allows you to rank the importance of alarms on
this object. The range is 0-9, with 0 as the most severe alarm condition.
Delay
This is the number of seconds that an alarm on this object must persist before alarm
notification is performed. This should be equal to or greater than a multiple of the object or
global interval .
Data Source Name
Enter or select the Data Source Name of the SQL Server to be monitored. Data Source
Names are configured in the ODBC Data Sources control panel applet. The DSN points to
the database type, ODBC driver and server location.
User Name
This is the user name used to login to the SQL server.
Password
This is the password used to login to the SQL server.
Timeout
This is the timeout in seconds to apply to all communications with the SQL server.
Query
This is the SQL Select statement to be executed if the MO successfully logs onto the SQL
server. If no records are returned by this Select statement, an alarm is generated. You can
click the Test button to execute the SQL Query operation and validate the setup.
Alarm Object
Identifies the Alarm Object to be used for alarm notification when this monitored object
generates an alarm. The drop down list shows all available Alarm Objects.
An Alarm Object must be selected to perform paging, broadcasting or email of alarm events
for this object.
Alarm Text
When an alarm is generated for an object, a default alarm notification message is issued by
PageR. This message identifies the object and describes the alarm. You can override the
default alarm message by entering custom alarm notification message text in this box. You
can use substitution keywords in the message which will be replaced by their run time
values when the message is generated. Keywords appear as [keyword] in the message
text. The keywords you can use for this object are:
Keyword
[TYPE]
[ID]
Description
expands to the monitored object's type.
expands to the monitored object's unique identification
string.
219
Help.rtf
PageR Enterprise
Page 220 of 270
[IDX]
expands to the monitored object's unique identification string
with the Data Source Name appended.
[DESC]
expands to the monitored object's long description.
[DSN]
expands to the Data Source Name.
[RECORDSFOUND expands to "True" if records are returned by the query
otherwise returns "False".
]
[LASTERROR]
expands to the last error returned by the ODBC driver.
[ALARMID]
expands to the unique numeric identifier for the monitored
object's current alarm event.
[TIME]
expands to the current time.
[DATE]
expands to the current date.
[AGENT]
expands to the the application name of "PageR".
[SYSTEM]
expands to the name of this system.
220
Help.rtf
PageR Enterprise
Page 221 of 270
Axis Video Camera Object Add/Change
This screen is used to add or change an Axis Video Camera monitored object .
This monitored object listens on the network for Motion Detection messages from Axis Video
Cameras. Alarms are generated for motion detection. This object can also capture video
images from the camera on a regular basis. This object has been tested with the Axis 210
network video camera but should work with any Axis network camera.
Description
This is an optional description of the monitored object.
Enabled
Enables/disables the object for monitoring. Used to temporarily exclude an object from
monitoring.
Address/Name
This is the IP address or DNS name of the Axis Video Camera. See below for information
about how to use this field.
Severity
This is the Severity indicator for this object. It allows you to rank the importance of alarms on
this object. The range is 0-9, with 0 as the most severe alarm condition.
221
Help.rtf
PageR Enterprise
Page 222 of 270
User Name
This is the user name used to login to the camera if required.
Password
This is the password used to login to the camera if required.
Port Number
Normally this MO listens on the network for messages from the camera. The camera must
be configured with the IP address of the system where PageR is located and a port number
must be selected for communication between the camera and PageR. This port number
MUST BE THE SAME for all Axis Camera MOs.
View Button
Click this button to view live video from the camera. Only works if the IP address/Name of
the camera is supplied. If there is any problem accessing the camera, the picture of the Axis
210 will be displayed instead of the live image.
Save Image on Alarm
When checked, if a Motion Detection message is received from the camera, the current
image on the camera is retrieved and stored in the directory entered below. If the camera
requires login, the user name and password must be supplied above.
Save Image on scan
When checked, on each scan (subject to the schedule, if any) the current image on the
camera is retrieved and stored in the directory entered below. If the camera requires login,
the user name and password must be supplied above.
Save Path
This is the directory path were camera images will be saved. The directory must exist.
Alarm Object
Identifies the Alarm Object to be used for alarm notification when this monitored object
generates an alarm. The drop down list shows all available Alarm Objects.
An Alarm Object must be selected to perform paging, broadcasting or email of alarm events
for this object.
Alarm Text
When an alarm is generated for an object, a default alarm notification message is issued by
PageR. This message identifies the object and describes the alarm. You can override the
default alarm message by entering custom alarm notification message text in this box. You
can use substitution keywords in the message which will be replaced by their run time
values when the message is generated. Keywords appear as [keyword] in the message
text. The keywords you can use for this object are:
Keyword
[TYPE]
Description
expands to the monitored object's type.
[ID]
expands to the monitored object's unique identification
string.
[IDX]
expands to the monitored object's unique identification string
with the Data Source Name appended.
222
Help.rtf
PageR Enterprise
Page 223 of 270
[DESC]
expands to the monitored object's long description.
[SOURCEIP]
expands to the IP address of the camera that sent the last motion
detection message.
[SOURCENAME]
expands to the DNS name (if available) of the camera that
sent the last motion detection message.
[SOURCE]
expands to the DNS name if available and if not, the IP
address of camera that sent the last motion detection
message.
[MSG]
expands to the actual content of the last motion detection
message.
[ALARMID]
expands to the unique numeric identifier for the monitored
object's current alarm event.
[TIME]
expands to the current time.
[DATE]
expands to the current date.
[AGENT]
expands to the the application name of "PageR".
[SYSTEM]
expands to the name of this system.
Notes
This monitored object listens for Motion Detection messages sent by Axis Video Cameras
on the network. The Video camera must be configured to send such messages to the system
hosting PageR on the port number set on this MO. If an IP address or DNS name is entered,
then the MO will only process messages from the camera with that address or name. If the IP
address box is left blank, then the MO becomes the default camera MO and will process
messages from any camera that is not handled by an MO with a specific address or name.
For motion detection to be monitored, you must configure the camera to have a TCP Event
Server record that points to the system where PageR is hosted using the same Port number
entered on this MO. Use the same port number for all cameras and all MOs. Then configure
the Motion Detection feature in the camera and select the TCP Event Server you created for
PageR. The motion detection message text configured in the camera is the alarm message
text reported by PageR in the [MSG] substitution variable.
When motion detection messages are received, you may capture the current image on the
camera to the directory entered. If you capture an image, and the Alarm Object you have
selected sends SMTP email notification, that image will be attached to the email notification.
Images are stored in the specified directory and have the file name format:
AxisImage_Source_yyyymmddhhmmss.jpg
Source will be the camera DNS name (if available) or the camera IP address.
If you wish to have the MO capture an image from the camera on a regular basis, you must
223
Help.rtf
PageR Enterprise
Page 224 of 270
enter the IP address or DNS name of the camera and check the appropriate box. Then, on
each scan, subject to any defined Schedule , the current image will be captured from the
camera and stored in the specified directory.
If cameras require a login, then you must specify the user name and password to be used in
order for any images to be capured. If you want to use logins on cameras, it is suggested that
you create a standard login user name and password for use by PageR and put that in all
cameras.
In order for the camera DNS name to appear in alarm reporting or in the captured image file
name, you must have a reverse DNS lookup record that maps the camera IP address to it's
name configured in your DNS server. This is in addition to the normal DNS record that maps
the name to the IP address.
Managing Configurations
A Configuration is all of the settings and objects configured within PageR Enterprise. A
Configuration has a name by which it is known. Configurations are stored by this name in the
Windows Registry under the LOCAL MACHINE\Software key. The Configuration created
when PageR Enterprise executes for the first time is called PageR. The name of the currently
loaded Configuration is displayed on the Globals tab of the Options Screen.
When PageR is executed, it loads the Configuration identified as the Start Up Configuration.
The loaded Configuration is stored in memory and can be modified using the Options Screen.
Modified configurations remain only in memory until explicitly saved to the Registry.
If you change the Configuration Name on the Globals tab of the Options Screen, and then
save the configuration to the Registry, the complete current configuration is copied to the this
new name and it becomes the next configuration to be loaded. The original configuration
remains in the Registry.
On the Main screen, under the Settings pull down menu, is an option to set the next Start-Up
Configuration. This displays a screen which allows you to select from a list of known
configurations or type a configuration name. The configuration you select will be loaded on
the next start up of PageR, so you must shutdown and restart to load the selected
configuration. You may type in the name of a non-existant configuration to create a new,
blank configuration.
You may also load the configuration from a file (see below).
You may also select the configuration to be loaded on the PageR.exe run line. On the Start
Menu shortcut that executes PageR, use the CONFIG=name parameter to select a start-up
configuration.
Under the Settings pull down menu is an option to save the currently loaded configuration to a
file. This will save the configuration in a disk file which is named as the configuration name
with a .cfg extension. This file is in XML format. You can load a configuration file by
specifying the file name (no extension) on the CONFIG=name run parameter and adding the
IMPORT parameter. The loaded configuration will have the name specified on the CONFIG
parameter. The file is saved to and loaded from the install directory.
224
Help.rtf
PageR Enterprise
Page 225 of 270
Windows System Object Add/Change
This screen is used to add or change a Windows System monitored object .
The Windows System Monitored Object is a generic MO that can be used to monitor any
system with a Windows Operating system. It functions the same as the NT System,
Windows 2000/XP system monitored objects. This MO allows for easier expansion to
additional Windows OS types and includes support for Windows 2003 and Windows Vista.
Description
This is an optional description of the monitored object.
Enabled
Enables/disables the object for monitoring. Used to temporarily exclude an object from
monitoring.
Interval
This is the scan interval for this object. This is the minimum time that must pass between
scans of this object.
Severity
This is the Severity indicator for this object. It allows you to rank the importance of alarms on
this object. The range is 0-9, with 0 as the most severe alarm condition.
Delay
225
Help.rtf
PageR Enterprise
Page 226 of 270
This is the number of seconds that an alarm on this object must persist before alarm
notification is performed. This should be equal to or greater than a multiple of the object or
global interval.
System Name
Enter or select the name of the Windows system to be monitored.
Windows Type
Select the Windows Operating System on the target system.
Alarm Object
Identifies the Alarm Object to be used for alarm notification when this monitored object
generates an alarm. The drop down list shows all available Alarm Objects.
An Alarm Object must be selected to perform paging, broadcasting or email of alarm events
for this object.
Alarm Text
When an alarm is generated for an object, a default alarm notification message is issued by
PageR. This message identifies the object and describes the alarm. You can override the
default alarm message by entering custom alarm notification message text in this box. You
can use substitution keywords in the message which will be replaced by their run time
values when the message is generated. Keywords appear as [keyword] in the message
text. The keywords you can use for this object are:
Keyword
[TYPE]
Description
expands to the monitored object's type.
[ID]
expands to the monitored object's unique identification string.
[DESC]
expands to the monitored object's long description.
[ALARMID]
expands to the unique numeric identifier for the monitored object's
current alarm event.
[TIME]
expands to the current time.
[DATE]
expands to the current date.
[AGENT]
expands to the the application name of "PageR".
[SYSTEM]
expands to the name of this system.
226
Help.rtf
PageR Enterprise
Page 227 of 270
Quick Start Guide
PageR Quick Start Instructions
To input a new licence key, run 'PageR Set Licence' from the PageR Start Menu.
At the main screen click OPTIONS to set up monitoring.
In a nutshell, we are going to do this:
(1) SET UP A NUMBER OF "MONITORED OBJECTS" (MOs), ie THINGS WE WATCH .
(2) EACH MO IS LINKED TO AN ALARM OBJECT (AO).
The Alarm Object can contain a grid of contacts which can provide alert escalation. It
escalates a ROW at a time on each scan .
(3) EACH AO USES ONE OR MORE SMS/PAGER/EMAIL 'CONTACTS' .
Therefore - we have to set up 'IN REVERSE ORDER', as follows:
1) CONTACTS
To add a Contact, go to the OPTIONS screen, click the 'Contacts' tab then 'Add Contact'.
Enter contact Name. To alert via pager or SMS phone, click Browse to the right of the Pager
Script box. Browse into the SAMPLES directory and select the CELLNET.MSG (UK) file or
the .MSG file appropriate for your paging/SMS provider.
Note: For SNPP (Internet) SMS (instead of modem dialup) put snpp or SNPP in the Pager
Script box. Later, set up the SNPP tab in OPTIONS as follows:
Server name: 195.157.52.212
Port: 444
Logon: tr/073
other fields can be blank. Try modem dialup first though.
Return to the Contacts Setup. Enter the mobile phone number (or pager id) in the
"Pager/Phone ID" box.
Set up separate contacts for email and mobiles eg 'Greg Mobile' and 'Greg Email'. Each can
then be used in different situations.
Email Alerts : Go to the Email tab in the OPTIONS screen to configure SMTP email by
entering the mail host (mail server) ip address and any valid email 'Return Address', usually
just your own email address.
2) ALARMS
To add an Alarm, go to the OPTIONS screen, click the 'Alarm Objects' tab, click Add Alarm.
Give the AO a name such as 'SUPPORT'. The grid is an escalation schedule, everyone on
227
Help.rtf
PageR Enterprise
Page 228 of 270
each ROW gets alerted together. If the problem persists it escalates down through the other
rows. You can leave boxes and whole rows blank and it will only alert on the boxes/cells filled
in.
3) MO's
To add an MO, go to Monitored Objects TAB on the OPTIONS screen and click Add Object.
The Monitored Object Types you see all have a different purpose and some are very powerful
(eg SNMP QUERY). Double click one then hit the F1 key. This will display the help
information for that MO. It's important you understand what all these MO types do. They are
your monitoring toolkit. Scroll down to see tham all. The license cost is based on how many
of these MOs you wish to use.
4) Set up a HEARTBEAT MO.
This is a daily reminder that PageR is still monitoring and the alerting is working. Double-click
the MO to set it up. Click Schedule and then click Once Per Day, then OK. Insert the Alarm
Object you just set up. Then click Accept. Now click Settings/Save, then START on the top
left of the main screen. This will test the alerting you have set up.
5) Run Internet Explorer 5 (or greater) on the same PC as PageR.
Enter 'http://localhost:1088' for the URL address. This should bring up the PAGER WEB
PAGE MANAGEMENT INTERFACE. To view this page from any other PC use the PageR
system's ip address or
'server name' as the http:// URL address.
Note: check the port number in OPTIONS/More Globals. We default to 1088 as it is registered
as ours, which means you would use the URL address followed by :1088 to browse PageR
Enterprise.
SYSTEM VIEW
System View (on main screen) is a visual console screen showing the servers being
monitored, when an MO fails the server shows up RED.
At the main screen click the Systems button. In the tool bar at the top you will see three
System Explorer icons. Hold the cursor on each to see what it does. Click the RH one to
explore the network for Windows servers. It may take some time. It will create a grey box
outline for every server it finds.
To set up MO's from here right-click the box and choose to set up a new MO. This will take
you to the ADD MO screen where you can choose an MO type. The server name is filled in
automatically for you.
228
Help.rtf
PageR Enterprise
Page 229 of 270
EIGHT MORE IMPORTANT FEATURES
1) STATUS button on main screen - shows outstanding alarms and the 'pager queue', ie
alarms waiting to be sent.
2) EVENTS button on main screen - is a 'Console Window' for Event logs, Syslog and
SNMP alerts which can be viewed 'live'.
3) AUTO ADD tab on OPTIONS screen - allows you to easily set up a Ping test for all
networked ip devices. It also allows you to scan the network and make a list of PING, SNMP
and Windows NT/2K/XP/2003 objects which can be used internally by PageR.
4) DOWNTIME REPORTING - using PageR data LOGGING and the sample Access
database SNT.MDB (See Downtime.zip).
5) INSTANT MESSAGING - each user can have their own personal Instant Messanger
console on their desktop to
will receive alerts. See online help or HELP.DOC.
6) WEB CAMS - can be set up using the Axis 210 webcam. We can alert on movement
detection.
7) ROOM ALERT - is an add-on option to allow environmental monitoring, temperature,
humidity, power, smoke etc.
8) DATACENTER EDITION - adds support for non-Windows servers eg UNIX, AS/400, VMS,
HP3000 etc.
FOR MORE HELP
See Online Help in PageR and GetStarted.doc in the START menu. Remember F1 gives
context-sensitive help.
Also from the PageR START menu, PageR.pps is a useful Powerpoint presentation/overview
for senior managers and for 'selling' PageR Enterprise to your IT team.
229
Help.rtf
PageR Enterprise
Page 230 of 270
Disk Drives Object Add/Change
This screen is used to add or change a Disk Drives Monitored Object .
The Disk Drives MO is used to monitor physical disk drives on a Windows system. On each
scan of the MO, attributes on each disk drive are checked and an alarm is generated for
any problems detected. The target system must have the Windows Management
Instrumentation (WMI) Core 1.5 or later installed.
Description
This is an optional description of the monitored object.
Enabled
Enables/disables the object for monitoring. Used to temporarily exclude an object from
monitoring.
Interval
This is the scan interval for this object. This is the minimum time that must pass between
scans of this object.
Severity
This is the Severity indicator for this object. It allows you to rank the importance of alarms on
this object. The range is 0-9, with 0 as the most severe alarm condition.
230
Help.rtf
PageR Enterprise
Page 231 of 270
Delay
This is the number of seconds that an alarm on this object must persist before alarm
notification is performed. This should be equal to or greater than a multiple of the object or
global interval.
System
Enter/select the host name or IP address of the Windows system on which the disk drives
will be monitored. Leave blank for the local system.
User Name
When accessing remote systems, it may be necessary to supply a user name for access to
the WMI objects desired. If no user name is entered, the local user credentials under which
you are executing will be used.
Password
If a user name is specifed above, the corresponding password must be entered.
Available Drives
This is a list of the Disk Drives on the system identified above. The list is refreshed whenever
the System is changed or the Load button is clicked. Check a drive to enable monitoring.
Click on a drive to display the monitoring details of the drive in the panel on the right.
The key monitored attribute is the Status of the drive. This value is determined by the drive
itself using S.M.A.R.T. self-monitoring technology. S.M.A.R.T. is an on-board technology of
disk drives. S.M.A.R.T. monitors an array of attributes such as temperature and
read/write/seek errors. The drive has thresholds for each monitored item built in by the
manufacturer. If any of the S.M.A.R.T. monitored attributes gets out if tolerance, the status
will change and report the error. You can also monitor the following additional drive
attributes:
Loaded
Generates an alarm if the drive has media loaded.
Not Loaded
Generates an alarm if the drive does not have media loaded.
Volume
When you click OK on this screen, the volume names of all drives with media loaded are
recorded. If you enable volume checking, an alarm will be generated if at any future point the
volume name does not match the recorded name.
Check for USB Drives
Generates an alarm if any USB drives are present on the target system.
Max Drives
Generates an alarm if the number of disk drives found on the target system exceeds this
value. Set to zero to disable.
Alarm Object
Identifies the Alarm Object to be used for alarm notification when this monitored object
generates an alarm. The drop down list shows all available Alarm Objects. An Alarm Object
must be selected to perform paging, broadcasting or email of alarm events for this object.
231
Help.rtf
PageR Enterprise
Page 232 of 270
Alarm Text
When an alarm is generated for an object, a default alarm notification message is issued.
This message identifies the object and describes the alarm. You can override the default
alarm message by entering custom alarm notification message text in this box. You can use
substitution keywords in the message which will be replaced by their run time values when
the message is generated. Keywords appear as [keyword] in the message text. The
keywords you can use for this object are:
Keyword
[TYPE]
Description
expands to the monitored object's type.
[ID]
expands to the monitored object's unique identification string,
the name or IP address of the target system or blank for local
system.
[DESC]
expands to the monitored object's long description.
[ALARMID]
expands to the unique numeric identifier for the monitored
object's current alarm event.
[SYSNAME]
expands to the name or IP address of the target system or
"Local System".
[DRIVENAME]
expands to the name of the disk drive that has generated the
current alarm.
[DRIVEID]
expands to the identifier of the disk drive that has generated the
current alarm.
[DRIVESTATUS expands to the description of the current alarm.
]
[TIME]
expands to the current time.
[DATE]
expands to the current date.
[AGENT]
expands to the the name of this application.
[SYSTEM]
expands to the name of this system.
232
Help.rtf
PageR Enterprise
Page 233 of 270
WMI Events Object Add/Change
This screen is used to Add or change WMI Events Monitored Objects.
Windows Management Instrumentation (WMI) is Microsoft's Windows platform
implementation of the Web Based Enterprise Management (WBEM) standard.
The WMI Events Monitored Object executes WMI Event monitoring scripts. These scripts
describe the WMI Events to be monitored and event handler procedures to process the
events when detected. The WMI Events MO reads the event script at the start of scanning
and posts the WMI Events described in the script to the WMI processor on the target system.
After that, WMI on the target system will monitor for the events and if an event occurs, WMI
will call back to this MO to execute the event handler procedure associated with the event.
This procedure is used to examine the event and raise alarms or perform other processing.
Once the events have been posted to WMI, this MO consumes no overhead and is only
active if an event is detected by WMI.
See the bottom of this page for additional important information about WMI and the content of
event scripts.
Identifier
This is a short label that is used to identify this WMI Events object.
Description
233
Help.rtf
PageR Enterprise
Page 234 of 270
This is an optional description of the monitored object.
Enabled
Enables/disables the object for monitoring. Used to temporarily exclude an object from
monitoring.
Severity
This is the Severity indicator for this object. It allows you to rank the importance of alarms on
this object. The range is 0-9, with 0 as the most severe alarm condition.
System Name
Enter or select the name or IP address of the Windows system on which the WMI query will
be executed. Click the ... button to scan your network and populate the drop down list.
User Name
When accessing remote systems, it may be necessary to supply a user name for access to
the WMI objects desired. If no user name is entered, the local user credentials under which
you are executing will be used.
Password
If a user name is specifed above, the corresponding password must be entered.
Event Script File
The Event Script is a VB script file containing script code that follows the convention defined
by this MO. The script file is read and executed at the start of scanning. The script describes
the WMI Events to be monitored and the event handler procedure for each event. See the
discussion of WMI Event Scripts below for more information.
There is an example event script in \Scripts\Samples\WMIEvents.txt. There are also a
number of pre-defined WMI Event MOs available on the Add new Monitored Object selection
screen.
Parameters
This is an optional list of comma or space separated parameters that are passed to the
event script at initialization. If a parameter has embedded spaces, enclose in quotes. See
the event script disucssion below for more information.
Alarm Object
Identifies the Alarm Object to be used for alarm notification when this monitored object
generates an alarm. The drop down list shows all available Alarm Objects. An Alarm Object
must be selected to perform paging, broadcasting or email of alarm events for this object.
Alarm Text
When an alarm is generated for an object, a default alarm notification message is issued.
This message identifies the object and describes the alarm. You can override the default
alarm message by entering custom alarm notification message text in this box. You can use
substitution keywords in the message which will be expanded to their run time values when
the message is generated. Keywords appear as [keyword] in the message text. The
keywords you can use for this object are:
Keyword
[TYPE]
Description
expands to the monitored object's type.
234
Help.rtf
PageR Enterprise
Page 235 of 270
[ID]
expands to the monitored object's unique identification string.
[IDX]
expands to the monitored object's identification string and
includes the target system name.
[SYSTEM]
expands to the target system name.
[SYSTEMX]
expands to " on target-system-name" or "(local)".
[DESC]
expands to the monitored object's long description.
[USER]
expands to the user name used to login to WMI.
[EVENTNAME]
expands to the name of the event that generated the current
alarm.
[EVENTCOUNT]
expands to the number of times this event has been detected.
[EVENTTIME]
expands to the time of the event that generated the current
alarm.
[EVENTMSG1]
expands to the alarm message #1 set by the event script for
the current alarm.
[EVENTMSG2]
expands to the alarm message #2 set by the event script for
the current alarm.
[DATE]
expands to the current date.
[AGENT]
expands to the name of this application.
[SYSTEM]
expands to the name of this system.
WMI Event Scripts
WMI Event monitoring is described in an event script. It is hosted by the WMI Events
monitored Object. It provides one or more WMI Event Notification queries to the MO and the
event handler routines to process events returned by those queries.
WMI Notification queries are created in the Init() method by adding a WMI WQL event
notification query to the MO via the AddEvent method, exposed to this script by the hosting
WMI Events MO. Events have a name, a type (intrinsic/extrinsic), the WMI namespace that
applies to the event class, a WQL notification query string, and the name of the method in
this script that will be called when events arrive.
WQL is a query language defined by WMI, similar to SQL. WMI queries can retrieve WMI
objects or define events (which are objects) that WMI will report. See WMI documentation for
more information on WQL. Intrinsic or extrinsic is an attribute of a WMI Event Object and is
obtained from the WMI documentation for the event in question.
The WMI Events MO will call the Init() method on the first scan of the MO to obtain the event
queries. The MO will then post those queries to WMI on the target system. When events are
235
Help.rtf
PageR Enterprise
Page 236 of 270
detected and the MO is notified, it will call the event handler method. Note that when a scan is
stopped and then restarted, this script will be reloaded from the file and the events will be
recreated.
Note that the Init(parms) method accepts a parameter array passed from the MO's
Parameters entry field. Each parameter will be in a separate array position of the parms array.
When the MO calls the event handler method, a parameter array is passed to the method.
The first parameter (array item 0) is a WMIEvent object as defined by the MO. These
WMIEvent objects are created by the call to AddEvent in the Init method. The WMIEvent
object exposes the following properties:
Name
EventType
NameSpace
Query
Handler
AlarmMsg1
method as
AlarmMsg2
handler method as
= name of the event (1st item of addevent call)
= type of the event (2nd item of addevent call)
= name space of the event (3rd item of addevent call)
= the WQL query string (4th item of addevent call)
= name of event handler method (5th item of addevent call)
= Primary alarm message for event. This is set by the event handler
appropriate for the event.
= Extended alarm message for event. This is set by the event
appropriate for the event.
LastEventTime = date & time of last determination by the event handler method that
the
event represents an alarm and notification should occur. Set in
conjunction
with the AlarmMsg fields.
EventInstance = an object reference that contains the WMI event object returned
with the WMI
event notification sent to the MO. The object will vary depending on
the query
and event type , but will be a WMI schema object defined in the WMI
doc. The
event handler can examine properties exposed by this object to
process the event.
The event handler method is responsible for examining the WMI EventInstance object passed
in the WMIEvent object to determine if the event represents an alarmable event. If so, the
handler will set the alarm messages, the event time and call SG.MOALARM2 ,,,WMIEvent
to cause alarm processing to occur. The handler may perform other actions as appropriate.
Long processing delays should be avoided in handlers as other events cannot be processed
while in a handler.
Note that several event queries can use the same event handler method if appropriate.
More about WMI
Windows Management Instrumentation is the Microsoft implementation of the WBEM systems
monitoring and management standard. The WBEM standard defines an object model for
managed systems called the Common Information Model (CIM). Systems that implement
WBEM expose a standard object model describing system components to WBEM
management tools. The CIM schema defines a standard object model that all WBEM
implementions are expected to expose populated with object instances and property values
appropriate to the target system. Implementations may define extensions to the schema as
appropriate. For more information, see the WMI Object Explorer.
236
Help.rtf
PageR Enterprise
Page 237 of 270
DISCLAIMER
WBEM, CIM and WMI are extensive and complex subjects. This help information is not
intended as documentation of these subjects. The user of the WMI support in this product is
expected to be familiar with WBEM, CIM and WMI. Extensive documentation on WMI is
available as a free download from Micrsoft. Target systems must have the appropriate WMI
Core components version 1.5 or later installed. This is also available as a free download from
Microsoft. This product does not install the WMI Core components.
More Options Window
The More Options Window contains a series of tabs that give access to additional PageR
configuration options.
The More Options window allows access to additional PageR configuration settings. The
settings are organized onto tabs. Switch between setting tabs by clicking on the appropriate
tab.
237
Help.rtf
PageR Enterprise
Page 238 of 270
The settings tabs are:
Speech
Skype
Database
After making changes to one or more tabs, you can click CANCEL to discard the changes
and return to the Main window or OK to accept all changes and return to the Main window.
Accepted changes are retained temporarily until saved to the Registry or until you exit
PageR. If there are unsaved changes at exit, you will be prompted to either keep the
changes to the Registry or discard them.
238
Help.rtf
PageR Enterprise
Page 239 of 270
Speech Options Tab
This tab configures spoken messages and alarms.
On the Options 2 tab of the primary Options screen, you can select audible alarms. In
addition to selecting sound files or built-in sounds, you can enter the word speak in that field
to have alarms and warning/error messages spoken aloud using Microsoft Speech. This tab
provides options to configure the speech.
Voice
Select the voice to use from the available voices on your system.
Rate
Set the speed of speaking.
Volume
Set the volume of speech.
Format
Select the format of the .wav that is generated and spoken for text to speech. Generally, you
should use SAFT22kHz16BitMono.
239
Help.rtf
PageR Enterprise
Page 240 of 270
Device
Select the output device from those available on your system.
Timeout
Set a timeout in seconds to limit how much time is allowed to speak messages or zero to not
limit the length of messages.
Speak Punctuation
Enable to have punctuation characters spoken. Normally they are ingored.
Speak Alarm Prefix
Enable to speak the prefix text (Monitored Object identifier) with alarm messages. Normally
only the alarm is spoken.
Speak Alarm Message
Enable to speak alarm messages.
Speak Alarm Extended Information
Enable to speak the extended information that may be available with alarm messages.
Speak in Service Mode
Enable to have speech occur when this application is run in service mode. Normally, service
mode operation would be silent.
Test Speech Settings
Enter sample text and click Speak to test the speech settings.
240
Help.rtf
PageR Enterprise
Page 241 of 270
Skype Options Tab
This tab configures delivery of logging and alarms via the Skype VOIP service .
Skype is a popular VOIP PC client and service. The Skype PC client is used to make voice
calls to other Skype clients or from the client to regular telephone line. Skype also supports
chat between clients. You may deliver alarms as voice calls to Skype users on thier PCs or to
regular telephones. Such alarms arrive as phone calls and when the recpient answers, the
alarm message is spoken. You may also send the activity log to the chat window of a
Skype client.
Use of Skype requires the Skype PC client be installed on the same system as PageR. You
just also have an account on the Skype Service. If you wish to call regular telephones, you
must have this feature enabled on your Skype account (may require payment of a fee).
Enable Alarm Notification via Skype
Check to enable use of Skype for Alarm Notifications.
Greeting
Enter text to be spoken at the start of a voice alarm notification. This introduces the alarm
message.
Sign Off
241
Help.rtf
PageR Enterprise
Page 242 of 270
Enter text to be spoken at the end of the alarm notification. This signifys the end of the
message.
Skype Path
Enter the full disk path to the Skype.exe executable program.
Default Target
This is the default target or recipient of alarm notifications. This can be a Skype user name
(target), a name in the local Skype client's contact list or a telephone number (starting with a +
sign).
Message Repeat
Enter number of times to send the notification.
Voice KB/sec
Adjust the number of Kbytes of wav file size representing one second of speech. This value
is used to compute how long to wait for Skype to deliver the message once it is converted to a
wav file and given to Skype for delivery. Skype does not tell us when it has completed
speaking the message, so we have to wait an appropriate amount of time.
Message Timeout
Maximum time in seconds to allowed for a complete alarm notification message.
Connect Timeout
Maximum time to wait for a connection to the target client or phone line to be established.
Notes on using Skype
In order to send alarm notifications via Skype, you must configure Alarm or Contact objects to
make use of Skype. On a Contact, enter the word skype in the Pager Script field. Enter the
Skype target (name or +number) in the Pager Service # field. On an Alarm object , you
enter the word skype in the Pager Script field to send alarms to the default Skype target.
If running PageR on the desktop, the Skype client may also be running, but it cannot be used
to make calls as that will prevent PageR from making calls. If the Skype client is not running
when PageR wishes to make a call, PageR will launch the client.
If running PageR as a service, you must NOT run the Skype client on the desktop. PageR
will manage the Skype client itself in a manner compatible with service mode operation.
Please note that the login of the Skype client to the Skype service can take a long time.
If Skype is enabled, you can log activity to the default Skype target via Skype chat. On the
Messaging Tab of the Options Window, you can select logging and alarm notifications to be
sent via Skype chat.
242
Help.rtf
PageR Enterprise
Page 243 of 270
Database Options Tab
This tab configures Database Archiving and Reporting.
The Database Archiving and Reporting function is an additional charge feature that can be
added to PageR. This function allows PageR to record information about Monitored Objects,
scans, alarms, notifications and network events to an MSSQL (2000 or later) database. This
information becomes a persistent archive of data about the events detected by PageR. The
database can aggregate information collected by multiple instances of PageR. It also
aggregates events collected by PageR from multiple systems. This data can be analyzed and
reported by any MSSQL compatible tool.
The Database Archiving and Reporting function comes with a set of reports and a report
viewer based on the popular Crystal Reports database reporting tool. You do not have to
purchase Crystal to use the included reports. You can modify the included reports, create new
reports based on them or use any MSSQL compatible reporting tool to create reports from the
data recorded by PageR.
Please see the intallation notes below before trying to use the Database function.
Enable Database Archiving
Check to enable Database Archiving. Do not enable archiving until you have installed the
database per the instructions below.
243
Help.rtf
PageR Enterprise
Page 244 of 270
DSN
Select the Data Source Name from the list of DSNs available on your system. This DSN will
be used to connect to the MSSQL Instance that contains the PageR database. See below for
more information.
User Name
Enter the database user name associated with the PageR database. This defaults to PageR.
Password
Enter the password associated with the database user name entered above. This defaults to
PageR5.
Notes on the Database function.
PageR uses a DSN (Data Source Name) to locate it's database on some MSSQL Instance.
You can use an existing DSN or create a new DSN with the Data Sources control panel
applet. A DSN describes a database connection as a system name and Instance name. The
DSN selected must point to the system and Instance of MSSQL where the PageR database is
installed.
In order for a Monitored Object to be included in database archiving, you just select
that MO type on the Logging Tab of the Options Window. You do not have to enable disk
file logging, just select the MOs you wish recorded in the database.
To install the PageR database, you must run the MSSQL Query Analyzer (logged on as the
DBA) and attach to the MSSQL instance where you wish the PageR database to reside. In
the Query Analyzer, execute the file CreateDB.sql found in the PageR install directory. This
script will create the database. The script will also add a login, PageR (password=PageR), to
the database and set that login to be the db_owner of the database. This user will be set to
use SQL Authentication. Integrated Authentication cannot be used with the archive
database.
Note that the first time you save the PageR configuration after enabling database archiving,
PageR will record all monitored objects in the configuration to the database. This may take
some time to complete. After the first time, PageR only updates the database for changed
MOs when the configuration is saved.
During scaning, PageR is updating the database in the background for events, alarms and
notifications. When scanning is stopped or when PageR is shutdown, summary information
for MOs is recorded in the database. This may take some time and delay the scan stop or
completion of shutdown.
For more information, see the topic Database Archiving and Reporting.
244
Help.rtf
PageR Enterprise
Page 245 of 270
Database Archiving and Reporting
PageR supports archiving of monitoring information to a Microsoft SQL database (2000 or
later). This provides for long term retention, aggregation, analysis and reporting of that
information. Monitored object attributes, scans, alarms, notifications and network events are
recorded.
Information in the database can be processed by any MSSQL compatible reporting tool.
Included with PageR is a set of history and analysis reports written in the Crystal Reports
query/reporting tool. A custom Report Viewer application is included to factilitate the use of
these reports. These reports can be modified by the user or new Crystal reports can be
written and used with the Report Viewer. You can also create Crystal reports that run outside
the Report Viewer. Use of the included Crystal based reports require the Crystal Reports 10
runtime to be installed on the computer that runs the Report Viewer. The Report Viewer also
requires the .Net Framework 2.0 to be installed. You can run the Report Viewer on any
system you wish, not just the PageR host system.
The .Net Framework 2.0 is available for download from the Microsoft web site at (watch the
wrap):
http://www.microsoft.com/downloads/details.aspx?familyid=0856EACB-43624B0D-8EDD- AAB15C5E04F5&displaylang=en
The Crystal Reports 10 runtime is available for download at your PageR distributor's web site.
The included reports and the Report Viewer application are located in the Reports directory
below the install directory.
The Database Archiving and Reporting feature is licensed separately from PageR. The
feature is available for evaluation when PageR is in demonstration mode.
More information on archiving and reporting is available in the following topics:
Installing and Configuring the Database
Logging to the Database
Using the Reports
245
Help.rtf
PageR Enterprise
Page 246 of 270
Installing and Configuring the Database
Before you can use the Archiving and Reporting feature, the Archive database must be
installed. This database is called PageR and is located in a new or existing MSSQL Instance.
If you already have MSSQL at your site you can install the PageR database into an existing or
new Instance. If you do not have MSSQL installed, you can download and install the free SQL
2005 Express Edition from Microsoft. If you install SQL 2005 Express Edition, it is
reccomended that you also download and install the SQL Server Management Studio
Express administration tool.
Once you have an MSSQL Instance available, you can use the CreateDB.sql script located
in the Reports directory to create the database. Click on the CreateDB.sql file. This should
launch the SQL administration tool installed on your system with the script in a query window.
Logon to the DB Admin user. If clicking the script does not start an SQL administration tool,
you will need to manually start the SQL administration tool that you normally use and logon as
the DB Admin user. Open a Query window. Load the script file into the query window. After
loading the script with either method, execute it.
This script will create the database. The script will also add a login, PageR, with password
PageR5, with access to the database and set that login to be the db_owner of the database.
This user will use SQL Authentication. Integrated Authentication cannot be used with the
archive database. While the user name and password default to PageR and PageR5 for
simplicity, you can change either to your own values.
Once the script has completed, use your SQL Administration tool to verify that the database
exists and the login exists and that the login has been assigned access to the database and
has the db_owner role enabled.
Note that the MSSQL Instance does not have to be located on the same system as PageR is
installed.
If you are installing SQL 2005 Express Edition for the first time, you must enable the TCP/IP
protocol for communication with SQL Express. On the SQL 2005 Express Edition Start Menu,
there is an item called SQL Server Configuration Manager. Exexute it and Open the SQL
Server 2005 Network Configuration item, then Protocols for <yourinstancename>. You should
see the various protocols listed. Enable TCP/IP. Then open the SQL Server 2005 Services
item and restart the SQL Server service .
Once the database is installed, on the system where PageR is installed, you must create a
Data Source Name (DSN). In the Control Panel, open the ODBC Data Sources applet.
Create a new System DSN that points to the system and SQL Instance where you installed
the database. The name of the DSN can be anything, but PageR is a good choice. If you
already have a DSN that points to that Instance, you do not need to create new one. Make
sure you can connect to the database with the connection tester using SQL authentication
and the user name and password as described above.
Now execute PageR and go to the More Options window. Select the Database tab. Enable
the use of the database and select the DSN from the drop down list. Enter user name and
password.
Finally, go the the Options Window and select the Logging tab. Check the Monitored Object
types you wish to have recorded in the database. You do not have to enable disk file logging,
just select the MOs to be included in database logging.
246
Help.rtf
PageR Enterprise
Page 247 of 270
Now, save the PageR configuration. Note that the first time you save the configuration after
enabling the database, there will be a significant delay while PageR writes all your Monitored
Objects to the database. After this initial update, only changed MOs will be updated on future
configuration saves.
Logging to the Database
When database archiving is enabled, PageR will record basic information about new or
changed Monitored Objects in the MonitoredObjects table. It will record the start and stop
time of every scanning session and the time of any configuration change in the ScanLog
table. Every alarm generated by a Monitored Object is recorded in the AlarmLog table as
well as any notifications (paging,email, etc) that are performed in response to alarms or
processing errors (NotificationLog table). Finally, network events processed by PageR MOs
(Eventlog, Snmp trap, Syslog , WMI events) are recorded in the EventLog table.
Records in each table are associated with the host system on which PageR is installed. In this
way, one database can record information from multiple installations of PageR.
Database logging can add time to scanning start up. While scanning is proceeding,
information is being logged to the database in the background, but will add overhead and may
slow PageR somewhat. When PageR is shutdown, summary downtime statistics collected by
PageR are flushed to the database and so slows down the shutdown process.
Using the Reports
Sample reports are included that were created with the Crystal Reports 10 database reporting
tool. These sample reports can be run directly, but the parameter prompting to customize the
reports is inflexible and difficult to use. For this reason, a custom Report Viewer was created.
When you select a report using this viewer, it handles the parameter prompting in concert with
the standard structure of the reports and facilitates the use of the reports. Reports are viewed
on-line but can be printed.
ReportViewer can be run on the PageR host system or from any other system you wish. For
other systems, you must be able to map a drive to the Reports sub directory of the PageR
install directory or you can just copy the reports directory to the system that will be running the
ReportViewer. The system which will execute the ReportViewer must have the .Net
Framework 2.0 and the Crystal Reports 10 runtime installed.
If you wish to modify the reports, copy them and then modify the copies. You must have a
Crystal Reports design environment or Visual Studio 2005 to modify the reports.
You can create your own reports in any reporting tool you wish, but the ReportViewer
247
Help.rtf
Page 248 of 270
PageR Enterprise
application can only be used with Crystal Reports and then only reports that have been
designed with the conventions of the included standard reports.
If you have ideas for modifications to the included reports or for new reports, but are not able
to create them youself, contact your distributor for assistance.
When you run the ReportViewer application you will need to select a report by using the
recent reports list under the File menu or by clicking the Select Report button. If you have not
previously connected to the database, you will be prompted for the SQL Instance and login
information need to access the database. This will be retained but can be changed under the
File menu.
You will then be prompted for any parameters needed by the report. If you have PageR
installed on more than one host system and reporting to the database, you will be prompted
for the name of the Monitoring System. If wish to report all systems you have, click Skip. If
you wish to select a specific system, enter it's name in the field and click Accept.
ReportViewer will remember your answers to each parameter prompt from the last time you
ran a report and pre-fill the fields with those values. You must still click Accept to keep the
value. Clicking Skip says you do not wish to supply a value.
On log type reports, you will be prompted for a date range. You can select from the predefined time periods in the drop-down list or click Skip to enter a custom date range.
Each report has a default sort defined, but you may be allowed to select different sort fields
from a drop-down list.
Some reports allow for selection of records to focus the report on items of interest. If asked,
you can choose a select field from the drop-down list and a comparision operator from the
second list. Then enter the value to be used in the record comparision to select records
included on the report.
If you select the LIKE comparison operator, the selection value is a pattern matching
expression as described below.
Pattern matching for string comparisons. The pattern-matching features allow you to match
each character in a string against a specific character, a wildcard character, a character list,
or a character range. The following table shows the characters allowed in pattern and what
they match.
Characters in pattern
Matches in string
?
Any single character
*
Zero or more characters
#
Any single digit (0–9)
248
Help.rtf
PageR Enterprise
[charlist]
Any single character in charlist
[!charlist]
Any single character not in charlist
Page 249 of 270
Character Lists
A group of one or more characters (charlist) enclosed in brackets ([ ]) can be used to match
any single character in string and can include almost any character code, including digits.
An exclamation point (!) at the beginning of charlist means that a match is made if any
character except the characters in charlist is found in string. When used outside brackets,
the exclamation point matches itself.
To match the special characters left bracket ([), question mark (?), number sign (#), and
asterisk (*), enclose them in brackets. The right bracket (]) cannot be used within a group to
match itself, but it can be used outside a group as an individual character.
The character sequence [] is considered a zero-length string (""). However, it cannot be part
of a character list enclosed in brackets. If you want to check whether a position in string
contains one of a group of characters or no character at all, you can use Like twice.
By using a hyphen (–) to separate the lower and upper bounds of the range, charlist can
specify a range of characters. For example, [A–Z] results in a match if the corresponding
character position in string contains any character within the range A–Z, and [!H–L] results in
a match if the corresponding character position contains any character outside the range H–
L.
When you specify a range of characters, they must appear in ascending sort order, that is,
from lowest to highest. Thus, [A–Z] is a valid pattern, but [Z–A] is not.
Multiple Character Ranges
To specify multiple ranges for the same character position, put them within the same
brackets without delimiters. For example, [A–CX–Z] results in a match if the corresponding
character position in string contains any character within either the range A–C or the range
X–Z.
Usage of the Hyphen
A hyphen (–) can appear either at the beginning (after an exclamation point, if any) or at the
end of charlist to match itself. In any other location, the hyphen identifies a range of
characters delimited by the characters on either side of the hyphen.
249
Help.rtf
PageR Enterprise
Page 250 of 270
Glossary
.MSG
File extension for Paging Files. See Paging File .
.str
A Search String file. The .str extension is only used as a convention. Any text file can be
used as a Search String file. Search String files contain words or phrases, one to a line,
that can be applied to event log or disk log file records to determine if an alarm
condition is present.
activity log
A long term recording of the activity log messages that appear in the Main window log
box. This log is written to the .LOG disk file.
alarm
An alarm is the occurence of a condition or event on an object on the network that is
monitored for and if detected, notification (s) are generated.
Alarm ID
A unique number assigned to every alarm event. Typically used for numeric paging.
Alarm Object
An Alarm Object contains information about alarm notification . Each Monitored Object
is linked to an Alarm Object. Alarm Objects contain the information needed to page,
broadcast or e-mail an alarm notification generated by an Alarm on a Monitored Object.
Alarm Text
Alarm Text is the message text that is issued when an alarm event occurs on a
Monitored Object . This text is written to the log screen and log file to record the alarm
and the text is what is mailed for e-mail notification and what is sent to another system
for broadcast notification. The alarm text can also be sent to an alphanumeric pager. An
example of alarm text is the message "161.208.12.5 not responding" being issued when a
ping object fails to reply to a ping. The Alarm Text for each Monitored Object can be
customized.
250
Help.rtf
PageR Enterprise
Page 251 of 270
Alert Script
Alert Script is the scripting language used to control a Message Server or modem. The
language allows you to program the behavior of the Message Server or modem to
perform paging with any type of paging service .
Contact Object
A Contact Object defines a person to be notified of an alarm . It contains the notification
methods to be used when notifying a person of an alarm. Contacts are associated with
Alarm Objects. Contacts can be grouped, with a single Contact belonging to up to two
groups.
Delay
This a a period of time that is waited after an alarm condition is detected before the
alarm is generated and notification performed. It allows objects with transient alarm
conditions to be monitored without generating false or superfulous alarms.
Disk Log
This is a simple disk file used by an application to log events of interest to the user of the
application. You monitor such files for new records and examine the records to determine
if alarm conditions exist.
event log
This is a special file used on Windows systems to record system events. The event log is
kept in three main parts, System events, Application events and Security events. Other
logs may exist for specific applications.
event type
Windows Event logs categorize events into three types: Informational, Warning and
Error. An event may be further categorized by the application that creates it.
hosts
A disk file that contains name to IP address mappings. Allows more easily remembered
names to be assigned to TCP/IP hosts and clients and used in place of the IP address.
The IP address for a name is resolved by searching the hosts file.
Impersonate
When a program needs access to resources not available to the user who ran the
program, the program can impersonate a known user and employ that user's credentials
251
Help.rtf
PageR Enterprise
Page 252 of 270
to access the resource. The issue is maily with Service mode programs. These
programs may not run as a logged on user and have limited access. Impersonating a
known user allows the service wider access. In order to impersonate, the program must
know a vaild user name and password that provides the desired level of access.
Interval
Amount of sleep time between scans of the monitored objects. At the monitored object
level, it is the amount of time between scans of that object.
MAPI
MAPI is a mail protocol used by Microsoft Messaging.
Message Server
A hardware product that attaches to the NT system and supports intelligent Alphanumeric
paging, system down detection and environmental monitoring.
notification
An action taken when an alarm condition is detected. May be simple logging, an e-mail
message or a page via Message Server or modem.
object
In general, an 'object' is something on the network that can be probed to determine it's
status. Objects include NT Event Logs, TCP/IP clients (ping), NT systems (server or
workstation), disk log files and more. Alarm notification definitions and Contact
definitions are also referred to as objects. Some objects, like the Ftp File get or Syslog
objects, perform an action or act as a server instead of representing an object that is
probed.
Paging File
A Paging file is a simple text file containing Alert Script for the Message Server or
Modem. Alert Script controls the Message Server or Alphanumeric Paging in software to
perform pages. A paging file can also contain modem commands for simple modem
paging. Pages are executed by copying paging files to the attached Message Server or
Modem. Paging files have the extension .MSG by convention.
Performance Counter
A Windows operating system measurement value associated with an "object" in the OS,
252
Help.rtf
PageR Enterprise
Page 253 of 270
such as logical disk, physical disk or memory. Windows records performance an
operational statistics in these counters that describe the operation of Windows. These
counters can be retrieved and tested to determine the status of a Windows system.
ping
A low-level TCP/IP echo function used to determine if a TCP/IP host is available.
Quiet time
A period of time when paging is suppressed. Quiet time can be defined by the half hour
for each of the seven weekdays.
Registry
The NT Registry is a system database where NT and application configuration
information is stored.
Scan
The action of checking each monitored object to determine if an alarm condition exists.
Schedule
A schedule is attached to a Monitored Object and controls when the object is scanned.
On each scan of Monitored Objects, MOs with schedules will check thier schedule and
determine if the MO should be scanned at that time. Schedules allow MOs to be scanned
at various times instead of on each scan of the Monitored Objects.
Service
A Windows Service is a process that runs "in the background", separate from the user's
desktop environment. Services can run when no user is logged on. Services are ideal for
activities that do not require user interaction and can perform their tasks unattended.
Services are controlled by the Service Manager, an applet on the Control Panel.
Severity
Severity is a value from 0-9 that indicates the importance or severity of an alarm
condition on a monitored object . 0 is most severe, 9 is least severe. This attribute allows
you to rank your monitored objects in terms of the impact an alarm has.
SMTP
SMTP or Simple Mail Transport Protocol is a TCP/IP based mail protocol.
253
Help.rtf
PageR Enterprise
Page 254 of 270
SNMP
Simple Network Management Protocol. A specification of a management information
database (MIB) that is implemented by a managed system and a protocol for mangement
applications to use to examine the database on target systems for management
purposes. Also includes facility for managed systems to send unsolicited alerts (Traps) to
management applications.
SPIN directory
This is a directory, typicall SPIN below the install directory, that is monitored for .MSG
files. If files are found in the directory, they will be sent to the Message Server or
Modem. Any application can copy or write .MSG files to the SPIN directory to have them
processed.
substitution keywords
Subsitution Keywords are tags that can appear in a text string or .MSG files and are
replaced with appropriate actual string values when the the text string or .MSG file is
processed. For instance, the keyword [DATE] is replaced by the current date when
expanded.
Syslog
Syslog is a logging facility used on Unix systems and other systems supporting Unix
compatibility. Syslog is used by applications and operating systems to log messages.
Syslog can forward messages to other systems for processing, including processing by
the Syslog Monitored Object .
Task
A Task Object is a monitored object that executes a script (VbScript or JScript), NT
command file or program when scanned. The task object can perform some task on a
recurring basis or can be used to create user defined monitored objects. Many attributes
and functions are exposed to scripts via the Script Global (SG) object visible in a script. A
task can also be executed by an Alarm object allowing the user to extend alarm
notification processing. Tasks have Schedules that further constrain when the task is
run, giving fine control over when and how often a task is executed.
tray icon
This is an icon in the Task Bar tray. When Main window is hidden or minimized, you can
place the cursor over this icon to view a simple status report. Right click the icon for more
detailed status information and options. Left click the icon to display the Main window.
WMI
254
Help.rtf
PageR Enterprise
Page 255 of 270
Windows Management Instrumentation. A specification of a management information
database (CIM) that is implemented by a managed system and a protocol for mangement
applications to use to examine the database on target systems for management
purposes. WMI is the Windows implementation of the Web Based Enterprise
Management (WBEM) standard.
(C) CPL Systems All Rights Reserved.
255
Help.rtf
PageR Enterprise
Page 256 of 270
Appendix – Quick Start Help Notes
1) PageR QUICK SETUP
At the main screen click OPTIONS to set up monitoring.
IN A NUTSHELL, WE ARE GOING TO DO THIS:
----- (1) SET UP AN NUMBER OF "MONITORED OBJECTS" (MOs, or MONITORS)
ie THINGS WE WATCH
----- (2) EACH MO IS LINKED TO AN ALARM OBJECT ('AO' or 'ALARM')
Each Alarm Object is a grid of contacts which can provide alert escalation.
It escalates a ROW at a time on each scan.
----- (3) EACH AO USES ONE OR MORE 'CONTACTS' (email, pager etc)
THEREFORE - WE HAVE TO SET UP "IN REVERSE ORDER", AS FOLLOWS:
1) CONTACTS - In OPTIONS, Click 'Contacts' tab and 'Add Contact'.
(a) EMAIL ALERTS
Go to the "Email" tab in OPTIONS to configure SMTP email (recommended) by entering the
mail host (mail server) ip address and any valid email 'Return Address', usually just your
own email address.
(b) SMS TEXT (DIALUP) ALERTS via modem
Enter contact Name. To alert via pager or SMS phone, click Browse to the right of the 'Pager
Script' box. Browse into \SAMPLES and select the service you want.
Enter the mobile cell phone number (or pager id) in the "Pager/Phone ID" box.
2) ALARMS - In OPTIONS, Click the 'Alarm Objects' tab
Click Add Alarm. Give the AO a name such as "SUPPORT". The grid is an escalation
schedule, everyone on each ROW gets alerted together. If the problem persists it escalates
down through the other rows. You can leave boxes and whole rows blank and it will only
alert on the boxes/cells filled in. 'Repeat Escalation Schedule' keeps it repeating until fixed.
3) MO's - Go to Monitored Objects TAB and click Add Object.
THE MONITORED OBJECT TYPES YOU SEE ALL HAVE A DIFFERENT PURPOSE AND
SOME ARE VERY POWERFUL (eg SNMP QUERY). DOUBLE-CLICK ONE THEN HIT THE
F1 KEY. THIS WILL DISPLAY THE HELP INFO FOR THAT MO. ITS IMPORTANT YOU
UNDERSTAND (AT LEAST SUPERFICIALLY) WHAT ALL THESE MO TYPES DO. THEY
ARE YOUR "MONITORING TOOLKIT". SCROLL DOWN TO SEE THEM ALL.
THE LICENCE COST IS BASED ON HOW MANY OF THESE YOU WISH TO BE ABLE TO
SET UP AND USE. HINT - SETUP A PING MO ON 1.1.1.1 TO TEST ALERTING.
Monitoring Room Alert and TemPageR devices
To setup monitoring on a ROOM ALERT or TemPageR device go to OPTIONS/ADD
OBJECT then choose SNMP QUERY. Hit F1 for help. To the right of the System Name is a
search button with 3 dots. Click that to find the devices you want to monitor.
256
Help.rtf
PageR Enterprise
Page 257 of 270
4) How To Set up a HEARTBEAT MO.
This is a useful daily reminder that we are still monitoring and the alerting is working.
Double-click the MO to set it up. Click SCHEDULE and then click "Once Per Day", then
"OK". Insert the Alarm Object you just set up. Then "Accept", then click Settings/Save, then
START on the top left of the main screen. This will test the alerting you have set up.
5) USING THE WEB BROWSER INTERFACE
To test web browser interface Run Internet Explorer 6 (or greater) on the same box as the
PageR install.
Enter 'http://localhost:1088' for the URL address. This should bring up the PageR WEB
PAGE MANAGEMENT INTERFACE. To view this page from any other PC use the install
system's ip address or 'server name' as the http:// URL address, eg
http://monitoring_server:1088
NOTE: check the port number in OPTIONS/More Globals. We default to 1088 as it is
registered as ours, which means you would use the URL address followed by :1088 to
browse events.
The STATUS button on main screen shows outstanding alarms and the 'pager queue', ie
alerts waiting to be sent.
2) SMS TEXT Alerts Setup
SMS TEXT is controlled by a dialup script (*.msg). The script used depends on which
service provider you are using, eg VERIZON. Its all set up in OPTIONS/CONTACTS/ADD
CONTACT. Hit F1 to see online help at that point.
If you BROWSE in samples you should see dedicated scripts for various services. If you
don't see what you want there you can choose the generic script TAP.msg and then select a
phone number from PAGING SERVICE PHONE NUMBER (the dedicated scripts have the
right phone number embedded).
See how far you get and then come back to me again.
From CONTACT Online Help
========================
Pager Script
To text the Contact with SMS alphanumeric paging, enter/select the appropriate paging
script file (.MSG) name from \SAMPLES. The correct phone number is embedded in these
scripts.
Pager ID
This is the PAGER ID or CELL PHONE NUMBER. It is substituted for the [PAGERID]
substitution parameter in the paging script.
Paging Service Phone Number
257
Help.rtf
PageR Enterprise
Page 258 of 270
This is the phone number of the PAGING SERVICE to use for alphanumeric paging. It is
substituted for the [PHONE] substitution parameter in the paging script. You may type a
number in the box or select a number from the drop down list of common paging services
(SEE BELOW). For example, if the device you are texting uses VERIZON network then use
the VERIZON.MSG script.
US Paging Service Phone Numbers available in PageR
USA AIRTOUCH,1-800-5594898,1200 EVEN 7 1
AMERITECH USA,1-800-7343503,9600 EVEN 7 1
USA ARCH,1-800-8448089,9600 NONE 8 1
FIRSTPAGE_NJ USA,1-800-9267272,9600 EVEN 7 1
GTE USA,1-866-823-0501,1200,EVEN 7 1
MAPCOMM USA,1-800-456-2190,9600 EVEN 7 1
MCI USA,1-970-221-2825,2400 EVEN 7 1
METRO USA,1-800-6225742,2400 EVEN 7 1
METROCALL USA,1-800-795-3689,9600 EVEN 7 1
METROMEDIA USA,1-800-655-6555,9600 EVEN 7 1
MOBILECOMM USA,1-800-844-8089,1200 EVEN 7 1
NEXTEL USA,1-510-385-6683,1200 EVEN 7 1
PACTEL USA,1-800-5647079,9600 EVEN 7 1
PAGENET USA,1-800-720-8398,1200 EVEN 7 1
PAGE_NEW_ENGLAND USA,1-800-543-6532,9600 EVEN 7 1
PAGEMART USA,1-800-864-9499,2400 EVEN 7 1
SKYTEL USA,1-800-759-6366,2400 EVEN 7 1
SUREPAGE USA,1-888-589-8600,1200 EVEN 7 1
USA MOBILE USA,1-800-666-6315,9600 EVEN 7 1
VOICESTREAM USA,1-800-937-8941,2400 NONE 8 1
WESTLINK USA,1-801-483-1081,9600 EVEN 7 1
VERIZON CELL,1-866-823-0501,1200,EVEN 7 1
VERIZON PAGER,1-510-293-0150,1200,EVEN 7 1
NOTES:
1) the above are MODEM numbers which use TAP protocol. If you dial it with a normal
phone youshould hear the characteristic whistle of the modem. If theline is dead the service
has probably been discontinued.
2) the recommended baud rates will probably all work on 9600
3) many of the service numbers will work with other providers devices so if your phone is not
listed its worth trying any of the other service providers above.
See http://www.pager-enterprise.com/TAP_dialup_numbers.pdf for a more comprehensive
list, but we cannot guarantee that service providers continue the service. Dial the number
with a normal phone initially
to check if its still live.
TESTING
To test a new service, go to OPTIONS/PAGING TAB
Select a service in PageR Service #
Enter the cell phone or pager device number in Pager/Phone ID
258
Help.rtf
PageR Enterprise
Page 259 of 270
Click ACCEPT
Click PAGING TAB again.
Click PAGING DEVICE TEST
Click SEND.
Testing your modem and phone line
Use HyperTerminal to dial out to the remote TAP number. When you hit return the remote
end should reply ID=
3) Trace Files
A trace file is an internal debug file which logs everything
the software does. Email the zipped trace file with a description
of the problem in the email (one email per problem please).
To create a PageR Enterprise trace file, please do the following:
(A) IF RUNNING ON DESKTOP (for running as a SERVICE, see (B) below)
(1) Run 'PageR With Trace' from the Start Menu
(2) Reproduce the problem
NOTE: IF POSSIBLE ALLOW PageR TIME TO COMPLETE 2 FULL
SCANS (MINIMUM) OF ALL THE MONITORED OBJECTS.
ALSO NOTE: DO NOT GO INTO 'OPTIONS' WHILE SCANNING.
(3) STOP and Shut down PageR
(4) ZIP and Email the file PageR.tra
to
[email protected]
HINT - if PageR is not in your START menu it may have been installed under
a different user. You can create a shortcut to PageR.exe and add the word
'trace' in the Target line of Properties, like this: "C:\Program Files\PageR
Enterprise\PageR.exe" trace but don't run with trace all the time as it may
create a massive file.
259
Help.rtf
PageR Enterprise
Page 260 of 270
(B) IF RUNNING PageR AS A SERVICE
1) Shut down the PageR service
2) add the word "trace" to the "Startup Parameters" box in the
PageR Service applet under
Control Panel/Administrative Tools/Services
3) Re-start the PageR service and reproduce the problem. Give
PageR time to finish its current scan and alerting before stopping.
4) Stop the PageR service and ZIP/email me the PageR.tra
file (in the install folder).
TO BREAK UP LARGE TRACE FILES
We cannot analyse huge trace files, therefore
to solve intermittent problems which require big traces
create the following new STRING Values in the registry under
HKEY_LOCAL_MACHINE/SOFTWARE/PageR/Globals
String Values:
TraceOverflow = 2
TraceAutoExtension = 1
This will create overflow files with date and time extensions
rather than one huge file. Normally we only need the 1st file
of the series and the one which contains the problem.
The files will be of this form,
PageR.tra.20021120153012
OTHER DEBUGGING INFORMATION
============================
If Dr Watson was involved, please put a .BMP screen dump
of the message and the Dr Watson log file in the Trace zip.
If an NT Event log was causing the problem, it can be saved
from the Event Log Viewer and included in the Trace zip.
If its an install problem send INSTALL.LOG from the install
folder which should be Program Files/PageR Enterprise
260
Help.rtf
PageR Enterprise
Page 261 of 270
4) Backup and Restore Config
Go to Settings/Export to save settings to a disc file (default=PageR.cfg).
To restore, create a shortcut to pager.exe on your desktop.
Then go to the shortcut Properties and edit the shortcut Target
(the run command). Add the following text after the last quotes:
config=PageR import
NOTE: the file name MUST be identical to the Registry Key name and
is case sensitive (default is "PageR") WITHOUT the .cfg extension.
This will restore everything including the Monitored Objects.
FINALLY, Click SETTINGS/Save Configuration to Registry.
We always save the settings to
backup.cfg
whenever we save settings to the registry, for emergency restore purposes.
To restore this file just rename it to PageR.cfg and do the above.
If nec use 52637 or 10205 as a temporary key while you request a new
license key.
5) Setting up PageR Enterprise for VOICE alerts
With PageR Enterprise 5.3.0 alarm notifications can be sent to a regular telephone using a
voice capable modem and the TAPI protocol. The modem is controlled directly from PageR
Enterprise (no script) and is used to make a voice connection to the target telephone (cell
phone or landline).
Once connected, the alarm notification is spoken to the person who answered the telephone.
After that they can issue various commands via their telephone keypad (see bottom of this
application note, appendix 1).
In order to send alarm notifications via TAPI, you must configure Alarm or Contact objects to
make use of TAPI. On a Contact, enter the word tapi in the Pager Script field. Enter the
telephone number in the Pager Service # field. On an Alarm object, you enter the word tapi in
the Pager Script field to send alarms to the default TAPI target.
REQUIREMENTS
261
Help.rtf
PageR Enterprise
Page 262 of 270
1) You must have the Microsoft .Net Framework 2.0 or later installed to use TAPI.
2) You must have a modem that supports TAPI and voice (wave/in and wave/out) calling.
These are normally low cost USB modems but they must specifically state the term VOICE
MODEM.
The TAPI calling Speech Format defaults internally to SAFT8kHz16BitMono. However, the
Voice, Rate, Volume and Speak Punctuation settings on the Speech Options Tab do apply
when generating the .wav file transmitted over the TAPI call.
The scheme by which PageR executes telephone calls is dependant on detection and proper
processing of tones on the phone line. Here is the sequence of events that occur during a
TAPI call session. This information is presented to aid you in diagnosing and working with
technical support to resolve call problems.
PageR commands Windows TAPI to dial the target phone number.
When TAPI (working with the modem) determines the line is connected, PageR starts
recording the sounds on the line.
PageR is trying to detect breaks in silence. When silence is broken by a sound on the line
PageR analyses the sound amplitude, frequency and duration to determine if the sound (tone)
is a busy signal, ring back signal, a keypad button push or a voice. A busy signal ends the
call.
Ring back tones come at a standard time interval. If no tone is detected for the length of time
set by the Answer Timeout field, PageR assumes the call is answered and begins the
message speaking process. For example, 7-8 seconds works for phone systems in the USA
because the US uses a 6 second ring back period.
If a sound is detected (silence ends) and the time since the last tone detection is shorter than
the ring back tone standard time, PageR assumes the call has been answered and a person
or a voice mail system is speaking on the line. The message speaking process begins.
PageR is also monitoring the line for any key press tone from the telephone key pad. So if a
person answers the call but does not speak or speaking does not trigger message delivery,
pressing any key on the pad will cause PageR to treat the call as answered and start the
message speaking process.
In the case where a voice or timeout causes PageR to treat the call as answered, PageR
cannot determine if the call was answered by a person or a voice mail system. So the Voice
Mail Delay field determines how speaking starts. You can either enter a time delay in seconds
to allow for a Voice Mail greeting to finish before PageR speaks (which is frustrating for a
person) or you can enter the # or * character. PageR will transmit these characters on the line
which will cause some voice mail systems to end their greeting and start recording
immediately. This eliminates the need for a delay. If a person answers they will hear this tone
and then speaking begins. Using # or * is the best way to handle voice mail if your system
supports these characters. Otherwise you must determine the length of time to wait for voice
mail greeting if you wish PageR messages to go to voice mail.
Once the # or * is transmitted or the Voice Mail Delay has elapsed, PageR will play the Alarm
Greeting text, then the alarm message text and then the Sign Off text on the line and
disconnect.
TAPI Setup in PageR Enterprise
Click OPTIONS/MORE OPTIONS/TAPI setup tab. The following describes each of the setup
262
Help.rtf
PageR Enterprise
Page 263 of 270
choices.
Enable Alarm via TAPI
Check to enable use of TAPI for Alarm Notifications.
Greeting
Enter text to be spoken at the start of a voice alarm notification. This introduces the alarm
message.
Sign Off
Enter text to be spoken at the end of the alarm notification. This signifies the end of the
message.
Default number
This is the default telephone number to call.
Message Repeat
Enter number of times to speak the notification.
Maximum Rings
The number of rings of the target telephone to wait for before abandoning the connection
attempt.
Answer Timeout
Maximum time to wait for between ring tones before connection to the target phone line is
assumed.
Enable Voice Detection
Detection of a call being answered is either by detecting sounds on the line that are not ring
tones and have a duration that is different than ring tones. In some cases, this detection is not
reliable and must be turned off. If voice detection is disabled, the Answer Timeout is used to
determine when ring tones have stopped, which is assumed to mean the call was answered.
Tone Threshold
This value is used by the ring/busy detection software to separate those tones from
background noise on the connection. If you can't connect to your phone, this value may need
to be changed. Contact technical support for assistance with this setting.
Silence Threshold
This value is used by the call answer detection by voice to separate silent periods (no Tone)
from background noise on the connection to detect tones or voice (end of silence). If you can't
connect to your phone, this value may need to be changed. Contact technical support for
263
Help.rtf
PageR Enterprise
Page 264 of 270
assistance with this setting.
Voice Mail Delay
After the call is answered, this is time to wait in seconds before speaking starts. Used to wait
for voice mail greeting in case the call is answered by voice mail. You may also enter the # or
* characters, which if present, will be sent to the listener on the call to trigger voice mail
systems to end the greeting and start recording.
Detection Error %
This is the allowable error when matching tones on the telephone line to determine if the tone
is a ring back, busy or someone speaking. The default is 10, for 10% error is allowed. When
tone detection is failing, increasing the error margin may correct the problem.
Modem Device
Select the modem to use to dial the call. Must support TAPI and voice.
Country
This is the country in which you are calling. Controls ring/busy detection.
TAPI Test Button
Click to request an immediate test of the TAPI configuration. The test message you enter will
be sent by voice to the Default Number. Note that you can change the Default Number and
click Test to test the number but if you change any other parameter, you must click Ok on the
More Options screen to save your changes and then redisplay More Options to perform the
test.
Telephone commands
After the call is answered and speaking begins, you can press keys on the numeric keypad of
your phone to send PageR commands:
1 = Add 1 to the message repeat count (must be pressed before the alarm message
ends).
2 = Clear the alarm on the Monitored object that generated the call.
3 = Clear the alarm on the Monitored object that generated the call and suspend
monitoring of the MO.
4 = Disable the Alarm object that generated the call.
5 = Disable all TAPI alarm notifications.
9 = Stop Scanning.
6) PAGER ENTERPRISE SQL DATABASE AND REPORTING MODULE
The Database Archiving and Reporting feature is licensed separately from
264
Help.rtf
PageR Enterprise
Page 265 of 270
Pager Enterprise. The feature is available for evaluation when Pager
Enterprise is in demonstration mode.We recommend testing it on a separate
PC to your production copy of Pager Enterprise.
Pager Enterprise 5.0.0 supports archiving of monitoring information to a
Microsoft SQL database (2000 or later). This provides for long term retention,
aggregation, analysis and reporting of that information. Monitored object
attributes, scans, alarms, notifications and network events are recorded. You
can now have have a powerful set of tools for a wide variety of reporting,
graphing and data analysis in relation to the system monitoring and alerting
carried out by Pager Enterprise.
SOFTWARE REQUIREMENTS
1. Pager Enterprise release 5.0.0 or later
2. Microsoft SQL Server or SQL Express 2005
3. Crystal Reports or Crystal 10 Runtime or any SQL compatible report writer
4. Microsoft .Net Framework 2.0 (required by SQL Express 2005)
If you do not have SQL or Crystal already the folllowing free software can be
downloaded off the internet:
SQL Express 2005 – FREE LICENCE from Microsoft
SQL Server Management Studio Express db admin tool - FREE LICENCE
Crystal 10 Runtime – FREE LICENCE from CPL Systems
Microsoft .Net Framework 2.0 – FREE LICENCE
Information in the database can be processed by any MSSQL compatible
reporting tool. Included with Pager Enterprise is a set of history and analysis
reports written in the Crystal Reports query/reporting tool. A custom Report
Viewer application is included to factilitate the use of these reports. These
reports can be modified by the user or new Crystal reports can be written and
used with the Report Viewer.
You can also create Crystal reports that run outside the Report Viewer. Use of
the included Crystal based reports require the Crystal Reports 10 runtime to
be installed on the computer that runs the Report Viewer. The Report Viewer
also requires the .Net Framework 2.0 to be installed. You can run the Report
Viewer on any system you wish, not just the Pager Enterprise host system.
SUMMARY
To create reports you can use one or more of the methodologies below:
Pager Enterprise 5.0.0 or later PLUS at least one of the following
combinations of tools,
265
Help.rtf
PageR Enterprise
Page 266 of 270
1. Microsoft SQL Server + Crystal Reports
2. Microsoft SQL Server + Any ‘Crystal-like’ SQL compatible report writer
3. Microsoft SQL Server + Pager Enterprise SQL Report Writer + Crystal 10
Runtime
4. Microsoft SQL Express 2005 + Pager Enterprise SQL Report Writer +
Crystal 10 Runtime
The Pager Enterprise Report Writer (ReportViewer.exe) and some preconfigured reports are to be found in the \Reports folder of the Pager
Enterprise install.
Pre-configured reports include the following:
Alarm Log
Event Log
Monitored Object List by ID
Monitored Object List by TYPE
Monitored Object List by SEVERITY
Notification Log
Processing Errors
If you install SQL 2005 Express Edition, it is recommended that you also
download and install the SQL Server Management Studio Express
administration tool from Microsoft (just Google it to find the download site).
Installing the SQL Database
========================
Before you can use the Archiving and Reporting feature, the Archive database
must be installed. This database is called Pager Enterprise and is located in a
new or existing MSSQL Instance. If you already have MSSQL at your site you
can install the Pager Enterprise database into an existing or new Instance.
If you do not have MSSQL installed, you can download and install the free
SQL 2005 Express Edition from Microsoft. Once you have an MSSQL
Instance available, you can use the CreateDB.sql script located in the Pager
Enterprise Reports directory to create the database. Note that the MSSQL
Instance does not have to be located on the same system as Pager
Enterprise is installed.
Creating the Database
=================
In the \Reports folder of the Pager Enterprise install there is a script file called
266
Help.rtf
PageR Enterprise
Page 267 of 270
CreateDB.sql
Double-click it to create the database.
If that does not work, try using the SQL administration tool that you employ (
eg SQL Server Management Studio Express) and open a Query Analyzer
window. Load the script into the query window and execute it while logged
into the MSSQL Instance as the DB Admin.
Failure is likely to be a security problem, eg you are not logged on as
Administrator or you are not the owner of the db etc.
The script will also add a login=Pager Enterprise, with password=Pager
Enterprise to the database and set that login to be the db_owner of the
database. This user will be set to use SQL Authentication. (Note: Integrated
Authentication cannot be used with the archive database). While the user
name and password default to Pager Enterprise for simplicity, you can change
either to your own values.
Creating the DSN (Data Source Name)
=============================
Once the database is installed, on the system where Pager Enterprise is
installed, you must create a Data Source Name (DSN).
Go to START/Control Panel/Administrative Tools, open the Data Sources
(ODBC) applet. Click the System DSN tab and click ADD. Scroll down and
highlight SQL Server. Click Finish.
Then complete the boxes for Name (Pager Enterprise), Description (Pager
Enterprise Database) and Server which is your PC/server’s computername
followed by \SQLEXPRESS such as Gregs_PC\SQLEXPRESS for example.
In the subsequent screens, make sure the SQL Authentication is chosen and
not Windows NT authentication. In the login boxes User is Pager Enterprise
and Password is also Pager Enterprise.
If you already have a DSN that points to that Instance, you do not need to
create new one. At the end make sure you can succesfully connect to the
database with the connection tester.
Setting up Pager Enterprise
=====================
Now execute Pager Enterprise and go to the More Options window. Select the
267
Help.rtf
PageR Enterprise
Page 268 of 270
Database tab. Enable the use of the database and select the DSN from the
drop down list. Enter user name and password.
Finally, go the the Options Window and select the Logging tab. Check the
Monitored Object types you wish to have recorded in the database. You do
not have to enable disk file logging, just select the MOs to be included in
database logging.
Now, save the Pager Enterprise configuration by going to Settings/Save
Configuration to Registry. Note that the first time you save the configuration
after enabling the database, there will be a significant delay while Pager
Enterprise writes all your Monitored Objects to the database. After this initial
update, only changed MOs will be updated on future configuration saves.
Logging data to the Database
======================
When database archiving is enabled, Pager Enterprise will record basic
information about new or changed Monitored Objects in the MonitoredObjects
table. It will record the start and stop time of every scanning session and the
time of any configuration change in the ScanLog table. Every alarm generated
by a Monitored Object is recorded in the AlarmLog table as well as any
notifications (paging,email, etc) that are performed in response to alarms or
processing errors (NotificationLog table). Finally, network events processed
by Pager Enterprise MOs (Eventlog, Snmp trap, Syslog, WMI events) are
recorded in the EventLog table.
Records in each table are associated with the host system on which Pager
Enterprise is installed. In this way, one database can record information from
multiple installations of Pager Enterprise.
Database logging can add time to scanning start up. While scanning is
proceeding, information is being logged to the database in the background,
but will add overhead and may slow Pager Enterprise somewhat. When Pager
Enterprise is shutdown, summary downtime statistics collected by Pager
Enterprise are flushed to the database and so slows down the shutdown
process.
Using the Reports
================
Sample reports are included that were created with the Crystal Reports 10
database reporting tool. These sample reports can be run directly, but the
parameter prompting to customize the reports is inflexible and difficult to use.
For this reason, a custom Report Viewer was created. When you select a
report using this viewer, it handles the parameter prompting in concert with
268
Help.rtf
PageR Enterprise
Page 269 of 270
the standard structure of the reports and facilitates the use of the reports.
Reports are viewed on-line but can be printed.
ReportViewer can be run on the Pager Enterprise host system or from any
other system you wish. For other systems, you must be able to map a drive to
the Reports directory of the hosting system or you can just copy the reports
directory to the system that will be running the ReportViewer. Note again the
the system which will execute the ReportViewer must have the .Net
Framework 2.0 and the Crystal Reports 10 runtime installed.
If you wish to modify the reports, copy them and then modify the copies. You
must have a Crystal Reports design environment or Visual Studio 2005 to
modify the reports.
You can create your own reports in any reporting tool you wish, but the
ReportViewer application can only be used with Crystal Reports and then only
reports that have been designed with the conventions of the included
standard reports.
When you run the ReportViewer application you will need to select a report by
using the recent reports list under the File menu or by clicking the Select
Report button. If you have not previously connected to the database, you will
be prompted for the SQL Instance and login information. This will be retained
but can be changed under the File menu.
You will then be prompted for any parameters needed by the report. All of the
included reports will ask for the name of the Monitoring System. If have only
one monitoring system or want to report all systems you have, click on Skip. If
you wish to select a specific system, enter it's name in the field and click
Accept.
ReportViewer will remember your answers to each parameter prompt from the
last time you ran a report and pre-fill the fields with those values. You must
still click Accept to keep the value. Clicking Skip says you do not wish to
supply a value.
On log type reports, you will be prompted for a date range. You can select
from the pre-defined time periods in the drop-down list or click Skip to enter a
custom date range.
Each report has a default sort defined, but you may be allowed to select
different sort fields from a drop-down list.
Some reports allow for selection of records to focus the report on items of
interest. If asked, you can choose a select field from the drop-down list and a
comparision operator from the second list. Then enter the value to be used in
269
Help.rtf
PageR Enterprise
Page 270 of 270
the record comparision to select records included on the report.
7) PageR LICENSE KEYS
Run START/Programs/PageR Enterprise/PageR Set License
to display the System Number at the top of the screen. We need this to generate a new
license key. Please email the System Number with your license details (in Help/About) to
support at pager-enterprise.com.
The new Product License Key which we will return to you is entered at the bottom of the Set
License screen. License Key Request.
PLEASE MAKE SURE THAT PageR IS NOT RUNNING AS A SERVICE
IN THE BACKGROUND WHEN YOU ENTER THE LICENSE KEY.
In an emergency a temporary license key may be used.
Temporary (30 day) license key = 52637
This allows unlimited Monitored Objects and all features enabled.
270