1
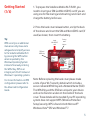
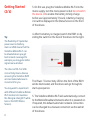
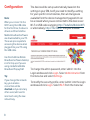
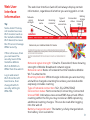
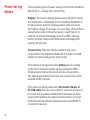
Quick Start Guide
Vodafone Mobile Wi-Fi
Vodafone R201
Welcome
to the world of Vodafone Mobile Broadband
1
Introduction
2
Device Overview
3
Getting Started
7
Connecting To The Vodafone
Mobile Wi-Fi Device
8
Configuration
9
Web User Interface Information
10 Power Saving Modes
11 Battery Charging
12 Advanced Configuration
2
Introduction
The Vodafone Mobile Wi-Fi R201 allows several Wi-Fi enabled
devices (for example PCs, mobile gaming devices, digital
music players) to share a secure mobile internet connection.
The device is battery, mains or USB powered, and this
flexibility allows the device to be positioned for best mobile
coverage and then share this coverage between several
devices via Wi-Fi. Note: you will get better Wi-Fi performance
when the device is being charged compared to when it is
running from the battery.
The Vodafone R201 is DLNA certified. This allows the device
to act as a Digital Media Server, streaming music, videos
and photos from a MicroSDHC™ card (not included) to other
DLNA-certified devices. It can also be configured as a shared
network drive to allow files to be shared among several Wi-Fi
devices.
System Requirements
To use the Vodafone Mobile Wi-Fi R201 you need a device
with Wi-Fi capability (supporting WiFi 802.11 b/g) and an
internet browser for further device configuration.
End User Licence Agreement (EULA)
Please ensure that you have read and accept the software
EULA for your country before using the Vodafone Mobile
Broadband software or device. The EULA is available at the
following location:
www.support.vodafone.com/VodafoneMobileWiFi/R201
1
Device
Overview
Tip:
The Mobile Broadband
Connectivity / Power LED
will be lit while the device is
booting up.
It will flash every 2 seconds
when the device is not
connected, and will flash every
10 seconds when the Vodafone
Mobile Wi-Fi is in power save
(sleep) mode.
When the R201 is switched
off, the LED will be off, but if it
is still being charged, a large
battery charging icon will be
displayed on the Device Status
Screen.
Tip:
The Wi-Fi Connectivity icon will
also show the number of users
connected to the device, for
example 3 users.
2
Micro
USB slot
Device Status
Screen
Back cover
release button
WPS / Display
button
Power / Mobile
Broadband
Connectivity LED
Power switch – slide
right to switch on
and left to switch off
Device Status Screen
Mobile Broadband operator
3G connectivity & SMS ‘message waiting’ (an SMS
could indicate you are roaming - see important
roaming indicator information on page 9)
Wi-Fi connectivity & WPS
information
Mobile Broadband signal
strength
Battery charge
Getting Started
(1/4)
1. To prepare the Vodafone Mobile Wi-Fi R201, you
need to insert your SIM (and MicroSDHC card if you are
using one for file sharing and streaming) and insert and
charge the battery before use.
2. Press the back cover release button, unclip the back
of the device and insert the SIM and MicroSDHC card (if
used) as shown, then insert the battery.
Tip:
WPS security is an additional
manual security measure to
safeguard and simplify access
to the Vodafone Mobile Wi-Fi
by pressing the WPS button
when requested by the
Windows Operating System
instead of manually entering
the WPA2 Key. WPS is an
integral part of both Vista and
Windows 7 operating systems.
For more information on WPS
configuration please refer to
the Advanced Configuration
Guide.
Insert
MicroSDHC
card
Factory
reset
button
SSID and
WPA2 Key
Insert
SIM
Note: Before replacing the back cover please make
a note of your Wi-Fi security details which include a
secure network WPA2 Key and a Network Name (SSID).
The WPA2 Key and the SSID are unique to your device
and can be found on a label on the inside of the back
cover. These details will be needed if your PC operating
system does not support WPS (Wireless Protected
Setup) security. WPS is found in both Microsoft®
Windows Vista™ SP2 and Windows® 7.
3
Getting Started
(2/4)
Tip:
The flexibility of 3 potential
power sources (battery,
mains or USB) means that the
Vodafone Mobile Wi-Fi can
be situated where you get
best network coverage (for
example, you may get a better
signal near a window).
The choice of Wi-Fi or USB
connectivity means devices
accessing the Vodafone R201
can be situated wherever is
convenient for you.
3. On first use, plug the Vodafone Mobile Wi-Fi into the
mains supply, turn the mains power on but do not switch
the device on to enable the battery to fully charge
before use (approximately 3 hours). A battery charging
icon will be displayed in the Status Screen on the front
of the device.
4. After the battery is charged, switch the R201 on by
sliding the switch on the face of the device to the right.
The Power / Connectivity LED on the front of the R201
will be illuminated, and the device will go through its
start-up sequence.
You may want to experiment
with different Vodafone Mobile
Wi-Fi locations to maximise
5. The Vodafone Mobile Wi-Fi will automatically connect
the 3G signal strength (5 white
to the Mobile Broadband network when it is powered on.
bars on the R201 Status
If required, this default automatic network connection
Screen).
can be changed to a manual connection via the web UI
of the device.
4
Getting Started
(3/4)
Note:
During charging the Status
Screen will cycle through the
charging icons.
Battery Charge:
Discharged (0%)
Charging (10%)
Charging (30%)
Charging (60%)
Charged (100%)
6. The Status Screen icons tell you about the state of
your device and if action is required.
Power: On (intermittent flash) / Off (unlit)
Mobile Broadband Operator: The name of the mobile
broadband network that the device is connected to is
displayed
3G Connectivity / SMS information: Shows the type of
network connection (3G+, 3G, GPRS/EDGE), and if there
is an unread SMS waiting it will alternate with a message
icon
Wi-Fi Connectivity / WPS information: Shows
the number of users connected by Wi- Fi
,
alternatively if a WPS action is required from the user
then the screen will look as follows :
WPS PIN required
Mobile Broadband Signal
Excellent signal
(connected)
WPS Push Button
validation required
VODAFONE
Excellent signal
(not connected)
Connection failed
or no service
Roaming
5
Getting Started
(4/4)
Tip:
For troubleshooting setup
problems, and for details
on how to configure the
Vodafone Mobile Wi-Fi device,
please refer to the Advanced
Configuration Guide, available
for download from:
www.support.vodafone.com/
VodafoneMobileWiFi/R201
7. Should your SIM card require a PIN code to be
entered (‘Input PIN’ displayed on Status Screen),
please open a web browser and you should be
redirected automatically a screen where you can
enter the PIN code.
If you are not automatically redirected, you can access
the Vodafone Mobile Wi-Fi configuration screen by
typing http://VodafoneMobile.WiFi or alternatively
http://192.168.0.1 into your web browser (only if you
are already associated / connected to the Vodafone
Mobile Wi-Fi via Wi-Fi or a USB cable).
8. The R201 Wi-Fi functionality is automatically
enabled upon power on, but you will need to create
a one-time association / connection between your
Wi-Fi enabled device (PC, Gaming device etc.) and
the Vodafone Mobile Wi-Fi. This association should
be used automatically in the future depending on the
setup of your device.
The association can usually be created by browsing
for available Wi-Fi networks on your device and using
the Vodafone Mobile Wi-Fi security details to set up an
automatic Wi-Fi connection.
6
Connecting To The
Vodafone Mobile
Wi-Fi Device
Note:
The WPS functionality on your
PC may change the SSID /
key when a WPS encrypted
connection is established.
Tip:
Remember that as soon as you
switch on the Vodafone Mobile
Wi-Fi it will automatically
connect to the Mobile
Broadband network.
If your PC is configured to
automatically connect to
the Vodafone Mobile Wi-Fi
when it is switched on, then
your PC may start generating
traffic through the device and
across the mobile network
(for instance if the PC has
automatic updates switched
on).
You will need either WPS functionality (built into
Windows 7 and Vista operating systems) or your WPA2
Key and SSID (on a label inside the back cover of the
Vodafone Mobile Wi-Fi – see diagram on page 3) for your
initial connection to the device. The WPA2 key is case
sensitive.
Use the normal Wi-Fi application on your computer
or device to connect. Select the network
VodafoneMobileWiFi-xxxxyy from the list of available
Wi-Fi networks and click Connect. The xxxxyy
represents a randomly generated set of numbers or
letters which will differ per device.
IMPORTANT
We recommend that you now review the default Wi-Fi
security settings to ensure they meet your personal
requirements. If required, configure the security
settings before using the device by accessing the
device management page which is detailed in the
Configuration section (next page).
You should change the WPA2 Key and administrator
password to something that you can easily remember to
protect your device.
7
Configuration
Note:
When you connect to the
R201 using the USB cable
for the first time, the device
drivers and the Vodafone
Mobile Broadband software
are downloaded to your PC.
These are pre-requisite to
accessing the device when
plugged into your PC using
the USB cable.
The device will be set up automatically based on the
settings in your SIM, but if you need to modify a setting
for your specific circumstances, then all changes are
available from the device management page which can
be accessed when you are connected to the device over
Wi-Fi or USB cable via typing http://VodafoneMobile.WiFi
or alternatively http://192.168.0.1 into your browser.
Use the Vodafone Mobile
Broadband software desktop
icon for top-ups if you are
using a Vodafone Mobile
To change the admin password, enter ‘admin’ into the
Broadband Prepay SIM.
Tip:
If you change the network
key, your wireless
connection will be
disabled and you (and any
other users) will need to
reconnect using the new
network key.
8
Login window and click Login. Select Administration from
the menu bar and select Settings.
To modify the security profile, enter ‘admin’ into the Login
window and click Login. Select Wi-Fi from the menu bar.
Web User
Interface
Information
Tip:
Some older PCs may
not be able to access
Wi-Fi routers (such as
the Vodafone Mobile
Wi-Fi device) because
the PC cannot manage
WPA2 security.
If this is the case, then
you can lower the
security level of the
Vodafone Mobile
Wi-Fi to WPA from
WPA2 from the web UI.
Log in and select
Wi-Fi from the left
hand menu, then
change the Wi-Fi
security setting to
WPA-PSK.
The web User Interface (web UI) will always display certain
information, regardless of whether you are logged in or not.
Network
signal
strength
Network
name
Roaming
indicator
Type of
network
connection
Battery
Connection
charge
status Unread
SMS
Network signal strength: 1 (low) to 5 (excellent) bars showing
strength of Mobile Broadband network signal
Network name: Name of network that the Vodafone Mobile
Wi-Fi is attached to
Roaming indicator: White triangle indicates you are roaming
and will be charged a roaming fee unless your data bundle
expressly includes roaming
Type of network connection: 3G+, 3G, GPRS/EDGE
Connection status: Not connected, Connecting, Connected
Unread SMS: Indicates a new unread SMS has arrived. When
roaming within the EU you may receive an SMS explaining
additional roaming charges. This can be read after logging
into the web UI
Battery charge indicator: The battery is fully charged when
the battery icon is all white
9
Power Saving
Modes
There are two types of power saving built into the Vodafone
Mobile Wi-Fi – display and connectivity.
Display: The built-in display power-saving function means
the information is displayed on the Vodafone Mobile Wi-Fi
for 20 seconds, then the display powers off to conserve
the battery charge. The Power / Connectivity LED will flash
every few seconds to show the device is switched on. In
order to illuminate the display, press the WPS / Display
button, and the status information will be displayed for
another 20 seconds.
Connectivity: After ten minutes without any users
connected to the Vodafone Mobile Wi-Fi (via Wi-Fi or USB
cable), the device will go into sleep mode.
If the device is being powered by battery and is in sleep
mode, then it must be woken up by pushing the WPS /
Display button before the device can be connected to.
The display will briefly illuminate and connectivity will be
allowed via Wi-Fi access.
If the device is being powered by the mains charger or
PC USB cable, then as soon as a Wi-Fi connection request
is received, the Vodafone Mobile Wi-Fi will wake up from
sleep mode (without any physical intervention), connect
to the Wireless Broadband network and accept the Wi-Fi
connection request.
10
Battery
Charging
Tip:
The device will always
charge faster when
connected to the mains.
When being trickle-charged
via the PC then battery
charge could be lost if there
are several users with high
volumes of traffic.
Note:
During charging the Status
Screen will cycle through
the charging icons.
Battery Charge
Discharged (0%)
Charging (10%)
Charging (30%)
Charging (60%)
Charged (100%)
Charging rates depend on whether the device is
connected to the Mobile Broadband network, whether
the Wi-Fi is transmitting, and whether the device is
connected to the mains charger or to a PC. The scenarios
are described below, but in summary it is best to use
the mains charger when possible to ensure the battery
remains charged:
Mains charging
• When not connected to the Mobile Broadband
network – will take a maximum of 3 hours.
• When connected – will depend on the number of users
and the amount of traffic flowing, but charging will take
slightly longer than 3 hours.
PC USB trickle charging
• When not connected to the Mobile Broadband network
(powered off) – will take a maximum of 4 hours.
• When connected – will depend on the number of users
and the amount of traffic flowing. With regular browsing
charging will take place at a reduced rate, but if high
volume traffic flows through the device then it will not
charge and may start discharging.
11
Advanced
Configuration
Troubleshooting tip:
If you are connected to
the device over Wi-Fi and
find the Vodafone Mobile
Wi-Fi redirects to the
web UI (i.e. configuration
page) instead of the
page you expected when
using the browser, this
will be due to the fact
that the device cannot
connect you to a Mobile
Broadband network.
Please check the Status
Screen on the front
of the R201, and also
the connected state in
the web UI to confirm
the device is showing
‘Connected’, and if not
refer to the Advanced
Configuration Guide.
12
The Vodafone Mobile Wi-Fi is designed to be quick and simple
to start using, but to also provide the user with a powerful
set of configurable parameters. For example, the Vodafone
Mobile Wi-Fi is DLNA certified, and this allows the device to
act as a Digital Media Server, streaming music, videos and
photos to other DLNA-certified devices. The Vodafone Mobile
Wi-Fi also allows a MicroSDHC card (not included) to be
shared among several connected Wi-Fi devices by mapping
the card as a network drive.
For details on how to configure the Vodafone Mobile Wi-Fi,
please refer to the Advanced Configuration Guide, available
for download from
www.support.vodafone.com/VodafoneMobileWiFi/R201
The Advanced Configuration Guide covers:
• Getting Started
• Browser interface and advanced configuration
• Troubleshooting
• Glossary
For further help, please visit www.support.vodafone.com,
or call Vodafone Support as follows:
Vodafone UK Customer Care: 191 or 08700 700 191
Vodafone Ireland customers should contact the Data
Customer Care team on 1850 28 70 00.
13
The term Mobile Broadband together with the ‘birds’
design is a trademark of GSMC Limited.
0682
© Vodafone 2010. Vodafone and the Vodafone
logos are trade marks of the Vodafone Group.
Any product or company names mentioned herein
may be the trade marks of their respective owners.
Product Code:
VodafoneMobileWiFi R201 05/10_en_UK/IE