1
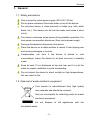
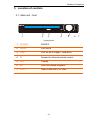
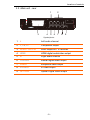
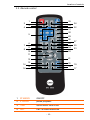
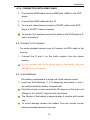
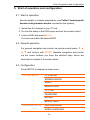
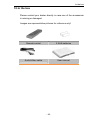
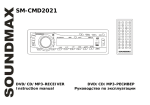
VER10720093020 MPEG4-DVD-PLAYER WITH HDMI DVX 3020 Symbol photo USER MANUAL 1 General Imprint All rights reserved. Any reproduction without consent of cmx® is prohibited. cmx® reserves the right to modifications of the device. Designed by cmx® in Europe | Assembled in China TM©2009 cmx electronics -2- General CONTEXTS 1. GENERAL ...................................................................................... - 5 1.1. Safety precautions................................................................. - 5 1.2. Disposal of waste electronic equipment ................................ - 5 1.3. Battery disposal ..................................................................... - 6 1.4. Copyright ............................................................................... - 6 1.5. Hearing protection ................................................................. - 6 1.6. Macrovision ........................................................................... - 6 1.7. Cleaning and maintenance ................................................... - 7 2. FEATURES..................................................................................... - 7 3. LOCATION OF CONTROLS ............................................................... - 8 3.1. Main unit - front ..................................................................... - 8 3.2. Main unit - rear ...................................................................... - 9 3.3. Remote control .................................................................... - 10 4. PREPARATION ............................................................................. - 12 4.1. Connection the device ......................................................... - 12 4.1.1. Connection with SCART cable ..................................... - 12 4.1.2. Connection with HDMI cable ........................................ - 13 4.2. Connect to hi-fi system ........................................................ - 13 4.3. Insert batteries..................................................................... - 13 5. START OF OPERATION AND CONFIGURATION .................................. - 14 5.1. Start of operation ................................................................. - 14 5.2. General operation................................................................ - 14 5.3. Configuration ....................................................................... - 14 5.3.1. System-Setup ............................................................... - 15 5.3.2. LANGUAGE SETUP .................................................... - 18 5.3.3. Audio Setup .................................................................. - 18 5.3.4. Video-Setup.................................................................. - 19 5.3.5. SPEAKER Setup .......................................................... - 19 5.3.6. DIGITAL SETUP .......................................................... - 20 6. FURTHER FUNCTIONS .................................................................. - 20 6.1. CD-Ripping .......................................................................... - 20 6.2. Programming ....................................................................... - 21 6.3. A-B....................................................................................... - 21 7. EXTERNAL COMPONENTS ............................................................. - 22 7.1. USB 2.0 ............................................................................... - 22 7.1.1. Music ............................................................................ - 22 -3- General 7.1.1. PICTURE ...................................................................... - 22 7.1.2. Video ............................................................................ - 23 7.2. HDMI ................................................................................... - 23 8. TROUBLESHOOTING ..................................................................... - 24 9. WARRANTY ................................................................................. - 24 9.1. Warranty Procedure ............................................................ - 25 9.2. Warranty has expired .......................................................... - 25 9.3. Shipping the Unit ................................................................. - 26 10.IN THE BOX .................................................................................. - 29 11.TECHNICAL SPECIFICATIONS ......................................................... - 30 - -4- General 1. General 1.1. Safety precautions Only connect to mains power supply (230 Volt / 50 Hz). Do not place containers filled with water on top of the device. Do not place device in close proximity of water (e.g. sink, wash basin, etc.). The device can fall into the water and cause a short circuit. The device consumes some power during standby operation. For zero power consumption disconnect from mains power supply. During a thunderstorm disconnect the device. Place the device on a stable surface to recent it from tipping over and causing damages or injuries. Condensation can form if the device is placed in cold surroundings. Leave the device for at least one hour in standby mode. Keep at least 10 cm distances at top and rear and 5 cm at the sides for proper ventilation to avoid overheating. Do not subject the device to direct sunlight or high temperatures, this can result in fire. 1.2. Disposal of waste electronic equipment Your product is manufactured from high quality raw materials and should be recycled. Ask you municipality for collecting points for waste electronic equipment. Do not dispose of old appliances with the household waste. -5- General The symbol on the product, the instructions for use or the packaging will advert about the methods for disposal. 1.3. Battery disposal The law requires returning exhausted batteries to public collection points or the dealer. Do not dispose of exhausted batteries with the household waste. 1.4. Copyright It is illegal to copy, send exhibit, broadcast via cable, publicly show or rent copyrighted materials without consent. 1.5. Hearing protection Select a moderate volume to protect your hearing. Only turn the volume to a level where you can still hear ambient noise. 1.6. Macrovision This product incorporates copyright technology that is protected by method claims of certain U.S. patents and other intellectual property rights owned by Macrovision Corporation and other rights owners. Use of this copyright protection technology must be authorized by Macrovision Corporation, and is intended for home and other limited viewing uses only unless otherwise authorized by Macrovision Corporation. Reverse engineering or disassembly is prohibited. -6- Features 1.7. Cleaning and maintenance Before cleaning disconnect from mains power supply. Do not clean with liquid cleaning agents or a wet cloth, this can cause a short circuit. Cleaning the casing Clean the casing with a dry cloth. 2. Features Dive into the world of high definition with the cmx® DVX 3020! The device is equipped with an HDMI port, USB 2.0 and CD-ripping function. Parental control, picture settings and other functions are also available. -7- Location of controls 3. Location of controls 3.1. Main unit - front 1 2 3 4 5 Symbol photo 1 POWER ON/OFF 2 DRIVE DVD drive 3 USB Port for MP3-Player / USB-Stick 4 IR Sensor for infrared remote control 5 LED Display 6 II 7 EJECT Start and pause playback Open/Close the DVD drive -8- 6 7 Location of controls 3.2. Main unit - rear 2 1 3 4 5 6 7 8 9 Symbol photo 1 L Left audio channel 2 Y, Pb, Pr Component output 3 SCART OUTPUT Scart output for TV/ recorder 4 HDMI HDMI digital audio/video output 5 R Right audio channel 6 COAXIAL coaxial digital audio output 7 VIDEO composite video output 8 S-VIDEO S-Video output 9 OPTICAL Optical Digital Audio output -9- Location of controls 3.3. Remote control 2 4 1 35 3 33 34 32 31 30 5 29 28 7 9 6 26 8 24 10 22 27 25 23 11 14 16 12 21 13 20 15 18 1 STANDBY ON/OFF 2 II PAUSE pause playback 3 TIME Quick select from a title 4 PBC PBC activate/deactivate - 10 - 19 17 Location of controls 5 0-9, 0/10, 10+ Numbers / digit entry (A-Z); 0; 6 DVD/USB Toggle between DVD / USB 7 REPEAT Select the playback mode 8 ZOOM Changing size of picture 9 OSD Disc information, including song information, playback time, remaining time. 10 SETUP Opening the setting menu 11 , , , ENTER 12 TITLE Display DVD title menu / Playback from the first song 13 A-B Loop sequence activate/deactivate 14 Rewind 15 STOP Stop playback 16 Previous chapter / track 17 Next chapter / track 18 VOL- Decrease volume 19 forward 20 VOL+ Increase volume 21 R/L Selecting sound channel 22 MENU Playback: open program menu (not every disc supports) Setup menu: return to main menu 23 SLOW Slow motion activate/deactivate 24 Ls/Ps Select video output: S-Video, YUV, RGB 25 N/P Stop mode: Toggle between AUTO/PAL/NTSC 26 RESET reset 27 STEP Single chapter playback 28 RESUME Start on last point 29 LANGUAGE Selection from the language , Cursor button Confirm the range - 11 - Preparation 30 SUB/COPY Selection Subtitle , CD ripping 31 ANGLE Camera-angle setting (disk dependent) 32 PROG Programming 33 MUTE Mute the sound 34 PLAY 35 EJECT Start the playback Open and close the DVD drive 4. Preparation 4.1. Connection the device Follow these steps to connect the DVD player. Ensure that all units are turned off when connecting. 1. Connect the TV with the DVD player. 2. Connect the mains power cable to a wall outlet. No connecting cables are supplied. You can connect the DVD player in several modes to TV, set recording device (e.g.: VCR) and other devices. Find details in chapter 4.1.1. Heed the user manuals for your TV set and the other devices. 4.1.1. CONNECTION WITH SCART CABLE 1. Connect the SCART cable into the SCART OUTPUT on the DVD player. 2. Connect the SCART cable with the TV. To connect hi-fi systems connect the cable to the DVD player‘s R and L connectors. - 12 - Preparation 4.1.2. CONNECTION WITH HDMI CABLE 1. Connect the HDMI cable into the HDMI jack HDMI on the DVD player. 2. Connect the HDMI cable with the TV. 3. To connect video devices connect a SCART cable tot he DVD player’s SCART Output connector. To connect hi-fi systems connect the cable to the DVD player‘s R and L connectors. 4.2. Connect to hi-fi system For audio playback connect your hi-fi system via RCA cable to the receiver. 1. Connect the R and L on the audio outputs from the stereo system. Do not connect your hi-fi’s phono input to the device; this can damage your hi-fi system. 4.3. Insert batteries The battery compartment is at the rear of the remote control. 1. Insert two AAA batteries (1, 5 V) observing the polarity (+ and -) as marked inside the battery compartment. Point the remote control towards the IR receiver on the main unit (Range of 5 m with 60° angle to both directions). The lifetime of the battery is approximately 6 months with normal use. To avoid damage remove the battery from the remote control during extended periods of non-use. - 13 - Start of operation and configuration 5. Start of operation and configuration 5.1. Start of operation See the details in chapter preparation (see Fehler! Verweisquelle konnte nicht gefunden werden. connection the system). 1. Select the AV channel on your TV set. 2. Go into the setup of the DVD player and set the correct output. 3. Insert a DVD and press PLAY. You can now watch the desired DVD. 5.2. General operation For general navigation and control via remote control press , , , and confirm with ENTER. Besides navigation and control via the cursor buttons you have the shortcut keys, which are described in chapter 3.3 remote control. 5.3. Configuration Press SETUP to display the main menu. SYSTEM SETUP TV SYSTEM SCREEN SAVER VIDEO RESOLUTION TV TYPE PASSWORD RATING MPEG4 LANG LANGUAGE SETUP OSD LANGUAGE AUDIO LANGUAGE - 14 - Start of operation and configuration SUBTITLE LANGUAGE MENU LANGUAGE AUDIO SETUP AUDIO OUT KEY VIDEO SETUP BRIGHTNESS CONTRAST HUE SATURATION SHARPNESS SPEAKER SETUP DOWNMIX DIGITAL SETUP OP MODE DYNAMIC RANGE DUAL MODE 5.3.1. System-Setup Select the desired menu item and open the submenu by pressing ENTER. 5.3.1.1. TV SYSTEM Here you can select the TV standard NTSC Select for TV with NTSC signal system (Quite common TV standard, especially in the U.S.A and Asia). PAL Select for TV with PAL signal system (European TV standard). AUTO Automatically setting on DVD player - 15 - Start of operation and configuration 5.3.1.2. SCREEN SAVER The activated screen saver turns on, when you’re turned-on DVD player is for more than 3 minutes in stop mode, open or without disc. 5.3.1.3. VIDEO Sets the connection type, with which you have connected the device. 5.3.1.4. RESOLUTION Select the type of video signal output via HDMI or YUV jack. If the picture is not clear or to your satisfaction, then try another option. 5.3.1.5. TV TYPE Here you can set the TV type 4:3 PS Picture is cut off on the left and right side 4:3 LB Picture is with black bars on the top and bottom. 16:9 Wide screen 5.3.1.6. PASSWORD 1. Enter the password „0000“. 2. Press ENTER. For changing the password, first enter the old password and than the new password. 5.3.1.7. RATING Some DVDs may have a parental level assigned to complete disc or to certain scenes on the disc. This feature lets you set - 16 - Start of operation and configuration a playback limitation level. The rating levels are from 1 to 8 and are country dependent. You can prohibit the playing of certain discs that are not suitable for your children or have certain discs played with alternative scenes. VCD, SVCD and CD have no level indication, so parental control function has no effect on those kinds of discs. This applies to most illegal DVD discs. 1 KID SAF Kids material, recommended especially for children and viewers of all ages. 2G General Audience recommended as acceptable for viewers of all ages. 3 PG Parental Guidance suggested 4 PG13 Material is unsuitable for children under age 13. 5 PG Parental Guidance-restricted, 6R recommended that parents restrict children under 17 from viewing or allow viewing only when supervised by a parent or adult guardian. 7 NC17 No children under age 17 not recommended viewing for children under age 17. 8 ADULT Should be viewed only by adults due to graphic sexual material, violence or language. - 17 - Start of operation and configuration 5.3.1.8. MPEG4 LANG Here you can choose between Central Europe and Western Europe Select. 5.3.2. LANGUAGE SETUP If your desired language is not on the disk, the player will play the disc default language. 5.3.2.1. OSD LANGUAGE Here you can set the OSD language. 5.3.2.2. AUDIO LANGUAGE Here you can set the audio language. 5.3.2.3. SUBTITLE LANGUAGE Here you can set the subtitle language. 5.3.2.4. MENU LANGUAGE Here you can set the menu language. 5.3.3. AUDIO SETUP 5.3.3.1. AUDIO OUT SPDIF/OFF Deactivation oft he Dolby digital decoder. SPDIF/RAW 2.0, Select if your player is connected to a digital stereo amplifier. SPDIF/PCM 5.1, Select if your DVD player is connected tot he amplifier by a coaxial cable. - 18 - Start of operation and configuration 5.3.3.2. Key Here you can set the tone from -4 to +4. 5.3.4. VIDEO-SETUP 5.3.4.1. BRIGHTNESS Here you can set the brightness. 5.3.4.2. Contrast Here you can set the contrast. 5.3.4.3. HUE Here you can set the colour tone respectively colour shading. 5.3.4.4. SATURATION Here you can set the saturation. 5.3.4.5. SHARPNESS Here you can set the sharpness. 5.3.5. SPEAKER SETUP 5.3.5.1. Downmix LT/RT Stereo Cinema sound, if the disc is recorded in Dolby Digital Pro Logic Stereo playback - 19 - Further functions 5.3.6. DIGITAL SETUP 5.3.6.1. OP MODE LINE OUT The input signals are compressed and linear volume is less. Recommended for the night's sleep. RF REMOD The volume is higher. Recommended for the day. 5.3.6.2. Dynamic Range If the OP MODE LINE OUT select, adjust the dynamic. If you select the highest setting, the compression ratio is the lowest. Select the lowest setting, the highest compression ratio is the highest. 5.3.6.3. DUAL MODE Here you can select the audio output fort he right and left channel. 6. Further functions 6.1. CD-Ripping You may rip music files directly from an Audio CD onto a USB memory stick or any other memory card, in order for you to listen tot he music files on your USB memory stick / MP3 player. Press or you come in the menus music, pictures and video. menus The are all corresponding files are available. - 20 - available only if the Further functions 1. Insert a CD. 2. Connect the USB memory stick / MP3 player or insert a memory card. 3. Select a title or folder. 4. Press SUB/COPY on the remote control. The ripping is starting. If you select a folder, the complete folder is ribbed. If you select a title only the title is ribbed. 6.2. Programming 1. During stop mode, press Program to display program menu. 2. Enter the track numbers and press ENTER. 3. Press PLAY and ENTER to play tracks in the programmed order. With 0/10 you can delete a false title, but the cursor must be at the right place. 6.3. A-B 1. During playback, press A-B for selecting starting point A of loop sequence. 2. Press again A-B to set the end point. The sequence between A-B will be repeated. 3. Press A-B (third time) to cancel the set loop sequence. Not every disc supports this function. For CD and SVCD playback, A and B must be located within the same track. - 21 - External components For DVD playback, A and B must be located within the same chapter. 7. External components 7.1. USB 2.0 Extend your system by connecting your MP3 player or USB stick. Do not disconnect the device when DVD/USB mode is selected. 1. Connect your MP3 player or USB stick. 2. Press DVD/USB button until „USB“is displayed. 3. Press PLAY to start playback. To avoid damage only disconnect the device after pressing the STOP button and selecting a different mode. 7.1.1. MUSIC PLAY Start playback II PAUSE Pause playback Rewind up to 8x possible Fast-forward up to 8x possible Previous title Next title 7.1.1. PICTURE , , Rotate or mirror images , - 22 - External components STOP To return to the main menu 7.1.2. VIDEO PLAY Start playback II PAUSE Pause playback Rewind up to 8x possible Fast-forward up to 8x possible Previous video Next video 7.2. HDMI The DVX 3020 has a built-in 1.2 HDMI output. Featuring a very high data transfer rate, the HDMI supports all digital video and audio formats of consumer electronics on the market. HDMI 1.2 transfers audio data on up to 8 channels, of frequencies up to 192 kHz with word length of up to 24 bits. So far the HDMI organization has only provided for cables of max.15 meters. A few cables of 20 meter length are available, which do not in all cases work properly. Longer cables generally need better high frequency properties in order to ensure error-free data recovery at the HDMI receiver. Cable quality and transfer properties of the HDMI receiver are thus crucial for a smooth date transfer. For cable lengths of up to 5 meters, cheaper cables are absolutely sufficient; from 10 meter onwards, high quality cables are less likely to feature transmission errors. Due to TMDS - 23 - Troubleshooting encryption used by HDMI, you may easily judge by the resulting image quality whether such errors have occurred. “Flashing” pixels or pixel chains clearly indicate transmission errors. 8. Troubleshooting Contact the service hotline or uses the contact form on the homepage in case of problems with the system are not dealt with here. Malfunction No picture / no sound Remote control does not Solution Ensure the connectors. Check the settings of the device. Decrease the distance to the system. work Exchange the battery. Point the remote control towards the system’s IR sensor. Image black & white Select the correct colour standard. System does not respond. Disconnect from mains power supply and reconnect after a 15 seconds. 9. Warranty This system comes with a 24-month warranty from the date of purchase. - 24 - Warranty Please keep your purchase documents! In case of manufacturing or material defects the warranty consists of rectification of defects or exchange. The warranty does not include damages or malfunctions due to improper use wear and tear repairs by third parties The warranty does not include display damage firmware update Accidental damage. Repair does not extend the warranty period. 9.1. Warranty Procedure In case of malfunctions, please contact: Your dealer Service hotline o Austria: +43 0720 502671 – please dial with the zero! o Germany: +49 (0)180 166 66 264 621 o Switzerland: +41 (0) 848 00 3322 Contact form – www.cmx-electronics.com 9.2. Warranty has expired Please contact us by phone or contact form in case your warranty has expired. We will help you! - 25 - Warranty Please inform us about the following: Unit type Purchase date Malfunction 9.3. Shipping the Unit To ensure a quick response, please observe the following in case you send us the unit: Send unit plus accessories Send postage free to service center Attach purchase documents Attach filled-out warranty card Error description Example for error description Wrong Correct Unit is defective Unit does not respond Unit malfunctions Unit cannot be switched on Please cut out the warranty card! - 26 - Warranty - 27 - Warranty - 28 - In the box 10. In the box Please contact your dealer directly in case one of the accessories is missing or damaged. Images are representative pictures for reference only! Remote control 2 AAA batteries Audio/Video cable User manual - 29 - Technical specifications 11. Technical specifications Formats Video DVD / DVD-R / DVD-RW / DVD+R / DVD+RW / SVCD / VCD MPEG4 Audio Audio-CD / CD-R / CD-RW / HDCD MP3-CD, MP3-CD-R, MP3-CD-RW, MP3-DVD Picture JPEG / KODAK Picture CD Signal outputs Colour system PAL / NTSC / AUTO Audio system Dolby Digital / Down mix / Stereo Connectors Inputs USB 2.0 Outputs 2 channel audio HDMI digital audio/video composite video (CVBS) component (YUV) coaxial digital audio optical digital audio Scart: for VCR, TV S-video General Dimensions 280 x 40 x 157 mm Size of picture 4:3 LB, 4:3 PS, 16:9 Frequency response 4 Hz – 44 kHz +/- 1 dB Mains power AC 100-240 V ~ 50/60 Hz Signal-to-noise ratio 90 dB Power consumption 10 Watt (Standby <3 Watt) Temperature Operation: 0°C ~ 40 °C Storage: -40°C ~ 65°C - 30 - Technical specifications www.cmx-electronics.com - 31 -