1
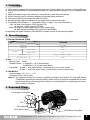
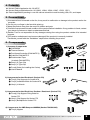
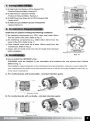
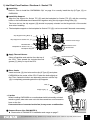
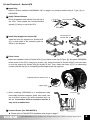
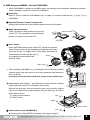
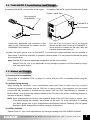
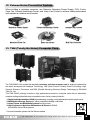
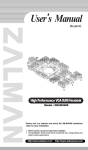
User’
s Manual
(English version)
CNPS9500
Intel Pentium 4
Socket 478 CPU
Intel
Dual Core Pentium/Pentium 4
Socket 775 CPU
AMD Sempron/AMD64
(Athlon 64 X2/Opteron/Athlon 64)
Socket 754/939/940 CPU
* Applies to all versions of CNPS9500.
* Please read before installation.
http://www.zalman.co.kr
http://www.zalmanusa.com
1. Features
1) 100% copper heatsink with aerodynamically optimized “tunnel” design for maximum cooling efficiency.
2) Innovative and patented, curved heatpipe design for a heat transfer capacity of up to 6 heatpipes with
just 3.
3) Optimized heatsink layout for maximum cooling efficiency with minimal materials.
4) 0.2mm ultra-slim fins for minimized weight and reduced airflow resistance.
5) Ultra quiet CNPS 92mm opaque fan with blue LEDs.
6) Aerodynamically optimized heatsink for smoother airflow and minimal noise.
7) Compatible CPUs (Refer to “7. Compatible CPUs” on page 3. for more information.)
- Intel : All Dual Core Pentium CPUs (Socket 775)
All Pentium 4 CPUs (Socket 775/478)
- AMD : All Dual Core AMD Athlon 64 X2 CPUs (Socket 939)
All AMD Sempron/AMD64 CPUs (Socket 754/939/940)
8) Adjustable fan speed controller (FAN MATE 2) enables control of noise and fan speed.
2. Specifications
1) Flower Heatsink (FHS)
Model
Spec.
Materials
Pure Copper
530(1)
Weight(g)
Thermal Resistance
(°C/W )
CNPS9500
Silent Mode
Normal Mode
Dimensions (mm)
Dissipation Area (㎠)
0.16
0.12
85(L) X 112(W) X 125(H)
3,698
2) Fan
- Bearing Type : 2-Ball
- Rotation Speed : 1,350RPM ± 10 % (Silent Mode)
2,600RPM ± 10 % (Low-noise Mode)
- Noise (dB) : 18.0dB ± 10% (Silent Mode) - measured at 1m from noise source
27.5dB ± 10% (Low-noise mode) - measured at 1m from noise source
3) FAN MATE 2
- Output Voltage : 5V ~ 11V ± 2 %
- Allowable Power : 6W or lower
(Note 1) The maximum weight for a cooler is specified as 450g for Intel Socket 775 and AMD Socket
754/939/940. Special care should be taken when moving a computer equipped with a cooler
that exceeds the specified weight limit. Zalman is not responsible for any damage that occurs
when moving a computer.
3. Exploded View
Fan Support Fixing Bolt
Heat sink
Fan
Fan Support
CPU Block Cover
※
CPU Block Fixing Bolt
The specifications of any product may change without prior notice to improve performance.
1
4. Patents
Korean Patent Application No. 05-45737
Korean Design Applications No. 05-15303, 15304, 15306, 15307, 17970, 17971
Patent Applications pending in over 20 nations around the world including USA, EU, and Japan
5. Precautions
1) If excessive force is exerted on the fan, it may result in malfunction or damage to the product and/or the
computer.
2) Do not put your finger in the fan while spinning.
3) Keep the product away from the reach of children and pets.
4) Check the components list and condition of the product before installation. If any problem is found, contact
your place of purchase to obtain a replacement/refund.
5) Zalman Tech is not responsible for any damages arising from using the product outside of its intended
purpose.
6) CPU and/or motherboard may become damaged if the product is incorrectly installed.
Familiarize yourself with the “Installation” steps before installing the product.
6. Components
1) Common Components
❶ CNPS9500
❷ Thermal Grease
❸ Fan Speed Controller (FAN MATE 2)
❹ Cable for FAN MATE 2
❺ Double-sided Tape
(to attach FAN MATE 2)
❻ One(1) S-Type Clip
❼ One(1) L-Type Clip
❽ Four(4) Bolts (for installing the Cooler)
❾ User’s Manual
❸
❷
❺
❹
❶
❻
2) Components for Intel Pentium 4 (Socket 478)
❿ Two(2) Clip Supports for Socket 478
Two(2) Installation Bolts for Socket 478
One(1) L-Wrench
❼
❽
❾
❿
3) Components for Intel Dual Core Pentium / Pentium 4 (Socket 775)
Four(4) Clip Support Fixing Bolts for
Socket 775
One(1) Clip Support for Socket 775
One(1) Backplate for Socket 775
4) Components for AMD Sempron/AMD64 (Socket 754/939/940)
Two(2) Nipples
※
The specifications of any product may change without prior notice to improve performance.
2
1) Intel Dual Core Pentium / Pentium 4 - Socket 775
① Install Clip
Refer to “How to Install the CNPS9500’s Clip” on page 3 to correctly install the clip (S-Type, ⑫) on
CNPS9500.
② Install Clip Support
Align the clip support for Socket 775 (⑭) and the backplate for Socket 775 (⑮) with the mounting
CP
holes on the motherboard and fasten them together using the clip support fixing bolts ( ⑬).
The lever slot on the clip support (⑭) should be properly oriented on the hinged side of the socket
lever when installing.
CPU
※ The backplate support on the backplate for Socket 775 (⑮) can be removed if deemed unnecessary.
Clip Support Fixing Bolt, ⑬
CPU
CPU
Clip Support for Socket 775, ⑭
Socket Lever Hinge
CPU
Motherboard
Backplate for Socket 775, ⑮
Backplate Support
Socket Lever
Socket Slot
CPU
③ Apply Thermal Grease
Thermal Grease
Clean off particles and residue from the top of
the CPU. Then spread the included thermal
grease (②) thinly on top of the CPU.
CPU (IHS)
④ Place Cooler
Insert two bolts (⑧) into holes on the clip (S-Type,⑥) and place
CNPS9500 at the center of the CPU. Fasten the bolts slightly at
first. Then, fasten the bolts in an alternating manner until the clip
(⑥) is completely pressed against the clip supports.
Bolt, ⑧
Clip(S-Type), ⑥
※Caution
When installing CNPS9500 on a motherboard with horizontally-oriented
retention guide, take extra care not to let the screwdriver exert excessive
force on the fan.
If excessive force is exerted on the fan, it may cause a malfunction.
⑤ Connect Power (Use FAN MATE 2)
◆ Please refer to FAN MATE 2 installation and usage on page 7.
※
The specifications of any product may change without prior notice to improve performance.
4
2) Intel Pentium 4 - Socket 478
① Install Clip
Refer to “How to Install the CNPS9500’s Clip” on page 3 to correctly install the clip (S - Type, ⑥) on
CNPS9500.
② Apply Thermal Grease
Clean off particles and residue from the top of
the CPU. Then spread the included thermal
grease (②) thinly on top of the CPU.
Thermal Grease
CPU (IHS)
Clip Support for
Socket 478, ⑩
③ Install Clip Support for Socket 478
Install the two clip supports for Socket 478
(⑩) on both sides of the retention guide as
shown in the diagram.
④ Place Cooler
Insert two installation bolts for Socket 478 (⑪) into holes on the clip (S-Type, ⑥) and place CNPS9500
at the center of the CPU. Using the L-wrench (⑫), fasten the bolts for Socket 478(⑪) into each hole
on the clip support for Socket 478(⑩) slightly at first. Then, fasten the bolts (⑪) in an alternating
manner until the clip (⑥) is completely pressed against the clip supports.
Installation Bolt for Socket 478, ⑪
Clip(S-Type),
※ When installing CNPS9500 on a motherboard with
L-wrench,
horizontally-oriented retention guide, take extra care
not to let the L-wrench (⑫) exert excessive force on
the fan. If excessive force is exerted on the fan, it
may cause a malfunction.
⑤ Connect Power (Use FAN MATE 2)
◆ Please refer to FAN MATE 2 installation and usage on page 7.
※
The specifications of any product may change without prior notice to improve performance.
5
3) AMD Sempron/AMD64 - Socket 754/939/940
※ When CNPS9500 is installed on an AMD system, the existing cooler installation framework (retention
frame, backplate, screws) is used for the installation.
① Install Clip
Refer to “How to Install the CNPS9500’s Clip” on page 3 to correctly install the clip (L-Type, ⑦) on
CNPS9500.
② Separate Retention Frame Fixing Screws
Unscrew the screws that fix the existing retention frame onto its place.
③ Apply Thermal Grease
Clean off particles and residue from the top
of the CPU. Then spread the included thermal
grease (⑦) thinly on top of the CPU.
Thermal Grease
CPU (Lid)
④ Place Cooler
Place CNPS9500 at the center of the CPU. Fasten the retention
frame fixing screws onto the backplate through the outer holes
of the clip (L-type, ⑦) slightly at first. Then, fasten the screws in
an alternating manner until the clip (⑦)
Screw
is completely pressed against the
retention frame.
Clip(L-Type),
※ When installing CNPS9500 on a motherboard with horizontally-oriented
retention guide, take extra care not to let the screwdriver exert excessive
force on the fan.
If excessive force is exerted on the fan, it may cause a malfunction.
◈ Motherboards with Pushpin - type Retention Frame need the included
nipples (⒃) and bolts (⑧) for installation of the cooler.
Remove the push-pins from the retention frame, and insert the nipples
(⒃) into it. Fasten them to the backplate using the bolts (⑧) and follow
these steps in order :
③ Apply Thermal Grease
④ Place Cooler
Bolt,
Nipple,
Retention Frame
Bolt,
⑤ Connect Power (Use FAN MATE 2)
◆ Please refer to FAN MATE 2 installation and usage on page 7.
※
The specifications of any product may change without prior notice to improve performance.
6
10. FAN MATE 2 Installation and Usage
1) Installing FAN MATE 2 on the Inside of the System
2) Installing FAN MATE 2 on the Outside of the System
Double - sided Tape
Fan Connector
(CNPS9500)
FAN MATE 2
6-Pin Connector
Motherboard
Connect the appropriate 3-pin connector on the
cable to the motherboard fan header and the
CNPS9500’s fan connector.
Pull the 6-pin connector out of the system
through the back and connect it to FAN MATE 2,
which should be installed on the case using the
included double-sided tape (⑤).
◆ When the speed control knob on FAN MATE 2 is turned fully counter-clockwise, the fan operates in
Silent Mode. Turned fully clockwise, it operates in Normal Mode. You can select the desired fan speed
by turning the knob.
Note) FAN MATE 2 has been specifically designed for the fan of this product.
Zalman Tech Co., Ltd. is not responsible for any damage to systems or CPUs caused by using it
with other types of fans.
11. Notes on Usage
1) Checking CPU Compatibility
Please refer to “Compatible CPUs” on page 3 to confirm that your CPU is compatible before using the
CPU cooler.
2) Cautions During Booting
When booting the computer, it may automatically power down after an alarm sound by a system
monitoring program to indicate that the CPU fan is rotating slowly. If this happens, turn the speed
control knob fully clockwise to increase the fan speed. Then set ‘CPU Fan Detected’ to ‘Disabled’ in
BIOS settings, or set the slowest rotational speed of the CPU fan in the system monitoring program to
less than or equal to 1300rpm.
Note) Some motherboards do not boot if the rotational speed of the CPU fan is below a certain rpm.
If the BIOS settings are updated, Silent Mode can be used. For more information on updating
your BIOS, please refer to your motherboard manufacturer's website. Disabling CPU fan speed
detection in BIOS settings does not affect computer performance.
3) OVERCLOCKING
Zalman Tech Co., Ltd. is not responsible for any damage resulting from CPU OVERCLOCKING.
※
The specifications of any product may change without prior notice to improve performance.
7
12. Zalman Noise Prevention System
When building a noiseless computer, use Zalman’s Noiseless Power Supply, CPU Cooler,
Case Fan, Fanless Northbridge Cooler, and Video Card Cooler to achieve stable performance
and maintain a noiseless environment.
Noiseless Power Supply
Noiseless Case Fan
Fanless Northbridge Cooler
Heatpipe HDD Cooler
Quiet VGA Cooler
Multi Fan Controller
13. TNN (Totally No Noise) Computer Case
The TNN 500AF is the world's first absolutely noiseless, anti-dust computer case for high-end systems that
has been developed with Heatpipe Technology, HSC (Heat Source Contact) Power Technology, High
Capacity Extrusion Technique, and FMS (Flexible Mounting Structure) Design Technology by ZALMAN
Tech Co., Ltd.
The TNN 500AF package includes a high performance aluminum computer case with an absolutely
noiseless cooling solution that does not require the use of a fan, making it ideal for :
1. Digital Audio Workstations (DAW) in broadcasting, recording, and postproduction studio control rooms.
2. Multi Media & Storage Servers for offices, educational facilities, and hotels.
3. Home Theater and Multi Media Systems for living rooms.
4. High Performance Noiseless Workstations & Servers for SOHO
(Small Office Home Office) systems.
For more information, please visit the Zalman website.
※
The specifications of any product may change without prior notice to improve performance.
8