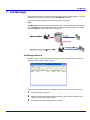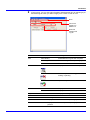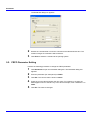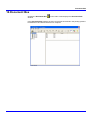
1
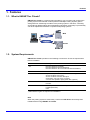
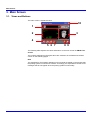
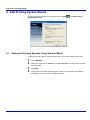
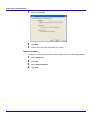
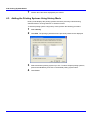
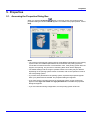
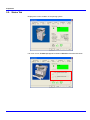
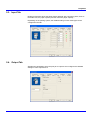
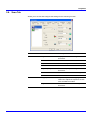
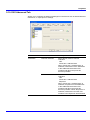
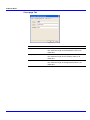
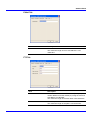
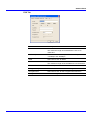
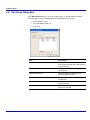
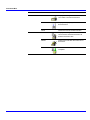
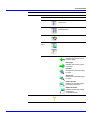
KM-NET for Clients
Operation Guide
Legal and General Information
Notice
Unauthorized reproduction of all or part of this guide is prohibited. The information in
this guide is subject to change without notice.
Kyocera Mita cannot be held liable for any problems arising from the use of this product,
regardless of the information herein.
Regarding Trademarks
KYOCERA, KYOCERA MITA, ECOSYS and PRESCRIBE are registered trademarks of
Kyocera Corporation.
KPDL and KIR (Kyocera Image Refinement) are trademarks of Kyocera Corporation.
Microsoft, Windows and Windows NT are registered trademarks of Microsoft
Corporation.
Apple, AppleTalk, Mac, Macintosh, Mac OS and TrueType are registered trademarks of
Apple Computer, Inc.
Adobe, Acrobat and Postscript are registered trademarks of Adobe Systems
Incorporated.
Novell and NetWare are registered trademarks of Novell, Inc.
HP and PCL are registered trademarks of Hewlett-Packard Company.
Intel, Pentium and Celeron are registered trademarks of Intel Corporation.
Other brand and product names contained in this document are registered trademarks
or trademarks of their respective companies.
General Information
When using this utility, the items that can be configured will differ depending on the
model of your printing system or multifunctional printer (hereinafter referred to as
"printing system").
Examples in this document are described in terms of the Internet Explorer 6.0 and
Microsoft Windows XP operating system environment.
Table of Contents
1. Features ................................................................................................................. 1
1.1. What is KM-NET for Clients? .......................................................................... 1
1.2. System Requirements..................................................................................... 1
1.3. Support Language .......................................................................................... 2
2. Installation and Startup ........................................................................................ 3
2.1. Installation....................................................................................................... 3
2.2. Startup ............................................................................................................ 3
3. Main Screen........................................................................................................... 4
3.1. Views and Buttons .......................................................................................... 4
3.2. Settings ........................................................................................................... 8
4. Add Printing System Wizard .............................................................................. 10
4.1. Adding the Printing Systems Using Standard Mode ..................................... 10
4.2. Adding the Printing Systems Using Advanced Mode.................................... 11
4.3. Adding the Printing Systems Using History Mode ........................................ 14
5. Properties ............................................................................................................ 15
5.1. Accessing the Properties Dialog Box............................................................ 15
5.2. Status Tab..................................................................................................... 16
5.3. Input Tab....................................................................................................... 17
5.4. Output Tab .................................................................................................... 17
5.5. Media Tab ..................................................................................................... 18
5.6. Printer Tab .................................................................................................... 19
5.7. Copy Tab ...................................................................................................... 20
5.8. Scan Tab....................................................................................................... 21
5.9. FAX Basic Tab .............................................................................................. 22
5.10. FAX Advanced Tab....................................................................................... 25
5.11. Resources Tab.............................................................................................. 27
5.12. Consumable Tab........................................................................................... 28
5.13. Counters Tab ................................................................................................ 28
5.14. Management Tab.......................................................................................... 29
5.15. Interface Tab................................................................................................. 31
6. Address Book...................................................................................................... 32
6.1. Address Book Window.................................................................................. 32
6.2. Search and Filtering Functions ..................................................................... 34
6.3. Edit Address Dialog Box ............................................................................... 35
6.4. Edit Group Dialog Box .................................................................................. 40
7. Job Manager ........................................................................................................ 41
8. Job Viewer ........................................................................................................... 42
8.1. What is Job Viewer? ..................................................................................... 42
8.2. Using the Job Viewer .................................................................................... 42
9. Broadcast ............................................................................................................ 45
9.1. Broadcast...................................................................................................... 45
9.2. FRPO Parameter Setting .............................................................................. 46
10. Document Box..................................................................................................... 47
11. Troubleshooting.................................................................................................. 50
Features
1. Features
1.1. What is KM-NET for Clients?
KM-NET for Clients is a network utility intended for use to monitor and configure the
printing systems and maintain e-MPS (enhanced-Multiple Printing System) jobs in
storage devices. Monitoring the status of the printing system in real-time, confirming
and modifying default settings and manipulating jobs stored temporarily or permanently
can all be implemented between computers and printing systems.
MFP
KM-NET
KM-NET
Printer
1.2. System Requirements
KM-NET for Clients operates in the following environment. Check the requirements
before installation.
Item
Description
OS
Microsoft Windows 98 SE/Me
Microsoft Windows 2000 Professional†
Microsoft Windows XP Home Edition/Professional Edition†
Web Browser
Microsoft Internet Explorer 5.5 or later
Hardware
A processor equivalent to a Pentium 200 MHz or greater
At least 32 MB of free memory
At least 10 MB of free hard disk space
SVGA (800 × 600, 256 color) or greater
A sound card capable of playing WAV files (optional)
Protocol
TCP/IP
IPX/SPX
Interface
Ethernet (10BASE-T/100BASE-TX)
Parallel (IEEE1284)
USB
† Administrator rights are required for installation.
Note
When the printing system is used locally, conform that KX Driver has already been
installed before using KM-NET for Clients.
KM-NET for Clients
1
Features
1.3. Support Language
KM-NET for Clients supports the following languages: Arabic, Brazilian Portuguese,
Czech, Danish, Dutch, English, Farsi, Finish, French, German, Hebrew, Hungarian,
Italian, Lithuanian, Japanese, Korean, Norwegian, Polish, Russian, Simplified Chinese,
Spanish, Swedish, Traditional Chinese and Turkish.
2
KM-NET for Clients
Installation and Startup
2. Installation and Startup
2.1. Installation
Install KM-NET for Clients on your computer.
Note
Before installing this application, check that the KX driver is installed on the computer.
KX Driver is on the CD-ROM supplied with the printing system.
Insert the CD-ROM that came with the printing system into the optical drive of the
computer.
The installation program starts up automatically. Follow the installation instructions.
2.2. Startup
When the installation is completed, start the KM-NET for Clients by proceeding from
the start menu > All Programs > Kyocera > KM-NET for Clients.
KM-NET for Clients
3
Main Screen
3. Main Screen
3.1. Views and Buttons
The main screen is explained below.
10
1
2
3
4
5 6 7
8 9
The following table explains the views and buttons on the main screen of KM-NET for
Clients.
The numbers appearing in the figure above are referred to in the Reference Number
column on the following pages.
Note
The explanations of messages appearing in this manual are based on the premise that
the printing system is used over a network. Accordingly, the explanations include some
messages that do not appear when the printing system is used locally.
4
KM-NET for Clients
Main Screen
Ref. Name and Icon
No.
Description
1
The Connection View displays connected printing
system icons for that have been discovered
through the printer discovery process.
Connection View
A maximum of five printing system icons can be
displayed in this view. Each icon describes the
status of the printing system.
Ready
Not connected
Error
Warning
Sleep
Add button
Click this button to start the wizard.
Follow instructions to add the printing
system.
Remove button
Select the icon for the desired printing
system within the Connection view, and
click this button to remove the printing
system.
KM-NET for Clients
5
Main Screen
Ref. Name and Icon
No.
Description
2
The Information View is located below the
Connection View and describes the status of the
printing system in greater detail.
Information View
Depending on the printing system, the status icons
shown in the information view is different.
Status Icon Pattern 1
The printing system is ready to print.
The paper runs out or the cassette is not
installed properly.
A paper jam has occurred.
Toner is low or runs out. When the toner
becomes low, the icon blinks. When the
loner runs out, the icon lights up.
An error has occurred.
Status Icon Pattern 2
The printing system is ready to print.
An error occurs for printing.
The printing system is ready to scan.
An error occurs for scanning.
The printing system is ready to fax.
An error occurs for fax.
Switch status information by clicking the icons
circled by red in the left images.
The various type of icons are displayed on
Information View according to options attached to
printing system and specific features. For details,
refer to online help.
6
KM-NET for Clients
Main Screen
Ref. Name and Icon
No.
Description
3
3D View can be set up to display a 3D rendering of
the selected printing system. It displays the status
of the printing system in real-time.
3D View
For example, if the top cover of the printing system
is opened, the top cover of the 3D image also
opens.
4
Properties Button
Click this button to open the properties dialog box.
The dialog box displays detailed information about
the printing system.
For details, refer to the section Properties.
5
Job Manager Button
Job Viewer Button
Click the Job Manager button to open the Job
Manager window and click the Job Viewer button
to open the Job Viewer window.
These windows enable the user to obtain job
information and administer jobs stored in the
storage devices in the printing system.
These buttons are available only when a hard disk
is installed. The button to be displayed will differ
depending on the model.
For details, refer to Job Manager on page 41 or Job
Viewer on page 42.
6
Broadcast Button
Click this button to open the Broadcast dialog box.
For details, refer to Broadcast.
7
Document Box Button
Click this button to open the Document Box
window. For details, refer to Document Box on
page 47.
8
Setup Button
The Setup button has 2 tabs.
For details, refer to Settings.
Status Polling Tab
Set up a polling interval and audible notification for
device error conditions here.
Appearance Tab
Set up a 3D image view and the appearance of this
utility here.
9
KM-NET for Clients
Help Button
The Help button displays the help window.display
7
Main Screen
Ref. Name and Icon
No.
Description
10
Click
Title Bar
in the title bar to display the menu.
About KM-NET for Clients
Displays the version information on KM-NET for
Clients.
3.2. Settings
When operating KM-NET for Clients, you can change settings for polling interval,
audible (error) notification, whether you want to use the 3D virtual printing system to
monitor the printing system status, etc.
1
2
Click SETUP
on the main screen. The KM-NET for Clients dialog box appears.
Configure the settings for status polling and appearance.
Status Polling Tab
Polling
When Polling is activated (check box checked), KM-NET for Clients logs itself
onto the printing system and automatically recognizes printing system changes at
predetermined intervals. The interval can be configured by moving the slider with
the mouse. The default setting is 5 seconds. Polling should normally be left
activated (check box checked).
Audible Notification
When Audible notification is activated (check box checked), a sound is played
when an error occurs. Specify the WAVE file (.wav file extension) by clicking
Browse and browsing for the folder that contains it.
8
KM-NET for Clients
Main Screen
Appearance Tab
Show 3D image
This displays the 3D virtual printing system for monitoring the status of the printing
system.
3D accelerator
Select the method which the PC renders the 3D image. The default is Software
rendering. Selecting Hardware rendering may improve the performance of
rendering the 3D image depending on the hardware requirement.
Show on Taskbar
When minimizing the main screen, the taskbar button will disappear from the task
tray, and an application icon will be displayed in the task tray. When clicking the
icon, the main screen resizes.
When an error occurs, the main screen with the type of error notification will be
displayed.
If the box is unchecked, then a minimized button will be displayed on the task bar.
Always on top
Error notification is given by a message that is displayed on top of all other
windows that may be currently open on the desktop.
KM-NET for Clients
9
Add Printing System Wizard
4. Add Printing System Wizard
To search for printing systems to be registered, click Add
System Wizard starts.
. The Add Printing
4.1. Adding the Printing Systems Using Standard Mode
To add the printing systems using standard mode, perform the following procedure.
1
2
3
4
10
Select Standard.
Select the check box for Network or Local connection according to the desired
printing system.
Click Next.
Perform the instructions displayed by the wizard. The instructions are different
depending on the connection type selected above.
KM-NET for Clients
Add Printing System Wizard
5
6
After searching completes, the searched printing systems are displayed. Up to five
desired printing systems can be selected. To select multiple printing systems,
press and hold Ctrl key and click on the desired printing system name.
Click Finish to return the main screen. The Connection View displays the icon for
the selected printing system.
4.2. Adding the Printing Systems Using Advanced Mode
Advanced mode has the following three options below to find the printing systems.
Option
Description
Local printer
Finds the printing system by selecting the local printer
name installed on PC.
Network address
Finds the printing system by entering the network
address.
Import printing systems
Imports printing systems from the selected file.
Local Printer
To add printing system using local printer option, perform the following procedure.
1
2
KM-NET for Clients
Select Advanced.
Click Next.
11
Add Printing System Wizard
3
4
5
Select Local printer.
Click Next.
Perform the instructions displayed by the wizard.
Network Address
To add printing system using network address option, perform the following procedure.
1
2
3
4
12
Select Advanced.
Click Next.
Select Network address.
Click Next.
KM-NET for Clients
Add Printing System Wizard
5
6
Select the protocol for printing system discovery.
Perform the instructions displayed by the wizard. The instructions are different
depending on the protocol selected above.
Import Printing Systems
To add printing system using import printing systems option, perform the following
procedure.
1
2
3
4
5
6
KM-NET for Clients
Select Advanced.
Click Next.
Select Import printing systems.
Click Next.
Select one data file to import network address. The data file that can be imported
is the CSV file exported by Network Print Monitor.
Click Next.
13
Add Printing System Wizard
7
Perform the instructions displayed by the wizard.
4.3. Adding the Printing Systems Using History Mode
History mode displays the printing systems that were previously searched using
standard mode or IP range discover in advanced mode.
To add the printing system using history mode, perform the following procedure.
1
2
3
4
14
Select History.
Click Next. The printing systems that were previously searched are displayed.
Select the desired printing system up to five. To select multiple printing systems,
press and hold Ctrl key and click on the desired printing system name.
Click Finish.
KM-NET for Clients
Properties
5. Properties
5.1. Accessing the Properties Dialog Box
When you click the Properties
button on the main screen, the printing system
properties dialog box as shown below appears. For details of the property items, refer to
Help.
Notes
• The contents of the printing system property will be different depending on the printing
system model, the installed optional devices, and whether the printing system is
connected via network interface or local interface. Also, if the printing system does not
support color printing, only the level of remaining black toner will be displayed.
• The default settings and the range of possible values in this utility may be different
depending on the printing system model. For details, refer to the Operation Guide of
the each printing system.
• If you have set a password for the printing system, a password prompt will appear.
Enter your password and click OK. The properties dialog box appears.
• If you have set the user login function for the printing system, a login prompt will
appear. Enter login user name and login password and click OK. The properties
dialog box appears.
• If you are instructed during configuration, turn the printing system off and on.
KM-NET for Clients
15
Properties
5.2. Status Tab
Displays the current condition of the printing system.
If an error occurs, Trouble tips appears instead of General information like below.
16
KM-NET for Clients
Properties
5.3. Input Tab
Displays information about the paper feeder attached with a printing system, such as
the media size, the paper capacity and the maximum paper capacity.
Depending on the printing system, the detailed setting of each media type can be
configured in this tab.
5.4. Output Tab
Specifies the destination which the print job is output to and configures the detailed
settings of each output device.
KM-NET for Clients
17
Properties
5.5. Media Tab
Displays the settings for media.
Main Item
Sub Item
Description
Media type
Weight
Media weight can be set for the
customized paper.
Temperature
The heat of fusing can be set for the
customized paper.
Density
Print density can be set for the
customized paper.
Duplex
Duplex printing can be set for the
customized paper.
Custom paper size
Sets the custom size for the paper.
Custom original size
Sets the custom size for the original
document.
Offset
Establishes the vertical and horizontal
offsets of the print area for each feeder
and the scan area for either the platen or
the document processor.
Paper size
Offset
18
KM-NET for Clients
Properties
5.6. Printer Tab
Allows you to configure the settings for the printing function.
Main Item
Sub Item
Description
Print quality
EcoPrint
Enables the printing system to reduce
the amount of toner consumption to
save printing costs.
Resolution
Selects the resolution for printing.
Tone
Selects the way the printing system
handles a pixel for representing the color
and halftoning for each pixel.
Gloss mode
The gloss mode, when set to High,
increases the effect of glossiness in
printing. However, the printing speed
slows down.
KIR
A smoothing function makes resolution
higher and realizes a high quality print
result.
Color mode
Selects the default color mode.
Duplex mode
Duplex printing is the mode of printing
on both sides of paper.
Copies
Enables setting for the default number of
copies.
Page orientation
Enables settings for Portrait or
Landscape printing.
Default emulation
Allows you to change the emulation
mode.
Page control
Emulation
KM-NET for Clients
19
Properties
5.7. Copy Tab
Allows you to check and configure the settings for the copy function.
20
Main Item
Sub Item
Description
Feed
APS media type
When the Enable check box is selected,
APS media type is activated.
Alternatively, a Media type can be
selected.
KM-NET for Clients
Properties
5.8. Scan Tab
Allows you to check and configure the settings for the scanning function.
Main Item
Sub Item
Description
Basic
Original size
Displays the size of the original
document.
Zoom
Select the zoom mode.
Exposure
Select the exposure mode for scanning.
Scan color
Select the color mode for scanning.
Original quality
Select the quality of the original
document.
Scan resolution
Select the resolution for scanning.
File format
Select the file format.
Copy exposure
Adjust the exposure for copying. Use the
slide bar to adjust the exposure of both
Auto and Manual modes.
Original orientation
Select the orientation of the original
document.
Advanced
KM-NET for Clients
21
Properties
5.9. FAX Basic Tab
Allows you to configure the basic settings for the FAX function such as transmission,
reception and encryption key settings.
Main Item
Sub Item
Description
Default
FAX firmware
Displays the FAX firmware version for
each port.
FAX line
Select the FAX line type for each port.
Pulse (10pps)
Pulse (20pps)
Tone (DTMF)
Local FAX ID
Specify the local FAX ID.
The ID must be a 4-digit number
between 0000 and 9999.
Local FAX number
Specify the local FAX number for each
port.
The FAX number must be 20 digits or
less and can include numerical
characters, "+," and spaces.
Local FAX name
Specify the local FAX name.
Name
Specify the local FAX name.
The maximum length of the FAX name is
32 characters.
Transmit settings TTI
22
Select whether the TTI will be sent as
well.
TTI position
Select the position where the TTI will be
printed.
Retry times
Specify the number of redials for FAX
transmission from 0 to 14.
KM-NET for Clients
Properties
Main Item
Sub Item
Description
Reception
settings 1
FAX receive
Select the FAX reception mode.
Auto (FAX/TEL)
Auto (Normal)
Auto (TAD)
Auto (DRD) *
Manual
* This is not displayed on European
models.
DRD pattern
Select a ringing pattern when Auto
(DRD) is selected in the FAX reception.
This is not displayed on European
models.
Receive date/time
Select whether the reception date and
time is printed out on the received
documents or not.
2 in 1
Select whether 2 pages of the received
documents are printed on a single sheet.
Remote switching dial
number
Change the dial number used in the
remote switching function.
Number of rings
Set the number of rings until it switches
to fax reception per FAX reception
mode.
AUTO: 1 - 15
TAD: 1 - 15
FAX/TEL: 0 - 15
Encryption reception
Select whether the encryption is enabled
or not. When enabled, specify the
encryption key as well.
Paper source settings
Specify the paper feed setting in the FAX
reception mode.
Media type
Select the type of paper to be used for
printing.
Use MP tray
The MP tray will be the paper source
when this is selected.
Paper output settings
Specify the output tray in the FAX
reception mode.
Output stack
Select the tray printed papers will be
delivered to.
Reception
settings 2
KM-NET for Clients
23
Properties
Main Item
Sub Item
Description
Reception
settings 3
Duplex printing
Select whether or not to allow duplex
printing in the reception.
Reduced reception size Select whether the received FAX will be
printed primarily at the same
magnification or at a reduced size.
Encryption key
24
Reception port
Specify the reception only port.
OFF
Port 1
Port 2 (If the optional device is attached)
Encryption key settings
Displays the list of encryption keys
currently registered.
Add button
Adds a new encryption key.
Delete button
Deletes the encryption key selected in
the list.
Properties button
Displays the details of the encryption
key selected in the list. It is possible to
edit the property.
KM-NET for Clients
Properties
5.10. FAX Advanced Tab
Allows you to configure the advanced settings for FAX function such as transmit/receive
restrictions, or report print out settings.
KM-NET for Clients
Main Item
Sub Item
Description
Restriction
Transmit restriction
Select the list used for transmit
restriction.
OFF
Permit list + Address Book
When "Permit list + Address Book" is
selected, transmission to the addresses
in the Address Book and the FAX
numbers and IDs in the permit list
becomes possible.
Receive restriction
Select the list used for receive
restriction.
OFF
Permit list + Address Book
Reject list
When "Permit list + Address Book" is
selected, reception from the addresses
in the Address Book and the FAX
numbers and IDs in the permit list
becomes possible. When "Reject list" is
selected, transmission from the FAX
numbers in the Reject list will be denied.
25
Properties
Main Item
Sub Item
Description
Permit List
Permit number list
Displays the list of FAX numbers
currently registered.
Add button
Adds a new FAX number.
Delete button
Deletes the FAX number selected in the
list.
Properties button
Allows the user to edit the FAX number
selected in the list.
Permit ID list
Displays the list of FAX IDs currently
registered.
Add button
Adds a new FAX ID.
Delete button
Deletes the FAX ID selected in the list.
Properties button
Enables the user to edit the FAX ID
selected in the list.
Reject number list
Displays the list of FAX numbers
currently registered.
Add button
Adds a new FAX number.
Delete button
Deletes the FAX number selected in the
list.
Properties button
Allows the user to edit the FAX number
selected in the list.
Outgoing FAX report
Select whether to record the FAX
transmission in a report.
Incoming FAX report
Select whether to record the FAX
reception in a report.
Send result report
Sends a result of the FAX transmission
to a specified destination.
OFF
ON
Error and forward only
FAX reception result
report
Sends a result of the FAX reception to a
specified destination.
OFF
ON
Error and forward only
FAX reception result
report type
Select whether to print out the FAX
reception result or send it by E-mail.
Destination
Enter the E-mail address to where the
FAX reception result will be sent.
Reject list
Report
26
KM-NET for Clients
Properties
5.11. Resources Tab
Displays information about all memory sources and data such as Font, Macro, Program
and Host information.
Main Item
Sub Item
Description
Memory
Memory information
Displays the amount of free and total
RAM and the available memory slots.
Host buffer
Displays and changes the host buffer
mode and the host buffer size.
Raster memory
Displays and changes the setting of the
raster memory size mode. When this
setting is Auto, the memory capacity
used for raster memory varies according
to the condition. When this setting is On,
the maximum size of the available
memory is secured for it.
Static storage
Displays the memory capacity of the
hard disk drive, memory cards and an
option ROM.
RAM disk
Displays and changes the RAM disk
size.
Font
Displays the fonts in the printing system.
Macro
Displays the macros in the printing
system.
Program
Displays the program in the printing
system.
Host data
Displays the host data in the printing
system.
Storage
Data
KM-NET for Clients
27
Properties
5.12. Consumable Tab
Displays the remaining level of toner amount and each consumable unit life.
5.13. Counters Tab
Displays the count information of the printing system.
28
Main Item
Sub Item
Description
Printed pages
-
Displays the total number of printed pages.
Scanned pages
-
Displays the total number of scanned pages
by Function
-
Displays the page counter per function.
KM-NET for Clients
Properties
Main Item
Sub Item
Description
by Paper size
-
Displays the page per paper size.
by Color mode
-
Displays the page counter per color.
5.14. Management Tab
Allows you to configure the management settings of the printing system.
Main Item
Sub Item
Description
System
Language
Selects the language displayed on the
message display.
Buzzer
A Buzzer can be set to sound when an
error condition occurs on a printing
system. The buzzer must be activated
within the application. It is available only
for those printing systems equipped with
this function.
Form feed timeout
Adjusts the form feed timeout time. If the
printer receives no data for a certain
period, it will time out and release the
current interface. It prints whatever data
it has in its buffer and feeds out the
page.
Auto sleep
Specifies sleep timer setting value. If the
printing system has not been used for a
specified time, it will enter sleep mode.
Operation panel
language
Selects the language displayed on the
message display.
Default operation
Selects the default operation at the initial
state.
Common
KM-NET for Clients
29
Properties
30
Main Item
Sub Item
Description
Timer
Auto panel reset
Specifies the time for auto panel reset.
When this function is enabled, if no
operation has been performed on the
operator panel during a specified time,
the display automatically returns to the
default.
Form feed timeout
Adjusts the form feed timeout time. If the
printer receives no data for a certain
period, it will time out and release the
current interface. It prints whatever data
it has in its buffer and feeds out the
page.
Auto sleep
Specifies sleep timer setting value. If the
printing system has not been used for a
specified time, it will enter sleep mode.
Click Advanced to enable or disable the
Auto Sleep.
Security
Panel lock
Displays the setting of panel lock.
Identification
Asset number
Specifies the Asset number for the
printing system. The maximum length of
asset number is 15 characters.
The User defined
settings
Specifies the Nickname and
Description for the printing system. The
maximum length of nickname and
description is 64 characters.
Address Book
Edit
Click this button to open the Edit dialog
box of the Address Book. For details,
refer to Address Book on page 32.
User login
User list
Confirms the users registered in the
printing system.
KM-NET for Clients
Properties
5.15. Interface Tab
Displays the general information for the network interface.
KM-NET for Clients
Main Item
Sub Item
Description
General
Network interface
Displays the information of the network
interface such as model name, firmware
version, MAC address and serial
number.
Novell
Novell configuration
Configures the settings of Novell
NetWare.
TCP/IP
TCP/IP configuration
Displays the information of the TCP/IP
configuration such as IP address,
subnet mask, default gateway and TCP/
IP port.
Serial
Serial
Configures the settings of the printing
system's serial port.
Protocol
Protocol settings
Enables or disables the protocol of the
network interface such as FTP,
AppleTalk, SMB, SMTP, NetWare,
NetBEUI and IPP.
31
Address Book
6. Address Book
In this section, we are viewing and editing the Address Book in the printing system.
Addresses in the Address Book can be specified for transmission or restriction of
transmission/reception.
You can also group individual addresses for batch transmission.
Note
The Address Book is available only in a printing system with hard disk.
6.1. Address Book Window
You can display the Edit dialog box of Address Book window by clicking Address
Book in the main menu of the Management Tab, and then clicking Edit.
The Address Book window displays the list of registered addresses.
32
KM-NET for Clients
Address Book
The search and filtering functions are available to help the user to quickly find the
necessary address.
Main Item
Sub Item
Description
File
Add Contact
Registers a new address.
Up to 2000 addresses can be
registered.
Add Group
Registers a new group.
Up to 500 groups can be registered.
Import
Imports addresses from a file.
Export
Exports the Address Book to a file.
Close
Exits the Address Book window.
Edit
Allows the user to edit the address or
group selected in the address list.
Copy
Copies the address or group selected in
the address list.
Paste
Pastes the copied data to the address
list.
Delete
Deletes the address or group selected
in the address list.
Edit
KM-NET for Clients
33
Address Book
Main Item
Sub Item
Description
View
Column
Allows the user to configure the
columns displayed in the Address Book
window.
Help
Help
Displays the help window for the
Address Book window.
Address List
Displays the list of registered
addresses.
6.2. Search and Filtering Functions
Helps the user to quickly find the address he/she wants.
34
Function
Description
Search box
Enter a string in the search box (caseinsensitive). The entered string will be
searched against the address data in the
name column. If the string matches the
leading part of an address, the address
will be displayed in selected state.
Filtering by Transmission Type
When a filtering criterion is selected,
address data that matches the criteria
will be displayed in the address list.
The item that has been checked in View
menu > column will be displayed and
become available to be selected.
None
Clears the filtering by transmission type.
E-mail
Displays address data that includes email addresses.
FTP
Displays address data that contains FTP
addresses.
SMB
Displays address data that contains
SMB addresses.
FAX
Displays address data that includes FAX
numbers.
Filtering by Address Type
When a filtering criteria is selected,
address data that matches the criteria
will be displayed in the address list.
None
Clears the filtering by address type.
Contacts
Displays contact address data.
Groups
Displays group address data.
KM-NET for Clients
Address Book
6.3. Edit Address Dialog Box
In the Edit Address dialog box, you can configure or edit addresses in detail.
Name Tab
KM-NET for Clients
Item
Description
Name
Enter the name.
The maximum length of the Name is 32 characters.
Address
The address is displayed in the following format.
E-Mail
E-mail: E-mail Address
FTP
FTP: Path(Host Name)
SMB
SMB: Path(Host Name)
FAX
FAX: FAX number
35
Address Book
Cover page Tab
36
Item
Description
Recipient
Enter the name of the recipient.
The maximum length of the destination name is 32
characters.
Company
Enter the name of the company.
The maximum length of the company name is 32
characters.
Department
Enter the name of the department.
The maximum length of the department name is 32
characters.
KM-NET for Clients
Address Book
E-Mail Tab
Item
Description
E-Mail Address
Enter the e-mail address.
The maximum length of the e-mail address is 126
characters.
FTP Tab
KM-NET for Clients
Item
Description
Host Name
Enter the host name of the FTP server. Specify the port
number different from the default (21) using the format of
Host Name: Port Number.
The maximum length of the host name is 62 characters.
Path
Enter the path.
The maximum length of the path is 126 characters.
37
Address Book
Item
Description
Login user name
Enter the login user name.
The maximum length of the login user name is 62
characters.
Login password
Enter the login password.
The maximum length of the login password is 62
characters.
SMB Tab
38
Item
Description
Host Name
Enter the host name. Specify the port number different
from the default (139) using the format of Host Name:
Port Number.
The maximum length of the host name is 62 characters.
Path
Enter the path.
The maximum length of the path is 126 characters.
Browse button
Click the browse button to open the Choose Folder
dialog box.
Login user name
Enter the login user name.
The maximum length of the login user name is 62
characters.
Login password
Enter the login password.
The maximum length of the login password is 62
characters.
KM-NET for Clients
Address Book
FAX Tab
KM-NET for Clients
Item
Description
FAX No.
Enter the FAX number.
The maximum length of the destination name is 32
characters.
TX Start Speed
Select the transmission speed from "33600bps,"
"14400bps" and "9600bps."
ECM
Select ON or OFF for ECM.
Sub Address
Enter the subaddress.
The maximum length of the subaddress is 20 characters.
Password
Enter the password.
Encryption Key No.
Select "None" or "1 - 20" for the encryption code.
Encryption box
Select ON or OFF for the encrypted document box.
Encryption box No.
Enter the encrypted document box ID from 0000 to 9999.
39
Address Book
6.4. Edit Group Dialog Box
In the Edit Group dialog box, you can create a group, or add or delete a member.
The maximum number of members that can be registered in a group is:
40
•
E-mail address: 100
•
FTP and SMB (in total): 10
•
FAX: 500
Item
Description
Group Name
Enter the name of the group.
The maximum length of the group name
is 32 characters.
Member List
Displays the list of members registered
for the group.
Add Member button
Click this button to open the group
member detail dialog box.
Delete button
Deletes the member selected in the
member list.
OK button
Saves the changes and closes the edit
group dialog box.
Cancel button
Closes the edit group dialog box without
saving the changes.
KM-NET for Clients
Job Manager
7. Job Manager
The printing job can be stored in the storage devices of the printing system. This job is
administered, reprinted and deleted using Job Manager function.
Turning the printing system power off will not delete stored jobs.
Note
Job Manager can only be used in the printing system which installed storages devices.
The Job Viewer may be displayed instead for particular printing systems. For details
about Job Viewer, refer to Job Viewer on page 42.
Job Manager Window
Enables to print or delete jobs stored in printing systems’ storage devices using job
manager. Also enables to print a job list.
Perform the following procedure to operate the job(s) stored in the storage device.
1
2
3
KM-NET for Clients
Select the job(s) to operate.
Select the desired operation from the Operation menu. When you select Print
operation, The print job wizard starts.
Follow the instructions displayed by the wizard.
41
Job Viewer
8. Job Viewer
8.1. What is Job Viewer?
Printing jobs can be stored on the hard disk drive (HDD) in the printing system. The job
log can be downloaded or deleted using the Job Viewer.
Stored jobs will not be deleted even if the printing system is turned off.
Note
Job Viewer can only be used in the printing system where a hard disk drive is installed.
The Job Manager may be displayed instead for particular printing systems. For details
about Job Manager, refer to Job Manager on page 41.
8.2. Using the Job Viewer
The following procedure describes how to use the Job Viewer.
1
42
When you click the Job Viewer
on the main screen, the Job Viewer screen
appears. Pressing F7 on the keyboard also displays the Job Viewer screen.
KM-NET for Clients
Job Viewer
2
In this screen, you can view job information and administer jobs by selecting a job
and selecting an action you want to apply from a menu or with an icon.
Menu
Cancel icon
Update icon
Details icon
Status tab
Schedule tab
Log tab
Main Item
Sub Item
Description
File
Save history
Downloads the log into the computer.
Clear Log
Deletes all logs from the printing system.
Close
Exits Job Viewer.
Detail
Displays details of the selected job.
Cancel
Cancels a job that is being processed,
waiting or pausing.
Refresh
Updates the job list to the latest state.
Tool bar
Displays/Hides the toolbar.
Status bar
Displays/Hides the status bar.
Job
View
Help
KM-NET for Clients
Displays the Help window.
Item
Description
Status tab
Displays the current status of the printing system.
Schedule tab
Displays the schedule of jobs the printing system will
process.
43
Job Viewer
44
Item
Description
Log tab
Displays the log of printing activities made by the printing
system.
KM-NET for Clients
Broadcast
9. Broadcast
Allows you to send PRESCRIBE commands to the printing system (Broadcast). Also
allows you to use this menu to confirm and change the internal settings of the printing
system when using either a local or network connection (FRPO).
For details on PRESCRIBE commands, refer to the PRESCRIBE Command
Reference manual. For details on FRPO, refer to the Operation Guide of the printing
system.
Notes
• Broadcast does not work with printing systems on an IPX network.
• The FRPO parameter menu is not available depending on the printing system.
9.1. Broadcast
Perform the following procedure to use the broadcast function.
1
KM-NET for Clients
Click Broadcast to open the broadcast dialog box.
45
Broadcast
The Broadcast dialog box appears.
2
3
Browse the command file or enter the command in the Broadcast text box. The
maximum length of command is 256 characters.
Click Send to send the command to the printing system.
9.2. FRPO Parameter Setting
Perform the following procedure to change the FRPO parameter.
1
2
3
4
5
46
Click Broadcast to open the broadcast dialog box. The Broadcast dialog box
appears.
Enter the parameter (for example R4) in FRPO.
Click Get. The current value is shown in Value.
Erase the current value and enter the new value. For example, to change the
default paper source to the MP Tray in the above example, enter 0 instead of 1 in
Value.
Click Set. The value is changed.
KM-NET for Clients
Document Box
10.Document Box
Clicking the Document Box
window.
on the main screen displays the Document Box
In the Document Box window, the user can preview documents in the printing system's
hard disk drive and download them to a computer.
KM-NET for Clients
47
Document Box
Main Item
Sub Item
Description
File
Add
Displays a dialog box where the user
can create a new document box.
Detail
Displays the property of the selected
document box.
Close
Closes the Document Box window.
Move
Displays a dialog box where the user
can move the selected document to
another document box.
Delete
Deletes the selected document box or
document.
Download
Downloads the selected document to a
computer.
Edit
48
KM-NET for Clients
Document Box
Main Item
Sub Item
Description
View
Tool bar
Displays or hides the tool bar.
Status bar
Displays or hides the status bar.
Details
Displays the documents in the list in
report form.
Thumbnail
Displays the documents in the list in
thumbnail form.
Refresh
Updates the data in the document box.
Preview
pane
Displays the preview pane.
Preview
Previous page
Displays the preview of the
previous page.
Next page
Displays the preview of the
next page.
Zoom In
Enlarges the preview image
in steps.
Zoom Out
Reduces the preview image
in steps.
Rotate 90 CW
Rotates the preview image
90 degrees clockwise.
Rotate 90 CCW
Rotates the preview image
90 degrees
counterclockwise.
Help
KM-NET for Clients
Help
Displays the help window.
49
Troubleshooting
11.Troubleshooting
If trouble occurs with using KM-NET for Clients, carry out the applicable remedy
indicated below. If the trouble persists, contact your service representative or authorized
service center.
Symptom
Cause
Remedy
The utility does not start. Your computer does not meet
the system requirements.
Upgrade or change your computer
to meet the system requirements.
For details, refer to System
Requirements.
A version of Microsoft Internet
Explorer 5.1 or earlier is being
used.
Use Microsoft Internet Explorer 5.5
or later.
Out of memory.
Close all unnecessary applications.
The utility is already running.
It cannot be run twice.
A maximum of five printing
systems have been added.
Reduce the number of connected
printing systems to add a new
printing system.
The printing system has been
turned off.
Start searching after the printing
system has been turned on.
The printing system has been
removed from the network.
Start searching after the printing
system has been connected to the
network.
The printing system is printing
or processing data.
Try to search for the printing system
again after processing and printing
are complete.
The KX Driver is not installed
in your computer.
When the printing system is
connected via local interface, the KX
Driver must be installed in your
computer.
Add
is grayed out.
No printing system is
discovered.
TCP/IP or IPX/SPX protocol is When the printing system is
not installed in your computer. connected via network interface,
TCP/IP or IPX/SPX protocol must be
installed in your computer.
The TCP/IP or IPX/SPX
settings on your computer is
not configured properly.
Contact your network administrator.
Depending on the network
router configuration, a printing
system is undetectable.
In some rare cases, heavy
network traffic may prevent
this utility from detecting the
printing systems.
50
Try to search again later or contact
your network administrator.
KM-NET for Clients
Troubleshooting
Symptom
Cause
Remedy
Status remains not
connected.
The printing system has been
turned off.
Turn the printing system on.
The printing system has been
removed from the network.
Connect the printing system to the
network.
The printing system has lost
Verify that there is an active network
the connection to the network. connection to the printing system.
The printing system
cannot be configured.
KM-NET for Clients
An error condition exists on
the printing system.
Cancel the error on the printing
system.
The network address of the
printing system has been
changed.
The network address of a printing
system is changed by DHCP, etc.
Search for the printing system
again.
In very rare cases, extremely
heavy network traffic may
prevent this utility from
detecting printing systems.
Try again after a brief interval or
contact your network administrator.
The password is set for the
printing system.
Enter the password properly.
The printing system has been
turned off.
Turn the printing system on.
The printing system has been
removed from the network.
Connect the printing system to the
network.
The printing system is printing
or processing data.
Try again after processing and
printing are complete.
The printing system is in
menu mode.
Try again after menu mode is no
longer being used.
The Read or Write community
name does not match the one
stored on the network
interface.
Contact your network administrator.
There are some settings that
cannot be changed from this
utility. They appear grayed out
in the menu.
Also, when an item is not
supported for the selected
model then it will be displayed
as blank.
-
If the keys and buttons on the
operation panel of the
printings system are locked,
the menu screen can not be
displayed when pressing
menu button.
Unlocked the keys and buttons.
51
2006
is a trademark of Kyocera Corporation
Rev. 3.4 2006.9