1
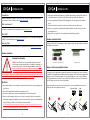
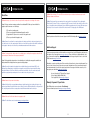
E006-00-000062
Table of contents
Overview
Overview ....................................................................................................... 2
Hardware Installation ................................................................................... 3
Quick Start .................................................................................................... 3
Hardware Installation Details ....................................................................... 4
Graphics Cards Requiring Additional Power .............................................. 4
SLI Installation .............................................................................................. 5
Software Installation .................................................................................... 5
Setting up Multiple Displays ........................................................................ 6
Quick Fixes ................................................................................................... 7
Thank you for purchasing a genuine EVGA graphics card. EVGA is an NVIDIA® Authorized Solution Provider that
builds high performance 3D cards. Our graphics cards are fully compatible with the latest 2D and 3D graphical
requirements.
Before installing your EVGA graphics card, it is highly recommended to first register the product to receive the full
support and warranty. You can register your card online at www.evga.com/register.
EVGA also strives to provide a full range of programs and services to enhance the customer experience including
but not limited to:
EVGA Advanced RMA (EAR) Program:
The EVGA Advanced RMA (EAR) Program is a program to protect yourself and your product in the case of product
failure. For more information please visit www.evga.com/support/ear.
EVGA Step-Up® Program:
In order to give our customers the greatest amount of flexibility when purchasing EVGA graphics cards, we have
instituted the EVGA Step-Up® Program. For more information please visit www.evga.com/stepup.
EVGA Online Community:
Additional Support ....................................................................................... 8
To visit the EVGA community forums, please visit www.evga.com/forums for more information.
Compliance Information .............................................................................. 9
EVGA Precision XTM:
Designed from the ground up to support new GPU technology, EVGA Precision XTM redefines what overclocking
software should be. For more information please visit www.evga.com/precision.
EVGA OC Scanner X:
Featuring a brand new look and layout, this popular application has been adapted to show all of the latest GeForce
vitals. For more information please visit www.evga.com/ocscanner.
EVGA FAQ:
To search our knowledge base and product FAQ, please visit www.evga.com/faq for more information.
EVGA GamingTM:
If you live to game, this is the place for you! We have the best tournaments, prizes and game servers. For more
information please visit www.evga.com/gaming.
1
2
Folding@EVGA:
5. Align your new card with the appropriate slot, (see illustration below) and press it in firmly until the card is fully
Distributed computing for the greater good. Did you know that you can turn your graphics card into a shared
supercomputer? For more information please visit www.evga.com/folding.
6. Connect the supplemental PCI Express (PCI-E) power adapter(s) to the card if applicable. (See illustration
seated. Make sure that the metal contacts of the card are completely pushed into the expansion slot.
below.)
EVGA Social NetworksTM:
Stay up to date on contests, promotions, tech tips, new products, driver releases and more by following EVGA on
your favorite social network! For more information please visit www.evga.com/sonet.
7. Replace the retaining screw to fasten the card into place, and then replace the computer cover.
8. Reconnect any devices that you detached during installation, and then connect the monitor’s video cable to
your new graphics card.
MODS RIGSTM:
9. Apply power to your system, boot to the operating system and install the proper drivers.
$1K Sponsorships for every 200 posts. Come show off your rig and join in on one of the biggest things happening
at EVGA. For more information please visit www.modsrigs.com.
Hardware Installation Details
EVGAontheTUBE:
New product unboxing, overview and features! For more information please visit www.youtube.com/teamevga.
PCI Express (PCI-E) and PCI slots are different, so prior to installation; please verify that the graphics card bus type
and available slot are the same.
Hardware Installation
Preparing Your Computer
WARNING: Turn off the power to your system and discharge your body’s static
electric charge by touching a grounded surface – for example, the metal surface of
the power supply or chassis – before performing any hardware procedure. EVGA
assumes no liability for any damage, caused directly or indirectly, by improper
installation of any components. If you do not feel comfortable with performing
the installation procedure, consult a qualified computer technician. Damage to the system components, the
graphics card, and injury to yourself may result if power is applied during installation. Now that you have
prepared your computer, you are ready to install your graphics card.
Quick Start
1. Before starting installation, it is recommended to completely remove all drivers for your existing graphics card
PCI Express (PCI-E) Graphics Cards
PCI Graphics Cards
Graphics Cards Requiring Additional Power
If your graphics card is equipped with a supplemental power adapter, it is required that it be connected at the time
of installation. This supplemental power adapter ensures that your graphics card receives the necessary power that
will allow it to function at optimal performance levels. Your card may require one or more 6 or 8-pin PCI Express
(PCI-E) supplemental power connectors. Please note that the 8-pin PCI-E power connector is not the same as the
8-pin CPU power connector. Please see the below illustration.
Always use the PCIE power cables from your Power Supply first, only use included adapters when your Power
Supply does NOT have the appropriate connectors.
8 pin or 6+2 pin
(If you have one).
2. Power off the computer and all attached devices (keyboard, mouse, etc.).
3. Disconnect the display cable from your current display adapter on the back of the computer.
4. Remove your existing graphics card (if you have one) from your computer. You will do this by removing the
retaining screw, and pulling the card directly up and out of the system. Please note that your motherboard may have a PCI Express (PCI-E) latch on the slot that needs to be pressed in first.
(NOTE: If your motherboard has integrated or onboard video, you may need to disable it first, please contact
your system or motherboard manufacturer for additional information.)
3
4
6 pin
SLI Installation (optional)
NOTE: If adding a secondary card to an existing PC, you may be required to REINSTALL the driver again.
On some EVGA graphics cards, it is possible to link multiple graphics cards together for improved performance,
this is called SLI. To install multiple cards in SLI, follow the below instructions, please note that in SLI setups both
cards must be the same model. For a video overview of setting up SLI, please visit www.evga.com/slivideo.
Also, you can view FAQ about SLI at http://www.evga.com/support/faq/?f=58605.
Note: If the autorun driver installation menu does not appear, it can be launched manually by clicking on the
“Computer” or “My Computer” icon, and double clicking the icon for your DVD/CD drive. After that double click on
the “autorun.exe” file.
Once the autorun installation menu appears, select the “Install Video Drivers” button. This will start the driver
installation process.
Note: During installation, you may be prompted by the Microsoft WHQL (Windows Hardware Quality Labs) warning,
please select the “Continue” or “Install this driver software anyway” option, as it is safe to do so.
Setting up Multiple Displays
Install your first GeForce graphics card
into the Primary PCI Express x16 slot.
2-way SLI: Install your second GeForce
graphics card in to the secondary PCI
Express x16 slot. Connect the two cards
together using the 2-way SLI bridge
connector that came with your SLI-ready
motherboard.
3-way SLI: Install the third GeForce card into
the tertiary PCI Express slot on the
motherboard. Connect the GeForce cards
together using the 3-way SLI bridge
connector that came with your SLI-ready
motherboard.
The NVIDIA Control Panel allows you to configure a multi-display environment, whether it is through multiple
computer monitors or by using a monitor in conjunction with an HDTV. The ability to use multiple displays within
Windows can simplify many everyday tasks by spreading out the Windows Desktop area, or make working with
an HDTV even easier by allowing you to watch a movie on one of the displays, while performing other tasks on the
other display. Multiple display configurations can be made in the “Set up Multiple Displays” subsection located
in the NVIDIA Control Panel. To access the NVIDIA control panel, simply right click on the desktop, and select
“NVIDIA Control Panel.”
Single Mode
TT
BO
OM
Select just one checkbox for the monitor you wish to use as your single display. This will disable the secondary
output and is the default setting if you only have one monitor connected to the graphics card.
2-way SLI
3-way SLI
4-way SLI
For ALL SLI configurations, please consult your motherboards user manual for proper placement of cards in the given PCI Express slots.
Always install the cards in 8x or 16x slots, as SLI will not function in 4x, the specific slot information should be available in the motherboards
users manual.
The above SLI bridges are included with your SLI ready motherboard depending on the configurations it supports. In order for your
SLI setup to work properly, you will need to use the appropriate bridge based on the number of cards you are connecting.
Software Installation
When you boot up your computer for the first time after installing your new graphics card, Windows may detect a
new display device and attempt to install the drivers. If it gives you the option to cancel, please do so, otherwise
wait for Windows to complete the installation (a reboot may be necessary).
After this process has been completed, it is necessary to install the recommended drivers for your graphics card.
To begin, it is recommended to download the latest drivers from www.evga.com/support, alternatively, you can
install the drivers off the EVGA Installation DVD.
5
Extended Mode
Select two or more checkboxes to enable more than one monitor. Once checked, right click on the monitors in the
section below to set the desired mode. Extended desktop mode can independently control resolution and refresh
rate settings for each display.
Duplicate Displays
Select two or more checkboxes to enable more than one monitor. Once checked, right click on the monitors in the
section below to set them to duplicate display mode, and select the primary monitor. Duplicate displays require
identical resolutions between both displays.
Enabling SLI (optional)
If you installed multiple cards in SLI mode, you will need to enable SLI to get the maximum performance from your
system. To enable SLI, visit the NVIDIA control panel by right clicking on the desktop, and select “NVIDIA Control
Panel.” Next, select “Set SLI and PhysX configuration.” Finally, select “Maximize 3D Performance” and select
apply. To see a video overview of the SLI installation procedure, please visit www.evga.com/slivideo.
6
Quick Fixes
Problem: When viewing my PC on an HDTV, the entire desktiop is not visible, and certain areas; such as the
Windows taskbar, reside offscreen.
Problem: At boot-up, all you hear is a series of beeps from the computer, but see no image on the screen.
Solution: Firstly, ensure that you are running at the correct resolution for your display. If it is, try adjusting the
“Resize Desktop” feature. This lets you compensate for HDTV overscan so that the entire desktop is visible. In this
case, to view display elements that appear offscreen, NVIDIA recommends using the Ovescan Shift feature to pan
the desktop. You can access the Overscan Shift controls from the TV Settings page of the NVIDIA panel.
Cause: The beep sounds are a warning sound from the motherboard BIOS that says it cannot initialize the
graphics card, this can mean one of four things:
1)
2)
3)
4)
The card is not seated properly.
There is a problem with the motherboard’s graphics card slot.
Supplemental PCI-E power is not connected to the graphics card.
There is a problem with the graphics card.
Solution: Remove the card from the computer and reinsert it, making sure that the card is seated properly in the
slot, and then try to boot the computer again. If this does not work then the problem is either with the motherboard
or the graphics card and you should contact your hardware manufacturer for further assistance.
Problem: The integrated video adapter has not been disabled prior to installing the new graphics card, and/or the
previous adapter’s drivers have not been properly uninstalled.”
Cause: The integrated video adapter has not been disabled prior to installing the new graphics card and/or not
having uninstalled the display drivers from your previous display adapter.
Solution: Ensure the integrated video adapter has been disabled through your motherboard’s BIOS or the
Windows Device Manager prior to installing the new graphics card, and that you have uninstalled the drivers
through the Windows Control Panel. After the new card has been installed, connect the monitor cable and if
required, any supplemental power adapters to the new card before booting up the system.
Problem: Games lockup or crash to the desktop.
Solution: Verify that all the necessary hardware drivers are installed and up to date, including the chipset, video
and sound card drivers. Reinstall the latest version of DirectX (located on EVGA installation disc) or the game itself.
Also, verify the game has all the necessary patches installed that are available from the developer.
Note: For problems not listed in this document, please visit the EVGA Knowledge Base at www.evga.com/faq.
Additional Support
Should you require any assistance with the installation or troubleshooting of your EVGA graphics card, please visit
the support section of our website at www.evga.com/support. There you will be able to download drivers, check
out our extensive Knowledge Base, and submit technical and customer support inquiries. Be sure to also visit the
EVGA forums at www.evga.com/forums.
Alternatively, we can be reached by phone. Before contacting Customer Service, please review this manual. If you
need to contact Customer Service, please have your system configuration as well as your card’s model number
and serial number ready. You will need to register your product before a support technician can assist you. You
may register your card online at www.evga.com/register.
• Hours of Operation: 24/7 Technical Phone Support
• Phone Support: (888) 880-EVGA (3842)
• Tech Support Web Site: www.evga.com/support
Warranty Program to Fit your Needs
Most EVGA products are covered under a 3 Year Warranty.
For more information please visit www.evga.com/support/warranty
Problem: Where can I find the latest drivers for my graphics card?
Solution: The latest drivers can be found at www.evga.com/support/drivers.
7
8
MEMO
Compliance Information
FCC Compliance Information
This device complies with FCC Rules Part 15. Operation is subject to the following two conditions:
This device may not cause harmful interference, and this device must accept any interference received, including interference that may
cause undesired operation. This equipment has been tested and found to comply with the limits for a Class B digital device, pursuant to
Part 15 of the FCC Rules. These limits are designed to provide reasonable protection against harmful interference in a residential installation.
This equipment generates, uses and can radiate radio frequency energy and, if not installed and used in accordance with the
manufacturer’s instructions, may cause harmful interference to radio communications. However, there is no guarantee that interference
will not occur in a particular installation. If this equipment does cause harmful interference to radio or television reception, which can be
determined by turning the equipment off and on, the user is encouraged to try to correct the interference by one or more of the following
measures:
Increase the separation between the equipment and signal source. Connect the equipment to an outlet on a circuit different from that to
which the signal source is connected. Consult the dealer or an experienced computer technician for help. The use of shielded cables for
connection of the monitor to the graphics card is required to ensure compliance with FCC regulations. Changes or modifications to this unit
not expressly approved by the party responsible for compliance could void the user’s authority to operate the equipment.
CE Compliance Information
EMC Directive 89/336/EEC and Amendment 92/31/EEC, Class B Digital Device EN 50081-14, Generic Emissions Standard for Residential,
Commercial and Light Industrial Products (EN 55022/CISPR 22, Limits and Methods of Measurement of Radio). (EN 55022/CISPR 22,
Limits and Method of Measurement of Radio Interference Characteristics Information Technology Equipment) Warning: This is a Class B
product. In a domestic environment this product may cause radio interference in which case the user may be required to take adequate
measure. EN 50082-1, Generic Immunity Standard for Residential, Commercial and Light Industrial Products (IEC 801-2, IEC 801-3, IEC
801-4)
Macrovision Product Notice
This product may incorporate copyright protection technology that is protected by U.S. patents and other intellectual property rights. Use
of this copyright protection technology must be authorized by Macrovision, and is intended for home and other limited viewing uses only
unless otherwise authorized by Macrovision. Reverse engineering or disassembly is prohibited.
Trademark Information
©2001-2015 All rights reserved. The manual is the property of EVGA corp. and is protected by copyright, trademark and other intellectual
property laws, and no part may be reproduced, transmitted, stored or translated into any other computer or foreign language without the
express prior written permission of EVGA corp. EVGA Corp. EVGA, the EVGA logo and combinations thereof are trademarks of EVGA Corp.
All brands and companies are trademarks of registered Trademarks of their respective companies and may not be used without permission.
All other trademarks are the property of their respective owners. The information contained in this manual may be subject to change without
notice. EVGA reserves the right to terminate this license if there is a violation of its terms or default by the Original Purchaser. Upon
termination, for any reason, all copies of the Software must be immediately returned to EVGA and the Original Purchaser shall be liable to
EVGA Corp. for any and all damages suffered as a result of the violation or default. The information contained herein is subject to change
without notice and is provided “AS IS” without warranty of any kind (express or implied). Users are advised to obtain the latest version of
relevant information to verify that information being relied on is current and complete.
9
10
MEMO
11
MEMO
12