1
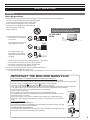
Model No. TX-L19X5B TX-L24X5B Operating Instructions LCD Television Thank you for purchasing this Panasonic product. Please read these instructions carefully before operating this product and retain them for future reference. The images shown in this manual are for illustrative purposes only. Please refer to Pan European Guarantee Card if you need to contact your local Panasonic dealer for assistance. English Contents SAFETY PRECAUTIONS..................................................................................................... 3 Warning��������������������������������������������������������������������������������������������������������������������������������������������������������������������������������������������������� 3 Caution.............................................................................................................................. 5 Maintenance..................................................................................................................... 6 Display panel, Cabinet, Pedestal����������������������������������������������������������������������������������������������������������������������������������������������������� 6 Mains plug���������������������������������������������������������������������������������������������������������������������������������������������������������������������������������������������� 6 Standard Accessories....................................................................................................... 6 Attaching the Pedestal..................................................................................................... 7 Installing Pedestal�������������������������������������������������������������������������������������������������������������������������������������������������������������������������������� 7 Uninstalling Pedestal�������������������������������������������������������������������������������������������������������������������������������������������������������������������������� 7 Wall-hanging (Not supplied)������������������������������������������������������������������������������������������������������������������������������������������������������������ 8 PART NAMES AND FUNCTIONS....................................................................................... 9 TV Controls/ Indicators����������������������������������������������������������������������������������������������������������������������������������������������������������������������� 9 TV (Side / Back)�������������������������������������������������������������������������������������������������������������������������������������������������������������������������������������� 9 Connections.................................................................................................................... 10 Computer Connection��������������������������������������������������������������������������������������������������������������������������������������������������������������������� 10 Video Equipment Connection������������������������������������������������������������������������������������������������������������������������������������������������������ 10 AC Power Cord Connection����������������������������������������������������������������������������������������������������������������������������������������������������������� 11 Aerial or Cable Connection������������������������������������������������������������������������������������������������������������������������������������������������������������ 11 Remote Control Batteries Installation.......................................................................... 11 Remote Control............................................................................................................... 12 Turning On/Off LCD TV................................................................................................... 13 Selecting Input Source................................................................................................... 13 ASPECT............................................................................................................................ 13 Initial Setup..................................................................................................................... 14 On-Screen Display.......................................................................................................... 16 Picture��������������������������������������������������������������������������������������������������������������������������������������������������������������������������������������������������� 16 Sound���������������������������������������������������������������������������������������������������������������������������������������������������������������������������������������������������� 17 Timer������������������������������������������������������������������������������������������������������������������������������������������������������������������������������������������������������ 18 Setup������������������������������������������������������������������������������������������������������������������������������������������������������������������������������������������������������ 18 Media Player���������������������������������������������������������������������������������������������������������������������������������������������������������������������������������������� 20 TROUBLESHOOTING....................................................................................................... 22 SPECIFICATIONS............................................................................................................. 23 Input Signal Compatibility Chart.................................................................................. 24 COMPONENT (Y, PB, PR), HDMI����������������������������������������������������������������������������������������������������������������������������������������������������� 24 PC (from D-sub terminal/ HDMI terminal)�������������������������������������������������������������������������������������������������������������������������������� 24 Multi-media Supported Specification.......................................................................... 25 Photo����������������������������������������������������������������������������������������������������������������������������������������������������������������������������������������������������� 25 Music������������������������������������������������������������������������������������������������������������������������������������������������������������������������������������������������������ 25 Movie����������������������������������������������������������������������������������������������������������������������������������������������������������������������������������������������������� 25 LICENSE........................................................................................................................... 26 2 SAFETY PRECAUTIONS Warning Mains plug and lead To help avoid risk of electrical shock, fire, damage or injury, please follow the warnings below: This TV is designed to operate on AC 220-240 V, 50 Hz. Insert the mains plug fully into the socket outlet. Ensure that the mains plug is easily accessible. Remove the mains plug when cleaning the TV. • • • • o not touch the mains plug •Dwith a wet hand. not damage the mains lead. •D−o− Do not place a heavy object If you detect anything unusual, immediately switch off the mains supply switch and remove the mains plug. AC 220-240 V 50 Hz on the lead. −− Do not place the lead near a high temperature object. −− Do not pull on the lead. Hold onto the mains plug body when disconnecting the plug. −− Do not move the TV with the lead plugged into a socket outlet. −− Do not twist the lead, bend it excessively or stretch it. −− Do not use a damaged mains plug or socket outlet. −− Ensure the TV does not crush the mains lead. Do not use any mains lead other than that provided with this TV. Do not place foreign objects inside the TV −− Do not allow any objects to drop into the TV through the air vents as fire or electrical shock may result. • • IMPORTANT: THE MOULDED MAINS PLUG FOR YOUR SAFETY, PLEASE READ THE FOLLOWING TEXT CAREFULLY. This TV is supplied with a moulded three pin mains plug for your safety and convenience. A 5 amp fuse is fitted in this mains plug. Shall the fuse need to be replaced, please ensure that the replacement fuse has a rating of 5 amps and that it is approved by ASTA or BSI to BS1362. Check for the ASTA mark or the BSI mark on the body of the fuse. If the mains plug contains a removable fuse cover, you must ensure that it is refitted when the fuse is replaced. If you lose the fuse cover the mains plug must not be used until a replacement cover is obtained. A replacement fuse cover may be purchased from your local dealer. Do not cut off the mains plug. Example 1 Do not use any other type of mains lead except the one supplied with this TV. The supplied mains lead and moulded plug are designed to be used with this TV to avoid interference and for your safety. If the socket outlet in your home is not suitable, get it changed by a qualified electrician. If the plug or mains lead becomes damaged, purchase a replacement from an authorized dealer. How to replace the fuse For plug type shown in example 1: Lift out the removable fuse compartment with a screwdriver and replace the fuse, then refit securely into the mains plug (see example 1). Example 2 For plug type shown in example 2: Lift open the fuse compartment, in the mains plug, with a screwdriver, and replace the fuse, then press the fuse cover down securely (see example 2). 3 Warning Take care To help avoid risk of electrical shock, fire, damage or injury, please follow the warnings below: Do not remove covers and never modify the TV yourself as live parts are accessible when they are removed. There are no user serviceable parts inside. • o not expose the TV to rain or excessive moisture. This TV must not be •Dexposed to dripping or splashing water and objects filled with liquid, such as vases, must not be placed on top of or above the TV. expose the TV to direct sunlight and other sources of heat. To prevent •Dfireo not never place any type of candle or naked flame on top or near the TV. o not place the TV on sloped or unstable surfaces, and ensure that the TV •Ddoes not hang over the edge of the base. insert foreign objects into the TV through the air vents. •DDoo not not use an unapproved pedestal / mounting equipment. Be sure to ask your local Panasonic dealer to perform the setup •or installation of approved wall-hanging brackets. strong force or impact to the display panel. •DThiso notTV apply • is designed for Table-top use. To prevent the spread of fire, keep candles or other open flames away from this product at all times Small object This product contains possibly dangerous parts that can be breathed in or swallowed by young children accidentally. Keep the dangerous parts out of reach of young children. • Radio waves o not use the TV in any medical institutions or locations with medical equipment. Radio waves from the TV may interfere •Dwith the medical equipment and cause accidents due to the malfunction. o not use the TV near any automatic control equipment such as automatic doors or fire alarms. Radio waves from the TV •Dmay interfere with the automatic control equipment and cause accidents due to the malfunction. 4 Caution Ventilation Allow sufficient space around the TV in order to help prevent excessive heat, which could lead to early failure of some electronic components. Minimum distance entilation should not be impeded by covering the •Vventilation openings with items such as newspapers, tablecloths and curtains. 10 cm 10 cm 10 cm 10 cm hether you are using the pedestal or not, always ensure the vents in the bottom of the TV are not blocked and there is •Wsufficient space to enable adequate ventilation. Moving the TV Before moving the TV, disconnect all cables. When not in use for a long time This TV will still consume some power even in the Off mode, as long as the mains plug is still connected to a live socket outlet. Remove the mains plug from the wall socket when the TV is not in use for a prolonged period of time. • Excessive volume Do not expose your ears to excessive volume from the headphones. Irreversible damage can be caused. Notice for DVB functions This TV is designed to meet the standards (as of August, 2010) of DVB-T (MPEG2 and MPEG4‑AVC(H.264)) digital terrestrial services and DVB-C (MPEG2 and MPEG4-AVC(H.264)) digital cable services. Consult your local dealer for availability of DVB-T services in your area. Consult your cable service provider for availability of DVB-C services with this TV. This TV may not work correctly with the signal which does not meet the standards of DVB-T or DVB-C. Not all the features are available depending on the country, area, broadcaster and service provider. Not all CI modules work properly with this TV. Consult your service provider about the available CI module. This TV may not work correctly with CI module that is not approved by the service provider. Additional fees may be charged depending on the service provider. The compatibility with future DVB services is not guaranteed. Check the latest information on the available services at the following website. (English only) http://panasonic.jp/support/global/cs/tv/ • • • • • • • Panasonic does not guarantee operation and performance of peripheral devices made by other manufacturers; and we disclaim any liability or damage arising from operation and/or performance from usage of such other maker’s peripheral devices. 5 Maintenance First, remove the mains plug from the socket outlet. Display panel, Cabinet, Pedestal Standard Accessories Check you have all the items shown. Remote Control (TZZ00000007A) Batteries (R03 AAA) x2 Regular care : Gently wipe the surface of the display panel, cabinet, or pedestal by using a soft cloth to clean the dirt or fingerprints. For stubborn dirt : Dampen a soft cloth with clean water or diluted neutral detergent (1 part detergent to 100 parts water). Then wring the cloth and wipe the surface. Finally, wipe away all the moisture. Caution o not use a hard cloth or rub the surface too hard. This •Dmay cause scratches on the surface. ake care not to subject the TV’s surfaces to water or •Tdetergent. Liquid inside the TV could lead to product failure. ake care not to subject the surfaces to insect repellent, •Tsolvent, thinner or other volatile substances. This may Neck and Base degrade surface quality or cause peeling of the paint. he surface of the display panel is specially treated and •Tmay be easily damaged. Take care not to tap or scratch the surface with your fingernail or other hard objects. not allow the cabinet and pedestal to make contact with •Da orubber or PVC substance for a long time. This may degrade surface quality. Mains plug Wipe the mains plug with a dry cloth at regular intervals. Moisture and dust may lead to fire or electrical shock. 6 Power Cord Screws x 3 (Assembly screws for neck and base) Attaching the Pedestal Warning Do not disassemble or modify the pedestal. therwise the TV may fall over and become damaged, and •Opersonal injury may result. Installing Pedestal 1. Place the LCD TV screen facing down on a flat surface place where maintained with soft materials (such as a blanket) for protecting the display screen. 2. Use the assembly screw to fasten the neck to the base securely. Caution Do not use any pedestal other than that provided with this TV. therwise the TV may fall over and become damaged, and •Opersonal injury may result. Do not use the pedestal if it becomes warped or physically damaged. If you use the pedestal while it is physically damaged, personal injury may result. Contact your nearest Panasonic dealer immediately. • During assembly, use only screws supplied and make sure that all screws are securely tightened. If sufficient care is not taken to ensure screws are properly tightened during assembly, the pedestal will not be strong enough to support the TV. It might fall over and become damaged and personal injury may result. 3. Use only the supplied assembly screws to fasten the pedestal securely to the TV. • Ensure that the TV does not fall over. If the TV is knocked or children climb onto the pedestal with the TV installed, the TV may fall over and personal injury may result. • Two or more people are required to install and remove the TV. If two or more people are not present, the TV may be dropped, and personal injury may result. • Caution Small object This product contains possibly dangerous parts that can be breathed in or swallowed by young children accidentally Keep the dangerous parts out of reach of young children. Uninstalling Pedestal 1. Place the LCD TV screen facing down on a flat surface place where maintained with soft materials (such as a blanket) for protecting the display screen. 2. Remove screws in two holes with screw driver. • 7 Wall-hanging (Not supplied) Wall-hanging Insets Depth of screw : minmum 6 mm maximum 7 mm Diameter : M4 Screw for fixing the TV onto the wall-hanging bracket (not supplied with the TV) (View from the side) TV Size 24 inch 19 inch VESA standard interface 75 x 75 mm 75 x 75 mm Wall-hanging bracket (Optional) Please contact your nearest Panasonic dealer to purchase the recommended optional accessories. For additional details, please refer to the manual of the optional accessories. Warning sing other wall-hanging brackets, or installing a wall •Uhanging bracket by yourself have the risk of personal injury and product damage. In order to maintain the unit’s performance and safety, be absolutely sure to ask your dealer or a licenced contractor to secure the wall-hanging brackets. Any damage caused by installing without a qualified installer will void your warranty. Do not mount the unit directly below ceiling lights (such as spotlights, floodlights or halogen lights) which typically give off high heat. Doing so may warp or damage plastic cabinet parts. Take care when fixing wall brackets to the wall. Always ensure that there are no electrical cables or pipes in the wall before hanging bracket. To prevent fall and injury, remove the TV from its fixed wall position when it is no longer in use. • • • 8 PART NAMES AND FUNCTIONS TV Controls/ Indicators 1 Remote Control Signal Receiver o not place any objects between the TV remote •Dcontrol signal receiver and remote control. 3 4 5 6 7 1 2 2 Power Indicator Red: Standby Green: On Green blink: Receiving a command from the remote control 3 VOL +/- to change volume. •UUsed sed to adjust the value of the selected item on On•Screen Menu. 4 CH a/b to change channels. •UUsed • sed to select item on On-Screen Menu. 5 MENU •Open or close the On-Screen Menu. 6 INPUT/OK se to select an input source. •UConfirm • and enter a selection. 7 (POWER) •Use to turn the TV On or Off. TV (Side / Back) 1 HDMI 1/HDMI 2 all kinds of HDMI output equipment. •CWonnect hen connecting a DVI device using an HDMI-DVI •adapter, connect the device to the HDMI1 jack. 2 AV 2 onnect video and audio output from video •Cequipment. 3 DIGITAL AUDIO OUT 7 •Connect an audio amplifier to this jack. 4 PC computer outputs to this terminal. •CConnect an audio cable to L/R jacks of AV2 and audio •outonnect jack on the computer. 5 AV 1 8 ST3 PC AUDIO via AV 2 6 Aerial Jack •Connects to TV RF signals (aerial/CATV). 7 Common Interface 10 The Common Interface Module menu provides access •to software contained on Common Interface (CI) 9 Manufactured under license from Dolby Laboratories. Dolby and the double-D symbol are trademarks of Dolby Laboratories. AV IN ST3 Modules. >PC< >PC< 1 ull SCART, which transmits RGB, S-Video and CVBS in, •Fand audio/video out (Analogue only). 2 34 5 6 8 ETHERNET his terminal is for access to the MHEG interactive •Tservices and features through an internet. •Please contact broadcasters for availability of services. 9 Headphone onnect a headphone (stereo) to this jack and the TV •Cspeaker out will be muted. 10USB onnect USB memory stick to this terminal to play •CMultimedia. 9 Connections Computer Connection Cable used for connection (This cable is not supplied with this LCD TV.) PC/VGA Cable (D-SUB 15pin) HDMI Cable Audio Cable [L/R] • • • Note: When connecting the cable, AC Power Cords of both LCD TV and external equipment should be disconnected from AC outlet. Turn LCD TV and peripheral equipment on before your computer is switched on. Note: You can connect the DVI source to HDMI1 input terminal by using the DVI to HDMI converter then connect audio input to PC audio input terminal (L/R jacks of AV2 INPUT). Video Equipment Connection Cables used for connection (These cables are not supplied with this LCD TV.) Component/Video, Audio Cable HDMI Cable: HDMI Input • • HDMI Input Note: When connecting the cable, AC Power Cords of both LCD TV and external equipment should be disconnected from AC outlet. Digital Audio Output ST3 PC AUDIO via AV 2 Manufactured under license from Dolby Laboratories. Dolby and the double-D symbol are trademarks of Dolby Laboratories. AV IN ST3 >PC< Component/Video Source AV2 IN can accept Component or Video cable. DVD video equipment (such as DVD player or high-definition TV source) Note: DIGITAL AUDIO OUT: Connect an audio amplifier to this jack. • 10 AC Power Cord Connection This LCD TV uses nominal input voltages of 220-240V AC. It is designed to work with single-phase power systems. To reduce risk of electrical shock, do not plug into any other type of power system. Consult your authorised dealer or service station if you are not sure the type of power being supplied. Connect the LCD TV with all peripheral equipment before turning the LCD TV on. Remote Control Batteries Installation 1. Remove the battery compartment cover. Caution safety, unplug AC power cord when the LCD TV is not •Finoruse. 2. Insert two size R03 AAA batteries (1.5V) according to “+” and “-” polarity markings inside the battery compartment. 3. Close the battery compartment cover. Aerial or Cable Connection Cable used for connection (This Outdoor Aerial cable is not supplied with this LCD TV.) Aerial Cable • Caution ST3 PC AUDIO via AV 2 Manufactured under license from Dolby Laboratories. Dolby and the double-D symbol are trademarks of Dolby Laboratories. AV IN ST3 >PC< Note: For all aerial circuit problems, please consult your local dealer. To insure safe operation, please observe the following precautions: Replace two batteries at the same time. Do not use a new battery with a used battery. Avoid contacting with water or liquid. Do not expose the Remote Control or Batteries to moisture, or heat such as sunshine, fire or the like. Do not drop the Remote Control. If a battery has leaked on the Remote Control, carefully wipe case clean and install new batteries. Risk of explosion if battery is replaced by an incorrect type. Dispose of used batteries according to the instructions. Remote control contains R03 AAA battery and must be kept out of reach of small children to avoid accidental ingestion. Replace only with same or equivalent type. Do not mix different battery types (such as alkaline and manganese batteries). Do not use rechargeable (Ni-Cd) batteries. • • • • • • • • • • • 11 Remote Control 1 16 2 3 17 4 5 18 19 6 20 7 8 9 21 22 23 24 10 25 11 12 13 14 15 26 27 28 29 1 Standby On / Off switch Switches TV On or Off standby. 2 Numeric buttons Changes channel and teletext pages. 3 FAVORITE Open the favourite channel list. Note: Add a channel into the favourite channel list: −− When you enter a channel, press FAVORITE button to open the favourite channel list, then press OK to add the selected channel into the favourite channel list. View a favourite channel: −− Press FAVORITE button to open the favourite channel list, selects a channel, then press OK to enter. Remove a favourite channel from the favourite channel list: −− Press FAVORITE button to open the favourite channel list, selects the channel, then press OK to enter. −− Press FAVORITE button again to open the favourite channel list, selects the current channel, then press OK to remove the channel from the favourite channel list. 4 AUDIO Selects multi audio in DVB mode or MPX selection in analogue mode. 5 OFF TIMER Sets the time settings of off timer. 6 VOL +/Press to adjust the volume. • • • • • • • • • 12 7 INPUT (TV) Switches to TV input source. 8 MUTE Press to mute or restore the sound. 9 TEXT Switches to teletext mode. Actives FreeView contents when MHEG source inputs. 10 MENU Open or close the On-Screen Menu. 11 R/G/Y/B (COLOUR BUTTON) Used for the selection, navigation and operation of various functions. Red button: Actives FreeView contents when MHEG source inputs. 12 F.P. (Favourite Page) Opens the favourite page list in teletext mode. Note: Add a teletext page into the favourite page list: −− When you enter a teletext page, press F.P. button to open the favourite page list, then press OK to add the selected teletext page into the favourite page list. View a favourite page: −− Press F.P. button to open the favourite page list, selects a teletext page, then press OK to enter the content. Remove a favourite page from the favourite page list: −− Press F.P. button to open the favourite page list, selects the teletext page, then press OK to enter the content. −− Press F.P. button again to open the favourite page list, selects the current teletext page, then press OK to remove the teletext page from the favourite page list. 13 REVEAL Reveal hidden information such as answers to a quiz. 14 Fast reverse for multi-media playback. (See page 20-21) 15 Play or pause for multi-media playback. (See page 20-21) 16 (Information) Displays channel and programme information. 17 LAST VIEW Switches to previously viewed channel or input mode. 18 GUIDE Displays TV Guide. Switches to teletext mode. 19 ASPECT Changes aspect ratio. 20 CH / Selects channel in sequence. 21 INPUT (AV) Opens input source list and switches to video input source. 22 EXIT Returns to the normal viewing screen. 23 STTL Displays subtitles. 24 a/b/c/d/ OK Confirms selections and choices. 25 BACK/RETURN Returns to the previous menu/page. 26 SUBPAGE To select the subpage when the current page contains subpages. 27 SIZE Teletext size function key. 28 Stop for multi-media playback. (See page 20-21) 29 Fast forward for multi-media playback. (See page 20-21) • • • • • • • • • • • • • • • • • • • • • • • • • • • • • Turning On/Off LCD TV 1. Complete the peripheral connections before turning on LCD TV. 2. Connect LCD TV’s AC Power Cord into an AC outlet. 3. Press POWER button on Side Control of LCD TV or use Remote Control to turn it ON. The POWER indicator will light up (green). 4. Press POWER button again to enter stand-by status, the POWER indicator will become red. Note: If there is no reaction when you press (POWER) on the remote control, press (POWER) button on Side Control again to active the TV. Selecting Input Source Select mode AV 1, AV 2, HDMI 1, HDMI 2, PC, USB, or TV by pressing INPUT(AV) button of Remote Control or INPUT/OK button of Side Control. Input Selection AV 1 AV 2 HDMI 1 HDMI 2 PC USB ASPECT Select screen size among “Auto”, “4:3“, “Zoom 1”, “Zoom 2”, “16:9” by pressing ASPECT button on Remote Control. [Auto] The optimum size and aspect can be chosen automatically, and you can enjoy finer images. [4:3] Displays the image at the standard 4:3 without distortion. [Zoom 1] Scales the classic 4:3 format to 14:9. [Zoom 2] Scales the classic 4:3 format to 16:9. [16:9] Directly displays the image at 16:9 without distortion (anamorphic). Note: [Auto] mode determines the best aspect ratio to fill the screen. It does this using a three step process (WSS, Control signal through SCART / HDMI terminal) to determine. TV 13 Initial Setup 1 Initial Setup <On-Screen> <Remote / Operation> Initial Setup Welcome to use the Wizard for Initial Setup !! Please press [OK] to start the wizard. 2 Mode Select (TV location setting) <On-Screen> Initial Setup <Remote / Operation> Mode select EXIT Please select your mode Home Back Shop Select Next Back Select Next Exit Exit Note: If you selected Shop, a message appears “Are you sure ?”. Select Yes to continue, or select No to change your selection. Select Home viewing environment to use in your home environment. Shop viewing environment is the demonstration mode to explain main features of this TV. To change viewing environment later on, you will need to initialise all settings by accessing Shipping Condition. • • 3 Country Setting <On-Screen> Initial Setup <Remote / Operation> Country EXIT Please select your country: United Kingdom Back Ireland Next Back 14 Select Next Exit Exit Select Initial Setup 4 Channel Scan <On-Screen> <Remote / Operation> Initial Setup Channel Scan EXIT First, please connect aerial. Start channel scan now ? If you skip this step, the channel scan could be performed in Menu. Back Scan Skip Scan Back Select Select Next Next Exit Exit 5 Search for channels <On-Screen> Initial Setup <Remote / Operation> Channel Scan Cancel The channel scan may take a while to complete. Status: Scanning... Analogue Channels: 2 Digital Channels: 0 15% Exit Cancel 6 Initial setup completed <On-Screen> Initial Setup <Remote / Operation> Complete Congratulations !! Completed Initial Setup. Back Please press [OK] to exit the wizard. Back 15 On-Screen Display Colour ncreases or decreases the levels of colour according to your •Ipersonal preference. (0~100) Picture Main Menu Viewing Mode 90 50 50 50 0 Brightness Colour Sharpness Tint Colour Balance Access Select • Normal Contrast Normal P-NR On 3D-COMB On Screen Display On EXIT RETURN 1. Press MENU button and ab buttons to select “Picture”, the Picture menu will be displayed. 2. Press OK button to enter Picture menu. 3. Press ab buttons to select item desired. 4. Press cd buttons to adjust value. 5. Press BACK/RETURN button to return the previous menu. 6. Press EXIT button to exit menu operation. Viewing Mode • Dynamic rovides enhanced picture contrast and sharpness when •Pviewing in a bright room. or indoor lighting conditions, change Colour Balance •Fsetting to Normal or Warm for best picture viewing. Basic picture mode Dynamic/Normal/Cinema/User/Game. Normal ecommended for viewing under normal ambient room •Rlighting conditions. Cinema • For watching movies in a darkened room with the improved performance of contrast, black and colour reproduction. User Sharpness Increases or decreases the levels of sharpness according to your personal preference. (0~100) Tint an NTSC signal source connected to the TV, the picture •Whueithcan be adjusted to suit your taste. (-50~50) •For NTSC signal reception only. • • Colour Balance Allows you to set the overall colour tone of the picture Cool/Normal/Warm. For indoor lighting conditions, change Colour Balance setting to Normal or Warm for best picture viewing. • • P-NR Enables or disables P-NR (Picture Noise Reduction) Automatically reduces unwanted picture noise and flicker noise in the contoured parts of a picture. 3D-COMB still or slow moving pictures look more vivid. •MForakes • CVBS signal reception only. • • • • Screen Display Turns the screen On or Off. Press any buttons (except Standby) to turn the screen on. The sound is active even if the screen turns off. This function is effective in reducing power consumption when listening to the sound without watching the TV screen. • Advanced Settings Provides various advanced settings for improving the picture quality. 16:9 Overscan the screen area displaying the image. •S−elects − On: Enlarges the image to hide the edge of the image. −− Off: Displays the image in the original size. •Sets the settings for your preferred. Game Adaptive Brightness response signal specifically to provide suitable images utomatically adjusts the brightness and contrast after •Fforastplaying •Aanalysing games. the input signal. This function enriches the Contrast ncreases or decreases the levels of contrast according to •Iyour personal preference. (0~100) Brightness ncreases or decreases the levels of brightness according to •Iyour personal preference. (0~100) 16 colours and the depth of the picture. Dynamic Back Light •Automatically optimises the backlight levels for dark scenes. DVI Input Settings hanges the black level in the image for HDMI input mode •Cwith DVI input signal manually. •For HDMI terminal with DVI input signal only. 3:2 Pulldown utomatically detects a film-based source (originally •Aencoded at 24 frames/second), analyses it then recreates each file frame for high-definition picture quality. 3:2 pulldown function is selectable when channel display shows an input resolution of 576i, 480i, or 1080i. • Main Menu SPDIF Selection • • Auto Mode Music 0 0 0 30 Bass Treble Balance Headphone Volume Surround MPX SPDIF Selection SPDIF Delay Access multiplex sound mode (if available). •SForelects • analogue mode only. SPDIF: A standard audio transfer file format. Selects the initial setting for digital audio output signal from DIGITAL AUDIO OUT terminal. Sound Select MPX Off Stereo Auto No Dolby Digital (if available) or default audio source •Otoutputs DIGITAL AUDIO OUT terminal. f the audio is recorded in Dolby Digital, the output from •IDIGITAL AUDIO OUT terminal will be Dolby Digital. PCM •Outputs PCM format to DIGITAL AUDIO OUT terminal. SPDIF Delay djusts the delay time of the sound output from DIGITAL •AAUDIO OUT terminal if the sound does not synchronise the EXIT RETURN 1. Press MENU button and ab buttons to select “Sound”, the Sound menu will be displayed. 2. Press OK button to enter Sound menu. 3. Press ab buttons to select item desired. 4. Press cd buttons to adjust value. 5. Press BACK/RETURN button to return the previous menu. 6. Press EXIT button to exit menu operation. Mode •Selects the basic sound mode Music/Speech. Music •Optimise sound quality for watching music videos, etc. Speech •Optimise sound quality for watching news, drama, etc. Bass image. HDMI1 input • • Digital •Selects Digital to input audio signal from HDMI terminal. Analogue elects Analogue to input audio signal from L/R jack of AV2 •SINPUT. Selects an input way of audio signal. For HDMI1 terminal only. Audio Description Audio Description −− Normal: Sets regular audio only. −− Hard of Hearing: Sets the mix of hearing impaired audio with regular audio. −− Visually Impaired: Sets the mix of visually impaired audio with regular audio. Volume •Adjusts the volume for Audio Description. (0~100) ncreases or decreases level to enhance or minimise lower, •Ideeper sound output. (-14~14) • Treble Increases or decreases level to enhance or minimise sharper, higher sound output. (-14~14) Balance •Adjusts volume level of right and left speakers. (-50~50) • Headphone Volume Adjusts the volume of the headphones. (0~100) Surround •Enriches (expanding and deepening) the sound quality. 17 Timer Setup Main Menu Main Menu Off Timer Auto Standby Off Tuning Menu Language 4 hours Display Settings Common Interface HDMI Control On System Menu Child Lock Other Settings Access Select EXIT Access Select RETURN 1. Press MENU button and ab buttons to select “Timer”, the Timer menu will be displayed. 2. Press OK button to enter Timer menu. 3. Press ab buttons to select item desired. 4. Press cd buttons to adjust value. 5. Press BACK/RETURN button to return the previous menu. 6. Press EXIT button to exit menu operation. Off Timer ets the time until the TV automatically goes to Standby •Smode. Auto Standby non-watched or non-used connected equipment go •MintoakesStandby mode to reduce the power consumption. EXIT RETURN 1. Press MENU button and ab buttons to select “Setup”, the Setup menu will be displayed. 2. Press OK button to enter Setup menu. 3. Press ab buttons to select item desired. 4. Press cd buttons to adjust value. 5. Press BACK/RETURN button to return the previous menu. 6. Press EXIT button to exit menu operation. PC Setup •For PC input source only. Input Resolution •Options change depending on signals. Clock •Sets to the minimum level if noise occurs. H-pos •Adjusts horizontal position. V-pos •Adjusts vertical position. Clock Phase •Eliminates flicker and distortion. Auto Adjustment adjusts the image settings such as position •Aandutomatically phase. Tuning Menu Auto Setup •Automatically sets the channels. Update Channel List pdates channel list without erasing the original •Uinformation. •Only available when Tuner Mode is set to Aerial. Single RF Scan •Scans single RF channels and checks the signal condition. 18 Analogue Manual Scan and stores analogue TV channels manually. •SForearches • TV mode only. Note: TV will store scanned channels, even if the scanning for channels have not completed. Channel Skip kips one or more channels when using remote control to •Sswitch between channels. Channel Sort Network •Sets network settings for your TV. Configuration −− Internet Connection: Selects On to enable network settings. −− Information: Displays information of network connection. −− IP Setting: Detects IP automatically or sets IP manually. −− Connection Test: Displays the network signal strength. Interaction channel •Reorders the channels in the programme list. nteraction channel provides an extension of broadcast •Iinteractive Channel Edit services via broadcast transmission or IP E dits the channel number or the channel name. • connection. Fine Tuning •Selects On to enable Interaction channel function. analogue channels manually when the reception MHEG5 PIN protection •Fisine-tunes poor. •Asks the viewer to enter the PIN to allow presentation. Clean Channel List SCART •Cleans all the current TV channels. •For AV1 (SCART) input source only. Language Auto Preferred Audio 1 / Preferred Audio 2 •Detects CVBS, RGB or S-Video automatically. elects the first and second preferred language for DVB Mix •Smulti audio (depending on the broadcaster). •Mix CVBS and RGB signals. Preferred Subtitle 1 / Preferred Subtitle 2 RGB elects the first and second preferred language for DVB •Ssubtitles •RGB signal is displayed. (depending on the broadcaster). Composite Display Settings •Composite signal is displayed. S-Video Teletext Character Set •S-video input is displayed. S elects teletext language. •Only for Ireland region. • System Menu Banner Display Timeout Shipping Condition •Sets how long the Information banner stays on screen. •Resets all settings, for example, when moving house. • Common Interface Uses include to watch encrypted channels. HDMI Control First, please connect your TV to a HDMI compliant device. T V will be turned on and display the previous viewed input source, when the connected HDMI compliant device is switched on. Connected HDMI compliant device will be switched to standby when TV turns to standby mode. • • OAD •Turns OAD function On or Off. Auto Download •Downloads new software by air automatically. Auto Install •Installs new software automatically Manual OAD •Upgrades software by air manually. System Information •Displays the system information of this TV. Software License •Displays the software license information of this TV. 19 Child Lock Media Player a channel / AV input to prevent access to it. •LWocks hen the locked channel / input is selected, a message •appears; you need to enter the PIN number to watch the Media Player restricted content. PIN need to enter the PIN when you access locked channel •Yorouinputs. •The default PIN is 0000. Channel Block •Prevents children from watching certain channels. Parental Rating revents children from watching certain TV programmes •Paccording to the age rating. Input Block •Disables the specific external input signals. Change PIN •Change the 4-digit parental control PIN. Clear All •Cleans child lock settings. Other Settings Power Save educes brightness of picture to economise on power •Rconsumption. Contents Select Select Photo ACCESS Movie 1. Insets the USB storage device to the USB port on the TV. 2. Press INPUT(AV) button, and the input source list will be displayed. 3. Press a/b to select USB, and press OK button to enter multi-media content. Note: Partition: FAT32, Not support NTFS format. (FAT32—Max Partition Size: 32GB, Max File Size: 4GB) Some of the USB storage devices may not be compatible with this TV, please try another USB storage devices. See page 25 for USB storage device compatibility. • • • Photo •Thumbnail Index/Single View Buttons Red Green Yellow Blue (Information) a/b/c/d •Playing Slideshow Buttons Blue 20 Music Storage Media Description lay slideshow. •PSelects type. •Selects viewing Photo, Music, or Movie •Opens option menu. • •Display file information. •Selects photos. •Go to the previous photo. •Play slideshow. eturn to the thumbnail photo •Rindex. •Go to the next photo. Description option menu. •OGopens • to the previous photo. ause slideshow and display •Psingle view of the photo. top slideshow and return to the •Sthumbnail photo index. •Go to the next photo. Music Buttons Blue Yellow (Information) a/b/c/d Description pens option menu. •OSelects • Photo, Music, or Movie. •Display file information. •Selects musics. •Rewind the selected music. •Play or pause the selected music. top the selected music and •Sreturn to the thumbnail music index. •Fast forward the selected music. Movie Buttons Blue Yellow (Information) a/b/c/d Description pens option menu. •OSelects • Photo, Music, or Movie. •Display file information. •Selects videos. •Rewind the selected movie •Play or pause the selected movie. top the selected movie and •Sreturn to the thumbnail movie index. •Fast forward the selected movie. • Option List In multi- media menu, you can press Blue colour key to select one of following options. Viewing photos Effect •TPransition hoto Size •Interval •Repeat • Playing music •Repeat Playing movies ulti Audio •MSubtitle •Aspect Change •Repeat •Viewing Mode • 21 TROUBLESHOOTING Before calling your dealer or service centre for assistance, check the matters below once again. 1. Make sure you have connected LCD TV to your equipment. 2. Check cable connection. Verify that all external equipment and power cords are properly connected. 3. Verify that all power is switched on. 4. If LCD TV still does not produce an image, re-start the external equipment. 5. If the image still does not appear, unplug LCD TV from the external equipment and check the external equipment. The problem may be with your graphics controller rather than with LCD TV. (When you reconnect LCD TV, remember to turn the external equipment and TV off before you power up LCD TV. Power the equipment back on in order of LCD TV and external equipment.) 6. If the problem still exists, check the following chart. Problem NO POWER Problem No sound There are tiny black points and/ or bright point on the TV • Try these Solutions lug this LCD TV into the AC •Poutlet. ress POWER button on side •Pcontrol or on Remote Control to turn on LCD TV. • getting trouble. the batteries. •CMheck sure nothing is between •theakeRemote Receiver and the Remote Control. ake sure you are not too far •Mfrom LCD TV when using Remote Control. operating range is •M(7maximum and a 30 degree angle of the front of the TV). s direct sunlight or strong •Iartificial light shining on LCD TV‘s Infrared Remote Receiver? Eliminate the light by closing curtains, pointing the light in a different direction, etc. A dedicated remote control is required for this model. Basically, the remote control of other brands (including Panasonic other models) cannot be used. Check the connection between the external equipment and LCD TV. When turning LCD TV on, it takes a few seconds to display the image. Check the system that you select is corresponding with the external equipment or the video equipment. Make sure the temperature is not out of the Operating Temperature (0°C ~ 35°C). Turn off power, then turn on again, re-start LCD TV. • No image • • • • • 22 the screen. This is a characteristic of the LCD panel, not a malfunction of the LCD TV. LCD panel is produced with very high accuracy technology. There is 99.99% or more dot pixel, but there is also 0.01 % or less of dot pixel lack or dot pixel that is constantly lighted. This is not defect. Regarding LCD panel characteristic, it may occur picture remain (look like a mirror) when the screen is changed if it displays same screen for a long time. Changing the picture or turn-off the power supply may recover. Stripe pattern (more, interference stripes) may show up on the screen depends on the reflected picture. Adjust the value of colour. • heck POWER Indicator. If this •Cindicator no light, this TV has Remote Control does not work Try these Solutions heck Audio cable connection •Cfrom Audio input source. djust the Sound System. •APress (+) button. •Press VOLUME button. •Dark orMUTE points of light (red, •green, orbright blue) may appear on Abnormal colour of image • Warning High voltages are used to operate this LCD TV. Do not attempt to open the cabinet. If the problem still persists after following all operating instructions, contact the sales dealer where you purchased LCD TV or the service centre. Give the model number and explain the difficulty. We will advise you how to obtain service. SPECIFICATIONS TX-L19X5B TX-L24X5B Power Source AC 220-240 V, 50Hz Energy efficiency class A A 17 W 24 W 25 kWh 35 kWh 25 W 40 W 0.3 W 0.3 W Dimensions (W × H × D) With Pedestal: 454 mm × 343 mm × 170 mm Without Pedestal (TV only): 454 mm × 303 mm × 46 mm With Pedestal: 567 mm × 406 mm × 170 mm Without Pedestal (TV only): 567 mm × 367 mm × 46 mm Mass With Pedestal: 3.5 kg Without Pedestal (TV only): 3.0 kg With Pedestal: 4.5 kg Without Pedestal (TV only): 4.0 kg On mode average power consumption Annual energy consumption*1 Rated Power Consumption Standby Power Consumption*2 Display panel Sound Aspect Ratio 16:9 Visible screen size 409.8 mm (W) × 230.4 mm (H) 18.5 inches (diagonal) 521.3 mm (W) × 293.2 mm (H) 23.5 inches (diagonal) Number of pixels 1,049,088 (1,366 (W) × 768 (H)) 2,073,600 (1,920 (W) × 1,080 (H)) Speaker (100 mm × 27 mm × 27 mm) × 2, 16 Ω (100 mm × 27 mm × 27 mm) × 2, 16 Ω Audio Output 6 W (3 W + 3 W), 10% THD 6 W (3 W + 3 W), 10% THD Headphones 3.5mm stereo mini Jack × 1 3.5mm stereo mini Jack × 1 Broadcast System Analogue: PAL-I Digital: DVB-T/T2 Aerial input VHF / UHF Operating Conditions Temperature : 0 °C - 35 °C Humidity : 20 % - 80 % RH (non-condensing) *1: Energy consumption XYZ kWh per year, based on the power consumption of the television operating 4 hours per day for 365 days. The actual energy consumption will depend on how the television is used. *2: When the TV is turned off with the remote control and no function is active. 23 Input Signal Compatibility Chart COMPONENT (Y, PB, PR), HDMI Signal name 525 (480) / 60i, 60p 625 (576) / 50i, 50p 750 (720) / 60p, 50p 1,125 (1,080) / 60i, 50i 1,125 (1,080) / 60p, 50p, 24p COMPONENT HDMI Mark : Applicable input signal PC (from D-sub terminal/ HDMI terminal) Signal name 640 × 400 @70 Hz 640 × 480 @60 Hz 640 × 480 @75 Hz 800 × 600 @60 Hz 800 × 600 @75 Hz 800 × 600 @85 Hz 1,024 × 768 @60 Hz 1,024 × 768 @70 Hz 1,024 × 768 @75 Hz 1,024 × 768 @85 Hz 1,280 × 768 @60 Hz 1,280 × 1,024 @60 Hz 1,366 × 768 @60 Hz Macintosh13” (640 × 480) Macintosh16” (832 × 624) Macintosh21” (1,152 × 870) Horizontal frequency (kHz) Vertical frequency (Hz) 31.47 31.47 37.50 37.88 46.88 53.67 48.36 56.48 60.02 68.68 47.78 63.98 48.39 35.00 49.73 68.68 70.08 59.94 75.00 60.32 75.00 85.08 60.00 70.07 75.03 85.00 59.87 60.02 60.04 66.67 74.55 75.06 Applicable input signal for PC is basically compatible to VESA standard timing Applicable input signal for PC is basically compatible to HDMI standard timing Note: Signals other than above may not be displayed properly. The above signals are reformatted for optimal viewing on your display. PC signal is magnified or compressed for display, so that it may not be possible to show fine detail with sufficient clarity. Only HDMI 1 supports PC/DVI (co-use R/L of YPbPr RCA jack for DVI mode audio input). • • • • 24 Multi-media Supported Specification Photo Format JPEG File extension Image resolution (pixel) .jpeg Baseline jpeg: 4 x 4 to 17,000 x10,000 DCF*1 and EXIF∗2 standards Progressive jpeg: Sub-sampling : 4:4:4, 4:2:2, 4:2:0 4 x 4 to 4,000 x 4,000 Details / Restrictions ∗1 : Design rule for Camera File system - unified standard established by Japan Electronics and Information Technology Industries Association (JEITA) ∗2 : Exchangeable Image File - image file format used by digital cameras Music Codec File extension Restrictions MP3 .mp3 – AAC .m4a – WMA .wma WMA lossless/WMA Pro are not supported. Movie Container File extension AVCHD .mts H.264 BP/MP/HP Video codec Dolby Digital Audio codec AVI .avi H.264 BP/MP/HP MPEG 4 MP3, MPEG1 Layer1/2, Dolby Digital, AAC, HE-AAC ASF .asf .wmv Windows Media Video v9/VC-1 Windows Media Audio v8, MP3 MKV .mkv H.264 BP/MP/HP MP3, MPEG1 Layer1/2, Dolby Digital, AAC, HE-AAC MP4 .mp4 .m4v H.264 BP/MP/HP MP3, AAC, HE-ACC TS .ts .tp H.264 BP/MP/HP MPEG 2 Dolby Digital, Dolby Digital Plus, MP3, AAC, HE-AAC PS .mpg .mpeg MPEG 1/MPEG 2 Dolby Digital, MPEG1 Layer1/2, AAC, DVD LPCM FLV .flv .f4v H.264 BP/MP/HP MP3, AAC, HE-AAC 3GPP .3gp H.264 BP/MP/HP MPEG 4 AAC, HE-AAC Note: Some files may not be played back even if they fulfill these conditions. Do not use two-byte characters or other special codes for data. The card may become unusable with this TV if the file or folder names are changed. • • • 25 LICENSE This product incorporates the following software or technology: (1) the software based in part on the work of the Independent JPEG Group, (2) the software developed by the Free Type Project. Dolby anufactured under license from Dolby Laboratories. Dolby and the double-D symbol are •Mtrademarks of Dolby Laboratories. HDMI DMI, the HDMI logo, and High-Definition Multimedia Interface are trademarks or registered •Htrademarks of HDMI Licensing LLC in United States and other countries. HD TV •The “HD TV” Logo is a trademark of DIGITALEUROPE. FreeView HD he Freeview HD words and logos are trade marks of DTV Services Ltd and are used •Tunder licence. © DTV Services Ltd. 26 Information for Users on Collection and Disposal of Old Equipment and used Batteries These symbols on the products, packaging, and/or accompanying documents mean that used electrical and electronic products and batteries should not be mixed with general household waste. For proper treatment, recovery and recycling of old products and used batteries, please take them to applicable collection points, in accordance with your national legislation and the Directives 2002/96/EC and 2006/66/EC. By disposing of these products and batteries correctly, you will help to save valuable resources and prevent any potential negative effects on human health and the environment which could otherwise arise from inappropriate waste handling. For more information about collection and recycling of old products and batteries, please contact your local municipality, your waste disposal service or the point of sale where you purchased the items. Penalties may be applicable for incorrect disposal of this waste, in accordance with national legislation. For business users in the European Union If you wish to discard electrical and electronic equipment, please contact your dealer or supplier for further information. [Information on Disposal in other Countries outside the European Union] These symbols are only valid in the European Union. If you wish to discard these items, please contact your local authorities or dealer and ask for the correct method of disposal. Note for the battery symbol (bottom two symbol examples) : This symbol might be used in combination with a chemical symbol. In this case it complies with the requirement set by the Directive for the chemical involved. Sales and Support Information Customer Communications Centre • For customers within the UK: 0844 844 3899 • For customers within Ireland: 01 289 8333 • For further support on your product, please visit our website: www.panasonic.co.uk Direct Sales at Panasonic UK • Order accessory and consumable items for your product with ease and confidence by phoning our Customer Communications Centre. Monday − Thursday 9:00am − 5:30pm, Friday 9:30am − 5:30pm (Excluding public holidays) • Or go on line through our Internet Accessory ordering application at www.pas-europe.com. • Most major credit and debit cards accepted. • All enquiries transactions and distribution facilities are provided directly by Panasonic UK. • It couldn’t be simpler! • Also available through our Internet is direct shopping for a wide range of finished products. Take a browse on our website for further details. Declaration of Conformity (DoC) Authorised Representative : Panasonic Testing Centre Panasonic Marketing Europe GmbH Winsbergring 15, 22525 Hamburg, Germany Customer’s Record The model number and serial number of this product may be found on its rear panel. You should note this serial number in the space provided below and retain this book, plus your purchase receipt, as a permanent record of your purchase to aid in identification in the event of theft or loss, and for Warranty Service purposes. Model Number Serial Number Willoughby Road, Bracknell, Berkshire, RG12 8FP Web Site: http://panasonic.net T012- © Panasonic Corporation 2012 Printed in China Q41G24MV03701&