1
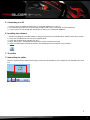
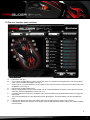
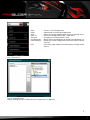
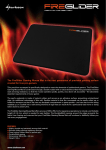
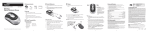
Manual Content 1.Features 2. Specifications 3. Package content 4. The mouse at a glance 5. Connecting to a PC 6. Installing the software 7. The editor 7.1 Launching the editor 7.2 The user interface (main window) 7.3 The pulldown menus 7.3.1General info 7.3.2No setting 7.3.3Keyboard 7.3.4Mouse 7.3.5Internet 7.3.6 Multimedia 7.3.7 Execute program 7.3.8 Key Combination 7.3.9 Office Sets 7.3.10 Windows 8 7.3.11 System 7.3.12 Select Macro File 7.3.13 Macro Manager 7.3.14 DPI setting 7.3.15 Report Rate 7.4 Macro Manager 7.4.1Overview 7.4.2 The tabs “Loop”, “Key”, “If” and “Equ” 7.4.3Command icons 7.4.4The record function 7.4.5 Macro play back mode 7.4.6Time control 7.4.7Absolute/relative movements 7.5 Further functions Dear customer! Thank you for purchasing this premium quality SHARKOON product. For an extended product lifetime, and to take full advantage of this product, we recommend that you read this manual completely. We hope you enjoy your experience with this Sharkoon product! SHARKOON Technologies fireglider optical 2 1. Features • • • • • • • • • Optical sensor 7 buttons, 5 of which are freely programmable DPI switch with color display (5 steps) Weight tuning system (max. 19.5 g) On-board memory for macros Smooth running and finely adjustable scroll wheel Ergonomic design for convenient handling Special grip areas offering maximum hold Supported operating systems: Windows XP, Vista, 7/8 (32-/64-bit) 2. Specifications Max. DPI/CPI 3000 DPI/CPI stepping 400-800-1200-1600-3000 Max. acceleration 5G Mouse weight max. 135 g (w/o cable) Dimensions (L x W x H) 130 x 65 x 45 mm Sensor Optical Connector USB (gold-plated) Cable length 180 cm (textile sheathing) Max. FPS 3600 Button reaction time 3 ms (left mouse button), rest 16 ms Polling rate Max. 1000 Hz (1 ms) Onboard memory Yes Number of buttons 7 DPI indication Yes (LED) Mouse slide pads 5, plastic Chip PixArt PAW3305 Lifting sensitivity 3 mm Weight Tuning System Yes, max. 19.5 g 3. Package content • • • • FireGlider Optical CD with software and manual (as PDF) Additional mouse skates Transport bag Note: If you are missing any of the items listed above, please contact our customer service immediately: [email protected] (Germany and Europe) [email protected] (international). fireglider optical 3 4. The mouse at a glance B A C D A – B – C – D – E– F– G – E F G Button 1: left mouse button Button 2: double-click button (freely programmable) Button 3: right mouse button (freely programmable) Button 4: middle mouse button and scroll wheel (freely programmable) Button 5: DPI selector Button 6: freely programmable Button 7: freely programmable B A C A – Button 6: freely programmable B – Button 7: freely programmable C – Grip area B B A A B B A – Weight tuning system (max. 19.5 g) B – Mouse slides made of teflon fireglider optical 4 5. Connecting to a PC 1. Plug the mouse’s USB connector into an available USB port on your PC. 2. The operating system will automatically recognize the mouse and install all required drivers. 3. If your mouse is not recognized, disconnect it and try it in a different USB port. 6. Installing the software 1. Before installing the included software, remove all previously installed mouse software from your system. 2. Place the included Tools CD into your CD/DVD drive. 3. Open the CD/DVD drive’s folder (e.g. D:/). 4. Start “Setup.exe” and follow the instructions of the installation wizard. 5. After completing the installation process the following icon will appear in the task bar: 7. The editor 7.1 Launching the editor Start the application by double-clicking the symbol on the desktop or the respective icon located in the task bar. fireglider optical 5 7.2 The user interface (main window) A B E C D F G H I A – File menu: see fig. 1. B – The current configuration’s name. Via the file menu any number of configurations with five profiles each can be created and edited (see fig. 1). C – Profile menu: up to five profiles can be saved on the mouse’s internal memory, select them from this dropdown menu (fig. 2). D – Rename the single profiles here. E – Button configuration: each mouse button can be assigned different functions, select these functions from the respective dropdown menu (see 7.3). F – Function definition: From this pulldown menu select the desired, pre-defined function to assign it to the button. G – This text field displays the pre-defined function description. This description may be changed any time. H – Clicking this button will close the editor without transferring the changes to the mouse. I – Clicking this button will transfer all changes made inside the editor to the mouse, the editor window remains open. fireglider optical 6 New – Creates a new configuration. Open – Opens/loads an existing configuration. Save – Saves the current configuration under its existing name. Save as – Saves the configuration under a new name. Rename – Changes the current profile’s name. Import/export – Allows for the import/export of macros (see below fig 1a). Read memory – Reads the current configuration from the internal mouse memory. Exit – Closes the editor without transferring the changes to the mouse. Fig. 1 (File menu) Fig. 1a (Import/Export): Import existing macros in AMC format or export them as AMC file. fireglider optical 7 Fig. 2 (Profile menu): Open the list by clicking the arrow. Select between profiles 1 through 5. These profiles allow defining five different button assignments within one configuration. Example: You can create different button assignments for different characters in one game. 7.3 The pulldown menus 7.3.1 General info The pulldown menus will open up when the button is pressed. The pulldown menus are similar for all mouse buttons (fig. 3). A B C A – Button B – Menu items C – Flyout menus with further functions/ options Fig. 3 By clicking the “OK” button all changes from the editor will be transferred to the mouse. Pressing “ ” will discard all changes and exit the program. fireglider optical 8 7.3.2 No setting The button is assigned no function. 7.3.3 Keyboard Assign keyboard functions to the button (fig. 4). Fig. 4 7.3.4 Mouse Clicking the arrow will bring up a flyout menu (fig. 5). Assign mouse functions to the button. Fig. 5: Assign different mouse functions to the button. fireglider optical 9 7.3.5 Internet Clicking the arrow will bring up a flyout menu (fig 6). Assign a browser function to the selected button. Fig. 6: Assign different browser commands to the button. 7.3.6 Multimedia Clicking the arrow will bring up a flyout menu (fig.7). Assign multimedia functions to the button. Fig. 7: Assign different multimedia commands to the button. fireglider optical 10 7.3.7 Execute program Designate any program being launched after pressing this button. 7.3.8 Key combination Clicking the arrow will bring up a flyout menu. Assign a key combination from the set “Text commands” (fig. 8) resp. “File Commands” (fig. 9) to the button. Fig. 8: Assign different text commands to the button. Fig. 9: Assign different file commands to the button. fireglider optical 11 7.3.9 Office Sets (OS functions) Clicking the arrow will display a flyout menu (fig. 10). Assign office functions to the button. Fig. 10: Assign different office functions to the button. 7.3.10 Windows 8 Clicking the arrow will display a flyout menu (fig. 11). Assign Windows 8 functions to the button. Fig. 11: Assign Windows 8 functions to the button. fireglider optical 12 7.3.11 System Clicking the arrow will bring up a flyout menu (fig 12). Assign a system function to the button. Fig. 12: Assign different system functions to the button. 7.3.12 Select Macro File Clicking the arrow will bring up a flyout menu (fig 13). Assign a pre-set macro function to the button. Fig. 13 fireglider optical 13 7.3.13 Macro Manager Launch the macro manager (see below 7.4). 7.3.14 DPI setting Fig. 14: Define the desired initial DPI setting matching your personal likings here. Toggle between the single DPI stepping by pressing the mouse’s DPI button. 7.3.15 Report Rate Fig. 15: Define the mouse’s report rate (= number of reports per second). Note that a higher report rate also requires more PC power. fireglider optical 14 7.4 Macro manager Using the macro manager allows you to create your own macros, which then may be assigned to any button (see 7.3.2). There are 3 ways to create a script: 1. Add the desired functions using the functions buttons and functions modules. 2. Tape mouse movements and key combinations using the record function. 3. Enter instructions using the input area resp. the keyboard connected to the PC. Save your settings by clicking “ ”. Via the button “ ”in the main window your settings will be transferred to the mouse. 7.4.1 Overview B A C D E F G H K I L J A – B – C – D – E– F– G – H – I – J– K – L– The tabs “Loop”, “Key”, “If” and “Equ” (see below 7.3.4.2) Menu bar Command icons (see below 7.3.4.3) Record function (see below 7.3.4.4) Macro play back mode (see below 7.3.4.5) Insert section repeat (see below 7.3.4.6) Insert jump instruction (see below 7.3.4.7) Define delay time (see below 7.3.4.8) Define absolute and relative mouse cursor movements (see below 7.3.4.9) Define a sequence of mouse button strokes Code area Define a sequence of key strokes fireglider optical 15 7.4.2 The tabs “Loop”, “Key”, “If” and “Equ” The tabs “Loop”, “Key”, “If” and “Equ” allows you to define different instructions which will be copied into the script by clicking the “Plug in” button. 1. Loop: a) Insert section repeat b) Insert jump instruction 2. Key: define the effect of pressing/releasing a button and copy this condition into the script using the “Plug in” button. Use the input areas to enter the respective start and end line and define how often this area shall be inserted into the script. Pressing the “Plug in” button will copy the defined section into the script. This function enables to define jump instructions which will be copied to the script using the “Plug in” button afterwards. fireglider optical 16 3. If: define different conditions and insert them into the script by clicking the “Plug in” button. 4. Equ: create different conditions and insert them into the script by clicking the “Plug in” button. 7.4.3 Command icons Save Back Next Cut Copy Paste Down Up Erase 7.4.4 The record function By selecting the “ “ button you can easily create a macro by pressing the complete keyboard and mouse actions. The single instructions will simultaneously be displayed in the code area. Using the “ “ button will save the created instruction code. fireglider optical 17 7.4.5 Macro play back mode Choose between the following menu items: Play Macro Once ONLY: the macro will be executed once by pressing the button. Play Macro Repeatedly: the macro will be executed several times. You may define if the macro is replayed until the button is released (Press to start release to stop) or if the macro is executed as long after hitting the button until any other button is pressed (Press to start. Re-press to stop). 7.4.6 Time control Tick the check boxes to define if the time delay shall be carried out after pressing the button or after releasing it. The combo boxes allow you to set time unit and time delay. “Plug in” copies your settings to the code area. 7.4.7 Absolute/relative movements To detect the current absolute coordinates grab the crosshairs ( ) by pressing (and not releasing) the mouse button and moving the crosshairs across the screen. Relative coordinates are defined using the respective input forms. With “Plug in” you copy the settings to the code area. fireglider optical 18 7.5 Further functions More functions and configurations may be accessed by right-clicking the icon “ “ in the task bar. The following context menu will be displayed (fig. 16): Fig. 16 Select between these menu items: a) Auto Launch on Boot: decides whether the mouse software shall be loaded and started during system’s start. b) Open Editor c) Exit: closes the context menu. fireglider optical 19 Legal disclaimer For potential loss of data, especially due to inappropriate handling, SHARKOON assumes no liability. All named products and descriptions are trademarks and/or registered trademarks of the respective manufacturers and are accepted as protected. As a continuing policy of product improvement at SHARKOON, the design and specifications are subject to change without prior notice. National product specifications may vary. The legal rights of the enclosed software belong to the respective owner. Please observe the license terms of the manufacturer before using the software. All rights reserved especially (also in extracts) for translation, reprinting, reproduction by copying or other technical means. Infringements will lead to compensation. All rights reserved especially in case of assignation of patent or utility patent. Means of delivery and technical modifications reserved. Disposal of your old product Your product is designed and manufactured with high quality materials and components, which can be recycled and reused. When this crossed-out wheeled bin symbol is attached to a product, it means the product is covered by the European Directive 2002/96/EC. Please be informed about the local separate collection system for electrical and electronic products. Please act according to your local rules and do not dispose of your old products with your normal household waste. The correct disposal of your old product will help prevent potential negative consequences to the environment and human health. © SHARKOON Technologies 2013 Sharkoon Technologies GmbH Siemensstraße 38 D-35440 Linden Germany [email protected] www.sharkoon.com fireglider optical 20