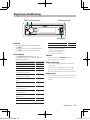
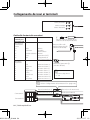
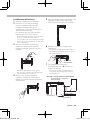
1
KDC-BT73DAB
KDC-BT53U
KDC-5057SD
CD-RECEIVER
Quick Start Guide
AMPLI-TUNER LECTEUR DE CD
Guide de démarrage rapide
CD-RECEIVER
Kurzanleitung
CD RECEIVER
Snelstartgids
SINTOLETTORE STEREO COMPACT DISC
Guida rapida all’uso
REPRODUCTOR DE DISCOS COMPACTOS
Guía de inicio rápido
CD-RECEIVER
Guia de iniciação rápida
РAДИОПРИЕMНИК С KOMПAKT–ДИСKAMИ
Краткое руководство пользователя
© 2012 JVC KENWOOD Corporation
B59-2186-00_00_13Stepup_QSG_E_En.indd 1
B59-2186-00/00 (E)
12/12/17 15:0
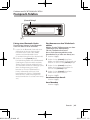
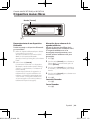
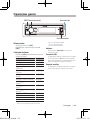
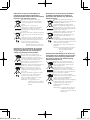
Contents
Before use
About the Quick Start Guide.......................... 2
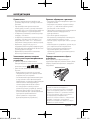
# WARNING
To prevent injuries or a fire, take
the following precautions:
Before use.............................................................. 2
Preparations.......................................................... 4
General operations............................................. 5
Playing music (CD/USB/SD/iPod).................. 6
Listening to the radio/Digital radio.............. 8
• Stop the car before operating the unit.
• To prevent a short circuit, never put or
leave any metallic objects (such as coins
or metal tools) inside the unit.
Appendix..............................................................19
! CAUTION
• Adjust the volume so that you can hear
sound outside the car. Driving with the
volume adjusted to a too high level may
cause an accident.
• Wipe off the dirt on the panel with a dry
silicon or soft cloth.
Failure to observe this precaution may
result in damage to the monitor or unit.
About the Quick Start
Guide
The unit may not function properly if the
connector between the unit and faceplate
are dirty. Detach the faceplate and clean the
connector with a cotton swab gently, being
careful not to damage the connector.
Hands-free phoning........................................... 9
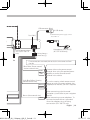
Before installation.............................................10
Connecting wires to terminals.....................12
Installing/Removing the unit........................14
Installing the Microphone unit ...................15
Installing the Digital radio antenna...........15
This Quick Start Guide describes basic
functions of this unit.
For functions not described in this Guide,
refer to the Instruction Manual on the
following website:
manual2.jvckenwood.com/edition/im362/
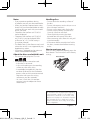
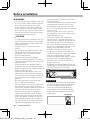
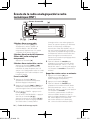
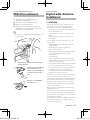
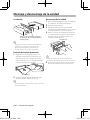
Cleaning the connector
Connector
Condensation
When the car is air-conditioned, moisture
may collect on the laser lens. This may cause
disc read errors. In this case, remove the disc
and wait for the moisture to evaporate.
To refer to the Instruction Manual, a browser
such as Internet Explorer® 7 or later, Firefox®
3.6 or later, Chrome™ 20 or later, Safari® 5.1
or later, iOS Safari® 4.0 or later, or Android™
2.2 or later is required.
2 | Quick Start Guide
B59-2186-00_00_13Stepup_QSG_E_En.indd 2
12/12/17 15:0
Notes
• If you experience problems during
installation, consult your Kenwood dealer.
• When you purchase optional accessories,
check with your Kenwood dealer to make
sure that they can work with your model
and in your area.
• Characters that conform to ISO 8859-1
can be displayed.
• Characters that conform to ISO 8859-5
or ISO 8859-1 can be displayed. Refer
to “Russian” of <12-7. Initial settings>
(Instruction Manual).
• The Radio Data System feature won’t work
where the service is not supported by any
broadcasting station.
• USB rating is indicated on the main unit
under the detachable faceplate.
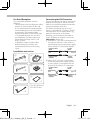
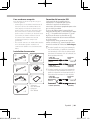
About the discs used with this unit
• This unit can only play the CDs with
Handling discs
• Do not touch the recording surface of
the disc.
• Do not stick tape etc. on the disc, or use a
disc with tape stuck on it.
• Do not use any accessories for the disc.
• Do not use any solvents to clean discs.
Use a dry silicon or soft cloth.
• Clean the disc by moving the cloth
outward from the center of the disc.
• When removing a disc from this unit, pull
it out horizontally.
• If the center hole or outside rim of a disc
has burrs, remove them before inserting
a disc.
How to reset your unit
If the unit fails to operate properly, press the
Reset button. The unit returns to the factory
settings.
Reset button
.
• The following discs cannot be used:
-- A disc that is not round
-- A disc with coloring on the recording
surface or a disc that is dirty
-- A recordable/rewritable disc that has
not been finalized (For the finalization
process, refer to the instruction manual
that came with your disc writing
software or your disc recorder.)
-- An 8 cm (3 inch) disc (An attempt
to insert using an adapter can cause
malfunction.)
B59-2186-00_00_13Stepup_QSG_E_En.indd 3
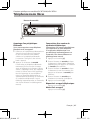
The illustrations of the display and panel appearing
in this manual are examples used to explain more
clearly how the controls are used. Therefore, what
appears on the display in the illustrations may differ
from what appears on the display on the actual
equipment, and some of the images on the display
may be inapplicable.
English | 3
12/12/17 15:0
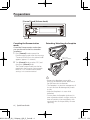
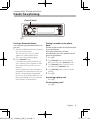
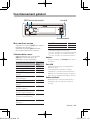
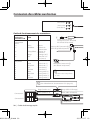
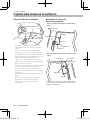
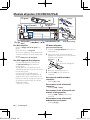
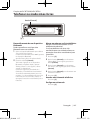
Preparations
[Control] knob (Volume knob)
Release
Canceling the Demonstration
mode
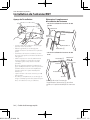
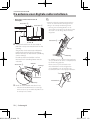
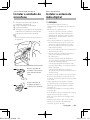
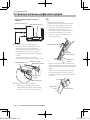
Detaching/ Attaching the faceplate
Cancel the Demonstration mode when
you use the unit for the first time after
installation.
1
Press [Control] knob to cancel the
Demonstration mode when the message
“To cancel DEMO Press the volume knob”
appears (approx. 15 seconds).
Press the
Release button.
2 Turn [Control] knob to select “YES”, and
then press [Control] knob.
The Demonstration mode can also be
canceled in the Function Setting mode.
Refer to <12-6. Demonstration mode
setting> in Instruction manual
!
• Remove the faceplate at once after
pressing the Release button; otherwise it
can fall down due to vibration.
• The faceplate is a precision component of
the unit and can be damaged by shocks
or jolts.
• Keep the faceplate in its case while
detached.
• Do not place the faceplate (and case) in
areas exposed to direct sunlight, excessive
heat or humidity. Also avoid places with
too much dust or the possibility of water
splashing.
4 | Quick Start Guide
B59-2186-00_00_13Stepup_QSG_E_En.indd 4
12/12/17 15:0
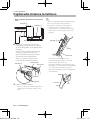
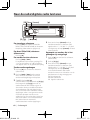
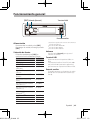
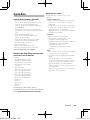
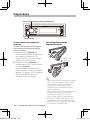
General operations
USB terminal
[SRC] [Control] knob
Auxiliary input
Power
To turn the power ON, press [SRC].
To turn the power OFF, press and hold
[SRC].
Source selection
Pressing [SRC] repeatedly switches
among sources.
Source
Display
Standby
“STANDBY”
Digital radio[2]
“DIGITAL RADIO”
Tuner
“TUNER”
USB device connected to front USB
“USB (FRONT)”
terminal
USB device connected to rear USB
“USB (REAR)”
terminal
[1]
iPod connected to front USB terminal “iPod (FRONT)”
iPod connected to rear USB terminal[1] “iPod (REAR)”
aha™ of iPod connected to front USB “aha (FRONT)”
terminal[1][2][3]
aha™ of iPod connected to rear USB “aha (REAR)”
terminal[1][2][3]
aha™ of device connected via
“aha”
Bluetooth[1][2][3]
Bluetooth audio[2] [3]
“BT AUDIO”
SD[1] [4]
“SD”
CD[1]
“CD”
Auxiliary Input
“AUX”
[3]
[4]
Function of KDC-BT53U.
Function of KDC-5057SD.
Volume
Turn [Control] knob to adjust the sound
volume.
USB terminal
A USB device or iPod can be connected.
The CA-U1EX (Max. 500mA) or KCA‑iP102
(optional accessories) is recommended
to connect a USB device or iPod.
Auxiliary input
A portable audio device can be
connected with a stereo mini-plug (3.5
mm ø).
This source can be selected only when it can
be played.
Function of KDC-BT73DAB.
[1]
[2]
B59-2186-00_00_13Stepup_QSG_E_En.indd 5
English | 5
12/12/17 15:0
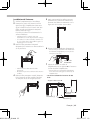
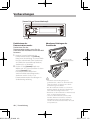
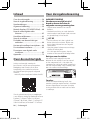
Playing music (CD/USB/SD/iPod)
Disc slot
CA-U1EX[1]
[G]
[SRC] [Control] knob
Disc slot cover
KCA-iP102[1]
[1/6] Release
[E/F] [R/S] REAR USB indicator USB Terminal
Playing a disc
Open the Disc slot cover upward.
Insert a disc in the Disc slot.
When it is inserted, the source is
switched automatically and playback
starts.
Close the Disc slot cover.
Playing a USB device/ iPod
Connect a USB device or iPod to the USB
terminal as shown above.
When it is connected, the source is
switched automatically and playback
starts.
You can connect the iPod or USB device
to either one of the USB terminals
provided at the front and rear of this unit.
If you connect it to the rear USB terminal,
the “REAR USB” indicator stays lit.
optional accessories
[1]
Playing SD card (KDC-5057SD only)
1
Press the Release button and detach the
Faceplate.
2 Hold the SD card as shown below and
insert it into the SD card slot until it
clicks.
SD card (commercially available)
3 Reattaching the Faceplate.
4 Press [SRC] to select “SD” source.
Selecting an audio file folder
Press [R] or [S].
Selecting a song (track or file)
Press [E] or [F].
Fast-forwarding or fastbackwarding a song (track or file)
Press and hold [E] or [F].
Pause and play a song (track or
file)
Press and hold [1/6].
6 | Quick Start Guide
B59-2186-00_00_13Stepup_QSG_E_En.indd 6
12/12/17 15:0
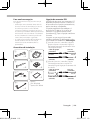
Music search
Ejecting disc
1 Press [1/6].
2 Search for a song.
Removing USB device/ iPod
You can search for the song you want to
play.
Operation type
Operation
Selecting items
Turn [Control] knob.
Determining selection
Press [Control] knob.
Returning to previous item Press [1/6].
To cancel music search in audio files or
iPod, Press and hold [1/6].
B59-2186-00_00_13Stepup_QSG_E_En.indd 7
Open the Disc slot cover upward, and
press [G].
Switch to a source other than USB, iPod,
and Aha Radio, and then remove the
USB device.
Data contained in the USB device/ iPod
may be damaged if you remove it when
it is used as the active source.
Removing SD card (KDC-5057SD only)
1
Press the Release button and detach the
Faceplate.
2 Push the SD card until it clicks and then
remove your finger from the card.
The card pops up so that you can pull it
out with your fingers.
3 Attaching the Faceplate.
English | 7
12/12/17 15:0
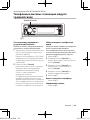
Listening to the radio/Digital radio
[SRC] [Control] knob
[1/6]
[R]
[E/F]
Selecting a tuner source
4 Turn [Control] knob to select preset
Selecting a band (FM or AM)
(Tuner only)
Recalling the stations in the
memory
Press [SRC] to select “TUNER” or “DIGITAL
RADIO” (KDC-BT73DAB only). Refer to
<Source selection> (page 5).
Press [R].
Selecting a station/ service
Press [E] or [F].
The seek mode can be changed. Refer
to <9-5. Tuner setting> or <10-9. Digital
Radio setting>in Instruction manual
Station preset memory
1 Press [R] to select a band. (Tuner only)
2 Press [E] or [F] to select the
station/ service you want to save in the
station preset memory.
number (FM/ Digital Radio: “1” – “18”,
AM: “1” – “6”), and then press and hold
[Control] knob.
1 Press [R] to select a band. (Tuner only)
2 Press [1/6].
3 Turn [Control] knob to select a preset
number (FM/ Digital Radio: “1” – “18”, AM:
“1” – “6”), and then press [Control] knob.
In the Mix Station preset mode, band
names of tuner sources are displayed as
follows:
FM: FM broadcast station
AM: AM broadcast station
DR: Digital Radio service
3 “TUNER”: Press [1/6].
“DIGITAL RADIO”: Press [1/6] twice.
Press [1/6] again to enter the Mix
Station preset mode. In this mode,
different bands and tuner sources (FM,
AM, Digital Radio etc.) can be saved
in the same preset layer, which allows
you to recall a desired station without
switching between bands and/or tuner
sources. Maximum of 6 stations can be
preset in the Mix Station preset mode.
8 | Quick Start Guide
B59-2186-00_00_13Stepup_QSG_E_En.indd 8
12/12/17 15:0
Function of KDC-BT73DAB, KDC-BT53U
Hands-free phoning
[Control] knob
[Ú]
Pairing a Bluetooth device
You can pairing your Bluetooth device in
this unit.
1
Operate the Bluetooth device to request
this unit for connection.
The name of this unit (“KDC-####”)
appears on the Bluetooth device.
“Press the volume knob” appears.
2 Press [Control] knob.
Connection to your Bluetooth device
starts, “Pairing Success” appears a while
later, and then the previous source is
selected.
When registration of your cell phone is
completed, the phone book of the cell
phone is automatically downloaded
to this unit. (If the phone book has not
been downloaded to this unit, operate
the cell phone to download it.)
B59-2186-00_00_13Stepup_QSG_E_En.indd 9
Dialing a number in the phone
book
Dial the phone number in the phone book
of your cell phone.
If the phone book has not been
downloaded to this unit, operate the cell
phone to download it.
1 Press [Ú].
2 Turn [Control] knob to select “Phone
Book”, and then press [Control] knob.
3 Turn [Control] knob to select a name,
and then press [Control] knob.
4 Turn [Control] knob to select a phone
number.
5 Press [Ú].
Answering a phone call
Press [Ú].
Disconnecting a call
Press [Ú].
English | 9
12/12/17 15:0
Before installation
# WARNING
• The unit can only be installed in a car with
a 12V DC power supply, negative ground.
• If you connect the ignition wire (red)
and the battery wire (yellow) to the car
chassis (ground), you may cause a short
circuit, that in turn may start a fire. Always
connect those wires to the power source
running through the fuse box.
! CAUTION
• Use the power harness enclosed with this
unit for connecting power. Using a power
harness enclosed with other models can
cause malfunction.
• Install this unit in the console of your
vehicle.
• Do not touch the metal parts of this unit
during and shortly after use of the unit.
Metal parts such as the heat sink and
enclosure become hot.
• Mounting and wiring this product
requires skills and experience. For safety’s
sake, leave the mounting and wiring work
to professionals.
• If you experience any problem during
installation, consult your Kenwood dealer.
• Disconnect the battery’s negative terminal
before installing the unit.
• Insulate unconnected wires with vinyl
tape or other similar materials. To prevent
a short circuit, do not remove the caps on
the ends of the unconnected wires and
terminals.
• Be sure to ground this unit to the car’s
chassis again after mounting.
• If the fuse blows, first make sure the wires
are not touching other parts to cause a
short circuit, and then replace the old fuse
with one with a new the same rating.
• When connecting only two speakers,
connect the connectors either to both
of the front output terminals or to both
of the rear output terminals (do not mix
front and rear terminals). For example, if
you connect the + connector of the left
speaker to a front output terminal, do
•
•
•
•
•
•
•
not connect the - connector to a rear
output terminal.
Connect the speaker wires correctly to the
corresponding terminals. The unit may
be damaged or fail to work if you share
the - wires or ground them to any metal
part in the car.
Do not use your own screws. Use only
the supplied screws. Using wrong screws,
could damage the unit.
If your car’s ignition key switch does
not have an ACC position, connect the
ignition wires to a power source that can
be turned on and off with the ignition
key. If you connect the ignition wires to
a constant-voltage power source, as with
battery wires, the battery may die.
If the console has a lid, make sure to
install the unit so that the faceplate will
not hit the lid when it is closed or opened.
After the installing the unit, check
whether the brake lamps, blinkers, wipers,
etc. on the car are working properly.
Mount the unit so that the mounting
angle is 30° or less.
Reception may become poor if there are
metal objects near the Bluetooth antenna.
(KDC-BT73DAB, KDC-BT53U only)
Bluetooth antenna unit
KDC-BT73DAB • This unit has the cooling fan to decrease
the internal temperature. Do not mount
the unit in a place where the cooling
fan of the unit are blocked. Blocking
these openings will inhibit the cooling
of the internal temperature and result in
malfunction.
Cooling fan
10 | Quick Start Guide
B59-2186-00_00_13Stepup_QSG_E_En.indd 10
12/12/17 15:0
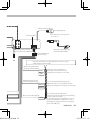
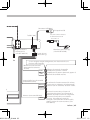
Connecting the ISO Connector
For Good Reception
To assure good reception, note the
following:
• Communicate with the cell phone within
the line-of-sight distance of 10 m (30
ft). The communication range becomes
shorter depending on the surrounding
environment. The communication
range also becomes shorter when there
is an obstacle between this unit and
the cell phone. The above maximum
communication range (10 m) is not
always assured.
• A broadcast station or walkie-talkie
located nearby can interfere with
communication due to a too strong
signal.
Installation accessories
1
2
Ignition cable
(Red)
Unit
5[1]
.....1
The pin arrangement for the ISO connectors
depends on the type of vehicle you drive.
Make sure to make the proper connections
to prevent damage to the unit.
The default connection for the wiring
harness is described in 1 below. If the ISO
connector pins are set as described in 2,
make the connection as illustrated.
Please be sure to reconnect the cable as
shown 2 below to install this unit to the
Volkswagen vehicles etc.
1When the A-7 pin (red) is connected with
the ignition, and the A-4 pin (yellow) is
connected to the constant power supply
of the vehicle’s ISO connector (default):
Battery cable
(Yellow)
.....1
6[1]
.....3
.....1 (3m)
Unit
Battery cable
(Yellow)
7[1]
3[1][2]
Vehicle
A-4 Pin
(Yellow)
2When the A-7 pin (red) is connected
to the constant power supply, and the
A-4 pin (yellow) is connected with the
ignition of the vehicle’s ISO connector:
Ignition cable
(Red)
.....2
A-7 Pin
(Red)
A-7 Pin
(Red)
Vehicle
A-4 Pin
(Yellow)
.....1
KDC-BT73DAB only
KDC-BT53U only
[1]
4[1]
[2]
.....1
B59-2186-00_00_13Stepup_QSG_E_En.indd 11
English | 11
12/12/17 15:0
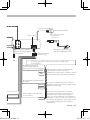
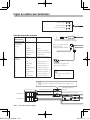
Rear output
Front output
R
Subwoofer output
L
SW FRONT REAR
Connecting wires to terminals
Connector Function Guide
Pin Numbers for
ISO Connectors
External Power
Connector
A-4
A-5
A-6
A-7
A-8
Cable Colour
Functions
Yellow
Blue/White
Orange/White
Red
Black
Battery
Power Control
Dimmer
Ignition (ACC)
Earth (Ground)
Connection
Speaker
Connector
B-1
B-2
B-3
B-4
B-5
B-6
B-7
B-8
Purple
Purple/Black
Gray
Gray/Black
White
White/Black
Green
Green/Black
Rear Right (+)
Rear Right (–)
Front Right (+)
Front Right (–)
Front Left (+)
Front Left (–)
Rear Left (+)
Rear Left (–)
FM/AM antenna input (JASO)
(KDC-BT73DAB, KDC-BT53U only)
R
Digital radio antenna
(Accessory5)
(KDC-BT73DAB only)
Microphone (Accessory3)
(KDC-BT53U only)
⁄
• Speaker Impedance:
4–8Ω
⁄ See <Connecting the ISO Connector> (page 11).
Connector A
8
7
6
5
4
3
2
1
Connector B
8
7
6
5
4
3
2
1
Red (A–7 Pin)
Red (Ignition wire)
Yellow (A–4 Pin)
Yellow (Battery wire)
KDC-BT73DAB only
12 | Quick Start Guide
B59-2186-00_00_13Stepup_QSG_E_En.indd 12
12/12/17 15:0
(JASO)
53U only)
USB connector (0.8m)
To USB device.
USB maximum power supply current : DC 5 V = 1 A
Fuse (10A)
R
L
FM/AM antenna input
(JASO)(KDC-5057SD
only)
Wiring harness
(Accessory1)
Microphone (Accessory3)
(KDC-BT73DAB only)
If no connections are made, do not let the wire come out from
the tab.
Blue/White (Power control/
Antenna control wire)
P.CONT
ANT.
CONT
Light Blue/Yellow (Steering
remote control wire)
REMOTE CONT
STEERING WHEEL
REMOTE INPUT
wire)
y wire)
Brown (Mute control wire)
B59-2186-00_00_13Stepup_QSG_E_En.indd 13
MUTE
Connect either to the power control
terminal when using the optional power
amplifier, or to the antenna control
terminal in the vehicle.
To use the steering wheel remote control
feature, an exclusive remote adapter (not
supplied) that matches your car is required.
When connecting to the Kenwood
navigation system: Refer to your navigation
manual.
When connecting to a car telephone: To
connect the terminal that is grounded
when the telephone rings or during
conversation. (KDC-5057SD only)
English | 13
12/12/17 15:0
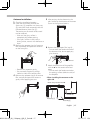
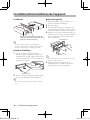
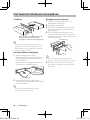
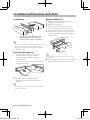
Installing/Removing the unit
Installation
Removing the unit
1
Bend the tabs of the mounting sleeve
with a screwdriver or the like and
attach it in place.
<
Remove the trim plate with reference to
<Removing the trim plate>.
2 Remove the faceplate.
3 Insert the two extraction keys
(Accessory2) deeply into the slots on
both sides as shown.
4 Lower the extraction key toward the
bottom, and then pull out the unit
halfway while pressing the extraction key
towards the inside.
Accessory2
• Make sure that the unit is installed
securely in place. If the unit is unstable, it
may malfunction (for example, the sound
may skip).
Removing the trim plate
1
Engage the catch pins on the extraction
key (Accessory2) and release the two
locks on the upper part of frame.
Lift up and pull the frame forward as
shown in the figure.
Lock
!
• Be careful to avoid injury from the catch
pins on the extraction key.
5 Pull the unit all the way out with your
hands, being careful not to drop it.
Catch
Accessory2
2 When the upper part of frame is
removed, remove the lower part of frame.
<
• The frame can be removed from the
bottom side in the same manner.
14 | Quick Start Guide
B59-2186-00_00_13Stepup_QSG_E_En.indd 14
12/12/17 15:0
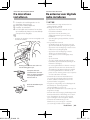
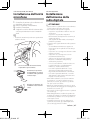
KDC-BT73DAB, KDC-BT53U only
KDC-BT73DAB only
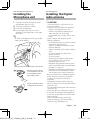
Installing the
Microphone unit
Installing the Digital
radio antenna
1
! CAUTION
• This film antenna is exclusively for use
inside the vehicle.
• Do not install at the following locations:
-- Where it may block driver’s view
-- Where it may obstruct operation of
safety devices such as air bags
-- On movable glass surface such as rear
hatch
• Signal strength will decrease at the
following locations:
-- On IR reflecting glass or where covered
with mirror type glass film -- Where it overlaps with genuine radio
antenna (pattern)
-- Where it overlaps with window heating
wires
-- At side of vehicle (e.g. door, front
quarter window)
-- On rear window
-- When glass that blocks radio signals
(e.g. IR reflecting glass, thermal
insulation glass) is used
-- Reception may decrease due to noise
when windshield wiper, air conditioner,
or motor is turned on.
-- Reception may decrease depending on
the direction of the broadcast station
with respect to the vehicle (antenna).
• Be sure to check the installation location
of film antenna (Accessory 4) before
installing. Film antenna cannot be
re-pasted.
• Thoroughly wipe oil and dirt from the
pasting surface with the included cleaner
(Accessory 7).
• Do not bend or damage the film antenna
(Accessory 4).
• Warm the pasting surface by turning on
the heater for example, before applying.
• It may not be possible to install on some
type of vehicle.
• Check the cable routing of the film
antenna (Accessory 4) and amplifier
(Accessory 5) before pasting.
Check the installation position of the
microphone (Accessory 3).
2 Clean the installation surface.
3 Install the microphone.
4 Lay the cable up to the unit with it
secured at several positions using tape
or the like.
<
• Install the microphone as far as possible
from the cell phone.
Accessory3
Fix the cable with a commercial item of tape.
Remove the separator of
the microphone, and stick
the microphone to the
place shown above.
Adjust the direction of the
microphone to the driver.
B59-2186-00_00_13Stepup_QSG_E_En.indd 15
English | 15
12/12/17 15:0
KDC-BT73DAB only
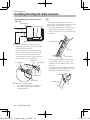
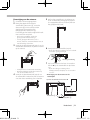
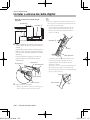
Installing the Digital radio antenna
Installation overview
Accessory45
Determining the antenna
installation location
• When installing the antenna on the
left side
Front pillar
150 mm
Earth sheet
Antenna cable (3.5 m)
70 mm*
• The antenna should be installed on the
passenger side for safety.
• Use cord clamper (Accessory 6) to
secure the antenna to the pillar at several
locations.
• The direction of the antenna film
(Accessory 4) changes depending on
whether the film antenna is installed on
the right side or left side.
• Separate the antenna film (Accessory 4)
from the ceramic line (black part) at the
top of the front glass by 150 mm.
Also, place it about 70 mm inside the
ceramic line at the side end of the front
glass. (where the earth sheet of the
amplifier can be pasted on the metal part
of the front pillar)
• Separate from other antennas by at least
100 mm.
• Do not paste the amplifier (Accessory 5)
on the ceramic line (black part) around
the front glass. Because there is not
enough adhesion.
Accessory4
Accessory5
• When installing the antenna on the
right side
Accessory5
Front pillar
Earth sheet
150 mm
Accessory4
70 mm*
*Where the earth sheet of amplifier unit
(Accessory 5) can be pasted on the metal
part of the front pillar.
16 | Quick Start Guide
B59-2186-00_00_13Stepup_QSG_E_En.indd 16
12/12/17 15:0
Antenna Installation
1 Check the installation location.
2 Clean the area where antenna film
3
(Accessory 4), amplifier unit (Accessory
5), and earth sheet are pasted with the
included cleaner (Accessory 7).
The coating on the metal surface need
not be removed.
• Wait until the glass surface is
completely dry before pasting.
• If the glass surface is cold, such as
during winter, warm it with defroster or
dryer.
Remove the separator (tag I) of antenna
film horizontally and paste the antenna
on the front glass.
5 After pasting, rub the element in the
glass surface in the direction of the arrow
shown in the figure to bond it.
6 Remove the application film (tag III).
• Do not touch the feeder terminal of
the element. Also, do not apply any
glass cleaner.
Feeder terminal
7 Match the protrusion of the amplifier
• Remove the separator gently.
• Do not touch the pasting surface
(adhesive side) of the antenna film.
4 Remove the separator (tag II) of antenna
film vertically and paste the antenna
gently while applying pressure.
B59-2186-00_00_13Stepup_QSG_E_En.indd 17
with the 5 on the antenna film and
paste.
• Do not touch the feeder terminal or
the pasting surface (adhesive side) of
the amplifier.
• When installing the antenna on the
right side
Match the protrusion with 5
Earth sheet
Accessory4
Accessory5
English | 17
12/12/17 15:0
KDC-BT73DAB only
Installing the Digital radio antenna
• When installing the antenna on the
left side
Accessory5
Accessory4
Earth sheet
Match the protrusion with 5
8
Remove the film covering the earth
sheet and paste the earth sheet on the
metal part of the vehicle.
Provide sufficient leeway for the earth
sheet so that it does not interfere with
the interior parts (front pillar cover). Also take care that the interior parts do
not interfere with the amplifier.
Accessory5
Front glass
Front pillar
<
• Take the following precautions when
passing the antenna cable inside the front
pillar where the air bag is installed.
-- Install the amplifier part of the antenna
cable in front or above the air bag so
that the antenna and the air bag do not
interfere.
Accessory5
Air bag
Front pillar
-- The front pillar cover is secured with
a special clip which may need to be
replaced when the front pillar cover is
removed.
Contact your vehicle dealer for details
on replacing the front pillar cover and
availability of replacement parts.
Interior part
Earth sheet
9 Wire the antenna cables.
Interior part
Clip
• Use cord clamper (Accessory 6) to
secure the antenna to the pillar at
several locations.
18 | Quick Start Guide
B59-2186-00_00_13Stepup_QSG_E_En.indd 18
12/12/17 15:0
Appendix
About Audio file
• Playable Audio files
AAC-LC (.m4a), MP3 (.mp3), WMA (.wma),
WAV (.wav) of USB device/ SD card
• Playable disc media
CD-R/RW/ROM
• Playable disc file formats
ISO 9660 Level 1/2, Joliet, Long file name.
• Playable USB devices USB mass storage class
• Playable SD cards SD card (≤2 GB), SDHC card (≤32 GB)
• Playable USB device/ SD card file systems
FAT12, FAT16, FAT32
The online manual about
audio files is put on the site,
www.kenwood.com/cs/ce/audiofile/.
Models of iPods/iPhones that can
be connected to this unit
Made for
• iPod touch (4th generation)
• iPod touch (3rd generation)
• iPod touch (2nd generation)
• iPod touch (1st generation)
• iPod classic
• iPod with video
• iPod nano (6th generation)
• iPod nano (5th generation)
• iPod nano (4th generation)
• iPod nano (3rd generation)
• iPod nano (2nd generation)
• iPod nano (1st generation)
• iPhone 4S
• iPhone 4
• iPhone 3GS
• iPhone 3G
• iPhone
For information on the compatibility with
iPod/iPhone software, visit www.kenwood.
com/cs/ce/ipod/.
B59-2186-00_00_13Stepup_QSG_E_En.indd 19
Requirements Aha™:
Requirements for listening to the Aha™ are as
follows:
iPhone or iPod touch
• Use an Apple iPhone or iPod touch running
iOS4 or later.
• Search for “aha” in the Apple iTunes App Store
to find and install the most current version of
the Aha™ application on your device.
• iPhone/ iPod touch connected to this unit with
a KCA-iP102.
Android™
• Use Android OS 2.2 or later.
• Download the Aha™ application to your
smartphone from the Google Play.
• Bluetooth must be built in and the following
profiles must be supported.
- SPP (Serial Port Profile)
- A2DP (Advanced Audio Distribution Profile)
NOTE
• In the application on your device, log in and
create a free account with Aha.
• Internet connection by LTE, 3G, EDGE, or WiFi.
• Because Aha™ is a third-party service, the
specifications are subject to change without
prior notice. Accordingly, compatibility may
be impaired or some or all of the services may
become unavailable.
• Some Aha™ functionality cannot be operated
from this unit.
English | 19
12/12/17 15:0
Table des matières
Avant utilisation
À propos du Guide de démarrage
rapide...........................................................20
Avant utilisation...........................................20
Préparatifs......................................................22
Fonctionnement général.........................23
Diffusion de musique (CD/périphérique
USB/carte SD/iPod).................................24
Écoute de la radio analogique/de la
radio numérique (RNT)..........................26
Téléphonie mains libres............................27
Avant installation........................................28
Connexion des câbles aux bornes........30
Installation/Désinstallation de
l'appareil.....................................................32
Montage du microphone ........................33
Installation de l'antenne RNT..................33
Annexe............................................................37
# AVERTISSEMENT
Pour éviter toute blessure et/
ou incendie, veuillez prendre les
précautions suivantes :
À propos du Guide de
démarrage rapide
Ce Guide de démarrage rapide décrit les
fonctions de base de cet appareil.
Les fonctions qui ne sont pas décrites ici, le
sont dans le mode d'emploi que vous trouverez
à l'adresse suivante :
manual2.jvckenwood.com/edition/im362/
• Arrêtez le véhicule avant d'utiliser
l'appareil.
• Pour éviter tout court-circuit, ne posez
jamais d'objets métalliques (telles que
pièces ou outils métalliques) à l'intérieur
de l'appareil.
! ATTENTION
• Réglez le volume de façon à pouvoir
entendre le son à l'extérieur du véhicule.
Conduire avec un volume sonore trop
élevé peut entraîner un accident.
• Nettoyez les poussières se déposant sur la
façade à l'aide d'un chiffon sec siliconé ou
d'un chiffon doux.
Si vous ne prenez pas cette précaution,
vous pouvez endommager l'écran ou
l'appareil.
Nettoyage des connecteurs
L'appareil ne fonctionne pas correctement si
les connecteurs le reliant au panneau frontal
sont sales. Retirez le panneau frontal et
nettoyez le connecteur délicatement avec
une tige de coton ouaté, en prenant soin de
ne pas endommager le connecteur.
Connecteur
Condensation
Pour consulter le mode d'emploi, vous devez
disposer d'un navigateur Internet, par exemple
Internet Explorer® 7 (ou une version ultérieure),
Firefox® 3.6 (ou une version ultérieure),
Chrome™ 20 (ou une version ultérieure), Safari®
5.1 (ou une version ultérieure), iOS Safari® 4.0
(ou une version ultérieure) ou bien Android™
2.2 (ou une version ultérieure).
De la condensation peut se former sur la
lentille du laser si le véhicule est climatisé.
Cela peut entraîner des erreurs de lecture
des disques. En pareil cas, retirez le disque
et laissez l'appareil au repos le temps que la
condensation s'évapore.
20 | Guide de démarrage rapide
B59-2186-00_00.indb 20
2012/12/17 15:1
Remarques
• Si vous rencontrez des problèmes
pendant l’installation, consultez votre
revendeur Kenwood.
• Lorsque vous achetez des accessoires en
option, vérifiez auprès de votre revendeur
Kenwood que ceux-ci fonctionnent avec
votre modèle et dans votre région.
• Les caractères conformes à l'ISO 8859-1
peuvent être affichés.
• Les caractères conformes à l'ISO 8859-5
ou l'ISO 8859-1 peuvent être affichés.
Reportez-vous à la description de
l'option « Russian » dans la section <12-7.
Préférences> du mode d'emploi.
• La fonction Radio Data System ne
fonctionne pas dans les régions où le
service n'est pris en charge par aucune
station de diffusion.
• Les données d'alimentation nominale via
le port USB sont mentionnées sur l'unité
principale, derrière la façade amovible.
À propos des disques utilisables
avec cet appareil
• Cet appareil ne peut lire que les CD
comportant
.
• Les disques suivants sont incompatibles
avec cet appareil :
-- Les disques qui ne sont pas ronds.
-- Les disques sales ou comportant
des colorations sur la surface
d'enregistrement.
-- Les disques inscriptibles/réinscriptibles
dont la gravure n'a pas été finalisée
(pour plus d'informations sur la
finalisation d'une gravure, reportez-vous
au manuel d'utilisation fourni avec votre
logiciel de gravure ou votre graveur.)
-- Les disques de 8 cm de diamètre
(une tentative d'insertion avec
un adaptateur peut entraîner des
dysfonctionnements.)
B59-2186-00_00.indb 21
Manipulation des disques
• Ne touchez pas la surface
d’enregistrement des disques.
• Ne collez pas de ruban adhésif, etc. sur les
disques et n'utilisez pas de disques avec
du ruban adhésif collé dessus.
• N'utilisez aucun accessoire avec les
disques.
• N'utilisez aucun solvant pour nettoyer les
disques. Utilisez un chiffon sec siliconé ou
un chiffon doux.
• Nettoyez le disque avec un chiffon,
radialement en partant du centre vers
l'extérieur.
• Pour retirer un disque de cet appareil,
tirez-le horizontalement.
• Si l'anneau intérieur ou la bordure
extérieure d'un disque présente des
bavures, retirez-les avant d'insérer le disque.
Comment réinitialiser votre
appareil
Si l'appareil ne fonctionne pas correctement,
appuyez sur le bouton de réinitialisation. Les
paramètres d'usine sont alors restaurés.
Bouton de
réinitialisation
Les illustrations d’affichage et de panneau utilisées
dans ce manuel sont des exemples qui permettent
d'expliquer plus clairement l'utilisation des
commandes. Il est donc possible que les illustrations
d’affichage soient différentes de ce qui apparaît
réellement sur votre appareil et que certaines
images d'affichage ne soient pas applicables.
Français | 21
2012/12/17 15:1
Préparatifs
Bouton de contrôle
Dégagement
Désactivation du mode de
démonstration
Retrait/fixation de la façade
Vous devez désactiver le mode de
démonstration lors de la première
utilisation de l'appareil.
1
Appuyez sur le bouton de contrôle lorsque
le message « To cancel DEMO Press the
volume knob » (Appuyez sur le bouton
de contrôle pour désactiver le mode de
démonstration) s'affiche à l'écran (vous
disposez d'environ 15 secondes).
Appuyez sur la touche
de dégagement.
2 Tournez le bouton de contrôle de façon à
sélectionner « YES » (Oui), puis appuyez sur
le bouton de contrôle pour confirmer.
Le mode de démonstration peut également
être désactivé via le mode de réglage des
fonctions. Reportez-vous à la section <12-6.
Réglage du mode de démonstration> dans
le mode d'emploi
!
• Retirez la façade immédiatement après avoir
appuyé sur la touche de dégagement ; vous
éviterez tout risque de chute du fait des
vibrations.
• La façade est un composant de précision de
l'appareil et peut être endommagée en cas de
chocs ou de secousses.
• Conservez la façade dans son étui lorsqu'elle est
détachée.
• N'exposez pas la façade (et son étui) à la lumière
directe du soleil ou à une chaleur ou humidité
excessive. Évitez également les endroits trop
poussiéreux ou exposés aux éclaboussures.
22 | Guide de démarrage rapide
B59-2186-00_00.indb 22
2012/12/17 15:1
Fonctionnement général
[SRC] Bouton de contrôle
Port USB
Entrée auxiliaire
Mise sous/hors tension
Appuyez sur la touche [SRC] pour mettre
l'appareil sous tension.
Maintenez la touche [SRC] enfoncée
pour mettre l'appareil hors tension.
Sélection de la source
Appuyez plusieurs fois sur la touche
[SRC] pour commuter entre les
différentes sources disponibles.
Source
Option
affichée
Mode veille
“STANDBY”
[2]
Radio numérique (RNT)
“DIGITAL RADIO”
Radio analogique
“TUNER”
Périphérique USB relié au port USB
“USB (FRONT)”
en façade
Périphérique USB relié au port USB à “USB (REAR)”
l'arrière de l'appareil
iPod relié au port USB en façade[1]
“iPod (FRONT)”
iPod relié au port USB à l'arrière de
“iPod (REAR)”
l'appareil[1]
Application aha™ via l'iPod relié au
“aha (FRONT)”
port USB en façade[1][2][3]
Application aha™ via l'iPod relié au
“aha (REAR)”
port USB à l'arrière de l'appareil[1][2][3]
Application aha™ via le périphérique “aha”
relié par une connexion Bluetooth[1]
Carte SD[1][4]
CD[1]
Entrée auxiliaire
“SD”
“CD”
“AUX”
Cette source n'est disponible que lorsqu'un
dispositif compatible est connecté.
Fonction spécifique au modèle KDC-BT73DAB.
[3]
Fonction spécifique au modèle KDC-BT53U.
[4]
Fonction spécifique au modèle KDC-5057SD.
[1]
[2]
Volume
Tournez le bouton de contrôle pour ajuster
le volume.
Port USB
Vous pouvez connecter un périphérique
USB ou un iPod.
Il est recommandé d'utiliser les câbles
adaptateurs CA-U1EX (intensité maximale
500 mA) ou KCA-iP102, proposés en option,
pour relier un périphérique USB ou un iPod.
Entrée auxiliaire
Un périphérique audio portatif peut être
connecté avec une mini-prise stéréo (ø
3,5 mm).
[2][3]
Périphérique relié par une connexion
Bluetooth[2][3]
B59-2186-00_00.indb 23
“BT AUDIO”
Français | 23
2012/12/17 15:1
Diffusion de musique (CD/périphérique USB/
Fente pour
le disque
[SRC] Bouton de contrôle
cart
CA-U1EX
[1]
[G]
Cache de la fente
d'insertion de disque
KCA-iP102[1]
[1/6] Dégagement [E/F] [R/S] Voyant du port USB arrière Port USB
Écouter un disque
Soulevez le cache de la fente d'insertion
de disque.
Insérez un disque dans la fente pour le
disque.
Une fois le disque inséré, la source change
automatiquement et la lecture démarre.
Refermez le cache de la fente d'insertion
de disque.
Retrait d'un périphérique USB/iPod
Connectez un périphérique USB ou un iPod
à la port USB.
Une fois le périphérique connecté, la source
change automatiquement et la lecture
démarre.
Vous pouvez relier l'iPod ou le périphérique
USB indifféremment sur l'un des deux ports
USB de l'appareil, celui en façade ou bien
celui situé à l'arrière.Lorsque vous connectez
un périphérique sur le port USB situé à
l'arrière de l'appareil, le voyant « REAR USB »
(Port USB arrière) reste allumé.
Accessoires proposés en option
[1]
Lecture à partir d'une carte SD
(KDC-5057SD uniquement)
1
Appuyez sur la touche de dégagement et
retirez la façade.
2 Présentez la carte SD comme illustré ci-après
et insérez-la dans l'emplacement pour carte
SD jusqu'à entendre un clic.
Carte SD (disponible dans le
commerce)
3 Remettez la façade en place.
4 Appuyez sur la touche [SRC] pour
sélectionner la source « SD ».
Sélection d'un dossier de fichiers
audio
Appuyez sur la touche [R] ou [S].
Choix d'un morceau (piste ou fichier)
Appuyez sur la touche [E] ou [F].
Avance ou retour rapide pour un
morceau (piste ou fichier)
Maintenez la touche [E] ou [F]
enfoncée.
Mise en pause et lecture d'un
morceau (piste ou fichier)
Maintenez la touche [1/6] enfoncée.
24 | Guide de démarrage rapide
B59-2186-00_00.indb 24
2012/12/17 15:1
carte SD/iPod)
Recherche de morceau
Éjection du disque
1 Appuyez sur la touche [1/6].
2 Recherchez un morceau.
Retrait d'un périphérique USB/iPod
Vous pouvez rechercher le morceau que
vous voulez écouter.
Description
Tourner le bouton de
contôle.
Confirmation d'une sélection Appuyez sur le bouton de
contrôle.
Retour à l'élément précédent Appuyez sur la touche
[1/6].
Soulevez le cache de la fente d'insertion
de disque puis appuyez sur la touche [G].
Commutez la source sur une source autre
que celles correspondant à l'iPod et à
l'application Aha Radio, puis déconnectez
l'iPod.
Les données stockées sur le périphérique
USB/iPod risquent d'être altérées si vous le
retirez lorsqu'il est utilisé en tant que source
active.
Type d’opération
Sélection d'éléments
Pour annuler la recherche musicale dans
les fichiers audio ou sur l'iPod, maintenez la
touche [1/6] enfoncée.
B59-2186-00_00.indb 25
Retrait d'une carte SD
(KDC-5057SD uniquement)
1
Appuyez sur la touche de dégagement et
retirez la façade.
2 Appuyez sur la carte SD jusqu'à entendre un
clic, puis retirez votre doigt de la carte.
La carte SD est alors éjectée hors de la fente
et vous pouvez aisément la prendre avec
les doigts.
3 Remettez ensuite la façade en place.
Français | 25
2012/12/17 15:1
Écoute de la radio analogique/de la radio
numérique (RNT)
[SRC] Bouton de contrôle
[1/6]
[R]
[E/F]
d'enregistrer dans une même gamme de
favoris des stations réparties sur différentes
bandes de fréquences et différentes
transmissions radio (FM, AM, RNT, etc.), ce
qui vous permet de rappeler une station
sans devoir au préalable changer de bande
de fréquences et/ou de source radio. Vous
pouvez enregistrer un maximum de 6
stations dans le mode de préréglage toutes
stations confondues.
Sélection d'une source radio
Appuyez sur la touche [SRC] pour
sélectionner la source « TUNER » ou
« DIGITAL RADIO » (KDC-BT73DAB
uniquement). Reportez-vous à la section
<Sélection de la source> (page 23).
Sélection d'une bande de fréquences
(FM ou AM) (radio analogique
uniquement)
Appuyez sur la touche [R].
Sélection d'une station/d'un service
Appuyez sur la touche [E] ou [F].
Il est possible de modifier le mode de
recherche de station. Reportez-vous à la
section <9-5. Configuration radio> ou <10-9.
Configuration de la radio numérique> dans
le mode d'emploi
Favoris radio/RNT
1
Appuyez sur la touche [R] pour
sélectionner une bande de fréquences.
(Radio analogique uniquement.)
2 Appuyez sur la touche [E] ou [F] pour
sélectionner la station/le service que vous
voulez enregistrer dans les favoris radios/RNT.
3 Pour la source « TUNER » : appuyez sur la
touche [1/6].
Pour la source « DIGITAL RADIO » : appuyez
deux fois sur la touche [1/6].
Appuyez à nouveau sur la touche [1/6]
pour passer en mode de réglage combiné
des favoris radio. Ce mode permet
4 Tournez le bouton de contrôle pour
sélectionner un numéro de favori (bande
FM/radio numérique : entre « 1 » et « 18»,
bande AM : entre « 1 » et « 6»), puis appuyez
sur le bouton de contrôle et maintenez-le
enfoncé.
Rappel des stations mises en mémoire
1
Appuyez sur la touche [R] pour
sélectionner une bande de fréquences.
(Radio analogique uniquement.)
2 Appuyez sur la touche [1/6].
3 Tournez le bouton de contrôle pour
sélectionner un numéro de favori (bande
FM/radio numérique : entre « 1 » et « 18»,
bande AM : entre « 1 » et « 6»), puis appuyez
sur le bouton de contrôle.
Le nom des sources/modes de diffusion
radio sont affichés comme suit dans le
mode de réglage combiné des favoris radio :
FM : station diffusée sur la bande FM
AM : station diffusée sur la bande AM
DR : service de radio numérique (RNT)
26 | Guide de démarrage rapide
B59-2186-00_00.indb 26
2012/12/17 15:1
Fonction spécifique aux modèles KDC-BT73DAB, KDC-BT53U
Téléphonie mains libres
Bouton de contrôle
[Ú]
Appairage d'un périphérique
Bluetooth
Vous pouvez appairer votre téléphone
Bluetooth avec cet appareil.
1
Définissez sur le périphérique Bluetooth une
demande de connexion de l'autoradio.
Le nom de l'autoradio (« KDC-#### »)
s'affiche sur le périphérique Bluetooth.
La mention « Paring Press the volume
knob » apparaît.
2 Appuyez sur le bouton de contrôle.
La connexion au périphérique Bluetooth
commence. Elle est suivie peu de temps
après de l'affichage de la mention « Pairing
Success » (Appairage réussi), puis l'appareil
revient à la source active avant l'appairage.
Une fois l'appairage de votre téléphone
réalisé, son répertoire téléphonique est
automatiquement téléchargé sur l'autoradio.
(Si le répertoire téléphonique n'est pas
téléchargé automatiquement sur l'autoradio,
vous devrez effectuer un téléchargement
manuel.)
B59-2186-00_00.indb 27
Composition d'un numéro du
répertoire téléphonique
Composition d'un numéro de téléphone
via le répertoire de votre téléphone.
Si le répertoire téléphonique n'est
pas téléchargé automatiquement sur
l'autoradio, vous devrez effectuer un
téléchargement manuel.
1 Appuyez sur la touche [Ú].
2 Tournez le bouton de contrôle de façon
à sélectionner « Phone Book » (Répertoire
téléphonique), puis appuyez sur le bouton
de contrôle pour confirmer.
3 Tournez le bouton de contrôle de façon
à sélectionner le nom d'un contact, puis
appuyez sur le bouton de contrôle pour
confirmer.
4 Tournez le bouton de contrôle pour
sélectionner un numéro de téléphone.
5 Appuyez sur la touche [Ú].
Répondre à un appel téléphonique
Appuyez sur la touche [Ú].
Mettre fin à un appel
Appuyez sur la touche [Ú].
Français | 27
2012/12/17 15:1
Avant installation
# AVERTISSEMENT
• L'appareil ne peut être installé que dans un
véhicule doté d'une alimentation 12 V CC avec
borne négative reliée à la masse.
• Si vous connectez le câble d’allumage (rouge)
et le câble de batterie (jaune) au châssis de
la voiture (masse), vous risquez de causer un
court-circuit qui peut provoquer un incendie.
Connectez toujours ces câbles à la source
d'alimentation passant par le boîtier de fusibles.
! ATTENTION
• Utilisez le faisceau d'alimentation fourni avec
cet appareil pour assurer son alimentation.
L'utilisation d'un faisceau d'alimentation fourni
avec d'autres modèles risque d'entraîner des
dysfonctionnements.
• Installez cet appareil sur la console de votre
véhicule.
• Ne touchez pas les pièces métalliques de cet
appareil pendant son utilisation et dans les
minutes qui la suivent. Les pièces métalliques,
telles que le dissipateur thermique et le boîtier,
peuvent être très chauds.
• Le montage et le câblage de ce produit
nécessitent des compétences spécifiques. Pour
des raisons de sécurité, laissez un professionnel
effectuer le travail de montage et de câblage.
• Si vous rencontrez des problèmes au cours de
l'installation, consultez votre revendeur Kenwood.
• Déconnectez la borne négative de la batterie
avant d'installer l'appareil.
• Isolez les câbles non connectés avec un ruban de
vinyle ou un autre matériel similaire. Pour éviter
tout court-circuit, ne retirez pas les capuchons
des extrémités des fils non connectés ou des
bornes.
• Une fois l'appareil installé, assurez-vous qu'il est
bien relié à la masse du châssis du véhicule.
• Si un fusible saute, assurez-vous d'abord que les
fils n'ont pas causé de court-circuit suite à un
contact avec une autre pièce, puis remplacez le
fusible défectueux par un nouveau de même
calibre.
• Si deux haut-parleurs seulement sont raccordés
au système, raccordez les fils aux deux bornes de
sortie avant ou aux deux bornes de sortie arrière
(n'utilisez pas simultanément la sortie avant et
la sortie arrière). Par exemple, si vous connectez
le câble + du haut-parleur gauche à une prise
de sortie avant, ne connectez pas le câble - du
haut-parleur droit à la prise de sortie arrière.
• Raccordez les câbles du haut-parleur aux
bornes correspondantes. L’appareil peut être
endommagé si le câble négatif - pour un des
haut-parleurs ou le câble de masse entre en
contact avec une partie métallique du véhicule.
• N'utilisez pas vos propres vis. N'utilisez que les
vis fournies. L'utilisation de vis non appropriées
risque d'endommager l'appareil.
• Si l'interrupteur d'allumage de votre voiture
n'est pas équipé de la position ACC, connectez
les fils d'allumage à une source d'alimentation
pouvant être mise sous tension et hors tension
avec la clé de contact. Si vous connectez les
câbles d'allumage à une source d'alimentation à
tension constante, comme un câble de batterie,
la batterie risque de se décharger.
• Si la console est équipée d'un couvercle, veillez à
installer l'appareil de façon à ce que la façade ne
touche pas le couvercle lors de la fermeture ou
de l'ouverture de celui-ci.
• Une fois l'appareil installé, contrôlez que les feux
de freinage, les clignotants, les essuie-glaces, etc.
du véhicule fonctionnent correctement.
• Montez l'appareil selon un angle de montage de
30° ou moins.
• La réception peut se détériorer si des objets
métalliques se trouvent à proximité de
l'antenne Bluetooth. (KDC-BT73DAB, KDC-BT53U
uniquement)
Antenne Bluetooth
KDC-BT73DAB • Cet appareil intègre un ventilateur qui permet
de réduire sa température interne. N'installez
pas l'appareil à un endroit où le ventilateur
se trouverait obstrué. Le fait de boucher ces
aérations empêche le bon refroidissement de
l'intérieur de l'appareil et peut entraîner des
dysfonctionnements.
Ventilateur
28 | Guide de démarrage rapide
B59-2186-00_00.indb 28
2012/12/17 15:1
Pour obtenir une bonne réception
Branchement du connecteur ISO
Accessoires pour l'installation
1La broche A-7 (rouge) est reliée à
l'allumage et la broche A-4 (jaune) est
reliée à l'alimentation permanente, sur le
connecteur ISO du véhicule (configuration
par défaut) :
Pour assurer une bonne réception, veuillez tenir
compte des indications suivantes :
• La communication avec le téléphone doit se faire
en respectant une distance de séparation directe
maximale de 10 m (30 pieds). La portée de
communication diminue selon l'environnement.
La portée de communication diminue également
si un obstacle se trouve entre cet appareil et
le téléphone. La portée de communication
maximale (10 m) indiquée ci-dessus n'est pas
toujours garantie.
• La présence d'une station radio ou d'un
émetteur-récepteur portable (talkie-walkie) à
proximité peut entraîner des interférences avec la
communication en raison d'un signal trop fort.
1
5[1]
.....1
2
.....1
.....3
7[1]
3[1][2]
.....1 (3 m)
B59-2186-00_00.indb 29
.....1
Appareil
KDC-BT73DAB
uniquement
[2]
KDC-BT53U
uniquement
Broche A-7
(Rouge)
Véhicule
Broche A-4
(Jaune)
2La broche A-7 (rouge) est reliée à
l'alimentation permanente et la broche
A-4 (jaune) est reliée à l'allumage, sur le
connecteur ISO du véhicule :
Câble d’allumage
(Rouge)
.....1
[1]
4[1]
Câble d’allumage
(Rouge)
Câble de batterie
(Jaune)
6[1]
.....2
La disposition des broches pour les
connecteurs ISO dépend du type de votre
véhicule. Vérifiez les connexions pour éviter
tout dommage sur l'appareil.
La connexion par défaut pour le câblage
électrique est décrite au point 1
ci-dessous. Si les broches du connecteur ISO
sont réglées comme décrit dans la section
2, réalisez les connexions comme indiqué
dans l’illustration.
Assurez-vous de reconnecter le câble
comme indiqué ci-dessous 2 pour installer
cet appareil dans les véhicules Volkswagen.
Appareil
Câble de batterie
(Jaune)
Broche A-7
(Rouge)
Véhicule
Broche A-4
(Jaune)
Français | 29
2012/12/17 15:1
Sortie arrière
Sortie avant
R
L
Sortie basses
SW FRONT REAR
Connexion des câbles aux bornes
Guide de fonctionnement des connecteurs
Numéros de
broche pour
connecteurs ISO
Connecteur
d'alimentation
externe
A-4
A-5
Couleur du
câble
Jaune
Bleu/Blanc
A-6
Orange/Blanc
A-7
A-8
Rouge
Noir
Connecteur de
haut-parleur
B-1
B-2
B-3
B-4
B-5
B-6
B-7
B-8
Violet
Violet/Noir
Gris
Gris/Noir
Blanc
Blanc/Noir
Vert
Vert/Noir
Fonctions
Entrée antenne FM/AM (format JASO) (KDC-BT73DAB,
KDC-BT53U uniquement)
Batterie
Commande
d’alimentation
Variateur de
luminosité
Allumage (ACC)
Connexion à la
terre (masse)
Arrière droit (+)
Arrière droit (–)
Avant droit (+)
Avant droit (–)
Avant gauche (+)
Avant gauche (–)
Arrière gauche (+)
Arrière gauche (–)
R
Antenne RNT (accessoire 5)
(KDC-BT73DAB uniquement)
Microphone (accessoire 3)
(KDC-BT53U uniquement)
⁄
• Impédance des haut-parleurs :
4–8Ω
⁄ Voir <Branchement du connecteur ISO> (page 29).
Connecteur A
8
7
6
5
4
3
2
1
Connecteur B
8
7
6
5
4
3
2
1
Rouge (broche A–7)
Rouge (câble d’allumage)
Jaune (broche A–4)
Jaune (câble de batterie)
KDC-BT73DAB
uniquement
30 | Guide de démarrage rapide
B59-2186-00_00.indb 30
2012/12/17 15:1
Connecteur USB (0,8m)
Vers périphérique USB.
Alimentation maximale
via le port USB : 5 V CC = 1 A
Fusible (10 A)
R
L
Entrée antenne FM/AM (format JASO)(KDC-5057SD
uniquement)
Microphone (accessoire 3)
(KDC-BT73DAB uniquement)
Câblage électrique
(accessoire 1)
Si aucune connexion n'est faite, ne laissez pas le câble sortir
de la languette.
Bleu/Blanc (commande
d'alimentation/câble de
commande de l'antenne moteur)
P.CONT
ANT.
CONT
Bleu clair/Jaune (télécommande
au volant)
REMOTE CONT
STEERING WHEEL
REMOTE INPUT
Connectez soit à la borne de commande
d'alimentation lorsque vous utilisez
l'amplificateur de puissance en option, soit à la
borne de commande d'antenne du véhicule.
Pour utiliser la télécommande au volant, un
adaptateur exclusif (non fourni) adapté à votre
véhicule est nécessaire.
llumage)
batterie)
B59-2186-00_00.indb 31
Marron (câble de commande
de la sourdine)
MUTE
Dans le cas d'une connexion au système
de navigation Kenwood : reportez-vous au
manuel de votre système de navigation.
Dans le cas d'une connexion à un téléphone
embarqué : à relier à la borne qui est mise à la
terre lorsque le téléphone sonne ou lors d'une
conversation téléphonique. (KDC-5057SD
uniquement)
Français | 31
2012/12/17 15:1
Installation/Désinstallation de l'appareil
Installation
Retrait de l’appareil
1
Tordez les languettes du manchon de
montage avec un tournevis ou un outil
similaire et fixez le manchon.
Retirez l'habillage en vous reportant à la
section <Retrait de l'habillage>.
2 Retirez la façade.
3 Insérez profondément les deux outils de
retrait (accessoire 2) dans les fentes situées
de chaque côté, tel qu'illustré sur la figure.
4 Appuyez sur les outils d'extraction pour les
enfoncer vers le bas, puis extrayez l'appareil
tout en enfonçant les outils d'extraction
dans le logement.
Accessoire 2
<
• Assurez-vous que l’appareil est solidement
installé. Si l’appareil est instable, il risque de mal
fonctionner (par ex. le son risque de sauter).
Retrait de l'habillage
1
Insérez les ergots de l'outil de retrait
(accessoire 2) et dégagez les deux pattes
de blocage sur la partie supérieure du cadre.
Soulevez et poussez le cadre vers l'avant, tel
qu'illustré sur la figure.
Crochet
!
• Faites attention de ne pas vous blesser avec les
ergots de l'outil de retrait.
5 Extrayez totalement l'appareil en le
manipulant avec les mains, et en faisant
attention de ne pas le faire tomber.
Broche de saisie
Accessoire 2
2 Une fois la partie supérieure du cadre retirée,
vous pouvez dégager la partie inférieure.
<
• Le cadre peut être retiré par le bas de la même
façon.
32 | Guide de démarrage rapide
B59-2186-00_00.indb 32
2012/12/17 15:1
KDC-BT73DAB, KDC-BT53U uniquement
KDC-BT73DAB uniquement
Montage du
microphone
Installation de
l'antenne RNT
1
! ATTENTION
Vérifiez la position à laquelle le microphone
(accessoire 3) va être installé.
2 Nettoyez la surface destinée à l'installation.
3 Installez le microphone.
4 Reliez le câble à l'appareil en le fixant en
plusieurs endroits avec du ruban adhésif ou
équivalent.
<
• Installez le microphone aussi loin que possible
du téléphone.
B59-2186-00_00.indb 33
Accessoire 2
Fixez le câble avec du ruban adhésif
disponible dans le commerce.
Retirez le film protecteur
du microphone puis collez
ce dernier à l'emplacement
indiqué ci-dessus.
Ajuster l'orientation du
microphone par rapport au
poste conducteur.
• Cette antenne sur film doit être utilisée
exclusivement à l'intérieur du véhicule.
• Ne pas installer sur les emplacements suivants:
-- Sur un endroit susceptible de gêner la vision
du conducteur
-- Sur un endroit susceptible de gêner le
fonctionnement des appareils de sécurité tels
que les airbags
-- Sur un surface mobile telle que le hayon arrière
• La force du signal diminuera dans les
emplacements suivants:
-- Sur du verre réfléchissants les IR ou une surface
couverte d'un film de verre de type miroir -- Sur un endroit où le film se chevaucherait avec
une antenne radio (diagramme)
-- Sur un endroit chevauchant les fils de
chauffage des vitres
-- Sur le côté du véhicule (par ex. porte, glace
de custode)
-- Sur la lunette arrière
-- Sur des verres bloquant les ondes radio (par
ex., verre filtrant le rayonnement infrarouge,
verre à isolation thermique)
-- La réception peut diminuer à cause du bruit
lorsque les essuie-glaces, la climatisation ou le
moteur sont allumés.
-- La réception peut diminuer selon la direction
de la station de radiodiffusion par rapport au
véhicule (antenne).
• Assurez-vous au préalable de bien vérifier
l'adéquation de l'emplacement choisi pour
l'installation de l'antenne sur film (accessoire 4).
L'antenne sur film ne peut pas être recollée.
• Éliminez toute trace de gras et toute impureté
de la surface choisie pour le collage de l'antenne,
à l'aide de la lingette nettoyante fournie
(accessoire 7).
• Veillez à ne pas plier ou endommager l'antenne
sur film (accessoire 4).
• Réchauffez la surface de collage en allumant
le chauffage par exemple, avant de procéder à
l'application.
• Il se peut que l'installation soit impossible sur
certains types de véhicules.
• Vérifiez le cheminement du câble de l'antenne
sur film (accessoire 4) et de l'amplificateur
(accessoire 5) avant de procéder au collage.
Français | 33
2012/12/17 15:1
KDC-BT73DAB uniquement
Installation de l'antenne RNT
Aperçu de l'installation
Accessoire 45
Déterminer l'emplacement
d'installation de l'antenne
• Lors de l'installation de l'antenne du côté
gauche
Montant A
Feuille de
mise à la terre
150 mm
Câble d'antenne (3,5 m)
70 mm*
• L'antenne doit être installée du côté passager
pour des raisons de sécurité.
• Utilisez le guide-fils (accessoire 6) pour
solidariser l'antenne au montant A en plusieurs
points.
• L'orientation de l'antenne sur film (accessoire
4) varie selon qu'elle est installée côté droit ou
côté gauche.
• Veillez à respecter un écart de 150 mm entre
l'antenne sur film (accessoire 4) et la ligne
céramique (partie noire) située en haut du
pare-brise.
Placez-la également 70 mm à l'intérieur de la
ligne céramique bordant les côtés du pare-brise.
(la feuille de mise à la terre de l'amplificateur
peut être collée sur la partie métallique du
montant A)
• Séparez l'antenne des autres antennes par 100
mm au moins.
• Ne collez pas l'amplificateur (accessoire 5) sur
la ligne céramique (partie noire) autour du parebrise, car l'adhérence n'est pas suffisante.
Accessoire 4
Accessoire 5
• Lors de l'installation de l'antenne du côté
droit
Accessoire 5
Montant A
Feuille de
mise à la terre
150 mm
Accessoire 4
70 mm*
*La feuille de mise à la terre de
l'amplificateur (accessoire 5) peut être
collée sur la partie métallique du montant
A.
34 | Guide de démarrage rapide
B59-2186-00_00.indb 34
2012/12/17 15:1
Installation de l'antenne
1 Vérifiez l'emplacement de l'installation.
2 Nettoyez les zones où l'antenne sur film
(accessoire 4), l'amplificateur (accessoire
5) et la feuille de mise à la terre vont être
collés, en utilisant la lingette nettoyante
fournie (accessoire 7).
Il ne faut pas enlever le revêtement de la
surface métallique.
5 Après avoir procédé au collage, pressez
l'élément sur la surface en verre dans la
direction des flèches mentionnées sur la
figure afin de l'associer au pare-brise.
• Attendre jusqu'à ce que le verre soit
totalement sec avant de procéder au collage.
• Si la surface en verre est froide, comme c'est
le cas pendant l'hiver, réchauffez-la grâce au
dégivrage ou à un séchoir.
3 Retirez le film protecteur horizontal
(étiquette I) de l'antenne sur film et collez-la
sur le pare-brise.
6 Enlevez le film d'application (étiquette III).
• Ne touchez pas au terminal de distribution
de l'élément. N'appliquez pas non plus de
nettoyant pour vitres.
Terminal de
distribution
7 Alignez les parties en saillie de
• Veillez à enlever doucement le film
protecteur.
• Ne touchez pas la face adhésive de l'antenne
sur film.
4 Retirez le film protecteur vertical (étiquette
II) de l'antenne sur film et collez l'antenne
en exerçant dessus une légère pression.
B59-2186-00_00.indb 35
l'amplificateur sur les repères 5 de l'antenne
sur film et collez l'amplificateur.
• Ne touchez pas le terminal de distribution
ou la surface de collage (face adhésive) de
l'amplificateur.
• Lors de l'installation de l'antenne du côté
droit
Aligner la bosse avec 5
Feuille de mise
à la terre
Accessoire 4
Accessoire 5
Français | 35
2012/12/17 15:1
KDC-BT73DAB uniquement
Installation de l'antenne RNT
• Lors de l'installation de l'antenne du côté
gauche
Accessoire 5
Accessoire 4
Feuille de
mise à la terre
Aligner la bosse avec 5
8
Enlevez le film de protection de la feuille
de mise à la terre et collez cette feuille sur la
partie métallique du véhicule.
Laissez suffisamment de marge pour
la feuille de mise à la terre afin qu'elle
n'interfère pas avec des éléments de
l'habitacle (garniture du montant A). Veillez également à ce qu'aucun élément de
l'habitacle n'interfère avec l'amplificateur.
Accessoire5
Pare-brise
Montant A
<
• Prenez les précautions suivantes lorsque vous
passez les câbles d'antenne à l'intérieur du
montant A lorsque l'airbag est installé.
-- Installez l'élément d'amplification du câble
d'antenne en face ou au-dessus de l'airbag afin
qu'il n'y ait pas d'interférences entre l'airbag
et l'antenne.
Accessoire 5
Airbag
Montant A
-- La garniture du montant A est fixée à l'aide
d'une attache spéciale qu'il faudra peut-être
remplacer si la garniture du montant A est
démontée.
Contactez votre concessionnaire automobile
pour obtenir plus de détails sur la garniture
du montant A et la disponibilité de pièces de
rechange.
Garniture
Feuille de mise
à la terre
9 Procédez au câblage de l'antenne.
Garniture
Attache
• Utilisez le guide-fils (accessoire 6) pour
solidariser l'antenne au montant en plusieurs
points.
36 | Guide de démarrage rapide
B59-2186-00_00.indb 36
2012/12/17 15:1
Annexe
À propos des fichiers audio
• Fichiers audio compatibles
AAC-LC (.m4a), MP3 (.mp3), WMA (.wma), WAV
(.wav) à partir d'un périphérique USB/d'une
carte SD
• Supports de disque compatibles
CD-R/RW/ROM
• Formats de fichiers de disques compatibles
ISO 9660 niveau 1/2, Joliet, Nom de fichier
étendu.
• Périphériques USB compatibles Classe de stockage de masse USB
• Cartes SD compatibles cartes SD (≤2 Go), cartes SDHC (≤32 Go)
• Systèmes de fichiers compatibles pour les
périphériques USB/cartes SD
FAT12, FAT16, FAT32
Un guide en ligne sur les fichiers audio est
disponible sur le site à l'adresse suivante :
www.kenwood.com/cs/ce/audiofile/.
Modèles d'iPod/iPhone pouvant être
connectés à cet appareil
Made for
• iPod touch (4th generation)
• iPod touch (3rd generation)
• iPod touch (2nd generation)
• iPod touch (1st generation)
• iPod classic
• iPod with video
• iPod nano (6th generation)
• iPod nano (5th generation)
• iPod nano (4th generation)
• iPod nano (3rd generation)
• iPod nano (2nd generation)
• iPod nano (1st generation)
• iPhone 4S
• iPhone 4
• iPhone 3GS
• iPhone 3G
• iPhone
Conditions d'utilisation de l'application
Aha™ :
Conditions pour utiliser l'application Aha™ :
iPhone ou iPod touch
• Utilisez un iPhone ou iPod touch Apple équipé
d'un iOS4 ou postérieur.
• Recherchez “aha” dans l'Apple iTunes App Store
pour installer la toute dernière version de
l'application Aha™ sur votre appareil.
• iPhone / iPod touch relié à cet appareil à l'aide
d'un câble KCA-iP102.
Android™
• Utiliser la version d'Android OS 2.2 ou
postérieure.
• Téléchargez l'application Aha™ sur votre
appareil à partir du portail Google Play.
• Votre appareil doit être compatible Bluetooth
et les profils suivants doivent pouvoir être pris
en charge.
- SPP (Profil port série)
- A2DP (Profil de distribution audio avancée)
REMARQUE
• Dans l'application de votre périphérique, vous
devez vous connecter et créer un compte
Aha gratuit.
• Connexion Internet via réseau LTE, 3G, EDGE
ou Wi-Fi.
• Aha™ est un service proposé par un tiers. Cette
offre est donc sujette à modification sans
préavis Il est donc possible que le service ne
soit pas toujours compatible ou que certains
ou tous les services ne soient pas disponibles.
• Certaines fonctionnalités Aha™ ne peuvent
être utilisées depuis cet équipement.
Pour plus d'informations sur la compatibilité
avec les logiciels iPod/iPhone, visitez le site
www.kenwood.com/cs/ce/ipod/.
B59-2186-00_00.indb 37
Français | 37
2012/12/17 15:1
Inhalt
Vor der Verwendung
Informationen zur Kurzanleitung..........38
Vor der Verwendung..................................38
Vorbereitungen............................................40
Allgemeine Funktionsweise....................41
Musikwiedergabe
(CD/USB/SD/iPod)...................................42
Radio/Digitalradio-Wiedergabe.............44
Freisprech-Telefon.......................................45
Vor dem Einbau...........................................46
Anschlussdiagramm...................................48
Gerät ein-/ausbauen..................................50
Mikrofon einbauen ....................................51
Digitalradio-Antenne installieren..........51
Anhang...........................................................55
# WARNUNG
Zur Vermeidung von Bränden und
Verletzungen beachten Sie bitte
die folgenden Hinweise:
Informationen zur
Kurzanleitung
In der vorliegenden Kurzanleitung
finden Sie eine Beschreibung der GeräteGrundfunktionen.
Näheres zu Funktionen, die in dieser Anleitung
nicht beschrieben sind, lesen Sie bitte in
der Bedienungsanleitung auf der folgenden
Website nach:
manual2.jvckenwood.com/edition/im362/
• Halten Sie das Fahrzeug an, bevor Sie das
Gerät in Betrieb nehmen.
• Stellen Sie sicher, dass keine
Metallgegenstände (Münzen, Nadeln,
Werkzeuge usw.) ins Innere des Geräts
gelangen und Kurzschlüsse verursachen.
! ACHTUNG
• Stellen Sie die Lautstärke so ein, dass Sie
noch alle Geräusche außerhalb des Fahrzeugs
wahrnehmen können. Ist die Lautstärke
während des Fahrens zu hoch eingestellt,
besteht Unfallgefahr.
• Wischen Sie die verschmutzte Frontblende
mit einem trockenen Silikontuch oder einem
anderen weichen Tuch ab.
Wird diese Vorsichtsmaßnahme nicht
beachtet, kann der Bildschirm bzw. das Gerät
beschädigt werden.
Anschluss reinigen
Das Gerät funktioniert möglicherweise nicht
korrekt, wenn der Anschluss zwischen dem
Gerät und der Frontblende verschmutzt
ist. Nehmen Sie die Frontblende ab, und
reinigen Sie den Anschluss vorsichtig mit
einem Wattestäbchen. Achten Sie darauf, den
Anschluss nicht zu beschädigen.
Anschluss
Kondensation
Zum Ansehen der Bedienungsanleitung
benötigen Sie einen Browser wie Internet
Explorer® 7 oder später, Firefox® 3.6 oder
später, Chrome™ 20 oder später, Safari® 5.1
oder später, iOS Safari® 4.0 oder später oder
Android™ 2.2 oder später.
Ist die Klimaanlage im Fahrzeug in Betrieb, kann
sich Feuchtigkeit auf der Laserlinse ansammeln.
Dadurch können Fehler beim Lesen der CD
auftreten. Nehmen Sie die CD aus dem Gerät
und warten Sie bis die Feuchtigkeit getrocknet
ist.
38 | Kurzanleitung
B59-2186-00_00.indb 38
2012/12/17 15:1
g
Hinweise
• Sollten Sie Probleme bei der Installation des
Geräts haben, lassen Sie sich bitte von Ihrem
Kenwood-Fachhändler beraten.
• Lassen Sie sich beim Kauf von optionalem
Zubehör von Ihrem Kenwood-Händler
beraten, um sicherzustellen, dass das
Zubehör von Ihrem Modell und in Ihrer
Gegend unterstützt wird.
• Zeichen nach ISO 8859-1 können angezeigt
werden.
• Zeichen nach ISO 8859-5 oder ISO 8859-1
können angezeigt werden. Siehe “Russian”
unter <12-7. Grundeinstellungen>
(Bedienungsanleitung).
• Die Radiodatensystem-Funktion funktioniert
nicht, wenn dieser Dienst von keinem Sender
angeboten wird.
• Die USB-Belastbarkeit ist unter der
abnehmbaren Frontblende am Hauptgerät
angegeben.
Informationen zu den CDs, die mit
diesem Gerät abgespielt werden
können
• Dieses Gerät kann nur CDs mit der Kennung
Handhabung von CDs
• Berühren Sie nicht die Aufnahme-Oberfläche
der CD.
• Kleben Sie keine Aufkleber oder ähnliches auf
eine CD. Verwenden Sie dem entsprechend
auch keine CDs, auf denen sich bereits ein
Aufkleber befindet.
• Verwenden Sie kein Zubehör für Ihre CD.
• Verwenden Sie zum Reinigen der CD keine
Lösungsmittel. Verwenden Sie ein trockenes
Silikontuch oder ein anderes weiches Tuch.
• Reinigen Sie CDs mit dem Tuch stets von der
Mitte der CD nach außen hin.
• Ziehen Sie die CD beim Entfernen aus dem
Gerät horizontal heraus.
• Wenn das Mittelloch oder der Außenrand
einer CD Grate aufweist, beseitigen Sie sie vor
dem Einlegen der CD.
Wissenswertes über die
Rückstellung Ihres Gerätes
Sollte das Gerät nicht richtig funktionieren,
drücken Sie die Rückstelltaste. Dies setzt das
Gerät auf die Werksvorgaben zurück.
Rückstelltaste
wiedergeben.
• Die folgenden CDs können nicht verwendet
werden:
-- CDs, die nicht rund sind
-- CDs, die auf der Aufnahme-Oberfläche
eingefärbt oder verschmutzt sind
-- CD-Rs oder CD-RWs, die nicht
abgeschlossen sind (Einzelheiten
hinsichtlich der Finalisierung finden
Sie in den Bedienungsanleitungen
Ihrer CD-Brennsoftware sowie Ihres
CD-Recorders.)
-- CDs mit einer Größe von 8 cm (3 Zoll) (Falls
Sie dennoch versuchen, eine solche CD mit
einem Adapter zu verwenden, kann es zu
einer Fehlfunktion kommen.)
B59-2186-00_00.indb 39
Die in dieser Bedienungsanleitung dargestellten
Abbildungen der Anzeige und der Frontblende
dienen der Veranschaulichung der Bedienung
Ihres Geräts. Daher können die Abbildungen
der Anzeige von der tatsächlichen Anzeige am
Gerät abweichen. Eventuell sind sogar manche
Abbildungen der Anzeige nicht zutreffend.
Deutsch | 39
2012/12/17 15:1
Vorbereitungen
[Control]-Knopf (Lautstärkeknopf)
Freigabe
Deaktivieren des
Demonstrationsmodus
Deaktivieren Sie den
Demonstrationsmodus, wenn Sie das
Gerät nach der Installation zum ersten Mal
benutzen.
1
Abnehmen/Anbringen der
Frontblende
Drücken Sie zum Deaktivieren des
Demonstrationsmodus den [Control]Knopf, wenn die Meldung “To cancel DEMO
Press the volume knob” (Zum Deaktivieren
der DEMO den Lautstärkeknopf drücken)
erscheint (ca. 15 Sekunden).
Drücken Sie die
Entriegelungstaste.
2 Drehen Sie den [Control]-Knopf zum
Wählen von “YES” (Ja) und drücken Sie dann
auf den [Control]-Knopf.
Der Demonstrationsmodus kann
auch im Funktionseinstellungsmodus
deaktiviert werden. Siehe <12-6.
Demonstrationsmodus-Einstellungen> in
der Bedienungsanleitung
!
• Nachdem Sie die Entriegelungstaste
gedrückt haben, sollten Sie die Frontblende
sofort abnehmen. Sie könnte sonst durch
Erschütterungen herabfallen.
• Bei der Frontblende handelt es sich um ein
Präzisionsbauteil, das durch Erschütterungen
oder Stöße beschädigt werden kann.
• Bewahren Sie die Frontblende in ihrem Etui auf,
wenn sie abgenommen wurde.
• Setzen Sie die Frontblende (und das Etui)
keinerlei direktem Sonnenlicht und keiner
übermäßigen Hitze oder Feuchtigkeit aus.
Schützen Sie beides darüber hinaus vor Staub
und Spritzwasser.
40 | Kurzanleitung
B59-2186-00_00.indb 40
2012/12/17 15:1
Allgemeine Funktionsweise
[SRC] [Control]-Knopf
USB-Anschluss
Zusatzeingang
Strom
Drücken Sie [SRC], um den Strom
einzuschalten.
Halten Sie [SRC] gedrückt, um den Strom
auszuschalten.
Quellenauswahl
Wiederholtes Drücken von [SRC] schaltet
zwischen den Quellen um.
Quelle
Anzeige
Standby
"STANDBY"
Digitalradio[2]
“DIGITAL RADIO”
Tuner
"TUNER"
An frontseitigen USB-Anschluss
“USB (FRONT)”
angeschlossenes USB-Gerät
An rückseitigen USB-Anschluss
“USB (REAR)”
angeschlossenes USB-Gerät
An frontseitigen USB-Anschluss
“iPod (FRONT)”
angeschlossener iPod[1]
An rückseitigen USB-Anschluss
“iPod (REAR)”
angeschlossener iPod[1]
aha™ eines an den frontseitigen USB- “aha (FRONT)”
Anschluss angeschlossenen iPods[1][2][3]
aha™ eines an den frontseitigen USB- “aha (REAR)”
Anschluss angeschlossenen iPods[1][2][3]
aha™ eines über Bluetooth
“aha”
verbundenen Geräts[1][2][3]
Bluetooth-Audio[2] [3]
"BT AUDIO"
SD[1] [4]
"SD"
CD[1]
"CD"
Zusatzeingang
"AUX"
B59-2186-00_00.indb 41
Diese Quelle kann nur ausgewählt werden,
wenn sie auch wiedergegeben werden kann.
Funktion des KDC-BT73DAB.
[3]
Funktion des KDC-BT53U.
[4]
Funktion des KDC-5057SD.
[1]
[2]
Lautstärke
Drehen Sie den [Control]-Knopf zum
Einstellen der Lautstärke.
USB-Anschluss
Sie können ein USB-Gerät oder einen iPod
anschließen.
Kabel CA-U1EX (max. 500mA) oder
KCA‑iP102 (optionales Zubehör) zum
Anschließen eines UBS-Geräts oder iPods
empfohlen.
Zusatzeingang
Mit einer Stereo-Miniklinke (ø 3,5 mm) kann
ein tragbares Audiogerät angeschlossen
werden.
Deutsch | 41
2012/12/17 15:1
Musikwiedergabe (CD/USB/SD/iPod)
CD-Fach
CA-U1EX[1]
[G]
[SRC] [Control]-Knopf
CD-Fach-Blende
KCA-iP102[1]
[1/6] Entriegelungs[E/F] [R/S] REAR USB-Anzeige
Wiedergabe von CDs
Öffnen Sie die CD-Fach-Blende nach oben.
Legen Sie eine CD in das CD-Fach ein.
Nach dem Einlegen wird die Quelle
automatisch umgeschaltet, und die
Wiedergabe beginnt.
Schließen Sie die CD-Fach-Blende.
Wiedergabe von Titeln auf USBGeräten/ iPods
Schließen Sie wie oben dargestellt ein
USB-Gerät oder einen iPod an den USBAnschluss an.
Nach dem Anschließen wird die Quelle
automatisch umgeschaltet, und die
Wiedergabe beginnt.
Sie können den iPod oder das USB-Gerät
an jeden der vorderen und hinteren USBAnschlüsse des Geräts anschließen. Bei
Anschluss an einen hinteren USB-Anschluss
leuchtet konstant die Anzeige “REAR USB”.
optionales Zubehör
[1]
USB-Anschluss
Wiedergabe - SD-Karte
(nur KDC-5057SD)
1
Drücken Sie die Entriegelungstaste und
nehmen Sie die Frontblende ab.
2 Halten Sie die SD-Karte wie unten gezeigt
und schieben Sie sie bis zum hörbaren
Einrasten in den SD-Kartenschlitz.
SD-Karte (im Handel erhältlich)
3 Frontblende wieder anbringen.
4 Drücken Sie [SRC] zum Wählen von “SD”
als Quelle.
Audiodatei-Ordner auswählen
Drücken Sie [R] oder [S].
Musikstück auswählen (Titel oder
Datei)
Drücken Sie [E] oder [F].
Musikstücke vor- oder zurückspulen
(Titel oder Datei)
Halten Sie [E] oder [F] gedrückt.
Wiedergabe eines Musikstücks
anhalten und fortsetzen (Titel oder
Datei)
Halten Sie [1/6] gedrückt.
42 | Kurzanleitung
B59-2186-00_00.indb 42
2012/12/17 15:1
Musiksuche
CD auswerfen
1 Drücken Sie [1/6].
2 Suchen Sie einen Titel.
USB-Gerät/ iPod entfernen
Sie können nach einem Titel suchen, der
wiedergegeben werden soll.
Funktion
Elemente auswählen
Auswahl festlegen
Zurückkehren zum
vorherigen Punkt
Vorgang
Drehen Sie den [Control]Knopf.
Drücken Sie den
[Control]-Knopf.
Drücken Sie [1/6].
Zum Abbrechen der Musiksuche in
Audiodateien oder einem iPod halten Sie
bitte [1/6] gedrückt.
B59-2186-00_00.indb 43
Öffnen Sie die CD-Fach-Blende nach oben
und drücken Sie [G].
Schalten Sie auf eine andere Quelle als USB,
iPod oder Aha Radio und entfernen Sie dann
das USB-Gerät.
Die auf dem USB-Gerät bzw. iPod
gespeicherten Daten können beschädigt
werden, wenn Sie das USB-Gerät entfernen,
während es als aktive Quelle genutzt wird.
SD-Karte entfernen (nur KDC-5057SD)
1
Drücken Sie die Entriegelungstaste und
nehmen Sie die Frontblende ab.
2 Schieben Sie die SD-Karte in den
Kartenschlitz, bis sie einrastet und nehmen
Sie Ihren Finger von der Karte.
Die Karte springt heraus, so dass Sie die
Karte herausziehen können.
3 Anbringen der Frontblende.
Deutsch | 43
2012/12/17 15:1
Radio/Digitalradio-Wiedergabe
[SRC] [Control]-Knopf
[1/6]
[R]
[E/F]
Tuner-Quelle auswählen
4 Drehen Sie den [Control]-Knopf zum
Ein Band wählen (FM oder AM) (nur
Tuner)
Abrufen der im Speicher abgelegten
Sender
Wählen der Presetnummer (FM/ Digitalradio:
"1"–"18", AM: “1” – “6”) und halten Sie den
[Control]-Knopf dann gedrückt..
Drücken Sie [SRC] zum Wählen von “TUNER”
oder “DIGITAL RADIO” (nur KDC-BT73DAB).
Siehe <Quellenauswahl> (Seite 41).
Drücken Sie [R].
Einen Sender/Dienst wählen
Drücken Sie [E] oder [F].
Der Suchmodus kann geändert werden.
Siehe <9-5. Tuner-Einstellungen> oder
<10-9. Digitalradio-Einstellungen>in der
Bedienungsanleitung
Senderspeicher
1
Drücken Sie [R] zum Wählen eines Bands.
(nur Tuner)
2 Drücken Sie [E] oder [F] zum
Wählen des Senders/Dienstes, der im
Senderspeicher gespeichert werden soll.
1
Drücken Sie [R] zum Wählen eines Bands.
(nur Tuner)
2 Drücken Sie [1/6].
3 Drehen Sie den [Control]-Knopf zum
Wählen einer Presetnummer (FM/
Digitalradio: "1"–"18", AM: “1” – “6”) und
drücken Sie dann auf den [Control]-Knopf.
Im Mix Station-Presetmodus werden die
Bänder und Tunerquellen folgendermaßen
angezeigt:
FM: FM-Sender
AM: AM-Sender
DR: Digitalradio-Dienst
3 "TUNER": Drücken Sie [1/6].
“DIGITAL RADIO”: Drücken Sie zweimal
[1/6].
Drücken Sie erneut [1/6], um den MixStation-Presetmodus aufzurufen.In diesem
Modus können verschiedene Bänder und
Tunerquellen (FM, AM, Digitalradio usw.)
in derselben Preset-Ebene gespeichert
werden, wodurch die gespeicherten Sender
abrufbar sind, ohne das Band und/oder
die Tunerquelle umschalten zu müssen. Im
Mix-Station-Presetmodus können maximal 6
Sender gespeichert werden.
44 | Kurzanleitung
B59-2186-00_00.indb 44
2012/12/17 15:1
Funktion von KDC-BT73DAB, KDC-BT53U
Freisprech-Telefon
[Control]-Knopf
[Ú]
Pairing eines Bluetooth-Geräts
Durch Pairing können Sie ein BluetoothGerät mit diesem Gerät verbinden.
1
Lassen Sie das Bluetooth-Gerät nach einer
Verbindung mit diesem Gerät suchen.
Der Name dieses Geräts (“KDC-####”)
erscheint auf dem Bluetooth-Gerät.
Es erscheint “Paring Press the volume knob”.
2 Drücken Sie den [Control]-Knopf.
Der Verbindungsaufbau mit dem BluetoothGerät beginnt, nach einer Weile erscheint
“Pairing Success” (Pairing erfolgreich) und
das Gerät wählt wieder die vorherige Quelle.
Wenn die Registrierung des Handys
beendet ist, wird das Telefonbuch des
Handys automatisch auf dieses Gerät
heruntergeladen. (Falls das Telefonbuch
nicht auf dieses Gerät heruntergeladen
wurde, downloaden Sie es bitte vom Handy
aus.)
B59-2186-00_00.indb 45
Eine Nummer aus dem Telefonbuch
wählen
Wählen Sie eine Telefonnummer aus dem
Telefonbuch Ihres Mobiltelefons.
Falls das Telefonbuch nicht auf
dieses Gerät heruntergeladen wurde,
downloaden Sie es bitte vom Handy aus.
1 Drücken Sie [Ú].
2 Drehen Sie den [Control]-Knopf zum
Wählen von “Phone Book” (Telefonbuch) und
drücken Sie dann auf den [Control]-Knopf.
3 Drehen Sie den [Control]-Knopf zum
Wählen eines Namens und drücken Sie
dann auf den [Control]-Knopf.
4 Drehen Sie den [Control]-Knopf zum
Wählen einer Telefonnummer.
5 Drücken Sie [Ú].
Annehmen eines Anrufs
Drücken Sie [Ú].
Anruf beenden
Drücken Sie [Ú].
Deutsch | 45
2012/12/17 15:1
Vor dem Einbau
# WARNUNG
• Voraussetzung für den Einbau des Geräts im
Fahrzeug ist ein 12-Volt-Gleichstromanschluss
sowie eine negative Masseverbindung.
• Beim Anschließen des Zündkabels (rot)
sowie des Batteriekabels (gelb) an das
Chassis des Fahrwerks (Masse) können
Kurzschlüsse auftreten, die wiederum Feuer
verursachen könnten. Schließen Sie diese
Kabel nur an Stromquellen an, die durch den
Sicherungskasten führen.
•
! ACHTUNG
•
• Verwenden Sie zur Stromversorgung des Geräts
stets die diesem beiliegende Versorgungsleitung.
Die Verwendung einer für ein anderes Gerät
bestimmten Versorgungsleitung kann einen
Defekt zur Folge haben.
• Montieren Sie dieses Gerät in der Konsole Ihres
Fahrzeugs.
• Berühren Sie die Metallteile des Geräts während
oder kurz nach der Benutzung nicht. Metallteile
wie der Kühlkörper und das Gehäuse werden
heiß.
• Die Montage sowie die Verkabelung dieses
Gerätes macht besondere Fähigkeiten und
Erfahrung erforderlich. Überlassen Sie die
Arbeiten zur Montage und Verkabelung
ausgewiesenem Fachpersonal.
• Sollten Sie Probleme beim Einbau des Geräts
haben, lassen Sie sich bitte von Ihrem KenwoodFachhändler beraten.
• Trennen Sie den Minuspol der Batterie, bevor Sie
das Gerät montieren.
• Isolieren Sie nicht angeschlossene Kabel mit
Vinylband oder ähnlichem Material. Entfernen
Sie nicht die Schutzhülsen von den Enden nicht
angeschlossener Kabel und Anschlüsse, damit
keine Kurzschlüsse entstehen.
• Schließen Sie das Gerät nach der Montage
wieder an den Masseanschluss des Chassis an.
• Wenn die Sicherung durchbrennt, überprüfen
Sie zuerst, ob die Drähte keine anderen Teile
berühren und einen Kurzschluss verursachen.
Ersetzen Sie dann die durchgebrannte Sicherung
durch eine neue Sicherung mit den gleichen
Nenngrößen.
• Werden nur zwei Lautsprecher an das System
angeschlossen, schließen Sie die Anschlüsse
entweder an die beiden vorderen oder an
die beiden hinteren Ausgänge an (mischen
•
•
•
•
•
Sie auf keinen Fall vorn und hinten). Wenn
Sie beispielsweise den +-Anschluss des
linken Lautsprechers an einen der vorderen
Ausgangsanschlüsse anschließen, schließen Sie
den --Anschluss auf keinen Fall an einen der
hinteren Ausgangsanschlüsse an.
Schließen Sie beide Pole der Lautsprecher an
den entsprechenden Lautsprecherausgängen
am Gerät an. Das Gerät kann beschädigt
werden oder den Dienst versagen, wenn Sie
die Minuspole (-) zusammenführen oder über
Metallteile des Fahrzeugs erden.
Verwenden Sie auf keinen Fall eigene Schrauben.
Verwenden Sie ausschließlich die mitgelieferten
Schrauben. Zu lange oder zu dicke Schrauben
könnten das Gerät beschädigen.
Falls der Zündschalter Ihres Fahrzeugs keine ACCPosition aufweist, schließen Sie die Zündkabel
an eine Stromquelle an, die sich mit dem
Zündschlüssel ein- und ausschalten lässt. Wenn
Sie die Zündkabel an einer Stromquelle mit einer
konstanten Stromversorgung wie beispielsweise
an Batteriekabeln anschließen, kann sich die
Batterie entladen.
Wenn die Konsole über einen Deckel verfügt,
stellen Sie sicher, dass die Frontblende beim
Öffnen und Schließen nicht an den Deckel stößt.
Überprüfen Sie nach der Montage des Geräts, ob
die Bremslichter, Blinker, Scheibenwischer usw.
ordnungsgemäß funktionieren.
Montieren Sie das Gerät so, dass der
Montagewinkel 30˚ oder weniger beträgt.
Die Empfangsqualität wird u. U. durch
metallische Gegenstände in der Nähe der
Bluetooth-Antenne beeinträchtigt. (nur
KDC-BT73DAB, KDC-BT53U)
Bluetooth-Antenne
KDC-BT73DAB • Dieses Gerät besitzt ein Kühlgebläse zum
Absenken der Innentemperatur. Bauen Sie
das Gerät nicht an einer Stelle ein, an der das
Kühlgebläse des Geräts blockiert ist. Wenn diese
Öffnungen blockiert werden, kann sich ein
Wärmestau ergeben und das Gerät beschädigt
werden.
46 | Kurzanleitung
B59-2186-00_00.indb 46
2012/12/17 15:1
Kühlgebläse
Guter Empfang
Um einen guten Empfang sicherzustellen, sollten
Sie Folgendes beachten:
• Kommunizieren Sie mit dem Handy innerhalb
einer Distanz von 10 m (Sichtlinie).Die Reichweite
kann in bestimmten Umgebungen weiter
abnehmen. Die Reichweite kann sich auch
verkürzen, wenn sich Hindernisse zwischen
Gerät und Handy befinden. Die oben genannte
maximale Reichweite (10 m) kann nicht immer
garantiert werden.
• In der Nähe befindliche Sendestationen oder
Funksprechgeräte können durch zu starke
Signale die Kommunikation stören.
Montagezubehör
1
.....1
1Wenn Stift A-7 (rot) an die
Zündung und Stift A-4 (gelb) an die
Konstantstromversorgung des ISOAnschlusses im Fahrzeug angeschlossen ist
(Vorgabe):
Gerät
.....1
6[1]
.....2
.....3
.....1 (3 m)
Batteriekabel
(gelb)
.....1
Stift A-7 (rot)
Fahrzeug
Stift A-4
(gelb)
2Wenn Stift A-7 (rot) an die
Konstantstromversorgung und Stift A-4
(gelb) an die Zündung des ISO-Anschlusses
im Fahrzeug angeschlossen ist:
Zündkabel (rot)
Gerät
7[1]
3[1][2]
Die Stiftbelegung der ISO-Anschlüsse
ist vom Fahrzeugtyp abhängig. Stellen
Sie sicher, dass Sie alles ordnungsgemäß
anschließen, um Schäden am Gerät zu
verhindern.
Der Standardanschluss für den Kabelbaum
wird unten unter 1 beschrieben. Sind
die ISO-Anschlussstifte wie unter 2
beschrieben belegt, führen Sie den
Anschluss bitte wie dargestellt durch.
Stellen Sie bitte sicher, dass das Kabel
wie unter 2 unten beschrieben wieder
angeschlossen wird, falls dieses Gerät in ein
Fahrzeug der Marke Volkswagen eingebaut
wird.
Zündkabel (rot)
5[1]
2
Anschließen des ISO-Anschlusses
Batteriekabel
(gelb)
Stift A-7 (rot)
Fahrzeug
Stift A-4
(gelb)
nur KDC-BT73DAB
nur KDC-BT53U
[1]
4[1]
B59-2186-00_00.indb 47
[2]
.....1
Deutsch | 47
2012/12/17 15:1
hinterer Ausgang
vorderer Ausgang
R
L
Subwoofer-Ausgang
SW FRONT REAR
Anschlussdiagramm
Zuordnung/Funktion der Anschlüsse
Stiftnummern für
ISO-Anschlüsse
Externer
Stromanschluss
A-4
A-5
A-6
A-7
A-8
Kabelfarbe
Funktionen
gelb
blau/weiß
orange/weiß
rot
schwarz
Batterie
Stromsteuerung
Dimmer
Zündung (ACC)
Erdungsanschluss
(Masse)
Lautsprecheranschluss
B-1
B-2
B-3
B-4
B-5
B-6
B-7
B-8
lila
lila/schwarz
grau
grau/schwarz
weiß
weiß/schwarz
grün
grün/schwarz
hinten rechts (+)
hinten rechts (–)
vorne rechts (+)
vorne rechts (–)
vorne links (+)
vorne links (–)
hinten links (+)
hinten links (–)
FM/AM-Antenneneingang (JASO)
(nur KDC-BT73DAB, KDC-BT53U)
R
Digitalradio-Antenne
(Zubehör 5)
(Nur KDC-BT73DAB)
Mikrofon (Zubehör 3)
(Nur KDC-BT53U)
⁄
• Lautsprecherimpedanz:
4–8Ω
⁄ Siehe <Anschließen des ISO-Anschlusses> (Seite 47).
Anschluss A
8
7
6
5
4
3
2
1
Anschluss B
8
7
6
5
4
3
2
1
rot (Stift A–7)
rot (Zündkabel)
gelb (Stift A–4)
gelb (Batteriekabel)
nur KDC-BT73DAB
48 | Kurzanleitung
B59-2186-00_00.indb 48
2012/12/17 15:1
g (JASO)
BT53U)
USB-Anschluss (0,8m)
An USB-Gerät.
Max. USB-Versorgungsstrom:
: DC 5 V = 1 A
Sicherung (10A)
R
L
FM/AM-Antenneneingang
(JASO)(nur KDC-5057SD)
Mikrofon (Zubehör 3)
(Nur KDC-BT73DAB)
Kabelbaum
(Zubehör 1)
Falls kein Anschluss hergestellt wird, lassen Sie den Draht nicht aus
der Lasche hervorstehen.
blau/weiß (Stromsteuerung /
Steuerkabel für die Antenne)
P.CONT
ANT.
CONT
hellblau/gelb (LenkradFernbedienung)
REMOTE CONT
STEERING WHEEL
REMOTE INPUT
bel)
B59-2186-00_00.indb 49
braun (Stummschaltkabel)
MUTE
Bei Verwendung einer externen Endstufe an
die Stromsteuerungsklemme, andernfalls an
die Antennensteuerklemme im Fahrzeug
anschließen.
Für die Verwendung der LenkradFernbedienungsfunktion benötigen Sie einen
speziellen Fernbedienungsadapter (nicht im
Lieferumfang enthalten), der auf den Typ Ihres
Fahrzeugs abgestimmt ist.
Bei Anschluss an das Kenwood
Navigationssystem: Siehe
Bedienungsanleitung des Navigationssystems.
Bei Anschluss an ein Autotelefon: Zum
Anschließen der beim Klingeln des Telefons
oder während eines Gesprächs geerdeten
Klemme. (Nur KDC-5057SD)
Deutsch | 49
2012/12/17 15:1
Gerät ein-/ausbauen
Einbau
Entfernen des Geräts
1
Sichern Sie das Gerät, indem
Sie die Metalllasche mit einem
Schraubendreher o. Ä. umbiegen.
<
Entfernen Sie wie unter <Entfernen der
Radioblende> beschrieben die Zierblende.
2 Entfernen Sie die Frontblende.
3 Schieben Sie die beiden
Entnahmewerkzeuge (Zubehör 2) wie
gezeigt tief in die Schlitze auf den beiden
Seiten.
4 Senken Sie die Entnahmewerkzeuge nach
unten ab und ziehen Sie das Gerät unter
Andrücken der Entnahmewerkzeuge nach
innen halb heraus.
Zubehör 2
• Stellen Sie sicher, dass das Gerät fest sitzt. Wenn
das Gerät nicht fest sitzt, können Fehlfunktionen
(beispielsweise Klangbeeinträchtigungen)
auftreten.
Entfernen der Radioblende
1
Setzen Sie das Ausbauwerkzeug (Zubehör
2) so ein, dass die Vorsprünge eingreifen,
und lösen Sie die beiden Arretierungen
oben am Rahmen.
Heben Sie den Rahmen an und ziehen Sie
ihn wie in der Abbildung dargestellt nach
vorne.
!
• Achten Sie darauf, dass Sie sich nicht an den
Vorsprüngen des Demontageschlüssels verletzen.
5 Fassen Sie das Gerät mit den Händen und
ziehen Sie es vorsichtig ganz heraus.
Verriegelung
Anschlag
Zubehör 2
2 Nach dem Entfernen des oberen
Rahmenteils etfernen Sie bitte den unteren
Teil des Rahmens.
<
• Der Rahmen kann auf die gleiche Art und Weise
von der Unterseite abgenommen werden.
50 | Kurzanleitung
B59-2186-00_00.indb 50
2012/12/17 15:1
nur KDC-BT73DAB, KDC-BT53U
nur KDC-BT73DAB
Mikrofon einbauen
Digitalradio-Antenne
installieren
1
Überprüfen Sie die Einbaulage des
Mikrofons (Zubehör 3).
2 Reinigen Sie die Installationsfläche.
3 Bauen Sie das Mikrofon ein.
4 Verlegen Sie das Kabel zum Gerät, und
befestigen Sie es an mehreren Stellen mit
Klebeband oder Ähnlichem.
<
• Installieren Sie das Mikrofon möglichst weit vom
Handy entfernt.
Zubehör 3
Befestigen Sie das Kabel mit handelsüblichem Klebeband.
B59-2186-00_00.indb 51
Ziehen Sie den Trennbogen
vom Mikrofon ab und
kleben Sie das Mikrofon an
der oben gezeigte Stelle
auf.
Richten Sie das Mikrofon
zum Fahrer aus.
! ACHTUNG
• Diese Folienantenne ist ausschließlich für die
Verwendung in einem Fahrzeug bestimmt.
• Installieren Sie sie nicht an folgenden Orten:
-- Wo sie die Sicht des Fahrers behindern könnte
-- Wo sie die Funktion von
Sicherheitseinrichtungen wie Airbags stören
könnte
-- Auf beweglichen Glasflächen wie bei einer
Heckklappe
• An den folgenden Orten vermindert sich die
Signalstärke:
-- Auf IR-reflektierendem Glas oder unter einer
Spiegelglasfolie -- Bei Überlappung mit der eigentlichen
Radioantenne (Muster)
-- Bei Überlappung mit Fensterheizungsdrähten
-- An der Fahrzeugseite (z.B. Tür, vorderes
Ausstellfenster)
-- Am Heckfenster
-- Wenn Rundfunksignale blockierendes Glas
(z.B. IR-reflektierende oder wärmeisolierende
Scheiben) vewendet wird
-- Frontscheibenwischer, Klimaanlage und Motor
können den Empfang durch Einstreuung
beeinträchtigen, wenn sie eingeschaltet sind.
-- Der Empfang kann ja nach Ausrichtung
des Fahrzeugs (Antenne) zur Richtung des
Radiosenders verschlechtert sein.
• Kontrollieren Sie vor dem Installieren unbedingt
die für die Anbringung der Filmantenne
(Zubehör 4) vorgesehene Stelle.Die Filmantenne
kann danach nicht mehr neu verklebt werden.
• Reinigen Sie die vorgesehene Fläche mit dem
beiliegenden Reiniger (Zubehör 7) gründlich
von Öl und Schmutz.
• Biegen oder beschädigen Sie die Filmantenne
(Zubehör 4) nicht.
• Wärmen Sie die vorgesehene Fläche durch z.B.
Einschalten der Heizung vor dem Verkleben an.
• Bei bestimmten Fahrzeugtypen ist das Installieren
eventuell nicht möglich.
• Kontrollieren Sie vor dem Aufkleben den Verlauf
der Kabel von Filmantenne (Zubehör 4) und
Verstärker (Zubehör 5).
Deutsch | 51
2012/12/17 15:1
nur KDC-BT73DAB
Digitalradio-Antenne installieren
Übersicht über die Installation
Zubehör 45
Bestimmen des Ortes der
Antenneninstallation
• Beim Installieren der Antenne auf der linken
Seite
Frontsäule
150 mm
Erdungsplatte
Antennenkabel (3,5 m)
70 mm*
• Die Antenne sollte aus Sicherheitsgründen
auf der Beifahrerseite des Fahrzeugs installiert
werden.
• Sichern Sie die Antenne mit Kabelklemmen
(Zubehör 6) an mehreren Stellen an der Säule.
• Die Ausrichtung des Antennenfilms (Zubehör 4)
richtet sich danach, ob die Filmantenne auf der
rechten oder linken Seite installiert wird.
• Setzen Sie den Antennenfilm (Zubehör 4) ca.
150 mm von der Keramiklinie (schwarzer Bereich)
oben an der Frontscheibe ab.
Platzieren Sie sie weiterhin circa 70 mm innerhalb
von der Keramiklinie auf der rechten Seite
der Frontscheibe. (Wo die Erdungsplatte des
Verstärkers auf das Metall der Frontsäule geklebt
werden kann)
• Um mindestens 100 mm von anderen Antennen
trennen.
• Kleben Sie den Verstärker 5) nicht auf die
Keramiklinie (schwarzer Bereich) um die
Frontscheibe. Dort ist die Haftung nicht
ausreichend.
Zubehör 4
Zubehör 5
• Beim Installieren der Antenne auf der rechten
Seite
Zubehör 5
Frontsäule
Erdungsplatte
150 mm
Zubehör 4
70 mm
*Wo die Erdungsplatte der Verstärkereinheit
(Zubehör 5) auf das Metall der Frontsäule
geklebt werden kann.
52 | Kurzanleitung
B59-2186-00_00.indb 52
2012/12/17 15:1
Antenneninstallation
1
2
Kontrollieren Sie den vorgesehenen
Installationsort.
Reinigen Sie die Fläche zum Aufkleben
von Antennenfilm (Zubehör 4),
Verstärkereinheit (Zubehör 5) und
Erdungsplatte mit dem beiliegenden
Reiniger (Zubehör 7).
Die Lackschicht auf der Metallfläche braucht
nicht entfernt zu werden.
• Warten Sie mit dem Verkleben, bis die
Glasfläche vollständig trocken ist.
• Wenn die Glasfläche kalt ist, wie z.B. im Winter,
wärmen Sie sie mit der Scheibenheizung
oder einem Föhn an.
3 Ziehen Sie den Trennbogen (Etikett I)
waagerecht vom Antennenfilm ab und
kleben Sie die Antenne auf die Frontscheibe.
5 Reiben Sie nach dem Aufkleben das
Element in der Glasoberfläche in Richtung
des Pfeils der Abbildung, um es zu binden.
6 Entfernen Sie die Auftragfolie (Etikett III).
• Berühren Sie nicht den Zuleitungsanschluss
des Elements. Tragen Sie auch keine
Glasreinigungsmittel auf.
Zuleitungsanschluss
7 Fluchten Sie den Verstärker mit dem
Vorsprung auf 5 am Antennenfilm aus und
kleben Sie ihn auf.
• Ziehen Sie vorsichtig den Trennbogen ab.
• Berühren Sie nicht die Klebefläche (klebende
Seite) des Antennenfilms.
4 Ziehen Sie den Trennbogen (Etikett II) der
Antennenfolie senkrecht ab und kleben
Sie die Antenne behutsam unter leichtem
Andrücken auf.
B59-2186-00_00.indb 53
• Berühren Sie nicht den Zuleitungsanschluss
oder die Haftfläche (klebende Seite) des
Verstärkers.
• Beim Installieren der Antenne auf der rechten
Seite
Vorsprung ausrichten mit 5
Erdungsplatte
Zubehör 4
Zubehör 5
Deutsch | 53
2012/12/17 15:1
nur KDC-BT73DAB
Digitalradio-Antenne installieren
• Beim Installieren der Antenne auf der linken
Seite
Zubehör 5
Zubehör 4
Erdungsplatte
Vorsprung ausrichten mit 5
8
Entfernen Sie den Film, mit dem die
Erdungsplatte abgedeckt ist, und kleben
Sie die Erdungsplatte auf ein Metallteil des
Fahrzeugs.
Sorgen Sie für ausreichenden Freiraum
um die Erdungsplatte, damit diese
nicht in Berührung mit anderen Teilen
(Frontsäulenverkleidung) kommt. Achten Sie auch darauf, dass keine
Innenteile den Verstärker berühren.
Zubehör 5
Frontscheibe
Frontsäule
<
• Treffen Sie die folgenden Vorsichtsmaßnahmen,
wenn Sie das Antennenkabel durch die
Frontsäule mit installiertem Airbag führen.
-- Installieren Sie den Verstärkerteil des
Antennenkabels vor oder über dem Airbag,
damit Antenne und Airbag einander nicht
berühren.
Zubehör 5
Airbag
Frontsäule
-- Die Frontsäulenverkleidung ist mit
einem Spezialclip gesichert, er eventuell
ersetzt werden muss, wenn die
Frontsäulenverkleidung abgenommen wird.
Erkundigen Sie sich bei Ihrem Fahrzeughändler
nach den Details zum Austauschen der
Frontsäulenverkleidung und zur Verfügbarkeit
von Ersatzteilen.
Innenteil
Erdungsplatte
9 Drähte der Antennenkabel
Innenteil
Clip
• Sichern Sie die Antenne mit Kabelklemmen
(Zubehör 6) an mehreren Stellen an der
Säule.
54 | Kurzanleitung
B59-2186-00_00.indb 54
2012/12/17 15:1
Anhang
Über Audiodateien
• Abspielbare Audiodateien
AAC-LC (.m4a), MP3 (.mp3), WMA (.wma), WAV
(.wav) von USB-Gerät/SD-Karte
• Abspielbare CD-Medien
CD-R/RW/ROM
• Abspielbare CD-Dateiformate
ISO 9660 Level 1/2, Joliet, lange Dateinamen.
• Abspielbare USB-Geräte USB-Massenspeicher-Klasse
• Abspielbare SD-Karten SD-Karte (≤2 GB), SDHC-Karte (≤32 GB)
• Abspielbare USB-Gerät/SD-Karte-Dateisysteme
FAT12, FAT16, FAT32
Das Online-Handbuch zu Audiodateien
finden Sie auf der Webseite
www.kenwood.com/cs/ce/audiofile/.
iPod/iPhone-Modelle, die an dieses
Gerät angeschlossen werden können
Made for
• iPod touch (4th generation)
• iPod touch (3rd generation)
• iPod touch (2nd generation)
• iPod touch (1st generation)
• iPod classic
• iPod with video
• iPod nano (6th generation)
• iPod nano (5th generation)
• iPod nano (4th generation)
• iPod nano (3rd generation)
• iPod nano (2nd generation)
• iPod nano (1st generation)
• iPhone 4S
• iPhone 4
• iPhone 3GS
• iPhone 3G
• iPhone
Aha™-Anforderungen:
Die Anforderungen für die Wiedergabe von Aha™
lauten wie folgt:
iPhone oder iPod touch
• Verwenden Sie ein Apple iPhone bzw. einen
Apple iPod touch mit dem Betriebssystem iOS
4 oder höher.
• Suchen Sie im Apple iTunes App Store nach
“aha” und installieren Sie die aktuellste Version
der Aha™-App auf Ihrem Gerät.
• iPhone / iPod touch muss mittels KCA-iP102 an
dieses Gerät angeschlossen sein.
Android™
• Verwenden Sie Android OS 2.2 oder höher.
• Laden Sie die Aha™-App vom Google Play
Store auf Ihr Smartphone.
• Bluetooth muss vorhanden sein und die
folgenden Profile müssen unterstützt werden.
- SPP (Serial Port Profile)
- A2DP (Advanced Audio Distribution Profile)
HINWEIS
• Melden Sie sich in der Anwendung auf Ihrem
Gerät an und erstellen Sie ein kostenloses
Konto bei Aha.
• Internet-Anschluss über LTE, 3G, EDGE oder
WiFi.
• Da es sich bei Aha™ um einen Fremdservice
handelt, sind Änderungen der technischen
Daten vorbehalten. Dementsprechend kann
die Kompatibilität beeinträchtigt sein bzw.
stehen evt. nicht alle Dienste zur Verfügung.
• Einige Aha™-Funktionen können auf diesem
Gerät nicht ausgeführt werden.
Weitere Informationen zur Kompatibilität
mit der iPod/iPhone-Software erhalten Sie
unter: www.kenwood.com/cs/ce/ipod/.
B59-2186-00_00.indb 55
Deutsch | 55
2012/12/17 15:1
Inhoud
Voor de ingebruikneming
Over de snelstartgids.................................56
Voor de ingebruikneming........................56
Voorbereidingen.........................................58
Algemene bediening.................................59
Muziek afspelen (CD/USB/SD/iPod).....60
Naar de radio/digitale radio
luisteren......................................................62
Handsfree telefoneren...............................63
Voor de installatie.......................................64
De kabels met de aansluitingen
verbinden...................................................66
Het toestel installeren/verwijderen......68
De microfoon installeren .........................69
De antenne voor digitale radio
installeren...................................................69
Appendix........................................................73
# WAARSCHUWING
Voorkom persoonlijk letsel of
brand en neem derhalve de
volgende voorzorgsmaatregelen:
Over de snelstartgids
Het toestel werkt mogelijk niet naar
behoren als de stekker tussen het toestel
en het voorpaneel vuil is. Verwijder het
voorpaneel en reinig de stekker voorzichtig
met een wattenstaafje. Zorg er daarbij voor
dat u de stekker niet beschadigt.
In deze snelstartgids worden de
basisfuncties van dit toestel besproken.
Raadpleeg voor functies die in deze
handleiding niet worden beschreven
de Gebruiksaanwijzing op de volgende
website:
manual2.jvckenwood.com/edition/im362/
• Stop de auto voordat u het toestel
bedient.
• Voorkom kortsluiting en steek derhalve
nooit metalen voorwerpen (zoals munten
en gereedschap) in het toestel.
! LET OP
• Stel het volume zo in dat u geluid van
buiten de auto kunt horen. Rijden met
een te hoog volume kan een ongeluk
veroorzaken.
• Veeg het paneel schoon met een droge
silicone of zachte doek.
Als u dit voorschrift negeert, kan de
monitor of het toestel beschadigd raken.
Reinigen van de stekker
Stekker
Condens
Als de auto airconditioning heeft, kan
condens neerslaan op de laserlens. Hierdoor
kunnen afspeelfouten ontstaan. Verwijder
in dat geval de disk en wacht tot het vocht
is verdampt.
Om de gebruiksaanwijzing te raadplegen
is een browser nodig, bijvoorbeeld Internet
Explorer® 7 of later, Firefox® 3.6 of later,
Chrome™ 20 of later, Safari® 5.1 of later, iOS
Safari® 4.0 of later, of Android™ 2.2 of later.
56 | Snelstartgids
B59-2186-00_00.indb 56
2012/12/17 15:1
eming
Opmerkingen
• Raadpleeg uw Kenwood-dealer indien
u problemen of vragen hebt tijdens de
installatie.
• Vraag bij aankoop van optionele
accessoires aan uw Kenwood-dealer of
deze functioneren met uw model en in
uw gebied.
• Tekens die voldoen aan de norm ISO
8859-1 kunnen worden weergegeven.
• Tekens die voldoen aan de norm ISO
8859-5 of ISO 8859-1 kunnen worden
weergegeven. Zie “Russisch” in <12-7.
Begininstellingen> (Handleiding).
• De Radio Data System-functie werkt niet
als de service door geen enkele zender
wordt ondersteund.
• De USB-snelheid is op het hoofdapparaat
aangegeven onder het verwijderbare
voorpaneel.
Met dit toestel te gebruiken disks
• Dit toestel kan alleen cd’s afspelen met de
symbolen
.
• De volgende disks kunnen niet worden
gebruikt:
-- Disks die niet rond zijn
-- Disks met een gekleurd
opnameoppervlak of vuile disks
-- Opneembare/herschrijfbare disks
die niet zijn voltooid (voor het
voltooiingsproces raadpleegt u de
gebruiksaanwijzing bij uw software
voor het beschrijven van disks of bij uw
diskrecorder.)
-- Disks van 8 cm (3 inch) (als u deze
probeert af te spelen met een adapter
kan het toestel defect raken.)
B59-2186-00_00.indb 57
Behandeling van disks
• Raak het opnameoppervlak van de disk
niet aan.
• Plak geen plakband e.d. op de disk.
Gebruik ook geen disks waar plakband
e.d. op geplakt is.
• Gebruik geen toebehoren voor disks.
• Gebruik geen oplosmiddelen om disks
schoon te maken. Gebruik een droge
silicone of zachte doek.
• Reinig de disk door met de doek vanuit
het midden van de disk naar buiten toe
te vegen.
• Trek disks horizontaal uit het toestel.
• Als de opening in het midden of de
buitenrand van een disk bramen vertoont,
verwijdert u deze voordat u de disk
plaatst.
Terugstellen van uw toestel
Als het toestel niet naar behoren
werkt, drukt u op de resettoets. De
fabrieksinstellingen van het toestel worden
dan hersteld.
Resettoets
De afbeeldingen van het display en het
voorpaneel in deze gebruiksaanwijzing zijn slechts
voorbeelden en zijn bedoeld om het gebruik van
de bedieningselementen te verduidelijken. Het is
daarom mogelijk dat de displays in de afbeeldingen
afwijken van wat er werkelijk op het display van
het apparaat wordt weergegeven, en dat sommige
displays in de afbeeldingen niet van toepassing zijn.
Nederlands | 57
2012/12/17 15:1
Voorbereidingen
Knop [Control] (volumeknop)
Ontgrendeltoets
De Demonstratiemodus annuleren
Annuleer de demonstratiemodus wanneer
u het toestel na de installatie voor het
eerst gaat gebruiken.
1
Het voorpaneel verwijderen/
bevestigen
Druk op de knop [Control] om de
demonstratiemodus te annuleren als de
melding “To cancel DEMO Press the volume
knob” verschijnt (ca. 15 seconden).
2 Draai aan de knop [Control] om “YES”
Druk op de
ontgrendeltoets.
te selecteren en druk dan op de knop
[Control].
De demonstratiemodus kan tevens
worden geannuleerd in de modus
Functies instellen. Zie <12-6. Instelling
van de demonstratiemodus> in de
gebruiksaanwijzing
!
• Verwijder het voorpaneel meteen nadat u op
de ontgrendeltoets hebt gedrukt. Als u het laat
zitten, kan het vallen vanwege trillingen en
dergelijke.
• Het voorpaneel is een precisie-onderdeel van het
toestel en kan gemakkelijk beschadigd worden
door schokken en stoten.
• Bewaar het voorpaneel in de houder terwijl het
is verwijderd.
• Plaats het voorpaneel (en de houder) niet in
direct zonlicht, hitte of extreme vochtigheid.
Vermijd ook plaatsen waar het zeer stoffig is of
waar gevaar bestaat voor waterspatten.
58 | Snelstartgids
B59-2186-00_00.indb 58
2012/12/17 15:1
Algemene bediening
[SRC] Knop [Control]
USB-aansluiting
Hulpingang
Aan/uit
Om de stroom IN te schakelen drukt u
op [SRC].
Om de stroom UIT te schakelen drukt u
op [SRC] en houdt u deze ingedrukt.
Bronselectie
Door [SRC] meerdere keren in te
drukken, schakelt u van de ene naar de
andere geluidsbron.
Geluidsbron
Display
Stand-by
“STANDBY”
[2]
Digitale radio
“DIGITAL RADIO”
Tuner
“TUNER”
USB-apparaat aangesloten op USB- “USB (FRONT)”
aansluiting aan de voorkant
USB-apparaat aangesloten op USB- “USB (REAR)”
aansluiting aan de achterkant
iPod aangesloten op USB-aansluiting “iPod (FRONT)”
voor[1]
iPod aangesloten op USB-aansluiting “iPod (REAR)”
achter[1]
aha™ van iPod aangesloten op USB- “aha (FRONT)”
aansluiting voor[1][2][3]
aha™ van iPod aangesloten op USB- “aha (REAR)”
aansluiting achter[1][2][3]
aha™ van apparaat verbonden via
“aha”
Bluetooth[1][2][3]
[2] [3]
Bluetooth-audio
“BT AUDIO”
SD[1] [4]
“SD”
B59-2186-00_00.indb 59
CD[1]
Hulpingang
“CD”
“AUX”
Deze bron kan alleen geselecteerd worden als
hij afgespeeld kan worden.
Functie van KDC-BT73DAB.
[3]
Functie van KDC-BT53U.
[4]
Functie van KDC-5057SD.
[1]
[2]
Volume
Draai aan de knop [Control] om het
geluidsvolume in te stellen.
USB-aansluiting
Er kan een USB-apparaat of iPod worden
aangesloten.
De CA-U1EX (max. 500 mA) of KCA‑iP102
(optionele accessoires) wordt aanbevolen
om een USB-apparaat of iPod aan te sluiten.
Hulpingang
Er kan een draagbaar audioapparaat worden
aangesloten via een stereo ministekker (3,5
mm ø).
Nederlands | 59
2012/12/17 15:1
Muziek afspelen (CD/USB/SD/iPod)
CD-gleuf
[SRC] Knop [Control]
CA-U1EX[1]
[G]
Klepje van de
cd-gleuf
KCA-iP102[1]
Ontgrendel- [E/F] [R/S] Indicatie REAR USB
[1/6] toets
Een disk afspelen
Open het Klepje van de cd-gleuf naar
boven.
Plaats een disk in de CD-gleuf.
Als de disk is geplaatst, wordt automatisch
van bron veranderd en wordt het afspelen
gestart.
Sluit het klepje van de diskgleuf.
SD-kaart afspelen
(uitsluitend KDC-5057SD)
1
Druk op de ontgrendeltoets en maak het
voorpaneel los.
2 Houd de SD-kaart vast zoals hieronder
afgebeeld en steek deze in de SD-kaartsleuf
totdat de kaart vastklikt.
Een USB-apparaat/iPod afspelen
Sluit een USB-apparaat of iPod aan op
de USB-aansluiting zoals hierboven
weergegeven.
Als het apparaat is aangesloten, wordt
automatisch van bron veranderd en wordt
het afspelen gestart.
U kunt de iPod of het USB-apparaat
aansluiten op de USB-aansluiting aan de
voorkant of die aan de achterkant van dit
toestel. Als u het op de USB-aansluiting aan
de achterkant aansluit, blijft de indicatie
“REAR USB” verlicht.
optionele accessoires
[1]
USB-aansluiting
SD-kaart (in de handel verkrijgbaar)
3 Breng het voorpaneel weer aan.
4 Druk op [SRC] om “SD” als bron te
selecteren.
Een map met audiobestanden
selecteren
Druk op [R] of [S].
Een nummer (track of bestand)
selecteren
Druk op [E] of [F].
Een nummer (track of bestand) snel
vooruit- of terugspoelen
Druk op [E] of [F] en houd deze
ingedrukt.
Een nummer (track of bestand)
onderbreken en afspelen
Druk op [1/6].
60 | Snelstartgids
B59-2186-00_00.indb 60
2012/12/17 15:1
Muziek zoeken
Disk uitwerpen
1 Druk op [1/6].
2 Zoek naar een nummer.
USB-apparaat/iPod verwijderen
U kunt het nummer dat u wilt afspelen
zoeken.
Type bewerking
Items selecteren
Selectie bepalen
Teruggaan naar het vorige
item
Actie
Draai aan de knop
[Control].
Druk op de knop
[Control].
Druk op [1/6].
Om het zoeken naar muziek in
audiobestanden of op de iPod te annuleren,
drukt u op [1/6] en houdt u deze
ingedrukt.
B59-2186-00_00.indb 61
Open het klepje van de cd-gleuf naar
boven en druk op [G].
Schakel over naar een andere geluidsbron
dan USB, iPod, en Aha Radio. Verwijder
vervolgens het USB-apparaat.
Gegevens op het USB-apparaat of op de
iPod kunnen beschadigd raken als u het
apparaat verwijdert terwijl het als actieve
bron in gebruik is.
SD-kaart verwijderen
(uitsluitend KDC-5057SD)
1
Druk op de ontgrendeltoets en maak het
voorpaneel los.
2 Druk tegen de SD-kaart tot hij klikt en haal
daarna uw vinger van de kaart.
De kaart komt een stukje naar buiten zodat
u hem met uw vingers kunt verwijderen.
3 Het voorpaneel bevestigen
Nederlands | 61
2012/12/17 15:1
Naar de radio/digitale radio luisteren
[SRC] Knop [Control]
[1/6]
[R]
[E/F]
Een tunerbron selecteren
4 Draai aan de knop [Control] om het
voorkeuzenummer te selecteren (FM/
digitale radio: “1” – “18”, AM: “1” – “6”), druk
vervolgens op de knop [Control] en houd
deze ingedrukt.
Druk op [SRC] om “TUNER” of “DIGITAL
RADIO” (alleen KDC-BT73DAB) te selecteren.
Raadpleeg <Bronselectie> (pagina 59).
Een band (FM of AM) selecteren
(alleen tuner)
Druk op [R].
Een zender/service selecteren
Druk op [E] of [F].
De zoekmodus kan worden gewijzigd. Zie
<9-5. Tuner instellen> of <10-9. Instelling
van digitale radio> in de gebruiksaanwijzing
Zendervoorkeurgeheugen
1
Druk op [R] om een band te selecteren.
(alleen tuner)
2 Druk op [E] of [F] om het station
of de service te selecteren die u in het
zendervoorkeurgeheugen wilt opslaan.
3 “TUNER”: Druk op [1/6].
Oproepen van zenders die in het
geheugen zijn vastgelegd
1
Druk op [R] om een band te selecteren.
(alleen tuner)
2 Druk op [1/6].
3 Draai aan de knop [Control] om een
voorkeuzenummer te selecteren (FM/
digitale radio: “1” – “18”, AM: “1” – “6”), druk
vervolgens op de knop [Control].
In de voorkeuzemodus Mix Station
worden de namen van de banden van de
tunerbronnen als volgt weergegeven:
FM: FM-radiozender
AM: AM-radiozender
DR: Digitale-radioservice
“DIGITAL RADIO”: Druk tweemaal op [1/6].
Druk nogmaals op [1/6] om naar de
voorkeuzemodus Mix Station te gaan. In
deze modus kunnen verschillende banden
en tunerbronnen (FM, AM, digitale radio
enz.) in de zelfde reeks voorkeuzes worden
opgeslagen, zodat u een gewenste zender
weer kunt oproepen zonder over te
schakelen naar een andere band en/of een
andere tunerbron. In de voorkeuzemodus
Mix Station kunnen maximaal 6
voorkeuzestations worden opgeslagen.
62 | Snelstartgids
B59-2186-00_00.indb 62
2012/12/17 15:1
Functie van KDC-BT73DAB, KDC-BT53U
Handsfree telefoneren
Knop [Control]
[Ú]
Een Bluetooth-apparaat koppelen
U kunt uw Bluetooth-apparaat aan dit
toestel koppelen.
1
Zorg ervoor dat het Bluetooth-apparaat is
ingeschakeld om een verbinding met dit
toestel aan te vragen.
De naam van dit toestel (“KDC-####”) wordt
weergegeven op het Bluetooth-apparaat.
“Paring Press the volume knob” wordt
weergegeven.
2 Druk op de knop [Control].
Het verbinden met uw Bluetooth-apparaat
begint, “Pairing Success” verschijnt enige
tijd later, vervolgens wordt de vorige bron
geselecteerd.
Wanneer de registratie van uw mobiele
telefoon voltooid is, wordt het telefoonboek
van de mobiele telefoon automatisch
naar dit toestel gedownload. (Gebruik, als
het telefoonboek niet naar dit toestel is
gedownload, de mobiele telefoon om het te
downloaden.)
B59-2186-00_00.indb 63
Een nummer bellen in het
telefoonboek
Kies het telefoonnummer in het
telefoonboek van uw mobiele telefoon.
Gebruik, als het telefoonboek niet naar
dit toestel is gedownload, de mobiele
telefoon om het te downloaden.
1 Druk op [Ú].
2 Draai aan de knop [Control] om “Phone
Book” te selecteren en druk vervolgens op
de knop [Control].
3 Draai aan de knop [Control] om een naam
te selecteren en druk dan op de knop
[Control].
4 Draai aan de knop [Control] om een
telefoonnummer te selecteren.
5 Druk op [Ú].
Een telefonisch gesprek
beantwoorden
Druk op [Ú].
Een gesprek beëindigen
Druk op [Ú].
Nederlands | 63
2012/12/17 15:1
Voor de installatie
# WAARSCHUWING
• Het toestel kan uitsluitend worden geïnstalleerd
in een auto met een 12V-accu met massa aan
de min-pool.
• Als u de ontstekingskabel (rood) en de accukabel
(geel) op het chassis van de auto (massa)
aansluit, kan u een kortsluiting veroorzaken
waardoor brand kan ontstaan. Sluit deze kabels
altijd aan op de voedingsbron die door de
zekeringkast loopt.
! LET OP
• Gebruik de bij dit toestel geleverde stroomkabel
om de stroom aan te sluiten. Het toestel werkt
mogelijk niet goed als u een stroomkabel van
een ander model gebruikt.
• Installeer dit toestel in de console van uw
voertuig.
• Raak de metalen onderdelen van dit toestel niet
aan tijdens en kort na het gebruik van het toestel.
Metalen onderdelen zoals de warmteafvoer en
behuizing worden heet.
• De bevestiging en bedrading van dit product
vereist vakbekwaamheid en ervaring. Laat de
bevestiging en bedrading om veiligheidsredenen
door vaklui uitvoeren.
• Raadpleeg uw Kenwood-dealer indien u
problemen of vragen hebt tijdens de installatie.
• Koppel de minpool van de accu los voordat u het
toestel installeert.
• Isoleer niet-aangesloten kabels met isolatieband
of ander geschikt materiaal. Voorkom kortsluiting
door de kapjes op het uiteinde van de nietaangesloten kabels en aansluitingen niet te
verwijderen.
• Controleer na de montage opnieuw of het
toestel geaard is aan het chassis van de auto.
• Als de zekering is doorgebrand, controleert u
eerst of de kabels geen andere onderdelen raken
en zo een kortsluiting veroorzaken en vervangt
u vervolgens de oude zekering door een nieuwe
met dezelfde stroomsterkte.
• Wanneer u slechts twee luidsprekers op het
systeem aansluit, sluit u de stekkers aan op beide
voor-uitgangsaansluitingen of beide achteruitgangsaansluitingen (meng de voor- en achteruitgangsaansluitingen niet). Als u, bijvoorbeeld,
de + connector van de linker luidspreker
aansluit op een voor-uitgangsaansluiting, sluit
dan de - connector niet aan op een achteruitgangsaansluiting.
• Sluit de luidsprekerdraden correct aan op de
bijbehorende aansluitingen. Dit toestel kan
beschadigd raken of niet functioneren als u de
- kabels deelt of met een metalen deel van het
voertuig aardt.
• Gebruik bij het installeren uitsluitend de
bijgeleverde schroeven. Gebruik uitsluitend
de meegeleverde schroeven. Het gebruik van
onjuiste schroeven kan resulteren in schade aan
het toestel.
• Als de voeding van uw auto geen ACC-stand
heeft, verbind dan de ontstekingsdraden met
een voedingsbron die met de contactsleutel
kan worden aan- en uitgezet. Als u de
ontstekingsdraden verbindt met een constante
voedingsbron, zoals de accukabels, dan kan de
accu leeglopen.
• Als de console een deksel heeft, moet u er bij
de installatie van het toestel op letten dat het
voorpaneel bij het openen en sluiten het deksel
niet raakt.
• Controleer na het installeren van het toestel of
de remlichten, richtingaanwijzers, ruitenwissers,
enz. van de auto juist functioneren.
• Installeer het toestel onder een maximale hoek
van 30˚.
• De ontvangst wordt mogelijk slecht wanneer
zich metalen voorwerpen in de buurt van
de Bluetooth-antenne bevinden. (uitsluitend
KDC-BT73DAB, KDC-BT53U)
Bluetooth-antenne
KDC-BT73DAB • Dit toestel bevat een koelventilator om de
interne temperatuur te verlagen. Monteer het
toestel niet op een plek waar de koelventilator
van het toestel wordt geblokkeerd. Als
de openingen voor de ventilator worden
geblokkeerd, belemmert dit het koelen van de
interne temperatuur en zal het toestel niet goed
meer werken.
64 | Snelstartgids
B59-2186-00_00.indb 64
2012/12/17 15:1
Koelventilator
Voor een goede ontvangst
Houd voor een goede ontvangst rekening met het
volgende:
• Communiceer met de mobiele telefoon op
een afstand van hoogstens 10 meter. Het
communicatiebereik kan korter worden,
afhankelijk van de omgevingssituatie. Het
communicatiebereik wordt ook korter als zich
een obstakel tussen dit toestel en de mobiele
telefoon bevindt. Het bovengenoemde maximale
communicatiebereik (10 m) is niet altijd
verzekerd.
• Een zendstation of walkietalkie in de buurt kan
de communicatie verstoren ten gevolge van een
te krachtig signaal.
Installatieaccessoires
1
2
6[1]
.....3
.....1 (3 m)
Ontstekingskabel
(rood)
Pen A-7
(rood)
Auto
Pen A-4
(geel)
2Als de pen A-7 (rood) met de constante
voeding wordt verbonden, en de pen A-4
(geel) wordt verbonden met de ontsteking
via de ISO-stekker van het voertuig:
Ontstekingskabel
(rood)
Toestel
Accukabel
(geel)
7[1]
3[1][2]
1Als de pen A-7 (rood) met de ontsteking
wordt verbonden, en de pen A-4 (geel)
wordt verbonden met de constante
voeding via de ISO-stekker van het voertuig
(standaard):
Accukabel
(geel)
.....1
.....2
De penopstelling van de ISO-stekkers is
afhankelijk van uw type auto. Zorg dat de
aansluitingen juist zijn om beschadiging van
het toestel te voorkomen.
De standaardverbinding van de
bedradingsbundel wordt in stap 1
hieronder beschreven. Maak de getoonde
verbindingen als de penopstelling van
de ISO-stekker overeenkomt met de
beschrijving in 2.
De kabel moet opnieuw worden
aangesloten zoals getoond in 2 hieronder
als u dit toestel installeert in Volkswagenmodellen.
Toestel
5[1]
.....1
De ISO-stekker aansluiten
Pen A-7
(rood)
Auto
Pen A-4
(geel)
.....1
uitsluitend
KDC-BT73DAB
uitsluitend
KDC-BT53U
[1]
4[1]
B59-2186-00_00.indb 65
[2]
.....1
Nederlands | 65
2012/12/17 15:1
Achter-uitgang
Voor-uitgang
R
L
Subwoofer-uitgang
SW FRONT REAR
De kabels met de aansluitingen verbinden
Stekkerfunctietabel
Pennummers voor
ISO-stekkers
Externe
spanningsaansluiting
A-4
A-5
A-6
A-7
A-8
Luidsprekerstekker
B-1
B-2
B-3
B-4
B-5
B-6
B-7
B-8
Kleur van
kabel
Functies
Geel
Blauw/wit
Oranje/wit
Rood
Zwart
Accu
Spanningsregeling
Dimmer
Contact (ACC)
Massaverbinding
Paars
Paars/zwart
Grijs
Grijs/zwart
Wit
Wit/zwart
Groen
Groen/zwart
Rechts achter (+)
Rechts achter (–)
Rechts voor (+)
Rechts voor (–)
Links voor (+)
Links voor (–)
Links achter (+)
Links achter (–)
FM/AM-antenne-ingang (JASO)
(alleen KDC-BT73DAB, KDC-BT53U)
R
Antenne voor digitale
radio (accessoire 5)
(alleen KDC-BT73DAB)
Microfoon (accessoire 3)
(alleen KDC-BT53U)
⁄
• Luidsprekerimpedantie:
4–8Ω
⁄ Zie <De ISO-stekker aansluiten> (pagina 65).
Aansluiting A
8
7
6
5
4
3
2
1
Aansluiting B
8
7
6
5
4
3
2
1
Rood (pen A–7)
Rood (ontstekingskabel)
Geel (pen A–4)
Geel (accukabel)
alleen KDC-BT73DAB
66 | Snelstartgids
B59-2186-00_00.indb 66
2012/12/17 15:1
USB-aansluiting (0,8 m)
Naar USB-apparaat.
USB - maximale voedingsstroom
: DC 5 V = 1 A
Zekering (10A)
R
L
FM/AM-antenne-ingang
(JASO) (alleen KDC-5057SD)
Microfoon (accessoire 3)
(alleen KDC-BT73DAB)
Bedradingsbundel
(accessoire 1)
Zorg dat de kabel niet uit het lipje komt wanneer u geen
verbindingen heeft gemaakt.
Blauw/wit (geschakelde
voeding/antennemotor)
P.CONT
ANT.
CONT
Lichtblauw/geel (draad
stuurafstandsbediening)
REMOTE CONT
STEERING WHEEL
REMOTE INPUT
Verbinden met een optionele
vermogensversterker of met een
gemotoriseerde antenne in de auto.
Als u de stuurafstandsbediening wilt
gebruiken, hebt u een specifieke adapter
nodig (niet meegeleverd) die bij uw auto past.
gskabel)
T73DAB
B59-2186-00_00.indb 67
Bruin (draad stilteregeling)
MUTE
Bij aansluiting op het Kenwoodnavigatiesysteem: Raadpleeg de handleiding
van het navigatiesysteem.
Bij aansluiting op een autotelefoon: Om de
geaarde aansluiting te verbinden wanneer
de telefoon overgaat of tijdens een gesprek.
(alleen KDC-5057SD)
Nederlands | 67
2012/12/17 15:1
Het toestel installeren/verwijderen
Installatie
Verwijderen van het toestel
1
Buig de lipjes van de bevestigingshuls
met een schroevendraaier of iets
dergelijks en plaats de bevestigingshuls.
Verwijder het inbouwframe. Zie: <Het
inbouwframe verwijderen>.
2 Verwijder het voorpaneel.
3 Steek de twee uitbouwsleutels (accessoire
2) diep in de sleuven aan beide kanten,
zoals afgebeeld.
4 Trek de uitbouwsleutel omlaag naar de
onderkant. Trek het toestel vervolgens half
naar buiten terwijl u de uitbouwsleutel naar
de binnenkant drukt.
Accessoire 2
<
• Controleer of het toestel goed op zijn plaats is
geïnstalleerd. Als het toestel niet stabiel is, kan
het slecht werken (het geluid kan bijvoorbeeld
soms onderbroken worden).
Het inbouwframe verwijderen
1
Gebruik de klempennen op de
uitbouwsleutel (accessoire 2) en maak de
twee vergrendelingen aan de bovenkant
van het frame los.
Breng het frame omhoog en trek het naar
voren zoals u in de afbeelding ziet.
!
• Wees voorzichtig om verwonding door de
klempennen op de uitbouwsleutel te vermijden.
5 Trek het toestel met uw handen geheel
naar voren en let op dat u het toestel niet
laat vallen.
Klem
Vergrendeling
Accessoire 2
2 Als het bovenste deel van het frame is
verwijderd, kunt u het onderste deel van het
frame verwijderen.
<
• Het frame kan op dezelfde wijze vanaf de
onderkant worden verwijderd.
68 | Snelstartgids
B59-2186-00_00.indb 68
2012/12/17 15:1
Alleen KDC-BT73DAB, KDC-BT53U
uitsluitend KDC-BT73DAB
De microfoon
installeren
De antenne voor digitale
radio installeren
1
! LET OP
Controleer de installatiepositie van de
microfoon (accessoire 3).
2 Reinig het installatieoppervlak.
3 Installeer de microfoon.
4 Leid de kabel naar het toestel en zet deze
op verschillende plaatsen vast met behulp
van tape of iets dergelijks.
<
• Installeer de microfoon voor zover mogelijk vanaf
de mobiele telefoon.
Accessoire 3
Bevestig de kabel met een stuk in de
handel verkrijgbare tape.
B59-2186-00_00.indb 69
Verwijder de beschermstrook van de microfoon en plak de microfoon
vast op de plek die hierboven te zien is.
Richt de microfoon op de
bestuurder.
• Deze kleefantenne mag uitsluitend in het
voertuig worden gebruikt.
• Bevestig de antenne niet:
-- op plaatsen waar hij het uitzicht van de
bestuurder belemmert
-- op plaatsen waar hij de werking van
veiligheidsvoorzieningen zoals airbags
belemmert
-- op beweegbare glasoppervlakken, zoals de
achterklep
• De signaalsterkte neemt af:
-- op IR-reflecterend glas of plaatsen waar het
glas wordt bedekt door spiegelende glasfilm -- op plaatsen waar overlapping is met de echte
radioantenne (stralingsdiagram)
-- op plaatsen waar overlapping is met de
draden van de ruitverwarming
-- aan de zijkant van het voertuig (bijv. deur,
zijruit)
-- op de achterruit
-- als er glas wordt gebruikt dat radiosignalen
belemmert (bijv. infraroodreflecterend glas of
thermisch isolatieglas)
-- De ontvangstkwaliteit kan afnemen vanwege
geluid dat ontstaat wanneer de ruitenwisser,
airconditioning of motor wordt ingeschakeld.
-- De ontvangstkwaliteit kan afnemen als de
positie van het voertuig (antenne) ten opzichte
van het radiostation verandert.
• Controleer de locatie waar de kleefantenne
(accessoire 4) wordt geïnstalleerd, voordat
u deze installeert. De kleefantenne kan niet
opnieuw worden vastgeplakt.
• Veeg olie en vuil grondig van het kleefoppervak
met behulp van het meegeleverde
reinigingsmiddel (accessoire 7).
• Pas op dat u de kleefantenne (accessoire 4) niet
buigt of beschadigt.
• Verwarm vóór de bevestiging het kleefoppervlak
door bijvoorbeeld de verwarming aan te zetten.
• Het is mogelijk dat de antenne op bepaalde
typen voertuigen niet bevestigd kan worden.
• Controleer de kabelroutering van de
kleefantenne (accessoire 4) en versterker
(accessoire 5) voordat u deze vastplakt.
Nederlands | 69
2012/12/17 15:1
uitsluitend KDC-BT73DAB
De antenne voor digitale radio installeren
Bevestigingsoverzicht
Accessoire 45
De bevestigingsplaats van de
antenne bepalen
• Bevestiging van de antenne aan de
linkerzijde
Voorstijl
150 mm
Massastrip
Antennekabel (3,5 m)
70 mm*
• De antenne moet omwille van de veiligheid
bevestigd worden aan de passagierszijde.
• Gebruik een kabelklemmer (accessoire 6) om
de antenne op verschillende plekken aan de
voorstijl vast te zetten.
• De richting van het antennefolie (accessoire
4) hangt ervan af of de kleefantenne aan de
rechterkant of de linkerkant wordt geïnstalleerd.
• Laat 150 mm tussenruimte tussen het
antennefolie (accessoire 4) en de keramische
strip (zwarte deel) aan de bovenkant van de
voorruit.
Plaats de antenne aan de zijkant van de voorruit
bovendien op een afstand van circa 70 mm van
de keramische strip. (plaats waar de massastrip
van de versterker vastgeplakt kan worden op het
metaal van de voorstijl)
• Houd een afstand van minimaal 100 mm tot
andere antennes.
• Plak de versterker (accessoire 5) niet op de
keramische strip (zwarte deel) rond de voorruit.
Deze heeft namelijk niet genoeg kleefkracht.
Accessoire 4
Accessoire 5
• Bevestiging van de antenne aan de
rechterzijde
Accessoire 5
Voorstijl
Massastrip
150 mm
Accessoire 4
70 mm*
*Plaats waar de massastrip van de versterker
(accessoire 5) kan worden vastgeplakt op
het metaal van de voorstijl.
70 | Snelstartgids
B59-2186-00_00.indb 70
2012/12/17 15:1
Bevestiging van de antenne
1 Controleer de bevestigingsplaats.
2 Reinig het oppervlak waarop de
antennefolie (accessoire 4), versterker
(accessoire 5) en massastrip worden
geplakt met het meegeleverde
reinigingsmiddel (accessoire 7).
De coating op het metalen oppervlak hoeft
niet te worden verwijderd.
5 Wrijf na het vastplakken in de richting van
de in de afbeelding weergegeven pijl over
de vastgeplakte antenne, zodat hij zich aan
het glasoppervlak hecht.
• Wacht met vastplakken totdat het
glasoppervlak helemaal droog is.
• Als het glasoppervlak koud is, zoals 's
winters, moet het verwarmd worden met de
ruitverwarming of een föhn.
3 Verwijder de beschermstrook (strip I) van de
antennefolie horizontaal en plak de antenne
op de voorruit.
6 Verwijder het beschermfolie (strip III).
• Raak de voedingsaansluiting niet aan. Gebruik
bovendien geen glasreiniger.
Voedingsaansluiting
7 Lijn het uitstekende deel van de versterker
met de 5 op de antennefolie en plak deze
vast.
• Verwijder de beschermstrook voorzichtig.
• Raak het plakoppervlak (de klevende kant)
van de antennefolie niet aan.
4 Verwijder de beschermstrook (strip II) van
de antennefolie verticaal en plak de antenne
vast door deze voorzichtig aan te drukken.
B59-2186-00_00.indb 71
• Raak de voedingsaansluiting of het
kleefoppervlak (hechtzijde) van de versterker
niet aan.
• Bevestiging van de antenne aan de
rechterzijde
Lijn het uitstekende deel uit met 5
Massastrip
Accessoire 4
Accessoire 5
Nederlands | 71
2012/12/17 15:1
uitsluitend KDC-BT73DAB
De antenne voor digitale radio installeren
<
• Bevestiging van de antenne aan de
linkerzijde
Accessoire 5
Accessoire 4
Massastrip
Lijn het uitstekende deel
uit met 5
8
Verwijder het folie van de massastrip en
plak hem vast op een metalen deel van het
voertuig.
Zorg ervoor dat de massastrip voldoende
ruimte heeft, zodat hij niet in aanraking
komt met delen van het interieur (afdekking
van de voorstijl). Pas ook op dat de onderdelen van het
interieur niet in aanraking komen met de
versterker.
Accessoire 5
Voorruit
Voorstijl
• Neem de volgende voorzorgsmaatregelen in
acht als de antennekabel ter hoogte van de
airbag in de voorstijl wordt doorgevoerd.
-- Bevestig het versterkergedeelte van de
antennekabel voor of boven de airbag, zodat
de antenne en de airbag elkaar niet in de
weg zitten.
Accessoire 5
Airbag
Voorstijl
-- De afdekking van de voorstijl is bevestigd met
een speciale klem. Als deze is verwijderd, moet
hij worden teruggeplaatst.
Neem contact op met uw dealer voor
meer informatie over het terugplaatsen
van de afdekking van de voorstijl en de
beschikbaarheid van vervangingsonderdelen.
Interieurdeel
Interieurdeel
Massastrip
Klem
9 Maak de antennekabels met draad vast.
• Gebruik een kabelklemmer (accessoire 6)
om de antenne op verschillende plekken aan
de voorstijl vast te zetten.
72 | Snelstartgids
B59-2186-00_00.indb 72
2012/12/17 15:1
Appendix
Audiobestanden
• Afspeelbare audiobestanden
AAC-LC (.m4a), MP3 (.mp3), WMA (.wma), WAV
(.wav) van USB-apparaat of SD-kaart
• Afspeelbare diskmedia
CD-R/RW/ROM
• Bestandsindelingen voor afspeelbare disks
ISO 9660 Niveau 1/2, Joliet, lange bestandsnaam.
• Afspeelbare USB-apparaten USB-massaopslagklasse
• Afspeelbare SD-kaarten SD-kaart (≤2 GB), SDHC-kaart (≤32 GB)
• Bestandssystemen van afspeelbare USBapparaten/SD-kaarten
FAT12, FAT16, FAT32
Een online handleiding over
audiobestanden is beschikbaar op de site
www.kenwood.com/cs/ce/audiofile/.
iPod-/iPhone-modellen die kunnen
worden aangesloten op dit toestel
Made for
• iPod touch (4th generation)
• iPod touch (3rd generation)
• iPod touch (2nd generation)
• iPod touch (1st generation)
• iPod classic
• iPod with video
• iPod nano (6th generation)
• iPod nano (5th generation)
• iPod nano (4th generation)
• iPod nano (3rd generation)
• iPod nano (2nd generation)
• iPod nano (1st generation)
• iPhone 4S
• iPhone 4
• iPhone 3GS
• iPhone 3G
• iPhone
Vereisten voor Aha™:
Voor het luisteren naar Aha™ gelden de volgende
vereisten:
iPhone of iPod touch
• Gebruik een Apple iPhone of iPod touch met
iOS4 of hoger.
• Zoek in de Apple iTunes App Store naar "aha"
en installeer de recentste versie van de Aha™toepassing op uw apparaat.
• iPhone/ iPod touch op dit toestel aangesloten
via een KCA-iP102-kabel.
Android™
• Gebruik Android OS 2.2 of hoger.
• Ga naar Google Play en download de Aha™toepassing op uw smartphone.
• Bluetooth moet ingebouwd zijn en de
volgende profielen moeten worden
ondersteund.
- SPP (Serial Port Profile)
- A2DP (Advanced Audio Distribution Profile)
OPMERKING
• Meld u bij de toepassing op uw apparaat aan
en maak een gratis account bij Aha aan.
• Internetverbinding via LTE, 3G, EDGE of WiFi.
• Omdat Aha™ een service van derden is,
kunnen de specificaties zonder voorafgaande
bekendmaking worden gewijzigd. Bijgevolg
kan de compatibiliteit worden aangetast en
zijn bepaalde of alle diensten mogelijk niet
meer beschikbaar.
• Bepaalde Aha™-functies kunnen niet via het
toestel worden bediend.
Kijk voor informatie over de compatibiliteit
met iPod-/iPhone-software op www.
kenwood.com/cs/ce/ipod/.
B59-2186-00_00.indb 73
Nederlands | 73
2012/12/17 15:1
Sommario
Prima dell'uso
Informazioni sulla Guida
rapida all'uso.............................................74
Prima dell'uso...............................................74
Preparazioni..................................................76
Funzioni generali.........................................77
Riproduzione musica
(CD/USB/SD/iPod)...................................78
Ascolto della radio/Radio digitale.........80
Chiamate vivavoce......................................81
Prima dell'installazione.............................82
Collegamento dei cavi ai terminali.......84
Installazione/Rimozione dell'unità.......86
Installazione dell'unità microfono .......87
Installazione dell'antenna della
radio digitale.............................................87
Appendice......................................................91
# AVVISO
Per prevenire lesioni o incendi,
adottare le seguenti precauzioni:
Informazioni sulla
Guida rapida all'uso
Pulizia del connettore
Questa guida rapida all'uso descrive le funzioni
di base di questa unità.
Per informazioni sulle funzioni non descritte in
questa Guida, fare riferimento alle Istruzioni per
l’uso disponibili nel seguente sito web:
• Fermare il veicolo prima di mettere in
funzione l'unità.
• Per evitare cortocircuiti, non inserire
mai oggetti di metallo (come monete o
strumenti di metallo) all’interno dell’unità.
! ATTENZIONE
• Regolare il volume in modo da riuscire a
sentire i suoni provenienti dall'esterno del
veicolo. Guidare con un volume troppo
alto potrebbe essere causa di incidente.
• Rimuovere lo sporco dal pannello con un
panno al silicone o morbido.
La mancata osservanza di questa
precauzione potrebbe portare al
danneggiamento del monitor o dell'unità
stessa.
L’unità potrebbe non funzionare
correttamente qualora il connettore fra
l’unità e il frontalino sia sporco. Rimuovere
il frontalino e pulire delicatamente il
connettore con un bastoncino cotonato
prestando attenzione a non danneggiare il
connettore.
manual2.jvckenwood.com/edition/im362/
Connettore
Condensa
Per consultare le Istruzioni per l’uso, è
necessario utilizzare un browser come
Internet Explorer® 7 o successivo, Firefox® 3.6
o successivo, Chrome™ 20 o successivo, Safari®
5.1 o successivo, iOS Safari® 4.0 o successivo,
oppure Android™ 2.2 o successivo.
Quando sul veicolo viene azionata l'aria
condizionata, potrebbe formarsi umidità
sulle lenti laser. Questo potrebbe causare
errori nella lettura del disco. In tal caso
estrarre il disco e attendere che l'umidità
evapori.
74 | Guida rapida all'uso
B59-2186-00_00.indb 74
2012/12/17 15:1
Note
• Se si verificano problemi durante
l'installazione, rivolgersi al rivenditore
Kenwood più vicino.
• All'acquisto di accessori opzionali,
contattare il proprio rivenditore Kenwood
e verificare che gli accessori siano adatti al
proprio modello e alla regione di utilizzo.
• È possibile visualizzare i caratteri ISO
8859-1.
• È possibile visualizzare i caratteri ISO 88595 o ISO 8859-1. Fare riferimento a “Russian”
di <12-7. Impostazioni iniziali> (Istruzioni
per l’uso).
• La funzione Radio Data System non
funziona se tale servizio non viene fornito
dalle emittenti.
• La potenza nominale USB è indicata
sull'unità principale, sotto il frontalino
amovibile.
Informazioni sui cd utilizzati con
questa unità
Gestione dei dischi
• Non toccare la superficie di registrazione
del disco.
• Non attaccare del nastro ecc. sul disco o
utilizzare un disco con del nastro incollato
sopra.
• Non utilizzare alcun accessorio per il disco.
• Non utilizzare solventi per la pulizia dei
dischi. Utilizzare un panno asciutto al
silicone o morbido.
• Pulire il CD muovendo il panno dal centro
del disco verso il bordo esterno.
• In fase di estrazione di un disco da questa
unità, estrarlo in posizione orizzontale.
• Se il foro centrale o il bordo esterno del
disco presentano sbavature, rimuoverle
prima di inserire il disco.
Reset dell'unità
Se l'unità non funziona correttamente,
premere il tasto di ripristino. L'unità ritorna
alle impostazioni predefinite.
Tasto di ripristino
• Questa unità è in grado di riprodurre
soltanto CD con
.
• Non è possibile utilizzare i seguenti dischi:
-- un disco non rotondo
-- un disco con colorazione sulla superficie
di registrazione o un disco sporco
-- un disco registrabile/riscrivibile
non finalizzato (per il processo di
finalizzazione fare riferimento al
software di scrittura dischi in vostro
possesso e alle istruzioni per l'uso del
registratore.)
-- un disco di 8 cm (3 pollici) (cercare di
inserirlo utilizzando un adattatore può
causare un malfunzionamento.)
B59-2186-00_00.indb 75
Le illustrazioni nel display e nel pannello riportate
nel presente manuale sono esempi utilizzati per
spiegare più chiaramente l'utilizzo dei comandi.
Pertanto, ciò che viene visualizzato sul display
nelle illustrazioni può differire da ciò che realmente
appare sul display dell'unità; parte delle immagini
potrebbe non essere visualizzata.
Italiano | 75
2012/12/17 15:1
Preparazioni
Manopola [Control] (Manopola volume)
Rilascio
Uscire dal modo dimostrativo
Uscire dal modo dimostrativo quando
si utilizza l'unità per la prima volta dopo
l'installazione.
1
Rimuovere / Inserire il frontalino
Premere la manopola [Control] per uscire
dal modo dimostrativo quando viene
visualizzato il messaggio “To cancel DEMO
Press the volume knob” (appross. 15
secondi).
Premere il tasto
di rilascio.
2 Ruotare la manopola [Control] per
selezionare “YES”, quindi premere la
manopola [Control].
È possibile uscire dal modo dimostrativo
anche nel modo impostazione funzioni. Fare
riferimento a <12-6. Impostazione modo
dimostrativo> nelle Istruzioni per l’uso
!
• Dopo aver premuto il tasto di rilascio, staccare
immediatamente il frontalino; in caso contrario, vi
è il rischio che cada a causa delle vibrazioni.
• Il frontalino è un componente dell’unità ad alta
precisione e può essere danneggiato da urti o
vibrazioni.
• Tenere il frontalino nell'apposita custodia quando
è rimosso.
• Non collocare il frontalino rimosso (e la relativa
custodia) in luoghi esposti a luce solare diretta o
a calore o umidità eccessivi. Evitare anche luoghi
in cui il prodotto può impolverarsi facilmente o
essere raggiunto da spruzzi d'acqua.
76 | Guida rapida all'uso
B59-2186-00_00.indb 76
2012/12/17 15:1
Funzioni generali
[SRC] Manopola [Control]
Terminale USB
Ingresso ausiliario
Alimentazione elettrica
Per attivare l'alimentazione elettrica,
premere [SRC].
Per disattivare l'alimentazione elettrica,
premere a lungo [SRC].
Selezione della sorgente
Premendo [SRC] in modo ripetuto, si
cambierà sorgente ad ogni pressione.
Sorgente
Display
Standby
“STANDBY”
[2]
Radio digitale
"DIGITAL RADIO"
Sintonizzatore
“TUNER”
Dispositivo USB collegato al terminale "USB(FRONT)"
USB anteriore
Dispositivo USB collegato al terminale "USB(REAR)"
USB posteriore
"iPod (FRONT)"
iPod collegato al terminale USB
anteriore[1]
"iPod (REAR)"
iPod collegato al terminale USB
posteriore[1]
aha™ dell'iPod collegato al terminale "aha (FRONT)"
USB anteriore[1][2][3]
aha™ dell'iPod collegato al terminale "aha (REAR)"
USB posteriore[1][2][3]
aha™ del dispositivo collegato tramite “aha”
Bluetooth[1][2][3]
“BT AUDIO”
Bluetooth audio[2][3]
SD[1][4]
“SD”
CD[1]
“CD”
Ingresso ausiliario
“AUX”
B59-2186-00_00.indb 77
Questa sorgente può essere selezionata solo
quando è pronta per essere riprodotta.
Funzione del modello KDC-BT73DAB.
[3]
Funzione del modello KDC-BT53U.
[4]
Funzione del modello KDC-5057SD.
[1]
[2]
Volume
Ruotare la manopola [Control] per regolare
il volume del suono.
Terminale USB
È possibile collegare un dispositivo USB o
un iPod.
Gli accessori CA-U1EX (max. 500mA) o
KCA-iP102 opzionali sono consigliati per
collegare un dispositivo USB oppure iPod.
Ingresso ausiliario
Un dispositivo audio portatile può essere
collegato con una minispina stereo (ø 3,5
mm).
Italiano | 77
2012/12/17 15:1
Riproduzione musica (CD/USB/SD/iPod)
Fessura del
disco
[SRC] Manopola [Control]
CA-U1EX[1]
[G]
Coperchio della
fessura del disco
KCA-iP102[1]
Indicatore USB
Terminale USB
[E/F] [R/S] POSTERIORE
Riproduzione di un disco
Riproduzione scheda SD
[1/6]
Rilascio
Aprire verso l'alto il coperchio della fessura
del disco.
Inserire un disco nell'apposita fessura del
disco.
Una volta inserito, la sorgente si attiva
automaticamente e inizia la riproduzione.
Chiudere il coperchio della fessura del
disco.
(solo KDC-5057SD)
1
Premere il tasto di rilascio e staccare il
frontalino.
2 Tenere la scheda SD come raffigurato sotto
e inserirla nell'apposita fessura fino a udire
un clic.
Scheda SD (disponibile in commercio)
Riproduzione di un dispositivo USB/
iPod
Collegare un dispositivo USB o un iPod al
terminale USB come mostrato sopra.
Una volta collegata, la sorgente si attiva
automaticamente e inizia la riproduzione.
L'iPod o il dispositivo USB possono essere
collegati a uno qualsiasi dei terminali USB
disponibili sulla parte anteriore e posteriore
dell'unità. Se si collega il dispositivo al
terminale USB posteriore, l'indicatore “REAR
USB” rimarrà illuminato.
accessori opzionali
[1]
3 Reinserire il frontalino.
4 Premere [SRC] per selezionare la sorgente
“SD”.
Selezione di una cartella di file audio
Premere [R] oppure [S].
Selezione di un brano (traccia o file)
Premere [E] oppure [F].
Avanzamento o riavvolgimento
rapido di un brano (traccia o file)
Premere a lungo [E] oppure [F].
Pausa e riproduzione di un brano
(traccia o file)
Premere a lungo [1/6].
78 | Guida rapida all'uso
B59-2186-00_00.indb 78
2012/12/17 15:1
Ricerca brano
Espulsione del disco
1 Premere [1/6].
2 Ricercare un brano.
Rimozione del dispositivo USB/iPod
È possibile ricercare il brano da riprodurre.
Aprire verso l'alto il coperchio della fessura
del disco, quindi premere [G].
Selezionare una sorgente diversa da USB,
iPod e Aha Radio, quindi rimuovere il
dispositivo USB.
I dati contenuti nel dispositivo USB possono
essere danneggiati se quest'ultimo viene
rimosso quando è ancora utilizzato come
sorgente attiva.
Tipo di operazione
Selezione degli elementi
Operazione
Ruotare la manopola
[Control].
Conferma della selezione Premere la manopola
[Control].
Tornare alla voce precedente Premere [1/6].
Per annullare la ricerca brano nei file audio o
nell'iPod, premere a lungo [1/6].
B59-2186-00_00.indb 79
Rimuovere la scheda SD
(solo KDC-5057SD)
1
Premere il tasto di rilascio e staccare il
frontalino.
2 Inserire la scheda SD fino a quando si
avverte un clic e successivamente togliere il
dito dalla scheda.
La scheda esce fuori in modo che la si possa
estrarre con le dita.
3 Inserire il frontalino.
Italiano | 79
2012/12/17 15:1
Ascolto della radio/Radio digitale
[SRC] Manopola [Control]
[1/6]
[R]
[E/F]
richiamare la stazione desiderata senza
commutare tra bande e/o sorgenti del
sintonizzatore. È possibile preselezionare
fino a un massimo di 6 stazioni nel modo
preselezione Mix Station.
Selezione di una sorgente
sintonizzatore
Premere [SRC] per selezionare
“TUNER” oppure “DIGITAL RADIO” (solo
KDC-BT73DAB). Fare riferimento alla
<Selezione della sorgente> (pagina 77).
4 Ruotare la manopola [Control] per scegliere
il numero di preselezione (FM/ Radio
digitale: “1” – “18”, AM: “1” – “6”), quindi
premere a lungo la manopola [Control].
Selezionare una banda (FM oppure
AM) (solo sintonizzatore)
Premere [R].
Selezione di una stazione / un
servizio
Premere [E] oppure [F].
Il modo di ricerca può essere modificato.
Fare riferimento a <9-5. Impostazioni
sintonizzatore> oppure <10-9. Impostazione
radio digitale> nelle Istruzioni per l’uso
Memoria di preselezione delle
stazioni
1
Premere [R] per selezionare una banda.
(Solo sintonizzatore)
2 Premere [E] oppure [F] per selezionare
la stazione/ il servizio che si vuole salvare
nella memoria di preselezione della stazione.
Richiamo delle stazioni memorizzate
1
Premere [R] per selezionare una banda.
(Solo Sintonizzatore)
2 Premere [1/6].
3 Ruotare la manopola [Control] per scegliere
un numero di preselezione (FM/ Radio
digitale: “1” – “18”, AM: “1” – “6”), quindi
premere la manopola [Control].
Nel modo di preselezione delle stazioni
miste, i nomi della bande delle sorgenti
del sintonizzatore sono visualizzati come
indicato di seguito:
FM: Stazione di radiodiffusione FM
AM: Stazione di radiodiffusione AM
DR: Servizio della radio digitale
3 “TUNER”: Premere [1/6].
"DIGITAL RADIO": Premere due volte [1/6].
Premere nuovamente [1/6] per accedere
al modo di preselezione delle stazioni
miste. In questa modalità è possibile salvare
diverse bande e sorgenti del sintonizzatore
(FM, AM, Radio Digitale, ecc.) nello stesso
livello di preselezione. Sarà così possibile
80 | Guida rapida all'uso
B59-2186-00_00.indb 80
2012/12/17 15:1
Funzione di KDC-BT73DAB, KDC-BT53U
Chiamate vivavoce
Manopola [Control]
[Ú]
Registrazione di un dispositivo
Bluetooth
In questa unità è possibile registrare,
effettuando l'accoppiamento, il proprio
dispositivo Bluetooth.
1
Attivare il dispositivo Bluetooth per
richiedere la connessione a questa unità.
Il nome di questa unità ("KDC-####") viene
visualizzato sul dispositivo Bluetooth.
Viene visualizzata l’indicazione “Paring Press
the volume knob”.
2 Premere la manopola [Control].
Inizia la connessione al proprio dispositivo
Bluetooth; dopo qualche istante sarà
visualizzato il messaggio “Pairing Success”,
quindi verrà selezionata la sorgente
precedente.
Una volta completata la registrazione del
telefono cellulare, la rubrica telefonica
del telefono stesso verrà scaricata
automaticamente in questa unità. (Se la
rubrica non è stata scaricata in questa unità,
mettere in funzione il telefono cellulare per
scaricarla).
B59-2186-00_00.indb 81
Comporre un numero memorizzato
in rubrica
Comporre il numero di telefono nella
rubrica del telefono cellulare.
Se la rubrica non è stata scaricata in
questa unità, mettere in funzione il
telefono cellulare per scaricarla.
1 Premere [Ú].
2 Ruotare la manopola [Control] per
selezionare “Phone Book”, quindi premere la
manopola [Control].
3 Ruotare la manopola [Control] per
selezionare un nome, quindi premere la
manopola [Control].
4 Ruotare la manopola [Control] per
selezionare un numero telefonico.
5 Premere [Ú].
Rispondere ad una chiamata
Premere [Ú].
Interrompere una chiamata
Premere [Ú].
Italiano | 81
2012/12/17 15:1
Prima dell'installazione
# AVVISO
• L'unità può essere installata solo su un veicolo
con alimentazione 12V DC, negativo a massa.
• Se si collega il cavo di accensione (rosso) e il cavo
della batteria (giallo) al telaio del veicolo (massa),
vi è il rischio di un cortocircuito, che potrebbe
causare a sua volta un incendio. Collegare
sempre quei cavi alla sorgente di alimentazione
che passa attraverso la scatola dei fusibili.
! ATTENZIONE
• Per il collegamento all'alimentazione elettrica
utilizzare gli appositi cavi di alimentazione in
dotazione di questa unità. L'utilizzo di cavi di
alimentazione elettrica in dotazione di altri
modelli può causare guasti.
• Installare l'unità nella console del veicolo.
• Non toccare le parti metalliche dell'unità durante
e subito dopo averla utilizzata. Le parti metalliche
come il dissipatore di calore e l'involucro
raggiungono temperature estremamente elevate.
• Il montaggio e il cablaggio di questo prodotto
richiedono conoscenze specifiche ed
esperienza. Per questioni di sicurezza, incaricare
del montaggio e del cablaggio personale
specializzato.
• Se si verificano problemi durante l'installazione,
rivolgersi al rivenditore Kenwood più vicino.
• Scollegare il terminale negativo della batteria
prima di installare l'unità.
• Isolare i cavi non collegati con nastro in vinile
o materiali simili. Per evitare cortocircuiti, non
rimuovere i cappucci all'estremità dei cavi e dei
terminali scollegati.
• Assicurarsi di ricollegare questa unità al telaio del
veicolo dopo il montaggio.
• Se brucia il fusibile, assicurarsi per prima cosa
che i cavi non tocchino altre parti causando
un cortocircuito e successivamente sostituire
il vecchio fusibile con uno nuovo dello stesso
grado.
• Se vengono collegati solo due altoparlanti,
collegare i connettori a entrambi i terminali
di uscita anteriori o a entrambi i terminali di
uscita posteriori (non mescolare terminali
anteriori e posteriori). Per esempio, se si collega
il connettore + dell'altoparlante sinistro al
terminale di uscita anteriore, non collegare
il connettore - con il terminale di uscita
posteriore.
• Collegare correttamente i cavi degli altoparlanti
ai corrispondenti terminali. L'unità potrebbe
danneggiarsi o non funzionare correttamente
se si condividono i cavi - o se li si collega a
qualsiasi parte metallica nel veicolo.
• Non usare viti diverse da quelle in dotazione.
Utilizzare esclusivamente le viti fornite in
dotazione. L’utilizzo di viti non adatte potrebbe
danneggiare l'unità.
• Se l’interruttore della chiave di accensione
del veicolo non è dotato di posizione ACC,
collegare i cavi di accensione ad una sorgente
di alimentazione che può essere accesa o
spenta tramite la chiave di accensione. Se si
collegano i cavi di accensione a una sorgente
di alimentazione a voltaggio costante, come ad
esempio i cavi della batteria, la batteria potrebbe
non funzionare più.
• Se la console ha un coperchio, assicurarsi di
installare l’unità in modo tale che il frontalino
non urti contro il coperchio quando è aperto
o chiuso.
• Dopo aver installato l'unità, controllare che le luci
dei freni, gli indicatori di direzione, i tergicristalli,
ecc. del veicolo funzionino correttamente.
• Installare l’unità in modo tale che l’angolo di
montaggio sia di 30˚ o inferiore.
• La ricezione potrebbe essere ridotta se sono
presenti oggetti metallici vicino all'antenna
Bluetooth. (solo KDC-BT73DAB, KDC-BT53U)
Unità antenna Bluetooth
KDC-BT73DAB • Questa unità è dotata di una ventola di
raffreddamento per ridurre la temperatura
interna. Non installare l'unità in una posizione
in cui la ventola di raffreddamento dell'unità
potrebbe bloccarsi. L'ostruzione di queste
aperture impedirà il raffreddamento della
temperatura interna causando dei guasti.
82 | Guida rapida all'uso
B59-2186-00_00.indb 82
2012/12/17 15:1
Ventola di raffreddamento
Per una buona ricezione
Per garantire una buona ricezione, osservare
quanto segue:
• Comunicare con il telefono cellulare entro la
distanza di una linea di visibilità pari a 10 m (30
ft). Il raggio di comunicazione potrebbe essere
ridotto a seconda dell'ambiente circostante. Il
raggio di comunicazione si riduce anche nel
caso in cui esista un ostacolo tra questa unità e
il telefono cellulare. Il raggio di comunicazione
sopra indicato (10 m) non è sempre garantito.
• Se nelle vicinanze è presente una stazione di
radiodiffusione o un walkie-talkie, potrebbero
verificarsi interferenze nella comunicazione a
causa di un segnale troppo forte.
5[1]
.....1
2
La disposizione dei terminali per i connettori
ISO dipende dal tipo di veicolo. Assicurarsi
di eseguire i collegamenti corretti per
evitare danni all'unità.
Il collegamento predefinito per il cablaggio
è descritto al punto 1 di seguito. Se i
terminali del connettore ISO sono impostati
come descritto al punto 2, eseguire il
collegamento come mostrato in figura.
Assicurarsi di ricollegare il cavo come
indicato al punto 2 di seguito per installare
l'unità nei veicoli Volkswagen ecc.
1Se un terminale A-7 (rosso) è collegato
all'accensione, e il terminale A-4 (giallo) è
collegato all'alimentazione elettrica costante
del connettore ISO del veicolo (predefinito):
Cavo di
accensione (rosso)
Unità
Cavo della
batteria (giallo)
Accessori di installazione
1
Collegamento del connettore ISO
.....1
Unità
.....2
.....3
Veicolo
Terminale
A-4 (giallo)
2Se un terminale A-7 (rosso) è collegato
all'alimentazione elettrica costante,
e il terminale A-4 (giallo) è collegato
all'accensione del connettore ISO del
veicolo:
Cavo di
accensione (rosso)
6[1]
Terminale
A–7 (rosso)
Cavo della
batteria (giallo)
Terminale
A–7 (rosso)
Veicolo
Terminale
A-4 (giallo)
7[1]
3[1][2]
.....1 (3 m)
.....1
Solo KDC-BT73DAB
Solo KDC-BT53U
[1]
4[1]
B59-2186-00_00.indb 83
[2]
.....1
Italiano | 83
2012/12/17 15:1
Uscita posteriore
Uscita anteriore
R
Uscita subwoofer
L
SW FRONT REAR
Collegamento dei cavi ai terminali
Guida alle funzioni dei connettori
Numeri dei
Colore del cavo
terminali per i
connettori ISO
Connettore di
alimentazione
esterna
A-4
Giallo
A-5
Blu/bianco
A-6
A-7
A-8
Connettore
altoparlante
B-1
B-2
B-3
B-4
B-5
B-6
B-7
B-8
Funzioni
Batteria
Controllo
alimentazione
Arancione/bianco Dimmer
Rosso
Accensione (ACC)
Nero
Collegamento di
messa a terra (massa)
Viola
Viola/nero
Grigio
Grigio/nero
Bianco
Bianco/nero
Verde
Verde/nero
Posteriore destro (+)
Posteriore destro (–)
Anteriore destro (+)
Anteriore destro (–)
Anteriore sinistro (+)
Anteriore sinistro (–)
Posteriore sinistro (+)
Posteriore sinistro (–)
Ingresso antenna FM/AM (JASO)
(solo KDC-BT73DAB, KDC-BT53U)
R
Antenna della radio
digitale (Accessorio 5)
(Solo KDC-BT73DAB)
Microfono (Accessorio 3)
(Solo KDC-BT53U)
⁄
• Impedenza altoparlante:
4–8Ω
⁄ Vedere <Collegamento del connettore ISO> (pagina 83).
Connettore A
8
7
6
5
4
3
2
1
Connettore B
8
7
6
5
4
3
2
1
Rosso (terminale A–7)
Rosso (cavo di accensione)
Giallo (terminale A–4)
Giallo (cavo batteria)
Solo KDC-BT73DAB
84 | Guida rapida all'uso
B59-2186-00_00.indb 84
2012/12/17 15:1
(JASO)
-BT53U)
Connettore USB (0,8m)
Al dispositivo USB.
Massima corrente elettrica
di alimentazione USB : DC 5 V = 1 A
Fusibile (10A)
R
L
Ingresso antenna
FM/AM (JASO)
(solo KDC-5057SD)
Microfono (Accessorio 3)
(Solo KDC-BT73DAB)
Fascio dei cavi
(Accessorio 1)
Se non vengono eseguiti collegamenti, non lasciare che il cavo
fuoriesca dalla linguetta.
Blu/bianco (cavo comando
alimentazione/ comando
antenna)
P.CONT
ANT.
CONT
Azzurro/giallo (cavo di controllo
telecomando sterzo)
REMOTE CONT
STEERING WHEEL
REMOTE INPUT
Collegare al terminale di controllo
alimentazione, quando si utilizza
l'amplificatore di potenza opzionale, oppure al
terminale di controllo antenna.
Per utilizzare la funzione comandi al volante,
è necessario un adattatore del telecomando
esclusivo (non in dotazione) adatto al veicolo.
accensione)
teria)
B59-2186-00_00.indb 85
Marrone (cavo controllo Mute)
MUTE
Nel caso di connessione al sistema di
navigazione Kenwood: Fare riferimento al
manuale del proprio sistema di navigazione.
Nel caso di connessione a un telefono
per auto: Per collegare il terminale
collegato a terra quando il telefono squilla,
oppure durante una conversazione. (Solo
KDC-5057SD)
Italiano | 85
2012/12/17 15:1
Installazione/Rimozione dell'unità
Installazione
Rimozione dell'unità
1
Rimuovere il supporto come indicato in
<Rimozione del supporto>.
2 Rimuovere il frontalino.
3 Inserire in profondità le due chiavi di
Piegare le linguette della flangia di
montaggio con un cacciavite o un
utensile simile e fissarle in posizione.
estrazione (Accessorio 2) nelle fessure
situate su entrambi i lati, come indicato.
4 Tirare la chiave di estrazione verso il basso
ed estrarre parzialmente l'unità spingendo
verso l'interno.
Accessorio 2
<
• Accertarsi che l’unità sia installata saldamente in
posizione. Se l'unità non è stabile, potrebbe non
funzionare correttamente (ad esempio, l'audio
potrebbe saltare).
Rimozione del supporto
1
Impegnare le estremità della chiave di
estrazione (Accessorio 2) e rilasciare
i due bloccaggi sulla parte superiore
dell'intelaiatura.
Sollevare la struttura e tirarla in avanti come
mostrato nella figura.
Fermo
!
• Fare attenzione a non ferirsi con la chiave di
estrazione.
5 Estrarre completamente l'unità con le mani,
prestando attenzione a non farla cadere.
Arresto
Accessorio 2
2 Una volta rimossa la parte superiore
dell'intelaiatura, rimuovere anche la parte
inferiore.
<
• L'intelaiatura può essere rimossa dal lato inferiore
nella stessa maniera.
86 | Guida rapida all'uso
B59-2186-00_00.indb 86
2012/12/17 15:1
solo KDC-BT73DAB, KDC-BT53U
Solo KDC-BT73DAB
Installazione dell'unità Installazione
dell'antenna della
microfono
radio digitale
1
Controllare la posizione di installazione del
microfono (accessorio 3).
2 Pulire la superficie di installazione.
3 Installare il microfono.
4 Svolgere il cavo fino all'unità assicurandolo
a diverse posizioni con nastro o materiali
simili.
<
• Installare il microfono il più lontano possibile dal
telefono cellulare.
Accessorio 3
Fissare il cavo con del nastro adesivo,
acquistabile separatamente.
B59-2186-00_00.indb 87
Rimuovere il separatore
del microfono, e inserire il
microfono nella posizione
indicata sopra.
Regolare la direzione del
microfono verso il conducente.
! ATTENZIONE
• Questa antenna a pellicola deve essere utilizzata
esclusivamente all'interno del veicolo.
• Non installarla nelle posizioni seguenti:
-- nei punti in cui potrebbe ostruire la vista del
conducente;
-- nei punti in cui potrebbe impedire il
funzionamento dei dispositivi di sicurezza, ad
esempio gli airbag;
-- sulle superfici di vetro mobili, ad esempio il
portellone posteriore
• La potenza del segnale diminuirà nelle posizioni
seguenti:
-- sui vetri riflettenti all'infrarosso oppure nei
punti coperti da una pellicola di vetro di tipo
a specchio; -- nei punti in cui si sovrappone all'antenna radio
originale (schema);
-- nei punti in cui si sovrappone ai cavi di
riscaldamento della finestra;
-- sulla fiancata del veicolo (ad esempio il
finestrino o il deflettore della portiera);
-- sul finestrino posteriore;
-- nel caso siano utilizzati cristalli che bloccano
i segnali radio (ad es. cristallo riflettente
l'infrarosso, cristallo termoisolante)
-- La ricezione potrebbe diminuire a causa
del rumore prodotto dall'attivazione del
tergicristalli, del climatizzatore o del motore.
-- La ricezione potrebbe diminuire, a seconda
della direzione della stazione di trasmissione
rispetto al veicolo (antenna).
• Prima dell'installazione, assicurarsi di verificare
la posizione in cui verrà installata l'antenna a
pellicola (Accessorio 4). L'antenna a pellicola
non può essere re-incollata.
• Rimuovere completamente lo sporco e il grasso
dalla superficie di incollaggio con il detergente in
dotazione (Accessorio 7).
• Non piegare né danneggiare l'antenna a pellicola
(Accessorio 4).
• Prima dell'applicazione, riscaldare la superficie da
incollare, ad esempio accendendo il riscaldamento.
• L'installazione potrebbe non essere possibile su
alcuni tipi di veicoli.
• Controllare il percorso del cavo dell'antenna
a pellicola (Accessorio 4) e dell'amplificatore
(Accessorio 5) prima di incollare.
Italiano | 87
2012/12/17 15:1
Solo KDC-BT73DAB
Installazione dell'antenna della radio digitale
Panoramica sull'installazione
Individuare la posizione di
installazione dell'antenna
• Quando si installa l'antenna sul lato sinistro
Accessorio 45
Montante anteriore
150 mm
Lamina di
collegamento
a terra
Cavo dell'antenna (3,5 m)
• Per motivi di sicurezza, l'antenna deve essere
installata sul lato del passeggero.
• Utilizzare un fermacavo (Accessorio 6) per
assicurare l'antenna al montante in diverse
posizioni.
• La direzione dell'antenna a pellicola (Accessorio
4) cambia a seconda che l'antenna a pellicola
sia installata sul lato destro o sul lato sinistro.
• Separare l'antenna a pellicola (Accessorio 4)
dalla linea di ceramica (parte nera), sulla parte
superiore del vetro anteriore, di 150 mm.
Posizionarla inoltre a circa 70 mm all'interno
della linea di ceramica, sull'estremità laterale
del vetro anteriore. (Nel punto in cui la lamina
di collegamento a terra dell'amplificatore
può essere incollata sulla parte metallica del
montante anteriore)
• Distanziarla dalle altre antenne di almeno 100
mm.
• Non incollare l'amplificatore (Accessorio 5)
sulla linea di ceramica (parte nera) intorno al
vetro anteriore, poiché non offre un'adesione
sufficiente.
70 mm*
Accessorio 4
Accessorio 5
• Quando si installa l'antenna sul lato destro
Accessorio 5
Montante anteriore
150 mm
Lamina di
collegamento
a terra
Accessorio 4
70 mm*
*Nel punto in cui la lamina di collegamento
a terra dell'amplificatore (Accessorio 5)
può essere incollata sulla parte metallica
del montante anteriore.
88 | Guida rapida all'uso
B59-2186-00_00.indb 88
2012/12/17 15:1
Installazione dell'antenna
1 Verificare la posizione di installazione.
2 Pulire l'area in cui verranno incollati
5 Dopo l'incollaggio, sfregare l'elemento sulla
superficie di vetro nella direzione della
freccia indicata nella figura, per incollarlo.
l'antenna a pellicola (Accessorio 4),
l'amplificatore (Accessorio 5), e il
collegamento a terra, con il detergente in
dotazione (Accessorio 7).
Il rivestimento presente sulla superficie
metallica non deve essere rimosso.
• Prima di incollare, attendere che la superficie
di vetro sia completamente asciutta.
• Se la superficie del vetro è fredda, ad esempio
durante l'inverno, riscaldarla con lo sbrinatore
o un asciugacapelli.
3 Rimuovere in direzione orizzontale il
separatore (etichetta I) dell'antenna a
pellicola ed incollare l'antenna sul vetro
anteriore.
6 Rimuovere la pellicola di applicazione
(etichetta III).
• Non toccare il terminale di alimentazione
dell'elemento. Inoltre, non applicare alcun
detergente per vetro.
Terminale di
alimentazione
7 Fare combaciare la sporgenza
dell'amplificatore con il 5 sull'antenna a
pellicola ed incollare.
• Rimuovere delicatamente il separatore.
• Non toccare la superficie di incollaggio (lato
adesivo) dell'antenna a pellicola.
4 Rimuovere in direzione verticale il
separatore (etichetta II) dell'antenna a
pellicola ed incollare l'antenna premendo
delicatamente.
B59-2186-00_00.indb 89
• Non toccare il terminale alimentatore né
la superficie di incollaggio (lato adesivo)
dell'amplificatore.
• Quando si installa l'antenna sul lato destro
Fare coincidere la sporgenza
con il punto 5
Lamina di collegamento a terra
Accessorio 4
Accessorio 5
Italiano | 89
2012/12/17 15:1
Solo KDC-BT73DAB
Installazione dell'antenna della radio digitale
• Quando si installa l'antenna sul lato sinistro
Accessorio 5
Accessorio 4
Lamina di collegamento a terra
8
Fare coincidere la sporgenza
con il punto 5
Rimuovere la pellicola che copre la lamina
di collegamento a terra ed incollarla sulla
parte metallica del veicolo.
Lasciare uno spazio libero sufficiente
affinché la lamina di collegamento a
terra non interferisca con le parti interne
(copertura del montante anteriore). Prestare inoltre attenzione che le
parti interne non interferiscano con
l'amplificatore.
Accessorio 5
Vetro anteriore
Montante
anteriore
<
• Prendere le seguenti precauzioni quando si passa
il cavo dell'antenna all'interno del montante
anteriore, nel punto in cui è installato l'airbag.
-- Installare la parte dell'amplificatore del
cavo dell'antenna davanti o sopra all'airbag,
in maniera che l'antenna e l'airbag non
interferiscano.
Accessorio5
Airbag
Montante
anteriore
-- La copertura del montante anteriore è
assicurata con un fermo speciale che in alcuni
casi deve essere sostituito, quando la copertura
del montante anteriore viene rimossa.
Per informazioni dettagliate sulla sostituzione
della copertura del montante anteriore, e sulla
disponibilità delle parti di ricambio, rivolgersi al
concessionario del proprio veicolo.
Parte interna
Lamina di collegamento a terra
9 Fissare i cavi dell'antenna.
• Utilizzare un fermacavo (Accessorio 6) per
assicurare l'antenna al montante in diverse
posizioni.
Parte interna
Fermo
90 | Guida rapida all'uso
B59-2186-00_00.indb 90
2012/12/17 15:1
Appendice
File audio
• File audio riproducibili
AAC-LC (.m4a), MP3 (.mp3), WMA (.wma), WAV
(.wav) del dispositivo USB / scheda SD
• Dischi riproducibili
CD-R/RW/ROM
• Formati file disco riproducibili
ISO 9660 Level 1/2, Joliet, nomi file lunghi.
• Dispositivi USB riproducibili Dispositivi di archiviazione di massa USB
• Schede SD riproducibili
scheda SD (≤2 GB), scheda SDHC (≤32 GB)
• File system del dispositivo USB / scheda SD
riproducibile
FAT12, FAT16, FAT32
All'indirizzo www.kenwood.com/cs/ce/audiofile/ è
disponibile una guida in linea sui file audio.
Modelli di iPod/iPhone collegabili a
questa unità
Made for
• iPod touch (4th generation)
• iPod touch (3rd generation)
• iPod touch (2nd generation)
• iPod touch (1st generation)
• iPod classic
• iPod with video
• iPod nano (6th generation)
• iPod nano (5th generation)
• iPod nano (4th generation)
• iPod nano (3rd generation)
• iPod nano (2nd generation)
• iPod nano (1st generation)
• iPhone 4S
• iPhone 4
• iPhone 3GS
• iPhone 3G
• iPhone
Requisiti Aha™:
I requisiti per l'ascolto con Aha™ sono i seguenti:
iPhone o iPod touch
• Utilizzare un Apple iPhone o iPod touch con
iOS4 o successivi.
• Cercare “aha” nell'Apple iTunes App Store e
installare la versione corrente dell'applicazione
Aha™ sul dispositivo.
• Connettere iPhone/iPod touch all'unità
utilizzando un cavo KCA-iP102.
Android™
• Utilizzare Android OS 2.2 o successivi.
• Scaricare l'applicazione Aha™ nel proprio
smartphone da Google Play.
• Bluetooth deve essere integrato e devono
essere supportati i seguenti profili.
- SPP (Serial Port Profile)
- A2DP (Advanced Audio Distribution Profile)
NOTA
• Accedere all'applicazione dal dispositivo e
creare un account gratuito con Aha.
• Connessione Internet tramite LTE, 3G, EDGE,
oppure WiFi.
• Aha™ è un servizio fornito da terzi, pertanto
le relative specifiche sono soggette a
modifica senza preavviso. Di conseguenza,
la compatibilità potrebbe essere ridotta o i
servizi potrebbero risultare solo parzialmente
disponibili o non disponibili.
• Alcune funzionalità di Aha™ non possono
essere gestite da questa unità.
Per informazioni sulla compatibilità del
software iPod/iPhone, visitare il sito www.
kenwood.com/cs/ce/ipod/.
B59-2186-00_00.indb 91
Italiano | 91
2012/12/17 15:1
Índice
Antes de usar
Acerca de la guía de inicio rápido.........92
Antes de usar................................................92
Preparación...................................................94
Funcionamiento general..........................95
Reproducción de música
(CD/USB/SD/iPod)...................................96
Escucha de la radio/radio digital...........98
Dispositivo manos libres..........................99
Antes de la instalación........................... 100
Conexión de los cables a
los terminales......................................... 102
Montaje y desmontaje de
la unidad.................................................. 104
Montaje de la unidad de
micrófono ............................................... 105
Instalación de la antena de la radio
digital........................................................ 105
Apéndice..................................................... 109
# ADVERTENCIA
Para evitar el riesgo de lesiones o
de fuego, observe las siguientes
precauciones:
Acerca de la guía de
inicio rápido
Limpieza del conector
En esta Guía de inicio rápido se describen las
funciones básicas de esta unidad.
En el caso de funciones no descritas en la
guía, consulte el Manual de instrucciones en el
siguiente sitio web:
manual2.jvckenwood.com/edition/im362/
• Detenga el coche antes de comenzar a
utilizar la unidad.
• Para evitar cortocircuitos, nunca coloque
ni deje objetos metálicos (por ejemplo,
monedas o herramientas metálicas)
dentro de la unidad.
! PRECAUCIÓN
• Ajuste el volumen a un nivel que le
permita oír los sonidos procedentes
del exterior. Conducir con el volumen
demasiado alto puede provocar un
accidente.
• Retire la suciedad del panel con un paño
suave o una gamuza seca.
La no observación de esta precaución
puede provocar daños en el monitor o en
la unidad.
La unidad puede no funcionar
adecuadamente si los conectores entre
la unidad y la placa frontal están sucios.
Extraiga la placa frontal y utilice un algodón
para limpiar el conector, teniendo cuidado
de no dañarlo.
Conector
Condensación
Para consultar el manual de instrucciones, se
requiere un navegador como Internet Explorer®
7 o posterior, Firefox® 3.6 o posterior, Chrome™
20 o posterior, Safari® 5.1 o posterior, iOS Safari®
4.0 o posterior, o Android™ 2.2 o posterior.
Si el aire acondicionado del coche
está encendido, se puede producir
condensación de humedad en la lente del
láser. Esto puede provocar errores en la
lectura del disco. En tal caso, retire el disco y
espere hasta que la humedad se evapore.
92 | Guía de inicio rápido
B59-2186-00_00.indb 92
2012/12/17 15:1
Notas
• Si tiene problemas durante la instalación,
consulte a su distribuidor Kenwood.
• Antes de comprar accesorios opcionales,
consulte a su distribuidor Kenwood para
asegurarse de que funcionan con su
modelo en su área.
• Pueden mostrarse en pantalla caracteres
de conformidad con la norma ISO 8859-1.
• Se pueden mostrar caracteres que
cumplan la ISO 8859-5 o la ISO 88591. Consulte “Russian” en la sección
<12-7. Ajustes iniciales> (manual de
instrucciones).
• La función Radio Data System no
funcionará en lugares donde no existan
emisoras compatibles con este servicio.
• El tipo de conexión USB se indica bajo
la placa frontal extraíble de la unidad
principal.
Acerca de los discos utilizados en
esta unidad
Manejo de los discos
• No toque la superficie de grabación del
disco.
• No pegue cintas etc. sobre el disco ni
utilice un disco con cinta pegada sobre él.
• No utilice accesorios para el disco.
• No utilice disolventes para limpiar los
discos. Use un paño suave o una gamuza
seca.
• Limpie el disco moviendo el paño desde
el centro hacia el borde.
• Cuando extraiga los discos de esta unidad,
tire de ellos en sentido horizontal.
• Si el orificio central o el borde del disco
presentan rebabas, elimínelas antes de
insertar dicho disco.
Cómo reiniciar su unidad
Si la unidad no funciona correctamente,
pulse el botón de reinicio. La unidad
recupera los ajustes de fábrica.
Botón de reinicio
• Esta unidad sólo puede reproducir los CD
.
con
• No se pueden utilizar los siguientes discos:
-- Discos que no sean redondos
-- Discos coloreados en la superficie de
grabación o discos que estén sucios
-- Discos regrabables/reescribibles que
no hayan sido finalizados (para obtener
detalles sobre el proceso de finalización,
consulte el manual de instrucciones
que se le entregó con el software de
escritura de discos o con grabador de
discos.)
-- Discos de 8 cm (3 pulgadas). (Intentar
insertar uno con un adaptador puede
provocar una avería.)
B59-2186-00_00.indb 93
Las ilustraciones de este manual donde puede verse
la pantalla de visualización y el panel son sólo
ejemplos que se utilizan para explicar claramente
la forma en la cual se utilizan los controles. Por
lo tanto, lo que aparece en la pantalla en las
ilustraciones puede diferir de lo que aparece
realmente en la pantalla del equipo; asimismo,
algunas de las imágenes de la pantalla pueden no
ser aplicables.
Español | 93
2012/12/17 15:1
Preparación
Mando [Control] (rueda de volumen)
Liberación
Cancelación del modo de
demostración
Cancele el modo de demostración cuando
utilice la unidad por primera vez después
de la instalación.
1
Extracción/instalación de la placa
frontal
Pulse el mando [Control] para cancelar el
modo de demostración cuando aparezca el
mensaje “To cancel DEMO Press the volume
knob” (aprox. 15 segundos).
Pulse el botón
de liberación.
2 Gire el mando [Control] para seleccionar
“YES” y, a continuación, pulse dicho mando.
El modo de demostración también puede
cancelarse en el modo de configuración de
las funciones. Consulte <12-6. Ajuste del
modo de demostración> en el manual de
instrucciones
!
• Extraiga la placa frontal después de pulsar el
botón de liberación; en caso contrario, podría
caerse debido a la vibración.
• La placa frontal es un componente de precisión
que puede resultar dañado por golpes o
sacudidas.
• Guarde la placa frontal en su estuche cuando no
la tenga conectada.
• No deje la placa frontal desmontada (ni su
estuche) en lugares expuestos a la luz directa
del sol o excesivamente húmedos o calurosos.
Además deberá evitar sitios con mucho polvo o
la posibilidad de que se derrame agua sobre ella.
94 | Guía de inicio rápido
B59-2186-00_00.indb 94
2012/12/17 15:1
Funcionamiento general
[SRC] Mando [Control]
Terminal USB
Entrada auxiliar
Alimentación
Para encender la unidad, pulse [SRC].
Para apagar la unidad, mantenga pulsado
[SRC].
Selección de fuente
Pulsando repetidamente [SRC] se
cambiará entre las diferentes fuentes.
Fuente
Visualización
Espera
“STANDBY”
Radio digital[2]
“DIGITAL RADIO”
SINTONIZADOR
“TUNER”
Dispositivo USB conectado al terminal “USB (FRONT)”
USB delantero
Dispositivo USB conectado al terminal “USB (REAR)”
USB trasero
iPod conectado al terminal USB
“iPod (FRONT)”
delantero[1]
iPod conectado al terminal USB
“iPod (REAR)”
trasero[1]
aha™ de iPod conectado al terminal “aha (FRONT)”
USB delantero[1][2][3]
aha™ de iPod conectado al terminal “aha (REAR)”
USB trasero[1][2][3]
aha™ de dispositivo conectado a través “aha”
de Bluetooth[1][2][3]
Audio Bluetooth[2] [3]
“BT AUDIO”
SD[1] [4]
“SD”
CD[1]
“CD”
Entrada auxiliar
“AUX”
B59-2186-00_00.indb 95
Esta fuente podrá seleccionarse únicamente si
puede reproducirse.
Función de KDC-BT73DAB.
[3]
Función de KDC-BT53U.
[4]
Función de KDC-5057SD.
[1]
[2]
Volumen
Gire el mando [Control] para ajustar el
volumen de sonido.
Terminal USB
Puede conectar un dispositivo USB o un
iPod.
Se recomienda utilizar CA-U1EX (máx. 500
mA) o KCA‑iP102 (accesorios opcionales)
para conectar un dispositivo USB o un iPod.
Entrada auxiliar
Es posible conectar un dispositivo de audio
portátil con un conector mini estéreo (3,5
mm ø).
Español | 95
2012/12/17 15:1
Reproducción de música (CD/USB/SD/iPod)
Ranura para
discos
[SRC] Mando [Control]
CA-U1EX[1]
[G]
Tapa de la ranura
para discos
KCA-iP102[1]
del USB
Terminal USB
[1/6] Liberación [E/F] [R/S] Indicador
TRASERO
Reproducción de un disco
Reproducción de una tarjeta SD
Levante la tapa de la ranura para discos
hacia arriba.
Inserte un disco en la ranura para discos.
Una vez introducido el disco, la fuente
cambia automáticamente y comienza la
reproducción.
Cierre la tapa de la ranura para discos.
Reproducción de un dispositivo USB/
iPod
Conecte un dispositivo USB o un iPod
al terminal USB tal y como se muestra
anteriormente.
Una vez conectado, la fuente cambia
automáticamente y comienza la
reproducción.
Puede conectar el iPod o dispositivo USB
a uno de los terminales USB situados en la
parte delantera o trasera de esta unidad.
Si lo conecta al terminal USB trasero, el
indicador del “REAR USB” permanecerá
iluminado.
accesorios opcionales
[1]
(sólo para KDC-5057SD)
1
Pulse el botón de liberación y extraiga la
placa frontal.
2 Sujete la tarjeta SD como se indica a
continuación e introdúzcala en la ranura
para tarjetas SD hasta que se escuche un
clic.
Tarjeta SD (disponible en tiendas)
3 Vuelva a colocar la placa frontal.
4 Pulse [SRC] par seleccionar la fuente “SD”.
Selección de una carpeta de archivos
de audio
Pulse [R] o [S].
Selección de una canción (pista o
archivo)
Pulse [E] o [F].
Avance o retroceso rápido de una
canción (pista o archivo)
Mantenga pulsado [E] o [F].
Pausa y reproducción de una canción
(pista o archivo)
Mantenga pulsado [1/6].
96 | Guía de inicio rápido
B59-2186-00_00.indb 96
2012/12/17 15:1
Búsqueda de música
Expulsión del disco
1 Pulse [1/6].
2 Busque una canción.
Extracción del dispositivo USB/iPod
Puede buscar la canción que desea
reproducir.
Tipo de operación
Selección de elementos
Confirmación de la
selección
Vuelta al elemento anterior
Cambie a una fuente distinta de USB, iPod
y aha radio y, a continuación, retire el
dispositivo USB.
Los datos contenidos en el dispositivo USB/
iPod pueden resultar dañados si lo retira
mientras lo está utilizando como fuente
activa.
Operación
Gire el mando [Control].
Pulse el mando [Control].
Pulse [1/6].
Para cancelar la búsqueda de música en
archivos de audio o en el iPod, mantenga
pulsado [1/6].
B59-2186-00_00.indb 97
Abra la tapa de la ranura para discos y
pulse [G].
Extracción de la tarjeta SD
(sólo para KDC-5057SD)
1
Pulse el botón de liberación y extraiga la
placa frontal.
2 Presione la tarjeta SD hasta que escuche
un clic y, a continuación, retire su dedo de
la tarjeta.
La tarjeta saldrá de la ranura y usted podrá
retirarla con los dedos.
3 Instalación de la placa frontal.
Español | 97
2012/12/17 15:1
Escucha de la radio/radio digital
[SRC] Mando [Control]
[1/6]
[R]
[E/F]
entre bandas o fuentes de sintonización.
En el modo de preajuste de emisoras
combinadas se puede presintonizar un
máximo de 6 emisoras.
Selección de una fuente del
sintonizador
Pulse [SRC] para seleccionar “TUNER” o
“DIGITAL RADIO” (Sólo para KDC-BT73DAB).
Consulte <Selección de fuente> (página
95).
Selección de una banda (FM o AM)
(solo sintonizador)
Pulse [R].
Selección de una emisora/ un
servicio
Pulse [E] o [F].
El modo de búsqueda se puede modificar.
Consulte <9-5. Configuración del
sintonizador> o <10-9. Configuración de la
radio digital> en el manual de instrucciones
Memoria de preajuste de emisoras
1
Pulse [R] para seleccionar una banda. (Solo
sintonizador)
2 Pulse [E] o [F] para seleccionar la
emisora/ el servicio que desea guardar en la
memoria de preajuste de emisoras.
3 “TUNER”: Pulse [1/6].
4 Gire el mando [Control] para seleccionar
un número preajustado (FM/Radio Digital:
“1” – “18”, AM: “1” – “6”) y, a continuación,
mantenga pulsado dicho mando [Control].
Recuperación de las emisoras de la
memoria
1
Pulse [R] para seleccionar una banda. (Solo
sintonizador)
2 Pulse [1/6].
3 Gire el mando [Control] para seleccionar un
número preajustado (FM/Radio Digital: “1”
– “18”, AM: “1” – “6”) y, a continuación, pulse
dicho mando [Control].
En el modo de preajuste de emisoras
mezcladas, los nombres de las bandas de
las fuentes de sintonizador se muestran del
siguiente modo:
FM: Emisora de difusión FM
AM: Emisora de difusión AM
DR: Servicio de radio digital
“DIGITAL RADIO”: Pulse [1/6] dos veces.
Pulse de nuevo [1/6] para acceder al
modo de preajuste de emisoras mezcladas.
En este modo se pueden guardar diferentes
bandas y fuentes de sintonización (FM,
AM, Digital Radio etc.) en la misma capa
de preajuste, lo que permite recuperar la
emisora deseada sin tener que cambiar
98 | Guía de inicio rápido
B59-2186-00_00.indb 98
2012/12/17 15:1
Función del KDC-BT73DAB y el KDC-BT53U
Dispositivo manos libres
Mando [Control]
[Ú]
Emparejamiento de un dispositivo
Bluetooth
Puede emparejar su dispositivo Bluetooth
en esta unidad.
1
Utilice el dispositivo Bluetooth para solicitar
la conexión de esta unidad.
Aparece el nombre de esta unidad (“KDC####”) en el dispositivo Bluetooth.
Aparece el mensaje “Paring Press the volume
knob”.
2 Pulse el mando [Control].
Da comienzo la conexión a su dispositivo
Bluetooth; a continuación aparece “Pairing
Success” y, seguidamente, se selecciona la
fuente anterior.
Cuando haya finalizado el registro de su
teléfono móvil, la agenda telefónica del
teléfono se descargará automáticamente
a esta unidad. (Si la agenda telefónica no
se ha descargado a esta unidad, utilice el
teléfono móvil para descargarla.)
B59-2186-00_00.indb 99
Marcación de un número de la
agenda telefónica
Marque el número de teléfono de la
agenda telefónica de su teléfono móvil.
Si la agenda telefónica no se ha
descargado automáticamente a esta
unidad, utilice el teléfono móvil para
descargarla.
1 Pulse [Ú].
2 Gire el mando [Control] para seleccionar
“Phone Book” y, a continuación, pulse el
mando [Control].
3 Gire el mando [Control] para seleccionar
un nombre y, a continuación, pulse dicho
mando.
4 Gire el mando [Control] para seleccionar un
número de teléfono.
5 Pulse [Ú].
Contestar llamadas
Pulse [Ú].
Cortar llamadas
Pulse [Ú].
Español | 99
2012/12/17 15:1
Antes de la instalación
#ADVERTENCIA
• La unidad sólo se puede instalar en un coche
que disponga de una fuente de alimentación de
12 V CC con conexión a tierra negativa.
• Si conecta el cable de encendido (rojo) y el cable
de la batería (amarillo) al chasis del automóvil
(tierra), podría producir un cortocircuito y esto, a
su vez, un incendio. Conecte siempre esos cables
a la fuente de alimentación que pasa por la caja
de fusibles.
! PRECAUCIÓN
• Utilice el mazo de cables de alimentación
suministrado con esta unidad para conectarla a
la alimentación. La utilización del mazo de cables
suministrado con otros modelos puede ocasionar
un error de funcionamiento.
• Instale esta unidad en la consola de su vehículo.
• No toque las partes metálicas de la unidad
mientras la esté utilizando ni poco después de
utilizarla. Las partes metálicas, tales como el
disipador de calor o la carcasa, pueden estar
muy calientes.
• La instalación y el cableado de este producto
requieren de habilidad y experiencia. Por
motivos de seguridad, deje la labor de montaje y
conexión de cables en manos de profesionales.
• Si tiene problemas durante la instalación,
consulte a su distribuidor Kenwood.
• Desconecte el borne negativo de la batería antes
de instalar la unidad.
• Aísle los cables no conectados con una cinta
de vinilo u otros materiales similares. Para
evitar cortocircuitos, no retire los tapones de
los extremos de los cables o terminales no
conectados.
• Después de la instalación compruebe otra vez
que esta unidad está conectada a tierra a través
del chasis del coche.
• Si se funde el fusible, asegúrese en primer lugar
de que los cables no se están tocando otros
componentes y causando un cortocircuito y, a
continuación, reemplace el fusible usado por
otro del mismo amperaje.
• Si sólo va a conectar dos altavoces, enchufe
los conectores a ambos terminales de salida
delanteros o a ambos terminales de salida
traseros (es decir, no mezcle terminales
delanteros y traseros). Por ejemplo, si conecta
el cable + del altavoz izquierdo a un terminal
de salida frontal, no conecte el cable - a un
terminal de salida posterior.
• Conecte los cables de los altavoces a los
terminales que les corresponden. La conexión
compartida de los cables - o la conexión a
tierra de los mismos a cualquier parte metálica
del automóvil podrá dañar la unidad o impedir
su correcto funcionamiento.
• No utilice sus propios tornillos. Utilice solo
los tornillos suministrados. El uso de tornillos
diferentes podría causar daños en la unidad.
• Si la llave de encendido de su automóvil
no está provista de la posición de contacto,
conecte los cables de encendido a una fuente
de alimentación que pueda conectarse y
desconectarse con la llave de encendido. Si
conecta los cables de encendido a una fuente de
alimentación que recibe un suministro constante
de corriente, tales como los cables de la batería,
la batería podría descargarse.
• Si la consola tiene una tapa, asegúrese de instalar
la unidad de modo que la placa frontal no
golpee dicha tapa al abrir y cerrar.
• Después de instalar la unidad, compruebe que
las luces de freno, las luces intermitentes, el
limpiaparabrisas, etc. funcionen correctamente.
• Instale la unidad en un ángulo de 30˚ o menos.
• La recepción podría reducirse si existen objetos
metálicos cerca de la antena Bluetooth. (Solo
para KDC-BT73DAB, KDC-BT53U)
Unidad de antena Bluetooth
KDC-BT73DAB • Esta unidad cuenta con un ventilador de
refrigeración para disminuir la temperatura
interna. No monte la unidad en un lugar en el
que el ventilador de refrigeración de la unidad
pueda quedar obstruido. Si estas aberturas
quedan bloqueadas, la refrigeración no se
producirá, lo que aumentará la temperatura
interna y podrá provocar averías.
Ventilador de refrigeración
100 | Guía de inicio rápido
B59-2186-00_00.indb 100
2012/12/17 15:1
Conexión del conector ISO
Para una buena recepción
Para garantizar una buena recepción, tenga en
cuenta lo siguiente:
• Comuníquese con el teléfono móvil dentro de
la distancia de línea de visibilidad directa de
10 m (30 pies). El intervalo de comunicación
puede acortarse en función del entorno de la
zona. El intervalo de comunicación también
puede acortarse cuando hay un obstáculo entre
esta unidad y el teléfono móvil. El intervalo
de comunicación máximo mencionado
anteriormente (10 m) no siempre está
garantizado.
• Una estación emisora o un walkie-talkie situados
en los alrededores pueden interferir en la
comunicación debido a una señal demasiado
fuerte.
Instalación de accesorios
1
5[1]
.....1
2
.....1
.....3
7[1]
3[1][2]
.....1 (3 m)
B59-2186-00_00.indb 101
Cable del
encendido (rojo)
Unidad
Sólo para
KDC-BT73DAB
Sólo para
KDC-BT53U
Patilla A7
(roja)
Vehículo
Patilla A4
(amarilla)
2Cuando la patilla A-7 (roja) está conectada
a la fuente de alimentación constante y la
patilla A-4 (amarilla) está conectada con el
encendido del conector ISO del vehículo:
Cable del
encendido (rojo)
.....1
[1]
4[1]
1Cuando la patilla A-7 (roja) está conectada
con el encendido y la patilla A-4 (amarilla)
está conectada a la fuente de alimentación
constante del conector ISO del vehículo (de
forma predeterminada):
Cable de la
batería (amarillo)
6[1]
.....2
La disposición de las patillas de los
conectores ISO depende del tipo de
vehículo. Asegúrese de efectuar las
conexiones de manera apropiada para evitar
que se dañe la unidad.
El ajuste de fábrica para la conexión del
mazo de conductores se describe más abajo
en 1. Si las patillas del conector ISO están
dispuestas tal como se describe en 2,
efectúe la conexión de la manera indicada
en la ilustración.
Asegúrese de volver a conectar el cable
como se indica en 2 a continuación para
instalar la unidad en vehículos Volkswagen,
etc.
Unidad
Cable de la
batería (amarillo)
Patilla A7
(roja)
Vehículo
Patilla A4
(amarilla)
[2]
.....1
Español | 101
2012/12/17 15:1
Salida trasera
Salida delantera
R
L
Salida de subwoofer
SW FRONT REAR
Conexión de los cables a los terminales
Guía de funciones de los conectores
Números de
patilla para
conectores ISO
Conector de
alimentación
exterior
A-4
A-5
A-6
A-7
A-8
Conector de
altavoz
B-1
B-2
B-3
B-4
B-5
B-6
B-7
B-8
Color del
cable
Funciones
Entrada de la antena FM/AM
(JASO)(Sólo para KDC-BT73DAB,
KDC-BT53U)
Amarillo
Azul/blanco
Batería
Control de
alimentación
Naranja/blanco Atenuación de la
iluminación
Rojo
Encendido (contacto)
Negro
Conexión a tierra
(masa)
Púrpura
Púrpura/negro
Gris
Gris/negro
Blanco
Blanco/negro
Verde
Verde/negro
Trasero derecho (+)
Trasero derecho (–)
Delantero derecho (+)
Delantero derecho (–)
Delantero izquierdo (+)
Delantero izquierdo (–)
Trasero izquierdo (+)
Trasero izquierdo (–)
R
Antena de la radio digital
(accesorio 5)
(Sólo para KDC-BT73DAB)
Micrófono (accesorio 3)
(Sólo para KDC-BT53U)
⁄
• Impedancia del altavoz:
4–8Ω
⁄ Consulte <Conexión del conector ISO> (página 101).
Rojo (patilla A-7)
Conector A
8
7
6
5
4
3
2
1
Conector B
8
7
6
5
4
3
2
1
Amarillo (patilla A-4)
Rojo (cable de
encendido)
Amarillo (cable de la
batería)
Sólo para
KDC-BT73DAB
102 | Guía de inicio rápido
B59-2186-00_00.indb 102
2012/12/17 15:1
Conector USB (0,8 m)
Al dispositivo USB.
Corriente eléctrica máxima del USB
: CC 5 V = 1 A
Fusible (10A)
R
L
Entrada de la antena
FM/AM (JASO)
(Sólo para KDC-5057SD)
B59-2186-00_00.indb 103
Micrófono (accesorio 3)
(Sólo para KDC-BT73DAB)
Mazo de cables
(accesorio 1)
Si no se ha realizado ninguna conexión, no deje que el cable
sobresalga de la lengüeta.
Azul/blanco (cable de control
de alimentación / control de la
antena)
P.CONT
ANT.
CONT
Azul claro/amarillo (cable
del mando a distancia de la
dirección)
REMOTE CONT
STEERING WHEEL
REMOTE INPUT
Marrón (cable de control de
silenciamiento)
MUTE
Conecte el terminal de control de potencia,
si utiliza el amplificador de potencia opcional,
o el terminal de control de la antena en el
vehículo.
Para utilizar la función de mando a distancia
en el volante es necesario un adaptador
remoto exclusivo (no suministrado) para su
vehículo.
Al conectarse al sistema de navegación de
Kenwood: consulte el manual de navegación.
Al realizar la conexión al teléfono de un
vehículo: conecte el terminal conectado a
tierra cuando suena el teléfono o durante una
conversación. (Sólo para KDC-5057SD)
Español | 103
2012/12/17 15:1
Montaje y desmontaje de la unidad
Instalación
Desmontaje de la unidad
1
Doble las lengüetas del manguito
de montaje con un destornillador o
similar y fíjelo.
Retire la placa protectora según lo indicado
en <Retirada de la placa protectora>.
2 Extraiga la placa frontal.
3 Introduzca las dos llaves de extracción
(accesorio 2) profundamente en las ranuras
de ambos lados, tal y como se muestra.
4 Mueva las llaves de extracción hacia abajo
y, a continuación, extraiga la unidad hasta
la mitad mientras presiona las llaves de
extracción hacia adentro.
Accesorio 2
<
• Asegúrese de que la unidad esté firmemente
instalada en su lugar. Si está instalada de
forma inestable, podrían ocurrir fallos de
funcionamiento (p. ej., saltos de sonido).
Retirada de la placa protectora
1
Enganche los pasadores de la llave de
extracción (accesorio 2) y libere los dos
bloqueos de la parte superior del marco.
Suba el bastidor y tire de él hacia adelante
tal como se indica en la imagen.
!
• Tenga cuidado de no hacerse daño con los
pasadores de bloqueo de la llave de extracción.
5 Termine de sacar la unidad con las manos,
prestando atención para no dejarla caer.
Fijador Uña
Accesorio 2
2 Al retirar la parte superior del marco, retire
también la parte inferior del mismo.
<
• Se puede quitar el marco desde la parte de abajo
de la misma forma.
104 | Guía de inicio rápido
B59-2186-00_00.indb 104
2012/12/17 15:1
Solo KDC-BT73DAB, KDC-BT53U
Sólo para KDC-BT73DAB
Montaje de la unidad
de micrófono
Instalación de la
antena de la radio
digital
1
Compruebe la posición de instalación del
micrófono (accesorio 3).
2 Limpie la superficie de instalación.
3 Instale el micrófono.
4 Conecte el cable del micrófono a la
unidad de forma segura fijándolo en varias
posiciones con cinta adhesiva o material
similar.
<
• Instale el micrófono lo más lejos posible del
teléfono móvil.
Accesorio 3
Fije el cable con un trozo de cinta adhesiva.
B59-2186-00_00.indb 105
Retire el separador del
micrófono y pegue el
micrófono en el lugar que
se muestra en la figura
anterior.
Ajuste la dirección del
micrófono hacia el conductor.
! PRECAUCIÓN
• La antena de película debe instalarse
exclusivamente en el interior del vehículo.
• No la instale en las siguientes ubicaciones:
-- Donde pueda obstruir la visión del conductor
-- Donde pueda obstaculizar el funcionamiento
de dispositivos de seguridad, como los airbags
-- Sobre superficies de cristal móviles, como el
portón trasero
• La intensidad de la señal se reducirá en las
siguientes ubicaciones:
-- En cristales que reflejen los rayos IR o en
superficies cubiertas con película de cristal
tipo espejo -- En áreas donde se solape con la antena de
radio original (patrón)
-- En áreas donde se solape con los cables de
calefacción de la ventana
-- En el lateral del vehículo (p. ej., puerta,
ventanilla lateral delantera)
-- En la luna trasera
-- Cuando se utiliza un cristal que bloquea
las señales de radio (por ejemplo, cristal
reflectante de IR, cristal con aislamiento
térmico)
-- La recepción puede reducirse debido al ruido
ocasionado al activar el limpiaparabrisas, el aire
acondicionado o el motor.
-- La recepción puede reducirse dependiendo de
la dirección de la emisora respecto al vehículo
(antena).
• Asegúrese de comprobar la ubicación de la
antena de película (accesorio 4) antes de
instalarla. La antena de película no puede volver
a pegarse.
• Limpie en profundidad los restos de aceite y
suciedad de la superficie adherente utilizando el
limpiador suministrado (accesorio 7).
• No doble ni dañe la antena de película (accesorio
4).
• Caliente la superficie adherente encendiendo la
calefacción, por ejemplo, antes de la aplicación.
• Es posible que no pueda instalarse en algunos
tipos de vehículos.
• Compruebe el tendido del cable de la antena
de película (accesorio 4) y del amplificador
(accesorio 5) antes de la adhesión.
Español | 105
2012/12/17 15:1
Sólo para KDC-BT73DAB
Instalación de la antena de la radio digital
Descripción general de la instalación
Elección del lugar de instalación de
la antena
• Si instala la antena en el lado izquierdo
Accesorio 45
Pilar delantero
150 mm
Lámina
de tierra
Cable de antena (3,5 m)
• La antena debe instalarse en el lado del
acompañante por razones de seguridad.
• Utilice la abrazadera de cable (accesorio 6) para
fijar la antena al pilar en varios puntos.
• La dirección de la película de antena (accesorio
4) varía en función de si se instala en el lado
derecho o izquierdo.
• Separe la película de la antena (accesorio 4)
unos 150 mm respecto al borde cerámico (parte
negra) de la parte superior del parabrisas .
Asimismo, sitúela a unos 70 mm del borde
cerámico del lateral del parabrisas (a una
distancia que permita adherir la lámina de tierra
del amplificador a la parte metálica del pilar
delantero).
• Sepárela de otras antenas un mínimo de 100
mm.
• No pegue el amplificador (accesorio 5) sobre
el borde cerámico (parte negra) alrededor
del parabrisas ya que este no dispone de la
suficiente adherencia.
70 mm*
Accesorio 4
Accesorio 5
• Si instala la antena en el lado derecho
Accesorio 5
Pilar delantero
Lámina de tierra
150 mm
Accesorio 4
70 mm*
*Donde puede pegarse la lámina de tierra
de la unidad del amplificador (accesorio 5)
en la parte metálica del pilar delantero.
106 | Guía de inicio rápido
B59-2186-00_00.indb 106
2012/12/17 15:1
Instalación de la antena
1 Compruebe el lugar de instalación.
2 Limpie la zona en la que se ha pegado
5 Después de pegar, frote el elemento en la
dirección de la flecha para asegurar una
correcta adherencia sobre el cristal.
la película de la antena (accesorio 4), la
unidad del amplificador (accesorio 5) y
la lámina de tierra utilizando el limpiador
suministrado (accesorio 7).
No es necesario retirar el recubrimiento de
la superficie metálica.
• Antes de pegar, espere a que la superficie del
cristal se haya secado por completo.
• Si la superficie del cristal está fría, por ejemplo
en invierno, caliéntela con el desempañador
o con un secador.
3 Retire el separador (pestaña I) de la película
de la antena horizontalmente y pegue la
antena en el parabrisas.
6 Retire la película de aplicación (pestaña III).
• No toque el terminal de alimentación del
elemento ni aplique limpiacristales.
Terminal de
alimentación
7 Haga coincidir el saliente del amplificador
con la marca 5 de la película de la antena
y péguelo.
• Retire el separador con cuidado.
• No toque la superficie adherente (lado del
adhesivo) de la película de la antena.
4 Retire el separador (pestaña II) de la película
de la antena verticalmente y pegue la
antena aplicando una suave presión.
B59-2186-00_00.indb 107
• No toque el terminal de alimentación de la
superficie adherente (lado del adhesivo) del
amplificador.
• Si instala la antena en el lado derecho
Haga coincidir el saliente
con la marca 5
Lámina de tierra
Accesorio 4
Accesorio 5
Español | 107
2012/12/17 15:1
Sólo para KDC-BT73DAB
Instalación de la antena de la radio digital
• Si instala la antena en el lado izquierdo
Accesorio 5
Accesorio 4
Lámina de tierra
8
Haga coincidir el saliente
con la marca 5
<
• Tome las siguientes precauciones al pasar
el cable de la antena por el interior del pilar
delantero, donde está instalado el airbag.
-- Al instalar la parte del amplificador del cable
de la antena, sitúela delante o encima del
airbag para que la antena y el airbag no
interfieran.
Accesorio 5
Retire la película que cubre la lámina de
tierra y pegue la lámina sobre la parte
metálica del vehículo.
Deje el margen suficiente para que la
lámina de tierra no interfiera con las partes
interiores (cubierta del pilar delantero). Procure asimismo que las partes interiores
no interfieran con el amplificador.
Accesorio 5
Airbag
Pilar delantero
Parabrisas
Pilar delantero
-- La cubierta del pilar delantero se fija con un
clip especial que deberá sustituirse, en caso
necesario, después de extraer la cubierta.
Consulte a su concesionario para obtener
información sobre la sustitución de la cubierta
del pilar delantero y la disponibilidad de piezas
de recambio.
Parte interior
Lámina de tierra
9 Tienda los cables de la antena.
• Utilice la abrazadera de cable (accesorio 6)
para fijar la antena al pilar en varios puntos.
Parte interior
Clip
108 | Guía de inicio rápido
B59-2186-00_00.indb 108
2012/12/17 15:1
Apéndice
Acerca de los archivos de audio
• Archivos de audio reproducibles
AAC-LC (.m4a), MP3 (.mp3), WMA (.wma), WAV
(.wav) de un dispositivo USB/tarjeta SD
• Soportes de disco que se pueden reproducir
CD-R/RW/ROM
• Formatos de archivo de disco reproducibles
ISO 9660 Level 1/2, Joliet y archivos con nombre
largo.
• Dispositivos USB reproducibles
Clase de almacenamiento masivo USB
• Tarjetas SD reproducibles Tarjeta SD (≤2 GB), tarjeta SDHC (≤32 GB)
• Sistemas de archivos reproducibles del
dispositivo USB/ la tarjeta SD
FAT12, FAT16, FAT32
Puede encontrar un manual en línea
sobre los archivos de audio en el sitio web
www.kenwood.com/cs/ce/audiofile/.
Modelos de iPod/iPhone que pueden
conectarse a esta unidad
Made for
• iPod touch (4th generation)
• iPod touch (3rd generation)
• iPod touch (2nd generation)
• iPod touch (1st generation)
• iPod classic
• iPod with video
• iPod nano (6th generation)
• iPod nano (5th generation)
• iPod nano (4th generation)
• iPod nano (3rd generation)
• iPod nano (2nd generation)
• iPod nano (1st generation)
• iPhone 4S
• iPhone 4
• iPhone 3GS
• iPhone 3G
• iPhone
Requisitos para Aha™:
Los requisitos para escuchar Aha™ son los
siguientes:
iPhone o iPod touch
• Utilice un iPhone o iPod touch de Apple que
funcione con el sistema iOS4 o versiones
posteriores.
• Busque “aha” en la iTunes App Store de Apple
para obtener e instalar la última versión de la
aplicación Aha™ en su dispositivo.
• iPhone/iPod touch conectado a esta unidad
mediante un KCA-iP102.
Android™
• Utilice Android OS 2.2 o posterior.
• Descárguese la aplicación Aha™ en su
smartphone desde Google play.
• El Bluetooth debe estar integrado y deben ser
compatibles los siguientes perfiles.
- SPP (Perfil de puerto serie)
- A2DP (Perfil de distribución de audio
avanzado)
Nota
• Inicie sesión y cree una cuenta gratuita de Aha
en la aplicación de su dispositivo.
• Conexión a Internet mediante LTE, 3G, EDGE
o WiFi.
• Debido a que Aha™ es un servicio de un
tercero, las especificaciones podrían cambiar
sin previo aviso. Por consiguiente, pueden
aparecer problemas de compatibilidad o
algunos o todos los servicios pueden dejar de
estar disponibles.
• Algunas funciones de Aha™ no se encuentran
disponibles en esta unidad.
Para obtener información sobre la
compatibilidad con el software iPod/iPhone,
visite www.kenwood.com/cs/ce/ipod/.
B59-2186-00_00.indb 109
Español | 109
2012/12/17 15:1
Índice
Antes da utilização
Acerca do Guia de iniciação rápida... 110
Antes da utilização.................................. 110
Preparação.................................................. 112
Operações gerais...................................... 113
Reproduzir música
(CD/USB/SD/iPod)................................ 114
Ouvir rádio/Rádio digital....................... 116
Telefonar no modo mãos-livres.......... 117
Antes da instalação................................. 118
Ligar os cabos aos terminais................ 120
Instalar/Retirar a unidade...................... 122
Instalar a unidade do microfone ....... 123
Instalar a antena de rádio digital........ 123
Anexo............................................................ 127
# ADVERTÊNCIA
Para impedir danos físicos ou
incêndio, tome as seguintes
precauções:
Acerca do Guia de
iniciação rápida
Este Guia de iniciação rápida explica as
funções básicas desta unidade.
Para obter informações sobre funções não
descritas neste Guia, consulte o Manual de
Instruções no seguinte website:
manual2.jvckenwood.com/edition/im362/
• Pare o veículo antes de operar a unidade.
• Para prevenir curtos-circuitos, nunca
colocar ou deixar objectos metálicos (por
exemplo, moedas ou ferramentas de
metal) dentro do aparelho.
! ATENÇÃO
• Regule o volume de forma a conseguir
ouvir os sons provenientes do exterior.
Conduzir com o volume demasiado alto
pode provocar um acidente.
• Limpe a sujidade no painel com um pano
de silicone seco ou com um pano macio.
A não observância desta precaução pode
resultar em danos no monitor ou na
unidade.
Limpar o conector
A unidade pode não funcionar
correctamente se o conector entre
a unidade e o painel frontal estiver
sujo. Destaque o painel frontal e limpe
cuidadosamente o conector com um
cotonete, tendo cuidado para não danificar
o conector.
Conector
Condensação
Para consultar o Manual de Instruções, é
necessário um navegador como Internet
Explorer® 7 ou posterior, Firefox® 3.6 ou
posterior, Chrome™ 20 ou posterior, Safari®
5.1 ou posterior, iOS Safari® 4.0 ou posterior
ou Android™ 2.2 ou posterior.
Quando o veículo tem ar condicionado,
pode acumular-se humidade na lente laser.
Isto pode provocar erros de leitura do disco.
Neste caso, retire o disco e aguarde que a
humidade se evapore.
110 | Guia de iniciação rápida
B59-2186-00_00.indb 110
2012/12/17 15:1
Notas
• Se aparecerem problemas durante a
instalação, consulte o seu revendedor
Kenwood.
• Quando adquirir acessórios opcionais,
verifique com o seu revendedor Kenwood
se estes funcionam com o seu modelo e
na sua área.
• Podem ser apresentados caracteres em
conformidade com a norma ISO 8859-1.
• Podem ser apresentados caracteres em
conformidade com a norma ISO 8859-5
ou ISO 8859-1. Consulte “Russian” de
<12-7. Definições iniciais> (Manual de
Instruções).
• A função Radio Data System não funciona
onde o serviço não é suportado por
nenhuma estação de difusão.
• A classe USB é indicada na unidade
principal, sob o painel frontal destacável.
Sobre os discos utilizados por esta
unidade
Manuseamento de discos
• Não toque na superfície de gravação do
disco.
• Não coloque adesivo, etc. no disco nem
utilize discos com adesivo colado.
• Não utilize acessórios para o disco.
• Não utilize solventes para limpar discos.
Utilize um pano de silicone seco ou um
pano macio.
• Limpe com um pano a partir do centro do
disco e com um movimento para fora.
• Quando retirar discos desta unidade,
puxe-os para fora horizontalmente.
• Se o orifício central ou o exterior do
rebordo dos discos tiver rebarbas, retire-as
antes de introduzir os discos.
Como reiniciar a unidade
Se a unidade não funcionar correctamente,
pressione o botão Reset. A unidade é
reposta nas definições de fábrica.
Botão Reset
• Esta unidade só reproduz CD com
.
• Não podem ser utilizados os seguintes
discos:
-- Discos que não sejam redondos
-- Discos cuja superfície de gravação seja
colorida ou discos sujos
-- Discos graváveis/regraváveis que
não tenham sido finalizados (sobre
o processo de finalização, consulte o
manual de instruções que veio com o
seu software de gravação de discos e
com o gravador de discos.)
-- Discos de 8 cm (3 polegadas) (a
tentativa de inserção utilizando um
adaptador poderá causar avaria).
B59-2186-00_00.indb 111
As ilustrações do ecrã e do painel apresentadas
neste manual são exemplos utilizados para
explicar mais claramente como são usados os
controlos. Portanto, o que aparece no ecrã das
ilustrações poderá diferir do que aparece no ecrã do
equipamento real, e algumas das imagens no ecrã
poderão não ser aplicáveis.
Português | 111
2012/12/17 15:1
Preparação
Botão [Control] (Botão de volume)
Libertar
Cancelar o modo Demonstração
Cancele o modo Demonstração quando
utilizar a unidade pela primeira vez após
a instalação.
1
Fixar/Soltar o painel frontal
Pressione o botão [Control] para cancelar
o modo Demonstração quando aparecer
a mensagem “To cancel DEMO Press the
volume knob” (aprox. 15 segundos).
Pressione o
botão libertar.
2 Rode o botão [Control] para seleccionar
“YES” e, em seguida, pressione o botão
[Control].
O modo de demonstração também pode
ser cancelado no modo de Definição de
funções. Consulte <12-6. Definições do
modo de demonstração> no Manual de
Instruções
!
• Remova o painel frontal imediatamente após
pressionar o botão Release; caso contrário, pode
cair devido à vibração.
• O painel frontal é um componente de precisão
e poderá ser danificado por pancadas ou
sacudidelas.
• Mantenha o painel frontal na sua caixa quando
destacado.
• Não coloque o painel frontal (e o estojo do
painel) em áreas expostas à luz solar directa, calor
ou humidade excessivos. Evite também locais
com demasiada poeira ou com a possibilidade
de salpicos de água.
112 | Guia de iniciação rápida
B59-2186-00_00.indb 112
2012/12/17 15:1
Operações gerais
[SRC] Botão [Control]
Terminal USB
Entrada auxiliar
Alimentação
Para ligar, pressione [SRC].
Para desligar, mantenha pressionado
[SRC].
Selecção de fonte
Pressionar [SRC] repetidamente permite
mudar de fontes.
Fonte
Indicação
Standby
“STANDBY”
Rádio Digital[2]
“DIGITAL RADIO”
Sintonizador
“TUNER”
Dispositivo USB ligado ao terminal
“USB (FRONT)”
USB dianteiro
Dispositivo USB ligado ao terminal
“USB (REAR)”
USB traseiro
iPod ligado ao terminal USB
“iPod (FRONT)”
dianteiro[1]
iPod ligado ao terminal USB traseiro[1] “iPod (REAR)”
aha™ do iPod ligado ao terminal USB “aha (FRONT)”
dianteiro[1][2][3]
aha™ do iPod ligado ao terminal USB “aha (REAR)”
traseiro[1][2][3]
aha™ do dispositivo ligado através de “aha”
Bluetooth[1][2][3]
Áudio Bluetooth[2] [3]
“BT AUDIO”
SD[1] [4]
“SD”
CD[1]
“CD”
Entrada auxiliar
“AUX”
[2]
[3]
[4]
Função de KDC-BT73DAB.
Função de KDC-BT53U.
Função de KDC-5057SD.
Volume
Rode o botão [Control] para ajustar o
volume de som.
Terminal USB
O dispositivo USB ou o iPod pode ser ligado.
O CA-U1EX (Máx. 500mA) ou o KCA-iP102
(acessórios opcionais) é recomendado para
ligar um dispositivo USB ou um iPod.
Entrada auxiliar
O dispositivo áudio portátil pode ser ligado
com a mini tomada estéreo (3,5 mm ø).
Só é possível seleccionar esta fonte quando
for possível reproduzir dados da mesma.
[1]
B59-2186-00_00.indb 113
Português | 113
2012/12/17 15:1
Reproduzir música (CD/USB/SD/iPod)
Ranhura do
disco
CA-U1EX[1]
[G]
[SRC] Botão [Control]
[1/6] Libertar
Tampa da ranhura
do disco
[E/F] [R/S] Indicador REAR USB
Reproduzir um disco
Abra a tampa da ranhura do disco para
cima.
Insira um disco na ranhura do disco.
Quando inserido, a fonte muda
automaticamente e a reprodução é iniciada.
Feche a tampa da ranhura do disco.
Reproduzir um dispositivo USB/ iPod
Ligue um dispositivo USB ou um iPod ao
terminal USB, como indicado em cima.
Quando ligado, a fonte muda
automaticamente e a reprodução é iniciada.
Pode ligar o iPod ou o dispositivo USB a
qualquer um dos terminais USB existentes
na parte da frente ou na parte de trás desta
unidade. Se o ligar ao terminal USB existente
na parte de trás, o indicador “REAR USB”
mantém-se aceso.
acessórios opcionais
[1]
KCA-iP102[1]
Terminal USB
Reproduzir um cartão SD
(apenas KDC-5057SD)
1
Pressione o botão libertar e destaque o
painel frontal.
2 Segure o cartão SD como indicado abaixo
e insira-o na respectiva ranhura até fazer
clique.
Cartão SD (disponível no mercado)
3 Recolocar o painel frontal.
4 Pressione [SRC] para seleccionar a fonte
“SD”.
Seleccionar uma pasta de ficheiros
de áudio
Pressione [R] ou [S].
Seleccionar uma música (faixa ou
ficheiro)
Pressione [E] ou [F].
Avanço rápido ou recuo rápido de
uma música (faixa ou ficheiro)
Mantenha pressionado [E] ou [F].
Pausa e reprodução de uma música
(faixa ou ficheiro)
Mantenha pressionado [1/6].
114 | Guia de iniciação rápida
B59-2186-00_00.indb 114
2012/12/17 15:1
Busca de música
Ejectar um disco
1 Pressione [1/6].
2 Procure uma música.
Remover o dispositivo USB/ iPod
Pode procurar a música que pretende
reproduzir.
Tipo de operação
Seleccionar itens
Determinar a selecção
Voltar ao item anterior
Mude para uma fonte diferente de USB,
iPod e Rádio Aha; em seguida, remova o
dispositivo USB.
Os dados contidos no dispositivo USB/
iPod podem ficar danificados, se este for
removido enquanto estiver a ser utilizado
como fonte activa.
Operação
Rode o botão [Control].
Pressione o botão
[Control].
Pressione [1/6].
Para cancelar a busca de música em
ficheiros áudio ou no iPod, mantenha
pressionado [1/6].
B59-2186-00_00.indb 115
Abra a tampa da ranhura do disco para
cima e pressione [G].
Remover o cartão SD
(apenas KDC-5057SD)
1
Pressione o botão libertar e destaque o
painel frontal.
2 Empurre o cartão SD até fazer clique e, em
seguida, retire os dedos do cartão.
O cartão sai da ranhura, de modo a poder
retirá-lo com os dedos.
3 Fixar o Painel Frontal.
Português | 115
2012/12/17 15:1
Ouvir rádio/Rádio digital
[SRC] Botão [Control]
[1/6]
[R]
[E/F]
fonte de sintonizador. O modo predefinido
Mix Station permite predefinir, no máximo,
6 estações.
Seleccionar uma fonte de
sintonizador
Pressione [SRC] para seleccionar “TUNER”
ou “DIGITAL RADIO” (apenas KDC-BT73DAB).
Consulte <Selecção de fonte> (página
113).
Seleccionar uma banda (FM ou AM)
(apenas sintonizador)
Pressione [R].
Seleccionar uma estação/serviço
Pressione [E] ou [F].
O modo procura pode ser alterado. Consulte
<9-5. Definição do sintonizador> ou <109. Definições iniciais de Rádio Digital> no
Manual de Instruções
Memória de predefinição de estações
1
Pressione [R] para seleccionar uma banda.
(Apenas sintonizador)
2 Pressione [E] ou [F] para seleccionar a
estação/o serviço que pretende guardar na
memória de predefinição de estações.
4 Rode o botão [Control] para seleccionar o
número de predefinição (FM/Rádio Digital:
“1” – “18”, AM: “1” – “6”) e, em seguida,
mantenha pressionado o botão [Control].
Aceder às estações na memória
1
Pressione [R] para seleccionar uma banda.
(Apenas sintonizador)
2 Pressione [1/6].
3 Rode o botão [Control] para seleccionar
um número de predefinição (FM/Rádio
Digital: “1” – “18”, AM: “1” – “6”) e, em seguida,
pressione o botão [Control].
No modo predefinido Mix Station, os nomes
de banda das fontes de sintonizador são
apresentados da seguinte forma:
FM: Estação transmissora FM
AM: Estação transmissora AM
DR: Serviço de Rádio Digital
3 “TUNER”: Pressione [1/6].
“DIGITAL RADIO”: Pressione [1/6] duas
vezes.
Volte a pressionar [1/6] para entrar
no modo predefinido Mix Station. Neste
modo, é possível guardar diferentes bandas
e fontes de sintonizador (FM, AM, Rádio
Digital, etc.) na mesma camada predefinida,
o que lhe permite aceder à estação que
pretende sem mudar de banda e/ou de
116 | Guia de iniciação rápida
B59-2186-00_00.indb 116
2012/12/17 15:1
Função de KDC-BT73DAB, KDC-BT53U
Telefonar no modo mãos-livres
Botão [Control]
[Ú]
Emparelhamento de um dispositivo
Bluetooth
Pode emparelhar o seu dispositivo
Bluetooth com esta unidade.
1
Opere o dispositivo Bluetooth para solicitar
esta unidade para ligação.
O nome desta unidade ("KDC-####") aparece
no dispositivo Bluetooth.
Aparece “Paring Press the volume knob”.
2 Pressione o botão [Control].
Tem início a ligação ao seu dispositivo
Bluetooth; um pouco depois, aparece
“Pairing Success” e, em seguida, a fonte
anterior é seleccionada.
Quando o registo do seu telemóvel é
concluído, a lista telefónica do telemóvel
é transferida automaticamente para esta
unidade. (Se a lista telefónica não tiver sido
transferida para esta unidade, efectue as
operações necessárias no telemóvel para a
transferir.)
B59-2186-00_00.indb 117
Marcar um número na lista telefónica
Marque o número de telefone na lista
telefónica do telemóvel.
Se a lista telefónica não tiver sido
transferida para esta unidade, efectue as
operações necessárias no telemóvel para
a transferir.
1 Pressione [Ú].
2 Rode o botão [Control] para seleccionar
“Phone Book” e, em seguida, pressione o
botão [Control].
3 Rode o botão [Control] para seleccionar
um nome e, em seguida, pressione o botão
[Control].
4 Rode o botão [Control] para seleccionar um
número de telefone.
5 Pressione [Ú].
Atender uma chamada telefónica
Pressione [Ú].
Desligar uma chamada
Pressione [Ú].
Português | 117
2012/12/17 15:1
Antes da instalação
# ADVERTÊNCIA
• A unidade só pode ser instalada num veículo
com alimentação 12 V CC, negativo à massa.
• Se ligar o cabo de ignição (vermelho) e o cabo
da bateria (amarelo) ao chassis do veículo
(massa), pode provocar um curto-circuito que
poderá dar origem a um incêndio. Ligue sempre
estes cabos à fonte de alimentação, na caixa de
fusíveis.
! ATENÇÃO
• Utilize a cablagem de alimentação incluída
nesta unidade para efectuar as ligações
de alimentação. Utilizar uma cablagem de
alimentação pertencente a outros modelos pode
provocar avarias.
• Instale esta unidade na consola do veículo.
• Não toque nas peças de metal desta unidade
durante ou logo após a utilização da unidade. As
peças de metal, como por exemplo as caixas de
protecção, podem ficar quentes.
• Montar e ligar este produto exige conhecimentos
e experiência. Para sua segurança, deixe o
trabalho de montagem e ligação ser feito por
profissionais.
• Se aparecerem problemas durante a instalação,
consulte o seu revendedor Kenwood.
• Desligue o terminal negativo da bateria antes de
instalar a unidade.
• Isole os cabos não ligados com fita isolante ou
outros materiais similares. Para evitar um curtocircuito, não remova as tampas das extremidades
dos cabos e terminais não ligados.
• Assegure-se de que liga esta unidade ao chassis
do veículo, novamente após a instalação.
• Se o fusível queimar, comece por se assegurar de
que os fios não estão em contacto, provocando
um curto-circuito, e, em seguida, substitua
o fusível antigo por um novo com a mesma
capacidade.
• Quando apenas dois altifalantes estão a ser
ligados ao sistema, ligue os conectores a ambos
os terminais de saída dianteira ou a ambos
os terminais de saída traseira (não misture as
saídas dianteira e traseira). Por exemplo, se ligar
o conector + do altifalante esquerdo a um
terminal de saída dianteira, não ligue o conector
- a um terminal de saída traseira.
• Ligue correctamente os fios dos altifalantes aos
terminais correspondentes. O aparelho pode
ficar danificado se partilhar os cabos - dos
altifalantes ou se fizer massa com eles em
qualquer das partes metálicas do veículo.
• Não use os seus próprios parafusos. Use apenas
os parafusos fornecidos. A unidade pode ficar
danificada se utilizar parafusos errados.
• Se o interruptor da chave de ignição do seu
veículo não possuir uma posição ACC, ligue os
cabos de ignição a uma fonte de alimentação
que possa ser ligada e desligada com a chave de
ignição. Se ligar os cabos de ignição a uma fonte
de alimentação com alimentação de tensão
constante, como os cabos da bateria, a bateria
pode esgotar-se.
• Se a consola tiver tampa, certifique-se que instala
a unidade de forma a que a placa frontal não
bata na tampa ao abrir e ao fechar.
• Depois de instalar a unidade, verifique se as luzes
de travão, os pisca-piscas, os limpa pára-brisa,
etc., do veículo funcionam correctamente.
• Monte o aparelho de forma a que o ângulo de
montagem seja de 30˚ ou menos.
• A recepção poderá ser fraca se existirem objectos
de metal próximo da antena Bluetooth. (Apenas
KDC-BT73DAB, KDC-BT53U)
Unidade de antena Bluetooth
KDC-BT73DAB • Esta unidade dispõe de uma ventoinha de
refrigeração para diminuir a temperatura interna.
Não monte a unidade num local em que a
ventoinha de refrigeração da unidade fique
obstruída. A obstrução destas aberturas prejudica
a refrigeração e provoca avarias.
Ventoinha de refrigeração
118 | Guia de iniciação rápida
B59-2186-00_00.indb 118
2012/12/17 15:1
Ligação do conector ISO
Para uma boa recepção
Para garantir uma boa recepção, tenha atenção
ao seguinte:
• Comunique com o telemóvel dentro da linha
de visão, num raio de 10 m (30 pés). O alcance
de comunicação torna-se mais reduzido
consoante o ambiente circundante. O alcance
de comunicação também diminui quando existe
um obstáculo entre esta unidade e o telemóvel.
O alcance máximo de comunicação indicado
acima (10 m) nem sempre é garantido.
• As comunicações podem sofrer interferências
devido aos fortes sinais de uma estação
transmissora ou de um walkie-talkie nas
proximidades.
Acessórios de instalação
1
1Quando o pino A-7 (vermelho) é ligado à
ignição e o pino A-4 (amarelo) é ligado à
alimentação constante do conector ISO do
veículo (predefinição):
Cabo de ignição
(vermelho)
5[1]
Aparelho
.....1
2
A disposição dos pinos nos conectores ISO
depende do tipo do veículo. Certifique-se
de que efectua as ligações correctamente,
para evitar danos no aparelho.
A ligação predefinida das cablagens é
descrita em 1 abaixo. Se os pinos do
conector ISO se apresentarem como
ilustrado em 2, faça as ligações conforme
ilustrado.
Assegure-se que torna a ligar o cabo
conforme indicado 2 abaixo para instalar
esta unidade em automóveis Volkswagen.
.....1
6[1]
.....2
.....3
Cabo de bateria
(amarelo)
.....1 (3m)
Aparelho
.....1
Veículo
Pino A-4
(amarelo)
2Quando o pino A-7 (vermelho) é ligado
à alimentação constante e o pino A-4
(amarelo) é ligado à ignição do conector ISO
do veículo:
Cabo de ignição
(vermelho)
7[1]
3[1][2]
Pino A-7
(vermelho)
Cabo de bateria
(amarelo)
Pino A-7
(vermelho)
Veículo
Pino A-4
(amarelo)
Apenas
KDC-BT73DAB
Apenas KDC-BT53U
[1]
4[1]
B59-2186-00_00.indb 119
[2]
.....1
Português | 119
2012/12/17 15:1
Saída traseira
Saída dianteira
R
L
Saída subwoofer
SW FRONT REAR
Ligar os cabos aos terminais
Guia da função do conector
Números dos
pinos para os
conectores ISO
Conector de
alimentação
externa
A-4
A-5
A-6
A-7
A-8
Ligação
altifalante
B-1
B-2
B-3
B-4
B-5
B-6
B-7
B-8
Cor dos cabos Funções
Amarelo
Azul/branco
laranja/branco
vermelho
Preto
Bateria
Controlo de energia
Redutor de iluminação
Ignição (ACC)
Ligação terra (massa)
Roxo
Roxo/preto
Cinzento
Cinzento/preto
Branco
Branco/preto
Verde
Verde/preto
Traseiro direito (+)
Traseiro direito (–)
Dianteiro direito (+)
Dianteiro direito (–)
Dianteiro esquerdo (+)
Dianteiro esquerdo (–)
Traseiro esquerdo (+)
Traseiro esquerdo (–)
Entrada da antena FM/AM (JASO)
(apenas KDC-BT73DAB, KDC-BT53U)
R
Antena de rádio digital
(acessório 5)
(apenas KDC-BT73DAB)
Microfone (acessório 3)
(apenas KDC-BT53U)
⁄
• Impedância do altifalante:
4–8Ω
⁄ Consulte <Ligação do conector ISO> (página 119).
Conector A
8
7
6
5
4
3
2
1
Conector B
8
7
6
5
4
3
2
1
Vermelho (pino A-7)
Vermelho (cabo de
ignição)
Amarelo (pino A-4)
Amarelo (cabo da bateria)
Apenas KDC-BT73DAB
120 | Guia de iniciação rápida
B59-2186-00_00.indb 120
2012/12/17 15:1
Ficha USB (0,8m)
Para o dispositivo USB.
Alimentação de corrente
máxima USB : DC 5 V = 1 A
Fusível (10A)
R
L
Entrada da antena FM/AM (JASO)
(apenas KDC-5057SD)
da bateria)
B59-2186-00_00.indb 121
Microfone (acessório 3)
(apenas KDC-BT73DAB)
Cablagem (acessório 1)
Se não forem feitas ligações, não deixe o fio sair da patilha.
Azul/branco (controlo de
alimentação/fio de controlo da
antena)
P.CONT
ANT.
CONT
Azul claro/amarelo (fio do
controlo remoto do volante)
REMOTE CONT
STEERING WHEEL
REMOTE INPUT
Castanho (fio de controlo de
silêncio)
MUTE
Ligue qualquer um dos terminais de controlo
da alimentação quando utilizar o amplificador
de potência opcional ou o terminal de
controlo da antena do veículo.
Para utilizar a função de controlo remoto do
volante, é necessário um adaptador remoto
exclusivo (não fornecido) compatível com o
veículo.
Quando ligar ao sistema de navegação
Kenwood: Consulte o seu manual do sistema
de navegação.
Quando ligar a um telefone para automóvel: Para ligar o terminal de terra quando o
telefone toca ou durante a conversação.
(apenas KDC-5057SD)
Português | 121
2012/12/17 15:1
Instalar/Retirar a unidade
Instalação
Retirar o aparelho
1
Dobre as patilhas da manga de
montagem com uma chave de
parafusos ou um utensílio semelhante
e fixe-a no respectivo lugar.
Retire a moldura, consultando <Retirar a
moldura>.
2 Retire o painel frontal.
3 Introduza as duas chaves de remoção
(acessório 2) profundamente nas ranhuras
de ambos os lados, como ilustrado.
4 Faça descer a chave de extracção e, em
seguida, puxe a unidade para fora até meio
enquanto pressiona a chave de extracção
contra a unidade.
Acessório 2
<
• Certifique-se de que o aparelho está firmemente
instalado na posição adequada. Se o aparelho
estiver instável, pode apresentar problemas de
mau funcionamento (por exemplo, o som pode
oscilar).
Retirar a moldura
1
Encaixe os pinos de retenção na chave
de remoção (acessório 2) e solte os dois
travões na parte superior da estrutura.
Levante e puxe a estrutura para a frente,
conforme mostra a figura.
!
• Tenha cuidado para não se ferir com os pinos de
retenção da chave de remoção.
5 Puxe a unidade totalmente para fora, com as
mãos, tendo cuidado para não a deixar cair.
Travão
Lingueta
Acessório 2
2 Depois de retirar a parte superior da
estrutura, retire a parte inferior da estrutura.
<
• A armação pode ser removida a partir do fundo,
da mesma forma.
122 | Guia de iniciação rápida
B59-2186-00_00.indb 122
2012/12/17 15:1
Apenas KDC-BT73DAB, KDC-BT53U
Apenas KDC-BT73DAB
Instalar a unidade do
microfone
Instalar a antena de
rádio digital
1
! ATENÇÃO
Verifique a posição de instalação do
microfone (acessório 3).
2 Limpe a superfície de instalação.
3 Instale o microfone.
4 Ao longo do seu percurso até à unidade, o
cabo deverá ser fixado em vários pontos,
com recurso a fita adesiva ou similar.
<
• Instale o microfone tão longe quanto possível
do telemóvel.
Acessório 2
Fixe o cabo com fita disponível no mercado.
B59-2186-00_00.indb 123
Retire o separador do
microfone e fixe o microfone ao local indicado
acima.
Regule a direcção do
microfone, de forma a
apontar para o condutor.
• Esta antena tipo película destina-se
exclusivamente a uma utilização no interior do
veículo.
• Não instalar nos seguintes locais:
-- Onde possa obstruir a visão do condutor
-- Onde possa obstruir o funcionamento de
dispositivos de segurança, como os airbags
-- Em superfícies de vidro móveis, como na
porta traseira
• A força do sinal diminui nos seguintes locais:
-- Em vidro reflector de IV ou no caso de estar
coberta por película espelhada para vidro -- Em caso de sobreposição com a antena de
rádio original (padrão)
-- Em caso de sobreposição com a resistência de
aquecimento dos vidros
-- Na parte lateral do veículo (por exemplo, na
porta ou no vidro dianteiro lateral)
-- No vidro traseiro
-- Quando é utilizado vidro que bloqueia os
sinais de rádio (por exemplo, vidro reflector de
IV, vidro de isolamento térmico)
-- A recepção pode diminuir devido ao ruído,
quando o limpa-vidros, o ar condicionado ou o
motor está ligado.
-- A recepção pode diminuir consoante a
direcção da estação emissora relativamente ao
veículo (antena).
• Assegure-se de que verifica o local de instalação
da antena tipo película (acessório 4) antes da
instalação. A antena tipo película não pode voltar
a ser colada.
• Limpe cuidadosamente gordura e sujidade
que possam existir na superfície de colagem,
utilizando o dispositivo de limpeza incluído
(acessório 7).
• Não dobre ou danifique a antena tipo película
(acessório 4).
• Antes de aplicar, aqueça a superfície de colagem,
ligando o aquecedor, por exemplo.
• Pode não ser possível instalar em alguns tipos
de veículo.
• Verifique o percurso do cabo da antena tipo
película (acessório 4) e do amplificador
(acessório 5), antes de colar.
Português | 123
2012/12/17 15:1
Apenas KDC-BT73DAB
Instalar a antena de rádio digital
Descrição da instalação
Acessório 45
Determinar o local de instalação da
antena
• Quando a antena for instalada do lado
esquerdo
Pilar dianteiro
150 mm
Folha de terra
Cabo de antena (3,5 m)
70 mm*
• Por uma questão de segurança, a antena deve
ser instalada do lado do passageiro.
• Utilize o grampo de cabo (acessório 6) para fixar
a antena ao pilar em vários pontos.
• A direcção da película da antena (acessório
4) varia consoante a antena tipo película seja
instalada do lado esquerdo ou direito.
• Separe a película da antena (acessório 4) da
linha cerâmica (parte preta) na parte superior do
pára-brisas, numa distância de 150 mm.
Da mesma forma, coloque-a cerca de 70 mm no
interior da linha cerâmica na extremidade lateral
do pára-brisas. (no caso de a folha de terra do
amplificador poder ser colada na parte metálica
do pilar dianteiro)
• Separe, pelo menos, 100 mm, das restantes
antenas.
• Não cole o amplificador (acessório 5) na linha
cerâmica (parte preta) em volta do pára-brisas.
Porque a aderência não é suficiente.
Acessório 4
Acessório 5
• Quando a antena for instalada do lado direito
Acessório 5
Pilar dianteiro
Folha de terra
150 mm
Acessório 4
70 mm*
*No caso de a folha de terra da unidade
amplificadora (acessório 5) poder ser colada
na parte metálica do pilar dianteiro.
124 | Guia de iniciação rápida
B59-2186-00_00.indb 124
2012/12/17 15:1
Instalação da antena
1 Verifique o local de instalação.
2 Limpe a área em que a película da antena
5 Depois de colar, pressione o elemento na
superfície de vidro na direcção da seta da
figura, para o fixar.
(acessório 4), a unidade amplificadora
(acessório 5) e a folha de terra vão ser
coladas, com o dispositivo de limpeza
incluído (acessório 7).
Não é necessário retirar o revestimento da
superfície metálica.
• Antes de colar, aguarde até que a superfície
de vidro esteja totalmente seca.
• Se a superfície de vidro estiver fria, por
exemplo, durante o Inverno, aqueça-a com
um aquecedor ou secador.
3 Retire o separador (etiqueta I) da película da
antena, horizontalmente, e cole a antena no
pára-brisas.
6 Retire a película de aplicação (etiqueta III).
• Não toque no terminal de alimentação do
elemento. Da mesma forma, não aplique
qualquer produto de limpeza para vidros.
Terminal de
alimentação
7 Faça corresponder a saliência do
amplificador com 5 na película da antena
e cole.
• Retire o separador cuidadosamente.
• Não toque na superfície de colagem (face
adesiva) da película da antena.
4 Retire o separador (etiqueta II) da película
da antena, verticalmente, e cole a antena
cuidadosamente, aplicando pressão.
B59-2186-00_00.indb 125
• Não toque no terminal de alimentação ou
na superfície de colagem (face adesiva) do
amplificador.
• Quando a antena for instalada do lado direito
Faça corresponder a saliência com 5
Folha de terra
Acessório 4
Acessório 5
Português | 125
2012/12/17 15:1
Apenas KDC-BT73DAB
Instalar a antena de rádio digital
• Quando a antena for instalada do lado
esquerdo
Acessório 5
Acessório 4
Folha de terra
Faça corresponder a saliência com 5
8
Retire a película que cobre a folha de terra
e cole a folha de terra na parte metálica do
veículo.
Disponibilize uma margem suficiente para a
folha de terra, de modo a que não interfira
com as partes interiores (cobertura do pilar
dianteiro). Da mesma forma, assegure-se de que as
partes interiores não interferem com o
amplificador.
Acessório 5
Pára-brisas
Pilar dianteiro
<
• Tome as seguintes precauções ao fazer passar o
cabo da antena no interior do pilar dianteiro em
que o airbag está instalado.
-- Instale a parte do amplificador do cabo da
antena à frente ou por cima do airbag, de
modo a que não haja interferência entre a
antena e o airbag.
Acessório 5
Airbag
Pilar dianteiro
-- A cobertura do pilar dianteiro é fixada com
um clipe especial, que poderá ter de ser
substituído quando a cobertura do pilar
dianteiro é retirada.
Contacte o seu concessionário automóvel para
obter informações sobre a substituição da
cobertura do pilar dianteiro e a disponibilidade
de peças sobressalentes.
Parte interior
Folha de terra
9 Ligue os cabos da antena.
Parte interior
Clipe
• Utilize o grampo de cabo (acessório 6) para
fixar a antena ao pilar em vários pontos.
126 | Guia de iniciação rápida
B59-2186-00_00.indb 126
2012/12/17 15:1
Anexo
Sobre o ficheiro de áudio
• Ficheiros áudio reproduzíveis
AAC-LC (.m4a), MP3 (.mp3), WMA (.wma), WAV
(.wav) do dispositivo USB/cartão SD
• Suporte do disco reproduzível
CD-R/RW/ROM
• Formatos do ficheiro do disco reproduzíveis
ISO 9660 nível 1/2, Joliet, nome de ficheiro longo.
• Dispositivos USB reproduzíveis Classe de armazenamento em massa USB
• Cartões SD reproduzíveis cartão SD (≤2 GB), cartão SDHC (≤32 GB)
• Sistemas de ficheiro de dispositivo USB/cartão SD
reproduzíveis
FAT12, FAT16, FAT32
O manual online sobre ficheiros
áudio está disponível no site
www.kenwood.com/cs/ce/audiofile/.
Modelos de iPods/iPhones que
podem ser ligados a esta unidade
Made for
• iPod touch (4th generation)
• iPod touch (3rd generation)
• iPod touch (2nd generation)
• iPod touch (1st generation)
• iPod classic
• iPod with video
• iPod nano (6th generation)
• iPod nano (5th generation)
• iPod nano (4th generation)
• iPod nano (3rd generation)
• iPod nano (2nd generation)
• iPod nano (1st generation)
• iPhone 4S
• iPhone 4
• iPhone 3GS
• iPhone 3G
• iPhone
Requisitos para Aha™:
Seguem-se os requisitos necessários para
reproduzir dados Aha™:
iPhone ou iPod touch
• Utilize um iPhone ou um iPod touch da Apple
com o sistema operativo iOS4 ou posterior.
• Pesquise por “aha” no Apple iTunes App Store
para procurar e instalar a versão mais recente
da aplicação Aha™ no seu dispositivo.
• iPhone/ iPod touch ligado a esta unidade com
um KCA-iP102.
Android™
• Utilize o Android OS 2.2 ou posterior.
• Transfira a aplicação Aha™ para o seu
smartphone a partir do Google play.
• A função Bluetooth tem de estar integrada e
os seguintes perfis têm de ser suportados.
- SPP (Perfil de porta série)
- A2DP (Perfil de distribuição de áudio
avançado)
NOTA
• Na aplicação do seu dispositivo, inicie sessão e
crie uma conta gratuita no Aha.
• Ligação à Internet através de LTE, 3G, EDGE
ou WiFi.
• Uma vez que o Aha™ é um serviço fornecido
por terceiros, as especificações estão sujeitas a
alterações sem aviso prévio. Da mesma forma,
a compatibilidade pode ser comprometida,
ou alguns ou todos os serviços podem estar
indisponíveis.
• Algumas funcionalidades do Aha™ não podem
ser utilizadas através desta unidade.
Para informações sobre a compatibilidade
do software iPod/iPhone, visite www.
kenwood.com/cs/ce/ipod/.
B59-2186-00_00.indb 127
Português | 127
2012/12/17 15:1
Содержание
Подготовка к э
О Кратком руководстве
пользователя.............................................. 128
Подготовка к э ксплуатации.................... 128
Подготовка...................................................... 130
Общие указания............................................ 131
Воспроизведение музыки
(CD/USB/SD/iPod)...................................... 132
Прослушивание радио/цифрового
радио.............................................................. 134
Телефонные вызовы с помощью
модуля громкой связи........................... 135
Перед установкой........................................ 136
Подсоединение кабелей к клеммам... 138
Установка/удаление устройства........... 140
Установка блока микрофона ................. 141
Установка антенны цифрового
радио.............................................................. 141
Приложение.................................................... 145
# ПРЕДУПРЕЖДЕНИЕ
Во избежание травм или пожара
соблюдайте следующие меры
предосторожности.
О Кратком руководстве
пользователя
В данном Кратком руководстве пользователя
имеется описание основных функций
устройства.
Функции, которые не упоминаются в данном
руководстве, описаны в инструкции по
эксплуатации на сайте:
manual2.jvckenwood.com/edition/im362/
ксп
• Прежде чем начать манипуляции с
устройством, автомобиль следует
остановить.
• Во избежание коротких замыканий никогда
не оставляйте металлические предметы
(например монеты или металлические
инструменты) внутри устройства.
! ОСТОРОЖНО!
• Отрегулируйте громкость звука таким
образом, чтобы были слышны звуки
за пределами автомобиля. Вождение
при установленной слишком высокой
громкости может стать причиной аварии.
• Вытирайте грязь с панели сухим силиконом
или мягкой тканью.
Невыполнение этого требования может
привести к повреждению монитора или
устройства.
Чистка разъема
Данное устройство может работать
неправильно, если разъем между
устройством и передней панелью
загрязнился. Отсоедините переднюю панель
и очистите разъем с помощью ватной
палочки, соблюдая осторожность, чтобы не
повредить разъем.
Разъем
Конденсация
Для просмотра инструкции по эксплуатации
необходим браузер Internet Explorer® 7 или
выше, Firefox® 3.6 или выше, Chrome™ 20 или
выше, Safari® 5.1 или выше, iOS Safari® 4.0 или
выше, либо Android™ 2.2 или выше.
Если в автомобиле действует система
кондиционирования воздуха, на линзе
лазера может собираться влага. Это может
вызвать сбои при считывании диска. В таком
случае следует извлечь диск и подождать,
пока влага испарится.
128 | Краткое руководство пользователя
B59-2186-00_00.indb 128
2012/12/17 15:1
ксплуатации
Примечания
Правила обращения с дисками
Замечания о дисках, которые
используются в рассматриваемом
устройстве
Порядок выполнения сброса
устройства
• В случае возникновения проблем при
установке обратитесь к дилеру компании
Kenwood.
• При приобретении дополнительных
аксессуаров уточните у дилера компании
Kenwood, будут ли эти аксессуары работать
с данной моделью и в данном регионе.
• Отображаются символы, соответствующие
стандарту ISO 8859-1.
• Отображаются символы, соответствующие
стандарту ISO 8859-5 или ISO 8859-1. См.
раздел “Russian” главы <12-7. Начальные
настройки> (Инструкция по эксплуатации).
• В регионах, где данная услуга не
поддерживается ни одной радиостанцией,
функция системы радиоданных (Radio Data
System) работать не будет.
• Версия USB указывается на основном
блоке под съемной панелью.
• Данное устройство обеспечивает
воспроизведение только компакт-дисков,
.
имеющих отметку
• Диск нельзя использовать в следующих
случаях:
-- Форма диска отличается от круглой
-- Поверхность диска со стороны записи
окрашена или он загрязнен
-- Записываемый/перезаписываемый диск
в ходе записи не был финализирован
(Информацию о процедуре финализации
можно найти в используемом для
записи программном обеспечении
и в инструкции по эксплуатации к
соответствующему устройству записи.)
-- Диаметр диска равен 8 см (3 дюйма)
(Попытка ввести диск с использованием
адаптерного приспособления
может привести к нарушению
функционирования устройства.)
B59-2186-00_00.indb 129
• Запрещено касаться поверхности диска со
стороны записи.
• Запрещено наклеивать на диск клейкую
ленту и т. п., либо использовать диски с
наклеенной на них лентой.
• При работе с дисками нельзя использовать
вспомогательное оборудование и
принадлежности.
• Для чистки дисков запрещено
использовать растворители. Используйте
сухой силикон или мягкую ткань.
• Очистите диск, перемещая ткань от центра
наружу.
• Извлекая диск из устройства, нужно тянуть
его в горизонтальном направлении.
• Если на центральном отверстии или
наружной кромке диска имеются
заусеницы, удалите их до вставки диска в
устройство.
Если устройство не функционирует
надлежащим образом, нажмите кнопку Reset
(Сброс). Устройство вернется к заводским
настройкам.
Кнопка сброса
Иллюстрации дисплея и лицевой панели
приведены в данной инструкции в
качестве примеров для уточнения порядка
применения органов управления. Поэтому
информация на дисплее, представленная на
этих иллюстрациях, может отличаться
от информации, отображаемой в
действительности на дисплее конкретного
прибора, и некоторые иллюстрации,
касающиеся изображения на дисплее, могут
оказаться неприменимыми.
Русский | 129
2012/12/17 15:1
Подготовка
Кнопка [Control] (регулятор громкости)
Открывание
Отмена демонстрационного
режима
Отмените демонстрационный режим
при первом включении устройства
после установки.
1 Нажмите кнопку [Control] для
отмены демонстрационного режима
при появлении сообщения “To
cancel DEMO Press the volume knob”
(приблизительно 15 секунд).
2 Поверните кнопку [Control] для
выбора варианта “YES”, затем нажмите
на кнопку [Control].
Демонстрационный режим также
можно отменить в режиме настройки
функций. См. раздел <12-6. Настройка
демонстрационного режима> в
инструкции по эксплуатации
130 | Краткое руководство пользователя
B59-2186-00_00.indb 130
Снятие/присоединение
передней панели
Нажмите кнопку
открывания.
!
• После нажатия кнопки открывания следует
сразу же снять переднюю панель. Иначе
панель может упасть из-за вибрации.
• Передняя панель является точным
устройством, и сотрясения или удары
могут ее повредить.
• После снятия передней панели храните ее
в предназначенном для нее футляре.
• Не оставляйте переднюю панель (и
чехол панели) в местах, подверженных
воздействию прямых солнечных лучей,
чрезмерного тепла или влажности. Также
избегайте сильно запыленных мест и мест,
где возможно попадание воды.
2012/12/17 15:1
Общие указания
[SRC] Кнопка [Control]
Порт USB
Дополнительный вход
Питание
Для включения питания нажмите [SRC].
Для выключения питания нажмите и
удерживайте кнопку [SRC].
Выбор источника
Нажатие [SRC] приводит к
дальнейшему переключению между
источниками.
Источник
Отображение
Режим ожидания
“STANDBY”
Цифровое радио[2]
“DIGITAL RADIO”
ТЮНЕР
“TUNER”
USB устройство, подключенное к
“USB (FRONT)”
переднему USB-порту
USB устройство, подключенное к
“USB (REAR)”
заднему USB-порту
iPod, подключенный к переднему “iPod (FRONT)”
USB-порту[1]
iPod, подключенный к заднему
“iPod (REAR)”
USB-порту[1]
aha™ iPod'а, подключенного к
“aha (FRONT)”
переднему USB-порту [1][2][3]
aha™ iPod'а, подключенного к
“aha (REAR)”
заднему USB-порту [1][2][3]
aha™ устройства, подключенного “aha”
через Bluetooth [1][2][3]
Аудиоустройство Bluetooth [2] [3]
“BT AUDIO”
SD[1] [4]
“SD”
CD[1]
“CD”
Дополнительный вход
“AUX”
B59-2186-00_00.indb 131
Этот источник можно выбрать только тогда,
когда возможно его воспроизведение.
Функция KDC-BT73DAB.
[3]
Функция KDC-BT53U.
[4]
Функция KDC-5057SD.
[1]
[2]
Громкость
Поверните кнопку [Control], чтобы
настроить громкость звука.
Порт USB
Используется для подключения
устройства USB или iPod.
CA-U1EX (макс. 500мА) или KCA-iP102
(дополнительные принадлежности) для
подключения устройства USB или iPod.
Дополнительный вход
Обеспечивается подключение
портативного аудиоустройства
посредством стереофонического
мини-штекера (ø 3,5 мм).
Русский | 131
2012/12/17 15:1
Воспроизведение музыки (CD/USB/SD/iPod)
Приемник
для дисков
[SRC] Кнопка [Control]
CA-U1EX[1]
[G]
Крышка слота
диска
KCA-iP102[1]
заднего
Порт USB
[1/6] Открывание [E/F] [R/S] Индикатор
USB
Воспроизведение с компактВоспроизведение с SD-карты
(только KDC-5057SD)
диска
Откройте крышку слота диска вверх.
Вставьте диск в приемник для
дисков.
При вставке диска автоматически
выполняется переключение источника
звукового сигнала и начинается
воспроизведение.
Закройте крышку слота диска.
1
2
Нажмите кнопку открывание и
снимите переднюю панель.
Держите карту SD, как показано на
ниже, и вставьте ее в гнездо карты до
щелчка.
SD-карта (имеется в продаже)
Воспроизведение с устройства
USB/проигрывателя iPod
Подключите USB-устройство или
проигрыватель iPod к порту USB, как
показано выше.
При подключении автоматически
выполняется переключение источника
звукового сигнала и начинается
воспроизведение.
Можно подключить iPod или USBустройство к одному из USB-портов,
расположенных на передней и задней
панелях устройства. При подключении
устройства к заднему USB-порту,
загорится индикатор “REAR USB”.
дополнительные принадлежности
[1]
3 Подсоединение передней панели.
4 Нажмите [SRC] для выбора источника
“SD”.
Выбор папки аудиофайла
Нажмите [R] или [S].
Выбор композиции (дорожки
или файла)
Нажмите [E] или [F].
Быстрая перемотка вперед или
назад в пределах композиции
(дорожки или файла)
Нажмите и удерживайте [E] или
[F].
132 | Краткое руководство пользователя
B59-2186-00_00.indb 132
2012/12/17 15:1
Пауза и воспроизведение
композиции (дорожки или
файла)
Нажмите и удерживайте [1/6].
Извлечение диска
Откройте крышку слота диска вверх
и нажмите [G].
Удаление устройства USB/ iPod
Переключитесь на источник, отличный
от USB, iPod и Aha Radio, затем
отсоедините USB устройство.
Если извлекать устройство USB
или iPod в то время, когда оно
используется в качестве активного
источника, возможно повреждение
содержащихся в нем данных.
Поиск композиций
Можно выполнить поиск композиции,
которую требуется воспроизвести.
1 Нажмите [1/6].
2 Поиск композиции.
Тип операции
Операция
Выбор элементов
Поверните кнопку
[Control].
Определение выбора
Нажмите кнопку
[Control].
Возврат к предыдущему Нажмите [1/6].
элементу
Для отмены поиска композиции в
аудиофайлах или iPod, нажмите и
удерживайте [1/6].
B59-2186-00_00.indb 133
Извлечение SD-карты
(только KDC-5057SD)
1
2
3
Нажмите кнопку открывание и
снимите переднюю панель.
Нажмите на SD-карту до щелчка, а
затем уберите с нее свой палец.
Карта выскочит до определенного
уровня, после чего ее можно извлечь
пальцами.
Присоедините переднюю панель.
Русский | 133
2012/12/17 15:1
Прослушивание радио/цифрового радио
[SRC] Кнопка [Control]
[1/6]
[E/F]
Выбор радиоприемника в
качестве источника
Нажмите [SRC] для выбора “TUNER” или
“DIGITAL RADIO” (только KDC-BT73DAB).
См. раздел <Выбор источника> (стр.
131).
Выбор диапазона (FM или AM)
(только тюнер)
Нажмите [R].
Выбор станции/ услуги
Нажмите [E] или [F].
Режим поиска можно изменить. См.
<9-5. Настройка тюнера> или <109. Настройка цифрового радио> в
Инструкции по эксплуатации
Память фиксированных станций
1
2
3
[R]
Нажмите [R] для выбора диапазона.
(Только тюнер)
Нажмите [E] или [F] для выбора
станции/ услуги, которые вы хотите
сохранить в памяти преднастроек
станций.
“TUNER”: Нажмите [1/6].
“DIGITAL RADIO”: Дважды нажмите
[1/6].
Нажмите [1/6] снова для
установления режима настройки
фиксированных станций в смешанном
порядке. В этом режиме данные
станций из разных диапазонов и
разных приемников (FM, AM, цифровой
радиоприемник и т. п.) можно сохранять
в одном ряду предварительных
настроек, что позволяет выбирать
нужную станцию, не переключая
диапазон и/или радиоприемники,
используемые в качестве источников.
В режиме настройки фиксированных
станций в смешанном порядке можно
предварительно настроить не более 6
станций.
4 Поверните кнопку [Control] для
выбора преднастроенного номера
(FM/ цифровое радио: “1” – “18”, АМ:
“1” – “6”), затем нажмите и удерживайте
кнопку [Control].
Вызов станций из памяти
1
2
3
Нажмите [R] для выбора диапазона.
(Только тюнер)
Нажмите [1/6].
Поверните кнопку [Control] для
выбора преднастроенного номера
(FM/ цифровое радио: “1” – “18”, АМ: “1” –
“6”), затем нажмите кнопку [Control].
В режиме настройки фиксированных
станций в смешанном порядке названия
диапазонов тюнера источников
отображаются следующим образом:
FM: Вещательная станция FM
AM: Вещательная станция AM
DR: Услуга цифрового радио
134 | Краткое руководство пользователя
B59-2186-00_00.indb 134
2012/12/17 15:1
Функция модели KDC-BT73DAB, KDC-BT53U
Телефонные вызовы с помощью модуля
громкой связи
Кнопка [Control]
[Ú]
Установление соединения с
устройством Bluetooth
Можно установить соединение данного
устройства с устройством Bluetooth.
1 Задействуйте устройство Bluetooth для
поступления запроса о подключении
данного устройства.
Название этого устройства ("KDC-####")
отображается на устройстве Bluetooth.
Отображается надпись “Paring Press the
volume knob”.
2 Нажмите кнопку [Control].
Начинается подключение к устройству
Bluetooth, через некоторое время
отображается сообщение “Pairing
Success” и затем выбирается
предыдущий источник.
По завершении регистрации сотового
телефона телефонная книга из него
автоматически загрузится в устройство.
(Если телефонная книга не загрузилась,
выполните соответствующие действия
с сотовым телефоном для ее загрузки.)
B59-2186-00_00.indb 135
Набор номера из телефонной
книги
Наберите номер телефона в телефонной
книге на мобильном телефоне.
Если телефонная книга не загрузилась,
выполните соответствующие действия с
сотовым телефоном для ее загрузки.
1 Нажмите [Ú].
2 Поверните кнопку [Control] для
выбора “Phone Book”, затем нажмите на
кнопку [Control].
3 Поверните кнопку [Control] для
выбора имени, затем нажмите на
кнопку [Control].
4 Поверните кнопку [Control] для
выбора телефонного номера.
5 Нажмите [Ú].
Ответ на вызов по телефону
Нажмите [Ú].
Завершение вызова
Нажмите [Ú].
Русский | 135
2012/12/17 15:1
Перед установкой
# ПРЕДУПРЕЖДЕНИЕ
• Устройство можно устанавливать только
в автомобилях с электропитанием 12 В
постоянного тока и отрицательным выводом
питания, подсоединенным к корпусу.
• Подсоединение провода зажигания (красный)
и провода батареи (жёлтый) к корпусу
автомобиля (заземление) может привести к
короткому замыканию, которое в свое очередь
может вызвать возгорание. Подсоединяйте
эти провода только к источнику питания,
снабженному закрытым плавким
предохранителем.
! ОСТОРОЖНО!
• Используйте жгут проводов питания
данного устройства для подключения
питания. Использование жгута проводов
питания, поставляемого с другими моделями
устройства, может привести к выходу
устройства из строя.
• Данное устройство подлежит установке в
приборную панель автомобиля.
• Не прикасайтесь к металлическим деталям
устройства в процессе и на протяжении
некоторого времени после завершения
эксплуатации устройства. Температура
металлических деталей, таких как радиатор
охлаждения и кожух, существенно повышается.
• Установка и подключение данного изделия
требует умений и опыта. Из соображений
безопасности предоставьте осуществление
установки и подключения профессионалам.
• В случае возникновения проблем при
установке обратитесь к дилеру компании
Kenwood.
• До установки устройства отсоедините
отрицательную клемму аккумуляторной
батареи.
• Неподключенные провода изолируйте
виниловой лентой или другими подобными
материалами. Во избежание короткого
замыкания не снимайте колпачки со
свободных кабелей и выводов.
• После установки устройство снова следует
заземлить, подсоединив его к шасси
автомобиля.
• Если перегорел плавкий предохранитель,
нужно прежде всего проверить, не касаются
ли провода друг друга или корпуса, вызывая
короткое замыкание, а затем заменить
предохранитель на новый с таким же
номиналом.
• Когда к системе подключаются всего две
акустических системы, присоединяйте
•
•
•
•
•
•
•
разъемы либо к двум передним выходным
клеммам, либо к двум задним выходным
клеммам (не используйте комбинацию
передней и задней клемм). Например, если
разъем + левого динамика присоединен к
передней выходной клемме, не присоединяйте
разъем - к задней выходной клемме.
Правильно подключайте провода динамиков к
соответствующим клеммам. Устройство может
быть повреждено или неправильно работать,
если вы разделите - кабели, либо же
заземлите их путем присоединения к любой
металлической части автомобиля.
При установке не применяйте никаких других
винтов, кроме винтов, поставленных вместе с
устройством. Использование неправильных
винтов может привести к повреждению
устройства.
Если зажигание автомобиля не имеет
положения ACC, присоедините кабели
зажигания к источнику питания, который
можно включать и выключать с помощью
ключа зажигания. Если присоединить провода
зажигания к источнику питания, который не
отключается, например к проводам батареи,
такая батарея может разрядиться.
Если у корпуса имеется крышка, убедитесь в
том, что лицевая панель не касается крышки
при открытии/закрытии.
После установки устройства, убедитесь в
том, что все осветительные и электронные
приборы вашего автомобиля работают в
прежнем режиме.
Установите устройство таким образом, чтобы
угол его наклона не превышал 30°.
При наличии металлических объектов возле
антенны Bluetooth качество приема может
снизиться. (только KDC-BT73DAB, KDC-BT53U)
Антенна устройства Bluetooth
KDC-BT73DAB • Данное устройство оснащено вентилятором
охлаждения для уменьшения внутренней
температуры. Не устанавливайте устройство
в таком месте, где вентилятор будет
заблокирован. Блокировка отверстий
вентилятора помешает снижению внутренней
температуры и приведет к неисправности.
136 | Краткое руководство пользователя
B59-2186-00_00.indb 136
2012/12/17 15:1
Охлаждающий вентилятор
Для обеспечения хорошего
приема
Для обеспечения хорошего приема необходимо
выполнение следующих условий:
• Связь с сотовым телефоном должна
осуществляться на линии прямой видимости
в пределах 10 м. Предельная дальность связи
может быть меньше в определенных условиях
окружающей среды. Предельная дальность
связи также уменьшается при наличии
препятствия между данным устройством
и сотовым телефоном. Таким образом,
вышеуказанная максимальная дальность связи
(10 м) не всегда гарантируется.
• Близко расположенная радиостанция или
переносная рация может повлиять на качество
связи из-за слишком сильного сигнала.
Принадлежности, используемые
при установке
1
2
.....1
6[1]
.....2
.....3
.....1 (3 м)
1Когда штекер А-7 (красный) подключается
к зажиганию, а штекер А-4 (жёлтый)
— к стабилизированному источнику
питания автомобильного разъёма ISO (по
умолчанию).
Кабель зажигания
(красный)
Устройство
Штекер А-7
(красный)
Автомобиль
Штекер А-4
(жёлтый)
2Когда штекер А-7 (красный) подключается
к стабилизированному источнику питания,
а штекер А-4 (жёлтый) — к зажиганию
на автомобильном разъёме ISO (по
умолчанию).
Кабель зажигания
(красный)
Устройство
Kабель батареи
(жёлтый)
7[1]
3[1][2]
Расположение штырей у разъемов ISO
зависит от типа автомобиля, на котором
вы ездите. Во избежание повреждения
устройства следите за правильностью
подключения.
Cтандартное подключение жгута
кабелей описано ниже в пункте 1. Eсли
штыри разъёма ISO расположены так,
как описано в пункте 2, выполните
подключение в соответствии с рисунком.
При установке этого устройства в
автомобилях Volkswagen и др. убедитесь
в подключении кабеля, как показано ниже
на рис. 2.
Kабель батареи
(жёлтый)
5[1]
.....1
Подключение разъёма ISO
Штекер А-7
(красный)
Автомобиль
Штекер А-4
(жёлтый)
.....1
только
KDC-BT73DAB
только KDC-BT53U
[1]
4[1]
B59-2186-00_00.indb 137
[2]
.....1
Русский | 137
2012/12/17 15:1
Тыловой выход
Фронтальный выход
R
Выход низкочастотного динамика
L
SW FRONT REAR
Подсоединение кабелей к клеммам
Taблица функций разъёма
Номера
штырьков
разъемов ISO
Разъем для
внешнего
источника
питания
A-4
A-5
A-6
A-7
A-8
Разъем для
акустической
системы
B-1
B-2
B-3
B-4
B-5
B-6
B-7
B-8
Цвет кабеля
Функции
Вход антенны FM/AM (JASO)
(только KDC-BT73DAB, KDC-BT53U)
Желтый
Аккумулятор
Синий/белый
Управление питанием
Оранжевый/белый Регулятор
освещенности
Kрасный
Зажигание (АCC)
Черный
Заземляющее
соединение (земля)
Фиолетовый
Фиолетовый/
чёрный
Cерый
Серый/чёрный
Белый
Белый/чёрный
Зеленый
Зелёный/чёрный
Задний правый (+)
Задний правый (–)
Передний правый (+)
Передний правый (–)
Передний левый (+)
Передний левый (–)
Задний левый (+)
Задний левый (–)
R
Антенна цифрового
радио
(Принадлежность 5)
(только KDC-BT73DAB)
Микрофон (Принадлежность 3)
(только KDC-BT53U)
⁄
• Полное сопротивление
катушки громкоговорителя
4 – 8 Ом
⁄ См. главу <Подключение разъёма ISO> (стр. 137).
Разъём A
8
7
6
5
4
3
2
1
Разъём B
8
7
6
5
4
3
2
1
Красный (штекер A–7)
Красный (Провод
зажигания)
Желтый (штекер A–4)
Желтый (Провод батареи)
только KDC-BT73DAB
138 | Краткое руководство пользователя
B59-2186-00_00.indb 138
2012/12/17 15:1
USB разъем (0,8 м)
К USB устройству.
Максимальный ток
источника питания USB
: 5 В постоянного тока = 1 A
Предохранитель (10А)
R
L
Вход антенны
FM/AM
(JASO)(только
KDC-5057SD)
д батареи)
B59-2186-00_00.indb 139
Жгут проводов
(Принадлежность 1)
Микрофон (Принадлежность 3)
(только KDC-BT73DAB)
Если никаких соединений не выполняется, не вытаскивайте
кабель из наконечника.
Синий/белый (Провод
управления питанием/
управления антенной)
P.CONT
ANT.
CONT
Голубой/жёлтый (Провод
пульта дистанционного
управления на руле)
REMOTE CONT
STEERING WHEEL
REMOTE INPUT
Коричневый (Провод
управления отключением звука)
MUTE
Подключите к гнезду включения/
выключения питания, если используется
дополнительный усилитель мощности, или к
гнезду управления антенной в автомобиле.
Для использования функции пульта
дистанционного управления на руле
необходим специальный адаптер (не входит
в комплект), соответствующий модели
вашей машины.
При подключении к навигационной
системе Kenwood: См. руководство по
навигационной системе.
При подключении к автомобильному
телефону: Для подключения к разъему,
который заземляется при телефонном
звонке или во время разговора. (только
KDC-5057SD)
Русский | 139
2012/12/17 15:1
Установка/удаление устройства
Установка
Cнятие устройства
1
C помощью отвёртки или подобного
инструмента отогните выступы
монтажной коробки и установите её
на место.
Снимите лицевую панель в соответствии
в описанием в разделе <Снятие лицевой
панели>.
2 Снимите переднюю панель.
3 Вставьте два ключа для снятия
(принадлежность 2) глубоко в разъемы с
обоих сторон, как показано на рисунке.
4 Опускайте вниз ключ для снятия и
затем наполовину вытяните устройство,
нажимая ключом внутрь.
Принадлежность 2
<
• Убедитесь в том, что устройство надёжно
установлено на место. Если устройство
не будет прочно закреплено, это может
привести к неисправности (например,
пропуску звука).
Cнятие лицевой панели
1
Вставьте захваты ключа-съемника
(принадлежность 2) и отпустите два
замка в верхней части рамы.
Приподнимите рамку и вытяните её
вперёд, как показано на рисунке.
!
• Cнимая устройство, будьте осторожны,
чтобы не пораниться зажимными
шпильками ключа для снятия.
5 Руками извлеките устройство полностью,
соблюдая осторожность, чтобы не
уронить его.
Фиксатор
Стопор
Принадлежность 2
2 При снятии верхней части рамы, снимите
нижнюю часть рамы.
<
• С нижней стороны рамку можно снять
таким же образом.
140 | Краткое руководство пользователя
B59-2186-00_00.indb 140
2012/12/17 15:1
только KDC-BT73DAB, KDC-BT53U
только KDC-BT73DAB
Установка блока
микрофона
Установка антенны
цифрового радио
1
! ОСТОРОЖНО!
Проверьте место установки микрофона
(принадлежность 3).
2 Очистите установочную поверхность.
3 Установите микрофон.
4 Протяните кабель до устройства, закрепив
его в нескольких местах с помощью
клейкой ленты или подобных средств.
<
• Установите микрофон как можно дальше от
сотового телефона.
Принадлежность 3
Закрепите кабель при помощи клейкой
ленты, доступной в торговой сети.
B59-2186-00_00.indb 141
Снимите прокладку
микрофона и прикрепите
микрофон к месту,
показанному выше.
Отрегулируйте микрофон
таким образом, чтобы
он был направлен на
водителя.
• Эта пленочная антенна предназначена
исключительно для использования в салоне
автомобиля.
• Не устанавливайте ее в следующих местах:
-- Там, где она может мешать обзору водителя
-- Там, где она может помешать
функционированию средств безопасности,
таких как подушки безопасности
-- На подвижную поверхность стекла, такую
как задний люк
• Мощность сигнала будет уменьшаться в
следующих местах:
-- На ИК-отражающих стеклах или на стеклах,
покрытых зеркальной пленкой -- Там, где она расположена параллельно
основной радиоантенне (контуру)
-- Там, где она расположена параллельно
проводам нагрева стекла
-- На боковых сторонах автомобиля
(например, на двери, передней
поворотной форточке)
-- На заднем стекле
-- При использовании стекла, блокирующего
радиосигналы (например, ИК-отражающего
стекла, стекла с тепловой изоляцией)
-- Прием может ухудшиться из-за шума, когда
включен стеклоочиститель, кондиционер,
или двигатель.
-- Прием может ухудшаться в зависимости от
направления радиостанции по отношению
к транспортному средству (антенне).
• Перед установкой проверьте
местоположение пленочной антенны
(принадлежность 4). Пленочная антенна не
может быть приклеена повторно.
• Тщательно удалите масло и грязь с
поверхности приклеивания с включенным
очистителем (принадлежность 7).
• Не сгибайте и не повреждайте пленку
антенны (принадлежность 4).
• Перед нанесением прогрейте поверхность
склеивания, включив обогреватель.
• Она не может быть установлена на
некоторые виды транспортных средств.
• Проверьте укладку кабеля пленочной
антенны (принадлежность 4) и усилителя
(принадлежность 5) перед приклеиванием.
Русский | 141
2012/12/17 15:1
только KDC-BT73DAB
Установка антенны цифрового радио
Обзор установки
Определение места установки
антенны
Принадлежность 45
• При установке антенны с левой
стороны
Передняя стойка
150 мм
Лист
заземления
Антенный кабель (3,5 м)
70 мм*
• Для обеспечения безопасности антенна
должна быть установлена со стороны
пассажира.
• Используйте фиксирующий шнур
(принадлежность 6) для крепления
антенны в нескольких местах стойки.
• Направление пленочной антенны
(принадлежность 4) изменяется в
зависимости от того, где она установлена:
на правой или на левой стороне.
• Отделите пленочную антенну
(принадлежность 4) от керамической
линейки (черная часть) наверху переднего
стекла на 150 мм.
Кроме того, поместите ее около 70 мм с
внутренней стороны керамической линии
со стороны края переднего стекла. (где
пластина заземления усилителя может
быть приклеена на металлическую часть
передней стойки)
• Удалите от других антенн на расстояние не
менее 100 мм.
• Не наклеивайте усилитель
(принадлежность 5) на керамическую
линейку (черная часть) вблизи переднего
стекла. Поскольку сцепление будет
недостаточным.
Принадлежность 4
Принадлежность 5
• При установке антенны с правой
стороны
Принадлежность 5
Передняя стойка
Лист заземления
150 мм
Принадлежность 4
70 мм*
*Где лист заземления блока усилителя
(принадлежность 5) может быть наклеен
на металлическую часть передней
стойки.
142 | Краткое руководство пользователя
B59-2186-00_00.indb 142
2012/12/17 15:1
Установка антенны
1 Проверьте место установки.
2 Очистите место приклеивания пленочной
3
антенны (принадлежность 4), блока
усиления (принадлежность 5) и листа
заземления с помощью прилагаемого
очистителя (принадлежность 7).
Не удаляйте покрытие металлической
поверхности.
• Перед наклеиванием подождите, пока
поверхность стекла полностью не
высохнет.
• Если поверхность стекла холодная,
например в зимний период, подогрейте
ее с помощью системы обогрева стекол
или осушителя.
Горизонтально снимите прокладку (ярлык
I) пленочной антенны и наклейте антенну
на переднее стекло.
5 После наклеивания, притрите элемент к
стеклянной поверхности в направлении
стрелки, показанном на рисунке, чтобы
присоединить его.
6 Удалите монтажную пленку (ярлык III).
• Не касайтесь фидерного терминала
элемента. Также, не используйте
стеклоочистители.
Фидерный
терминал
7 Совместите выступ усилителя с 5 на
• Осторожно снимите прокладку.
• Не касайтесь поверхности
приклеивания (клейкой стороны)
пленочной антенны.
4 Вертикально снимите прокладку (ярлык
II) пленочной антенны и, осторожно
прикладывая давление, наклейте антенну.
B59-2186-00_00.indb 143
пленочной антенне и приклейте.
• Не касайтесь фидерного терминала
или клеящей поверхности (клейкой
стороны) усилителя.
• При установке антенны с правой
стороны
Совместите выступ с 5
Лист заземления
Принадлежность 4
Принадлежность 5
Русский | 143
2012/12/17 15:1
только KDC-BT73DAB
Установка антенны цифрового радио
• При установке антенны с левой
стороны
Принадлежность 5
Принадлежность 4
Лист заземления
<
• Примите следующие меры
предосторожности при укладке кабеля
антенны внутри передней стойки, где
установлены подушки безопасности.
-- Установите усилительную часть
антенного кабеля спереди или выше
подушки безопасности так, чтобы
антенна и подушка безопасности не
мешали друг другу.
Совместите выступ с 5
8
Снимите пленку, покрывающую
лист заземления и приклейте его на
металлическую часть автомобиля.
Оставьте достаточный зазор для листа
заземления, так, чтобы он не мешал
внутренним деталям (крышке передней
стойки). Также позаботьтесь о том, чтобы
внутренние детали не задевали усилитель.
Принадлежность 5
Принадлежность 5
Подушка
безопасности
Передняя
стойка
Переднее стекло
Передняя стойка
Внутренняя
деталь
-- Крышка передней стойки прикреплена
специальной скобой, которую возможно
придется заменить при снятии передней
стойки.
Обратитесь к автомобильному дилеру
для консультации по замене крышки
передней стойки и возможности замены
деталей.
Лист заземления
9 Подключите антенные кабели.
• Используйте фиксирующий шнур
(принадлежность 6) для крепления
антенны в нескольких местах стойки.
Внутренняя
деталь
Скоба-зажим
144 | Краткое руководство пользователя
B59-2186-00_00.indb 144
2012/12/17 15:1
Приложение
Об аудиофайлах
• Воспроизводимые аудиофайлы
AAC-LC (.m4a), MP3 (.mp3), WMA (.wma),
WAV (.wav) устройства USB/ карта SD
• Воспроизводимые диски
CD-R/RW/ROM
• Воспроизводимые форматы файлов на
дисках
ISO 9660, уровень 1/2, Joliet, длинные
имена файлов.
• Воспроизводимые устройства USB
USB класса накопителей
• Воспроизводимые SD карты Карта SD (≤ 2
ГБ), карта SDHC (≤ 32 ГБ)
• Воспроизводимое устройство USB/
файловые системы SD-карты
FAT12, FAT16, FAT32
По адресу
www.kenwood.com/cs/ce/audiofile/
приведено интерактивное руководство по
аудиофайлам.
Модели устройств iPod/iPhone,
которые можно подключать к
данному устройству
Made for
• iPod touch (4th generation)
• iPod touch (3rd generation)
• iPod touch (2nd generation)
• iPod touch (1st generation)
• iPod classic
• iPod with video
• iPod nano (6th generation)
• iPod nano (5th generation)
• iPod nano (4th generation)
• iPod nano (3rd generation)
• iPod nano (2nd generation)
• iPod nano (1st generation)
• iPhone 4S
• iPhone 4
• iPhone 3GS
• iPhone 3G
• iPhone
Информацию, касающуюся совместимости
программного обеспечения устройств iPod
и iPhone, можно найти на веб-сайте www.
kenwood.com/cs/ce/ipod/.
B59-2186-00_00.indb 145
Требования Aha™:
Для прослушивания Aha™ должны выполняться
следующие требования:
iPhone или iPod touch
• Используйте Apple iPhone или iPod touch
под управлением операционной системы
iOS4 или выше.
• С помощью поиска “aha” найдите в интернетмагазине приложений Apple iTunes и
установите на свое устройство самую новую
версию приложения Aha™.
• iPhone/ iPod touch подключаются к этому
устройству с помощью KCA-iP102.
Android™
• Используйте Android OS 2.2 или выше.
• Загрузите на свой смартфон приложение
Aha™ с Google play.
• Должна иметься встроенная функция
Bluetooth с поддержкой следующих
профилей.
- SPP (Профиль Serial Port)
- A2DP (Расширенный профиль
распространения аудио)
ПРИМЕЧАНИЕ
• В приложении на своем устройстве
выполните вход и создайте бесплатную
учетную запись с Aha.
• Интернет-соединение с использованием 3G,
LTE, EDGE или WiFi.
• Поскольку Aha™ представляет собой услугу
стороннего поставщика, спецификации
могут изменяться без предварительного
уведомления. В результате таких изменений
может быть нарушена совместимость либо
некоторые или все услуги могут оказаться
недоступными.
• Некоторые функции Aha™ в данном
устройстве недоступны.
Русский | 145
2012/12/17 15:1
Information on Disposal of Old Electrical
and Electronic Equipment and Batteries
(applicable for EU countries that have adopted
separate waste collection systems)
Products and batteries with the
symbol (crossed-out wheeled bin)
cannot be disposed as household
waste.
Old electrical and electronic
equipment and batteries should be
recycled at a facility capable of
handling these items and their waste
byproducts.
Contact your local authority for details
in locating a recycle facility nearest to
you.
Proper recycling and waste disposal
will help conserve resources whilst
preventing detrimental effects on our
health and the environment.
Notice: The sign “Pb” below the
symbol for batteries indicates
that this battery contains lead.
Informations sur le traitement des appareils
électriques et électroniques et des batteries
usagés (applicable aux pays de l’UE ayant
adopté un système de tri des déchets)
Les produits et les batteries sur
lesquels le pictogramme (poubelle
barrée) est apposé ne peuvent pas
être jetés parmi les déchets ménagers.
Les vieux appareils électriques et
électroniques, ainsi que les batteries
doivent être recyclés dans un
complexe adapté au traitement de ces
déchets et de leurs sous-produits.
Prenez contact avec les services
publics locaux afin de localiser un
complexe de recyclage proche de
chez vous.
Recycler de manière adaptée et jeter
ses déchets au bon endroit aide à
préserver les ressources tout en
évitant les effets néfastes sur notre
santé et l’environnement.
Remarque : Le signe “Pb” sous le
symbole des piles indique
que la batterie contient du
plomb.
B59-2186-00_00.indb 146
Informationen zur Entsorgung von Elektround Elektronikaltgeräten (anwendbar in
EU-Ländern mit Systemen zur getrennten
Abfallsammlung)
Produkte und Batterien mit dem
Symbol (durchgestrichene Abfalltonne
auf Rädern) dürfen nicht als
Haushaltsabfälle entsorgt werden.
Elektro- und Elektronikaltgeräte und
Batterien müssen in Anlagen recycelt
werden, die auf die Entsorgung dieser
Gegenstände und ihrer
Abfallnebenprodukte ausgelegt sind.
Ausführliche Informationen zur
nächstgelegenen Recycling-Anlage
erhalten Sie bei den örtlichen
Behörden.
Die ordnungsgemäße Durchführung
von Recycling und Abfallentsorgung
trägt zur Schonung der Ressourcen bei
und verhindert schädliche
Auswirkungen auf Gesundheit und
Umwelt.
Hinweis: Das Zeichen “Pb” unter dem
Batteriesymbol bedeutet,
dass diese Batterie Blei
enthält.
Informatie met betrekking tot de afvoer van
oude elektrische en elektronische apparatuur
en batterijen (van toepassing op EU-landen
die aparte systemen voor afvalinzameling
hebben geïntroduceerd).
Producten en batterijen met het
symbool (afvalcontainer met kruis)
kunnen niet worden afgevoerd als
huishoudelijk afval.
Oude elektrische en elektronische
apparaten en batterijen moeten
worden gerecycled in een installatie
waar deze items en hun bijproducten
kunnen worden verwerkt.
Neem contact op met uw lokale
autoriteiten voor nadere details bij het
zoeken naar de dichtstbijzijnde
afvalverwerkingsinstallatie.
Correcte recycling en afvalverwijdering
helpt hulpbronnen te besparen en
negatieve gevolgen voor onze
gezondheid en het milieu te
voorkomen.
Opmerking: Het teken “Pb” onder het
symbool voor batterijen
geeft aan dat deze batterij
lood bevat.
2012/12/17 15:1
Informazioni sullo smaltimento delle vecchie
apparecchiature elettriche ed elettroniche
e delle batterie (valide per i Paesi europei
che hanno adottato sistemi di raccolta
differenziata)
I prodotti e le batterie recanti il
simbolo di un cassonetto della
spazzatura su ruote barrato non
possono essere smaltiti insieme ai
normali rifiuti di casa.
I vecchi prodotti elettrici ed elettronici
e le batterie devono essere riciclati
presso una apposita struttura in grado
di trattare questi prodotti e di
smaltirne i loro componenti.
Per conoscere dove e come recapitare
tali prodotti nel luogo a voi più vicino,
contattare l’apposito ufficio comunale.
Un appropriato riciclo e smaltimento
aiuta a conservare la natura e a
prevenire effetti nocivi alla salute e
all’ambiente.
Nota: Il simbolo “Pb” sotto il simbolo
delle batterie indica che questa
batteria contiene piombo.
Informações sobre a eliminação de baterias
e de equipamentos eléctricos e electrónicos
antigos (aplicável aos países da UE que
adoptaram sistemas de recolha de resíduos
separados)
Os produtos e as baterias com o
símbolo (caixote de lixo com uma
cruz) não podem ser eliminados
como lixo doméstico.
As baterias e o equipamento eléctrico
e electrónico antigo devem ser
reciclados numa fábrica capaz de
manusear estes itens e os seus
subprodutos de resíduos.
Contacte a sua autoridade local para
obter informações sobre um ponto
de reciclagem perto de si.
A reciclagem e a eliminação de
resíduos adequada ajudam a
conservar os recursos, evitando os
efeitos prejudiciais na saúde e no
ambiente.
Aviso: O sinal “Pb” por baixo do
símbolo nas baterias indica que
esta bateria contém chumbo.
Información acerca de la eliminación de
equipos eléctricos, electrónicos y baterías al
final de la vida útil (aplicable a los países de la
Unión Europea que hayan adoptado sistemas
independientes de recogida de residuos)
Los productos y las baterías con el
símbolo de un contenedor con
ruedas tachado no podrán ser
desechados como residuos
domésticos.
Los equipos eléctricos, electrónicos y
baterías al final de la vida útil, deberán
ser reciclados en instalaciones que
puedan dar el tratamiento adecuado
a estos productos y a sus
subproductos residuales
correspondientes.
Póngase en contacto con su
administración local para obtener
información sobre el punto de
recogida más cercano.
Un tratamiento correcto del reciclaje y
la eliminación de residuos ayuda a
conservar los recursos y evita al
mismo tiempo efectos perjudiciales
en la salud y el medio ambiente.
Nota: El símbolo “Pb” debajo del
símbolo de baterías indica que
dicha batería contiene plomo.
B59-2186-00_00.indb 147
2012/12/17 15:1
The marking of products using lasers
CLASS 1
LASER PRODUCT
The label is attached to the chassis/case and
says that the component uses laser beams that
have been classified as Class 1. It means that
the unit is utilizing laser beams that are of a
weaker class. There is no danger of hazardous
radiation outside the unit.
Signalisation sur les produits utilisant
des lasers.
CLASS 1
LASER PRODUCT
L’étiquette est attachée au châssis/boîtier et
indique que le composant utiliser des rayons
laser de classe 1. Cela signifie que l’appareil se
sert de rayons laser d’une classe inférieure. Il n’y
a pas de danger de radiation accidentelle hors
de l’appareil.
Kennzeichnung von Produkten, die mit
Lasertechnik arbeiten
CLASS 1
LASER PRODUCT
Dieser Aufkleber wird am Chassis/Gehäuse
angebracht und besagt, dass das Gerät mit
Laserstrahlung der Klasse 1 arbeitet. Das
bedeutet, dass das Gerät mit schwächeren
Laserstrahlen arbeitet. Außerhalb des Geräts
besteht keine Gefahr schädlicher Strahlung.
B59-2186-00_00.indb 148
De markering van producten waarbij
gebruik wordt gemaakt van lasers
CLASS 1
LASER PRODUCT
Het label is bevestigd aan het chassis/de
behuizing en geeft aan dat de component
gebruikmaakt van laserstralen die zijn
geclassificeerd als Klasse 1. Dit betekent dat het
toestel gebruikmaakt van laserstralen van een
lagere (zwakkere) klasse. Er bestaat geen risico
op gevaarlijke straling buiten het toestel.
Marcatura laser dei prodotti
CLASS 1
LASER PRODUCT
L’etichetta si trova sul rivestimento o sulla
scatola e serve ad avvertire che il componente
impiega raggi laser che sono stati classificati
come classe 1. Ciò significa che l’apparecchio
utilizza raggi laser di una classe inferiore. Non
c’è alcun pericolo di radiazioni pericolose
all’esterno dell’apparecchio.
Marca de los productos que utilizan
láser
CLASS 1
LASER PRODUCT
Esta etiqueta está colocada en el chasis e indica
que el componente funciona con rayos láser
de clase1. Esto significa que el aparato utiliza
rayos láser considerados como de clase débil.
No existe el peligro de que este aparato emita
al exterior una radiación peligrosa.
2012/12/17 15:1
A marcação dos produtos utilizando
lasers
CLASS 1
LASER PRODUCT
A etiqueta está fixada no chassis/caixa e indica
que o componente utiliza feixes laser que
foram classificados como Classe 1. Isto significa
que a unidade está a utilizar feixes laser com
uma classe inferior.Não existe o perigo de
radiação perigosa fora da unidade.
Маркировка изделий, оснащенных
лазерами
CLASS 1
LASER PRODUCT
К корпусу устройства прикреплена табличка,
указывающая, что устройство использует
лазерные лучи класса 1. Это означает, что
в устройстве используются лазерные лучи
слабой интенсивности. Они не представляют
опасности и не распространяют опасную
радиацию вне устройства.
При Правильном соблюдении всех условий
эксплуатации и техническких требований,
указанных в данной инструкций, срок
службы купленного Baм изделия составляет
7 лет. Гарантийный срок эксплуатации
изделия соответевует сpоку, указанному в
гaрантийном талоне.
В период срока службы эксплуатация и
хранение изделия не может представлять
oпасность для Вашей жизни, здоровья,
причинять вред Вашему имуществу или
окружающей срeде.
B59-2186-00_00.indb 149
• The Bluetooth word mark and logos are owned by
the Bluetooth SIG, Inc. and any use of such marks
by JVC KENWOOD Corporation is under license.
Other trademarks and trade names are those of
their respective owners.
• The “AAC” logo is a trademark of Dolby
Laboratories.
• “Made for iPod” and “Made for iPhone” mean that
an electronic accessory has been designed to
connect specifically to iPod or iPhone, respectively,
and has been certified by the developer to meet
Apple performance standards. Apple is not
responsible for the operation of this device or its
compliance with safety and regulatory standards.
Please note that the use of this accessory with iPod
or iPhone may affect wireless performance.
• iPhone, iPod, iPod classic, iPod nano, and iPod
touch are trademarks of Apple Inc., registered in
the U.S. and other countries.
• iTunes and Safari are trademark of Apple Inc.
• IOS is a trademark or registered trademark of
Cisco in the U.S. and other countries and is used
under license.
• Adobe, Acrobat and Reader are either registered
trademarks or trademarks of Adobe Systems
Incorporated in the United States and/or other
countries.
• Android and Chrome are trademark of Google Inc.
• Internet Explorer and Windows Media are
registered trademark of Microsoft Corporation in
the United States and other countries.
• Firefox is a registered trademark of Mozilla
Foundation in the United States and other
countries.
• aha, the Aha logo, and the Aha trade dress are
trademarks or registered trademarks of HARMAN
International Industries, used with permission.
• SDHC Logo is a trademark of SD-3C, LLC.
2012/12/17 15:1
Declaration of Conformity with regard to
the EMC Directive 2004/108/EC
Declaration of Conformity with regard to
the R&TTE Directive 1999/5/EC
Manufacturer:
Conformiteitsverklaring met betrekking
tot de EMC-richtlijn van de Europese Unie
(2004/108/EC)
Conformiteitsverklaring met betrekking
tot de R&TTE-richtlijn van de Europese
Unie (1999/5/EC)
Fabrikant:
JVC KENWOOD Corporation
3-12, Moriyacho, Kanagawa-ku, Yokohama-shi,
Kanagawa 221-0022, JAPAN
EU-vertegenwoordiger:
JVC KENWOOD Corporation
3-12, Moriyacho, Kanagawa-ku, Yokohama-shi,
Kanagawa 221-0022, JAPAN
Kenwood Electronics Europe BV
Amsterdamseweg 37, 1422 AC UITHOORN,
Nederland
Kenwood Electronics Europe BV
Amsterdamseweg 37, 1422 AC UITHOORN, The
Netherlands
Dichiarazione di conformità relativa alla
direttiva EMC 2004/108/CE
Dichiarazione di conformità relativa alla
direttiva R&TTE 1999/5/CE
Produttore:
EU Representative's:
Déclaration de conformité se rapportant à
la directive EMC 2004/108/EC
Déclaration de conformité se rapportant à
la directive R&TTE 1999/5/EC
Fabricant:
JVC KENWOOD Corporation
3-12, Moriyacho, Kanagawa-ku, Yokohama-shi,
Kanagawa 221-0022, JAPAN
Rappresentante UE:
JVC KENWOOD Corporation
3-12, Moriyacho, Kanagawa-ku, Yokohama-shi,
Kanagawa 221-0022, Japon
Kenwood Electronics Europe BV
Amsterdamseweg 37, 1422 AC UITHOORN, The
Netherlands
Kenwood Electronics Europe BV
Amsterdamseweg 37, 1422 AC UITHOORN, Pays-Bas
Declaración de conformidad con respecto
a la Directiva EMC 2004/108/CE
Représentants dans l’UE:
Konformitätserklärung in Bezug auf die
EMC-Vorschrift 2004/108/EC
Konformitätserklärung in Bezug auf die
R&TTE-Vorschrift 1999/5/EC
Hersteller:
JVC KENWOOD Corporation
3-12, Moriyacho, Kanagawa-ku, Yokohama-shi,
Kanagawa 221-0022, JAPAN
EU-Vertreter:
Kenwood Electronics Europe BV
Amsterdamseweg 37, 1422 AC UITHOORN,
Niederlande
B59-2186-00_00.indb 150
Declaración de conformidad con respecto
a la Directiva R&TTE 1999/5/CE
Fabricante:
JVC KENWOOD Corporation
3-12, Moriyacho, Kanagawa-ku, Yokohama-shi,
Kanagawa 221-0022, Japón
Representante en la UE:
Kenwood Electronics Europe BV
Amsterdamseweg 37, 1422 AC UITHOORN, Países
Bajos
Declaração de conformidade relativa à
Directiva EMC 2004/108/EC
Declaração de conformidade relativa à
Directiva R&TTE 1999/5/EC
Fabricante:
JVC KENWOOD Corporation
3-12, Moriyacho, Kanagawa-ku, Yokohama-shi,
Kanagawa 221-0022, Japão
Representante na UE:
Kenwood Electronics Europe BV
Amsterdamseweg 37, 1422 AC UITHOORN, Holanda
2012/12/17 15:1
English
Svenska
• Hereby, JVC KENWOOD declares that this unit KDC-BT73DAB,
KDC-BT53U is in compliance with the essential requirements and
other relevant provisions of Directive 1999/5/EC.
• Härmed intygar JVC KENWOOD att denna KDC-BT73DAB, KDC-BT53U
stär l överensstämelse med de väsentliga egenskapskrav och övriga
relevanta bestämmelser som framgår av direktiv 1999/5/EG.
Français
Suomi
• Par la présente JVC KENWOOD déclare que l’appareil KDC-BT73DAB,
KDC-BT53U est conforme aux exigences essentielles et aux autres
dispositions pertinentes de la directive 1999/5/CE.
• Par la présente, JVC KENWOOD déclare que ce KDC-BT73DAB,
KDC-BT53U est conforme aux exigences essentielles et aux autres
dispositions de la directive 1999/5/CE qui lui sont applicables.
• JVC KENWOOD vakuuttaa täten että KDC-BT73DAB, KDC-BT53U
tyyppinen laite on direktiivin 1999/5/EY oleellisten vaatimusten ja sitä
koskevien direktiivin muiden ehtojen mukainen.
Deutsch
Slovensko
• S tem JVC KENWOOD izjavlja, da je ta KDC-BT73DAB, KDC-BT53U v
skladu z osnovnimi zahtevami in ostalimi ustreznimi predpisi Direktive
1999/5/EC.
• Hiermit erklärt JVC KENWOOD, dass sich dieser KDC-BT73DAB,
KDC-BT53U in Übereinstimmung mit den grundlegenden
Anforderungen und den anderen relevanten Vorschriften der Richtlinie
1999/5/EG befindet. (BMWi)
• Hiermit erklärt JVC KENWOOD die Übereinstimmung des Gerätes
KDC-BT73DAB, KDC-BT53U mit den grundlegenden Anforderungen
und den anderen relevanten Festlegungen der Richitlinie 1999/5/
EG. (Wien)
Slovensky
Nederlands
Ελληνικά
• Hierbij verklaart JVC KENWOOD dat het toestel KDC-BT73DAB,
KDC-BT53U in overeenstemming is met de essentiële eisen en de
andere relevante bepalingen van richtlijn 1999/5/EG.
• Bij deze verklaat JVC KENWOOD dat deze KDC-BT73DAB, KDC-BT53U
voldoet aan de essentiële eisen en aan de overige relevante
bepalingen van Richtlijn 1999/5/EC.
Italiano
• Con la presente JVC KENWOOD dichiara che questo KDC-BT73DAB,
KDC-BT53U è conforme ai requisiti essenziali ed alle altre disposizioni
pertinenti stabilite dalla direttiva 1999/5/CE.
Español
• Por medio de la presente JVC KENWOOD declara que el KDC-BT73DAB,
KDC-BT53U cumple con los requisitos esenciales y cualesquiera otras
disposiciones aplicables o exigibles de la Directiva 1999/5/CE.
Português
• JVC KENWOOD declara que este KDC-BT73DAB, KDC-BT53U está
conforme com os requisitos essenciais e outras disposições da
Directiva 1999/5/CE.
Polska
• JVC KENWOOD niniejszym oświadcza, że KDC-BT73DAB, KDC-BT53U
spełnia zasadnicze wymogi oraz inne istotne postanowienia
dyrektywy 1999/5/EC.
Český
• JVC KENWOOD timto prohlasuje, ze KDC-BT73DAB, KDC-BT53Ue ve
shode se zakladnimi pozadavky a s dalsimi prislusnymi ustanoveni
Narizeni vlady c. 426/2000 Sb.
Magyar
• Alulírott, JVC KENWOOD, kijelenti, hogy a jelen KDC-BT73DAB,
KDC-BT53U megfelel az 1999/5/EC irányelvben meghatározott
alapvető követelményeknek és egyéb vonatkozó előírásoknak.
B59-2186-00_00.indb 151
• Spoločnosť JVC KENWOOD týmto vyhlasuje, že KDC-BT73DAB,
KDC-BT53U spĺňa zákldné požiadavky a ďalšie prislušné ustanovenia
Direktĺvy 1999/5/EC.
Dansk
• Undertegnede JVC KENWOOD erklærer harved, at følgende udstyr
KDC-BT73DAB, KDC-BT53U overholder de væsentlige krav og øvrige
relevante krav i direktiv 1999/5/EF.
• ΜΕ ΤΗΝ ΠΑΡΟΥΣΑ JVC KENWOOD ΔΗΛΩΝΕΙ ΟΤΙ KDC-BT73DAB,
KDC-BT53U ΣΥΜΜΟΡΦΩΝΕΤΑΙ ΠΡΟΣ ΤΙΣ ΟΥΣΙΩΔΕΙΣ ΑΠΑΙΤΗΣΕΙΣ ΚΑΙ
ΤΙΣ ΛΟΙΠΕΣ ΣΧΕΤΙΚΕΣ ΔΙΑΤΑΞΕΙΣ ΤΗΣ ΟΔΗΓΙΑΣ 1999/5/EK.
Eesti
• Sellega kinnitab JVC KENWOOD, et see KDC-BT73DAB, KDC-BT53U
vastab direktiivi 1999/5/EC põhilistele nõudmistele ja muudele
asjakohastele määrustele.
Latviešu
• Ar šo, JVC KENWOOD, apstiprina, ka KDC-BT73DAB, KDC-BT53U
atbilst Direktīvas 1999/5/EK galvenajām prasībām un citiem tās
nosacījumiem.
Lietuviškai
• Šiuo, JVC KENWOOD, pareiškia, kad šis KDC-BT73DAB, KDC-BT53U
atitinka pagrindinius Direktyvos 1999/5/EB reikalavimus ir kitas
svarbias nuostatas.
Malti
• Hawnhekk, JVC KENWOOD, jiddikjara li dan KDC-BT73DAB,
KDC-BT53U jikkonforma mal-ħtiġijiet essenzjali u ma provvedimenti
oħrajn relevanti li hemm fid-Dirrettiva 1999/5/EC.
Українська
• Компанія JVC KENWOOD заявляє, що цей виріб KDC-BT73DAB,
KDC-BT53U відповідає ключовим вимогам та іншим пов’язаним
положенням Директиви 1999/5/EC.
Turkish
• JVC KENWOOD, işbu belge ile KDC-BT73DAB, KDC-BT53U numaralı bu
ünitenin 1999/5/EC Direktifi’nin özel gereksinimlerine ve ilgili diğer
hükümlerine uygun olduğunu beyan eder.
2012/12/17 15:1
B59-2186-00_00.indb 152
2012/12/17 15:1