1
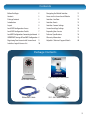
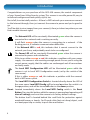
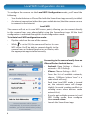
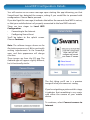
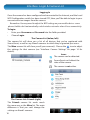
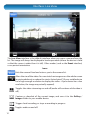
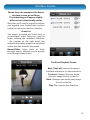
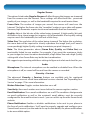
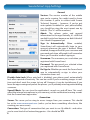
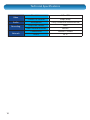
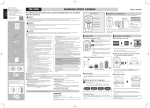
English
ADS-450
SwannSmart Video Security
M450IPC050411E
1
Before You Begin
FCC Verification
NOTE: This equipment has been tested and found to comply with the limits for Class B digital device,
pursuant to part 15 of the FCC Rules. These limits are designed to provide reasonable protection against
harmful interference in a residential installation. This equipment generates, uses and can radiate radio
frequency energy and, if not installed and used in accordance with the instructions, may cause harmful
interference to radio or television reception, which can be determined by turning the equipment off and
on, the user is encouraged to try to correct the interference by one or more of the following measures:
•
Reorient or relocate the receiving antenna
•
Increase the separation between the equipment and the receiver
•
Connect the equipment into an outlet on a circuit different from that to which
the receiver is connected
•
Consult the dealer or an experienced radio/TV technician for help
These devices comply with part 15 of the FCC Rules. Operation is subject to the following two conditions:
1. These devices may not cause harmful interference, and
2. These devices must accept any interference received, including interference
that may cause undesired operation.
IMPORTANT NOTE:
All jurisdictions have specific laws and regulations relating to the use of cameras. Before using any
camera for any purpose, it is the buyer’s responsibility to be aware of all applicable laws and regulations
that prohibit or limit the use of cameras and to comply with the applicable laws and regulations.
FCC Regulation (for USA): Prohibition against eavesdropping
Except for the operations of law enforcement officers conducted under lawful authority, no person shall
use, either directly or indirectly, a device operated pursuant to the provisions of this Part for the purpose
of overhearing or recording the private conversations of others unless such use is authorized by all of the
parties engaging in the conversation.
WARNING
Modifications not approved by the party responsible for compliance could void user’s authority to
operate the equipment.
IMPORTANT SAFETY INSTRUCTIONS
Make sure product is fixed correctly and stable if fastened in place
•
Do not operate if wires and terminals are exposed
Do not cover vents on the side or back of the camera and allow adequate space for ventilation
•
•
2
Contents
Before You Begin2
Contents3
Package Contents3
Introduction4
Layout5
Local WIFI Configuration: Access
6
Local WIFI Configuration: Details
7
Local WIFI Configuration: Connecting to Internet 8
IMPORTANT: Turning off Local WIFI Configuration 8
Registering Your Account with SwannSmart 9
Interface: Login & Camera List
10
Navigating the Mobile Interface
11
Access via the SwannSmart Website
11
Interface: Live View12
Interface: Events13
Interface: Camera Settings
14
SwannSmart App Settings
16
Expanding Your Service17
Technical Specifications18
Warranty Information19
Helpdesk / Technical Support Details
20
Package Contents
ADS-450 Camera
Ethernet Cable
Operating Instructions
5V 1.5A Power Adapter
3
Introduction
Congratulations on your purchase of this ADS-450 camera, the central component
of your SwannSmart Video Security system. This camera is versatile, powerful, easy to
install and configure and looks pretty stylish, too.
Best of all, it can be totally wireless - if there’s a WIFI network your camera can connect
to the Internet through, then just connect the camera to power and you’re good to
go.
You’ll be able to view images from your camera(s) from just about anywhere you can
find a mobile Internet signal.
The Network LED will be constantly illuminated green when the camera is
connected to a network and is working correctly.
It will flash orange when the camera is connecting to a network - if the
flashing persists, it indicates communication difficulties.
If the Network LED is red, this indicates that it cannot connect to the
network you chose, and probably needs to be re-configured.
The Power LED will be constantly illuminated green when the camera is
connected to power and switched on.
If this turns either orange or red, this indicates a problem with your power
supply - the camera is not receiving enough power. Ensure you’re using the
correct power supply, that the cables are undamaged and all connections
are firmly made.
The Local WIFI Configuration LED will be illuminated green while the
camera is set to Local WIFI Configuration mode (set by the switch of the
same name).
If this is either orange or red, this indicates a problem with the camera’s
built-in WIFI access point.
The Local WIFI Configuration Switch is located directly above the LED of
the same name. Local WIFI Config will be turned on when the switch is in
the up position, and will be turned off when in the down position.
Reset: Located immediately above the Local WIFI Config switch is the Reset
Button. Pressing this button while the camera is powered and operating will
clear all settings, and reset the camera to its factory default settings.
The button itself is located behind the small hole for protection against
accidental bumps or knocks. You’ll need a thin (but not sharp) object, such
as a bent paper clip or similar, to push the reset button.
4
Layout
Light Sensor
Infrared LEDs
Lens
Microphone
LAN Port
DC Input
Reset Button
Local WIFI
Configuration
Stand
Config LED
Network LED
Power LED
5
Local WIFI Configuration: Access
To configure the camera via the Local WIFI Configuration mode, you’ll need the
following:
• Your Android device or iPhone/iPad with the SwannSmart app correctly installed.
• An internet connection (other than your mobile device) that the camera can use
to connect to the Internet.
Local WIFI
The camera will act as its own WIFI access point, allowing you to connect directly
to the camera from your phone/tablet using the SwannSmart app. All the local
configuration is achieved through this local configuration mode.
To initiate local WIFI configuration mode:
• Flip the switch on the rear of the camera.
•
While
is set to ON, the camera will act as its own
WIFI server. You’ll be able to connect directly to the
camera from an Android-handset or an iPhone, with
the appropriate app installed correctly.
Connecting to the camera locally from an
iPhone/iPad or Android device:
• Android: Open Settings > Wireless &
networks > Wi-Fi Settings
• iPhone: Choose Settings > Wi-Fi
• From the list of available networks,
choose CAMxxxx (where “xxxx” is a
code which will vary).
• Each time Local WIFI mode is turned
on, the network name will change
slightly (to avoid creating conflicts or
creating errors when devices cache
network lists).
• If you’ve got multiple cameras in Local
WIFI Config mode, then configure
them one at a time.
• Launch the SwannSmart app.
6
Local WIFI Configuration: Details
You will receive an on-screen message upon starting the app informing you that
SwannSmart has detected the camera, asking if you would like to proceed with
configuration. Choose Yes to proceed.
If you don’t get this message, it indicates that either the camera’s local WIFI is not on,
or that your mobile device isn’t properly connected to the local WIFI network.
There are two stages to Local WIFI
Configuration:
• Connecting to the Internet
• Configuring SwannSmart
You’ll be taken to the splash screen.
Choose Continue.
Note: The software images shown are for
illustration purposes only. We’re continually
making improvements to the SwannEye
apps, and their appearance will change
over time.
These images are from the iOS app. The
Android app will appear slightly different,
but is functionally similar.
The first thing you’ll see is a preview
image of what your camera is seeing.
If you’re not getting a picture at this stage,
it indicates that something is very amiss
with either the camera or your mobile
device.
To continue, select Connect camera to
Internet.
7
Local WIFI Configuration: Connecting to Internet
Connect to Internet
You’ll need to decide whether you’re
using a wireless or a wired network to
connect to the Internet. We suggest using
the wireless connection as it’s one less
cable to worry about - however, wired
connections don’t suffer connectivity
problems as often as wireless ones and
are inherently more secure.
Wireless networks:
• Select the wireless network of your
choice in the list presented onscreen.
• If your chosen network is secured,
then you’ll need to enter the network
key. We strongly suggest using a
secure wireless network.
Wired Networks:
• Ensure that the camera is connected
to your network with a high quality
ethernet cable (cat5e or higher).
• Choose Use Ethernet.
IMPORTANT: Turning off Local WIFI Configuration
Once you’re finished configuring the camera
(make sure you register an account if you have to - see the next page)
ensure that you set the Local Configuration WIFI switch to OFF.
Until the Local Configuration WIFI switch is OFF, the camera won’t
connect to the network of your choice, as it will still be acting as an adhoc wireless network hub.
8
Registering Your Account with SwannSmart
To access your ADS-450 via the Internet, you’ll need to setup a SwannSmart account.
•
Accounts are easy to setup, and it
only takes a moment.
• You can create an account during
the Local WIFI Configuration step,
or you can do it via the SwannSmart
website.
Register an Account during Local WIFI
Configuration
• You’ll automatically be taken to the
Connect to SwannSmart interface
once you’ve connected the camera
to the Internet.
• If you’ve already registered with
SwannSmart, choose Use Existing.
• If you need to make a new account,
enter a Username, Password (and
Confirm) and a valid Email address.
• Then choose Continue.
Note that you can only log into one device at a time.
•
•
•
Register an Account with SwannSmart via the Website
Open a web browser and enter www.swannsmart.com in the address bar.
On the SwannSmart website, click the button labelled “Register”.
Enter your username and a valid email address, then choose a password and
confirm it.
Ensure that you use a valid email address:
If anything goes wrong with your account, or if you forget your password,
this is how we’ll verify that you’re really you.
9
Interface: Login & Camera List
Logging In
Once the camera has been configured and connected to the Internet, and the Local
WIFI Configuration switch has been turned OFF, then you’ll be able to login to your
account and view images from the camera.
Remember: You may need to adjust the WIFI settings on your mobile device - some
phones/tablets don’t automatically switch wireless networks when it loses connectivity.
To login:
• Enter your Username and Password into the fields provided.
• Choose Login.
The Camera List (below, left)
The camera list will show you a list of all devices that you’ve registered with
SwannSmart, as well as any friend’s cameras to which they’ve granted you access.
The Mine camera list will show you all your camera(s). Choose the
icon to adjust
the settings for that camera (see “Interface: Camera Settings” on page 14 for
details).
Icons:
The camera can be detected.
SwannSmart can’t detect the state of the camera.
The camera is not online.
The Camera List: Friends (right)
The Friends camera list works much
the same way as the Mine list. The main
difference is that you can’t change the
settings on friend’s cameras.
10
Navigating the Mobile Interface
The navigation bar gives you access to the various interfaces, camera lists and
settings contained within the SwannSmart app.
Mine: Opens the list of cameras that are registered to you, as shown
in ”Interface: Login & Camera List” on page 10.
Friends: Shows a list of friend’s cameras to which they’ve granted
you access, as well as “demo” cameras.
Events: If you’ve expanded your service to include motion and/or
event detection recording, then you’ll be able to access a log here.
Settings: Opens the local settings page (see “SwannSmart App
Settings” on page 16 for details). Note that the App Settings
screen is quite seperate from the Camera Settings screen (see
“Interface: Camera Settings” on page 14).
Access via the SwannSmart Website
From a web browser, you can login to your account via the SwannSmart
website. You’ll be able to view images from your cameras, as well as
configure the advanced aspects of your account and/or expand your
service(s) - see “Expanding Your Service” on page 17 for more.
Simply open a web browser and enter:
www.swannsmart.com
into the address bar.
11
Interface: Live View
The Live View interface is the default interface when you open a camera from the
list. The image will always be displayed in landscape mode (where the device is held
so that the screen is wider than it is tall). Other modes (such as the Event interface)
use a portrait orientation.
Icons
Exits the camera’s feed and returns you to the camera list.
Alters the size of the video. You can stretch an image across the whole screen
(as pictured above) or reduce the size to “actual pixels” (if your mobile device
has a high enough resolution to display the video - if your device has a low
resolution, the image may actually expand).
Toggles the video streaming on and off (audio will continue while video is
off ).
Captures a shapshot of the current image, and saves it to the Gallery /
Images folder on your mobile device.
Triggers local recording, or stops a recording in progress.
Toggles audio on and off.
12
Interface: Events
Shown here is an example of the Events
interface as seen on an iPhone.
The Android app will appear slightly
different, but is functionally similar.
Note that you’ll need to properly configure
and upgrade your SwannSmart account
before you can access the Event interface.
Event List
The events recorded are listed here in
chronological order. Select an event to
begin viewing the recorded slideshow
- the number on the right hand side
indicates how many images are contained
within the slide show for that event.
Newer/Older: Skips back or forth
through events, allowing you to quickly
scan through event history.
The Event Playback Screen
Back (Top Left): Leaves the camera
interface and returns to the camera list.
Previous: Changes the view to the
previous image (event) on the list.
Next: Changes view to the next image
(event) on the list.
Play: Plays/pauses the slideshow.
13
Interface: Camera Settings
General
Name: The title you’ve selected for
the camera during the Local WIFI
Configuration stage.
Share/Unshare: Whether you want to
share access to this camera with other
people using SwannSmart. There’s no
requirement to share, and - if you choose
to do so - you can be very specific about
who has access. All users/cameras
involved require properly configured
SwannSmart accounts to use this
feature.
Status: Whether the camera is currently
detected as being online or not.
Online: SwannSmart can detect your
camera over the Internet, and foresees
no problem with connecting to it and
streaming images.
Offline: The camera cannot be detected
by the SwannSmart server.
Video
Rotation: The orientation of the camera’s
images on your screen. If you’ve mounted
the camera on the ceiling or using the
mounting bracket (i.e. upside down) then
this option will flip the image “the right
way up”.
IR: The behavior of the infrared LEDs,
which are resposible for the ADS-450’s
night vision capabilities - you can think of
them like an invisible spotlight that only
the camera can see.
14
Regular Stream
The options listed under Regular Stream will affect the way that images are streamed
from the camera over the Internet. These settings will affect both the perceived
quality of your images, as well as the bandwidth required to send/receive them.
Frame Rate: The number of images per second the camera will send over the
Internet. The higher the frame rate, the “smoother” motion in your video will appear.
However, high framerates require much more bandwidth than low framerates.
Quality: Adjusts the bit-rate of the video being streamed. A high quality (bit-rate)
will feature crisp, sharp images but requires a lot of bandwidth. A low quality setting
requires much less bandwidth, but will look a little fuzzy.
Video Size: The resolution of the video being streamed. The higher the resolution,
the more data will be required to cleanly reproduce the image (and you’ll need a
corrospondingly higher Quality setting to maintain per-pixel sharpness).
Note: The three parameters above (Frame Rate, Quality and Video Size) are
inextricably linked to one another. For example, if you want the maximum clarity
in your images but want to reduce bandwidth, a high Video Size and a high Quality
setting with a low Frame Rate may be the best combination.
We suggest experimenting with these settings to figure out what works best for you.
Audio
Microphone: The internal microphone can be enabled or disabled here. When the
microphone is off, no sound will be sent from the camera or recorded.
iSecurity + Services
The advanced iSecurity + Services features are available only for registered
SwannSmart accounts which have additional services selected. See “Expanding Your
Service” on page 17 for more informaiton.
Motion Detection: Toggles motion detection on or off.
Sensitivity: How much motion must occur before the camera registers motion.
Email Notification: Turns email notifications on or off. The conditions that generate
an email notification as well as the recipient’s email address must be correctly
configured for the email function to work - you can set this up form the SwannSmart
website.
Phone Notification: Enables or disables notifications to be sent to your phone in
the form of push notifications. You’ll need to properly upgrade and configure your
SwannSmart account (see the website for up-to-date details) for phone notifications
to be an available option.
15
SwannSmart App Settings
General
Version: The version number of the mobile
app you’re running. You might need to know
this number if you’re in contact with Swann
Technical Support - however, if you’ve got
auto-updates enabled for your phone/tablet,
you should be using the most recent one by
default. (The “x”s will be numbers.)
About: The release notes and general
information for the app. Basically, it’s stuff that
we didn’t write here because we didn’t think of
it or it hadn’t happened yet.
Sign In Automatically: When enabled,
SwannSmart will automatically login to your
account whenever the app is booted. When
disabled, the app will ask for your username and
password each time, although it will remember
them: you’ll need to confirm signing in.
Username: The username you used when you
registered with SwannSmart.
Password: The password you selected when
you registered with SwannSmart.
Re-Sign In: Whether you want the SwannSmart
app to automatically re-sign in when your
connection times-out.
Disable Auto-Lock: When auto-lock is disabled, your phone won’t automatically
lock after a period of inactivity. This can be useful if you’re watching images in realtime and don’t want the screen to turn off. However, it can be troublesome if you
leave the app running and pocket the phone - you’ll probably wind up pocket dialing
someone.
Sound Effects: You can turn the application’s sounds on and off here. This won’t
affect the internal microphone in your camera, just the notification/warning sounds
that the SwannSmart app makes.
Connection
Server: The server you’re using to access images from your cameras. This should
be set to www.swannsmart.com (unless you’ve done something ultra-clever, like
creating your own server).
Connection: The type of connection that you want to use. By default - and unless
you’re some kind of evil networking genius - this should be TCP.
16
Expanding Your Service
So, you’ve got your ADS-450 connected to the internet, you’ve signed up for your
free account and are enjoying the seriously-this-was-like-totally-sci-fi-like-ten-shortyears-ago feeling of viewing images from your camera(s) from your phone... but it’s
just not enough, eh?
Well then: good news, everyone! SwannSmart offers loads of additional services
including (but not limited to):
• Secure online cloud-based data storage. Never lose a recording or risk missing
an event.
• Security-based event recording with motion detection. Never miss
something that happens!
• Push notifications. Don’t wait to find out what’s going on, have the information
sent directly from SwannSmart’s secure online server direct to your phone/tablet!
• Advanced video codecs. Get better quality images and/or reduce the
bandwidth required to transmit them.
We’re continually expanding the services that SwannSmart offers, and finding ways
to improve the performance and functionality of your Swann IP camera.
We offer several competitive plans that you can choose from to find the best
combination of services for your unique needs. As these are continually changing,
check out the website for the most up-to-date information possible.
www.swannsmart.com
17
Technical Specifications
Video
Audio
Recording
Network
18
Resolution
640 x 480
Frames Per Second
30fps (max)
Microphone
1-way (camera to mobile device)
Snap Shot Format
JPEG
Video Record function
MJPEG
Connections
Wireless / Wired
Access
HTTP
Warranty Information
Swann Communications USA Inc.
12636 Clark Street
Santa Fe Springs CA 90670
USA
Swann Communications
Unit 13, 331 Ingles Street,
Port Melbourne Vic 3207
Swann Communications LTD.
Stag Gates House
63/64 The Avenue
SO171XS
United Kingdom
Limited Warranty Terms & Conditions
Swann Communications warrants this product against defects in workmanship and
material for a period of one (1) year from its original purchase date. You must present
your receipt as proof of date of purchase for warranty validation. Any unit which
proves defective during the stated period will be repaired without charge for parts
or labor or replaced at the sole discretion of Swann. The end user is responsible for all
freight charges incurred to send the product to Swann’s repair centers. The end user
is responsible for all shipping costs incurred when shipping from and to any country
other than the country of origin.
The warranty does not cover any incidental, accidental or consequential damages
arising from the use of or the inability to use this product. Any costs associated with
the fitting or removal of this product by a tradesman or other person or any other
costs associated with its use are the responsibility of the end user. This warranty
applies to the original purchaser of the product only and is not transferable to any
third party. Unauthorized end user or third party modifications to any component or
evidence of misuse or abuse of the device will render all warranties void.
By law some countries do not allow limitations on certain exclusions in this warranty.
Where applicable by local laws, regulations and legal rights will take precedence.
For Australia: Our goods come with guarantees which cannot be excluded under
Australian Consumer Law. You are entitled to a replacement or refund for a major
failure and for compensation for any other reasonably foreseeable loss or damage.
You are also entitled to have the goods repaired or replaced if the goods fail to be of
acceptable quality and the failure does not amount to major failure.
19
Swann Technical Support
All Countries E-mail: [email protected]
Telephone Helpdesk
Helpdesk / Technical Support Details
USA toll free
1-800-627-2799
(Su, 2pm-10pm US PT)
(M-Th, 6am-10pm US PT)
(F 6am-2pm US PT)
USA Exchange & Repairs
1-800-627-2799 (Option 1)
(M-F, 9am-5pm US PT)
AUSTRALIA toll free
1300 138 324
(M 9am-5pm AUS ET)
(Tu-F 1am-5pm AUS ET)
(Sa 1am-9am AUS ET)
NEW ZEALAND toll free
0800 479 266
UK
0203 027 0979
© Swann Communications 2012
20