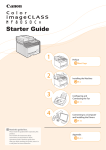
1
1
Preface
P.2
2
Installing the Machine
P.4
3
Connecting to a Computer
and Installing the Drivers
P.12
4
Configuring and
Connecting the Fax
P.24
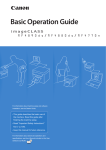
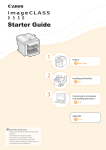
Read this guide first.
Please read this guide before operating this product. The remarks for important safety instructions are described in the Basic
Operation Guide. After you finish reading the Starter Guide, store it in a safe place for future reference.
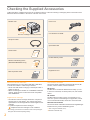
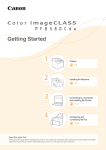
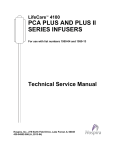
Checking the Supplied Accessories
Confirm that all the supplied accessories are contained in the box. If an item is missing or damaged, please contact the Canon
Authorized Service Facilities or the Canon Customer Care Center.
Machine Unit
Power Cord
The toner cartridge is already installed.
User Software CD-ROM
Telephone Cable
Speed Dial Label
Starter Guide
Sta
Limited Warranty Notice
Wireless LAN Setting Guide
(MF4890dw/MF4880dw Only)
Basic Operation Guide
About the LAN and USB cable
User Software CD-ROM
The machine does not come with a LAN cable, USB cable,
or a hub. Have cables or a hub ready as needed.
The User Software CD-ROM contains the MF Drivers, MF
Toolbox, various software, and the e-Manual.*¹
• Please use LAN Cable of Category 5 twisted pair cable or
higher for support.
• When connecting the machine to a 100BASE-TX Ethernet
network, all the devices on the LAN must be compatible
with 100BASE-TX.
MF Drivers
Supplied Toner Cartridge
• The included "Canon Cartridge 128 Starter" can print an
average yield of 1,000 sheets*. The average yield of the
replacement toner cartridge differs from the supplied toner
cartridge.
• To purchase replacement toner cartridges:
"Replacement Toner Cartridges" in the e-Manual
* The average yield is based on "ISO/IEC 19752" when printing A4
size paper with the default printing density.
2
Registration Card
The MF Driver contains the Network Scan Utility*² (to use
to scan over a network) as well as printer, fax, and scanner
drivers.
MF Toolbox
The MF Toolbox provides a group of commands for you,
such as to open a scanned image in an application, send it
as an e-mail attachment file, and store it on the hard disk.
Miscellaneous Software
The User Software CD-ROM contains Presto! PageManager.
Install it from the [Custom Installation] option.
*1 See "Using the e-Manual" (P.31).
*2 Windows 7/Vista/XP only.
Checking the Supplied Accessories
Included Documents
Printed Manuals
Sta
This manual
Starter Guide
Wireless LAN Setting Guide
Basic Operation Guide
This manual describes the
configuration and software
installation.
(MF4890dw/MF4880dw Only)
This manual describes the basic use of
the machine.
This manual explains the wireless
LAN setup procedures and
troubleshooting during the setup.
Manuals Included in the CD-ROM
e-Manual
This manual explains all the features of the machine,
and is categorized by subject. For details about using
the e-Manual, see “Using the e-Manual” (P.31).
1
Preface
2
Installing the Machine
3
Connecting to a Computer and Installing the Drivers
4
Configuring and Connecting the Fax
3
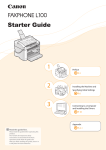
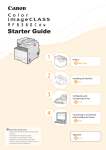
Removing the Packing Materials
Remove all the packing materials, such as orange tape. Packing materials may change in form or placement, or may be added or
removed without prior notice.
1
2
3
1
2
Do not remove
this packing
material yet.
Establishing an Installation Site
= 4" (100 mm)
MF4890dw
31 1/4" (793 mm)
24 5/8" (626 mm)
29 1/4" (741 mm)
1
★
★
★
★
2
3
★
MF4880dw
31 1/4" (793 mm)
24 5/8" (626 mm)
28 1/2" (723 mm)
1
★
★
★
★
2
3
★
MF4770n
29 3/4" (755 mm)
24 5/8" (626 mm)
28 1/2" (723 mm)
1
★
★
★
★
★
4
2
3
Removing the Packing Materials
4
Check!
Are all the packing materials removed?
Tape
Packing Material with tape
Packing Material
Do not place the machine near the following:
• Alcohol, paint thinner, or other flammable substances ▶ If flammable substances come into contact with electrical
parts inside the machine, this may result in a fire or electrical shock.
• Any medical equipment ▶ Radio wave emitted from this machine may interfere with medical equipment.
• Surfaces that are unstable, subject to excessive vibration, objects that could block the ventilation slot, dampness
or dust, in direct sunlight or exposed to the elements, subject to high temperatures, open flames, and poor
ventilation ▶ Installing the machine in locations with these characteristics may result in personal injury, fire, or
electric shock.
Ozone from the Unit
Although ozone is generated from the machine during operation, it does not have any affect on the human body.
However, if you intend to use the machine for long periods of time, ensure that the installation location is well
ventilated for a comfortable working environment.
Proper Handling
Hold here.
Hold here.
1
Preface
2
Installing the Machine
3
Connecting to a Computer and Installing the Drivers
4
Configuring and Connecting the Fax
5
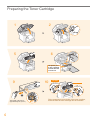
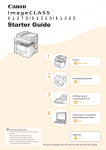
Preparing the Toner Cartridge
1
2
1
2
5
6
The plastic part
is also a packing
material. Be sure
to remove it.
9
10
Left Side
Protrusions
Right Side
Protrusions
2
The length of the tape is
approximately 20" (50 cm).
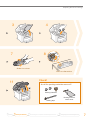
6
1
Fit the protrusions on each side of the toner cartridge,
and then slide the toner cartridge into the machine.
Preparing the Toner Cartridge
3
4
7
8
Shake 5 to 6 times.
Place on a flat surface.
Check!
11
Are all the packing materials removed?
2
1
Packing materials
Packing material
with a sheet
Sealing tape
1
Preface
2
Installing the Machine
3
Connecting to a Computer and Installing the Drivers
4
Configuring and Connecting the Fax
7
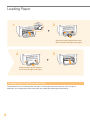
Loading Paper
1
2
Spread the paper guides a little wider
than the width and length of the paper.
4
5
Adjust the paper guides tightly to
the width and length of the paper.
Loading Paper Other than Letter Size
The procedure here is for loading Letter size paper. To load paper other than Letter size, such as Legal or
Statement, see “Loading Paper Other than Letter Size” (P.29) after finishing the initial settings.
8
Loading Paper
3
Load Limit Guide
Check!
Push until the edge of the paper stack meets
the back of the paper cassette.
Make sure that the paper
stack does not exceed the
load limit guide.
Use the paper stopper when printing.
Pull out the paper stopper to prevent the paper
from falling out of the output tray.
Lift the paper stopper.
Push out the output tray extension, and then pull it out.
1
Preface
2
Installing the Machine
3
Connecting to a Computer and Installing the Drivers
4
Configuring and Connecting the Fax
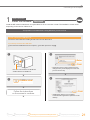
9
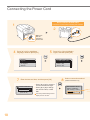
Connecting the Power Cord
Do not connect the USB cable.
Connect the cable when installing the software.
1
2
Make sure
that the
machine is
OFF turned OFF.
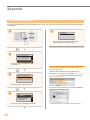
4
Press [▲] or [▼] to highlight a
language, and then press [OK].
5
Press [▲] or [▼] to highlight a
region, and then press [OK].
Language
English
French
Portuguese
Spanish
7
Enter the date and time, and then press [OK].
Current Time Set.
01/01/2012 12:52 AM
(0:00-12:59)
10
Select Country/Region
United States (US)
Canada (CA)
Brazil (BR)
Mexico (MX)
• Press [◀] or [▶] to move the
cursor to the left and right.
• Press [▲] or [▼] to change
the numeric value, or AM/
PM.
The factory default settings for time
display is set as 12-Hour.
8
Select a connection method.
(MF4890dw/MF4880dw only)
Use wireless LAN to
connect computer?
(Can config. later.)
Yes
No
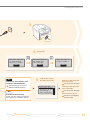
Connecting the Power Cord
3
ON
6
Press [OK].
Open toner cover;see
if orange packing
material is removed.
Check that tape/tabs
are removed from
toner cartridge.
Next
Next
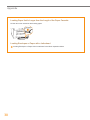
9
Yes
Connect to the computer via a
wireless LAN immediately.
Check that paper is
loaded in Drawer 1.
Next
Confirm the screen,
and then press [OK].
Connect to the computer
via a wired LAN
Proceed to the next page.
Start from step 3 on P.4 in the
Wireless LAN Setting Guide.
Connect to the computer
via a USB cable
Current Time Set.
Must rechg. battery
for 24 hrs. to save
time settings.
After turning main
NO
Proceed to the next page.
Do not connect to PC
Proceed to the next step.
Proceed to “Configuring
the Fax” (P.24).
Select <No> also when you connect to
the computer via a wireless LAN later.
1
Preface
2
Installing the Machine
3
Connecting to a Computer and Installing the Drivers
4
Configuring and Connecting the Fax
11
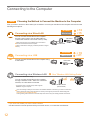
Connecting to the Computer
Check!
Choosing the Method to Connect the Machine to the Computer
First, you need to decide on the method you would like to connect your machine to the computer. Choose from the
following three options.
Windows
Connecting via a Wired LAN
Macintosh
You can connect the machine to the computer
through a wired router. Use the LAN cables to
connect the machine to the wired router (or hub).
Make sure that there is an available port in the router to
connect the machine and the computer.
Have a LAN Cable of Category 5 twisted-pair cable or higher
ready.
You can connect the machine to the computer using
a USB cable.
Connecting via a Wireless LAN
Wired Router
Macintosh
P. 21
See "Wireless LAN Setting Guide"
You can connect the machine to the computer
through a wireless router*. Since it is connected
wireless, no LAN cables are needed.
Wireless Router
(Access Point)
If you are looking to install your new device via a Wireless Network connection, you can find a video and
written guides with step-by-step instruction to assist you through the process from the following URL:
www.usa.canon.com/WirelessHelp
Viewing these guides will ensure a smooth setup of the device into your existing wireless environment.
If you do not sure whether your router is wired or wireless:
See the instruction manual provided with your network device, or contact the manufacturer.
12
P. 19
USB Cable
(MF4890dw/MF4880dw Only)
* A wireless router (or access point) which supports
IEEE802.11b/g/n is required.
P.15
LAN Cable
Windows
Connecting via a USB
P.13
Connecting to the Computer
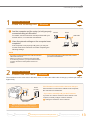
1
Wired LAN Connection
Check the following first.
Windows
Are the computer and the router (or hub) properly
connected using a LAN cable?
Internet
Router
For details, see the instruction manual provided with your
network device, or contact the manufacturer.
LAN Cable
Have the network settings on the computer been
complete?
If the computer is not properly configured, you may not
use the wired LAN connection even after completing the
following settings.
NOTE
• You cannot connect both the wired LAN and wireless
LAN at the same time.
• When you connect to a network environment that
is not security protected, your personal information
could be disclosed to third parties. Please use
caution.
2
• If you connect through a LAN in the office, contact
your network administrator.
Wired LAN Connection
Connect the LAN cable.
Windows
The machine does not come with a LAN cable, router, or a hub. Have LAN Cable of Category 5 twisted pair cable or
higher ready.
Router
(or Hub)
If the IP address on this machine has been changed:
If the machine is on the same subnet as the computer,
the connection is maintained.
* If you want to manually configure the IP address:
If you have set a static IP address to the IP address of the
computer, manually configure a static IP Address.
"Setting the IP Address" in the e-Manual
LAN Cable
Wait for approximately 2 minutes.
The IP address will be automatically configured.*
1
Preface
2
Installing the Machine
3
Connecting to a Computer and Installing the Drivers
4
Configuring and Connecting the Fax
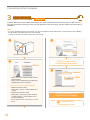
13
Connecting to the Computer
3
Wired LAN Connection
Install the software.
Windows
Install the MF Drivers and the MF Toolbox. Make sure that the machine is turned ON, and log on to Windows as a
user with administrative privileges. Shut down all applications that are running. See the e-Manual for details about
installation.
NOTE
• If you are operating in the IPv6 environment, you may not install the software following the procedures below. See “Installing
the MF Drivers on the WSD Network” in the e-Manual.
• You may not use the scan function in the IPv6 environment.
▲
Click! ▶
User Software CD-ROM
Follow the instructions
on the screen to continue.
◀ Click!
• Printer, fax, scanner drivers and MF Toolbox
will be installed.
• Select [Custom Installation] to install Presto!
PageManager and the e-Manual.
If the screen is not correctly displayed:
• Windows XP/Server 2003
[Start] Menu → [Run] → enter [D:\MInst.exe*]
→ [OK]
• Windows Vista/7/Server 2008
[Start] Menu → [Search programs and files]
(or [Start Search]) → enter [D:\MInst.exe*] →
press the [Enter] key
* The CD-ROM drive name is indicated as "D:" in this
manual.
14
◀ Select
✔
◀ Click!
• Take the CD-ROM out, if necessary.
Computer connection via the
wired LAN is now complete.
Proceed to P.24
to configure the fax.
Connecting to the Computer
1
Wired LAN Connection
Check the following first.
Macintosh
Are the computer and the router (or hub) properly
connected using a LAN cable?
Internet
Router
For details, see the instruction manual provided with your
network device, or contact the manufacturer.
LAN Cable
Has the network settings on the computer been
complete?
If the computer is not properly configured, you may not
use the wired LAN connection even after completing the
following settings.
NOTE
• You cannot connect both the wired LAN and wireless
LAN at the same time.
• When you connect to a network environment that
is not security protected, your personal information
could be disclosed to third parties. Please use
caution.
2
• If you connect through a LAN in the office, contact
your network administrator.
Wired LAN Connection
Connect the LAN cable.
Macintosh
The machine does not come with a LAN cable, router, or a hub. Have LAN Cable of Category 5 twisted pair cable or
higher ready.
Router
(or Hub)
If the IP address on this machine has been changed:
If the machine is on the same subnet as the computer,
the connection is maintained.
* If you want to manually configure the IP address:
If you have set a static IP address to the IP address of the
computer, manually configure a static IP Address.
"Setting the IP Address" in the e-Manual
LAN Cable
Wait for approximately 2 minutes.
The IP address will be automatically configured.*
1
Preface
2
Installing the Machine
3
Connecting to a Computer and Installing the Drivers
4
Configuring and Connecting the Fax
15
Connecting to the Computer
3
Wired LAN Connection
Install the software.
Macintosh
Install the MF drivers for Macintosh. It requires Mac OS X 10.5.8 version or later. The installation screen varies
depending on the version of Mac OS X.
This operation is for Macintosh. If using Windows, proceed to P.14.
▲
Insert the User Software CD-ROM and
double-click the CD-ROM icon.
▼
◀ Click!
• Installing the drivers is now complete.
Continued with registratiion operations on the
desktop.
▼
◀ Double-click!
◀ Click!
▼
Follow the instructions
on the screen to continue.
▼
◀ Click!
◀ Enter
◀ Click!
• Depending on the system environment, the
dialog box may not be displayed. In this case,
proceed to next step.
▼
16
Connecting to the Computer
Connecting with the manual setting
◀ Click!
◀ Select
◀ Click!
• [IPP (Internet Printing Protocol)] is not supported.
• If you are using Mac OS X 10.5.8, click [+],
select [CanonMF4800] or [CanonMF4700]
from the dialog box displayed, and then
proceed to next step..
▼
▼
◀
◀ Enter
Click!
◀
◀
Select
◀ Select
Select
◀
▼
Click!
Select a printer name for which [Bonjour] is
displayed in the [Kind] or [Connection] column.
◀ Select
If you are using Mac OS X 10.5.x, select the
corresponding driver from [Print Using].
• An IP address is automatically configured
by the Bonjour function. If there is not the
Bonjour function or you want to set the
IP address manually, see “Setting the IP
Address” in the e-Manual.
◀ Click!
▼
Proceed to P.18
1
Preface
2
Installing the Machine
3
Connecting to a Computer and Installing the Drivers
4
Configuring and Connecting the Fax
17
Connecting to the Computer
Macintosh
◀
Click!
Check that this
machine is added.
◀
◀ Click!
• If you are using Mac OS X 10.5.x,
select [Select a driver to use] and the
corresponding driver from [Print Using], and
then click [Add].
▼
18
Computer connection via the
wired LAN is now complete.
Proceed to P.24
to configure the fax.
Connecting to the Computer
1
USB Connection
Install the software.
Windows
Install the MF Drivers and the MF Toolbox. Make sure that the machine is turned ON, and log on to Windows as a
user with administrative privileges. Shut down all applications that are running. See the e-Manual for details about
installation.
Do not connect the USB cable yet.
Connect the USB cable after installing the MF Drivers and the MF Toolbox.
If you already connected the USB cable:
Windows 7: 0 Disconnect the USB cable from the computer, 1 and then
proceed to step .
Windows Vista/XP: 0 If the dialog box on the right appears, disconnect the
USB cable from the computer*, 1 click [Cancel], 2 and then proceed to
step .
* If the USB cable is disconnected and the dialog box disappears, proceed to step .
For Windows Vista/XP
• Windows Vista/7/Server 2008
[Start] Menu → [Search programs and files]
(or [Start Search]) → enter [D:\MInst.exe*] →
press the [Enter] key
* The CD-ROM drive name is indicated as "D:" in this
manual.
▲
User Software CD-ROM
Follow the instructions
on the screen to continue.
◀ Click!
◀ Select
✔
◀ Click!
• Printer, fax, scanner drivers and MF Toolbox
will be installed.
• Select [Custom Installation] to install Presto!
PageManager and the e-Manual.
If the screen is not correctly displayed:
• Remove the CD-ROM, if necessary.
• Windows XP/Server 2003
[Start] Menu → [Run] → enter [D:\MInst.exe*]
→ [OK]
Proceed to P.20
1
Preface
2
Installing the Machine
3
Connecting to a Computer and Installing the Drivers
4
Configuring and Connecting the Fax
19
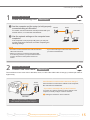
Connecting to the Computer
2
USB Connection
Connect the USB cable.
Windows
After installing the software, such as MF Driver, connect the USB cable. Make sure the software is installed first.
Square Connector
Connect to the machine.
Remove this.
Flat Connector
Connect to the computer.
Computer connection via the USB is now complete.
Proceed to P.24 to configure the fax.
20
Connecting to the Computer
1
USB Connection
Install the software.
Macintosh
Install the MF drivers for Macintosh. It requires Mac OS X 10.5.8 version or later. The installation screen varies
depending on the version of Mac OS X.
This operation is for Macintosh. If using Windows, proceed to P.19
Do not connect the USB cable yet.
Connect the USB cable after installing the MF Drivers and the MF Toolbox.
If you already connected the USB cable:
0 Disconnect the USB cable from the computer, 1 and then proceed to step .
◀ Enter
◀ Click!
▲
Insert the User Software CD-ROM and
double-click the CD-ROM icon.
• Depending on the system environment, the
dialog box may not be displayed. In this case,
proceed to next step.
▼
▼
◀ Double-click!
▼
Follow the instructions
on the screen to continue.
▼
1
Preface
2
Installing the Machine
3
◀ Click!
• Installing the drivers is now complete.
Continued with registratiion operations on the
desktop.
Connecting to a Computer and Installing the Drivers
4
Configuring and Connecting the Fax
21
Connecting to the Computer
2
USB Connection
Connect the USB cable.
Macintosh
After installing the software, such as MF Driver, connect the USB cable. Make sure the software is installed first.
Square Connector
Connect to the machine.
Remove this.
Flat Connector
Connect to the computer.
Computer connection via the USB is now complete.
Proceed to P.24 to configure the fax.
22
Connecting to the Computer
1
Preface
2
Installing the Machine
3
Connecting to a Computer and Installing the Drivers
4
Configuring and Connecting the Fax
23
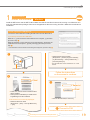
Configuring the Fax
Set Up 1
Register the Fax Number and Unit Name
Register unit name.
(Sender name,
company name, etc.)
*Next Screen: Press OK
Register Unit Name
ABC
<Apply>
Entry Mode: A
Perform fax setup?
Set up Now
Set up Later
• If you select <Set up Later>, the receive mode
will be set to <Auto>.
• To reconfigure the settings, select [Menu] →
<Fax TX Settings> → <Fax Setup Guide>.
Register the unit
telephone number for
this machine.
*Next Screen: Press OK
Register Unit Tel No.
031234567
<Apply>
+
• Enter the telephone number using the numeric
keys.
Register Unit Tel. No.
031234567
<Apply>
+
• Press [▲] or [▼] to highlight <Apply>, and then
press [OK].
• By referring to "Entering Text" (P.35), enter the unit
name.
Register Unit Name
ABC
<Apply>
Entry Mode: A
• Press [▲] or [▼] to highlight <Apply>, and then
press [OK].
Set the RX mode.
Answer the following
questions to select
the appropriate mode.
*Next Screen: Press OK
• Do not operate the machine when this screen
appears and proceed to the next page.
Registered information will be printed on the recipient's
paper.
The fax number and unit name registered here will
be printed on the recipient's paper as the sender
information.
Number's Type
Sent Time
01/01/2012 02:07 PM
24
FAX
Fax Number
Unit Name
123XXXXXXX
CANON
Page Number
P.0001
Configuring the Fax
Receive Mode That Fits Your Purpose
Check!
Choose a receive mode that meets your purpose from the following receive modes. The receive mode will be used
to configure the setting in "Selecting the Fax Receive Mode" (P.26).
Use for Fax Only/No Voice Calls
You can use only for fax and may not use for voice calls. You do not
need to connect the external telephone.
Fax
Receive Mode
⇒ Auto
Mainly Use for Voice Calls/Almost Not Use for Fax
Connect an external phone to receive calls.
Press [
] (FAX), select <Start Receiving>, and
then hang up the handset to receive faxes.
Phone
Receive Mode
⇒ Manual
Telephone
Use for Fax and Voice Call
Phone
Fax
Using an answering machine
Connect an external answering machine to record
voice messages when you are out, as well as
receive calls. Faxes will be automatically received.
Receive Mode
⇒ Answering
Machine
Answering machine
Using a General Telephone
Connect the external telephone. Faxes will be
automatically received and the machine will ring
when voice calls come in.
Receive Mode
1
Preface
2
Installing the Machine
3
⇒ Fax/Tel Auto
Switch
Connecting to a Computer and Installing the Drivers
Telephone
4
Configuring and Connecting the Fax
25
Configuring the Fax
Set Up 2
Selecting the Fax Receive Mode
Set the receive mode that you confirmed in "Receive Mode That Fits Your Purpose" (P.25).
Set the RX mode.
Answer the following
questions to select
the appropriate mode.
*Next Screen: Press OK
Do you want to use
this machine for fax
only (no telephone)?
Yes
No
<Auto>
Yes
*Reset: Press Back
*Apply: Press OK
• To set to Auto mode → <Yes>
• To set to other receive modes → <No>
No
Do you want to autoreceive faxes and
answer phone manually?
Yes
No
<Fax/Tel>
Yes
• To set to Fax/Tel Auto Switch mode → <Yes>
• To set to other receive modes → <No>
• To set to Answering Machine mode →
<Yes>
• To set to Manual mode → <No>
26
Connect phone line.
Follow illustrations
on the next screen:
Connect line to A.
*Next : Press OK
Connect phone line.
Follow illustrations
on the next screen
to make connections:
1. Phone line to A
The screen that appears varies
depending on the receive mode
selected.
No
Do you want to use
an answering machine
to answer the phone?
Yes
No
RX Mode Settings
RX Mode: XXXXXX ◀ Check!
<Answer>
Yes
<Manual>
No
When connecting a telephone with fax
functions:
Set the fax receive mode of the telephone to
“manual.”
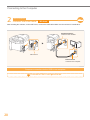
Configuring the Fax
Connecting the Telephone Line
Set Up 3
End Fax Setup
Guide?
You cannot use the fax
function if it is not properly
connected.
Yes
No
Press [◀] to highlight <Yes>.
B
A
Setting is complete.
Turn the main power
OFF and ON.
OK
Turn OFF the machine.
To an analog
telephone line
Wait for at least 10
seconds.
Connect if necessary
Telephone
(answering machine)
Turn ON the machine.
The machine will restart, and
the telephone line type will be
automatically set*.
• Press [OK] when connecting is finished.
* If the telephone line type is not automatically set:
See the Basic Operation Guide to set manually.
“Fax” → “Change the Fax Settings” → “Changing Fax Sending Settings” in the Basic Operation Guide
1
Preface
2
Installing the Machine
3
Connecting to a Computer and Installing the Drivers
4
Configuring and Connecting the Fax
27
Appendix
Checking the IP Address
You can check the IP address of the machine. Use it when you need to enter the IP address during the configuration
or registration.
IP Address
192.168.0.215
• The IP address is displayed. Press [Status
Monitor/Cancel] to close the screen.
Status Monitor/Cancel
Copy Job Status
Fax Job Status/Hist...
Print Job Status
Network Information
• Press [▲] or [▼] to highlight <Network
Information>.
Check if the Machine Is Connected to the
Network Correctly
Network Information
IPv4
IPv6
Wireless LAN Informa...
“Start the web browser of the computer that is
connected to the network, enter [http://IP address of
the machine], and then press [ENTER]. (Example:
http://192.168.0.215/)
• Press [▲] or [▼] to highlight <IPv4>.
The screen below (Remote UI) should be displayed.*
IPv4
IP Address
Subnet Mask
Gateway Address
Host Name
• Press [▲] or [▼] to highlight <IP Address>.
28
* If the remote UI screen is not displayed, see the e-Manual.
Appendix
Loading Paper Other than Letter Size
To load paper other than Letter size, such as Legal or Statement, see “Loading Paper” (P.8) and the following
procedure after finishing the initial settings.
Load Limit
Guide
Paper Settings
MP Tray
1 Drawer 1
• Press [▲] or [▼] to highlight the paper source
to load paper, and then press [OK].
• Load the paper into the paper cassette.
• Make sure that the paper stack does not
exceed the load limit guides.
Paper Size
LTR
LGL
STMT
EXEC
• Press [▲] or [▼] to highlight a paper size, and
then press [OK].
• Adjust the paper guides tightly to the width
and length of the paper.
Paper Type
Plain (16 lb Bond-24
Plain L (16 lb Bond...
Recycled
Color
• Press [▲] or [▼] to highlight a paper type, and
then press [OK].
29
Appendix
Loading Paper that Is Longer than the Length of the Paper Cassette
Lift the dust cover extension after loading paper.
Loading Envelopes or Paper with a Letterhead
“Loading Envelopes or Paper with a Letterhead” in the Basic Operation Guide.
30
Appendix
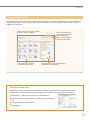
Using the e-Manual
The e-Manual is an electronic manual document that is displayed on the computer. All features of the machine are
categorized by subject, and you can quickly view the information you need by using its search function. Use the
e-Manual as a reference.
Click to refer to the contents, glossary,
and how to use the e-Manual.
Enter a keyword that you
want to search to quickly
find the information.
Click to view precautions
when using Macintosh.
Click a button to access the
information that you want.
Click when performing troubleshooting or
maintenance of the machine.
Using the Online Help
Information, such as driver software information, is included in the online help. When using the driver
software, you can immediately view the description of the features and the contents of the settings.
Select [File] → [Print] from the menu bar of an application.
Select the printer in [Select Printer] or [Name] in the [Print] dialog
box.
Click [Preferences] or [Properties].
Click [Help].
31
Appendix
Windows
Installing in a Windows Environment
Insert the User Software CD-ROM in your
computer.
Click [Custom Installation]*.
Click [Next].
Select only the [Manuals] check box.
Click [Install].
Click [Yes].
Click [Next].
Click [Exit] to finish the installation.
* If the CD-ROM setup screen does not appear:
• Windows XP/Server 2003
[Start] Menu → [Run] → enter [D:\MInst.exe**] →
[OK]
• Windows Vista/7/Server 2008
[Start] Menu → [Search programs and files]
(or [Start Search]) → enter [D:\MInst.exe**] →
press the [ENTER] key
** The CD-ROM drive name is indicated as “D:” in this
manual.
Displaying the e-Manual
Double-click the shortcut icon
[MF4800 Series e-Manual] or
[MF4700 Series e-Manual] on the desktop.
Displaying the e-Manual from the
CD-ROM
Insert the User Software CD-ROM in your computer,
click [Diplay Manuals], and then click [ ] for
[e-Manual].
Depending on the operating system, a message will be
displayed for security protection to display the content.
32
Macintosh
Installing in a Macintosh Environment
Insert the User Software CD-ROM in your
computer.
Open the [Documents] folder.
Drag and drop the [MF Guide] folder into a
location where you want to save it.
When displaying the installed e-Manual, doubleclick [index.html] in the saved [MF Guide] folder.
Displaying the e-Manual from the CD-ROM
Double-click [index.html] in the saved [MF Guide]
folder.
For Details About the Fax, Print,
and Scan Functions
• Canon MF Printer Driver Installation Guide
User Software CD-ROM →[Documents] → [Print]
→ [Guide] → [index.html]
• Canon Fax Driver Installation Guide
User Software CD-ROM → [Documents] → [FAX]
→[Guide] → [index.html]
• Canon Scanner Driver Guide
User Software CD-ROM → [Documents] → [Scan]
→[Guide] → [index.html]
Appendix
33
Disclaimers
The information in this document is subject to change
without notice. CANON INC. MAKES NO WARRANTY
OF ANY KIND WITH REGARD TO THIS MATERIAL,
EITHER EXPRESS OR IMPLIED, EXCEPT AS PROVIDED
HEREIN, INCLUDING WITHOUT LIMITATION,
THEREOF, WARRANTIES AS TO MARKETABILITY,
MERCHANTABILITY, FITNESS FOR A PARTICULAR
PURPOSE OF USE OR NON-INFRINGEMENT. CANON
INC. SHALL NOT BE LIABLE FOR ANY DIRECT,
INCIDENTAL, OR CONSEQUENTIAL DAMAGES OF ANY
NATURE, OR LOSSES OR EXPENSES RESULTING FROM
THE USE OF THIS MATERIAL.
Trademarks
Canon, the Canon logo, and imageCLASS are registered
trademarks of Canon Inc. in the United States and may also
be trademarks or registered trademarks in other countries.
34
Apple, Mac OS, and Macintosh are trademarks or registered
trademarks of Apple Inc. in the U.S. and/or other countries.
Microsoft, Windows, Windows Vista and Windows Server
are either registered trademarks or trademarks of Microsoft
Corporation in the United States and/or other countries. All
other product and brand names are registered trademarks,
trademarks or service marks of their respective owners.
Copyright
© CANON INC. 2012 All Rights Reserved
No part of this publication may be reproduced, transmitted,
transcribed, stored in a retrieval system, or translated into
any language or computer language in any form or by any
means, electronic, mechanical, magnetic, optical, chemical,
manual, or otherwise, without the prior written permission of
Canon Inc.
Entering Text
During the setup or initial configuration, you may need to
enter letters and numbers. Use [▲], [▼], [◀], [▶], numeric
keys, and [OK] to enter text.
OK
▼▲◀ ▶
Numeric Key
Numeric Clear
C
keys
Entry Mode (See below on how to change the Entry mode)
<A>
<a>
@.-_/
<12>
1
ABC
abc
2
DEF
def
3
GHI
ghi
4
JKL
jkl
5
MNO
mno
6
PQRS
pqrs
7
TUV
tuv
8
WXYZ
wxyz
9
(Not available)
0
- .* # ! " , ;:^ ` _ = / | ' ?
$@%&+\()[]{}<>
(Not available)
Changing the Entry Mode
Entering a Space
The machine supports three entry modes: <A>
for uppercase, <a> for lowercase, and <12> for
numbers. The default setting is <A>. Press [▼] to
highlight <Entry Mode: A>, and then press
(Tone) to switch between the entry modes.
Move the cursor to the end of the text, and then
press [▶].
Moving the Cursor
Deleting Characters
Press
(Clear) to delete characters.
Press and hold to delete all characters.
Press [◀] or [▶] to move the cursor.
35
Contacting the Service Center
When you have a problem with your machine, refer to
“Troubleshooting” in the Basic Operation Guide or the
e-Manual first. If you cannot solve the problem after
referring the manuals, contact the Canon Authorized
Service Facilities or the Canon Customer Care Center.
Canon Customer Care Center
1-800-OK-CANON
(U.S.A./Canada)
U.S.A
Monday through Friday
From 8:00 A.M. to 8:00 P.M. EST
Canada
Monday through Friday
From 9:00 A.M. to 8:00 P.M. EST
http://www.canon.ca/
CANON INC.
30-2, Shimomaruko 3-chome, Ohta-ku, Tokyo 146-8501, Japan
CANON MARKETING JAPAN INC.
16-6, Konan 2-chome, Minato-ku, Tokyo 108-8011, Japan
CANON U.S.A., INC.
One Canon Plaza, Lake Success, NY 11042, U.S.A.
CANON EUROPE N.V.
Bovenkerkerweg, 59-61, 1185 XB Amstelveen, The Netherlands
CANON CHINA CO. LTD.
15F Jinbao Building No.89, Jinbao Street, Dongcheng District, Beijing 100005, PRC
CANON SINGAPORE PTE LTD
1 HarbourFront Avenue, #04-01 Keppel Bay Tower, Singapore 098632
CANON AUSTRALIA PTY LTD
1 Thomas Holt Drive, North Ryde, Sydney NSW 2113, Australia
CANON GLOBAL WORLDWIDE SITES
http://www.canon.com/
FT6-0295 (000)
XXXXXXXXXX
© CANON INC. 2012
PRINTED IN KOREA