1
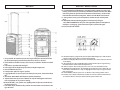
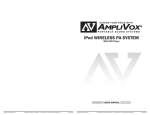
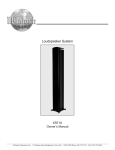
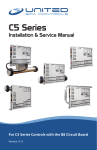
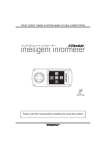
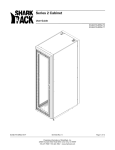
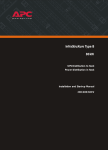
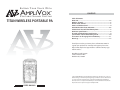
E XTEND Y OUR V OICE W ITH
AMPLIVOX
®
CONTENTS
P ORTABLE S OUND S YSTEMS
Table of Contents
Main Unit-------------------------------------------------------------------1-2
Wireless Controls-----------------------------------------------------------2
Master Panel Control------------------------------------------------------3
Power and Volume Panel-------------------------------------------------4
CD/USB/SD Audio Player & Remote--------------------------------5-6
USB/SD Card Slots/Handheld Microphone--------------------------7
Main Unit Specifications--------------------------------------------------8
Channel and Microphone Specifications-----------------------------9
Special Notes and Troubleshooting Guide-------------------------10
Instructions on Changing Main Unit Battery---------------------11
Warnings----------------------------------------------------------------12
TITAN WIRELESS PORTABLE PA
Should you need any assistance please call 800-267-5486. To
register your product for warranty and support please visit
http://www.ampli.com/support.htm or submit warranty registration card to...
AmpliVox Sound Systems
3995 Commercial Ave.
Northbrook, IL 60062
1 Year Limited Warranty on manufacturer’s defect only. This does not cover accidental damage or abnormal operating/storage conditions such as extreme heat
or cold or excessive moisture. Please contact the manufacturer (information
above) for service or replacement. Warranty is considered null and void should
the product case be opened or appear tampered with.
USERS MANUAL
Amplivox Sound Systems
- Call 800-267-5486 for assistance - www.ampli.com for support and registration-
10/30/2009
Amplivox Sound Systems
- Call 800-267-5486 for assistance - www.ampli.com for support and registration-
10/30/2009
Main Unit - Wireless Control
Main Unit
12. Lead Acid Rechargeable Battery: User Replaceable - Remove 2 screws and
battery plates from main panel board. Remove batteries from the unit. When
reinserting batteries please note the direction of the battery. Positive- Red
line with Red Line Terminal; Negative - Black Line with Black Line Terminal.
13. Storage Area: Store system microphone, remote control, and AC power
cord.
14. Microphone Battery Recharging Box: Simultaneously charge 4
1.2V/1300mA!2500mA for the spare rechargeable batteries of microphone,
red light as in charging, green continuous light as full load charged.
15.Carry handle with wheels
1. Carry Handle: To extend or retract the carry handle press the button on the
top of the telescoping handle firmly then lift or retract as desired.
2. Hard Shell Case: Audio accessory units factory installed in durable hard shell
case.
3. Front Cover: Speaker with fixed grill.
4. Front Upper Cover: High Range Speaker (For High Frequencies).
5. Heat Sink Board: Heat sink.
6. Loudspeaker: (6A) Full range 8” speaker.
7. Luggage Wheels: Easily transport unit from place to place... Extend handle to
roll.
8. Grill Cover: Metal Mesh Grill Cover for Speaker Protection
9. Tripod Socket: For tripod stand. Rotates on Tripod 360 degrees to enhance
sound projection in any acoustic setting.
10. Power On/Off : [-] On, power start; [0]Off, power off, please turn off electricity when not in use.
11. AC Power Input: Automatically switches for international use based on voltage. 90v-264v.
Amplivox Sound Systems
- Call 800-267-5486 for assistance - www.ampli.com for support and registration-
A1. RF (Radio Frequency) Signal Indicator: The yellow LED RF lights up to indicate when
a wireless audio signal is being received and transmitted.
A2. LED channel display: When a channel is selected (A4), the current channel is showed
on the display.
A3. AF Signal Indicator: The red LED AF lights up when the microphone signal is being
transmitted and received and the microphone is on.
A4. Channel selector: Turn rotating selector to one of 16 user selectable channels.
A5. RA/RB Diversity A/B indicator: the LED lights glow when the receiver detects RF signals from the transmitter. If it is only one light glows means only one signal received
from one antenna.
A6. Power ON/OFF: Indicates power is on or off. Turn on by rotating volume control.
A7. Volume control: Rotate volume knob clockwise to increase volume to desired level
or counterclockwise to decrease volume until the power switches off.
1
10/30/2009
2
Amplivox Sound Systems
- Call 800-267-5486 for assistance - www.ampli.com for support and registration-
10/30/2009
Master Panel Control
Power & Volume Panel
B1. CD VOL: Volume control with on/off.
Rotate to turn unit on.
B2: Tape volume: Not Used.
B3. Line in VOL: Volume control for
external audio input.
B4. RCA Audio Line in: Plug In CD, DVD,
MP3, or any external audio source
with RCA Cable (Cables available to
switch from multiple formats to RCA).
C1. Battery Charge Indicator: Press power switch to turn unit on. Plug in AC power to
recharge the battery.
B5. Digital Echo volume control. Creates Reverb for better sound in larger
rooms and/or vocals.
C2. External Speaker Output
B6. Wired MIC volume control. Controls
your mic volume independent of
other inputs.
C4. Wireless MIC Battery Strength Indicator - The greater the batter charge the further the indicator will light up towards the right
C3. DC IN 24V/3A
C5. Line Out
B7. Select Wireless Microphone Priority.
C6. Main Volume control
B8. 1/4” Microphone input jack. Accepts
male 1/4” microphone cable. Use XLR
jack for XLR cables.
C7. Bass Level - Controls the bass tone output of the system. Turn to the right for
increased bass response.
C8. Treble Level - Controls the treble tone output of the system. Turn to the right for
increased treble response.
B9. Balanced XLR Microphone Input
Jack. Accepts standard Male XLR
cable. Use 1/4” jack for 1/4” Cables.
3
Amplivox Sound Systems
- Call 800-267-5486 for assistance - www.ampli.com for support and registration-
10/30/2009
4
Amplivox Sound Systems
- Call 800-267-5486 for assistance - www.ampli.com for support and registration-
10/30/2009
CD/USB/SD Audio Player & Remote
CD/USB/SD Audio Player & Remote Continued
1. Power : On - Press Power to switch on the
power. Press and hold Power to switch off the
power.
2. SD / USB / CD - Change mode from SD to USB
or CD.
3. Reverse - Press to search in reverse through
track. Press “PLAY / PAUSE” to return to normal
play.
4. Forward - Press to search or advance through
track. Press “ PLAY / PAUSE “ back to normal play.
5. Select files - Available for playing DM3 format.
Press FOLDER key and it will change to next
folder.
6. Reverse - Press to change to previous track.
7. Forward - Press to change to next track.
8. Play/Pause - Press once play, press again to pause.
9. Stop/Eject - Press to stop play. Press again to eject disk.
10. InfraRed Window - Picks up signal from the remote control.
11. USB Connector - Connect USB thumb drive to system
12. SD/MMC Card - Connect SD Card or MMC Card.
13. Low Pitch - To adjust slow-speed play. Each time you press this button the pitch
level decreases in increments of -1 (-1,-2,-3, ... -10) until a maximum of -10 is reached.
14. High Pitch - To adjust high speed play. Each time you press this button the pitch
level increases in increments of 1 (1, 2, 3, ... 10) until a maximum of 10 is reached.
15. Normal Pitch - To adjust the speed/pitch to normal (or 0). Press NOR/PITCH key. Play
will resume at normal speed.
5
Amplivox Sound Systems
- Call 800-267-5486 for assistance - www.ampli.com for support and registration-
10/30/2009
16. LCD Display - Displays CD status including track number and playing time.
17. Program - Programs into memory a set playing procedure. Press “PROG” key (LCD
Indicator will read “MEMORY”) then select track/song number (23 = press 2 then press
3) then press confirm
to add to memory. Enter next number for program and
then hit confirm
. When programming is complete press play
and CD will play
tracks in programmed order. To cancel program press “PROG” key twice.
18. Random - A random selection is played from available tracks. Press “ and LCD it
shows SHUFFLE. Press again to cancel
19. Repeat - Repeat mode.
Press 1 - Repeats all tracks after playing to the end. LCD shows REPEAT ALL
Press 2 - Repeats individual track. LCD shows REPEAT 1
Press 3 - Repeat Cancels
20.
: To next Track
21.
: Skip Current Track
22.
: On/Off Mute
23.
: Confirm or OK selection
24. Zone Memory “A-B” - While playing track press A-B and system will memorize a
start point to play current track. Press again to end selection. Player will repeat everything contained from the first press of the button to the second press. You can isolate
a chorus or any part of a song with this method. A common use is to figure out lyrics
or listen to just one part of a song over and over again. Press “A-B” again to cancel
Function.
Notes:
1. When inserting or removing the disk from the CD player, let the system move the CD
in or out at its own rate. Do not push or pull CD to load or retrieve more quickly. Damage to the mechanism may occur and render your product inoperable. This type of
abuse is not covered by normal warranty coverage.
2. When using the remote control, please aim towards the receiving area of the face
plate. Stand within 15 feet of the unit to use remote control. Remote batteries model
CR2025 3V should be the only type placed in the remote controller.
3. Battery installation of remote control.
1. Press and hold the nodule located on lower left-hand corner of the rear of the
remote control, then pull out the battery slot by pulling the slot to the right of the
nodule.
2. Place the battery... positive electrode faces upwards.
3. Push the battery compartment back to the fixed position.
6
Amplivox Sound Systems
- Call 800-267-5486 for assistance - www.ampli.com for support and registration-
10/30/2009
USB/SD Card Slots / Handheld Microphone
Specifications
USB Port Media Player in CD Player Unit
1. Insert USB media into USB slot on CD Player.
2. Press SD / USB / CD on CD Player or Remote Control until USB is selected.
3. Press PLAY / PAUSE on CD or Remote Control to begin playing media.
4. Other controls on CD Player and Remote (Stop, Forward, Reverse, etc.) work in the
same way they do when playing a CD. See Above.
TITAN Wireless PA
Speaker
SD/MMC Card Slot Media Player in CD Player Unit
1. Insert SD Card or MMC Card into SD/MMC CARD slot in the face plate. Push the card in
until it latches into the unit.
2. To Release the SD Card push the card into the unit FIRST and then pull the card out.
Not pushing in before removing can damage your media and the unit.
3. Press SD / USB / CD on the CD Player or remote control until SD is selected.
4. Press PLAY / PAUSE on the CD Player or remote control to begin playing media.
4. Other controls on the CD Player and Remote (Stop, Forward, Reverse, etc.) work in the
same way they do when playing a CD. See Above.
UHF PLL Single or Dual - 16 User Selectable Channels
Frequency Band
UHF ~900mhz
Output Power
RMS 100 Watts (Class D-Digital Amplifier System)
Function
Anti-Shock CD Player, USB Player, SD Card Player
Charging Time
Main Unit: 6-8 Hours
Handheld Mic: Approximately 4 Hours
Operating Time
Average of 3-10 hours depending on volume,
and use of components
Power Supply
Rechargeable Battery
7
Amplivox Sound Systems
- Call 800-267-5486 for assistance - www.ampli.com for support and registration-
10/30/2009
90V-264V (2A) auto Switching for International power sources
Main Unit: 12V / 4.5Ah (2 peices) Lead Acid Battery
Handheld Mic: 1.2V / 1.3Ah Nickel-Hydrogen Battery
Frame Material
Waterproof P. P. Fiber Plastic (Plastic Steel)
Special Design
• Low Power Consumption with Class D Amplifier
• Automatic charge design
• Top Storage for Accessories and battery recharger for microphones
• Battery Charges while in use
• Digital Echo/Reverb Controls
• One Touch Retractable Luggage Carry Handle
Handheld Wireless Microphone
H1. Steel grille: Protects microphone
equipment and serves as a mild wind
break for reduce ambient noise.
H2. Aluminium neck ring. Remove cap by
rotating threaded head here.
H3. Battery Compartment: Two 1.5V or
1.2V batteries.
H4. Channel switch from 1 to 16. Rotate
switch to change wireless frequency
for optimal reception. Must remain on
same channel set on main unit, so set
channel on main unit first.
H5. Battery indicator: Red light indicator
flashes when the batteries are almost
out of power.
H6. Power switch on / off : Controls microphone power.
4 Ohm 8” Full Range
Receiver Module
Dimensions
Weight
19.5-in. H x 13in.W x 11.5in.D
Approximately 35 lbs.
8
Amplivox Sound Systems
- Call 800-267-5486 for assistance - www.ampli.com for support and registration-
10/30/2009
Special Notes & Troubleshooting Guide
Channel and Microphone Specifications
Note On Unit Installation
1. For best sound projection unit should be placed on raised surface or tripod 4-6
feet above the floor.
2. When turning on the system initially, volume should be set to lowest settings,
and raised as needed.
3. The battery charge light will blink green when the batteries are charging, but
will remain steady once fully charged.
4. If there is poor wireless microphone reception (crackling, buzzing or cutting in
and out), change the channels on the main unit and wireless microphone to one
of the other available 16 channels. There may be interference on the channel
your operating on. It is also a likely possibility that the microphone’s batteries
need recharged/replaced if wireless signal is weak.
5. If adding your own external speaker, the requirements are 4Ω/80W. Failure to
meet these requirements may result in poor audio, or excessive feedback.
Channel Specifications (Wireless Frequency Channel)
Carrier Frequency
Range
UHF 600-960MHz
Stability
+/- 0.005%
Deviation
+/- 40KHz, with level Limiting circuit control
Dynamic range
>110dB
S/N Ratio
>105dB
T.H.D.
<0.5%
Squelch Circuit
Pilotone squelch / PLL Synthesized Receiver / Non-Diversity
Frequency Response
50Hz~18KHz63dB
Receiver Mode
Quartz and Tone Squelch True Diversity/
Wireless Microphone
Capsule Type
Single Receiver/Non-Diversity or PLL System
Wireless Transmitter
Ratio
Dynamic Capsule or Condenser Capsule Approx 10mW
Transmitter Battery
AA No 3 Batteries (2 pcs) / 9V Battery (1pc)
Troubleshooting Guide
1. Make sure battery’s positive side faces up when changing the remote control
batteries, and observe the correct insertion direction (positive/negative) for the
system’s and microphone’s rechargeable batteries before calling for support.
2. Turn unit off while not in use and remove batteries if unit is to be left unused for
a long period of time.
3. Operating time depends on volume. When the green signal is steady (not flashing) battery is fully charged. If indicator is flashing unit can receive charge. If
charge is very low the indicator will remain off. Please recharge as soon as possible. You may need to plug into external power source at this point.
4. To keep batteries in optimal condition, please charge once every 2-3 months.
Microphone Specifications
Carrier frequency range
Pre-programmed Frequency
600-960MHz
Preset 16 Channels
Frequency stability
<0.005%
Frequency response
50Hz-18KHz( ± 3dB)
Antenna
External antenna
Battery
1.5v x 2 or 1.2V x 2(AA UM-3)
Weight
3.4 ozs
Note on Unit:
1. Do not open this unit, or alter its components in any way. Doing so voids your
warranty, and can result in electrocution or unit damage. You alone are liable if
anything occurs when servicing the unit yourself.
2. Be careful not to drop or jar the unit severely. Damage may occur, and this type
of abuse is not covered by the warranty.
3. Do not leave the unit exposed to the heat and direct sunlight for prolonged
periods of time. Heat may damage the unit.
4. Do not use wheels in mud, stone or poor ground conditions to avoid any damage to wheel assembly.
9
Amplivox Sound Systems
- Call 800-267-5486 for assistance - www.ampli.com for support and registration-
10/30/2009
10
Amplivox Sound Systems
- Call 800-267-5486 for assistance - www.ampli.com for support and registration-
10/30/2009
Warnings
Instructions on Changing Main Unit Battery
Warning
Federal Communication Commission Interference Statement
This equipment has been tested and found to comply with the limits for a Class
B digital device, pursuant to Part 15 of the FCC Rules. These limits are designed
to provide reasonable protection against harmful interference in a residential
installation. This equipment generates, uses and can radiate radio frequency
energy and, if not installed and used in accordance with the instructions, may
cause harmful interference to radio communications. However, there is no guarantee that interference will not occur in a particular installation. If this
equipment does cause harmful interference to radio or television reception,
which can be determined by turning the equipment off and on, the user is
encouraged to try to correct the interference by one of the following measures:
Refer to instructions and diagram below for changing batteries.
1. Please switch power off before changing the batteries.
2. Remove the 4 screws on the battery covers and remove batteries plates from
main panel board and take old batteries out. Install the new batteries 12V/4.5A
into battery compartment.
3. Make sure each battery is properly inserted. Then:
Connect red line into Positive R1 Red Line Terminal
Connect black line into Negative B2 Black Line Terminal
Connect Negative B2 Black Line Terminal to Gathered Negative B1
Connect Negative B1 Black to Positive R2 Red.
Note: Make sure the pole matches the color.
4. Then reattach the battery covers with four screws that were removed at the
beginning of the procedure.
- Reorient or relocate the receiving antenna.
-Increase the separation between the equipment and receiver.
-Connect the equipment to an outlet on a circuit different from that to which the
receiver is connected.
-Consult the dealer or an experienced radio/TV technician for help.
Attaching battery incorrectly may result in battery fluid
Expulsion, corrosion, and possibly injury. Please call for
technical assistance if needed. (800-267-5486)
FCC Caution: To assure continued compliance, any changes or modifications not
expressly approved by the party responsible for compliance could void the
user’s authority to operate this equipment. (Example use only shielded interface
cables when connecting to computer or peripheral devices).
CAUTION :To reduce the risk of electric shock, do not
remove the cover, No user serviceable parts inside. Refer
servicing to qualified personnel. Exception: Battery may
be changed by user if correct procedure is followed.
WARNING: To prevent fire or electric shock, do not
expose this equipment to rain or moisture.
Explanation Of Graphical Symbols
The lightning flash with arrowhead symbol, within an equilateral triangle, is
Intended to alert the user to the presence of uninsulated dangerous voltage
within the products enclosure that may be of sufficient magnitude to
constitute a risk of electric shock to humans.
The exclamation point, within an equilateral triangle, is intended to alert the
user to the presence of important operating and maintenance(servicing)
instructions in the literature accompanying the appliance.
11
Amplivox Sound Systems
- Call 800-267-5486 for assistance - www.ampli.com for support and registration-
10/30/2009
12
Amplivox Sound Systems
- Call 800-267-5486 for assistance - www.ampli.com for support and registration-
10/30/2009
E XTEND Y OUR V OICE W ITH
AMPLIVOX
®
This page left blank intentionally
P ORTABLE S OUND S YSTEMS
TITAN WIRELESS PORTABLE PA
Amplivox Sound Systems LLC.
3995 Commercial Ave.
Northbrook, IL 60062
800-267-5486
Amplivox Sound Systems
- Call 800-267-5486 for assistance - www.ampli.com for support and registration-
10/30/2009
Amplivox Sound Systems
- Call 800-267-5486 for assistance - www.ampli.com for support and registration-
10/30/2009