1
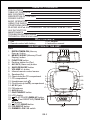
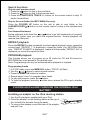
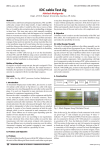
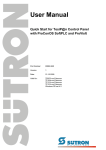
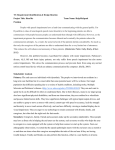
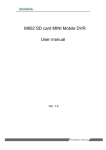
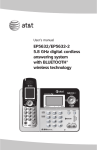
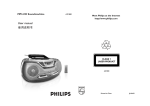
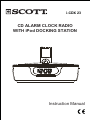
i-CDX 23
CD ALARM CLOCK RADIO
WITH iPod DOCKING STATION
Instruction Manual
PRECAUTIONS
Follow the instructions below to ensure the product is used safely and correctly.
LOCATION
• Do not use the unit in places which are extremely hot, cold, dusty, or humid.
• Place the unit on a flat, level surface.
• Do not restrict the airflow around the unit by placing it in a place with poor ventilation, covering it with a cloth, or placing it on a carpet.
• Do not place the unit close to heat sources.
• Use the unit only in moderate climates.
• Do not expose the unit to rain or splash with water
• Do not place objects filled with liquids such as vases on the unit.
SAFETY
• When connecting and disconnecting the AC power adapter, take hold of the plug
and not the cord. Pulling the cord may damage it and may be dangerous.
• The plug must be easily accessible.
• When you are not going to use the unit for a long period of time, disconnect the
adapter from the AC mains outlet.
AC VOLTAGE
• Before use, check that the rated voltage of your unit matches your local voltage.
CONDENSATION
• The unit may not work properly if it has condensation inside.
• Unplug the unit for 1 to 2 hours before turning the power back on, or gradually
heat the room up and dry the unit before use.
• Ensure a space of at least 5 cm around the apparatus to enable sufficient ventilation.
• Do not cover the ventilation openings.
BATTERIES
• Pay attention to the environmental aspects of battery disposal.
CAUTION
RISK OF ELECTRIC SHOCK
DO NOT OPEN
The lightning flash with
an arrowhead symbol
within a triangle is a
warning sign alerting
the user to the
presence of dangerous
voltage inside the unit.
ATTENTION: To reduce the risk of
electric shock, do not remove the
cover. There are no user serviceable
parts inside the unit. Refer all
servicing to qualified personnel.
GB-1
The exclamation mark
within a triangle is a
warning sign alerting
the user to the
presence of important
instructions accompanying the product.
TABLE OF CONTENTS
PRECAUTIONS
TABLE OF CONTENTS
BOX CONTENTS
DESCRIPTION OF THE UNIT
POWER SUPPLY
BASIC OPERATION
USING THE RADIO
CD/MP3/WMA MODE
PLAYING AN iPod AND CHARGING THE INTERNAL iPod BATTERY
AUX IN FUNCTION
MAINTENANCE
TROUBLESHOOTING GUIDE
TECHNICAL SPECIFICATIONS
1
2
2
2
3
4
6
6
7
8
8
9
9
BOX CONTENTS
1. Unit
2. Remote control with battery
3. AC adapter
4. Instruction manual
DESCRIPTION OF THE UNIT
Unit
141315 16 12
1. REPEAT/MEM-DN (Memory
Down ) button
2. MEM/CLK/DISP (Memory/Clock/
Display) button
3. FUNCTION button
4. Docking station for iPod
5. AL1/AL2 (Alarm set) button
6. SNOOZE/SLEEP button
7. VOLUME +/- button
8. Infrared remote control sensor
9. Speakers(2x)
2
10. Open/close the CD compartment
11. CD compartment
3
12. Headphones jack
13. Clock back-up battery compartment 7
14. AC 8V jack
17
15. FM antenna
16. AUX IN jack
17. ON/STANDBY button
18. LCD display
19.
(PLAY/PAUSE)/MEM-UP button
20.
/ (Fast REW/FWD)/TUNE DN/
UP buttons
21. (STOP)/BAND button
22. FOLDER UP button
23. DIMMER LOW / HI switch
GB-2
4
11
22
20
19
21
10
9
5
18
6
23 8
5
9
Remote control
1. MUTE
2
STANDBY/AL OFF
2.
20
3. MEM/CLK (Memory/Clock set)
21
MENU (access iPod menu)
4. DISP (display)
3
19
5. SHUFFLE
10
6. AL1/AL2 (Alarm set)
4
7. SNOOZE/SLEEP
5
8. ALBUM/FOLDER /
8
9. CHAPTER/10 TRACK +/10. REPEAT
9
11. (STOP )/BAND
12. iPod mode
13. MENU /
6
14. TUNER mode
(Fast REW/FWD, TUNE DN/UP)
15. /
16. SELECT
20. CD mode
17. PLAYLIST/MEMORY +/21. AUX mode
18. VOLUME /
22. FM ST (stereo)
(PLAY/PAUSE)
19.
12
14
22
11
13
15
16
1
17
18
7
POWER SUPPLY
AC power supply
Insert the AC adapter into a 230V AC ~ 50Hz mains outlet and the other end of the
cord into the AC 8V jack at the back of the unit.
Installing the clock back up battery
The clock time can be maintained during a power failure by 2 x AAA/ LR03 batteries (not supplied). However, the time may go forward or back slightly and may
need resetting.
Inserting the batteries
1. Open the battery compartment on the bottom of the unit by pressing on the
catch and removing the cover.
2. Insert 2 x AAA/ LR03 batteries (preferably alkaline batteries) into the battery
compartment, following the polarity as shown on the diagram inside the
compartment.
3. Replace the battery compartment cover.
Installing the remote control battery
OPEN
LIT
H
IU
M
C B
R A
20 T T
25 E
RY
Y
ER
TT
BA 25
IUM 20
TH CR 3V
LI
CR2025
PUSH
CR2025
1. Remove the battery compartment cover
on the bottom of the remote control, by
OPEN
pushing the tab to the right while removing
PUSH
the cover.
2. Insert a 3V lithium battery (CR2025 or equivalent) following the polarity (+) as
shown on the diagram inside the compartment.
3. Replace the battery compartment cover.
GB-3
3V
Note: The remote control battery normally lasts for about one year, although it
depends on how often the remote control is used. If the remote control is not
working properly, replace the battery.
Precautions when using batteries
1. CAUTION: Danger of explosion if battery is incorrectly inserted. Replace only
with the same or equivalent type.
2. Do not mix different types of batteries together (e.g. alkaline, rechargeable and
standard (carbon zinc)) or old batteries with fresh ones.
3. Exhausted batteries must be removed to prevent possible leakage.
4. Dispose of batteries properly in accordance with the environmental regulations
in force.
BASIC OPERATION
ON/ Standby
When it is connected to a power supply (refer to “POWER SUPPLY”), the unit goes
to standby mode and the clock time is displayed. Press the ON/STANDBY button
to turn on the unit and press it again to go back to standby mode.
Setting the clock
1. In standby mode, press and hold down the MEM/CLK button and use the
/ buttons to select 24Hr or 12Hr display format. Press the MEM/CLK button
to confirm and set the clock.
2. Use the
buttons to set the hour, and press the MEM/CLK button to
/
confirm.
3. Repeat step (2) above to set the minutes.
Using the alarm
The unit allows you to wake up to the sound of the buzzer or to music
(Radio/CD/iPod).
Setting the alarm time
1. In standby mode, press AL1 or AL2 to display the alarm time. Then, press and
hold down AL1 or AL2. The hour digits will flash.
2. Use the
/ buttons to set the hour.
3. Press AL1 or AL2 to confirm. The minute digits will flash.
4. Repeat steps (2) and (3) to set the minutes.
Setting the alarm mode
5. After setting the alarm time, the alarm mode option will flash. Select a source
using the
buttons: Buzzer “
”, “Radio”, “CD” or “iPod”. Press AL1 or
/
AL2 to confirm.
Enabling/ Disabling the alarm function
6. Press and hold AL1 or AL2 to enable or disable the alarm function.
7. When the alarm function is on, the buzzer or music will come on at the set time.
8. To stop the alarm, press the
/AL OFF button. The alarm will sound again at
the same time the next day.
9. To disable the alarm function, press and hold AL1 or AL2.
GB-4
Note:
• Both the buzzer and music alarm volume are fixed and cannot be adjusted.
At the set alarm time, the music volume will increase gradually until it reaches
level ”22”.
The buzzer volume level also increases gradually.
• If CD or iPod mode is selected, make sure there is a CD in the disc compartment
or an iPod is inserted in the docking station.
• This unit has a dual alarm function. Use the AL1 button to set the time for alarm
1, or the AL2 button to set the time for alarm 2.
Snooze function
When the alarm sounds, press the SNOOZE/SLEEP button to stop the alarm
temporarily and it will sound again after 6 minutes. To cancel the SNOOZE function,
press the /AL OFF button. The alarm will stop and come on again the next day.
Sleep function
This function allows you to program the unit so that the radio turns off automatically
after a certain time (up to 90 minutes).
1. When the unit is switched on, press the SNOOZE/SLEEP button repeatedly to
select a duration between 90 and 10 minutes. The duration is set in intervals of
10 minutes, from 90 minutes to sleep function off. “SLEEP” is displayed when this
function is activated.
2. At the end of the set time, the unit turns off automatically.
3. To cancel the sleep function before the end of the preset time, press the
ON/STANDBY button to turn off the unit immediately.
Selecting a source
When the unit is switched on, press the FUNCTION button repeatedly on the unit or
the corresponding mode button on the remote control to select one of the following
sources: “Radio”, CD, “AUX” or “iPod”.
VOLUME control
Press the VOL +/- buttons to adjust the volume level.
MUTE
Press the MUTE button on the remote control to turn off the sound. “MUTE” will flash
on the display. Press it again or use the VOL +/- buttons to resume the sound.
Connecting the headphones
Plug your headphones (not supplied) into the headphones jack at the back of the
unit for private listening. The speaker output will shut off automatically.
DIMMER control
Slide the DIMMER switch to HI (high) orLOW to adjust the brightness of the display.
Time display
When the unit is switched on, press and hold the MEM/CLK/DISP button on the unit
or simply press the DISP button on the remote control repeatedly to display the clock
time or current mode information.
GB-5
USING THE RADIO
Listening to the radio
1. When the unit is switched on, press the FUNCTION button on the unit or the
TUNER button on the remote control to select “Radio” mode.
2. Press the /BAND button to select FM or MW.
3. Hold down the
or
button to start searching up / down. For manual search,
you can briefly press these buttons repeatedly to adjust the frequency step by
step.
FM Stereo
In FM mode, “(ST)” is displayed when the unit is receiving a station with a strong
signal and stereo sound.
For optimum reception
In FM mode, extend and position the FM antenna to achieve optimum reception.
In MW mode, orientate the unit to achieve optimum reception.
Preset radio stations
You can store up to 20 FM stations and 20 MW stations.
1. Use the
/
buttons to search for a station. Press the MEM/CLK button to
store that station. A preset number will flash.
2. Press the
/MEM-UP or REPEAT/MEM-DN button on the unit or the
PLAYLIST/MEMORY +/- button on the remote control to select the desired
preset number for the station.
3. Press the MEM/CLK button again to confirm the setting.
4. Repeat steps 1 to 3 to store other stations.
Listening to a preset station
When listening to the radio, press the
/MEM-UP or REPEAT/MEM-DN
button on the unit or the PLAYLIST/MEMORY +/- button on the remote control
to select a preset radio station.
CD/MP3/WMA MODE
Start playback
1. When the unit is switched on, press the FUNCTION button on the unit or the CD
button on the remote control to select “CD” mode.
2. Open the CD compartment and insert a CD or CD-R/RW with the printed side
facing up. Close the CD compartment.
3. The unit will read the disc and then display the total number of tracks and
folders (for MP3/WMA files only). The unit will start playback from the first track.
During playback, the current track number and folder number (for MP3/WMA
files only) are displayed.
Pause playback
Press the
button to pause playback. The symbol “ ” will flash. Press the button
again to resume playback.
Stop playback
Press the
button to stop playback. Then press the
from the first track.
GB-6
button to start playback
Search functions
Skip to next/ previous track
1. Press the
button to skip to the next track.
2. Press the
button to skip to the previous track.
3. Press the CHAPTER/10 TRACK +/- button on the remote control to skip 10
tracks forward/back.
Skip to the next folder (for MP3/ WMA files only)
Press the FOLDER UP button on the unit to skip to next folder or the
ALBUM/FOLDER / button on the remote control to skip to the next/previous
folder.
Fast forward/backward
During playback, hold down the
or button to go fast backwards or forwards.
Release the button once you reach the required section.. Normal playback will
resume from that point.
REPEAT playback
Press the REPEAT button repeatedly to select repeat playback mode: repeat the
current track (“REPEAT 1” is displayed), repeat the folder (For MP3/WMA files
only - “REPEAT FOLDER” is displayed), repeat all of the tracks (“REPEAT ALL” is
displayed) or cancel the repeat function.
PROGRAM playback
This function allows you to program up to 20 tracks for CD and 99 tracks for
MP3/WMA files to be played in the desired order.
Note: Programming can only be performed when playback is stopped.
Programming tracks
1.
2.
3.
4.
5.
6.
In STOP mode, press the MEM/CLK button. “PROG” will flash.
Use the
/
buttons to select a track number.
Press the MEM/CLK button to confirm.
Repeat steps 2 and 3 to program other tracks.
To play the program, press the
button.
To clear the program, press the button twice, remove the CD or go to standby
mode.
PLAYING AN iPod AND CHARGING THE INTERNAL iPod
BATTERY
Installing an adapter on the iPod docking station
1. Use the iPod adapter supplied with your iPod .
2. Place the adapter on the docking station at the top of
the unit with the two tabs facing forwards.
3. To remove the adapter, press the back of the adapter
and pull it up.
GB-7
Note: Ensure that the iPod adapter is correctly installed on the docking station.
Listening to your iPod
1. With the iPod adapter installed, gently dock the iPod (without the protective
cover) in the docking station.
2. When the unit is switched on, press the FUNCTION button on the unit or iPod
button on the remote control to select iPod mode.
3. Then press the button to start playback. Press it again to pause playback.
Press it again to resume normal playback.
4. Press the / buttons repeatedly to skip to the previous or next track.
5. Hold down these buttons to move fast forward or back.
6. Use the CHAPTER, ALBUM and PLAYLIST buttons on the remote control to
navigate through the chapters, albums, or playlists on a docked iPod.
7. Press the MENU button to access the iPod menu. Use the MENU / and
SELECT buttons on the remote control to navigate through the iPod’s menu.
Use the SELECT button to confirm your selections.
8. Alternatively, you can use the controls on your iPod.
9. Random playback: Press the SHUFFLE button on the remote control to play the
tracks in random order. Press the SHUFFLE button again to cancel the function.
Note:
• The iPod’s internal battery charges until it is fully charged.
• Adjust the volume using the volume control button on the unit.
• To prevent sound distortion during iPod playback on this unit, the EQ function in
your iPod must be set to “Off”.
• The unit is not designed for playing and charging an iPod shuffle, but it is
possible to connect the iPod’s line out or headphones jack to the AUX IN jack
on the unit.
AUX IN FUNCTION
This unit has an AUX IN jack which allows you to connect an external audio device
such as an MP3 player or earlier iPod model.
1. Connect a 3.5mm stereo connection cable (not supplied) to the AUX IN jack at
the back of the unit and the line out/headphones jack on your external audio
device.
2. When the unit is switched on, press the FUNCTION button on the unit or the
AUX button on the remote control to select “AUX” mode.
3. Operate your external audio device as usual to select and play music.
4. Adjust the volume controls on both your external audio device and this unit to
the desired volume level.
Note: In AUX mode, this unit cannot display any music information (e.g. track
number) for your external audio device.
MAINTENANCE
Care and maintenance
To clean the casing, unplug the unit and wipe off dust and stains with a soft, damp
cloth. Do not use benzene, thinner or similar chemicals to clean the casing.
GB-8
Cleaning CDs
If the music skips or does not play, the disc may need cleaning. In that case,
before playback, wipe the disc from the center out with a clean cloth. After use,
store the disc in its case.
If at any time in the future you want to dispose of this product, please note that
electrical products should not be disposed of with household waste. Find out
where your nearest recycling centre is. Consult your local authority or retailer for
more details. (Waste Electrical and Electronic Equipment Directive)
TROUBLESHOOTING GUIDE
Problems
1. The player or display
is not working
properly.
Recommendations
1.1 Press the STANDBY button to go to standby mode
and press it again to turn the unit back on.
1.2 Reset by unplugging the AC power cord for few
seconds, then plug it back in.
2. No sound, poor
2.1 Check the cable connections.
sound.
2.2 Use the FUNCTION or iPod button to select the correct
mode.
3. The disc does not
3.1 Reinsert the disc with the printed side facing up.
play.
3.2 Ensure that the disc is clean and in good condition.
3.3 Only CD and CD-R/RW discs can be played.
3.4 Clean the disc.
4. Noise or distorted
4.1 FM mode: Extend and position the FM antenna to
sound in radio mode.
achieve the best reception.
4.2 AM mode: Orientate the unit to achieve the best
reception.
5. No sound, poor sound 5.1 Use your iPod adapter.
in iPod mode.
5.2 The EQ function in your iPod must be set to “Off”.
5.3 Your iPod model is not supported by the unit. Connect
your iPod to the docking station via the AUX IN jack.
TECHNICAL SPECIFICATIONS
CD: compatible discs/files
Radio: Frequency range
Antenna
General
Output power
Power consumption
Speakers
AC adapter
CD, CD-R/RW, MP3 and WMA
FM: 87.3 – 108 MHz, MW: 522 – 1620 kHz
FM: wire antenna, MW: built-in ferrite bar
3 W (2 x 1.5 W)
16 W
2 x 2 1.4”, 4 Ohms
Input: AC 230V~50Hz
Output: AC 8V
DC 3V (2 x 1.5V): 2 x AAA/LR03 batteries
Clock back-up
82(H) x 246(W) x 212(D) mm
Dimensions
1.1Kg
Weight
Note: Due to continuing improvements, the technical specifications are subject to
change without notice.
GB-9