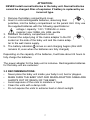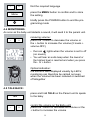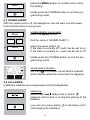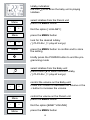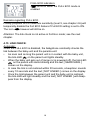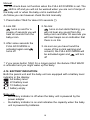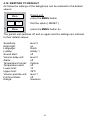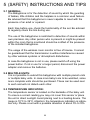
1
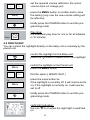
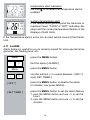
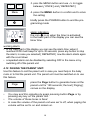
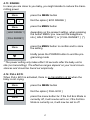
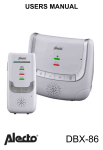
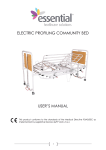
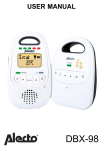
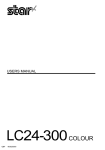
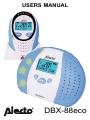
USERS MANUAL
DBX-88eco
LCD Language:
Depending on the purchased version, the LCD language might not be
English on start-up. Please see chapter 4.3 on page 8 how to change the
language of your DBX-88 eco.
1 ECO MODE
This Alecto DBX-88 ECO babyphone is equipped with an unique ECO
mode. Already in normal operation mode, the baby-unit stops transmission when the baby is not crying. In Full Eco mode it even suppresses
the controlling signals between the baby-unit and the parent unit, so no
transmitting at all.
Next to the Full eco mode, you can set the output power. In case you are
at home with your baby not far away, you can set the babyphone in half
range mode, with low transmitting power and reduced power consumption. In case the baby is not close to you, you may switch to full range.
Attention: once the baby produces noise, the baby-unit is activated and
contacts the parent unit. This causes a small delay which means that
short sounds from the baby may not be heard by you. In case you really
want to hear all sounds from the baby room, you must set the sensitivity
to maximum (see chapter 4.6); with this setting the baby-unit is constantly
active.
2
2 OVERVIEW
2.1 OVERVIEW PARENT UNIT:
1. sound indication LED’s
2. volume up; up button when
programming
3. volume down; down button when
programming
4. button MENU/OK
5. link-check (
), see below
6. loudspeaker
7.
8.
9.
10.
11.
12.
13.
charge contacts
battery compartment
microphone
start/stop lullaby
display (see paragraph 2.3)
power on/off
talk back
1
2
13
3
12
4
11
10
5
9
6
8
7
Link check
:
• flashes when there is no link between baby unit and parent unit or
parent unit is out of range with the baby unit.
• on steadily when linked to the baby unit
• in the full eco mode this lamp only lights when the parent unit actual
receives noise from the baby unit; in idle state this lamp is OFF
during FULL ECO mode
3
2.2
1.
2.
3.
4.
5.
6.
7.
8.
OVERVIEW BABY UNIT:
battery indication: see below
display (see paragraph 2.3)
built-in nightlight (not visible
when switched-off
power on/off
microphone
DC input for power adapter
start-stop lullaby
battery compartment (backside)
14
9.
10.
11.
12.
selection lullaby
loudspeaker
volume up/down
temperature sensor (backside)
13. page (to page the parent
unit)
14. nightlight on/off
13
12
11
1
2
3
10
4
9
5
6
7
8
battery indication :
• lights when batteries are installed and the power adapter is connected to indicate that batteries are being charged (does NOT goes off
when batteries are fully charged)
4
2.3 OVERVIEW DISPLAY:
display parent unit
display baby-unit
on when night light is enabled
off when night light is disabled
on when lullaby is playing
on when the speaker volume is turned
off; off when the speaker volume is
turned on
displaying of the
several functions
and warnings
during use
displaying of the
several settings
during programming
on when sound alert is enabled
flashes when sound alert is triggered
indication temperature reading in Celsius or in
Fahrenheit
on when temperature alert is enabled, flashes when
temperature alert is triggered
on when the alarm time/count down timer is set, flashes
when the alarm time/count down timer is arrived
on when the FULL ECO MODUS is enabled
battery indication:
full battery level
2/3 battery level
1/3 battery level
battery empty
parent unit: this indication animates in cycle while charging. baby-unit: this indication does not light
when the power adapter is connected
5
3 INSTALLATION
3.1 PARENT UNIT:
The parent unit is powered by 2 supplied rechargeable batteries. These
batteries are charged through the included power adapter.
ATTENTION:
NEVER install normal batteries in the baby unit. Normal batteries
cannot be charged. Risc of explosion if battery is replaced by an
incorrect type.
1. Remove the belt clip with the help of a small screwdriver
2. Remove the battery compartment cover.
3. Insert 2 x AAA rechargeable batteries, observing their
polarities, into the battery compartment on the parent
Unit. Only use the supplied batteries with the following
specifications:
voltage / capacity: 1.2V / 750mAh or more
material / size: NiMH, AAA, HR03
4. Replace the battery door on the Parent unit
5. Connect the output plug of the mains adapter to the DC socket on
the side of the baby unit and the mains adapter to the wall mains
supply.
As soon as the battery icon stops animating, the batteries are fully
charged (*). The LED on the charger pod remains on until you lift the
parents unit from the charger pod.
*: for the first time, it is recommended to continue charging for at least 24 hours, even when the
battery icon indicates that the batteries are full.
3.2 BABY-UNIT:
The baby-unit is powered by the supplied power adapter.
Only connect the provided power adapter with the following specifications: Input: 100-240VAC 150mA; Output: 9VDC 500mA
For portable use you can install 4 pcs RECHARGEABLE batteries.
6
ATTENTION:
NEVER install normal batteries in the baby unit. Normal batteries
cannot be charged. Risc of explosion if battery is replaced by an
incorrect type.
1. Remove the battery compartment cover.
2. Insert 4 x AA rechargeable batteries, observing their
polarities, into the battery compartment on the parent Unit. Only use
the supplied batteries with the following specifications:
voltage / capacity: 1.2V / 1300mAh or more
material / size: NiMH, AA, HR6, penlite
3. Reattach the battery compartment cover.
4. Connect the output plug of the mains adapter to the DC
socket on the side of the baby unit and the mains adapter to the wall mains supply.
5. The battery indication comes on and charging begins (this LED
remains lit, even when the batteries are fully charged)
Depending on the capacity of the batteries, It will take about 24 hours to
fully charge the batteries.
The power adapter for the baby-unit is inclusive. Rechargeable batteries
for the baby-unit are exclusive.
3.3 RECOMMENDATIONS:
• Never place the baby unit inside your baby’s cot, bed or playpen.
• MAKE SURE THE BABY UNIT AND MAINS ADAPTOR CABLE ARE
ALWAYS OUT OF REACH OF THE BABY.
• Avoid exposure of the units to moisture or liquid.
• Clean the units with a damp cloth.
• Do not expose the units to extreme heat or direct sunlight.
7
4 USING YOUR BABY MONITOR
Please read these instructions carefully, and be reminded that this baby
monitor is just intended as an aid. It is not a substitute for responsible,
correct parental supervision.
4.1
POWER ON/OFF:
2
sec.
provided the parent unit is off, press and hold
<POWER> for about 2 seconds to switch-ON
the unit
2
sec.
provided the parent unit is on, press and hold
<POWER> for about 2 seconds to switch-OFF
the unit
4.2 LINK CHECK:
As soon as the parent unit is turned on, it starts looking for the baby unit.
1. The link-led
blinks and the text [SEARCHING] comes on the
display
2. As soon as the parent unit finds the baby unit, the link-LED lights
steadily
3. In case the parent unit cannot find the baby unit within a period of 30
seconds (because it is not yet switched on, the batteries of the babyunit are empty or the distance is too large), the text [ NOT LINKED]
comes on the display and attention tones sound every 10 seconds.
See also paragraph 4.15.
4.3 LANGUAGE:
It is recommended to first set the language so that all text comes on the
LCD in your favorite language. By default the Dutch language is programmed.
You only have to set the language onto the parent unit, the baby unit will
be synchronized automatically.
2x
Menu
press the MENU button 2x
8
-
+
find the required language
press the MENU button to confirm and to store
the setting
Menu
briefly press the POWER button to end the programming mode
4.4 MONITORING:
As soon as the baby unit detects a sound, it will send it to the parent unit.
-
+
receiving volume:
press the - button to decrease the volume or
the + button to increase the volume (5 levels +
volume-OFF)
• the icon
lights when the volume is set to off
(no sound)
• You will hear an extra beep when the lowest or
the highest level is reached and when you press
the - or + button..
Optical indication:
the sound is also displayed visually by LED’s;
monitoring can therefore be carried out even
when the volume has been reduced or switched
off altogether
4.5 TALK BACK:
press and hold TALK on the Parent unit to speak
to the baby
Talk
-
+
control the volume on the Baby unit:
press the - button to decrease the volume or the
+ button to increase the volume
9
control the volume on the Parent unit:
press the MENU button
Menu
-
+
Menu
-
find the option [ BABY VOLUME ]
press the MENU button
+
Set the required volume (attention: the actual
volume does not change yet)
press the MENU button to confirm and to store
the setting (only now the new volume setting will
be effective)
Menu
briefly press the POWER button to end the programming mode
4.6 SENSITIVITY:
You can adjust the sensitivity on the Parent Unit to monitor the sound
from Baby Unit:
Menu
-
+
Menu
-
press the MENU button
find the option [ SENSITIVITY ]
press the MENU button
+
select the required level
There are five levels of sensitivity which are
indicated by lighted blocks:
level 1 represents lowest sensitivity
level 4 represents a high sensitivity
level 5 represents the highest sensitivity (the
microphone is activated all the time)
You will hear an extra beep when the lowest or the
highest level is reached and when you press the - or
+ button.
10
press the MENU button to confirm and to store
the setting
Menu
briefly press the POWER button to end the programming mode
4.7 SOUND ALERT:
With the volume set to off, the babyphone can still warn you with beeptones that the baby is crying loud.
enable/disable sound alert:
press the MENU button
Menu
2x
+
Menu
find the option [ SOUND ALERT ]
press the menu button 2x:
if the alert is currently off, it will now be set to on;
if the alert is currently on, it will now be set to off
briefly press the POWER button to end the programming mode
sound alert indication:
the icon
is on when sound alert is enabled
and it flashes when the sound alert is triggered
4.8 LULLABIES:
5 Different lullabies are programmed into this babyphone
start/stop:
(baby-unit) or button
press button
(parents unit) to start or to stop the playing of the
lullabies
(you can also press button
start playing the lullabies)
11
on the baby unit to
lullaby indication:
the icon is on when the baby unit is playing
lullabies
select lullabies from the Parent unit:
press the MENU button
Menu
-
+
press the MENU button
Menu
-
find the option [ LULLABY ]
+
look for the desired lullaby
( [ PLAY ALL ] = play all songs)
press the MENU button to confirm and to store
the setting
Menu
briefly press the POWER button to end the programming mode
select lullabies from the Baby unit:
press button to select another lullaby
( [ PLAY ALL ] = play all songs)
-
+
control the volume on the Parent unit:
press the MENU button
Menu
-
+
Menu
control the volume on the Baby unit:
Press the - button to decrease the volume or the
+ button to increase the volume
find the option [BABY VOLUME]
press the MENU button
12
-
+
set the required volume (attention: the actual
volume does not change yet)
press the MENU button to confirm and to store
the setting (only now the new volume setting will
be effective)
Menu
briefly press the POWER button to end the programming mode
Play time:
the maximum play time for one or for all lullabies
is 15 minutes
15min.
4.9 NIGHTLIGHT:
You can control the nightlight directly on the baby unit or remotely by the
parent unit.
control the nightlight on the Baby unit:
press the
button to switch-on/off the nightlight
control the nightlight on the Parent unit:
press the MENU button
Menu
-
+
2x
Menu
find the option [ NIGHTLIGHT ]
press the menu button 2x:
if the nightlight is currently off, it will now be set to
on; if the nightlight is currently on, it will now be
set to off
briefly press the POWER button to end the programming mode
night light indication:
the icon
is on when the night light is switched
on
13
4.10 ROOM TEMPERATURE AND ALERT:
In idle state the display of both the Baby unit and the Parent unit indicates
the temperature of the Baby room in degrees Celsius (°C) or in degrees
Fahrenheit (°F). With this option you can set the format, the limits and
enable or disable the Temperature alert.
Menu
-
press the MENU button
+
press the MENU button
Menu
-
find the option [ TEMPERATURE ]
+
use the buttons -/+ to select between:
[ FORMAT ]
to alter between Celsius and Fahrenheit
[ MIMIMUM ]
to set the minimum temperature
(in between 10°C (50°F) and 20°C(69°F))
[ MAXIMUM ]
to set the maximum temperature
(in between 21°C (70°F) and 39°C(99°F))
[ ALERT ON/OFF ]
to enable or disable the temperature alert
press the MENU button
Menu
-
+
Menu
use the buttons -/+ to change the settings
press the MENU button to confirm and to store
the setting
briefly press the POWER button to end the programming mode
14
temperature alert indication:
the icon
is on when the temperature alert is
enabled
working temperature alert:
If the temperature goes beyond the minimum or
maximum level, “COLD” or “HOT” indication displays and the current temperature flashes in the
displays of both Units.
If the Temperature alert is set to On, an alert will be sound at the Parent
Unit.
4.11 ALARM:
Alarm feature is useful for you to remind yourself for some special arrangements, like feeding time, etc.
press the MENU button
Menu
-
+
press the MENU button
Menu
-
find the option [ ALARM ]
+
use the buttons -/+ to select between: [ OFF? ]
and [ SET TIMER ]
[ OFF? ]
press the MENU button to disable the alarm
(to disable, now press MENU)
[ SET TIMER ]
press the MENU button to set the alarm feature
1. pres the MENU button and use -/+ to set the
hours
2. pres the MENU button and use -/+ to set the
minutes
15
-
+
Menu
3. pres the MENU button and use -/+ to toggle
between [ ONCE ] and [ REPEATED ]
4. press the MENU button to confirm and to store
the setting
briefly press the POWER button to end the programming mode
alarm indication:
the icon
is on when the timer is activated;
in the lower part of the display you can see the
timer time
working alarm:
• in the lower part of the display you can see the alarm time; when it
reaches 00:00 it will beep for up to 30 seconds; press any button to stop
the alarm; in case you selected [ REPEATED ] now the alarm starts again
with the count down
• a repeated alarm can be disabled by selecting OFF in the menu or by
switching off of the parent unit
4.12 PAGING THE PARENT UNIT:
Use this feature to call the parent unit in case you need help in the baby
room or to find the parent unit. The parent unit must be switched-on to use
this feature.
Page
•
•
•
press the Page button to generate tones at the
parent unit for 120 seconds; the text [ Paging ]
comes on the display
You may end this signaling by again pressing button Page or by
pressing any key on the parent unit.
The volume of these tones is fixed.
In case the volume of the parent unit was set to off, when paging the
volume will be set to on and remain on.
16
4.13 RANGE:
In case you are close to you baby, you might decide to reduce the transmitting power
Menu
-
press the MENU button
+
find the option [ ECO RANGE ]
press the MENU button
Menu
[ HALF RANGE ? ]
[ FULL RANGE? ]
depending on the present setting, when pressing
the button MENU you now set the babyphone
into [ HALF RANGE? ] or [ FULL RANGE? ] (*)
press the MENU button to confirm and to store
the setting
Menu
briefly press the POWER button to end the programming mode
* The power setting only takes effect 30 seconds after the baby unit is
idle (no transmitting). The effective ranges depend on your local circumstances and should be found out empirically.
4.14 FULL ECO:
When FULL ECO is activated, there is no transmitting at all when the
baby is not crying.
Menu
-
press the MENU button
+
Menu
find the option [ FULL ECO ]
press the menu button 2x: if the Full Eco Mode is
currently off, it will now be set to on; if the Full Eco
Mode is currently on, it will now be set to off
17
FULL ECO indication:
turns on when the FULL ECO mode is
enabled
Remarks regarding FULL ECO
Lullaby playback and a maximum sensitivity (level 5, see chapter 4.6) will
temporarily disable the Full ECO feature if Full ECO setting is set to ON.
The icon
however will still be on.
Attention: The link check is not active in Full Eco mode; see the next
chapter.
4.15 LINK CHECK:
Automatic:
When the FULL ECO is disabled, the babyphone constantly checks the
link between the baby-unit and the parents-unit:
• As soon and as long the parent unit is in contact with the baby unit,
the link-LED
on the parent unit lights steadily.
• When the baby unit gets out of range (or is powered off), the link-LED
on the parent unit starts blinking and the text [ SEARCHING ]
comes on the display.
• In case the link is not restored within 30 seconds, a beeptoon sounds
every 10 seconds and the text [ NOT LINKED ] comes on the display.
• Once the link between the parent unit and the baby unit is restored,
the link-LED will light steadily and the text [ NOT LINKED ] will disappear from the display.
18
Manual:
The link check does not function when the FULL ECO MODE is set. The
-LED is off and you will not be warned when you are out of range of
the baby-unit or when the baby unit is switched-off.
As follow you can however check the link manually
1. Press button TALK for about 0.5 seconds (*):
2. Link OK:
turns on and for a
couple of seconds you will
hear all sounds from the
baby-room
3. After some seconds the
FULL ECO MODE is
activated again and
turns off
2. No link:
turns on but starts flashing; you
will not hear any sound from the
baby-room and after 30 seconds you
will hear beeps as an indication that
there is no link
3. As soon as you have found the
cause of the no-link warning and
solved it, the FULL ECO MODE will
be activated again and
will turn
off
*: if you press button TALK for a longer period, the feature TALK BACK
is activated and you might wake up the baby.
4.16 BATTERY INDICATION:
Both the parent unit and the baby unit are equipped with a battery level
indicator in the display:
: full battery level
: 2/3 battery level
: 1/3 battery level
: battery empty
Baby-unit:
• the battery indicator is off when the baby unit is powered by the
power adapter
• the battery indicator is on and indicates the capacity when the baby
unit is powered by batteries
19
•
•
when the battery indicator on the baby unit indicates flat batteries
(
), the text [ BU LOW BATT! ] comes on the display of the
parent unit; it is advised to now directly replace the batteries in the
baby unit or to connect the power adapter; (attention: when the
parent unit is in the alarm mode, this warning text will not come on
the display)
in case you do not change the batteries or do not connect the power
adapter, the baby unit will switch off after a while; the link-LED on the
parent unit will start blinking and the text [ NOT LINKED ] will come
on the display of the parent unit; after you replace the batteries or
connect the power adapter, the set functions as normal again
Parent unit:
• the charging of the batteries is indicated with an animated battery
icon; as soon as the batteries are charged, this icon shows ‘battery
full’ (
)
• in idle state this icon shows the actual capacity of the batteries
• soon after the battery icon shows ‘empty batteries’ (
), the parent
unit will switch-off; reconnect the power adapter to get the parent unit
function again
4.17 BELT CLIP:
On the backside of the parents unit you will find the belt clip to carry the
unit around while keeping your hands free.
Use a small screwdriver to remove this clip if you want.
20
4.18 RESTORE TO DEFAULT:
As follow the settings of the babyphone can be restored to the default
values:
Parent unit:
press the MENU button
Menu
2x
+
Menu
find the option [ RESET ]
press the MENU button 2x
The parent unit switches off and on again and the settings are restored
to their default values:
Sensitivity:
Night light:
Language:
Lullaby:
Sound alert:
Volume baby-unit:
Alarm:
Temperature format:
Temperature alert:
Lower limit:
Upper limit:
Volume parents-unit:
Full Eco Mode:
Range:
level 3
on
Dutch
lullaby 1
off
level 3
off
Celsius
off
14
39°C
level 1
off
maximum
21
5 (SAFETY) INSTRUCTIONS AND TIPS
5.1 GENERAL:
The Babyphone is for the detection of sound by which the guarding
of babies, little children and the helpless is a common used feature.
Be advised that this babyphone is never capable to meet with the
presence of an adult or a parent.
Each time before use, check the functionality of the set. Be advised
to regularly check the link during use.
The use of the babyphone is restricted to detection of sounds within
own premises. Any other person who is present or might be present
within the room that is monitored should be notified of the presence
of the installed babyphone.
The usage of the wireless room monitor is free of license. It cannot
be guaranteed that the transmission is without interference caused
by other wireless systems or atmospheric disturbance.
In case the babyphone is not in use, please switch-off using the
power button. If not in use for a longer period, disconnect the power
adapter and remove the batteries.
5.2 MULTIPLE UNITS:
It is not possible to extend this babyphone with multiple parent units
or multiple baby units. In case more baby’s are to be watched, some
more complete units should be purchased. These can be used next
to each and will not disturb each other.
5.3 TEMPERATURE INDICATION:
The temperature sensor is located on the backside of the baby unit.
To ensure a correct reading you may not cover this sensor or place
the unit in direct sunlight. Avoid placing next to a heating device. The
range is 10°C to 39°C. Attention: the temperature indication is indicative only. Please count with a possible deviation of about 5% to10%.
22
5.4 REACH:
The reach of the babyphone is approximately 50 meters indoor and
300 meter outdoor. Please be informed that large buildings, metal
constructions, atmospheric disturbances and other wireless devices
can influence this reach.
5.5 BATTERY LIFE TIME:
Parent unit:
With fully charged rechargeable batteries with a capacity of 750mAh
you can use the parent unit for up to 24 hours without the power
adapter.
Baby unit:
When alkaline batteries are installed, the baby unit will function for
about 48 hours without the power adapter.
5.6 POWER SUPPLY:
Power adapters:
Use only the mains adapters supplied with this baby monitor.
Incorrect adapter type(s) can cause damage to the unit(s).
Adapter baby-unit:
Model: S004LV0900050
Input: 100-240VAC 150mA; Output: 9VDC 500mA
Adapter charger pod:
Model: S004LV0600045
Input: 100-240VAC 150mA; Output: 6VDC 450mA
Batteries:
Only install RECHARGEABLE batteries in both the parent unit and
the baby-unit:
Baby-unit: 4 x 1,2V NiMH AA
Ouder-unit: 2 x 1,2V NiMH AAA
5.7 MAINTENANCE:
Never use chemical cleansers to clean the cabinet, the cabinet may
only be cleaned with a moist cloth.
Always disconnect the babyphone from the mains (remove the
power adapters) before cleaning.
23
5.8 DISPOSAL OF THE DEVICE (ENVIRONMENT):
At the end of the product lifecycle, you should not throw this
product into the normal household garbage but bring the
product to a collection point for the recycling of electrical
and electronic equipments. Exhausted batteries may never
be disposed of in household waste but must be handed in at your
local depot for chemical waste.
6 DECLARATION OF CONFORMITY
This babyphone complies with the essential requirements and provisions as described in the European Directive 1999/5/EC.
The declaration of conformity is available on the website WWW.ALECTO.INFO
7 TECHNICAL SPECIFICATIONS
No. of channels:
Frequency:
Power supply of Baby Unit:
120
1881.792 - 1897.344 MHz
Switching mode power supply
9V/500mA/
(incl.)
4x 1.2V AA NiMH rechargeable
batteries (excl.)
Power supply of Parent Unit: Switching mode power supply,
(incl.)
6V/450mA/
2x 750mAH NiMH rechargeable
batteries (incl.)
Transmitting power:
Max. 250mW
Operating temperature:
10°C to 40°C
Storage temperature:
0°C to 60°C
Temperature accuracy:
±1°C (at 25°C)
24
8 TROUBLESHOOTING
PROBLEM:
POSSIBLE SOLUTION:
LED
flashes
• The parent unit and the baby unit may be out of
range with each other. Reduce the distance between
the units.
• The baby unit may be switched off. Press POWERkey to switch on the baby unit.
LED
• Lost connection with the baby unit. Reduce the disflashes +
tance between the parent unit and the baby unit.
attention tones • The baby unit may be switched off. Press POWERfrom parent unit
key to switch on the baby unit.
• Rechargeable batteries in baby-unit are empty.
Connect the baby unit to the mains power with the
supplied power adaptor for recharging.
Cannot hear
sound or baby
cry from the
parent unit
• The volume level in the parent unit may be set too
low, increase the volume level of the parent unit.
• The microphone sensitivity level of the baby unit may
be set too low. Increase the sensitivity level of the
baby unit.
High-pitched
tone
• The parent unit and the baby unit are too close to
each other. Make sure the parent unit and baby unit
are at least 1.5 metre away from each other.
• The speaker volume of the parent unit maybe set too
high. Decrease the volume of the parent unit.
In case the babyphone still does not operate correctly, please disconnect
the power adapters and remove the batteries. Wait for some minutes
and install batteries and connect the power adapters again. In case the
malfunction still persists, please contact your dealer.
25
9 CONTENTS
1
3
2
2.1
2.2
2.3
ECO MODE......................................................................2
3
3.1
3.2
3.3
INSTALLATION
PARENT UNIT..................................................................6
BABY-UNIT ......................................................................6
RECOMMENDATIONS ....................................................7
4
4.1
4.2
4.3
4.4
4.5
4.6
4.7
4.8
4.9
4.10
4.11
4.12
4.13
4.14
4.15
4.16
4.17
4.18
USING YOUR BABY MONITOR
POWER ON/OFF .............................................................8
LINK CHECK....................................................................8
LANGUAGE .....................................................................8
MONITORING ..................................................................9
TALK BACK......................................................................9
SENSITIVITY ...................................................................10
SOUND ALERT ................................................................11
LULLABIES ......................................................................11
NIGHTLIGHT....................................................................13
ROOM TEMPERATURE AND ALERT .............................14
ALARM .............................................................................15
PAGING THE PARENT UNIT ..........................................16
RANGE ............................................................................17
FULL ECO ........................................................................17
LINK CHECK....................................................................18
BATTERY INDICATION ...................................................19
BELT CLIP........................................................................20
RESTORE TO DEFAULT .................................................21
5
5.1
5.2
5.3
5.4
(SAFETY) INSTRUCTIONS AND TIPS
GENERAL ........................................................................22
MULTIPLE UNITS ............................................................22
TEMPERATURE INDICATION .........................................22
REACH.............................................................................23
OVERVIEW
OVERVIEW PARENT UNIT .............................................3
OVERVIEW BABY UNIT ..................................................4
OVERVIEW DISPLAY ......................................................5
26
5.5
5.6
5.7
5.8
BATTERY LIFE TIME .......................................................23
POWER SUPPLY.............................................................23
MAINTENANCE ...............................................................23
DISPOSAL OF THE DEVICE (ENVIRONMENT) ............24
6
DECLARATION OF CONFORMITY ................................24
7
TECHNICAL SPECIFICATIONS .....................................24
8
TROUBLESHOOTING .....................................................25
9
CONTENTS .....................................................................26
10
GUARANTEE ..................................................................28
27
10
GUARANTEE
You have a guarantee of 24 MONTHS after the date of purchase of this
babyphone. We guarantee during this period the free repair of defects
caused by material- and construction faults. This at the importers discretion. It is only possible to claim to the guarantee when you enclose your
purchase ticket with the babyphone.
HOW TO ACT:
If you notice a defect, consult the manual first. If this manual gives you
no definite answer, consult your dealer with a clear description of your
complaint. He will collect the device together with this guarantee card
and the dated purchase ticket and he will take care of a prompt repair,
respectively free sending to the importer.
THE GUARANTEE EXPIRES:
When used inexpert, faulty connections, leaking and faulty placed batteries, use of unoriginal parts or accessories, negligence and defects
caused by fire, flood, stroke of lightning and natural disasters. With unqualified modifications or repairs by third persons. With incorrect transport
without a suitable packing. If the device is not handed in with the correct
filled in guarantee card and the purchase ticket.
NOT UNDER THIS GUARANTEE: cords, plugs and batteries.
All further responsibilities, in particular subsequent damages, are excluded.
Service
Aziëlaan 12
‘s-Hertogenbosch
WWW.HESDO-SERVICE.NL
[email protected]
Help
+31 (0) 73 6411 355
ver GB3.2
28