Transcript
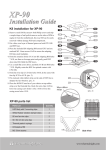
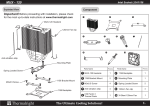
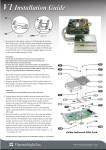
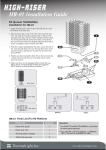
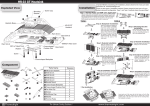
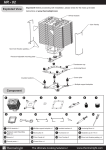
Installation Instructions:
Step 1:
Step 2:
AMD
Step 1:Part Installation
Take out True Spirit cooler from the paper box.Remove the
12cm fan from the cooler by pulling the fan clips upwards
in order to give room. And leave the fan clips on the
Heatsink Body. Do not remove them.Apply Anti-Vibration
Strips to two sides of the Heatsink Body.
Step 3:
Step 4:backplate cap
Note: When installing on a AMD platform,
please first insert the Back Plate Cap into
the opening on the Metal Back plate, make
sure you have the Cap facing downwards.
Step 2:Backplate Installation
Choose the platform (AMD) you are in use. Make four M3L10 Screw Pillars go through the
Metal Back Plate from bottom towards top.
And then place the Metal Back Plate on the table. Put the four Washers (for AMD) around the Screw Pillars.
Step 4:
Step 5:
Step 5:Place the motherboard on top of
the Back Plate. See the four Screw Pillars
go through the four holes around the
processor socket.Cap the four Screw Pillars
with the four Screw Nuts.Make sure the
side with a washer is facing the Back Plate.
Step 7:
Step 7:Anchoring Mount Installation
Place the Heat Sink Body on top of the CPU.
Make Mounting Plate go through the Heatsink Body.
And then use the two M3L6 screws to secure the
Mounting Plate.
Step 6:
Step 6:
Place the Anchoring Mount on the Screw
Nuts. Use the four M3L6 Screws to fix
the Anchoring Mount on to the Screw Nuts.
Step 8:
Step 8:Fan Installation
Place the included 12cm fan onto the Heat Sink body.
And then secure it with the 12cm fan clips, by pulling
the Fan Clips to place the four ends at the four holes on the
12cm fan.
The Ultimate Cooling Solutions !
Step 7:Applying Thermal Paste
Apply the Thermal Paste to the base of the
Heatsink and the surface of the CPU evenly.
Step 9:
Step 9:Installation completed
Plug in the fan connector to the CPU PWM Fan socket
on the motherboard. Installation complete.
www.thermalright.com