1
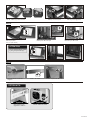
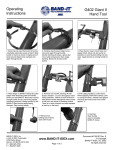
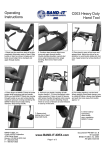
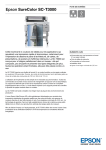
Assembly Guide
Case View
Handle
Left panel
PCI slots
Right panel
For HDD
M/B tray
Power switch
PSU tray
Reset switch
CD-ROM
support bracket
PSU
support bracket
with rubber pad
Case components
M/B tray
PCI slot
CD-ROM
support bracket
Left panel
Handle 2
PSU
support bracket
Right panel
Handle 1
PSU tray
Hardware list
A
Screw 3x6mm (6)
(4) for PSU support bracket
(2) for optional (USB3.0)
Stand off (10)
for M/B assembling
G
B
Thumb screw (16)
for side panel
C
Screw (4)
for PSU mounting
E
Rubber ring/screw (4)
for HDD
F
Hex wrench (1)
for M/B stand-off
H
Screw 3x4mm (4)
for handle
Foot cushion (4)
D
Screw (14)
for CD-ROM / PCI bracket /
M/B assembling
Rubber pad (2)
for PSU support bracket
Step 1:
Left / right panel with
rubber cushion
Place the PSU on the PSU tray,
and use “C” screw to secure
the PSU.
PSU support bracket with
rubber pad
Use “ A “ screw to secure
PSU support bracket on the
Left / right panel
Use “ D “ screw to secure
CD-ROM support bracket on
the CD-ROM
Use “ B “ screw to secure
CD-ROM support bracket on
the left panel
Use “ B “ screw to
secure PSU tray on the
Left / right panel
Use “ B “ screw to secure
CD-ROM support bracket on
the right panel
Use “ B “ screw to secure
M/B tray on the left panel
Place the HDD on the MB tray, and
use “ E ” rubber ring / screw to secure
Use “ B “ screw to secure
M/B tray on the right panel
Step 2:
Place the “ G ”(stand-off 10pcs) on the
M/B tray fix points.
Tool: “ F “(Hex wrench)
Secure the PCI slots bracket on the
M/B tray with “D” screw 6pcs
Place the M/B on the stand-off and
fastened by the ”D” screws
ATTENTION
You can adjust the height of M/B
by using “ G ”(stand-off 4pcs)
Step 3:
Assemble handle1 and handle 2
altogether
Fasten “ H ” screw
Combine L/R panel with “B” screw.
OPTION KITS:
Optional
Optional
Multi-Media I/O Ports
Upgrade Kit (USB3.0)
120mm /140mm fan Cooler
C50.T7000.00