1
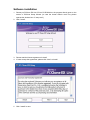
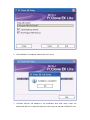
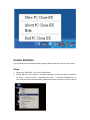
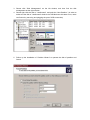
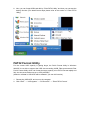
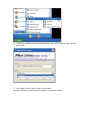
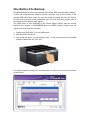
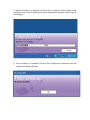
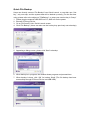
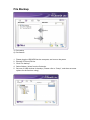
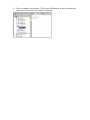
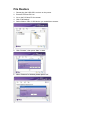
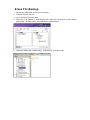
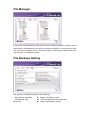
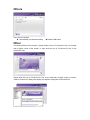
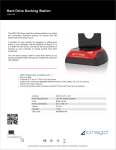
USB 3.0 DUAL SATA HDD DOCKING STATION User Manual (DA-70547) Introduction DA-70547 is a USB3.0 enabled dual-SATA hard drive enclosure. It supports simultaneously use of two 2.5” or 3.5” SATA hard disk for both data read and data write. It also is downward compatible with USB2.0 and USB1.1. The maximum transfer speed of USB3.0 can reach 5Gbps. The actual transfer speed of DA-70547 is 200M/s. DA-70547 provides high storage capacity, high data transfer rate, and best data protection. It’s easy to use the design which can satisfy both regular users and professionals of the ever-increasing demand for large and efficient data storage media. Function Support USB3.0 SUPERSPEED mode max 5Gbps/ USB2.0 HIGH-SPEED mode 480Mbps/USB1.1 FULL-SPEED 12Mbps Support SATA I (1.5G) / SATA (3G) HDD Achieves transfer speeds of up to 200MB/s Downwards compatible with any USB2.0 enabled computers and notebooks Easy to Install and Set-up To achieve USB3.0 transfer speeds, a USB3.0 interface card with USB3.0 cable is required Supported OS: Windows 7 (32/64-bit), Vista (32/64-bit), XP(32/64-bit) One Touch Back-Up function User’s Manual Notice The type of file system is able to support FAT32 and NTFS both.. When users operate the PC Clone EX Lite, the login must be from Administrator; it can not login from the Guest or any authorized account. Does the hard disk happen to the bad sector? Please confirm in advance that can prevent an improper operating of backup or restore. System Requirements Pentium computers or 100% compatible computers. Support OS: Microsoft Windows 98SE/ME/200/XP/Vista/7. CPU Pentium or above 128 MB RAM Display card: compatible with VESA standard An external USB hard disk Software installation 1. Please put PCClone EX Lite CD into CD ROM drive, the program directly goes on the screen of PCClone Setup Wizard. (In case the screen doesn’t come out, please operate the window box of “setup.exe”) 2. Click “install’. 3. Please read the license agreement in detail 4. If users accept the agreement, please click “Next” to install 5. Click “Install” to next 6. The installation is completed, please click “OK” to exit. 7. “PCClone EX”icon will displays in the notification area after setup; users can double-click the icon or press the right key of the mouse to execute PCClone EX Lite. Create Partition If your USB HDD has managed already, please skip this part and move on next context. Steps 1. Please plug USB HDD. (Turn on the USB power) 2. Please right click “My computer”, and point “Manage”. (If also can click in succession as “Start”→ “Control Panel”→ “Administrative Tools”→ “Computer Management” (If your USB HDD has managed already, please skip this part and move on next context) 3. Please click “Disk Management” as the left window, and then find the disk management as the right window. 4. Please right click the disk of “Unallocated”, and point the “New Partition”. (In order to make sure the disk of “Unallocated” whether the USB disk uses this area or not, users can find out by removing and plugging the port of USB connection) 5. Follow up the installation of “Partition Wizard” to operate the disk of partition and format 6. Also, you can format USB hard disk by “FNet FAT32 Utility” and then you can start the backup function (The detail format steps please refer to the section of “FNet FAT32 Utility”) FAT32 Format Utility For the current HDD capacity is getting larger, the Fat32 Format Utility in Windows 2000/XP is not able to support the HDD size exceeding 32GB; FNet recommends FNet Fat 32 Format Utility, which can format the large capacity to be FAT32 Format rapidly and fully, the size even maximums up to 4TB (4000GB) (Attention: all data in USB HDD will be deleted if you use this function) 1. Please plug USB HDD, and turn on the computer 2. Click “Start ” → “All Programs” → “PCClone EX” → “FNet FAT32 Format” 3. Confirm the “USB Device’ and “Drive to Format ” in the FAT32 Format Utility, and then press “Start” 4. Tick “Quick Format” and click “Start” for executing (Attention: All data in USB HDD will be deleted if you use this function) 5. The window shows in progress One Button File Backup One Button backup function only supports the external HDD case with button design – It won’t set comprehensive steps for backup anymore, only use the button of the external HDD case. Note: when you click the button of backup, the icon of PCClone EX Lite must be staying at the notification area. (For first time using, please refer to the context of “File backup” and “Setup”) The USB driver of Win 98SE/ME to the button trigger support has not unified, therefore, this support in Win98SE/ME does not definite exactly, Please refer the original user manual of the computer. 1. Please plug USB HDD. (Turn on USB power) 2. Execute PCClone EX Lite. 3. Just press the button on the external case. (If the external device has double buttons, please click the “File” one) 4. A dialog window will jump out of confirming the File backup or users can click “Start’ by the mouse. 5. When the backup is in progress, PCClone EX Lite diagram will be blinking at the notification area. There is a dialog box will be displayed the progress every single 10 percentages. 6. After the backup is completed, PCClone EX Lite diagram at notification area will appears the “Backup finished” Quick Launch Quick File Backup Users can directly execute “File Backup’ from Quick Launch, or use their own “Hot key”, only one step, and the system data will be backed up easily. (For the first time using, please refer to the subject of “FileBackup”, or setup your own hot key in “Setup” 1. Please plug the external USB HDD into PC, AND turn on the power. 2. Execute PCClone EX Lite 3. Go on PCClone EX Lite / Quick Launch screen 4. Click “File Backup” (Users can also use the hot key they previously set to backup) 5. Appearing a dialog screen, please click “Start” to backup 6. When backup is in progress, the window shows progress and proceed time 7. When backup is done, click “OK’ for backup finish! (The file backup has been successfully through PCClone EX Lite into USB HDD) File Backup 1). File backup 2). File Restore 1. 2. 3. 4. 5. Please plug the USB HDD into the computer, and turn on the power Execute PCClone EX Lite Click “File backup” Select folders / drives from the fix device Set one of USB devices for backup.( Please refer to “Setup”, and then set some options for the first time using) 6. Select “Backup” and press “Start” to start. 7. Backup is completed, please press “OK”. 8. The selected folders have been moved from the fixed devise to the USB device successfully. 9. There is a hidden root directory F: FNet in the USB device, all the file backups are kept in there. Be careful, don’t delete it carelessly. File Restore 1. 2. 3. 4. 5. Please plug the USB HDD, and turn on the power. Execute PCClone EX Lite. Go on the PCClone EX Lite screen. Click “File Backup”. Select folders / files of USB device you would like to restore. 6. Click “Restore”, then press “Start” to start. 7. When “Restore” is finished, please press “OK”. Erase File Backup 1. 2. 3. 4. Please plug USB HDD, and turn on the power. Execute PCClone EX Lite. Go on PCClone EX Lite screen. Select the “File backup” of USB device, then, right click the mouse to click “Delete select Files”, all select files in the USB device will be deleted. 5. Otherwise, delete the root directory F: FNet directly; it will also work. File Manager PCClone EX Lite File Manager is the same function as Windows Explorer. Directly cut and paste folders / files between two windows of local and USB HDD. It is convenient for users who can review / manage / move / access their folders / files directly without clicking the “My computer” or “Windows Explorer”. File Backups Setting The options of File Backup setting as the followings: After backup completing ◆ Hidden “File backup” folder Files Backup Type. ◆ Quick file backup double confirmation ◆ Hot key. ◆ System folder backup setting Others There are two options: ◆ automatically on Windows startup ◆ Enable USB button Other Connecting PCClone EX Lite spec., please click the icon of “PCClone EX Lite” on the right side of upper corner of the screen, or right click the icon of “PCClone EX Lite” in the notification area. Please click the icon of “PCClone EX Lite” on the right side of upper corner of screen, “About PCClone EX” dialog with display and assist to recognize PCClone EX lite.