Transcript
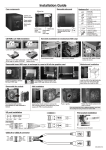
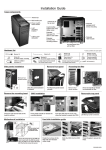
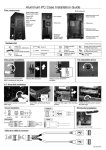
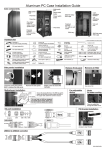
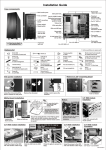
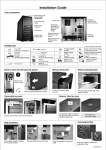
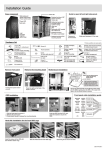
Installation Guide
Removable side panel
Case components
Hardware list
120mm fan
Screw(8)
to fix drive
Clamp(1)
5.25" & 2.5”
device module
Thumb screw(24)
for HDD
Power switch
Reset switch
Screw(4)
Multi-media
ports
Screw(4)
spare part for side panel
140mm fan
Removable
Removable
upper
HDD cage lower
HDD cage
CD-ROM / 2.5" HDD installation
Cable tie(1)
Remove six screws to
disassemble the side
panel
PCI bracket (1)
USB3.0 to USB2.0
convertor (1)
Hard disk installation for modularized HDD cage
Loose left / right screws to release 5.25" module.
Secure the 2.5" HDD to the base Insert the CD-ROM,
of the cage, sit below CD-ROM
fasten screws.
Loose thumb screws.
Slide it out to release
Removable lower HDD cage, to exchange for room to fit full size
graphics card
Fan mounted with tool-less
anti-vibration kit, slide outwards to
remove.
PSU installation
Loosing four thumb screws to remove the
PSU mounting bracket, assembling the power
supply with PSU mounting bracket.
I/O port installation
USB3.0
HD AUDIO
BLUE 10
BLACK PUEPLE 8
YELLOW 6
BROWN 4
RED 2
9
7
5
3
1
GREEN
KEY
ORANGE
N.C.
GND+H.S. TUBE
Motherboard installation
Install the M/B to the right-hand-side panel, yow may
remove the side panel before you install the M/B.
Loose four screws to remove the lower HDD cage
Removable fan module
Insert the HDD, fasten thumb
screws to secure.
4
5
1
9
4
5
1
9
Push in gently.
Fasten four thumb screws to the
case to secure, you may insert
the PSU in different direction,
and have the cooling fan facing
inwards for fanless M/B.
PCI bracket installation
For access to rear I/O port.
USB3.0 to USB2.0 convertor
VCC
RED
D- WHITE
D+ GREEN
GND BLACK
RED
WHITE
GREEN
BLACK
KEY
VCC
DD+
GND
C50.Q0800.00-E