Transcript
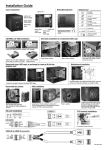
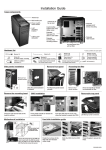
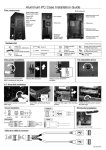
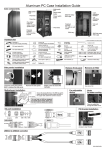
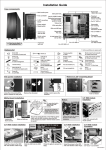
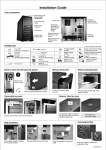
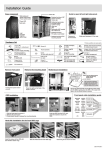
Installation Guide
Removable side panel
Case components
Hardware list
120mm fan
Screw (8)
to fix drive
Clamp (1)
5.25" & 2.5”
device module
Thumb screw (24)
for HDD
Screw (4)
Power switch
Reset switch
Screw (4)
spare part for side panel
Multi-media
ports
Cable tie (1)
140mm fan
Removable
Removable
upper
HDD cage lower
HDD cage
CD-ROM / 2.5" HDD installation
PCI bracket (1)
Remove six screws to
disassemble the side
panel
USB3.0 to USB2.0
convertor (1)
Support frame (1)
for upper HDD cage
Hard disk installation for modularized HDD cage
Loose left / right screws to release 5.25" module.
Loose thumb screws.
Slide it out to release
Secure the 2.5" HDD to the base Insert the CD-ROM,
of the cage, sit below CD-ROM
fasten screws.
Insert the HDD, fasten thumb
screws to secure.
Removable lower HDD cage, to exchange for room to fit full size graphics card
Motherboard installation
Loose four screws to remove
the lower HDD cage
Install the M/B to the right-hand-side
panel, yow may remove the side
panel before you install the M/B.
Assembling the support frame to the
upper HDD cage, secure with screws.
Removable fan module
PSU installation
Fan mounted with tool-less
anti-vibration kit, slide outwards to
remove.
Loosing four thumb screws to remove the
PSU mounting bracket, assembling the power
supply with PSU mounting bracket.
I/O port installation
USB3.0
4
5
1
9
4
5
1
9
Push in gently.
Fasten four thumb screws to the
case to secure.
You may insert the PSU in different direction, and have
the cooling fan facing inwards for fanless M/B.
PCI bracket installation
HD AUDIO
BLUE 10
BLACK PUEPLE 8
YELLOW 6
BROWN 4
RED 2
9
7
5
3
1
GREEN
KEY
ORANGE
N.C.
GND+H.S. TUBE
For access to rear I/O port.
USB3.0 to USB2.0 convertor
VCC
RED
D- WHITE
D+ GREEN
GND BLACK
RED
WHITE
GREEN
BLACK
KEY
VCC
DD+
GND
C50.Q0800.01-E