1
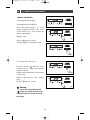
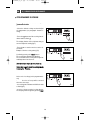
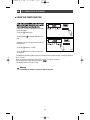
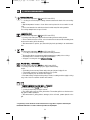
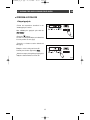
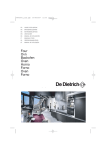
99644001_A_ml.qxp
FR
EN
ES
PT
21/12/2007
10:35
GUIDE D'UTILISATION
USER GUIDE
MANUAL DE UTILIZACIÓN
MANUAL DE UTILIZAÇÃO
Four
Oven
Horno
Forno
Page 1
99644001_A_ml.qxp
21/12/2007
10:36
Page 20
FR 02
Dear Customer,
EN 20
You have purchased a DE DIETRICH oven and we would like to thank
you.
ES 38
PT 57
Our research teams have designed a new generation of appliances for
you which, thanks to their quality, esthetics and technological advances have resulted in exceptional, products, a testament to our
know-how.
Your new DE DIETRICH oven will fit in harmoniously in your kitchen,
combining top cooking performance with ease of use. Our desire is to
offer you a product of excellence.
In the DE DIETRICH line of products, you will also find a wide range of
cookers, hobs, ventilation hoods, dishwashers, built-in refrigerators,
which can be coordinated with your new DE DIETRICH oven.
Of course, in an ongoing effort to better satisfy your demands with regard to our products, our after-sales service department is at your disposal and ready to listen in order to respond to all of your questions
and suggestions (contact information at the end of this booklet).
You can also log on to our website :
www.dedietrich-electromenager.com where you will find our latest innovations as well as useful and additional information.
DE DIETRICH
Setting New Values
As part of our commitment to constantly improving our products, we reserve the right to make
changes to them based on advances to their technical, functional and/or aesthetic properties.
Important :
Before installing and using your appliance, please read this Installation and Usage Guide
carefully, which will allow you to quickly familiarize yourself with its operation.
20
99644001_A_ml.qxp
21/12/2007
10:36
Page 21
EN
TABLE OF CONTENTS
1 / DESCRIPTION OF YOUR APPLIANCE
• Introduction to your oven ____________________________________
• Accessories _______________________________________________
• Introduction to the programmer ______________________________
• Introduction to the selecting touch controls ____________________
2 / USING YOUR APPLIANCE
• Using the programmer
º How to set the time_____________________________________
º Instant cooking ________________________________________
• Programmed cooking
º Immediate start ________________________________________
º Delayed start __________________________________________
• Using the timer function_____________________________________
• Customising the recommended temperature ___________________
• Locking the controls________________________________________
22
23
24
25
26
27
28
29
30
31
31
3 / OVEN COOKING MODES_______________________________________
32
4 / CARING FOR AND CLEANING YOUR OVEN
• Performing a pyrolysis
º Instant pyrolysis _______________________________________
º Delayed pyrolysis ______________________________________
34
35
5 / NOTES ______________________________________________________
36
6 / AFTER-SALES SERVICE
• Repairs ___________________________________________________
37
21
99644001_A_ml.qxp
EN
21/12/2007
10:36
Page 22
1 / DESCRIPTION OF YOUR APPLIANCE
• INTRODUCTION TO YOUR OVEN
5
3
1
A
Programmer
D
Wire shelf supports
B
Control buttons
E
Hole for rotisserie
C
Lamp
22
99644001_A_ml.qxp
21/12/2007
10:36
Page 23
1 / DESCRIPTION OF YOUR APPLIANCE
EN
•Accessories
Your appliance is equipped with two safety grids with handles, one with handles for a 45 mm
dish, a Lissium pastry dish and a 45 mm dish.
23
99644001_A_ml.qxp
EN
21/12/2007
10:36
Page 24
1 / DESCRIPTION OF YOUR APPLIANCE
• INTRODUCTION TO THE PROGRAMMER
E
A
B
D
C
F
G
A
H
A Oven temperature display.
G Clock or timer display
B Cooking time indicator
H Pyrolysis locking
C Timer indicator
D Cooking end time indicator
E Shelf support indicator and selected
cooking mode indicator.
F Control panel lock indicator
(child safety device)
24
E
99644001_A_ml.qxp
21/12/2007
10:36
Page 25
EN
1 / DESCRIPTION OF YOUR APPLIANCE
• INTRODUCTION TO THE SELECTING TOUCH CONTROLS
G
F
A
B
C
D
H
E
I
J
A
Top oven start
G Oven cooking mode indicator
B
Setting buttons
H Temperature button
C
Start
I
D
Lower oven start
J Cooking end time indicator
E
Setting buttons
K Timer
F
Control panel lock indicator
(child safety device)
25
Cooking time indicator
K
99644001_A_ml.qxp
EN
21/12/2007
10:36
Page 26
2 / USING YOUR APPLIANCE
•How to set the time
- When supplied with electricity
The display flashes at 12:00 (fig.1).
fig.1
Set the time by pressing the + or - touch
controls (holding your finger on the touch
control allows you to scroll through the
numbers rapidly) (fig.2).
Example : 12:30
fig.2
Press the
button to confirm.
The time display no longer flashes (fig.3).
fig.3
- To reset the time on the clock
Press and hold the
button for a few
seconds until the display starts flashing
(fig.1), then release.
Audible beeps indicate that it is now possible
to set the time.
fig.1
Adjust the time with the + and - buttons
(fig.2).
Press the
button to confirm.
fig.2
Warning
If there is no confirmation from the
“
” button, the set time will not be confirmed and the time will revert to the time before setting.
26
99644001_A_ml.qxp
21/12/2007
10:36
Page 27
EN
2 / USING YOUR APPLIANCE
•Instant cooking
— The programmer should display only the time. It should not be flashing.
Press the button
(fig.1) then select your
cooking programme using + or - (fig.2).
fig.1
Example :
—> shelf support 2 recommended..
— Confirm with the button “Start” (fig.3).
The indicator for cooking programme and recommended temperature flash. The shelf
support indicator and heating elements in use
also light up.
The oven begins heating.
fig.2
Place your dish in the oven based on the recommendation indicated in the display.
Your oven recommends the optimal temperature for the chosen cooking mode.
Hower, you can still adjust the temperture by
pressing the “°C” button under the display
(fig.4).
The “C” flashes in the display to indicate that
you can adjust the termperature by pressing
the + or - buttons (fig.5).
fig.3
Example :
—> adjusted to 220°C.
— Confirm with the “Start” or “°C“ button.
To stop cooking, press and hold the button
for a few seconds.
fig.4
fig.5
Warning
After a cooking cycle, the cooling fan continues to operate for a period of time in order
to guarantee optimal oven reliability.
Warning
All types of cooking are done with the door closed.
27
99644001_A_ml.qxp
EN
21/12/2007
10:36
Page 28
2 / USING YOUR APPLIANCE
• PROGRAMMED COOKING
- Cooking with immediate start and programmed duration
- Select the desired cooking mode and adjust
the temperature (see paragraph : instant cooking).
- Press the
button until the cooking time indicator starts to flash .
fig.1
The display flashes 0:00 to indicate that you
can now adjust the setting (fig.1).
- Press the + or - touch controls to set the desired time.
Example : 30 mins cooking time (fig.2).
Confirm by pressing the “Start” button.
The cooking time display stops flashing.
The countdown of the cooking time begins immediately after it has been set.
fig.2
After these three steps, the oven heats up :
At any time, you can check the cooking time by
pressing the
button.
At the end of cooking (end of programmed time),
A series of beeps will be emitted
when the oven stops,
- the cooking time indicator and 0:00 both start
to flash (fig.3),
- a series of beeps sounds for a few minutes.
The beeping can be stopped by pressing Start.
fig.3
28
99644001_A_ml.qxp
21/12/2007
10:36
Page 29
EN
2 / USING YOUR APPLIANCE
• PROGRAMMED COOKING
- Cooking with delayed start and chosen
cooking end time
Proceed as with programmed cooking.
- Select the desired cooking mode and adjust
the temperature (see paragraphe : instant cooking).
- Press the button until the cooking end time
indicator starts to flash .
The display flashes to indicate that you can
now adjust the setting (fig.1).
fig.1
- Press the + or - button to set the desired cooking end time.
Example : end of cooking at 14:00 (fig.2).
Confirm by pressing the “Start” button.
The cooking end time display stops flashing.
fig.2
After these 3 steps, oven heating is delayed so
that cooking ends at 14:00.
At any time, you can check the cooking time by
pressing the
button.
At the end of cooking (end of programmed time),
- the oven turns off;
- the cooking time indicator and 0:00 both start
to flash (fig.3),
- a series of beeps sounds for a few minutes.
The beeping can be stopped by pressing Start.
The display returns to the time of day.
fig.3
In the case of programmed cooking cycles, the
cavity lights up until cooking begins, and remains lit until cooking is finished.
29
99644001_A_ml.qxp
EN
21/12/2007
10:36
Page 30
2 / USING YOUR APPLIANCE
• USING THE TIMER FUNCTION
- Your oven’s programmer can be used as an
independent timer that allows you to count
down a time without operating the oven.
In this case, the timer display has priority over
the clock display.
- Press the
button (fig.1).
fig.1
The time symbol
play.
and 0m00s flash in the dis-
- Adjust the chosen time by pressing the + ou buttons (fig.2).
- Press the
button to confirm.
fig.2
- Press the
button for a few seconds to turn
off the timer.
The display stops flashing after a few seconds and the timer starts working, counting down the time in seconds.
Once the time has expired, the timer emits a series of beeps to notify you.
The beeping can be stopped by pressing on “Start”.
The display returns to the time of day.
Warning
It is possible to change or cancel the timer at any time.
30
99644001_A_ml.qxp
21/12/2007
10:37
Page 31
EN
2 / USING YOUR APPLIANCE
• CUSTOMISING THE RECOMMENDED TEMPERATURE
Select the cooking function.
- Press on Start.
If you wish to customize the recommended temperature :
- Hold down the °C button for a few seconds until the temperature figures start to flash.
- Turn the + or - button until the desired temperature appears.
- Press Start to confirm.
- For subsequent cooking programmes, the temperature you have just entered will be taken into
account.
• LOCKING THE CONTROLS (CHILD SAFETY)
OVEN OFF
You have the option of preventing access to
the oven controls by taking the following steps:
when the oven is off, hold down the + and buttons for a few seconds (fig.1),
a “key” appears on the display
-> access to the oven controls is now locked
(fig.2).
fig.1
To unlock access, hold down the + and - buttons for a few seconds.
The oven controls are once again accessible.
fig.2
Warning
You cannot lock the oven if you have programmed a cooking cycle.
31
99644001_A_ml.qxp
EN
*
21/12/2007
10:37
Page 32
3 / OVEN COOKING MODES
CIRCULATING HEAT
(recommended temperature 180°C min 35°C max 235°C)
• Cooking is controlled by the heating element located at the back of the oven and by
the fan.
•Rapid temperature increase : Some dishes can be placed in the oven while it is still
cold.
•This is recommended to retain the moisture in white meat, fish and vegetables.
For cooking multiple items on up to.3 levels.
COMBINED HEAT
(recommended temperature 205°C min 35°C max 275°C)
•Cooking controlled by the upper and lower heating elements and by the fan.
•Three combined sources of heat : a lot of heat from the bottom, a little circulating heat
and a touch from the grill for browning.
•Recommended for quiches, pies, tarts with juicy fruits, preferably in an earthenware
dish.
*
ECO
(recommended temperature 200°C min 35°C max 275°C)
• Cooking controlled by the upper and lower heating elements.
•This position allows energy savings while maintaining the quality of the cooking.
•The ECO position is used for energy label performance.
• All types of cooking are done without preheating.
PULSED GRILL + ROTISSERIE
(recommended temperature 200°C min. 180°C max. 230°C)
•Cooking controlled, alternately, by the upper element and by
the fan.
• Preheating is unnecessary. Roasts and poultry are juicy and crispy all over.
• The turnspit continues to operate until the door is opened.
• Slide the drip tray onto the bottom shelf support.
•Recommended for all spit-roasted poultry or meat, for sealing and thoroughly cooking
a leg or rib of beef To retain fish steaks’ moist texture.
VARIABLE MEDIUM and HIGH GRILL + TURNSPIT
(recommended settings 2 or 4 - min 1 - max 4)
• Cooking controlled by the upper element.
•The double grill covers the entire grid surface. The medium grill it is as effective as the
high grill for smaller quantities.
•Recommended for grilling cutlets, sausages, slices of bread, prawns placed on the
grill.
* Programme(s) used to obtain the results indicated on the energy label in compliance with European
standard EN 50304 and in accordance with European Directive EC/2002/40.
32
99644001_A_ml.qxp
21/12/2007
10:37
Page 33
EN
3 / OVEN COOKING MODES
KEEPING WARM
(recommended temperature 80°C min. 35°C max. 100°C)
•This position allows you to keep your food warm by spurts of heat from the element at
the back of the oven combined with fan.
•Recommended for letting dough rise for bread, brioche, kugelhopf...without exceeding
40° C (plate warming, defrosting).
DEFROSTING
(recommended temperature 30°C min. 30°C max. 50°C)
•Dishes are defrosted by a limited amount of heat and the fan.
•Ideal for delicate dishes (fruit tart, custard pie, etc).
•Meat, buns, etc, are defrosted at 50°C (meat should be placed under the grill with a
dish underneath to catch drips from the defrosting which are not edible).
BREAD
(recommended temperature 205°C min. 35°C max. 275°C)
•Recommended cooking sequence for bread making.
•After preheating, place the ball of dough on the pasty dish - 2nd shelf.
•Don’t forget to place a ramekin of water on the base to obtain a golden crispy crust.
33
99644001_A_ml.qxp
21/12/2007
10:37
Page 34
4 / CARING FOR AND CLEANING YOUR OVEN
EN
• PERFORMING A PYROLYSIS
•Instant pyrolysis
Warning
Take out the oven fittings out, as well as the sliding dish support (see the chapter on
accessories in the “installation guide”) and remove any large splashes that may have have
formed.
- Check that the programmer is displaying the
time of day and that it is not flashing. (fig.1).
Press the (fig.1)
button then select Pyro
Max
using the + or - buttons: (fig.2).
Pyro Max
: pyrolysis duration 2h00m.
fig.1
Press the Start button. (fig.3).
The pyrolysis duration by default displays
2h00 (fig.3), but you can make this longer or
shorter.
Example : pyrolysis cycle 1h45 or 1h30.
Press the + button to obtain the duration you
want (fig.4).
Confirm your selection by pressing Start.
fig.2
The pyrolysis starts. The duration starts to
count down immediately after it has been set.
The symbol
If you click on the
sis, the
appears.
fig.3
,button during the pyroly-
symbol appears in the programmer
indicating that the door is locked (fig.5).
When pyrolysis finishes, 0:00 flashes as well
as the symbol
.
fig.4
-When the oven is cool, use a damp cloth to remove the white ashes.
The oven is clean and once again ready for the
cooking application of your choice.
fig.5
34
99644001_A_ml.qxp
21/12/2007
10:37
Page 35
4 / CARING FOR AND CLEANING YOUR OVEN
EN
• PERFORM A PYROLYSIS
•Delayed pyrolysis
- Follow the instructions described in the
“Instant pyrolysis” section.
After validating the pyrolysis cycle with the
Start button:
- Press the
button..
The end of cooking time flashes to indicate that
it is now possible to set it (fig.1)
fig.1
- Press the + or - button to set the desired end
time (fig.2).
Example : end of cooking at 2 hours 30.
Confirm your selection by pressing Start.
- After these steps, the beginning of pyrolysis is
delayed so that it finishes at 2 hours 30.
fig.2
35
99644001_A_ml.qxp
EN
21/12/2007
10:37
Page 36
5 / NOTES
36
99644001_A_ml.qxp
21/12/2007
10:37
Page 37
EN
6 / AFTER-SALES SERVICE
• REPAIRS
Any repairs that are made to your appliance
must be handled by a qualified professional
authorised to work on the brand. When you
call, mention your appliance’s complete reference (model, type, serial number). This information appears on the manufacturer’s nameplate (Fig.1).
BRANDT APPLIANCES SAS
7 rue Henri Becquerel
92500 RUEIL MALMAISON
MADE IN FRANCE
230V ~ 50 Hz
fig.1
SPARE PARTS
During maintenance work, request the exclusive use of certified genuine replacement
parts.
Brandt Appliances - simplified shareholder company with capital of 10,000,000 Euro RCS Nanterre 440,302,347.
37
99644001_A_ml.qxp
21/12/2007
10:39
Page 76
Translation / DTP¨by Technicis SA, Boulogne-Billancourt, France
DOD798X
9964001 10/07