1
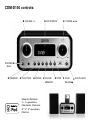
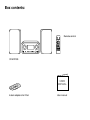
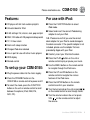
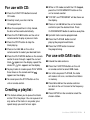
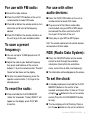
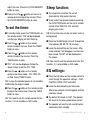
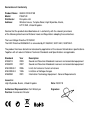
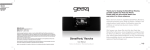
CDM-D150 User Manual Thank you for buying the CDM-D150, CD micro system with dock for iPod and DAB / FM radio. Please read over this manual before use and retain it for future reference. CDM-D150 controls: ➊ VOLUME -/+ ➋ LCD DISPLAY ➌ TUNING / PHONES ➍ JACK ➎ STANDBY ➏ FUNCTION ➐ ENTER ➑ CLOCK/ ➒ STOP PLAY/ MEMORY PAUSE Made for iPod touch (1st, 2nd generation), iPod classic, iPod nano (3rd, 4th, 5th generation), iPod mini AUX IN JACK Box contents: Remote control CDM-D150 USER MANUAL 4 dock adapters for iPod User manual Please read before use. CDM-D150 Features: For use with iPod: ■■ CD player with 64 track custom playlists ■■ Press the FUNCTION button to select iPod mode. ■■ Universal dock for iPod ■■ 5 EQ settings: flat, classic, rock, pop and jazz ■■ DAB / FM radio with 20 programmable presets ■■ 12 / 24 hour clock ■■ Alarm with sleep function ■■ Charges iPod when docked ■■ Line-in port for use with other music players ■■ RDS display ■■ Remote control To set up your CDM-D150: ■■ Plug the power cable into the mains supply. ■■ Press the STANDBY button on the CDM-D150 or remote control to power on/off. ■■ To select the mode, press the FUNCTION button on the unit or remote control to scroll between the options (iPod, DAB, FM, AUX, CD). ■■ Select and insert the correct iPod docking adapter to suit your iPod. N.B. Please ensure that you use the correct dock adapter for your iPod to avoid damage to the dock connector. If the specific adapter is not included, please use the adapter that was provided by Apple with your iPod. ■■ Carefully insert your iPod into the dock. ■■ Press the PLAY button on the unit or remote control to play or pause your music. ■■ Use the MENU button on the remote control to navigate through the iPod menu. ■■ Press the UP and DN buttons on the remote control to navigate the various features of the iPod menu. ■■ Press the ENTER button on the remote control to confirm your selection. ■■ Turn the tuning knob on the unit or press / on the remote control to scan through tracks. ■■ Turn the volume knob on the unit or press VOL / on the remote control to adjust the volume. User Manual CDM-D150 | GEAR4 1 For use with CD: ■■ Press the FUNCTION button to select CD mode. ■■ Carefully insert your disc into the CD compartment. ■■ When the compartment is fully closed, the disc will be read automatically. ■■ Press the PLAY � � button on the unit or remote control to play or pause a track. ■■ Press the STOP button to stop the track playing. ■■ Press or turn �/ � on the unit or remote control to select your desired track. ■■ Press the PLAY MODE button on the remote control to scan through: repeat the current appears on the display, repeat the track ALL appears on the display. whole CD ■■ To play tracks at random press PLAY MODE three times on the remote control appears on the display. ■■ To cancel press the STOP button on the unit or remote control. Creating a playlist: ■■ This feature allows you to queue the tracks on the CD in the player. You can queue all or only some of the tracks in any order, plus repeat songs you want to hear again. ■■ While in CD mode and with the CD stopped, press the CLOCK/MEMORY button on the unit or remote control. ■■ "P-01 00" and "PROGRAM" will be shown on the display. ■■ Press or turn �/ � on the unit or remote control to input the desired track. Press CLOCK/MEMORY button to continue everytime. ■■ Up to 64 tracks can be programmed. ■■ Press the PLAY � � button to start playing the programmed tracks. ■■ Press the STOP button to cancel the programming. For use with DAB radio: ■■ Extend the radio antenna. ■■ Press the FUNCTION button on the unit or remote control to select DAB mode. ■■ For initial use press PLAY �� , the radio will make a full scan, and store the stations in memory. ■■ Press � or � on the remote control or turn dial on the unit to scan to the frequency desired. ■■ Press ENTER on the remote to select the chosen station. User Manual CDM-D150 | GEAR4 2 ■■ Extend the radio antenna. For use with FM radio: For use with other audio devices: ■■ Press the FUNCTION button on the unit or remote control to select FM mode. ■■ Press the FUNCTION button on the unit or remote control to select AUX mode. ■■ Press � or � on the remote control or turn dial on the unit to scan to the frequency desired. ■■ Plug one end of the 3.5mm audio cable (not included) into your MP3 or MP4 player and connect the other end into the AUX line-in port at the front of the unit. ■■ Press PLAY � � on the remote control or on the unit to go to the next avaliable station. To save a preset frequency: ■■ You can set up to 10 DAB presets and 10 FM presets. ■■ Adjust the radio to your desired frequency then press and hold one of the numeric buttons (1-9) on the remote control. 'Preset # Saved' will be shown on the display. ■■ To listen to a preset frequency, press the specific numeric button (1-9) to go to the desired preset. To reset the radio: ■■ Press and hold the CLOCK/MEMORY button for 5 seconds. “Factory RESET” will appear on the display, press PLAY �� to confirm. ■■ Press play on your MP3 or MP4 player. N.B. The remote control will not control devices connected via 3.5mm cable. RDS (Radio Data System): ■■ Press the INFO/ESP button on the remote control to scroll through the available information (track/artist info and station name, current time & date, and frequency). ■■ The information will be displayed on the screen. To set the clock: ■■ In standby mode press and hold the CLOCK/ MEMORY button on the unit for a few seconds and select either 24 hour or 12 hour using the / buttons on the unit or remote control (Press the CLOCK/MEMORY button to save). ■■ The hour display will start flashing. Press or turn the / button on the unit or remote to User Manual CDM-D150 | GEAR4 3 adjust the hour (Press the CLOCK/MEMORY button to save). ■■ Press or turn the / button on the unit or remote control to adjust the minutes (Press the CLOCK/MEMORY button to save). To set the timer: ■■ In standby mode, press the TIMER button on the remote control. “ON” will be displayed and the hour display will start flashing. / button on the remote ■■ Press the control to adjust the hour. Press the TIMER button to save. / button on the remote ■■ Press the control to adjust the minutes. Press the TIMER button to save. ■■ “OFF” will now be displayed. Follow the above 2 steps to set the OFF TIME. / button on the remote ■■ Press the control to set timer mode – FM / DAB, CD, or iPod. Press TIMER to save. NB: In case the selected source is not available, DAB will be the output instead. / button on the remote control ■■ Press the to adjust the volume level. Press the TIMER button to save. NB: You need to use the remote control for this function. It is not available in AUX mode. 4 Sleep function: ■■ The sleep timer switches the unit off automatically after preset intervals. ■■ To set, select the desired mode by pressing the FUNCTION button on the unit or remote control (iPod, DAB, FM, CD) and start playing your music. NB: this function can only be set when music is being played. ■■ Press the SLEEP button to scroll through the timer options (90, 80, 70..10 minutes). ■■ Leave the desired time on the screen. After a few seconds it will disappear and has now been saved. 'SLEEP' will be displayed on the screen. NB: You need to use the remote control for this function. It is not available in AUX mode. EQ settings: ■■ Press the EQ button on the remote control to scroll through the equaliser settings – FLAT, CLASSIC, ROCK, POP and JAZZ. ■■ Leave the desired setting on the screen. After a few seconds it will disappear and has now been saved. ■■ The default EQ mode is FLAT. The speaker will revert to this when powered on and off. ■■ The speaker will use the last used EQ when switched on from standby. User Manual CDM-D150 | GEAR4 4 ESP and DBBS settings: ■■ Press INFO/ESP* button on the remote control to activate the ESP function. ■■ Press the DBBS** button on the remote control to turn the DBBS on/off. *Electronic Skip Protection ** Dynamic Bass Boost System Warning To reduce the risk of fire or electric shock, do not expose this unit to rain or moisture. Caution Use of controls or adjustments of performance of procedures other than those specified may result in hazardous radiation exposure. Unpacking and installation Unpack your unit carefully. We recommend that you save the packaging in case you ever need to store your unit. To avoid damage, never place the unit or it’s batteries near radiators, in front of heating vents, under direct sunlight or near water. For your safety –When disconnecting the unit, pull the power plug first. Do not pull the cord by itself. –Never handle the power plug with wet hands, as this could cause fire or electric shock. –Do not open the housing. –Do not twist or pinch the power supply cord. If the plug or power supply cord needs to be replaced, ensure that it complies with the manufacturer’s recommendation. –Unplug the unit during lightning storms and when unused for extended periods of time. –Do not put anything except a compact disc into the compartment. Other objects may damage the unit. To download some of the finest new music around for FREE, visit: www.gear4.com/newmusic All rights reserved. Reproduction in whole or in part is prohibited. GEAR4 and product names are trademarks of Disruptive Ltd. iPod is a trademark of Apple Inc., registered in US and other countries. All other product names are or may be trademarks of and used to identify products or services of their respective owners. Brands are used for illustration purposes only and should not be used to infer any relationship between GEAR4 and respective owners. "Made for iPod" means that an electronic accessory has been designed to connect specifically to iPod and has been certified by the developer to meet Apple performance standards. – Refer servicing to qualified personnel only. User Manual CDM-D150 | GEAR4 5 Apple is not responsible for the operation of this device or its compliance with safety and regulatory standards. Please ensure that your iPod is using the latest software version. To update the software, connect your iPod to iTunes. If there is a newer software version available you will be prompted to upgrade. Disposal According to the European Directive 2002/96/ EC all electrical and electronic products must be collected separately by a local collection system. Please act according to your local rules and do not dispose of your old products with your normal household waste. The exclamation point within an equilateral triangle is intended to alert user to the presence of important operating and maintenance (servicing) instruction in the literature accompanying the appliance. ATTENTION RISK OF ELECTRIC SHOCK – DO NOT OPEN. CAUTION: TO REDUCE THE RISK OF ELECTRIC SHOCK, DO NOT REMOVE COVER (OR BACK). NO USER-SERVICEABLE PARTS INSIDE. REFER SERVICING TO QUALIFIED SERVICE PERSONNEL. CLASS 1 LASER PRODUCT The lightning flash with arrowhead symbol, within an equilateral triangle, is intended to alert user to the presence of uninsulated ‘Dangerous Voltage’ within the product’s enclosure that may be of sufficient magnitude to constitute risk of electric shock to person. User Manual CDM-D150 | GEAR4 6 GEAR4 One-Year Warranty Disruptive Ltd owners of the GEAR4 brand warrants this product to be free from defects in workmanship and materials, under normal use and conditions, for a period of one (1) year from the date of original purchase (“Warranty Period”). THE WARRANTY DESCRIBED IN THIS PARAGRAPH SHALL BE IN LIEU OF ANY OTHER WARRANTY, EXPRESS OR IMPLIED, INCLUDING BUT NOT LIMITED TO, ANY IMPLIED WARRANTY OF MERCHANTABILITY OR FITNESS FOR A PARTICULAR PURPOSE. This warranty does not apply to damage or defects caused by failure to follow the enclosed instructions, accident, abuse, misuse, misapplication, product modification, faulty ancillary equipment, improper voltage or current, lightning or other acts of God, commercial non-home use, normal wear and tear, shipping damage or loss, damage to digital media players or damage caused by service performed by anyone other than GEAR4. GEAR4 will, at its option, repair or replace any product covered by this warranty that proves to be defective in workmanship or materials. If your product is no longer being manufactured or is out of stock, at its option, GEAR4 may replace your product with a similar or better product. GEAR4’s liability is limited to the repair or replacement, at our option, of any defective product under warranty and shall not include any incidental or consequential damages. This warranty is valid only in Europe, is not transferable and does not extend to users other than the original purchaser. User Manual CDM-D150 | GEAR4 7 Return Policy / Warranty Service Proof of Purchase as evidence the unit was purchased from an authorised dealer within the Warranty Period is required for warranty service. In order to make a warranty claim, the purchaser must contact GEAR4 within 60 days of occurrence. If service is required, do not return the product without first contacting GEAR4. To get this product repaired or replaced, you must contact GEAR4 during the Warranty Period by email ([email protected]). You must include your email address, name, address, telephone number, date and place of purchase, alternative contact and a detailed description of the problem you are experiencing and the name / details of the product. If the problem appears to be based on a defect in workmanship or materials, GEAR4 will provide a Return to Manufacturer Authorisation number and instructions for return shipment. Return shipments are at the customer’s expense, and the return MUST be accompanied by the original proof of purchase. GEAR4 is not responsible for lost or damaged product during shipment. Any product returned without the original proof of purchase will be returned at the customer’s expense. To avoid any charges, all returns and exchanges must include the original packing materials, product box, all included accessories which may include, without limitation, power adapter or power cord, connecting cables, remote control, adapters, inserts cards and instruction manuals. Any replacement units or parts may be new or rebuilt. GEAR4 will not be liable for inconvenience, loss of time, loss of use of the product, lost profits or exemplary or consequential damages caused by or relating to this product. This warranty gives you specific legal rights. You may also have other rights that vary from country to country. Some countries do not allow the exclusion or limitations of incidental or consequential damages or limitations on how long an implied warranty lasts, so the above may not apply to you. Purchase or use of the GEAR4 product constitutes your acknowledgement of, and agreement to completely abide by, the forgoing warranty and disclaimers. User Manual CDM-D150 | GEAR4 8 Declaration of Conformity Product Name: Model: Distributor: Address: GEAR4 CDM-D150 PG437UK Disruptive Ltd. Windsor House, Turnpike Road, High Wycombe, Bucks, HP12 3NR, United Kingdom. Declare that the product described below is in conformity with the relevant provisions of the following directives and National Laws and Regulations adopting these directives. The Low Voltage Directive 73/23/EEC The EMC Directive 89/336/EEC as amended by 91/263/EEC, 92/31/EEC, 93/97/EEC. The product has been tested and assessed by application of the relevant standards or specifications. Together with all relevant National Technical Standards and Specifications as applicable. StandardYear EN55013: 2003 EN55020: 2007 EN61000-3-2: 2006 EN61000-3-3: 1995 EN60950: 2001 Description Sound and Television Broadcast receivers and associated equipment Sound and Television Broadcast receivers and associated equipment Limits for harmonic Current emissions Limitation of Voltage changes Information Technology Equipment - General Requirements Issued in: High Wycombe, Bucks, United Kingdom Authorised Representative: Carl Walastyan Position: Commercial Director Date: 23/02/10 Signature: MODEL NO: PG437UK INPUT: 230-240v~50Hz All rights reserved. Reproduction in whole or in part is prohibited. GEAR4 and product names are trademarks of Disruptive Ltd. iPod is a trademark of Apple Inc., registered in the US and other countries. All other product names are or may be trademarks of and used to identify products or services of their respective owners. Brands are used for illustration purposes only and should not be used to infer any relationship between GEAR4 and respective owners. “Made for iPod” means that an electronic accessory has been designed to connect specifically to iPod and has been certified by the developer to meet Apple performance standards. Apple is not responsible for the operation of this device or its compliance with safety and regulatory standards.