1
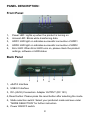
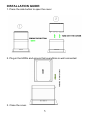
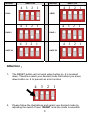
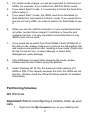
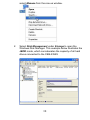
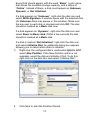
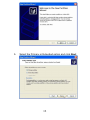
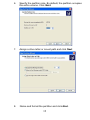
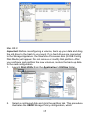
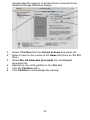
**Please read this manual carefully before you use the product** Description: The CEB-2355S is a multifunction storage device designed in a special body structure, which can be simply connected to the PC by either USB2.0 or eSATA. It supports 2 SATA HDDs with entirely screw free patent design for easy installation and is additionally equipped with ball bearing fans to keep the HDDs cool !! MODE: z z z z z z Dual Mode: 2 HDDs appear on your computer and can be used / accessed simultaneously JBOD Mode: Your computer displays 1 HDD with the capacity of two HDDs combined Raid 0 Mode**: This mode involves no redundancy and splits the files equally into each HDD. The advantage of this mode is the data transfer speed, but the disadvantage is data might be damaged if one of the HDDs is defect. Raid 1 Mode** (mirroring): One HDD has its data duplicated on another HDD. If either drive fails, the other continues to function as a single drive and thus provides full redundancy. SAFE50 Mode*:½ (50%) of the HDD volume is used for mirroring and the rest is used for Raid 0. SAFE33 Mode*:1/3 (33%) of the HDD volume is used for mirroring and the rest is used for Raid 0. * The SAFE33 & SAFE50 modes only perform when your motherboard / PCI card contains Silicon IC ** Some WD (Western Digital) Desktop Edition HDDs do not support the RAID function. Please check the website below for more information. http://wdc.custhelp.com/cgi-bin/wdc.cfg/php/enduser/std_adp.php ?p_faqid=1397&p_created=1131638613&p_sid=PV5Aepsj&p_acce ssibility 1 FEATURES: 1. Entirely screw-free patent design for easy installation 2. Aluminum and unique casing with ball bearing fan to provide best possible heat dissipation 3. Support 2.5” & 3.5” SATA HDD. 4. Support 6 modes: Dual / JBOD / RAID 0 / RAID 1 / SAFE33 / SAFE50. 5. Plug and Play / Hot Swapping. 6. OS support Windows 2000 / XP / Vista/ Windows7 / Mac OS 10.4.8 above/ Linux. SPECIFICATIONS Material Aluminum HDD Type 3.5" and 2.5" SATA Ⅰ /Ⅱ HDD Interface & Transfer Rate System Requirements USB2.0 up to 480 Mbps eSATA up to 3.0 Gbps Windows 2000 / XP / Vista /WIindows7 / Mac 10.4.8+/Linux RAID Modes Dual/JBOD/RAID0/RAID1/SAFE33/SAFE50 -Green for Power LED -Blue for Access、HDD1 and HDD2 -Red for Error Dimension 165 x 116 x 197 mm (L x W x H) Power AC Input:100 ~ 240V, DC Output:12V 3A. 2 SYSTEM REQUIREMENTS: Intel Pentium-Ⅱ 500MHz, 64MB RAM Windows 2000/XP/Vista/windows 7or Mac OS 10.4.8 250 MB of free disk space eSATA Connection:SteelVine Host Bus Adapter card and above/Linux associated software drivers, or any other SATA Host Card with Port Multiplier support. USB Connection:USB 1.1 or 2.0 direct host connection or USB Hub. Strongly recommended to use Intel Pentium 4 systems or higher PACKAGE CONTENT: USB 2.0 + eSATA Item Quantity Dual HDD enclosure 1 PC Installation Guide / Manual 1 PC eSATA cable 1 PC USB cable 1 PC PCI bracket for eSATA 1 PC Adapter (12V/3A) 1 PC RB 4PCS 3 PANEL DESCRIPTION: Front Panel 1、 2、 3、 4、 5、 Power LED: Lights up when the product is turning on Access LED: Blinks while transferring data HDD1: LED light on indicates successful connection of HDD1 HDD2: LED light on indicates successful connection of HDD2 Error LED: When Error LED turns on, please check the product settings, software or HDD status Back Panel 1、eSATA Interface 2、USB2.0 Interface 3、DC-(JACK) Connection: Adapter OUTPUT (DC 12V) 4、Reset button: Please press the reset button after selecting the mode. 5、Mode selection switch: Select your preferred mode and see under “MODE SELECTION” for further instruction 6、Power ON/OFF switch. 4 INSTALLATION GUIDE: 1. Press the side button to open the cover 2. Plug-in the HDDs and ensure that everything is well connected 3. Close the cover. 5 4. Connect the DC adapter (into) with the enclosure and the socket. 5. Plug USB or eSATA cable into the enclosure and PC.(USB & eSATA interface can not be used at the same time) 6 6. Select your mode. (The SAFE33 & SAFE50 modes are only available with motherboards/PCI cards that contain Silicon IC) ** Please see “MODE SELECTION for further details ** 7. Please wait 1~2 minutes when CEB-2355S is connected to the PC for the first time. (Recognition time varies with different OS) 8. Installation of 2.5 HDDs 9. Plug the HDDs into the enclosure and ensure everything is well connected. For more stabilization insert the EVA MODE SELECTION: Please select your desired mode by following the illustration below and press “Reset” once the mode is selected. 7 MODE SWITCH 4 3 2 MODE 1 DUAL SWITCH 4 3 2 1 4 3 2 1 4 3 2 1 JBOD 4 3 2 1 RAID 0 RAID 1 4 3 2 1 SAFE 33 SAFE 50 Attention: 1、 The RESET button will not work when button no. 4 is pressed down. Therefore select your desired mode first before you press down button no. 4 to prevent an error function 4 3 2 1 2、 Please follow the illustrations and select your desired mode by adjusting the switch. Press “RESET once the mode is selected. 8 3、 For certain mode change, you will be requested to reformat your HDDs. For example, if you switch from JBOD to DUAL mode. 4、 If you select Raid 0 mode, it is necessary to format the hard drive before using it. 5、 If you select Raid 1 mode, the HDDs need to be formatted (in Dual Mode) first and switch it to Raid 1 mode. If you would like to see the mirroring HDD, you need to switch it to Dual Mode to see it. 6、 When you use the eSATA connection, if your motherboard does not either contain Silicon Image IC controller or have the port multiplier function, it is very important to know that there is only JBOD mode can be used. 7、 If you would like to switch from Raid 0/Raid 1/Safe 33/Safe 50 to the other mode, please make sure to remove the old partition first and create a new partition after resetting a new mode. (Right-click the My Computer icon Æ select Manage Æ select Disk Management under Storage) 8、 If the HDD does not react after changing the mode, please initialize and format it before doing the partition 9、 Under Windows XP 32 OS, the maximum total capacity of 2 HDDs is 3TB. If the capacity exceeds this limit, the HDDs will not function. (Please check the official Windows website for detailed information) Partitioning Volumes MS Windows Important: Before reconfiguring a volume, back up your data. 1. Right-click the My Computer icon on your desktop and 9 select Manage from the pop-up window. 2. Select Disk Management under Storage to open the Windows Disk Manager. This example below illustrates the JBOD mode, which concatenates the capacity of all hard drives connected to the CEB-2355S 10 Every Disk should appear with the word “Basic”, a size value that shows the available storage capacity, and a status of “Online”. Instead of Basic, a disk could appear as Unknown, Dynamic, or Not Initialized. If a disk appears as “Unknown”, right-click the disk icon and select Write Signature. A window opens with the selected disk (All Unknown disks may appear in this window). Make sure the box next to each disk is checked and click OK. The disk should be marked as a Basic disk now. If a disk appears as “Dynamic”, right-click the disk icon and select Rever to Basic disk. Within a few seconds the disk should be marked as a Basic disk. If a disk is marked “Not Initialized”, right-click the disk icon and select Initialize Disk. An additional dialog box appears allowing you to select which disks to initialize. 3. Right-click the configured disk’s unallocated space and select New Partition. If the New Partition option is not available, select the disk and initialize it first. To do this, right-click on the disk item and select “Initialize Disk”. 4. Click Next to start the Partition Wizard. 11 5. Select the Primary or Extended option and click Next. 12 6. Specify the partition size. By default, the partition occupies the entire volume. Click Next. 7. Assign a drive letter or mount path and click Next. 8. Name and format the partition and click Next. 13 9. Review the file system settings and click Finish to create the logical Partition. 10. Repeat steps I through 9 to partition any remaining disks. 14 Mac OS X Important: Before reconfiguring a volume, back up your data and drag the old drive to the trash to un-mount. If no hard drives are connected to the Storage Appliance, the SteelVine Processer disk (8.0GB Config Disk Media) will appear. Do not remove or modify that partition. After you configure and partition the new volumes, restore the back-up data to the new configuration. 1. Launch Disk Utility from the Application > Utilities folder. 2. Select a configured disk and click the partition tab. This procedure illustrates the JBOD Storage Policy configuration, which 15 concatenates the capacity of all hard drives connected to the SteelVine Storage Reference Design. 3. 4. 5. 6. 7. 8. Select 1 Partition from the Volume Scheme drop-down list. Enter a name for the volume in the Name field (such as “My BIG Disk.) Select Mac OS Extended (journaled) from the Format drop-down list. Specify the size of the partition in the Size field. Click the Partition button. Click Partition to acknowledge the warning. 16 Disk Utility mounts the created partition and represents it with an icon on the desktop. The icon is labeled with the partition name. 9. Review the file system setting and click Finish to create the logical partition. 10. Repeat steps 1 through 9 to partition any remaining disks. To remove the device: USB interface For Windows 2000/XP/Vista Users Please double-click the icon dialog box will appear. OR on the system tray. A Double-click the Generic USB Storage Device to remove the device for preventing data loss. Mac OS You can remove the cable of USB after putting the icon of USB HDD on the desktop into the trash can. CEB-2355S NO: 40203-105148-188 17