1
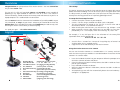
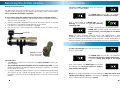
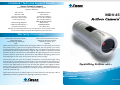
Helpdesk / Technical Support Details
™
Swann Technical Support
All Countries E-mail: [email protected]
Telephone Helpdesk
USA toll free
1-800-627-2799
(Su, 2pm-10pm US PT)
(M-Th, 6am-10pm US PT)
(F 6am-2pm US PT)
USA Exchange & Repairs
1-800-627-2799 (Option 1)
(M-F, 9am-5pm US PT)
Advanced security made easy ™
AUSTRALIA toll free
1300 138 324
(M 9am-5pm AUS ET)
(Tu-F 1am-5pm AUS ET)
(Sa 1am-9am AUS ET)
NEW ZEALAND toll free
0800 479 266
INTERNATIONAL
+61 3 8412 4610
MDV-450
Action CameraTM
See http://www.worldtimeserver.com for information on time zones and the
current time in Melbourne, Australia compared to your local time.
Warranty Information
Swann Communications USA Inc.
12636 Clark Street
Santa Fe Springs CA 90670
USA
Swann Communications PTY. LTD.
Building 4, 650 Church Street,
Richmond, Victoria 3121
Australia
Swann Communications warrants this product against defects in workmanship and material
for a period of one (1) year from it’s original purchase date. You must present your receipt
as proof of date of purchase for warranty validation. Any unit which proves defective during
the stated period will be repaired without charge for parts or labour or replaced at the sole
discretion of Swann. The end user is responsible for all freight charges incurred to send the
product to Swann’s repair centres. The end user is responsible for all shipping costs incurred
when shipping from and to any country other than the country of origin.
The warranty does not cover any incidental, accidental or consequential damages arising
from the use of or the inability to use this product. Any costs associated with the fitting or
removal of this product by a tradesman or other person or any other costs associated with
its use are the responsibility of the end user. This warranty applies to the original purchaser
of the product only and is not transferable to any third party. Unauthorized end user or
third party modifications to any component or evidence of misuse or abuse of the device will
render all warranties void.
Operating Instruct
Instructions
tions
s
By law some countries do not allow limitations on certain exclusions in this warranty. Where
applicable by local laws, regulations and legal rights will take precedence.
SW361-MDS
www.swannsecurity.com
16
© Swann Communications 2009
SR361-MDS-60001-280909
1
Before You Begin
FCC Verification:
NOTE: This equipment has been tested and found to comply with the limits for
Class B digital device, pursuant to part 15 of the FCC Rules. These limits are designed to provide reasonable protection against harmful interference in a residential installation. This equipment generates, uses and can radiate radio frequency
energy and, if not installed and used in accordance with the instructions, may
cause harmful interference to radio or television reception, which can be determined by turning the equipment off and on, the user is encouraged to try to correct the interference by one or more of the following measures:
· Reorient or relocate the receiving antenna
· Increase the separation between the equipment and the receiver
· Connect the equipment into an outlet on a circuit different from that to which
the receiver is connected
· Consult the dealer or an experienced radio/TV technician for help
IMPORTANT NOTE: Prohibition against eavesdropping
Except for the operations of law enforcement officers conducted under lawful
authority, no person shall use, either directly or indirectly, a device operated pursuant to the provisions of this Part for the purpose of overhearing or recording the
private conversations of others unless such use is authorized by all of the parties
engaging in the conversation.
WARNING: Modifications not approved by the party responsible for compliance
could void user’s authority to operate the equipment.
Technical Specifications
MDV-450 Action Camera
Video
Video Format
Resolution
Video Size
Photo Format
Photo Resolution
Image File Size
AVI
640 x 480
4710kbps
JPEG
2048 x 1536 (interpolated)
Approx. 700KB
Audio
Microphone
Audio Range
Yes (built in)
2m (under typical conditions)
Recording
Recording Mode
Frame Rate
Storage Type
Storage Capacity
Storage Time
Manual / Continuous
24fps
MicroSD Card
Up to 8GB
Approx. 30min/GB
General
Battery Type
Record Time per Charge
Charging Method
Dimensions
Rechargeable Lithium-Ion 490mAH
90 mins
USB (via computer)
3.5” x 1.2” x 1.2”
90mm x 30mm x 30mm
IMPORTANT SAFETY INSTRUCTIONS:
· Make sure product is fixed correctly and stable if fastened in place
· Do not operate if wires and terminals are exposed
2
15
Troubleshooting
Problem: The Action Camera won’t turn on.
Solution: The most likely culprit is the battery. Check out the instructions on page
5 regarding charging the battery. Try completely charging the battery. When doing
so, avoid using a USB hub - some USB hubs will not provide a full 5V to attached
devices and thus will not charge the battery properly. You can also charge the
Action Camera from a stand-alone USB charger.
Problem: I’ve recorded videos, but the microSD card seems to be blank.
Solution: Chances are that this problem is caused by turning the Action Camera
off before the video files have been properly saved to the microSD card. Always
use the Rec/Pause button to stop recordings and waiting until the green light has
gone out before turning the Action Camera off.
Problem: My videos and pictures seem blurry.
Solution: The lens of the Action Camera is protected by a small glass cover - this
is protected itself by the adhesive lens protection film. First, ensure that this is
removed. If the glass cover on the lens becomes dirty, then this will cause a large
part (or all) of the image captured by the Action Camera to be distorted, soft and
blurred. Clean the glass lens cover using a dedicated lens cleaning cloth and lens
cleaning solution. By unscrewing the front part off the Action Camera, you can
extract the glass lens cover if this makes cleaning it easier. Be careful if you take the
glass lens cover off not to allow dust or moisture into the lens itself.
Problem: My videos seem too shaky.
Solutions: As a general rule, this usually indicates that the mount you’ve used
for the camera (or arm, if you’re shooting hand-held) needs to be more stable.
One option is to mount the Action Camera on the sturdiest platform you can find.
Of course, when you’ve got the camera strapped to your bike and you’re riding
down the steep side of a mountain, neither yourself nor the bike are going to be
particularly stable! As a rule, action video is energetic, frantic and really, really
shaky. Check out extreme sports videos shot with self-mounted cameras - a shaky
image is pretty much par for the course. In fact, the frantic movement often makes
them more exciting and dynamic!
Problem: I’m worried that the recording might skip if the Action Camera is bumped
or knocked too hard.
Solution: It’s really hard to mess up the Action Camera. Whilst we certainly don’t
recommend throwing, dropping or hitting the Action Camera, it doesn’t have any
moving parts and is therefore somewhat resistant to shocks and bumps. The most
fragile part of the Action Camera is the glass lens cover. Try not to allow this to
become scratched or broken - it protects the lens, after all!
14
Table of Contents
Before You Begin
Package Contents
Overview
Layout
Preparing the Action Camera
Mounting the Action Camera...
...on a Window/Windshield
...on Handlebars
...on your Head
Recording
Playback
Additional Functions
Troubleshooting
Technical Specifications
2
3
4
4
5
6
7
8
9
10
12
13
14
15
Package Contents
MDV-450 Action Camera
Handlebar Mounting Clasp
Clip-On Viewfinder
Head Strap
USB 2.0 Cable
2GB microSD Card
Suction Grip Stand
If any of these items are missing or damaged,
please contact Swann Technical Support for assistance.
3
Overview
Additional Functions
Congratulations on your purchase of the Action Camera – the most convenient
way to shoot action video.
Time Stamp
This tiny unit is a fully self contained camera and recording system, capable of
producing a very high standard of video for a unit of its size. It has a built in
Lithium-ion battery, records to Micro-SD memory cards and connects to your PC or
laptop computer via a standard USB 2.0 connection!
You can mount the Action Camera on the handlebars of your bike, stick it to your
car’s windshield, or strap it to your head – whatever you need to do to chase that
perfect shot! We’ve included all the mounting hardware you need to strap, stick
and sling the Action Camera onto just about anything.
So – grab your gear… and stick a camera on it.
Layout
1
The Action Camera can stamp the time and date onto the upper right corner of
photos and video recordings. This can be useful if you’re using the Action Camera
as a diary camera, or need to prove that at half past four on Friday afternoon you
actually were hurling yourself out of a perfectly good light aircraft.
To setup the Time Stamp function:
• Connect the Action Camera to your computer.
• Create a .TXT file using a standard text editor (such as Notepad).
• The only information to include in the .TXT file is the full time and date,
formatted as follows: YYYY-MM-DD HH:MM:SS
• When entering the value for hours, use 24 hour time. (eg. 4:00pm = 16:00)
• When entering a time or date which only has one digit, be sure that it is
preceded by a “0”. For example, rather than entering “9”, enter “09”.
For example, if it was half past four in the afternoon of the twenty-fifth of
September 2009, the file would read:
8
2009-09-25 16:30:00
2
•
3
4
•
5
6
Save this file as “userconf.txt”. Do not call it anything else, or format it to be
anything other than a standard text file.
Copy this file to the root directory of the Action Camera.
Using the Action Camera as a PC Camera
7
11
10
9
1.
2.
3.
4.
5.
6.
7.
8.
9.
10.
11.
4
Rec/Pause Button
Micro SD Card Slot
Mini-USB Connection
On / Off Switch
Removable Screw Cap
Lens
Stand with Suction Grip
Head Strap
Handlebar Clip
Viewfinder
USB 2.0 Cable
(makes
makes it start or stop recording)
(with
i h a Mi
MicroSD
SD C
Card
dh
hanging
i out))
(for plugging into things like PCs)
(turns the power on and off)
(protects electronic bits)
(point at what you want to shoot)
(for sticking to things like glass)
(for strapping to your head)
(mounts on things like handlebars)
(finds the right view)
(plugs things into other things)
You can use the Action Camera as a standard USB 1.1 PC camera, and use it in
much the same way that you would use a standard webcam. To activate the Action
Camera in PC camera mode:
•
•
•
•
•
Insert the included CD-ROM into your computer. Follow the prompts to install
the Action Camera software and drivers.
Once the software has been installed, connect the USB 2.0 cable to a free USB
port on your computer.
Press and hold the Rec/Pause button.
Whilst the Rec/Pause button is held down, connect the USB 2.0 cable to the
Action Camera.
Your operating system will then automatically detect the new hardware, and
configure it as appropriate.
13
Playback
Preparing the Action Camera
In order to playback files recorded on the Action Camera, you just need to get
those files onto a computer. There are two ways of doing this.
Your Action Camera is almost ready to go right out of the box, we just need to
remove the adhesive lens protector, install the MicroSD card and charge the
built-in battery.
To connect the Action Camera to a PC as an external storage device:
By connecting the Action Camera in this way, it will be detected by your computer
as an external USB storage device, much like a USB flash drive.
• Ensure the power button on the Action Camera is turned OFF.
• Connect the Action Camera to your PC via the USB 2.0 cable.
• Your operating system should detect the Action Camera automatically.
• Access your files in the same way that you would access files from any other
USB drive.
To retrieve files directly from the microSD card:
If you have a card reader capable of reading microSD cards, or have a microSD to
SD or USB adaptor, then:
• Eject the microSD card from the rear of the Action Camera.
• Insert the microSD card into a card reader or adaptor (as required).
• Connect the card reader/adaptor to your computer.
• The microSD card will be detected by your operating system as an external
flash drive.
• Open and access this drive the same way you would access a typical USB flash
drive.
Opening files:
The microSD card, whether you access it via the Action Camera or via a card reader,
will contain two folders, one named AVI and one named JPG.
The AVI folder contains your recorded videos, as .AVI files. These can be played
by a standard video player, such as Media Player or Quicktime. They can also be
copied and pasted like any other file. If you wish to copy them to a DVD, you’ll
need to get dedicated DVD burning software, as the file format is not compatible
with most standard DVD players.
If you have problems playing any of the .AVI files, we suggest using VLC Media
Player. This is a free player which can play just about anything. Grab it online, from
http://www.videolan.org/vlc/
The JPG folder contains all your photographs, as .JPG files. JPG is a very standard
file format, and the most popular format for pictures shown on the Internet. Almost
all computers and computer-like devices (such as newer video game consoles or
even advanced mobile phones) can open and display JPG files with no additional
software.
12
Removing the Adhesive Lens Protector
Locate the small tab on the corner of the lens. Pull on this, and peel the protective
film from the front of the lens.
Installing the SD Card
The Action Camera can record video to a Micro-SD card, and is compatible with
both standard SD cards and the newer SDHC (High Capacity) cards also. It can take
Micro-SD cards ranging from 128MB right up to 8GB. Obviously, the bigger the
card you put in it, the more video you can record to it!
To install or change your Micro-SD card:
1. Unscrew the cap from the rear of the Action Camera
2. To remove a Micro-SD card, press in to release the locking mechanism, and it’ll
pop out of the spring-loaded mechanism.
3. If you haven’t got long enough fingernails, you may need to use a thin object
(thin, not sharp!) such as a paperclip to get to the card. Alternately, find
someone with fingernails or stop biting yours.
4. Insert the new SD card, with the connections facing inwards towards the
Action Camera, and down towards the USB port and power switch. Basically,
it only goes in one way – don’t force it if it resists. SD cards are pretty robust
but they’re not invincible, and neither is the SD slot on the Action Camera.
5. Insert the Micro-SD card until it ‘clicks’ into position.
6. Screw the end cap back onto the Action Camera.
Charging the Built-In Battery
We charge them up before we ship ‘em out but, due to time in transit en route to you,
it’ll need to be recharged before you put the Action Camera through its paces.
Oh, and you’ll want to leave it charging until it’s completely full, especially the first
time – otherwise, the battery might be damaged.
Think of it like it’s a camel – it’ll go the distance, but it needs to fully stock up its
metaphorical hump before travelling!
To charge the battery:
1. Unscrew the screw cap, exposing the ON/OFF switch and USB port.
2. Ensure that the ON/OFF switch is set to OFF (if it’s ON, a computer will detect it as
a USB Mass Storage Device rather than just charge it up).
3. Connect the USB port on the Action Camera to a free USB port on your computer.
4. The miniature lithium-ion battery built into your Action Camera will give you
approximately 1 - 2 hours of recording time.
5. Whilst the Action Camera is charging, the RED light will stay lit to let you know it’s
working.
Whilst charging, the RED light will stay lit.
When the battery is running low, the RED light will FLASH.
5
Mounting the Action Camera...
Video Mode
Aiming the Action Camera
To start a video recording, press the Rec/Pause
button whilst in Video Mode.
You gotta know what you’re shooting, right? As there is no screen on the Action
Camera (we’d have put one on, but they’re a bit too bulky and a lot too fragile!)
we’ve included a detachable viewfinder.
To get a look at what the Action Camera will see from a mounted position:
1. Take the detachable viewfinder, and slip onto the Action Camera. It easiest to
slide it on over the rear cap.
2. Slide the detachable viewfinder to the rear of the Action Camera - it will lock
into position in the groove towards the back of the camera.
3. Put your eye as close to the viewfinder as possible.
4. The area you see in focus through the viewfinder will be the field of view of
the camera.
The GREEN light will turn on – this indicates that
the Action Camera is preparing to record.
After a few seconds, the GREEN light will start
flashing. This indicates that you are currently
recording video.
To stop a recording, press the Rec/Pause button. The
GREEN light will now stay lit. This means that the
Action Camera is writing data to the MicroSD
card.
Viewfinder
Note: If a single, unbroken video file reaches 2GB (approximately 1 hour of
recording time) then the Action Camera must stop recording for a moment in
order to write data to the microSD card. There will be a several second pause, after
which the Action Camera will continue recording to a new file automatically.
Photo Mode
To take a photograph, press the Rec/Pause button
whilst in Photo Mode.
Arrow showing
correct orientation
of the Viewfinder
Tips and Tricks:
• The arrow on the top of the viewfinder should point towards whatever you
want to shoot.
• The viewfinder should be aligned as close to straight as possible – use the
Rec/Pause button on the top of the Action Camera as a reference – it’s directly
on the top of the camera.
• It’s always a good idea to do a couple of ‘test runs’ before shooting something
that matters to you. Though the Action Camera is an easy to use bit of
hardware, it can be a little tricky to get the knack of early on. Practice makes
perfect!
6
The GREEN light will turn on – this indicates that
the Action Camera has captured an image, and
is currently saving that image to the microSD
card.
After a few seconds, the GREEN light will turn off.
This indicates that the Action Camera is ready to
take another photograph.
Note: When using Photo Mode, it’s really important to keep the Action Camera
steady whilst taking a picture. If the camera is moving, then the image the
Action Camera captures is likely to be blurry.
11
Recording Modes
...on a Windshield/Window
The Action Camera has two modes: Video Mode and Photo Mode.
To record either what’s going on inside or outside of the car, you can mount the
Action Camera to the windshield or to a window using the included stand with
suction-grip.
Video Mode allows you to shoot moving
videos, which are saved to the microSD
card as .AVI files. Whilst in Video Mode,
the BLUE and ORANGE lights will stay
ON.
In Photo Mode the Action Camera will
take single still images, which are saved
to the microSD card as .JPG files. Whilst
in Photo Mode, the BLUE light only will
be ON.
Video Mode
Photo Mode
Selecting your Mode:
After turning the Action Camera on:
1. Wait until the BLUE and ORANGE lights are both ON. This indicates that you
are in Video Mode.
2. To change to Photo Mode, press and hold the Rec/Pause button for three
seconds.
3. The ORANGE light will go out, and the BLUE light will stay on. This indicates
that you are in Photo Mode.
4. To change back to Video Mode, press and hold the Rec/Pause button for
three seconds. The ORANGE light will come back on, indicating the mode has
changed back to Video Mode.
5. Each time you turn on the Action Camera, it will automatically enter Video
Mode, regardless of the mode it was in when turned off.
IMPORTANT:
Do NOT turn the Action Camera OFF whilst you are recording video or
capturing a still image (basically, any time that the GREEN light is ON).
To mount the suction-grip stand:
1. Find a flat, glass surface to mount the suction-grip on.
2. Clean the glass using a glass cleaner or cleaning alcohol, and a soft, lint
free cloth. Clean suction cup with same method. Allow both to dry completely.
The cleaner both surfaces are, the better the suction cup will stick.
3. Make sure that the lever on the suction-grip is released (aimed UP).
4. Press the suction cup firmly against the surface you wish to stick it to.
5. Press the lever down to lock into position.
6. Check the integrity of the suction-grip’s hold by gently pulling and tapping
the stand.
7. If it is secure, mount the Action Camera into position, and aim it as required.
Suction Grip
Released
Suction Grip
Attached
To release the suction-grip:
1. Remove the Action Camera from the stand.
2. Move the lever to the released (UP) position.
3. Pull the small tab on the side of the suction-grip.
Tips and Tricks:
• For the safety of your Action Camera, we strongly suggest mounting the
suction-grip stand inside the vehicle only! If it does come unstuck, you don’t
want to run over it with your car (it’s tough, but not that tough).
• You can use the same mechanism to attach the suction-grip stand to any flat,
clean, nonporous surface. However, exercise caution: many surfaces don’t
offer as reliable a surface as glass to mount the suction-grip to.
If the Action Camera is turned off whilst writing a file to the microSD card then the
file will not be saved properly. In some cases, this can corrupt the file structure of
the microSD card, effectively erasing other recordings. Always use the Rec/Pause
button to stop recording before turning the Action Camera off!
10
7
...on Handlebars
...on your Head
If you’re using the Action Camera to record your bicycling adventures, it’s often
a better idea to mount the Action Camera to your handlebars than to your
body. Mounting the Action Camera to the handlebars will ensure that the camera’s
view stays upright, and doesn’t wind up looking down at the road or up at the sky
depending on the angle of your neck!
The head strap which came with your Action Camera is a great way to record
exactly what you’re seeing when your skating, snowboarding, participating in the
next extreme ironing championship – whatever floats your boat. Basically, by using
a cunning combination of practical design and some elastic, the Action Camera
head strap lets you strap the Action Camera to your head.
1. Undo the bottom strap of the handlebar clip.
2. Place over handlebars, lining up the groove in the clip to sit in.
3. Attach the strap so the clip is secure in place, but not so tight that the strap
will break or stretch.
4. Once you’re satisfied the clip is secure, attach the Action Camera using the
second strap on the top.
To use the Action Camera with the head strap:
1. Before attaching the Action Camera to the head strap, try the head strap on.
Get a feel for the shape and size of the head strap.
2. To figure out which way around the head strap should be worn, the three
adjustable clasps go towards the back.
3. Adjust the size and feel of the head strap with the three clasps. Ideally, the head
strap should be tight enough to the head to prevent unwanted movement,
whilst loose enough to be comfortable.
4. Locate the two elastic rings, located on the left hand side of the head strap
(whilst worn). Move them to the location that you’d like to mount the Action
Camera.
5. Push the Action Camera through the elastic loops, and secure the Action
Camera in place with one elastic loop around the front and one elastic loop
around the back of the Action Camera. It should be a tight fit!
Tips and Tricks
• Many handlebars are not exactly straight, rather they are curved. This is not a
problem. Once you mount the handlebar clip, you can pivot the top half of the
clip to face the way you want.
• Mount the Action Camera so that the Rec/Pause button is covered by the tab
in the centre of the top strap. This means that the button is protected from
being accidentally bumped and your recording halted prematurely.
Tips and Tricks
• Make sure you mount the Action Camera the right way up. Even a slight angle
can seem quite dramatic when you play your footage back! The easiest way to
ensure this is to check that the Rec/Pause button is facing up.
• When placing the camera in the final position, it can help to use a mirror (or
willing accomplice) to make sure that it is facing exactly forward.
• Mount the Action Camera far enough forward on your head to avoid shooting
your own ear!
The Action Camera worn
with the head strap fits
neatly under most helmets.
If required, you can twist the Action
Camera slightly to compensate for
the curvature of your handlebars
8
9