1
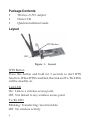
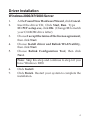
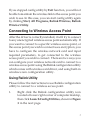
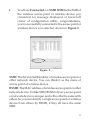
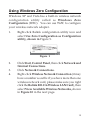
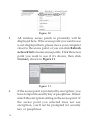
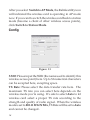
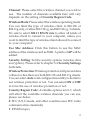
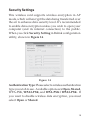
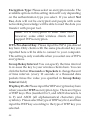
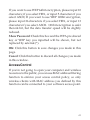
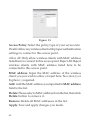
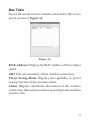
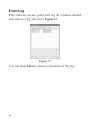
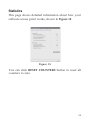
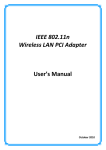
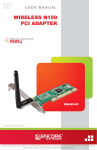
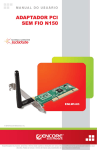
Wireless-N PCI Adapter
Quick Installation Guide
Introducing the Wireless-N PCI Adapter
The Wireless-N PCI Adapter is designed to connect your
desktop computer to your wireless network for fast
internet access.
Features and Benefits
•
•
•
•
•
Complies with 802.11n Draft 2.0, 802.11g and
802.11b standards
Supports QoS-WMM, WMM-PS
Supports 64/128-bit WEP, WPA (TKIP with IEEE
802.1x), WPA2 (AES with IEEE 802.1x) functions for
high level of security
Dual external antenna with 1T2R feature enhances
data throughput with increased transmitting range
for all compatible legacy bands (802.11 a/b/g)
Farther coverage, less dead spaces and higher
throughput with MIMO technology
System Requirements
•
•
Pentium® or equivalent computer with an available
PCI slot
Windows® 2000 / XP (32-/64-bit) / Server 2003
(32-/64-bit) / Vista (32-/64-bit)
04-0536B
1
Package Contents
•
•
•
Wireless-N PCI Adapter
Driver CD
Quick Installation Guide
Layout
WPS Button
LED
Figure 1: Layout
WPS Button
Press this button and hold for 3 seconds to start WPS
function. When WPS is enabled, the Link and Tx/Rx LEDs
will be steadily on.
Link LED
On: Link to a wireless access point
Off: Not linked to any wireless access point
Tx/Rx LED
Blinking: Transferring/receivind date
Off: No wireless activity
2
Safety Information
In order to keep the safety of users and your properties,
please follow the following safety instructions.
1.
2.
3.
Shutdown the computer and remove the power
cord of your computer when you want to install /
remove the network card. If you’re not familiar
about interface card installation, ask an experienced
technician for help.
The antenna of this network card is small enough
to put in a child’s mouth, ear, or nose, and it could
cause serious injury. PLEASE KEEP THIS
NETWORK CARD OUT OF THE REACH OF
CHILDREN!
If you smell something strange or even see some
smoke coming out from your computer, switch the
computer off immediately, and call your place of
purchase for help.
3
Hardware Installation
General instructions for installing the card are provided
below. Since the design of computer cases and
motherboards vary, refer to your computer’s reference
manual for further information, if needed.
Static Electricity Discharge may permanently damage
your system. Discharge any static electricity build up in
your body by touching your computer’s case for a few
seconds. Avoid any contact with internal parts and handle
cards only by their external edges.
1.
2.
3.
4.
5.
6.
7.
4
Turn OFF the power to your computer and any
other connected peripheral devices.
Unplug the power cord from the back of the
computer.
Remove your computer cover.
Remove the slot bracket from an available PCI slot.
To install the card, carefully align the card's bus
connector with the selected PCI slot on the
motherboard. Push the board down firmly, but
gently, until it is well seated.
Replace the slot bracket holding screw to secure the
card.
Replace the computer cover and reconnect the
power cord.
Driver Installation
Windows 2000/XP/2003 Server
1.
2.
3.
4.
5.
At the Found New Hardware Wizard, click Cancel.
Insert the driver CD, Click Start, Run. Type
D:\PCI\setup.exe, click OK. (Change D: to match
your CD-ROM drive letter)
Choose I accept the terms of the license agreement,
then click Next.
Choose Install driver and Ralink WLAN utility,
then click Next.
Choose Ralink Configuration Tool, then click
Next.
Note: Skip this step and continue to step 6 if you
have Windows 2000.
6.
7.
Click Install.
Click Finish. Restart your system to complete the
installation.
5
Windows Vista™
1.
2.
3.
4.
5.
6.
7.
8.
At the Found New Hardware window, click Cancel.
Insert the driver CD. Click Start, in the Start Search
box, type D:\PCI\setup.exe, press Enter. (Change
the D: to match your CD-ROM drive letter)
Click Allow.
Choose I accept the terms of the license agreement,
then click Next.
Choose Install driver and Ralink WLAN utility,
then click Next.
Click Install.
Click Finish. Restart your system to complete the
installation.
A new icon will appear at lower-right corner of
your computer desktop shown in Figure 2, you can
put the mouse cursor on the icon, and the status of
wireless card will be displayed as a popup balloon.
When you want to configure your wireless
connection, please right click on this icon, and a
popup menu will appear. You can click Launch
Config Utilities to start configuration program.
Figure 2
6
If you stopped config utility by Exit function, you will not
be able to maintain the wireless link to the access point you
wish to use. In this case, you can start config utility again
by clicking Start, All Programs, Ralink Wireless, Ralink
Wirelss Utility.
Connecting to Wireless Access Point
After the driver is correctly installed, it will try to connect
to any unencrypted wireless access point automatically. If
you want to connect to a specific wireless access point, or
the access point you wish to connect uses encryption, you
have to configure the wireless network card and input
required parameters, to get connected to the wireless
access point you wish to connect. There are two ways you
can configure your wireless network card to connect to a
wireless access point: using the Ralink configuration utility
which comes with wireless card driver, and using built-in
windows zero configuration utility.
Using Ralink Utility
Please follow the instructions to use Ralink configuration
utility to connect to a wireless access point.
1.
Right click the Ralink configuration utility icon
located at lower-right corner of computer desktop,
then click Launch Config Utilities, shown in Figure
3 in the next page.
7
Figure 3
2.
Configuration utility will scan for all wireless access
points automatically. Scan results will be displayed
here, please check if the wireless access point with
the SSID (the name of wireless access point) you
preferred is shown in Figure 4. If the wireless access
point you wish to connect does not show here,
please click Rescan to try again, until the one you
preferred is displayed. You may have to click Rescan
several times before you can see the access point
you wish to use. If you still can not see the access
point you wish to use after clicking Rescan for more
than five times, please move your computer closer
to the location where the wireless access point is.
Figure 4
8
3.
Click the wireless access point or network device
you wish to connect to, then click Connect, shown
in Figure 5 below.
Figure 5
The non-encrypted access point (The Encryption field
indicate None) will connected within one minute. Please
jump to step 5 on page 9 if the access point you selected
enables encryption, otherwise proceed to next step.
4.
If the wireless access point does not have SSID,
you’ll be prompted to input it here. Please ask the
owner of wireless access point and input the exact
SSID here, then click OK when ready. If the SSID
you provided here is wrong, you’ll not be able to
connect to this access point.
9
If the wireless access point you selected have SSID, please
skip this step, shown in Figure 6.
Figure 6
5.
If the wireless access point uses encryption, you
have to input WEP passphrase or WPA preshared
key. Shown on Figure 7, please ask the owner of the
wireless access point to obtain the correct
passphrase/preshared key and enter here, then
click OK. If the value you inputted here is wrong,
you will not be able to connect to this wireless access
point. Authentication type is selected automatically,
please don’t change it.
If the access point you selected does not enable encryption
and does not require authentication, please skip this step.
Figure 7
10
6.
You’ll see Connected <-> SSID (SSID is the SSID of
the wireless access point or wireless device you
connected to) message displayed at lower-left
corner of configuration utility, congratulations,
you’re successfully connected to the access point or
wireless device you selected, shown in Figure 8.
Figure 8
SSID: The Service Set IDentifier of wireless access point or
other network device. You can think it as the name of
access point of wireless device.
BSSID: The MAC address of wireless access point or other
network device. Unlike SSID, BSSID of every access point
or network device is unique, and will not be the same with
others.So you can identify a single access point or wireless
device from others by BSSID, if they all have the same
SSID.
11
Signal: Shows the signal strength of access point or wireless
device. Larger number means better radio strength.
Channel: Shows the channel number that access point or
wireless device uses.
Encryption: Shows the encryption method that access
point or wireless device uses. If the wireless access point
does not enable encryption, you’ll see None displayed
here.
Authentication: Shows the authentication mode that access
point or wireless device uses. If the wireless access point
does not require authentication, you’ll see Unknown
displayed here.
Network Type: Shows the type of wireless connection. If
it’s a wireless access point, Infrastructure will be displayed
here; if it’s a computer or network device, AdHoc will be
displayed here.
Note: Wireless access point (Infrastructure) is a
network device which acts as a bridge, to let
wired and wireless network devices
communicate with each other.
AdHoc is another connection type. A computer
or network device can establish a direct wireless
link with other computer or network device
directly, without the help of wireless access
point.
12
Using Windows Zero Configuration
Windows XP and Vista has a built-in wireless network
configuration utility called as Windows Zero
Configuration (WZC). You can use WZC to configure
your wireless network adapter.
1.
Right-click Ralink configuration utility icon and
select Use Zero Configuration as Configuration
utility, shown in Figure 9.
Figure 9
2.
3.
4.
Click Start, Control Panel, then click Network and
Internet Connections.
Click Network Connections.
Right-click Wireless Network Connection (it may
have a number as suffix if you have more than one
wireless network card, please make sure you right
click the Ralink 802.11n Wireless LAN Card), then
select View Available Wireless Networks, shown
in Figure 10 in the next page.
13
Figure 10
5.
All wireless access points in proximity will be
displayed here. If the access point you want to use
is not displayed here, please move your computer
closer to the access point, or you can click Refresh
network list to rescan access points. Click the access
point you want to use if it’s shown, then click
Connect, shown in Figure 11.
6.
If the access point is protected by encryption, you
have to input its security key or passphrase. It must
match the encryption setting on the access point. If
the access point you selected does not use
encryption, you’ll not be prompted for security
key or passphrase.
Figure 11
14
7.
If you can see Connected message, the connection
between your computer and wireless access point
is successfully established.
Soft-AP Function
In addition to being a wireless client of other wireless
access points, this wireless card can act as a wireless service
provider. You can switch this wireless card’s operating
mode to AP mode to simulate the function of a real
wireless access point by software, therefore, all other
computers and wireless devices can connect to your
computer wirelessly, even share the internet connection
you have.
Switch to AP Mode and Basic Configuration
The operating mode of the wireless card is Station Mode
(becoming a client of other wireless access points) by
default. If you want to switch to AP mode, please right click
the Ralink utility icon, and select Switch to AP Mode,
shown in Figure 12.
Figure 12
15
After you select Switch to AP Mode, the Ralink utility icon
will indicated the wireless card is operating in AP mode
now. If you want to switch the wireless card back to station
mode (become a client of other wireless access points),
click Switch to Station Mode.
Config
Figure 13
SSID: Please input the SSID (the name used to identify this
wireless access point) here. Up to 32 numerical characters
can be accepted here, excepting space.
TX Rate: Please select the data transfer rate here. The
maximum TX rate you can select here depends on the
wireless mode you’re using. It’s safe to select Auto to let
wireless card select a proper TX rate according to the
strength and quality of radio signal. When the wireless
mode is set to 802.11 B/G/N Mix, TX Rate will be set to Auto
and cannot be changed.
16
Channel: Please select the wireless channel you wish to
use. The number of channels available here will vary
depends on the setting of Country Region Code.
Wireless Mode: Please select the wireless operating mode.
You can limit the type of wireless client to 802.11b or
802.11g only, or allow 802.11b/g, and 802.11b/g/n clients.
It’s safe to select 802.11 B/G/N mix to allow all kinds of
wireless client to connect to your computer, unless you
want to limit the type of wireless client allowed to connect
to your computer.
Use Mac Address: Click this button to use the MAC
address of the wireless card as SSID. A prefix of AP will be
added.
Security Setting: Set the security options (wireless data
encryption). Please refer to chapter 3-2 Security Settings
fordetails.
Wireless Protection: Wireless protection will prevent data
collision when there are both 802.11b and 802.11g clients.
You can select Auto to let configuration utility to decide to
use wireless protection or not. You can select ON or OFF
to force the use of wireless protection or not.
Country Region Code: Available options are 0-7, which
will affect the available wireless channels you can use,
please see below.
0: FCC (US, Canada, and other countries uses FCC radio
communication standards)
1: ETSI (Europe)
17
2: SPAIN
3: FRANCE
4: MKK
5: MKKI (TELEC)
6: ISRAEL (Channel 3 to 9)
7: ISRAEL (Channel 5 to 13)
Beacon(ms): You can define the time interval that a beacon
signal should be send. Default value is 100. Do not modify
this value unless you know what will be affected.
Idle Time: Select the idle time of your wireless network
card. Default value is 300. Do not modify this value unless
you know what will be affected.
No forwarding among wireless clients: Check this box
and wireless clients will not be able to exchange data with
each other.
Hide SSID: Check this box and the SSID will not be
broadcasted to the public. Your wireless clients must
know the exact SSID to be able to connect to your computer.
This option is useful to enhance security level.
Allow BW 40 MHz: Check this box to allow BW 40MHz
capability.
Default: Click this button to restore all settings in this page
back to default value.
Apply: Click this button to activate current settings.
18
Security Settings
This wireless card supports wireless encryption in AP
mode, which will encrypt the data being transferred over
the air to enhance data security level. It’s recommended
to enable data encryption unless you wish to open your
computer (and its internet connection) to the public.
When you click Security Setting in Ralink configuration
utility, shown in Figure 14.
Figure 14
Authentication Type: Please select a wireless authentication
type you wish to use. Available options are Open, Shared,
WPA-PSK, WPA2-PSK, and WPA-PSK / WPA2-PSK. If
you want to disable wireless data encryption, you must
select Open or Shared.
19
Encryption Type: Please select an encryption mode. The
available options in this setting item will vary depending
on the authentication type you select. If you select Not
Use, data will not be encrypted and people with some
networking knowledge will be able to read the data you
transfer with proper tool.
Note: WPA encryption is safer than WEP,
however, some older wireless clients don’t
support WPA encryption.
WPA Pre-shared Key: Please input the WPA pre-shared
key here. Only clients with the same pre-shared key you
inputted here will be able to connect to your computer.
This setting is only available when you select one of WPA
encryptions.
Group Rekey Interval: You can specify the time interval
to re-issue the key to your wireless clients here. You can
click the button 10 seconds or Kpackets to change the unit
of time interval. (every 10 seconds or a thousand data
packets times the value you specified in Group Rekey
Interval field)
Wep Key #1~#4: Please input the WEP encryption key here
when youselect WEP as encryption type. There are 2 types
of WEP keys: Hex (number 0 to 9, and ASCII characters A
to F) and ASCII (all alphanumerical characters plus
symbols). Please select the type of WEP key first, and then
input the WEP key according to the type of WEP key you
selected.
20
If you want to use WEP 64 bit encryption, please input 10
characters; if you select HEX, or input 5 characters if you
select ASCII; If you want to use WEP 128bit encryption,
please input 26 characters if you select HEX, or input 13
characters if you select ASCII. 128 bit encryption is safer
then 64 bit, but the data transfer speed will be slightly
reduced.
Show Password: Check this box and the WPA pre shared
key or WEP key you inputted will be shown, but not
replaced by asterisk (*).
OK: Click this button to save changes you made in this
page.
Cancel: Click this button to discard all changes you made
in this window.
Access Control
If you’re not going to open your computer and wireless
resources to the public, you can use MAC address filtering
function to enforce your access control policy, so only
wireless clients with MAC address you defined by this
function can be connected to your software access point.
21
Figure 15
Access Policy: Select the policy type of your access rule:
Disable:Allow any wireless client with proper authentication
settings to connect to this access point.
Allow All: Only allow wireless clients with MAC address
listed here to connect to this access point. Reject All: Reject
wireless clients with MAC address listed here to be
connected to this access point.
MAC address: Input the MAC address of the wireless
client you you wish to allow or reject here. No colon (:) or
hyphen (-) required.
Add: Add the MAC address you inputted in MAC address
field to the list.
Delete: Please select a MAC address from the list, then click
Delete button to remove it.
Remove: Delete all MAC addresses in the list.
Apply: Save and apply changes you made.
22
Mac Table
Shows the list all wireless clients connected to this access
point, shown in Figure 16.
Figure 16
MAC Address: Displays the MAC address of this wireless
client.
AID: The serial number of this wireless connection.
Power Saving Mode: Displays the capability of power
saving function of this wireless client.
Status: Displays additional information of this wireless
connection, like current wireless operating mode and data
transfer rate.
23
Event Log
This software access point will log all wireless-related
activities as a log, shown in Figure 17.
Figure 17
You can click Clear to remove all entries in the log.
24
Statistics
This page shows detailed information about how your
software access point works, shown in Figure 18.
Figure 18
You can click RESET COUNTERS button to reset all
counters to zero.
25
Blank Page
26
Technical Support and Warranty
QUESTIONS? SIIG’s Online Support has answers! Simply visit our web
site at www.siig.com and click Support. Our online support database is
updated daily with new drivers and solutions. Answers to your questions
could be just a few clicks away. You can also submit questions online and a
technical support analysts will promptly respond.
SIIG offers a 5-year manufacturer warranty with this product. Please see our
web site for more warranty details. If you encounter any problems with this
product, please follow the procedures below.
If it is within the store's return policy period, please return the product to the
store where you purchased from. If your purchase has passed the store's
return policy period, please follow these steps to have the product repaired or
replaced.
Step 1: Submit your RMA request.
Go to www.siig.com, click Support, then RMA to submit a
request to SIIG RMA. If the product is determined to be
defective, an RMA number will be issued.
Step 2: After obtaining an RMA number, ship the product.
• Properly pack the product for shipping. All accessories that came
with the original package must be included.
• Clearly write your RMA number on the top of the returned package.
SIIG will refuse to accept any shipping package, and will not be
responsible for a product returned without an RMA number posted
on the outside of the shipping carton.
• You are responsible for the cost of shipping. Ship the product to the
following address:
SIIG, Inc.
6078 Stewart Avenue
Fremont, CA 94538-3152, USA
RMA #:
•
SIIG will ship the repaired or replaced product via Ground
in the U.S. and International Economy outside of the U.S. at
no cost to the customer.
27
About SIIG, Inc.
Founded in 1985, SIIG, Inc. is a leading computer upgrade manufacturer of I/O
connectivity products, including PCI & ISA serial and parallel ports, USB, Serial
ATA & UltraATA controllers, FireWire (1394a/b), networking, sound cards,
and other accessories. SIIG is the premier one-stop source of upgrades.
SIIG products offer comprehensive user manuals, many user-friendly features,
and are backed by an extensive manufacturer warranty. High-quality control
standards are evident by the overall ease of installation and compatibility of
our products, as well as one of the lowest defective return rates in the industry.
SIIG products can be found in computer retail stores, mail order catalogs,
through major distributors, system integrators, and VARs in the Americas and
the UK, and through e-commerce sites.
PRODUCT NAME
Wireless-N PCI Adapter
FCC RULES: TESTED TO COMPLY WITH FCC PART 15, CLASS B
OPERATING ENVIRONMENT: FOR HOME OR OFFICE USE
FCC COMPLIANCE STATEMENT:
This device complies with part 15 of the FCC Rules. Operation is subject
to the following two conditions: (1) This device may not cause harmful
interference, and (2) this device must accept any interference received,
including interference that may cause undesired operation.
THE PARTY RESPONSIBLE FOR PRODUCT COMPLIANCE
SIIG, Inc.
6078 Stewart Avenue
Fremont, CA 94538-3152, USA
Ph: 510-657-8688
Wireless-N PCI Adapter is a trademark of SIIG, Inc. SIIG and the SIIG logo are registered
trademarks of SIIG, Inc. Microsoft, Windows and Windows Vista are either registered
trademarks or trademarks of Microsoft Corporation in the United States and/or other
countries. Pentium is a registered trademark of Intel Corporation. Other names used in this
publication are for identification only and may be trademarks of their respective companies.
April, 2009
Copyright © 2009 by SIIG, Inc. All rights reserved.