1
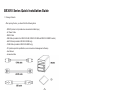
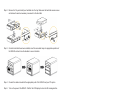
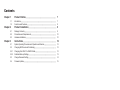
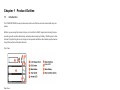
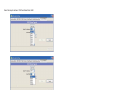
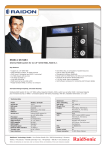
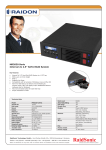
User Manual
Version : 1.0
SOHORAID Series
SR3610 Series
Forewords
About this manual
Thank you for using products from Raidon Technology Inc.
This manual will introduce the STARDOM SR3610 Series product. Before using STARDOM SR3610
Series, you are advised to read this manual first. All information contained in this manual has been
carefully confirmed before printing, but the actual product specifications shall be in accordance with those
at the time of delivery; any update to product specifications or relevant information may be found on
www.stardom.com.tw, and no separate notification will be made.
If you have any query regarding the products of Raidon Technology, or you would like the latest product
information, please contact us at [email protected], and we shall give you a reply as soon as
possible.
Note : Raidon Technology will only provide technical support and services on products purchased directly
from the company. General consumers and third-party buyers who did not purchase from the
company should contact their distributor or supplier directly to receive faster support and response.
If you did not purchase products directly from our company, please avoid contacting our company
directly because your support and response may be delayed to your satisfaction.
Copyright © RAIDON TECHNOLOGY, INC. All rights reserved.
SR3610 Series Quick Installation Guide
1. Package Contents
After opening the box, you should find the following items:
•SR3610 product unit (includes two removable hard disk trays)
•AC Power Cable
•RS232 Cable
•USB Cable (included in the SR3610-2S-B2, SR3610-2S-SB2 and SR3610-2S-WBC models)
•eSATA Cable (included in SR3610-2S-SB2 only)
•1394B Cable (included in SR3610-2S-WBC only)
•CD (contains product specifications, user manuals and management software)
•User Manual
•Accessories Bag
Should any of the above accessories be missing or the main unit is damaged prior to initial use, please
contact your distributor or supplier.
Front View
Alarm LED
Rear View
2. Hardware Installation
Please follow the steps below to complete installation of the SR3610 hardware.
Step 1
Place the device on a flat and stable surface. Make sure the fan exhaust is not blocked and there
is sufficient cooling space around the unit. (Please keep away from water sources or other
hazardous environments that may damage the product.)
Step 2
Remove the Tray and install your hard disk onto the tray. Make sure the hard disk secure screws
are fastened to avoid unnecessary movements to the hard disk.
Step 3
Once the hard disks have been installed, insert the removable trays into appropriate positions of
the SR3610 unit and close the handles to secure the disks.
Step 4
Connect the cables included to the appropriate ports of the SR3610 and your PC system.
Step 5
Turn on the power of the SR3610. Wait for the LCD display to show the OK message before
turning on your PC system.
Installation Complete. Your operation system will automatically identify the new hardware and once
recognized, follow the operating system’s instructions to format the hard disks. Once the formatting is
complete the device is then ready for operation.
Contents
Chapter 1
1.1
1.2
Chapter 2
2.1
2.2
2.3
Chapter 3
3.1
3.2
3.2.1
3.2.2
3.3
3.4
Product Outline............................................................................................. 7
Introduction............................................................................................................. 7
Functions and Features.......................................................................................... 8
Product Installation...................................................................................... 9
Package Contents.................................................................................................. 9
Precautions and Requirements.............................................................................. 10
Hardware Installation............................................................................................. 10
Instructions...................................................................................................... 12
System Operating Procedure and Operation architecture.................................... 12
Changing RAID Level and Scheduling.................................................................. 12
Changing from RAID 1 to RAID 0 Mode................................................................ 12
Schedule Backup Settings..................................................................................... 13
Change Password Setting..................................................................................... 14
Firmware Update.................................................................................................... 15
Chapter 1 Product Outline
1.1
Introduction
The STARDOM SR3610 series provides users with a cost-effective and safe external disk array subsystem.
Whether you are using this product at home or in the office, its RAID1 support and mirroring function
provides you with real-time data backup, enhancing data security and stability. RAID0 support is also
included. By optimizing the use of storage on two separate hard disks, data transfer speed enhances
though there will be no data fault tolerance.
Front View
Alarm LED
Rear View
Product Outline 7
1.2
Functions and Features
The STARDOM SR3610 series is a disk array system designed to provide users with the most
cost-effective solution for their storage needs. It makes the swapping of hard disks easy while also
guaranteeing data security and completeness.
• 24 Hour Real-Time Data Backup
Using RAID1, all data in the main hard disk can be immediately mirrored onto another hard disk,
ensuring the complete backup of your data at all times.
• Online Automatic Data Rebuild
In RAID1 mode, once a malfunctioning hard disk has been replaced, the system will automatically
rebuild the data to the new disk. No extra settings required.
• Custom Backup Schedule to Prevent Virus Infections
The user can define their own schedule for data backups. This may protect & delay the backup disk
from virus attacks that may have already infected the primary disk.
• LCD Status Display
The simple to use LCD display control panel makes the RAID and backup scheduling setups easy.
The fan and temperature information shown on the display also keeps users up to date on the
system’s status, simplifying product management.
• Plug and Play Support
The removable tray design allows plug and play of hard disks at any time, simplifying maintenance.
• No Drivers Needed
No additional drivers need to be installed. The product is compatible with Windows/Mac/Linux
operating systems.
• Hot Swapping Support
A malfunctioning hard disk can be replaced online without having to turn off the system power.
• GUI Monitoring Software
The Product is provided with a Windows-based RAIDGuide GUI software. Using the RS232 port
connection, the user can monitor the disk array system’s status at all times. An e-mail alert can be
sent if the system malfunctions to ensure complete protection.
8
Product Outline
Chapter 2 Product Installation
2.1
Package Contents
After opening the box, you should find the following items:
•SR3610 product unit (includes two removable hard disk trays)
•AC Power Cable
•RS232 Cable
•USB Cable (included in the SR3610-2S-B2, SR3610-2S-SB2 and SR3610-2S-WBC models)
•eSATA Cable (included in SR3610-2S-SB2 only)
•1394B Cable (included in SR3610-2S-WBC only)
•CD (contains product specifications, user manuals and management software)
•User Manual
•Accessories Bag
Should any of the above accessories be missing or the main unit is damaged prior to initial use, please
contact your distributor or supplier.
Product Installation 9
2.2
Precautions and Requirements
1. The SR3610 can be used with two hard disks that are of different models and storage capacities initially.
However, for improved performance, we recommend that both disks should have the same specifications
and capacity from the same manufacturer. It is also necessary that the backup drive be the same or
bigger in capacity than the source drive under the RAID1 model .
2. Please ensure that the two hard disks used contain no bad tracks. This avoids system crash or data
loss in the event that one hard disk malfunctions.
3. RAID0 mode offers improved data transfer performance and the full use of both hard disks as one
large capacity disk. It does not offer data mirroring, however so, if one hard disk is damaged, all data
will be lost.
4. We recommend that you decide whether to use the product in RAID0 or RAID1 (default value) mode
before it begins initial operation. Changing the RAID mode at a later date will result in the complete
loss of all data on the hard disks.
2.3
Hardware Installation
Please follow the steps below to complete installation of the SR3610 hardware.
Step 1
Place the device on a flat and stable surface. Make sure the fan exhaust is not blocked
and there is sufficient cooling space around the unit. (Please keep away from water sources or
other hazardous environments that may damage the product.)
Step 2
Remove the Tray and install your hard disk onto the tray. Make sure the hard disk secure
screws are fastened to avoid unnecessary movements to the hard disk.
10
Product Installation
Step 3
Once the hard disks have been installed, insert the removable trays into appropriate positions of
the SR3610 unit and close the handles to secure the disks.
Step 4
Connect the cables included to the appropriate ports of the SR3610 and your PC system.
Step 5
Turn on the power of the SR3610. Wait for the LCD display to show the OK message before
turning on your PC system.
Installation Complete. Your operation system will automatically identify the new hardware and once
recognized, follow the operating system’s instructions to format the hard disks. Once the formatting is
complete the device is then ready for operation.
Product Installation 11
Chapter 3 Instructions
3.1
System Operating Procedure and Operation architecture
The system operating procedure and operation architecture are as follow: (Default system
password: 0000)
3.2
Changing RAID Level and Scheduling
The SR3610 offers two RAID levels – RAID 0 and RAID 1. You may choose the RAID level suitable for
your needs. The factory default is at RAID 1.
Note : 1. Please backup all data on hard disks before changing RAID level.
2. Changing the RAID level results in loss of all data on disks.
3.2.1
Changing from RAID 1 to RAID 0 Mode
Step 1
Log into the system then use “▼” or “▲” with the LCD display to scroll through the options until
“CHANGE RAIDMODE RAID-0” appears. (Default system password: 0000)
12
Instructions
Step 2
Press the “ENT” button and the screen will show the message “RAID-0 MODE YES NO”.
Press the “ENT” button again to confirm.
Step 3
System will show the warning “DATA WILL LOSE YES NO”. To confirm loss of data is allowed,
press the “ENT button”.
Step 4
System will show the message “RESET SYSTEM YES NO”. Press the “ENT” button to confirm.
Step 5
After confirming you will hear a “Beep” sound confirming that the system has been changed to
the RAID mode as directed.
※To change from RAID 0 to RAID 1 mode, at Step 1 go to the “RAID-1 MODE YES NO” option before
pressing the “ENT” button instead. Follow the remaining steps to change the RAID mode.
3.2.2 Schedule Backup Settings
When the user uses RAID 1 mode for backups, since both hard disks are being mirrored online at the
same time, the backup data may contain viruses. To avoid this problem, the Schedule Backup function
provided by the SR3610 allows the user to define a backup interval of multiple days. At the scheduled
intervals the RAID will back up the data from the Primary Disk to the Secondary Disk. This means the
data in the disk array system does not have to be mirrored constantly at all times. This approach also
saves system processing time, making data backup more efficient and effective.
Instructions:
The user can specify a certain number of days (1~30 days) and at the appropriate times the system will
automatically back up the data.
Step 1
Log into the system then use “▼” or “▲” with the LCD display to scroll through the options until
“SCHEDULE BACKUP YES NO” appears. (Default system password: 0000)
Instructions 13
Step 2
After pressing the “ENT” button the display will show “SCHEDULE BACKUP TIME 0=>30
(DAYS) 00)”. Use the “▼” or “▲” buttons to adjust to the number of days between backups.
Once the backup time has been set please press the “ENT” button.
Step 3
System will now ask you to confirm the settings. Press the “ENT” button to confirm.
Step 4
The system will now show that the settings have been recorded.
If DAY is set to “00” then the device will operate in RAID 1 mode with constant mirroring at all times.
Note : 1. If Schedule Backup is used, since hard disk data is not backed up simultaneously, if a hard disk malfunctions then all new
data since the last backup will be lost. Before using this function, we recommend that you consider carefully the use of
RAID 1 Mode or Schedule Backup as well as the backup interval length.
2. Scheduled Backup does not store data from other hard disks to the RAID. It only copies all data from the RAID’s primary
disk to the secondary disk.
3. To cancel the Schedule Backup function, set the days to “00”. The system will revert to the RAID 1 mode.
3.3
Change Password Setting
To prevent unauthorized system settings, the SR3610 incorporates a password feature to help
administrators protect their data. Be sure to record the new password somewhere safe after making a
change. Losing the password will cause a great inconvenience to the user.
Step 1
Log into the system then use “▼” or “▲” with the LCD display to scroll through the options until
“SETUP PASSWORD YES NO” appears. (Default system password: 0000)
Step 2
After pressing the “ENT” button please use the “▼” or “▲” buttons to adjust and set the 1st, 2nd,
3rd and 4th digit of the password.
14
Instructions
Step 3
Once you have made the change, please press the “ENT” button. The following message will
be shown “PASSWORD:XXXX YES NO”.
Step 4
Please press the “ENT” button again. The message “SETUP PASSWORD OK” will be shown,
indicating that you have successfully set a new password.
3.4
Firmware Update
You can update firmware through the RAIDGuide software via RS232 connection. Insert the CD, click
on "Management Software" and then click "RAIDGuide 1.28.1.14" to begin installation or open the
"RAIDGuide v1.28.1.14" file in the "Management Software" file and click "setup.exe" to begin installation.
Note : 1. If your hardware is functioning normally, it is recommended not to try and update the firmware to avoid any incompatibility
from occurring which may result in data loss!
2. When updating firmware becomes necessary, please be sure to backup all information on the HDDs to avoid possible
accident(s) during the update, which may result in data loss!
Run RAIDGuide GUI and open the window, select RAID System 1 Setting under “Advanced” in the tool
bar above, and the Setting window will appear. Click the RS232 UPGRADE button. The system will
pop up the following window and prompt “Do you want upgrade firmware?”, click “OK” to start updating
Firmware.
Instructions 15
Select Serial port address: COM1 and Baud Rate: 9600
Click “Open Files” button to locate, then open the Firmware update file.
16
Instructions
Specify the correct Firmware update file, and click “Run”, then the system will begin updating firmware
with the following message “Verifying…Address:xxxx”.
When update is complete, the system will show a message advising successful upgrade.
Instructions 17