1
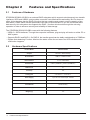
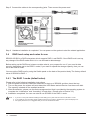
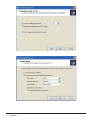
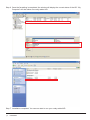
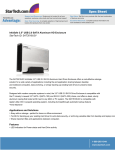
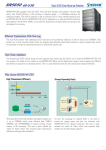
Version : 1.0
SOHORAID Series
SR3620-2S-SB2
User Manual
Introduction
About this Manual
Thank you for using the product of RAIDON Technology Inc.
This user manual will introduce the STARDOM SR3620-2S-SB2 products. It is recommended that you
go through this manual before starting using the STARDOM SR3620-2S-SB2 products. Although the
information has been verified before published, specifications are subject to change without prior notice.
Please refer to www.stardom.com.tw for any product specification or update of related information.
If you have any questions on STARDOM products or need the latest product information, user manual
or firmware, please contact us at [email protected] and we will get back to you as soon as
possible.
Notice: RAIDON Technology Inc. only provides technical support and service to RAIDON direct
customers. For end users or non-direct customers, please contact your distributor for better support
and prompt responses. If your product is not purchased directly from RAIDON, please do not contact us
directly since you may not get any reply.
All the product information in this manual is the property of RAIDON Technology Inc. All rights reserved
Rear View
2. Hardware Installation
Please follow the following procedures to complete the hardware installation of SR3620-2S-SB2:
Step 1 Open the outer package and take out the product body. (Make sure the related accessories and
the product body are not damaged or missing. If you have any questions, please contact the
distributor or sales)
Step 2 Mount the product to a stable surface. Make sure that the fan is not blocked and there is appropriate
space around for heat dissipation. (Do not place the product nearby water area or any environment
that may cause damage to the product)
Step 6 Connect the cables to the corresponding jacks. Then connect the power cord.
Step 7 Hardware installation is completed. You can power on the system to start the related setup and
application.
Installation completed. Your operating system will automatically recognize the hardware. Once
recognized, you will be able to use it.
Chapter 1
1.1
RAID Introduction
What is RAID?
It is inevitable that a single hard disk, either with SCSI or IDE interface, will suffer the compatibility
problem between the motor rotational speed and the transfer interface. As a result, an Ultra160 SCSI or
ATA100 IDE hard disk can only achieve the transfer rate of up to 30MB/Sec at the bandwidth of 100MHz.
In addition, the life span of a hard disk is limited. Once a hard disk is damaged, it is likely to lead to the
system crash and data loss. Abovementioned are two severe problems in network system architecture.
These factors have encouraged the generation of RAID (Redundant Arrays of Inexpensive / Independent
Disks), a technology that combines multiple inexpensive and independent hard disks into an array of hard
disks so as to increase data transfer performance and storage efficiency.
RAID implements the mechanisms such as Striping or Mirroring plus Parity Checking, to combine two
or more physical hard disks into one virtual/logical disk array that allows On-line, quick access, huge
capacity and fault tolerance. If one of the hard disks in the array is damaged, the system continues to
operate using the remaining working hard disks, resulting in no system crash or data loss.
In summary, RAID technology increases the performance and data security in network system
architecture.
1.2
RAID Functions
•Expanding storage capacity
•Increasing data transfer speed
•Saving cost
•Inherent Fault Tolerance
•Hot Swap
•Auto-Rebuild
•Hot Spare
•On-line Capacity Expansion
1.3
RAID 0 vs. RAID 1
STARDOM SR3620-2S-SB2 provides two level applications: RAID 0 (Striping) and RAID 1 (Mirror):
RAID 0: Striping (fast, has no fault tolerance; requires at least two hard disks)
At the RAID 0 level, the data of hard disks in the entire array is scattered and disassembled. For a
server concerned, the array is considered as a large hard disk of which the capacity is approximately
equal to N times as large as the smallest capacity of its N physical disks actually installed. For instance,
if two physical disks are installed with one at 40GB and the other at 80GB, then the usable capacity at
the RAID 0 level will be approximately 80GB. Because multiple read/write can be operated with parallel
method, the import/export efficiency of the array is much better than that of the single physical disk.
The RAID 0 array does not backup data, so it is not regarded as a real RAID application. If one of the
hard disks is damaged, the entire array will fail, and all data in the array will be lost. Therefore, the fault
tolerance of RAID 0 is lower than that of any hard disk in the array. However, RAID 0 is still the term
widely used to describe these arrays. It is because that its basic idea is similar to real RAID application.
RAID 1: Mirroring (slow, has fault tolerance, and requires at least two hard disks)
In the RAID 1 array (commonly referred to as mirroring array), hard disks are paired up; each of the two
8
RAID Introduction
Chapter 2
2.1
Features and Specifications
Features of Hardware
STARDOM SR3620-2S-SB2 is an external RAID subsystem which supports simultaneously two transfer
interfaces, SATA and USB2.0, and provides users with cost-effectiveness and safety. Be it for home or
office, this subsystem has the RAID 0 function that can combine and properly use the capacity of two
hard disks; it offers faster transfer performance but has no fault tolerance. If you are concerned about
data security, this subsystem also supports the RAID 1 function which works through the mirroring
operation in order to enhance security and reliability of data storage.
The STARDOM SR3620-2S-SB2 comes with the following features:
•USB2.0 + SATA interfaces: Through the composite interfaces, plug-and-play will works on either PC or
MAC system.
•Supports RAID 0 and RAID 1: On RAID 0, the transfer speed can be stably maintained up to 70MB/sec.
•System Auto-detecting Function: Monitors the status of the fan and warns via LED indicators when
malfunction happens.
2.2
10
Hardware Specifications
Product Model
SR3620-2S-SB2
Chipset
SIL4723 + SPIF215A Chip
Host Interface
USB 2.0 + SATA II Combo
Drive Interface
2 x 3.5” SATA HDDs
Transfer Rate
USB2.0 (56MB/Sec); SATA II (300MB/Sec)
RAID Levels
0, 1
Hot-Swap
Yes
Cooling Fan
3 cm Fan x 1 + 4 cm Fan x 1
Power Supply
Input: AC 100~240V Output: 70Watts
LED Display
Yes
Case Material
Aluminum Alloy
Dimension (mm)
122W x 205D x 105H
Weight (kg)
1.67
Features and Specifications
Rear View
3.2
Environment Requirements and Precautions
1. Although SR3620-2S-SB2 allows users to use hard disks with different capacities, it is recommended
that identical hard disks be used to gain convenience in purchasing hard disks and better performance
in using them.
2. Please make sure that hard disks are free of any bad track. Otherwise, system crash or the loss of all
data will occur in case of any hard disk malfunction.
3. It is recommended that the mode RAID 0 or RAID 1 is determined beforehand. Once the system is
being re-set after setup for use, the data of hard disks will be damaged.
4. RAID 0 does not have data backup function. They can combine all hard disks into a large-capacity
hard disk to have faster transfer performance. All data in the hard disks will be damaged in case of any
hard disk malfunction.
3.3
Hardware Installation
After verifying that the product body and related accessories are not missing or damaged, please follow
the following procedures to complete the hardware assembly.
Step 1 Mount the product to a stable surface. Make sure that the fan is not blocked and there is appropriate
space around for heat dissipation. (Do not place the product nearby water area or any environment
that may cause damage to the product)
12
Installation
Step 5 Connect the cables to the corresponding jacks. Then connect the power cord.
Step 6 Hardware installation is completed. You can power on the system to start the related application.
3.4
RAID level setup and notes for use
SR3620-2S-SB2 is a RAID subsystem which supports RAID 1 and RAID 0. Once RAID level is set up,
any change of the RAID mode while it is in use will lead to data damage.
Before setting up the RAID level, please consider what is your purpose for use. If your need is data
security, then please set to the RAID 1 mode; if you want to expand the storage capacity, then you can
set to the RAID 0 mode.
You can set the RAID level by using the Switch panel on the back of the product body. The factory default
value of SR3620 is RAID 1.
3.4.1 The RAID 1 mode (default value)
Please refer to the following installation instructions:
1. With the power turned off, install two hard disks in the tray of SR3620, and then insert the tray.
2. Turn on the power; the system will auto-detect the HDD status and set Device 0 as the source disk.
The capacity is based on the smallest hard disk.
3. After the detection, please use the disk management tool that is provided by the operating system to
complete the “initialization” and “formatting” of hard disks. (Please refer to Section 3.5)
4. Installation completed. You can now start to use SR3620 in the RAID 1 mode.
Note : 1. If you turn on the power without installing the hard disk(s), the system will not function in the RAID 1 mode.
2. If you install only one hard disk, please install it at the Device 0 position; otherwise the system will display error.
3. For higher performance, it is suggested that you use two identical hard disks.
14
Installation
Step 3 Enter the "Disk Management" and select the newly added HD, and start “initializing” the HD.
After the initialization is done, you can “format” the HD as a described one according to your
preference or need.
Step 4 After you have selected “New Partition..”, the system will pop up the related window to guide you
through the formatting of the HD. You only need to select and complete in order.
16
Installation
18
Installation
Step 6 Once the formatting is completed, the window will display the current status of the HD. “My
Computer” will also show one newly added HD.
Step 7 Installation completed. You can now start to use your newly added HD.
20
Installation