1
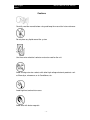
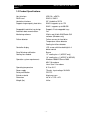
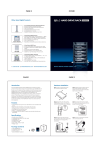
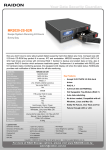
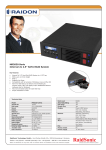
MS2UB Series
MS2UT Series
User’s Manual
Version 1.0
Sans Digital
Series
Preface
MS2UT/MS2UB User Manual
Thank you for purchasing the Sans Digital MobileSTOR MS2UT/MS2UB RAID system. In this
document you will find information regarding installation and use of the MobileSTOR
MS2UT/MS2UB RAID system. Please read this manual carefully before using the MobileSTOR
MS2UT/MS2UB RAID system in order to achieve the best performance.
Notice
Sans Digital makes no representation or warranties with respect to the contents hereof and
specifically disclaims any implied warranties of merchantability or fitness for any particular
purpose. Further, Sans Digital reserves the right to revise this manual and to make changes in
its content without obligation to notify any person or organization of such revision or change.
Sans Digital reserves the right to make improvements in the products described in this manual
at any time without prior notice.
Copyright Notice
This manual is copyrighted, all rights reserved. It may not be copied, photocopied, translated, or
reduced to any electronic medium or machine-readable form without Sans Digital’s prior written
permission. All Rights Reserved worldwide. Unauthorized duplication is strictly prohibited.
Licenses and Trademarks
®
Windows is a trademark of Microsoft Corporation. Other product names mentioned in this
guide may be trademarks or registered trademarks of their respective companies and are
hereby acknowledged.
About Sans Digital
Sans Digital, located in Santa Fe Springs, CA is a provider of high capacity, multi-functional
advanced storage solutions. These advanced storage solutions can be used for home offices,
small and medium-sized businesses, video editing, data backup, surveillance systems, and
other various industries. Our products provide great solutions for companies and individuals
across the world that need effective and reliable data storage.
Contact Sans Digitals US headquarters at:
10038 Pioneer Blvd. Santa Fe Springs, CA 90670
Office: 800.980.1988
Fax: 562.949.3328
Email: [email protected]
Website: http://www.sansdigital.com
Manual Copyright © 2006 Sans Digital 1st Edition
-2-
Sans Digital
Series
MS2UT/MS2UB User Manual
Table of Content
Chapter 1: Product Introduction
5
1-1 Functions and Features
1-2 Product Specifications
5
7
Chapter 2: Hardware Installation
8
2-1 Package Content
8
2-2 System Requirement
9
2-3 Environment requirement and Notices
2-4 How to install hard drive in swappable tray
2-5 How to connect MS2UT/MS2UB to computer system
10
10
11
Chapter 3: MS2UT/MS2UB Operation Guide
3-1 RAID Level set up
3-2 How to Change and set up RAID mode
3-3 How to set up Schedule Backup
3-4 How to change password
3-5 Format and Partition when using Windows operating system
3-6 Format when using Macintosh operating system
3-7 Error Message on LCD screen
3-8 Replacing a new Hard Drive
-3-
14
14
16
17
19
21
21
22
23
Sans Digital
Series
MS2UT/MS2UB User Manual
Cautions
Carefully read the manual before using and keep the manual for future reference.
Do not place any liquid around the system
Use three wires electrical socket or extension cord for the unit.
Avoid sharing extension sockets with other high voltage electronic products such
as Blow dryer, microwave, or air Conditioner, etc.
Avoid high heat and moisture area.
Avoid area with eletro magnetic.
-4-
Sans Digital
Series
MS2UT/MS2UB User Manual
Chapter 1
Product Introduction
MOBILESTOR MS2UT/MS2UB is a RAID subsystem supporting eSATA &
USB 2.0 (MS2UT) or Firewire & USB 2.0 (MS2UB) host interfaces while providing
users an affordable and safe external RAID 0 or RAID 1 subsystem.
With RAID 0 support, both of the Hard Drive inside of the unit will work as a
group to combine the sizes and the performance together. On the other hand,
RAID 1 will allow data protection to prevent Hard Drive defective by real-time
mirror copying the information on one Hard Drive to the other.
1-1 Functions and Features
The MS2UT is a RAID system designed specifically for the user in mind. It is
the most cost effective choice; you can expand storage at your discretion while
ensuring the safety and integrity of stored data.
- Plug & Play Removable Tray Module Design
The hot-swappable tray design allows instant access to the device after each
swap, so the hard disk can be removed or installed at any given time which
provides instant access to newly replaced hard disk.
- Independent operation system design
MS2UT provide HARDWARE RAID function. No software is required.
-5-
Sans Digital
Series
MS2UT/MS2UB User Manual
- No driver needed
No need to install additional drivers and is compatible with Windows/Mac/Linux
operating system. OS Supported: Windows ME/2000/XP/Server2003, Mac 10 and
above, Linux Core 2.4 and above.
- Supports hot swap function
There is no need to turn off the system power when changing a failed
Hard Drive.
- Simple and easy operation with the use of an LCD control panel
Using the buttons located on the front of the unit next to the LCD, you can set the
RAID mode and schedule a backup. The status of cooling fans and temperature is
also displayed on LCD for easy management.
- Auto rebuilding data online
After changing the hard drive, the MS2UT automatically performs a reconstruction
of data in RAID 1. The process is done automatically without any interruption.
- Automatically schedules backups to prevent potential virus attack.
You can automatic schedule backups, by pressing a button to set the preferred
days, periodic system data backup, to prevent a system failure from any virus
attack.
- GUI Monitoring Software
Included in the package is a Window-based RAIDGuide GUI software. You can
connect to the computer through an RS232 port in order to monitor the RAID
system status from a remote location. In case of failures, you can be notified by the
software via e-mail for remote notification.
- Compatibility with eSATA & USB 2.0 (MS2UT) or Firewire & USB 2.0
transfer interface
Supports USB 2.0 for up to 480Mbps or eSATA up to 3.0 Gbps. (MS2UT)
Supports USB 2.0 for up to 480Mbps or Firewire 800
-6-
Sans Digital
Series
MS2UT/MS2UB User Manual
1-2 Product Specifications
Host interface
USB 2.0 + eSATA
RAID Level
RAID 0 / RAID 1
Hard drive interface
3.5” Hard drive SATA
Supports large capacity hard drive
RAID 0 supports up to 1TB
RAID 1 supports up to 500 GB
Swappable hard drive tray design
Automatic data reconstruction
Supports 2 hot-swappable trays
Yes
Monitoring software
32-bits and 64-bits RAIDGuide GUI
Failure detector
Controller display
Panel Warning notification
Cooling fans module
Operation system requirements
Operating temperature
Power supply
Safety certification
Exterior material
Dimension
Weight (lbs)
software (Windows only)
Failure sensors for hard drive
Temperature failure detector
Cooling fan failure detector
LCD screen with blue backlight & 4
button control
Buzzer
1.2” cooling fan x 1 (MS2UT only)
1.6” cooling fan x 1 (MS2UT & MS2UB)
Windows 2000/XP/Server 2003
MAC 10 or above
Linux Core 2.4 or above
0 ºC to 40 ºC
75 watts, Input voltage: 90-240V
CE/FCC
Aluminum case
4.8"W x 7.9"D x 4"H
4.4lbs
-7-
Sans Digital
Series
MS2UT/MS2UB User Manual
Chapter 2
Hardware Installation
2-1 Package content
When you open the box of this product, please refer to the following list of
included accessories. In case any of the content is missing or damaged, please
contact your point of purchases.
MOBILESTOR MS2UT/MS2UB included accessories are as follow:
-8-
Sans Digital
Series
MS2UT/MS2UB User Manual
2-2 System requirement
Hardware requirement
1. PC or MAC operating system which supports USB 2.0 or eSATA Ports for
MS2UT. Firewire 400 or 800 connector for MS2UB.
2. Hard drive which supports SATA transfer interface
Operation requirement
USB 2.0:
Mac 10 and above
Windows 2000/XP/Server 2003
Linux Kernel 2.4 and above
eSATA :
Mac 10 and above
Windows 2000/XP/Server 2003
Linux Kernel 2.6 and above
Firewire:
Mac 10 and above
Windows 2000/XP/Server 2003
Linux Kernel 2.6 and above
-9-
Sans Digital
Series
MS2UT/MS2UB User Manual
2-3 Environment requirement and notices
1.
The MS2UT/MS2UB allows user to use hard drives of different specification
and storage space in this device. However, the same model, brands and
sizes hard drives will yield better performance.
2.
Please make sure the 2 hard drives is new and free of defects to avoid
possible device failures or lost of all data in the unit when the hard drives fails
again.
3.
eSATA and Firewire host interface is much faster than USB 2.0 at RAID 0
mode in terms of data transfer. The average transfer rate could reach over
100 MB/s in eSATA and 70 MB/s in Firewire. Therefore eSATA and Firewire
connections port is recommended to achieve higher performance.
4.
Please decide on whether to select RAID 0 or RAID 1 before use. The change
of the RAID level will result in loss of data.
2-4 How to install hard drive in swappable tray
1.
Place hard drive in the frame of movable tray, and align the 4 screw positions,
then use screws to fasten and secure it into position.
2.
When assembly is done, gently push it along the sliding track into the hard
drive compartment of MS2UT/MS2UB, and then close the tray, as illustrated
below.
- 10 -
Sans Digital
Series
MS2UT/MS2UB User Manual
2-5 How to connect MS2UT/MS2UB to computer system
1.
Given that all power are turned off, connect either one of the USB 2.0 or
eSATA (MS2UT) or Firewire (MS2UB) cable in the box to the corresponding
connection port on the back of MS2UT/MS2UB, and connect the other end to
the corresponding connection port on the computer. Finally, connect the
power cable to the unit and the power outlet.
- 11 -
Sans Digital
Series
MS2UT/MS2UB User Manual
2.
Turn on the power of MS2UT/MS2UB (power switch is on the back of the
unit)
3.
Make sure the primary disk and the second disk are ready which will be
indicated by the “OK” message on LCD screen, before turning on the power
of computer, please refer to illustration below.
- 12 -
Sans Digital
Series
MS2UT/MS2UB User Manual
Caution: Caution: Prior to connecting USB 2.0 or eSATA or Firewire cable to
computer, confirm in advance whether your computer system is supporting USB
2.0 or eSATA or Firewire.
If the computer system is not equipped with this device, it is available for sale in
Sans Digitals website (www.sansdigital.com) or our authorized dealers.
- 13 -
Sans Digital
Series
MS2UT/MS2UB User Manual
Chapter 3
MS2UT/MS2UB Operation Guide
3-1 RAID Level set up
1.
MS2UT/MS2UB is able to support RAID 1 mode or RAID 0 mode. Once RAID
Level has been set up, any future changes will erase the data stored in the
unit during the rebuilding process.
2.
RAID Level could be set up by press of buttons on the front panel.
MS2UT/MS2UB’s default value is RAID 1. If RAID 0 is preferred, change
could be made by pressing the buttons on the front LCD control panel and
follow the instruction displayed on the screen.
Steps for installation of two new hard drives
1. It is recommended to use 2 hard drives with same model, brands and sizes
to achieve better performance.
2.
After all power have been turned off, place the 2 new hard drives in the
swappable tray of MS2UT/MS2UB, since the system has been internally
programmed to RAID 1, there is no need for further set up.
3.
Using the buttons in the system’s control panel, assign appropriate drive to
the completed RAID hard drive, then perform formatting and partition with
disk management software.
4.
It is optional to install other software as required. (RAIDGuide software)
5.
If the 2 hard drives used are of different storage capacity, MS2UT/MS2UB
will use the smaller capacity hard drive due to RAID 0 configuration.
Steps for installing a data-existing hard drive and a new hard drive
In the event of installing one new hard drive along with a used hard drive, it is
recommended to use the same models, brands and sizes for both hard drives.
When the both hard drives are ready, MS2UT/MS2UB will perform automatic data
rebuilding, i.e. duplicates the data to the newer hard drive.
- 14 -
Sans Digital
Series
MS2UT/MS2UB User Manual
1.
When all power are turned off, first place the data existed hard drive in the
tray and insert it into the first HDD position of MS2UT/MS2UB.
2.
Power on MS2UT/MS2UB. LED indicator of “ALARM” will light up and the
buzzer will on; On the LCD, it will display Pri HDD: OK Sec HDD: OFF”.
3.
At this time, insert the new hard drive into the second HDD position of
MS2UT/MS2UB. In about 10 to 15 seconds, MS2UT/MS2UB will
automatically perform data rebuilding and the progress can be seen on LCD
screen.
4.
It will take about 20 minutes to perform the data rebuilding depend on sizes
of the hard drive.
§ Setting up RAID 0
Turn off the power of computer and install 2 pcs of hard disks into carries of
MS2UT/MS2UB. If the RAID 0 mode already had been set up and then restart
turn on the power of computer, it will show capacity of 2 hard drives combines
under device manager.
Please format and partition the unit under the computer before use.
Notices:
1. In case it is necessary to turn off the power of MS2UT/MS2UB or disconnect
its cable, please safety remove the hardware under the computer OS or turn
of the computer.
2. Data will be lost if one of the hard drive fail under RAID 0 mode.
3. The unit only support either RAID 0 or RAID 1.
4. In case you wan to switch mode from RAID 0 to RAID 1, make sure the data
is backed up. Data will be lost during the mode conversions.
5. If the hard drives sizes is different in the unit. The smaller sizes will be use.
The total sizes of RAID 0 will be the smaller sizes multiply by 2.
- 15 -
Sans Digital
Series
MS2UT/MS2UB User Manual
3-2 How to Change RAID mode
The button on the LCD panel introducing as below:
“ ” button
“Forward” button to change the options forward
“ ” button
“Backward” button to change the options backward
“
To confirm the option
” button
“ESC” button
To cancel the option
1.
LCD screen displays status of “Pri HDD: OK & Sec HDD: OK”
2.
Press “
3.
LCD screen prompts to enter password “0000”
(The default password is “0000”)
4.
Press “
5.
Press “ ” button twice, when the message “CHANGE RAIDMODE RAID -0”
” button
” button for 4 times to select each digit, and enters the next screen.
is displayed on screen. Press “
6.
” button.
Press “ ” button to confirm when the message ”RAID- 0 MODE YES NO”
appears on LCD screen, or press “ESC” to quit.
- 16 -
Sans Digital
Series
7.
The system will display the message “DATA WILL LOSE
“
8.
MS2UT/MS2UB User Manual
YES
NO”. Press
” button to confirm or press “ESC” to cancel.
The message “RESET SYSTEM YES NO” will be displayed. Press “
button to confirm or press “ESC” to cancel.
”
9. The unit will reboot itself and signal by a buzzer.
10. To switch RAID 0 to RAID 1, please follow above steps 1 to 9. However, you
will see the message ”RAID- 1 MODE YES NO” appears on LCD screen.
(Steps 6). Press “
” button to confirm or press “ESC” to cancel.
3-3 How to set up Schedule Backup
Schedule Backup can be set so that the data is not mirror copy at real-time.
How to use Schedule Backup
The user can program on selected period of times (1 to 30 days), scheduled time
arrives, and the system will automatically back up data.
1.
Screen displays “Pri HDD: OK & Sec HDD: OK”
- 17 -
Sans Digital
Series
MS2UT/MS2UB User Manual
2.
Press “
” button
3.
Screen prompts to enter password.
(The default password is “0000”)
4.
To execute, press “ ” button for 4 times to confirm the password digit, and
“ ” the next screen.
5.
The message “SCHEDULE BACKUP YES NO” is displayed on screen. Press
“
” button to confirm or press “ESC” to cancel.
6.
The ”SCHEDULE BACKUP TIME 1->30 (DAYS) 00” messenger will appear.
7.
Please use “ ”or “ ” button to adjust the days. Press “
confirm.
8.
”SET BACKUP TIME 1->30 (DAYS) 01” will appear and the days of your
backup schedule is ready.
9.
If the date is set to 0, the real-time RAID 1 setup will be used. The unit will
restart to confirm the setting.
- 18 -
” button to
Sans Digital
Series
MS2UT/MS2UB User Manual
Notes:
1. The schedule backup is not RAID 1. A hard drive failure will result in data lost.
Only the last backup data will be found.
2.
The schedule backup will rebuild the data in a scheduled time
How to change the function from Schedule Backup to RAID 1 mode
1.
Go to the ”SCHEDULE BACKUP” mode on the LCD screen. (Steps 1~6 on
previous sections.
2.
Adjust the day to "00"
3. Restart the MS2UT/MS2UB unit.
Notes:
1.
Restart the unit will ensure the setting is talking effects.
2.
To change from RAID 0 to RAID 1, please go to section 3-2.
3-4 How to change password
MS2UT/MS2UB features password function to protect unauthorized changes. The
lost of password will disable the ability of the setting change.
1.
Screen displays “Pri HDD: OK & Sec HDD: OK”
2.
Press “
” button
- 19 -
Sans Digital
Series
3.
MS2UT/MS2UB User Manual
Screen prompts to enter password.
(The default password is “0000”)
4.
To execute, press “ ” button for 4 times to confirm the password digit, and
“ ” the next screen.
5.
Press “ ” button, when the message “SETUP PASSWORD
is displayed on screen. Press “
YES
NO”
” button.
6.
Please use “ ”or “ ” button to set up the digit of password.
7.
When the digit is selected, Press “
four digit is seleceted
8.
The following message will display:
“PASSWORD:8000 YES&NO”.
In above example, 8000 is the new password
9.
Press “
” button. Repeat the process until the all
” button to confirm, or press “ESC” to cancel.
10. The new password will be set as the following screen will display:
“SETUP PASSWORD
OK.”
- 20 -
Sans Digital
Series
MS2UT/MS2UB User Manual
3-5 Format and Partition when using Windows operating system.
Make sure the RAID level is selected and connect the unit to your computer.
1.
Connect power cord to power jack on the back of MS2UT/MS2UB.
2.
Connect USB 2.0 or eSATA or Firewire cable to the computer
3.
Turn on the power of MS2UT/MS2UB.
4.
Turn on the computer
5.
The unit will display until “Disk Management” under the Control Panel.
6.
Partition and format the hard drive using “Disk Management”
Detail instruction of partition and format can be find under our web site,
www.sansdigital.com, product support sections.
3-6 Format when using Macintosh operating system
Make sure the RAID level is selected and connect the unit to your Macintosh.
1.
Connect power cord to power jack on the back of MS2UT/MS2UB.
2.
Connect USB 2.0 or eSATA or Firewire cable to the computer
3.
Turn on the power of MS2UT/MS2UB.
4.
Turn on the Macintosh Computer.
5.
Go to Spotlight, located on the upper right hand corner on your screen
6.
Type “Disk Utility”. Open Disk Utility by clicking the result located under the
search results.
7.
Select the hard drive in the left hand column and click on the Erase tab.
- 21 -
Sans Digital
Series
8.
MS2UT/MS2UB User Manual
In the Volume Format drop-down menu, select the files system, and name
your drive.
9.
Once the format is selected and named the drive, click on Erase.
10. Confirm the operation by clicking “Erase” The Erase process will begin and
format the hard drive.
3-7 Error Message on the screen
1.
There are 3 status messages that could be displayed for hard drive
information
OK
OFF
FAIL
Hard drive is ready
Hard drive not installed
Invalid hard drive, or hard drive is defective
2.
When MS2UT/MS2UB is overheat, “T” will be displayed on the upper
right-hand corner of screen.
3.
When cooling fan is not functioning, “F” will be displayed on the lower
right-hand corner of screen.
4.
When MS2UT/MS2UB is not able to detect first or second hard drive, the
buzzer will sound, and screen will display follow message as shown in
illustration.
- 22 -
Sans Digital
Series
MS2UT/MS2UB User Manual
3-8 Replacing a new Hard Drive
MS2UT/MS2UB support hot-swappable feature so that the unit does not need to
power off when replacing a hard drive.
1.
When you insert a new hard drive to replace the current hard drive in the
swappable tray, the buzzer will sound and screen will display an error
message as follow:
2.
The ready message will display when the replacement hard drive is detected.
3.
The auto-rebuild process will begin.
4.
When data is completed, the ready message will show again.
- 23 -