1
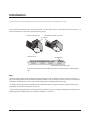
Network Attached Storage
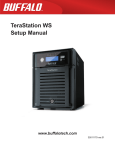
TeraStation Setup Manual
www.buffalotech.com
35011043 ver.02 v 1.0
Contents
Chapter 1 Setup.................................................................3
TeraNavigator Setup................................................................ 3
Diagrams and Layout............................................................... 8
Chapter 2 Using your TeraStation.................................... 10
Opening a Shared Folder......................................................... 10
Opening a Shared Folder from a Second PC.......................... 11
Adding Additional TeraStations................................................ 12
Auto Power Mode..................................................................... 13
Opening the Web Admin.......................................................... 14
Adding a Shared Folder........................................................... 16
Adding Users............................................................................ 20
Adding Groups......................................................................... 22
Access Restrictions.................................................................. 23
RAID Arrays............................................................................. 32
Changing the Admin Password................................................ 41
Initialization.............................................................................. 42
Chapter 3 Useful Functions.............................................. 44
RAID Scanning......................................................................... 44
UPS.......................................................................................... 45
Replication............................................................................... 46
Time Machine........................................................................... 48
Sleep Timer.............................................................................. 51
TeraStation Setup Manual
1
Appendix
. .................................................................... 53
Specifications........................................................................... 53
List of LCD Display................................................................... 54
Software................................................................................... 58
Info Folder................................................................................ 60
Troubleshooting....................................................................... 61
Data Backup............................................................................. 62
GPL Information....................................................................... 62
Contact Information (USA / Canada)........................................ 63
Contact Information (Europe)................................................... 64
Contact Information (Asia Pacific)............................................ 65
TeraStation Setup Manual
2
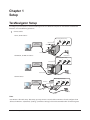
Chapter 1
Setup
TeraNavigator Setup
To configure your TeraStation, insert the TeraNavigator CD into a Windows computer on the network and follow the
directions, or use the following procedure.
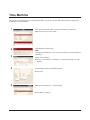
1
Connect cables
<TS-XL, TS-XEL Series>
Fasten the plug with the clamp.*
2
1
3
Power Connector
Network
(Hub or Router)
LAN Port 1
* TS-XL Series Only
Ethernet Cable
<TS-WXL/R1, TS-WXL/1D Series>
Power Outlet
AC Cable
Fasten the plug with the clamp.
2
1
3
Power Connector
Network
(Hub or Router)
LAN Port 1
Ethernet Cable
Power Outlet
AC Cable
<TS-RXL Series>
Fasten the plug with the clamp.
Network
(Hub or Router)
LAN Port 1
1
2
3
Power Connector
Ethernet Cable
Power Outlet
AC Cable
Note:
Use LAN Port 1 for initial setup. After setup, you may connect a second cable to LAN Port 2. If used, configure the IP
address of LAN Port 2 at [Network] - [Setting] - [IP Address Settings] in the TeraStation Web Admin or NAS Navigator2.
TeraStation Setup Manual
3
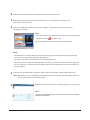
2
Hold down the power button on the TeraStation for three seconds to turn it on.
3
Wait until the green power LED changes from flashing to lit. In the TS-RXL Series, the LED is not
illuminated. Continue to Step 4.
4
Insert the TeraNavigator software CD into your computer. The TeraNavigator wizard will launch.
Click [Begin Installation].
Note:
If the wizard doesn’t open automatically, navigate to the TeraNavigator CD
and double-click the
icon (TSNavi.exe).
Step through the wizard to connect cables and install software.
Notes:
• For Windows Vista, click [Run TSNavi.exe] when the auto-play screen is displayed. When [A program needs your permission to continue] is displayed, click [Continue].
• For Mac OS, open the CD and double click on the [TeraNavigator] icon.
• Disable your anti-virus software and firewall before continuing. You may not be able to install the software if anti-virus software or a software firewall are enabled. After you’ve finished setup, re-enable your firewall and antivirus software.
5
When the message [Completed] is displayed, click [Launch NAS Navigator2]. NAS Navigator2 will launch.
Note: Alternately, you can click [Next] to display more information about the power mode switch, which can
turn the TeraStation on and off automatically.
6
Right-click on your TeraStation’s icon, and choose [Properties] - [IP Settings].
Note:
For Mac OS, hold the Control key, click on the TeraStation icon, then click [Open
Web Admin] - [IP Address].
TeraStation Setup Manual
4
7
1 Enter the desired IP Address, Subnet Mask, and Default Gateway Address.
Note:
If you don’t know how to configure these settings,
click [Automatically obtain IP address] to check the box.
2 Click [OK].
Note:
If you are prompted to enter the administrator’s password, enter the
TeraStation’s password (it is set to “password” by factory default).
Continue to set the TeraStation's Clock.
8
Right-Click on the TeraStation icon in NAS Navigator2 and choose [Open Web Admin].
Notes:
• For Mac OS, hold the Control key, click the TeraStation icon, and click [Open Web Admin].
• The TeraStation web-based configuration utility requires Firefox 1.5 or later, Internet Explore 6.0 Service Pack 2 or
later, or Safari 3 or later.
9
Enter the administrator name and password, and click [Login].
Notes:
• The following settings are set by factory default.
Username: admin
Password: password
•The default language for the configuration utility is English. To change the display language,
click [System] - [Settings] - [Language] - [Modify Settings], select [Display Language], and click [Save].
10
Click [System] - [Settings] - [Date and Time].
11
Click [Modify Settings].
TeraStation Setup Manual
5
1 To manually configure the date and time, click [Manual] and adjust [Date],
[Time], and [Time Zone].
Note: Click [Use Local Date/Time] to use your computer's time (or Time
Zone) for the TeraStation's time.
12
Notes:
2 Click [Save].
• By default, the TeraStation will attempt to use an NTP server to set the time.
• NTP may not be usable in some network environments.
• Please read the terms of use for Internet Multifeed Co. at www.jst.mfeed.ad.jp. Internet Multifeed Co. is the group that manages the NTP Server at www.jst.mfeed.ad.jp. Internet Multifeed Co. is not responsible for any loss or damages caused by this service.
• BUFFALO is not responsible for any loss or damage caused by using of this service, stopping the service, or missing service.
• If your TeraStation fails to automatically obtain the time from NTP Server, verify the settings for the DNS server address of the TeraStation. You must set a primary DNS server address to specify an NTP server by host name. Otherwise you will have to specify the DNS server by IP address. You can change the DNS server settings at [Network] - [Settings] - [IP Address] in the Web Admin.
13
The following settings changes are recommended.
Change your administration password
We recommend that you change the default password to a secure password.
1 Click [Users/Groups] - [Local Users] in the configuration utility.
2 Select [admin] from the user list and click [Edit User].
3 -1 Enter a new password (twice).
-2 Click [Save].
Your administrator password is now changed.
Configure RAID Scanning
RAID Scanning checks your RAID 1, 5 or 10 arrays for problems and automatically fixes any errors it can. To
configure:
1 Click [System] - [Storage] - [RAID Scanning] - [Modify Settings].
2 Click [Enable] for RAID Scanning.
3 Select the schedule to perform RAID Scanning.
Note: With [Immediate] checked, RAID Scanning will run immediately.
4 Click [Save].
You have completed the settings for RAID Scanning.
TeraStation Setup Manual
6
14
15
Double-click on your TeraStation’s icon.
The TeraStation’s shared folders are displayed.
Note:
For Mac OS, TeraStation is mounted as a drive icon on the desktop, or displayed in the sidebar of the Finder.
Setup is now complete. You can now use the TeraStation's shared folders to save files just like other hard drives.
Note:
Keep the TeraStation updated with the latest firmware. You can download the latest firmware from
www.buffalotech.com. The currently installed firmware version is displayed on the main screen of NAS Navigator2.
TeraStation Setup Manual
7
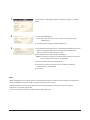
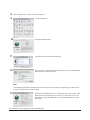
Diagrams and Layout
<TS-XL, TS-XEL Series>
1
Front View
2 3 4 5
6
7
Rear View
10
8
11
12
9
TS-XL
Series
TS-XEL
Series
±³
±´
±µ
±
±·
±·
±´
±µ
±
±¸
±¹
²°
<TS-WXL/R1, TS-WXL/1D Series>
1
Front View
2 3 4 5
6
Rear View
7
10
8
18
11
19
9
20
12
13 14 15 16 17
<TS-RXL Series>
9
Front View (with the front cover)
Figure: The front cover is open
11 12 14
11 21 2 3
4 5
1
6
8
7 11
10 11
Rear View
19
TeraStation Setup Manual
21
13 14 15 16 17
20
18
19
8
1 Power Switch
Power ON: Push the Power Switch. When the power is ON,
power switch will be illuminated in green (except TS-RXL
series).
Power OFF: Press and hold the Power Switch for 3 seconds (or
until it beeps).
2 INFO LED
If there is a message about the current status, the amber INFO
LED is illuminated. Check the LCD display for current status.
3 ERROR LED
The red Error LED is illuminated when an error occurs. Check
the LCD display for more information.
4 LAN1 LED
When the LAN1 Port is connected to a network, it is
illuminated in green (the light next to the LAN Port1 will be
illuminated as well).
5 LAN2 LED
When the LAN2 Port is connected to a network, it is
illuminated in green (the light next to the LAN Port2 will be
illuminated as well).
6 LCD Display
Displays the status of the TeraStation.
7 Display Toggle Switch
Switches between different display modes.
8 Function Button
Use this button to perform the following operations:
• DirectCopy
• Removal of USB devices
• Rebuild RAID after replacing hard drives
9 Drive Lock
Open the front panel with the key to replace hard drives or
press the Reset Button.
10 Reset Button
11 Status LEDs 1 - 4
LEDs 1 through 4 will be illuminated in green when the
corresponding hard drives are accessed. If an error occurs on
a hard drive, the corresponding LED will be illuminated or
flash in red or amber.
12 Factory Use Only
TS-XEL Series doesn’t have this port
13 UPS Port
Connect a UPS (Uninterruptible Power Supply).
14 USB Connector (USB 2.0/1.1 Series A)
Compatible Buffalo USB hard drives, USB flash drives, and
Digital Cameras can be connected. USB hubs are not
supported.
15 LAN Port 1
Connect to a router, hub, or switch on your Ethernet network.
16 LAN Port 2
Use this second Ethernet port for redundancy or backup. For
backup, a second TeraStation may be connected directly.
17 Power Mode Switch
Switches between Auto and Manual power modes (page 13).
18 Power Connector
Use the included AC cable to connect to an UPS, surge
protector, or outlet.
19 Fan
Do not block the fan when installing the unit.
20 Anti-Theft Security Slot
You can also secure it using an off-the-shelf wire lock.
21 UID Button
The blue LED next to the UID button will be illuminated or
turned off every time you push this button on the front or
back.
With the TeraStation powered on, hold down this button
until it beeps (about 5 seconds), to reset the TeraStation’s IP
address and Password to the factory defaults. The password
will not be reset if this functionality has been disabled from
within the Web Admin.
Note: To access the TS-RXL series’ reset button, insert the tip
of an unfolded paper clip.
TeraStation Setup Manual
9
Chapter 2
Using your TeraStation
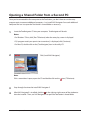
Opening a Shared Folder
1
Launch NAS Navigator2.
Notes:
• For Windows, double-click the [Buffalo NAS Navigator2] icon on your desktop.
• For a Mac, double-click on the [NAS Navigator2] icon in the Dock.
2
Double-click on the TeraStation icon.
Note:
This example shows a TS-XL series TeraStation.
Your icon may be different.
3
The TeraStation’s Shared folders are displayed.
Note:
With a Mac, the TeraStation is mounted as a drive icon on the desktop, and displayed in the
sidebar of the Finder.
You can now use the TeraStation's shared folders to save files just like other hard drives.
TeraStation Setup Manual
10
Opening a Shared Folder from a Second PC
Once you’ve connected the first computer to the TeraStation, you don’t have to run the setup
program again to connect additional computers. Just install NAS Navigator 2 on each additional
computer and use it to open the TeraStation’s shared folder as necessary.
1
Insert the TeraNavigator CD into your computer. TeraNavigator will launch.
Notes:
• For Windows 7/Vista, click [Run TSNavi.exe] when the auto-play screen is displayed.
• If [A program needs your permission to continue] is displayed, click [Continue].
• For Mac OS, double-click on the [TeraNavigator] icon in the utility CD.
2
Click [Install NAS Navigator].
Note:
If this screen doesn’t open, open the CD and double-click on the
icon (TSNavi.exe).
3
Step through the wizard to install NAS Navigator 2.
4
After NAS Navigator2 is installed, click the in the right top right corner of the window to
close the installer. Then, use NAS Navigator 2 to open the TeraStation’s shared folder.
TeraStation Setup Manual
11
5
Launch NAS Navigator2.
Note:
• For Windows computers, double-click the [Buffalo NAS Navigator2] icon on the Desktop.
• For a Mac, double-click the [NAS Navigator2] icon in the Dock.
6
Double-click on the TeraStation icon.
Note:
This example shows a TS-XL series TeraStation.
Your icon may be different.
7
The TeraStation’s Shared folders are displayed.
Note:
With a Mac, the TeraStation is mounted as a drive icon on the desktop, and displayed in the
sidebar of the Finder.
You can now use the TeraStation’s shared folders to save files just like other hard drives.
Adding Additional TeraStations
Run the TeraNavigator installation program from the CD for each TeraStation that you add to the
network. You cannot set up multiple TeraStations at the same time.
TeraStation Setup Manual
12
Auto Power Mode
The TeraStation can be configured to automatically turn on and off with your computer. To use this feature, install NAS
Navigator 2 on your computer(s) and then set the power mode switch on the back of your TeraStation to “Auto”.
<TS-XL Series>
<TS-XEL Series>
Manual (default):
In this position, the power button on the front of the TeraStation turns it
on and off. It is not affected by the power state of connected computers.
Auto:
In this position, if all connected computers are turned off, the TeraStation
will turn off too. If a connected computer is powered on, the TeraStation
will power on too.
<TS-WXL/R1, TS-WXL/1D
Series>
<TS-RXL Series>
Notes:
• After you turn off your computer, it may take several minutes for the TeraStation to shut down.
• When the power mode switch is changed from Auto to Manual or vice-versa, it takes about five minutes
for the change to take effect.
• Power on the TeraStation before moving the switch to the Auto position.
• Auto Power Mode doesn’t work if port trunking is enabled or if NasNavi detection is disabled.
• Install NAS Navigator 2 on all computers that will be accessing the TeraStation before switching to Auto
Power Mode.
• Some networks may not support the Auto Power Mode. If you have problems with it, just use Manual
Power Mode.
TeraStation Setup Manual
13
Opening the Web Admin
1
Double-click [Buffalo NAS Navigator2] on your computer's Desktop.
Note: Click the [NAS Navigator2] icon in the Doc if you are using Mac OS.
2
Right-click the TeraStation icon and choose [Open Web Admin].
Notes:
• For Mac OS, press and hold the Control key, click on the TeraStation icon, then click [Open Web Admin].
• Please record the TeraStation’s IP address, which is displayed at the bottom right of the NAS Navigator2 window.
This example shows the TS-XL series’ display.
3
1 Enter Username and Password.
The following settings are the factory defaults.
Username: admin
Password: password
2 Click [Login].
Note:
To login as a guest, type "guest" for the Username, leave the password blank, and click [OK]. Guests can check
the TeraStation’s name, IP address, workgroup, and disk status. Regular users can change their login passwords
as well as check the TeraStation name, IP Address, workgroup, and disk status. Administrator user, "admin" by
default, can configure all options.
4
The Web Admin is displayed.
Notes:
• The Web Admin supports Firefox 1.5 or later, Internet Explorer 6.0 with SP2 or later, and Safari 3 or later. It may not
display properly in other browsers.
• The Web Admin may not display correctly in Internet Explorer due to your browser security settings. If this happens,
navigate to [Tools] - [Internet Options] - [Security] on Internet Explorer, and set the Security Settings to [Local Intranet].
TeraStation Setup Manual
14
The home page of the Web Admin contains the following items.
[Shared Folders]
Add or delete Shared Folders; configure Access Restrictions, DirectCopy,
DFS and TeraSearch.
[Users/Groups]
Add, delete, and configure Users and Groups.
[Network]
Configure Network, Workgroup, and NFS settings.
[System]
Configure Name, Date and Time, RAID setup, RAID Scanning, Check Disk/Format Disk, Backup, Replication,
Email Notification, Sleep Time, UPS Settings, Restore/Format.
[Extensions]
Configure Web Access, Print Server, and Time Machine.
Notes:
• You may also open the TeraStation’s Web Admin by typing the IP address that you wrote down in step 2 into the
address field of your browser. Press the <Enter> key and bookmark this page in your browser so that you can
return to it easily.
• With Mac OS X 10.4 or later, you can open the TeraStation’s Web Admin from within Safari with Bonjour.
1 Launch the Safari Browser.
2 Click on the [Show all Bookmarks] icon at the top left of the Safari menu.
3 Click [Bonjour] - [(TeraStation Name)] from the bookmark.
4 Enter your user name and password, and click [Login].
This completes opening the Web Admin.
TeraStation Setup Manual
15
Adding a Shared Folder
1
1In the Web Admin, click [Shared Folders] - [Folder Setup].
2Click [Create Folder].
2
1 Set Name, Shared Folder Support and so on.
2 Click [Save].
You have created a new shared folder.
Notes:
• Shared folder names can contain up to 12 alphanumeric letters (or 6 2-byte letters). Hyphens and underscores may be
used. Do not use a number or symbol as the first letter of a shared folder name.
• You can enter up to 50 alphanumeric characters (25 characters for 2-byte) for the description. Hyphens, underscores,
and spaces may be used. Don’t use a number or symbol as the first letter of the name.
• You may create up to 400 shared folders on the TeraStation.
TeraStation Setup Manual
16
Recycle Bin
Each shared folder on the TeraStation that is connected by SMB may have the recycle bin enabled or disabled from within the Web Admin. If
enabled, deleted data from a shared folder will be temporarily moved to a [Trashbox] subfolder. To recover deleted data, open the [Trashbox]
subfolder and move files.
Notes: To delete all files in the Recycle Bin, click [Shared Folders] - [Folder Setup] - [Empty recycle bin of each folder] on the Web Admin.
Read-only Shares
A folder may be configured as read-only by selecting [Read Only] from Shared Folder Attributes.
Notes: The default setting is [Read & Write].
A shared folder whose attribute is set to read-only is read-only for all users, even if they are assigned write permissions on the share.
When a shared folder is configured to be read-only, the message "(Read Only)”is added to the description of that share folder.
Hidden Shares
In the Web Admin, click [Shared Folder] and select [Hidden Share] on [Folder Mode (SMB Only) ]. Click [Save].
Only SMB shares may be hidden. If other protocols are checked for the share, such as AFP, FTP, or SFTP, you cannot select [Hidden Share].
To open a hidden share, click [Start] - [Run] and enter \\TeraStation Name\Shared Folder name$\. Example: If your TeraStation is named "TS-XL001" with the default
share "share” hidden, enter \\TS-XL001\share$\.
TeraStation Setup Manual
17
Technical Restrictions
• Windows does not support some characters that OS X and the TeraStation allow. So, if you create a filename on a Mac with any
of the following characters, it will not display correctly on a Windows computer. With Mac OS X 10.2 or later, you may have to
connect to the TeraStation via AFP in order to display or copy any of the following characters: ? [ ] / ¥ = + < > ; : ” , | *
•
Do not use any of the following words as a Username or Group Name: root, bin, daemon, sys, adm, tty, disk, lp, sync, shutdown,
halt, operator, nobody, mail, news, uucp, ftp, kmem, utmp, shadow, users, nogroup, all, none, hdusers, admin, guest, man, www,
sshd, administrator, ftpuser, apache, mysql.
•
Do not use any of the following words as a shared folder name: info, spool, usbdisk1, usbdisk2, usbdisk3, usbdisk4, lost+found,
global, printers, homes, lp, auth, ram, disk1, disk2, disk3, disk4, array1, array2.
•
When using 2-byte characters (such as Japanese), make folder or file names with 80 characters or less. You may not be able to
copy a folder or a file whose name length is more than 80 characters.
•
You cannot set hidden or read-only attributes to folders or files on a TeraStation from Windows. To set an attribute for a share
on the TeraStation, use the TeraStation’s Web Admin. In [Shared Folders] - [Folder Setup], click the shared folder you want to
configure. Select [Read Only] or [Read & Write] from [Shared Folder Attributes], and [Hide Share] from [Folder Mode (SMB Only)].
•
If local characters aren’t displayed properly in a Shared Folder or Workgroup name, use alphabetical character.
•
If you access a shared folder from a Macintosh computer, information files for Macintosh may be automatically generated. Do
not delete these files from a Windows computer. Otherwise, you may no longer access folders from Macintosh.
•
A volume name mounted by Finder from Mac OS X 10.3.9 may be corrupted when connected via SMB. File names and data
should be fine.
•
On Mac OS X 10.5 - 10.5.6, you cannot search by Spotlight while connected via AFP. In such a case, use SMB connection or use
Mac OS X 10.5.7 or later.
•
TeraStation belongs to the default zone specified by an AppleShare Server. You cannot specify a zone.
•
Date and Time stamp information stored on a TeraStation’s hard disk or a USB hard disk connected to the TeraStation may be
updated by an attached OS, and its accuracy cannot be guaranteed.
•
If you display size of hard drives through the Web Admin, it will show a larger value than that shown by Windows’ drive
properties.
• If you change a TeraStation’s settings in TeraStation while transferring files, the file transfer may be aborted.
•
Copying files to TeraStation is protected by the Journaling File System. However, the following events may occur if you cancel or
abort a copy.
- Data configured (TeraStation, User or Group names) may be lost.
- The copied file may be incomplete and it may not be deleted. In such a case, restart TeraStation and delete the file, and try
copying the file again.
•
Although you format TeraStation’s hard disk, [Percent Used] or [Amount Used] in the Web Admin will not show 0 (zero). This is
because some space is used for the system.
•
Set the TeraStation’s username and password the same as the user’s username and password for logging into the Windows
network. If they are different, you may not be able to access share folders with access restrictions.
•
Click [Shared Folders] - [Folder Setup] - [Empty recycle bin of each folder] in the Web Admin to delete all of the contents of the
[Recycle Bin] folder in the shared folder.
TeraStation Setup Manual
18
•
Do not set the same network address for LAN port1 and LAN port 2, or data transmission may be unstable. If this happens,
initialize the TeraStation with the Reset Button.
•
If you want to access a different network from the TeraStation, use LAN port 1. LAN port 2 cannot access beyond the local subnet
as it doesn’t have a default gateway.
Examples: You cannot use the Mail Notification (cannot find the mail server). You cannot find a TeraStation/LinkStation which
specified as a backup destination by IP address.
To resolve, place the TeraStation on the same subnet as the device that you are trying to connect to via LAN port 2.
TeraStation Setup Manual
19
Adding Users
1
1 Click [Users/Groups] - [Local Users].
2 Click [Create User].
2
1 Enter [Name], [Password], and [Description].
2 Click [Save].
Notes:
• Usernames can contain up to 20 alphanumeric characters. Hyphens, underscores, and periods may be used. Do not
use a symbol as the first character of a name.
• User descriptions may contain up to 50 alpha-numeric characters (25 characters for 2-byte characters). Hyphens and
underscores may also be used. Do not use a number or symbol as the first character of a user description.
• You may register up to 300 local users with the TeraStation.
• Passwords can contain up to 20 alphanumeric characters. Hyphens, underscores, commas, semi-colons, periods, @, !, #,
$, %, &, ', (, ), *, +, /, <, >, =, ?, [, ], ^, {, }, |, and ~ (tildes) may be used. Do not use any symbol except the underscore as the
first letter of a password.
• Set the TeraStation’s username and password the same as the user’s username and password for logging into the
Windows network. If they are different, the user may not be able to access shared folders with access restrictions.
• Repetitive deletions and additions of users may cause the quota feature to not work properly. Even though the data
is copied by the backup function of the TeraStation, the Quota feature may not work properly if a user ID/group ID is
duplicated. In such a case, use a user name/group name of an unused user ID or group ID.
• To assign quotas for users, check [Enable] for User Quota and enter a limit in GB.
• If the user ID is left blank, a user ID will be automatically assigned. When using the Quota feature, use numbers between
1000 and 1999 to set a group ID manually. Make sure that user ID are unique.
TeraStation Setup Manual
20
Importing Users
To import many users at once, enter the following information in the [Input CSV format data] field on [Users/
Groups] - [Local Users] on Web Admin, and click [Import].
Format of the user information: Username (required), Password (required), and Description (optional)
Example)
username1, password1, description1
username2, password2, description2
username3, password3, description3
…
Notes:
• It may take about 1 hour depending on the number of users you import. Please note that you cannot use the Web
Admin while the system is busy.
• Use commas as separators. Do not use spaces before or after the commas.
• If a line is incorrectly formatted, then the user in that line will not be registered.
• If a username is already registered on the TeraStation, that user will be overwritten.
• Commas should not be used in usernames, passwords, or user descriptions
TeraStation Setup Manual
21
Adding Groups
1
1 Click [Users/Groups] - [Local Groups] in the Web Admin.
2 Click [Create Group].
2
1 Enter Group Name and Description.
2 Select users who join a group, click [Add].
3 Click [Save].
Notes:
• Group names can contain up to 12 alphanumeric letters. Hyphens, underscores, and periods may be used. Do not use
any symbol except underscore as a first letter of the name.
• Group descriptions may contain up to 50 alphanumeric characters (25 characters for 2-byte characters). Hyphens and
underscores may also be used. Do not use a number or symbol as the first character of a group description.
• You may register up to 300 groups with the TeraStation.
• Repetitive deletions and additions of groups may cause the quota feature to not work properly. Even though the data
is copied by the backup function of the TeraStation, the Quota feature may not work properly if a user ID/group ID is
duplicated. In such a case, use a user name/group name of an unused user ID or group ID.
• f the Group ID is left blank, a Group ID will be automatically assigned. When using the Quota feature, use numbers
between 1000 and 1999 to set a group ID manually. Make sure that a user ID does not duplicate to other users.
• To set a quota for a group, check [Enable] for Group Quota, and enter the maximum disk space allotted in GB.
TeraStation Setup Manual
22
Access Restrictions
Setting Access Restrictions for Users/Groups
The TeraStation allows you to specify which groups and users can access specific shared folders.
1
Register Users and Groups to the TeraStation as described in the previous sections.
2
1 In the Web Admin, click [Shared Folders] - [Folder Setup].
3
Click [Access Restrictions].
4
2 Click the shared folder you want to set Access Restrictions for.
Click [Add].
Note:
The procedure described here shows an example of how to set the access restrictions for local users. To set the access
restrictions on Local Groups bases, click [Local Groups] - [Add].
TeraStation Setup Manual
23
5
1 Check users or groups that you want to allow to access to the share.
2 Click [Add].
6
7
Select the level of privilege for the user or group you added.
Click [Save].
You have completed configuring access restrictions.
Notes:
• If you log on from a Microsoft Network Domain, you can set the access restrictions with the user names/group names
which are registered on the domain.
• If a specific user is assigned both Read Only and Read & Write, they will have Read Only access. The most restrictive
access is always used.
TeraStation Setup Manual
24
Access Restrictions on NT Domain
The TeraStation can download users, groups, and passwords from an NT Domain server. This procedure is recommended
for system administrators only.
1
Create an account on the Domain Controller for the TeraStation.
Note: If there is an option to "Accept accounts for computers with Windows 2000 or earlier", then select it.
2
Click [Network] - [ Workgroup/Domain] - [Modif y Settings] in the
Web Admin.
3
1 Select [NT Domain].
2 Select [NT Domain Name].
3 Select [NT Domain Controller Name].
4 Enter an Administrator password.
5 Enter an Administrator password.
6 Enter WINS Server IP Address
7 Click [Save].
4
Follow the instructions in the previous section to add access restrictions to the domain.
Notes:
• Domain names can contain up to 15 alphanumeric letters. Hyphens, underscores, and periods may be used. Do not
use a number or symbol as the first letter of a domain name.
• Domain controller names can contain up to 12 alphanumeric letters. Hyphens, underscores, and periods may be used.
Do not use a number or symbol as the first letter of a domain name.
TeraStation Setup Manual
25
Restrictions
• If you change the TeraStation’s Name, you will no longer be able to use Domain Users/Groups or access restrictions. Rejoin the domain.
• If a domain user name contains more than 20 characters, the TeraStation truncates it to 20 characters.
• The TeraStation only downloads the first 1000 users or the first 1000 groups from a Domain Controller.
• If you operate TeraStation as a member server of NT Domain or Active Directory Domain, you cannot connect as a
guest user via AFP.
• When you change the user or group settings on the domain controller, these changes may not take effects immediately
on TeraStation. If you need to reflect changes on the domain controller immediately, reboot TeraStation.
• While you are operating TeraStation as a member server of NT Domain or Active Directory and you change the
[Authentication Method] in [Network] - [Workgroup Settings] to [Workgroup] on the Web Admin, the computer account
on the domain controller will not be deleted automatically.
• If it has already joined the domain network, you cannot connect to the TeraStation via FTP using a domain user
account.
TeraStation Setup Manual
26
Access Restrictions on Active Directory
The TeraStation can download users, groups, and passwords from an Active Domain server. This procedure is
recommended for system administrators only.
1
1 Click [Network] - [ Workgroup/Domain] - [Modif y Settings] in the Web
Admin.
2
1 Select [Active Directory].
2 Enter an Active Directory Domain Name (NetBIOS name).
3 Enter an Active Directory Domain Name (DNS name).
4 Enter an Active Directory Domain Controller Name (Computer name).
5 Enter an Administrator password.
6 Enter an Administrator password.
7 Enter WINS Server IP Address
8 Click [Save].
3
Follow the instructions on page 23 to 24 to add Access Restrictions to Domain Users/Domain Groups.
You have completed the settings for this feature.
TeraStation Setup Manual
27
Restrictions when administrating in Active Directory Domain
• When you have the TeraStation joined to an Active Directory domain, you must specify the DNS Server which can •
resolve names for Active Directory domain.
• After building an Active Directory domain, the administrator's password which is needed to join the Active Directory
Domain must be changed at least once, or joining the Active Directory domain will fail.
• Active Directory domain's DNS name and NetBIOS name must be identical.
• If there are more than 5 minutes differences between the TeraStation’s clock and the Domain controllers' clock, joining
the domain or authenticating domain user or group may fail.
TeraStation Setup Manual
28
Access Restrictions through Delegate Authority to External SMB Server
To permit access to the TeraStation by administrating all user accounts and passwords together using a delegate server,
follow procedures below. This is recommended for network administrators only.
Notes:
• For Windows 7/Vista, Windows Server 2003/Server 2008 Users
• When setting Access Restrictions via Delegate Authority to External SMB Server, you need to change the security
setting on Windows 7/Vista and Windows Server 2003/Server 2008.
• Select [Start] - [Buffalo] - [File Security Tool] - [File Security Tool] and select [Change the file security level] to change
the security level (when changing back again, select [Change back the file security level]).
Notes:
• [File Security Tool] can be installed only on Windows 7/Vista, Windows Server 2003/Server 2008 from the CD included with this product.
• During the initial setup, the message, [Changing the security level. Are you sure?] is displayed. Click [Yes] and follow
the instructions on the screen to restart your PC .
• Clicking [Yes] on the message for converting to Local Users which is displayed when applying changing External SMB
Server Settings will convert all Local Users registered on the TeraStation to External SMB Server Users. You must set the
Local user password again after resetting the External SMB Server.
TeraStation Setup Manual
29
1
2
Click [Network] - [ Workgroup/Domain] - [Modif y Settings] in the Web
Admin.
1 Double click [Workgroup].
Notes: Even if you will use this unit in a domain environment, select
[Workgroups].
2 Select [Delegate Authority to External SMB Server].
3
1 Click [Automatic User Registration]. Check [Enable Authentication Shared
Folder]. If using Windows Domain Controller, check [Use Windows
Domain Controller as Authentication Server].
2 Enter [Authentication Server Name or IP Address].
Note: If you will be connecting using AFP and FTP, entering an IP address
for the authentication server is recommended.
3 Enter an Authentication Share Folder Name.
4 If you want to allow access by local users in addition to externally
authenticated use, select [Allow].
5 Click [Save].
Notes:
• Match the Workgroup name of this product and the Windows Domain Controller's domain Name if you would like to
specify the Windows Domain Controller as an External Authentication S Server.
• A Workgroup Name can be up to 15 alpha numerical character-length (or 7 two-byte characters). Hyphens,
underscores, and periods may be used.
• Don’t use a number or symbol as the first letter of a workgroup name.
TeraStation Setup Manual
30
4
An Authentication Shared Folder is created on the TeraStation.
When a user who is registered to the specified External Server opens the Authentication Shared Folder, he/she
will be automatically registered as a TeraStation user (you can directly register users).
Notes:
• A user who is automatically registered will belong to the "hdusers" group. They can be set to belong to any
group from the Group settings.
• Access Restrictions to shared folders can be set for the User Name obtained
• User Name registered will be displayed when clicking [Users/Groups] - [External Users]. To delete a user that
automatically registered, select the user and click [Delete External Users].
• When connecting using AFP and FTP, always use an IP address. Authentication may fail if a Server Name is
used.
• Enter the IP address when specifying a server in a different subnet.
• AFP and FTP connections do not allow obtaining user information by delegating authority to External SMB
Server.
5
Follow the instructions on pages 23 and 24 to add access restrictions to External Users/Groups.
You have completed the settings for the Authentication Server.
Restrictions when administrating Delegate Authority option
•
I f you cannot access the TeraStation while logged into Windows using the account information registered to the
authentication server, you cannot access shared folders on the TeraStation or set access restrictions.
•
If you use the Delegate Authority option, you cannot connect as a guest user via AFP.
•
If you use the Delegate Authority option, you cannot connect as a Anonymous user via FTP.
TeraStation Setup Manual
31
RAID Arrays
TS-XL, TS-XEL and TS-RXL series TeraStations default to RAID 5 mode (4 hard drives), TS-WXL/R1 series default to RAID 1 mode, and
TS-WXL/1D series default to Normal mode. The characteristics of each type of RAID are described below. If you change the RAID
mode, all of the data on the hard drive is deleted. Always back up any important data before changing the RAID mode.
Note:
In this document, "Recovery" means putting the TeraStation back to the state it was in before the malfunction happened. It does
not mean reading data from failed hard drives.
• RAID 5 mode (4 hard drives) (Default for TS-XL, TS-XEL and TS-RXL Series)
Note: TS-WXL/R1 and TS-WXL/1D TeraStations don’t support this mode, as they don’t have 4 hard drives.
Uses 4 hard drives as one array. It generates parity during writes, so access speeds are slower than other RAID modes.
Usable space is the sum of 3 hard drives' space. If one hard drive in the array is damaged, you can recover data by
replacing the hard drive. You cannot recover data if 2 or more drives are damaged.
• RAID 5 mode (3 hard drives)
Note: TS-WXL/R1 and TS-WXL/1D TeraStations don’t support this mode, as they don’t have 3 hard drives.
Uses 3 hard drives as one array. It generates parity during writes, so access speeds are slower than other RAID modes.
Usable space is the sum of 2 hard drives’ space. You can designate a 4th drive as a hot spare, which will boot automatically
if one of the drives in the array fails. If one hard drive in the array is damaged, you can recover data by replacing the hard
drive. You cannot recover data if 2 or more drives are damaged.
• RAID 10 mode
Note: TS-WXL/R1 and TS-WXL/1D TeraStations don’t support this mode, as they don’t have 4 hard drives
RAID 10 combines 4 hard drives into a single array. Usable space is the sum of the capacity of 2 hard drives. Data is
written quickly and access speed is faster than other RAID modes except for RAID 0. Since the same data is written to 2
hard drives at the same time, if drive in a pair (1-2 or 3-4) is damaged, data can be recovered by replacing the damaged
hard drive. If both 1-2 or 3-4 hard drives are damaged, you cannot recover data.
TeraStation Setup Manual
32
• RAID 1 mode (TS-WXL/R1 Series Default Settings)
Uses 2 hard drives as one array. You can use up to 2 arrays on TS-XL, TS-XEL and TS-RXL Series. The space you can use is 1
hard drive's space for each array. The same data is written to 2 drives at once. If a drive is damaged, data can be recovered
by replacing the damaged hard disk. If both drives in an array are damaged, data cannot be restored. You can create an
array and designate another drive as a hot spare (which will boot automatically when one of the hard drive fails) in TSXL, TS-XEL and TS-RXL TeraStations. You can use 2 drives to create a RAID 1 array, use anther drive as a hot spare, and use
another as a regular drive, all at once.
• RAID 0 mode
This mode uses multiple hard drives as a single array. The disk space you can use is the total space of all hard drives used.
This is the fastest of the TeraStation’s RAID modes. If any hard disks are damaged, you cannot recover data.
• Normal Mode (TS-WXL/1D Series Default Settings)
This mode uses the hard drives inside the TeraStation as individual hard disks. The disk space you can use is the total
space of all hard drives in the TeraStation. If a hard disk is damaged, you cannot recover data from that drive.
Note: During a recovery, the TeraStation’s front LED display shows “RAID ARRAY* Resyncing” and file transfer speeds are
slower than usual until the RAID array is rebuilt.
TeraStation Setup Manual
33
• Using Normal mode
1
Click [System] - [Storage] - [RAID Array] in the Web Admin.
2
Select the array you want to configure.
3
Click [Create RAID Array].
4
When [Are you sure you want to change RAID mode?] is displayed, click [Apply].
5
6
The confirm operation screen will appear. Enter the number shown in the [Confirmation Number] field within 60
seconds, and click [Apply].
Follow the instructions displayed on the screen.
You have now set up Normal mode. Refer to page 16 to create a shared folder.
Confirm Operation screen
When you perform any of the following tasks, a confirmation screen is displayed . To continue, enter the displayed
number within 60 seconds and click [Apply].
• Changing structures of RAID array (Create/Delete)
• Format Array or Disk
• Delete Folder
• Remove Disk
• TeraStation's Restore Factory Defaults
• Rebuild RAID array
• Format TeraStation
• Configure hot spare
• Empty recycle bin of each folder
• Configure normal mode
TeraStation Setup Manual
Confirm Operation Screen
34
• Using RAID 5 mode (4 hard drives)
1
Change system to normal mode (previous page).
2
Click [System] - [Storage] - [RAID Array] in the Web Admin.
3
Click the array you want to configure.
4
Select hard disks (all 4 of them) to use in RAID5.
5
1 Select [RAID5].
2 Click [Create Raid Array].
Note:
Building the RAID array will take approximately 10 hours per TB. File transfers will be slower during this period.
While the "RAID ARRAY x Resyncing" message is displayed on the LCD screen, do not turn off the TeraStation. If
you turn it off, the configuration process will start over.
6
7
The confirm operation screen will appear. Enter the number shown in the [Confirmation Number] field within 60
seconds, and click [Apply].
Follow the instructions displayed on the screen.
You have now set up a RAID 5 array. Turn to page 16 to create a shared folder.
TeraStation Setup Manual
35
• Use in RAID5 mode (3 hard drives)
1
Change system to normal mode (page 34).
2
Click [System] - [Storage] - [RAID Array] in the Web Admin.
3
Click the array you want to configure.
4
Select hard disks (3 of them) to use in RAID5.
5
1 Select [RAID5].
2 Click [Create Raid Array].
Note:
Building the RAID array will take approximately 10 hours per TB. File transfers will be slower during this period.
While the “RAID ARRAY x Resyncing” message is displayed on the LCD screen, do not turn off the TeraStation. If
you turn it off, the configuration process will start over.
6
7
The confirm operation screen will appear. Enter the number shown in the [Confirmation Number] field within 60
seconds, and click [Apply].
Follow the instructions displayed on the screen.
You have now set up a RAID 5 array. Refer to page 40 to configure a hot spare with the remaining drive. Turn to page 16 to create a shared folder.
TeraStation Setup Manual
36
• Using in RAID 10 mode
1
Change system to normal mode (page 34).
2
Click [System] - [Storage] - [RAID Array] in the Web Admin.
3
Click the array you want to configure.
4
Select hard drives (all 4 of them) to use in RAID10.
5
1 Select [RAID 10].
2 Click [Create Raid Array].
Note:
Building the RAID array will take approximately 10 hours per TB. File transfers will be slower during this period.
While the “RAID ARRAY x Resyncing” message is displayed on the LCD screen, do not turn off the TeraStation. If
you turn it off, the configuration process will start over.
6
7
The confirm operation screen will appear. Enter the number shown in the [Confirmation Number] field within 60
seconds, and click [Apply].
Follow the instructions displayed on the screen.
You have now set up a RAID 10 array. Turn to page 16 to create a shared folder.
TeraStation Setup Manual
37
• Using in RAID 1 mode
1
Change system to normal mode (page 34).
2
Click [System] - [Storage] - [RAID Array] in the Web Admin.
3
Click the array you want to set.
4
Click hard disks (Disk 1 and Disk 2, or Disk 3 and Disk 4) in RAID1.
5
1 Select [RAID 1].
2 Click [Create Raid Array].
Note:
Building the RAID array will take approximately 10 hours per TB. File transfers will be slower during this period.
While the “RAID ARRAY x Resyncing” message is displayed on the LCD screen, do not turn off the TeraStation. If
you turn it off, the configuration process will start over.
6
7
The confirm operation screen will appear. Enter the number shown in the [Confirmation Number] field within 60
seconds, and click [Apply].
Follow the instructions displayed on the screen.
You have set up a RAID 1 array. Repeat the steps to create a second RAID 1 array with the other two drives, or refer to page 40 to configure a hot spare
with one of the remaining drives. Turn to page 16 to create a shared folder.
TeraStation Setup Manual
38
• Using in RAID 0 mode
1
Change system to normal mode (page 34).
2
Click [System] - [Storage] - [RAID Array] in the Web Admin.
3
Click the array you want to configure.
4
Select all available hard drives.
5
1 Select [RAID 0].
2 Click [Create Raid Array].
6
7
The confirm operation screen will appear. Enter the number shown in the [Confirmation Number] field within
60 seconds, and click [Apply].
Follow the instructions displayed on the screen.
You have set up a RAID 0 array. Turn to page 16 to create a shared folder.
TeraStation Setup Manual
39
• Configuring a Hot Spare
If you have 3 drives in a RAID 5 array, or 2 drives in a RAID 1 array, then you can configure another drive as a hot spare. If
one of the drives in the array fails, the TeraStation will switch over to the hot spare immediately.
1
Click [System] - [Storage] - [RAID Array] in the Web Admin.
2
Click an array which is set either RAID5
or RAID1.
3
Click [Set to spare-disk].
Notes:
If a hot spare is configured, click [Set to normal disk] to change the hot spare to a normal disk.
4
5
The confirm operation screen will appear. Enter the number shown in the [Confirmation Number] field within 60
seconds and click [Apply].
Follow the instructions displayed on the screen.
You have now configured a hot spare.
Note:
All data in the hot spare drive will be deleted when it is configured as a hot spare and again when it changes over from
a spare to a drive in the array.
TeraStation Setup Manual
40
Changing the Admin Password
1
Click [Users/Groups] - [Users] in the Web Admin.
2
1 Click [admin] from the user list.
2 Click [Edit User].
3
1Enter Password and Confirm Password.
2Click [Save].
You’ve now changed the admin password.
Notes:
• Passwords can contain up to 20 alphanumeric letters. Spaces, hyphens, underscores, commas, semicolons, (, ), @, !, #, $,
%, &, ', *, +, /, <, >, =, ?, [, ], ^, {, }, |, and ~ (tildes) may be used. Do not use a symbol besides underscore as the first letter
of a password.
• The admin username "admin" cannot be changed. (Ver.1.10 or later, the username can be changed.)
• You cannot assign access restrictions to the “admin” account, or use it for WebAccess.
TeraStation Setup Manual
41
Initialization
To reset the TeraStation to its factory default settings, power on the unit and hold down the reset button for five seconds.
Location of the reset button varies according to model. You will need to open or remove the drive door to access it. A
key for the drive door is included in your TeraStation package.
<TS-XL, TS-XEL Series>
<TS-WXL/R1, TS-WXL/1D Series>
Reset Button
<TS-RXL Series>
Reset Button
* View with the front cover open
To press the reset button on the TS-RXL TeraStation, insert the tip of an unfolded paper
clip.
Notes:
• Normally, holding down the reset button initializes settings for IP address, Ethernet frame size, admin password, SSL
key, port trunking (default is off), and NASNavi detection (default is on). The ability to reset the admin password may be
turned off in the Web Admin. You can also initialize settings from in the Web Admin (next page).
• To disable resetting the admin password from the initialization button, navigate to [System] - [Restore/Format] and
select [Keep current admin password]. Click [Save].
• If you disable resetting the admin password from the reset button, you can no longer configure the TeraStation if you
forget the password. Write down your password and keep it in a safe place.
TeraStation Setup Manual
42
Initialization in the Web Admin
In the Web Admin, you can initialize the following settings, including things that are not initialized from the reset button.
TeraStation Name, Description, NTP Settings, Workgroup Settings, Network Services, Shared Folders Settings, USB Disk Settings,
RAID Scanning, Timer ON/OFF, Upon restore, Restrictions on Shared Folders, User Settings, User/Group, Notification Settings,
Synchronization with UPS, Backup Settings, Admin password, Network Settings (IP Address, Subnet Mask and etc.), Time Machine,
Web Access, DFS, DirectCopy, NFS, TeraSearch, Alert Sound Settings, Front Panel Settings, Language, Syslog, PrintServer
1
Navigate to [System] - [Restore/Format] in the Web Admin.
2
Click [Restore TeraStation].
3
The [Confirm Operation] screen is displayed.
Enter the exact same number as shown in the [Confirmation Number] field within 60 seconds, and click [Apply].
4
Follow the instructions displayed on the screen.
Notes:
• To disable resetting the admin password from the reset button, navigate to [System] - [Restore/Format] and select [Keep
current admin password]. Click [Apply].
• If you disable resetting the admin password from the reset button, you can no longer configure the TeraStation if you
forget the password. Write down your password and keep it in a safe place.
TeraStation Setup Manual
43
Chapter 3
Useful Functions
RAID Scanning
A RAID Scanning checks your TeraStation’s RAID 1, 5 or 10 array and automatically fixes any problems it finds. If you’re
using a RAID array, it’s recommended that you perform regular RAID scans.
1
1 Click [System] - [Storage] - [RAID Scanning] in the TeraStation’s Web
Admin.
2 Click [Modify Settings] under [RAID Scanning].
2
1 Click [Enable].
2 Select a schedule for RAID Scanning.
NOTE: Check [Shutdown] to automatically shut down the TeraStation
whenever a RAID error occurs.
3 Click [Save].
Notes:
• Check [Begin Immediate RAID Scan] and click [Save} to immediately initiate RAID scanning
• To stop a RAID scan, click [Abort RAID Scanning].
RAID Scanning is now configured.
TeraStation Setup Manual
44
UPS
An uninterruptible power supply (UPS) can protect the TeraStation from power outages and brownouts. To use the
TeraStation with a UPS, proceed as follows:
1
Plug the power cable of the UPS to a wall socket.
2
Connect the AC cable of the TeraStation to the UPS.
3
Connect the UPS to the TeraStation with a USB or serial connection.
4
Turn on the UPS, then the TeraStation.
5
In the TeraStation’s Web Admin, click [System] - [Power Management] - [UPS Settings].
6
Click [Modify Settings].
7
1 Select [Enable].
2 Configure each setting.
3 Click [Save].
Notes:
• If the UPS has shut down the TeraStation because of a power outage, make sure that power has been restored before
restarting the TeraStation. If the TeraStation is restarted after a shutdown, but power is not available, then the UPS will
not shut down the TeraStation a second time even if its battery is running low.
• If the TeraStation is set to use UPS recovery, then the UPS will restart the TeraStation when normal power is restored.
TeraStation Setup Manual
45
Replication
Replication will mirror data on your TeraStation to a second TeraStation. An exact duplicate of a data share on the first
TeraStation is copied to the second TeraStation virtually simultaneously. To configure Replication, use an Ethernet cable
to connect LAN port 2 on the first TeraStation to LAN port 2 on the second TeraStation. The first TeraStation should be
connected to the local Network by LAN port 1. Configure replication as described below.
1
2
Click [System] - [Backup] - [Replication] on the TeraStation Web Admin.
Click [Add].
3
4
1 Select replication source folder.
2 Select replication target folder.
3 Click [Save].
Read the alert message carefully and click [OK].
Replication configuration is complete.
TeraStation Setup Manual
46
Notes:
• If the first TeraStation goes down, you can switch to the second TeraStation by moving the main Ethernet cable from
the first TeraStation to the second TeraStation’s LAN port 1.
• Replication copies data only, not users or settings. To back up users, groups, and passwords from a TeraStation, use the
NS-SHFT utility.
• If a backup password is set for a share, then that share cannot be selected as a backup target for replication.
• Replication copies data from the source folder to a target folder. Please note that any data in the target folder that is
not in the backup source folder will be deleted.
• Only folders on TeraStations which support Replication (TS-XL, TS-XEL, TS-WXL, TS-RXL, TS-HTGL, TS-RHTGL Series and
so on) can be selected as replication source folders or target folders.
• Up to 64 shares can be selected for replication.
• Only data written by SMB and CIFS (Windows) and AFP, NFS, SFTP, FTP and FTPS (Apple) can be mirrored by the
replication function.
• Replication transfers files asynchronously. It may take time to transfer files depending on the network environment or
status of TeraStation operations.
• Replication will retry file transfers if they fail because of a network problem. If the retry fails, the TeraStation’s Error LED
will light and an alarm will sound. To repair, fix the network problem, then in the TeraStation’s Web Admin, navigate to
[System] - [Backup] - [Replication] and click [Resynchronize].
• Do not set multiple Backup Targets for one Backup Source. Multiple transfer processes for Replications will run, and
system performance will be adversely affected.
• Do not replicate a share that is the target of Time Machine backups by Mac OS X.
• System performance may be degraded if Mac OS X writes to the replication source folder with an AFP connection. If
this occurs, connect via SMB for better performance.
• When replicating to a USB drive, a folder which has the same name as the backup source will be created on the USB
drive. If the same folder name already exists on the USB drive, any files in that folder will be deleted.
• External hard drives formatted with FAT 16 or FAT 32 should not be used with replication. For best results with the
TeraStation, format your external USB hard drive with XFS or EXT3.
TeraStation Setup Manual
47
Time Machine
Time Machine is a backup program included with Mac OS X 1.5 and later. To use it with the TeraStation, configure the
TeraStation as described below.
1
In the TeraStation Web Admin, navigate to [Network] - [Network] [Network Services] and click [AFP].
2
Select [Enable] and click [Save].
Note:
Settings for both LAN port 1 and 2 are the same (ports cannot be configured
separately).
3
1 Click [Shared Folders].
2 Choose a shared folder to configure as a backup destination for Time
Machine.
4
1 Check [Apple] under [Shared Folder Support].
2 Click [Save].
5
1 Navigate to [Extensions] - [ Time Machine].
2 Click [Modif y Settings].
TeraStation Setup Manual
48
6
1 Select [Enable].
2 Select the shared folder that you set in step 3.
3 Click [Save].
7
1 Enter the Mac’s host name.
2 Enter the Mac’s Ethernet MAC address.
3 Click [Create].
Note:• A Macintosh computer’s host name can be found under [Computer Name] in [System Preferences] - [Sharing].
Examples: If Computers on your local network can access your
computer at "bbbbbbbbbb.local", enter ‘bbbbbbbbbb" for the
host name. If it is "cccccccccc.eee-ee.local", enter "cccccccccc" for
the host name. If it is "dddddddddd.fff-ff.jp", enter "dddddddddd"
for the host name.
• A Macintosh computer’s Ethernet MAC address is available from its network page.
1 From the Apple menu, select [About This Mac], then [More Info].
2 System Profiler will open. Click [Network] on the left side.
3 The Ethernet MAC address will have a BSD Device Name of “en0”. It
will be labeled “IPv4 Addresses”. Copy the address and paste it into
[Target MAC address].
Note:
The folder <Macintosh Host Name>_<Macintosh MAC address>.sparsebundle will be created in the shared folder
that was selected as the target share for Time Machine in step 3. Do not delete this folder or change its name, or
Time Machine will not work properly. .
TeraStation Setup Manual
49
8
From the Apple menu, select [System Preferences].
9
10
Click [Time Machine].
Click [Choose Backup Disk].
11
Select TeraStation, and click [Use for Backup].
12
Enter a user name and password with the rights to access the shared folder of
the TeraStation, and click [Connect].
Note:
If the backup target folder on the TeraStation does not have access restrictions configured, type “admin” for the
username and “password” for the Password.
13
Make sure that Time Machine is "on". A backup will start in 120 seconds. Time
Machine will run in the background, and you can use your Mac as usual. For
information on using Time Machine, do a search for “Time Machine” in your
Mac’s help.
Your TeraStation is now configured for use with Time Machine.
TeraStation Setup Manual
50
Sleep Timer
Sleep Timer will automatically turn your TeraStation on and off at specific times to save energy. In Sleep mode, the
TeraStation’s hard drives, display panel, and LED lights are turned off. To use Sleep Timer, set your TeraStation’s Power
Mode Switch to “Manual”. Sleep Timer is not usable when the Power Mode Switch is set to “Auto”.
1
In the Web Admin, navigate to [System] - [Power Management] - [Sleep Timer].
2
Click [Modify Settings].
3
Specify the Timer Interval, Wake up at time, and Begin Sleeping at time.
You can set up to 3 timers. Wake up at times may be set from 0:00 to 23:45.
Begin Sleep at times may be se from 0:00 to 27:45. If “Begin Sleep at” is set
to 24:00 or later, then “Wake up at” can be set from 4:00 to 23:45. 24:00 is
equivalent to 0:00 of the next day, and 27:00 is equivalent to 3:00 of the next
day. Wake up times should be earlier in the day than Begin Sleep times. Do
not set the same time for both Awaken Time and Begin Sleeping time.
Click [Save] when done.
TeraStation Setup Manual
51
Notes:
• To exit sleep mode, hold in the power button on the TeraStation for about 3 seconds. The unit will power on.
• The TeraStation will not go into sleep mode while performing Check Disk, Disk Format, or Backup, or if a backup is
scheduled within 5 minutes of the current time.
• If multiple sleep timers conflict, the longest interval time is used. Here are some examples of multiple timers:
A timer is set to turn the unit on for Wednesday at 10:00:
Timer 1 Everyday 12:00:00 - 24:00
Timer 2 Disabled
Timer 3 Disabled
-> Nothing happens at 12:00 and the unit enters sleep mode at 24:00
A timer is set to turn the unit on for Wednesday at 10:00:
Timer 1 Everyday 9:00 - 18:00
Timer 2 Select Day Wednesday 10:00:00 - 20:00:00
Timer 3 Disabled
-> Except on Wednesdays, the unit powers on at 9:00 and moves to sleep mode at 18:00.
-> On Wednesday, it enters sleep mode at 20:00.
A timer is set to turn the unit on for Wednesday at 10:00:
Timer 1 Everyday 9:00 - 18:00
Timer 2 Select Day Wednesday 10:00 - 25:00
Timer 3 Disabled
-> Except on Wednesdays, the unit powers on at 9:00 and moves to sleep mode at 18:00.
-> Except on Wednesdays, it enters sleep mode at 1:00 of the next day.
A timer is set to turn the unit on for Wednesday at 10:00:
Timer 1 Everyday 9:00 - 18:00
Timer 2 Select Day Wednesday 07:30:00 - 22:00:00
Timer 3 Disabled
->Except on Wednesdays, the unit powers on at 9:00 and enters sleep mode at 18:00.
-> On Wednesday, the unit powers on at 7:30 and enters sleep mode at 22:00 of the next day.
TeraStation Setup Manual
52
Appendix
Specifications
Check Buffalo's catalogs or web site (www.buffalotech.com) for information about the latest products or compatible models.
Interface
(LAN Port)
Interface: Complied with IEEE802.3ab (1000BASE-T), Complied with IEEE802.3u (100BASE-
TX), Complied with IEEE802.3 (10BASE-T)
Transfer Speed:
1000Mbps Full duplex (auto-negotiation), 100Mbps Full duplex/Half duplex (auto-
negotiation) 10Mbps Full duplex/Half duplex (auto-negotiation)
Number of ports:
2 port (supports AUTO-MDIX)
Connector type:
RJ-45 8-pin
Access method:
CSMA/CD
Protocol:
TCP/IP
Supported Network File System: SMB/CIFS, AFP, FTP, FTPS, SFTP, NFS
Jumbo Frame frame length:
1.518/4,102/7,422/9,694 Bytes
(Including 14 bytes of the header and 4 bytes of FCS)
Interface: USB Standard Revision 2.0
Data Transfer Speed:
480 Mbps (Logical value) Maximum
Connector:
TS-XL, TS-XEL, TS-WXL/R1, TS-WXL/1D : USB Connector (Series A) X 2
TS-RXL : USB Connector (Series A) X 3
Compatible USB Devices : Supporting USB devices: USB hard disk manufactured by BUFFALO, USB UPS, and USB printer.
Interface: UPS Port (D-SUB 9 pin (Male)) X 1
Compatible UPS: UPS manufactured by Omron or APC.
Interface
(USB Port)
Interface
(UPS Port)
Internal Hard Drive Disk Composition:
Power /
Power
Consumption
External size/
Weight
Operating
Environment
Compatible
Computer
Supported OS
Configured to RAID 5 mode (4 hard drives) for TS-XL, TS-XEL and TS-RXL at the
factory default. Configured to RAID1 mode for TS-WXL/R1. Configured to Normal mode for TS-WXL/1D.
NOTE: If the hard drives in the TeraStation are malfunctioned, replace with the hard drive OP-HD Series
(with the same capacity as the malfunctioned hard drive) manufactured by BUFFALO which is sold separately. Refer to BUFFALO's website (www.buffalotech.com) for details.
TS-XL, TS-XEL :
AC100- 240V 50/60Hz / approx. 60W( Average)
TS-WXL/R1 : AC100- 240V 50/60Hz / approx. 40W( Average)
TS-WXL/1D : AC100- 240V 50/60Hz /approx. 30W( Average)
TS-RXL : TS-XL, TS-XEL : AC100- 240V 50/60Hz / approx. 110W( Average)
W170×H215×D230mm (excluding protruding parts) / approx. 8kg
TS-WXL/R1 : W170×H170×D230mm (excluding protruding parts) / approx. 4.5kg
TS-WXL/1D : W170×H170×D230mm (excluding protruding parts) / approx. 3.6kg
TS-RXL : W430×H44.3×D420mm (excluding protruding parts) / approx. 9kg (main unit only)
Temperature 5 - 35 °C , Humidity 20 - 80 % (no condensation)
IBM/PC Compatible (OADG spec), Apple Mac Series,
NOTE: • Equipped with LAN interface.
•The TeraStation can only connected via LAN with your computer, and no USB connection can be established.
Windows 7 (32bit/64bit)/Vista (32bit/64bit)/XP/2000, Windows Server2003/Server2008, Windows 2000 Server
Mac OS X 10.3.9 or later
TeraStation Setup Manual
53
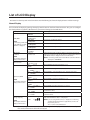
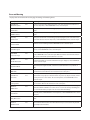
List of LCD Display
TeraStation has the LCD panel on the front of the unit. The following list shows the displayed items and their meanings.
Normal Display
You can switch the display by pressing the Display switch button on the front of the TeraStation. Also, you can configure
the displayed items in [System] - [Maintenance] - [Front Panel Settings] on the Web Admin.
Examples of LCD
Meaning
LINK SPEED
NO LINK
LINK SPEED
10Mbps HALF
LINK SPEED
LINK SPEED
10Mbps FULL
NOTE:
If connecting a LAN cable LINK SPEED
to the LAN Port 2, "LINK
100MbpsHALF
SPEED2" is displayed.
LINK SPEED
100MbpsFULL
LINK SPEED
1000Mbps
HOST Name
TS-XL ***
IP Address
192.168.11.50
NOTE:
The example shows the
display of TS-XL Series.
Calendar clock
Operation, MODE
NOTE:
The example shows the
display of TS-XL Series.
Storage Capacity
NOTE:
The example shows the
display of TS-XL Series.
DATE TIME
2007/11/11 11:11
HD 1-2-3-4
RAID5
HD 1-2-3: RAID 5
4 :SINGLE
HD 1-2-3: RAID 5
4 : STANDBY
HD 1-2-3-4
RAID 0
HD 1-2-3-4
RAID 10
HD 1, 2, 3, 4
SINGLE
HD 1 - 2 : RAID 1
3 - 4 : RAID 1
HD 1 - 2 : RAID 1
3, 4 : SINGLE
HD 1, 2 : SINGLE
3 - 4 : RAID 1
HDD
^
USED
1_2 3 4
Not connected to the network.
Connected as 10 Mbps half-duplex.
Connected as 10 Mbps full-duplex.
Connected as 100 Mbps half-duplex.
Connected as 100 Mbps full-duplex.
Connected as 1000 Mbps full-duplex.
Displays the host name and the IP address. The letter F (the static IP
address) or D (expresses that the IP address is automatically obtained
by the DHCP server) is displayed at the end of IP address.
NOTE: If connecting a LAN cable to the LAN Port 2, the Host Name is
displayed as "NETWORK2".
Displays the date and time that is set to TeraStation.
Structured RAID5 using the hard drives 1 to 4.
Structure RAID 5 using hard drives 1 to 3, and 4 as a Normal mode.
Structure RAID 5 using hard drives 1 to 3, and 4 as a hot spare.
Structure RAID 0 using the hard drives 1 to 4.
Structure RAID 10 using the hard drives 1 to 4.
Uses 4 hard drive (1 - 4) as stand-alone drives.
Structure RAID1 using the hard drive 1, 2 and 3, 4.
Structures RAID1 with hard drive 1 and 2, and uses hard disk 3 and 4
as stand-alone drives.
Structure RAID1 with hard disk 3 and 4 and uses hard drive 1 and 2 as
stand alone drives.
Indicates the usage of TeraStation's internal hard drives 1 - 4 in bar
graph. If the hard drive is full, "^" is displayed.
NOTE: If you are using TS-RXL Series, it is displayed as a following
example (the displayed value is approximate, and it is displayed every 6 to 7 %.
"D1: 13% D2: 0% D3:Full D4: 25%”
NOTE: If you are using TS-RXL Series, one line's worth of height of LCD display will be scrolled horizontally and 2
lines worth of information above will be displayed.
TeraStation Setup Manual
54
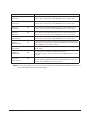
Status
Displays the current status when changing the settings or formatting drives.
Examples of LCD
HDx Warning Bad Sectors
OperationMode
DEGRADE MODE
RAID
ARRAYx Formatting
RAID
ARRAYx Checking
RAID
ARRAYx Scanning
RAID
ARRAYx Creating
RAID
ARRAYx Resyncing
RAID
ARRAY xRebuilding
RAID
ARRAYx 0 Filling
DISK
DISKx Formatting
DISK
DISKx Checking
DISK
DISKx 0 Filling
SYSTEM
Initializing
Network Setting Config
SYSTEM
F/WUPDATING
Web Setting
Initializing
USB Diskx
Checking
USB Diskx
Formatting
Press FuncSW
New Diskx ready
Set From Web New Diskx ready
Meaning
I12
Bad sectors in the xth hard drive may reach the dangerous zone. Replace xth hard
drive.
RAID Degrade mode is running.
I13
Formatting Xth RAID Array.
I14
Checking Xth RAID Array.
I11
I15
Investigating the error status occurred in xth RAID array.
NOTE: During the investigation, transfer speed will be degraded.
I16
I17
Creating Xth RAID Array.
Resyncing Xth RAID Array.
NOTE: During the resyncing, transfer speed will be degraded.
I18
I19
Rebuilding Xth RAID Array.
While rebuilding, the transfer speed will be degraded.
Deleting data completely by filling 0 into Xth RAID array.
I20
Formatting Xth hard disk.
I21
Checking Xth hard disk.
I22
Deleting data in Xth hard drive.
I23
Initializing the system.
I24
Setting the network such as obtaining an IP address.
I25
Updating the TeraStation's firmware.
NOTE: Do not turn off TeraStation while updating.
I26
Initializing web configuration.
I27
Checking Xth USB hard disk.
I28
Formatting Xth USB hard disk.
I31
This message is displayed when restructure RAID by pressing a function switch
after replacing the hard drive.
This is displayed when RAID needs to be restructured on the Web Admin or formatted after replacing the hard drive.
I32
NOTE: If you are using TS-RXL Series, one line's worth of height of LCD display will be scrolled horizontally and 2
lines worth of information above will be displayed.
TeraStation Setup Manual
55
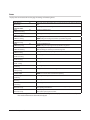
Error and Warning
Displays the current status when changing the settings or formatting drives.
Examples of LCD
Meaning
SYSTEM Error MPU No Response
E00
System is not responding. Unplug the power code of the TeraStation and reboot it. If
the error still persists, contact BUFFALO's service center for repair.
DRAM LINES DATA Failure
E01
Some parts of internal IC is not working properly. Contact BUFFALO's service center for
repair.
DRAM LINES ADDRESS Failure
E02
Some parts of internal IC is not working properly. Contact BUFFALO's service center for
repair.
RTC Chip No RTC Clock
E03
Some parts of internal IC is not working properly. Unplug the power code of the TeraStation and reboot it. The error still persists, contact BUFFALO's service center for repair.
SYSTEM Error Can't Load Krnl!
E04
WDT
SYSTEM Stopped
E05
TFTP MODE Lost boot image
E06
HD ALL
ALL HD Not Found
E07
UPS
Dependent Mode
E10
SYSTEM
TOO HOT!
I10
SYSTEM Error
Fan Failure
E11
SYSTEM Error Cooling Failure
E12
RAID Error ARRAYx Error
E13
RAID Arrayx
Can't Mount
E14
Firmware version is damaged. Contact BUFFALO's service center for repair.
System hungs up. Unplug the power code of the TeraStation and reboot it. The error still
persists, contact BUFFALO's service center for repair.
Firmware version is damaged.
Contact BUFFALO's service center for repair. Wait for 5 minutes to show "E04" and turn
off, or press and hold the power button for 10 seconds.
Hard disks are not found.
Even if the hard disks are connected but this message is displayed, contact BUFFALO's
service center for repair.
Operating using UPS battery due to the power outage. System will be shut down safely.
Check the power supplied to UPS, and turn TeraStation off if there is no problem on
UPS.
Temperature in the system may be over the limits of warranty. Do not place any object
around the TeraStation. Or move the TeraStation to the cooler place.
There is a problem with the number of fan spinning.
Check if there is any objects or dusts on the fan. If you see any objects or dusts, remove
them by tweezers or an air duster. The error still persists, contact BUFFALO's service
center for repair.
Temperature in the system is over the limits of warranty. Do not place any object around
the TeraStation. Or move the TeraStation to the cooler place.
An error occurs in Xth RAID array. When rebooting the TeraStation, it will run as degrade
mode when RAID1 or RAID5 is used. You can use an erroneous drive by rebuilding, but
it is recommended that you replace the erroneous drive immediately.
Xth RAID array could not be mount. Turn off TeraStation, and turn it on again. If the
error still persists, rebuild RAID. The error still persists, contact BUFFALO's service center
for repair.
HDx Error
Many Bad Sectors
E15
The bad sector in xth hard drive has reached the dangerous zone. Replace xth hard
drive.
HDx Error HDx Not Found
E16
Cannot find the Xth hard drive. The Xth hard drive may not connected or may be damaged. Replace the hard drive.
TeraStation Setup Manual
56
Examples of LCD
Meaning
Chip Error
RTC Failure
E17
The circuit board is damaged. Unplug the power code of the TeraStation and
reboot it. The error still persists, contact BUFFALO's service center for repair.
Chip Error SATA1 Failure
E18
The circuit board is damaged. Unplug the power code of the TeraStation and
reboot it. The error still persists, contact BUFFALO's service center for repair.
Chip Error SATA2 Failure
E19
The circuit board is damaged. Unplug the power code of the TeraStation and
reboot it. The error still persists, contact BUFFALO's service center for repair.
Chip Error USB Failure
E20
The circuit board is damaged. Unplug the power code of the TeraStation and
reboot it. The error still persists, contact BUFFALO's service center for repair.
Chip Error Ethernet Failure
E21
The circuit board is damaged. Unplug the power code of the TeraStation and
reboot it. The error still persists, contact BUFFALO's service center for repair.
HDx Error HDx Can't Mount
E22
HDx Error HDx Is Faulty
E23
SATAx Error COMM. Failure
E24
Replication Replicate Failure
E26
Failed to mount the hard drive. Format the hard disk. After formatting, reboot the
system. If the error is still displayed, replace the hard drive. The error still persists,
contact BUFFALO's service center for repair.
An error occurred and the Xth hard disk was removed from RAID array. Replace
xth hard drive.
An error occurred to communicate with the Xth hard drive.
Reboot the TeraStation. The error still persists, contact BUFFALO's service center
for repair.
An error occurred during Replication process. Click [Resynchronize] under
[System] - [Backup] - [Replication] in the TeraStation Web Admin. The error still
persists, contact BUFFALO's service center for repair.
NOTE: If you are using TS-RXL Series, one line's worth of height of LCD display will be scrolled horizontally and 2
lines worth of information above will be displayed.
TeraStation Setup Manual
57
Software
You can install following software applications and the manual by using Utility CD (TeraNavigator) which comes with
the TeraStation. Select and install software from the selection screen which is displayed during Setup (Or click [Option]
in TeraNavigator and follow the instruction on the screen to install software).
[BUFFALO NAS Navigator2]
You need NAS Navigator 2 in order to display the TeraStation Web Admin or search for
the TeraStation from the Network.
It is always installed when you setup by clicking [Begin Installation] on TeraNavigator..
NOTE: When using Power Management with PC feature, you need to install NAS
Navigator2 on all computers connected within the same network as the TeraStation.
Top Screen
[File Sharing Security Level Change Tool]
When you configure the [Success Restrictions by using Delegate Authority server] on the Web Admin of the TeraStation,
you need to change security on Windows 7/Vista and Windows Server 2003/Server 2008.[Start]-[BUFFALO]-[File Sharing
Security Level Change Tool] - [File Sharing Security Level Change Tool], and then select [Change Security level] to change
the security settings (Select "Recover default security level" change it back to the previous setting).
NOTE: • This utility can be installed only on Windows 7/Vista and Windows Server2003/Server2008.
• During the initial setup, the message, "Start changing file sharing security level. Will you continue?" will be dis
played. If you click [Yes], follow the instructions on the screen and restart your PC .
[NS-SHFT]
This software allows to recover the TeraStation's configuration information when necessary which is saved to a configuration file (nas_config file) on the computer via the network. After Setup, refer to [(All) Programs] - [BUFFALO] - [NS-SHFT]
- [User Manual (PDF)] for the instructions of how to use it.
NOTE: • This software cannot be used on Windows Server 2003/Server 2008, Windows 2000 Server, and Mac OS.
• NS-SHIFT does not save data in the shared folder on the TeraStation.
[Adobe Reader]
Manuals for this product include PDF files. You need to install Adobe Reader to your computer in order to read PDF files.
Install Adobe Reader if you haven't installed it yet. Refer to the Adobe Reader Help for instructions how to use it.
TeraStation Setup Manual
58
[EXT3 Reader]
Read USB hard drive on Windows which is formatted in EXT3 on TeraStation.
NOTE: To delete the software installed, click [Options] - [Delete Software] in TeraNavigator. Follow the instructions displayed on the screen.
TeraStation Setup Manual
59
Info Folder
In the folder called "info" on the internal hard disk of the TeraStation, Install programs such as the manual, NAS Navigator2, or Easy Backup are included. When you want to read the manual on your computer in the network, install the utilities when you want.
[info] - [English] Folder
- [manual] Folder
- manual.pdf
Display TeraStation PDF manuals.
- [NASNavi2] Folder
- Inst.exe
Install NAS Navigator2.Refer to TeraStation Setup Guide for the instructions how to use it.
- [lmcmchg] Folder
- Inst.exe
Install File Security Tool. Refer to TeraStation Setup Guide for the instructions how to use it.
- [nascfgsr] Folder
- nascfgsr_ins.exe
Install NS-SHIFT.Refer to "How to use NS-SHIFT (a PDF file)" for the instructions to use it.
- nascfgsr.pdf
Provide the instructions of how to use NS-SHIFT (a PDF file). To read PDF
file, Adobe Reader must be installed.
- [EXT3] Folder
- instEXT3.exe
Install EXT3 Reader.
TeraStation Setup Manual
60
Troubleshooting
In the folder called “info” on the internal hard disk of the TeraStation, Install programs such as the manual, NAS Navigator2, or Easy Backup are included. When you want to read the manual on your computer in the network, install the utilities when you want.
If You cannot Setup:
The following list contains the typical symptoms and causes when TeraStation cannot be found on NAS Navigator2 or
you cannot display the Web Admin.
Cause 1 Cables are not connected properly.
The hard drive is not physically connected or may have the bad connection. Reconnect the AC cable and the LAN cable
and restart your computer and the TeraStation.
Cause 2 The firewall is enabled, or software running in the background is installed.
Disable the firewall or uninstall software which enables the firewall, and try to search for the TeraStation again.
Cause 3. Both wireless and Ethernet adapter are enabled.
Disable any adapters other than the LAN adapter to connect to the TeraStation.
Cause 4 The defective LAN cable or the connection is not stable.
Change a port on the hub to connect or replace the LAN cable.
Cause 5 Your LAN board, card, or adapter is malfunctioning.
Replace a LAN board, card, or adapter.
Cause 6. The LAN board you are using or the transfer mode of the hub is not set.
Change the LAN board, or change the transfer mode to [10M half-duplex] or [100M half-duplex].
Some LAN boards and hubs may not be connected to the network properly if the transfer mode is set to [Auto Negotiation].
Cause 7 There is a network bridge.
If any network bridge which is not used, delete them.
Cause 8 You are searching from a different network.
You cannot search for the TeraStation over network segments. Connect the TeraStation to the same segment as the computer you use for search.
Cause 9 TCP/IP does not work properly.
Reinstall the LAN Adapter’s driver.
TeraStation Setup Manual
61
If Shared folders on the TeraStation would not suddenly open:
If you map Shared Folders on the TeraStation as a Network Drive, you may suddenly not be able to access TeraStation
when the IP address or Workgourp is changed.
In Such a case, follow the instructions on the front of this sheet and open the shared folder on the TeraStation by using
NAS Navigator2.
NOTE:• On Mac OS, TeraStation is mounted as a drive icon on the desktop, or displayed in the sidebar on the Finder.
• If the problem still persists after you tried the procedures described above on Mac OS, select [System] - [Storage] - [Disk] - [Check Disk] - [Delete any hidden, non-essential MacOS dedicated files] on the Web Admin of the
TeraStation, and run Disk Check.
If a shared folder does not open even though NAS Navigator 2 recognizes the TeraStation
If power outage occurred or the AC cable is unplugged while the TeraStation is ON, the TeraStation's firmware may be
corrupted and shared folders may not open (You can search for folders on NAS Navigator2 but they do not open).
NOTE: In such a case, TeraStation Name displayed on NAS Navigator2 or TeraStation Web Admin is displayed as TS-XLEM*** (the example of TS-XL Series)*** expresses last 3 digits of the TeraStation's MAC address
In such a case, download the latest firmware from BUFFALO's website (www.buffalotech.com) and update it.
Data Backup
While using the TeraStation, you may loose your important data due to sudden accidents, hard disk failure, or accidental
misoperation. It is important to backup your data to recover data or minimize losses in such a case.
Use Mass Storage class hard disk manufactured by BUFFALO (such as TeraStation/LinkStation and a USB external hard
disk) as Backup Targets.
GPL Information
The source code for Buffalo products that use GPL code is available at http://opensource.buffalo.jp/ .
TeraStation Setup Manual
62
Contact Information (USA / Canada)
Buffalo Technology USA Inc.
11100 Metric Blvd, Suite 750
Austin, TX 78758-4018
GENERAL INQUIRIES
Monday through Friday
8:30am-5:30pm CST
Direct: 512-794-8533 | Toll-free: 800-456-9799 | Fax: 512-794-8520 |
Email: [email protected]
TECHNICAL SUPPORT
North American Technical Support by phone is available 24 hours a day, 7 days a week. (USA and
Canada).
Toll-free: (866) 752-6210 | Email: [email protected]
TeraStation Setup Manual
63
Contact Information (Europe)
Buffalo Technology UK LTD.
2 Bracknell Beeches, Old Bracknell Lane
Bracknell, Berkshire, RG 12 7BW
United Kingdom
GENERAL INQUIRIES
Email: [email protected]
TECHNICAL SUPPORT
Buffalo Technology provides technical support in English, German, French, Italian, and Spanish.
UK
0845 3511005
Austria
08101 0251552
Belgium
0787 99917
Denmark 70150919
Finland 010802812
France 0811 650220
Germany 01801 003757
Ireland 1890 719901
Italy 848 782113
Netherlands 09000401256
Norway
81000050
Spain 9018 10750
Sweden 0771404105
Switzerland 0848 560374
For all other regions please contact +353 61 704617
www.buffalo-technology.com/contact
TeraStation Setup Manual
64
Contact Information (Asia Pacific)
Australia
TEL: 1300-761-310
e-mail: [email protected]
China
TEL: 86-800-820-8262
e-mail: [email protected]
Hong Kong
TEL: 852-2345-0005
e-mail: [email protected]
India
TEL: 1-8004256210
e-mail: [email protected]
Indonesia
TEL: 021-6231-2893
Malaysia
TEL: 03-5032-0138
e-mail: [email protected]
Philippines
TEL: 2-688-3999
e-mail: [email protected]
Republic of Korea
TEL: 02-2057-2095
e-mail: [email protected]
Singapore
TEL: 65-6297-2085
e-mail: [email protected]
Taiwan
TEL: 0800-660-886
e-mail: [email protected]
Thailand
TEL: 02-716-6669
Other Areas
Please contact the shop or distributor where you purchased the unit, referring to the attached warranty card issued by the distributor.
TeraStation Setup Manual
65