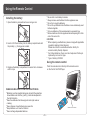
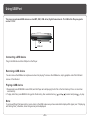
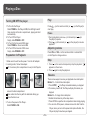
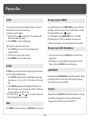
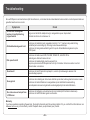
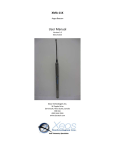
1
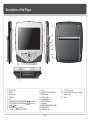
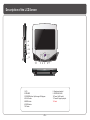
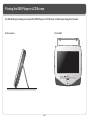
ENGLISH
DUAL SCREEN PORTABLE DVD PLAYER
OWNER`S MANUAL
For information and support, www.lenco.eu
ENTER
SETUP
DVD USB
MENU PBC
Please read this manual before operating
REVERSE
16:9/4:3
DOWN
UP
MES-330
Table of Contents
Table of Contents...................................................................................................................................................................1
Safety Information.................................................................................................................................................................2
Remote Control.....................................................................................................................................................................3
Description of the Player........................................................................................................................................................4
Description of the LCD Screen................................................................................................................................................5
Placing the DVD Player or LCD Screen....................................................................................................................................6
Using the Remote Control.......................................................................................................................................................7
Connecting the LCD Screen to the Player.................................................................................................................................8
Connecting Earphones (Optional Accessory) to the Player or LCD screen ...................................................................................9
Using USB Port....................................................................................................................................................................10
Using the AC Adaptor............................................................................................................................................................11
Mounting the Player / Screen for In-Car Use............................................................................................................................12
Playing a Disc.................................................................................................................................................................13-16
Playing MP3 and Regular Audio CD........................................................................................................................................17
Playing Picture CD................................................................................................................................................................18
Changing Settings..........................................................................................................................................................19-20
Adjusting LCD Screen...........................................................................................................................................................21
Troubleshooting...................................................................................................................................................................22
Specifications......................................................................................................................................................................23
Troubleshooting
~1~
Safety Information
Please read all of the safety and operating instructions before operating this Player, follow all warnings placed on the Player
and in the user's manual. These safety and operating instructions should be retained for future reference.
Safety Information
Do not expose the system to excessive moisture, rain, sand, or heat sources.
Place the DVD Player on a firm, flat surface.
Keep the DVD Player away from domestic heating equipment and direct sunlight.
When placing the DVD Player in a cabinet, allow about one inch of space all around the DVD Player for ventilation.
SAFETY WARNING
CLASS 1 LASER PRODUCT / KLASSE 1 LASER PRODUKT / LUOKAN 1 LASER LAITE / KLASS 1 LASER APPARAT / PRODUCTO
LASER CLASE.
INVISIBLE LASER RADIATION WHEN OPEN AND INTERLOCKS DEFEATED. AVOID EXPOSURE TO BEAM.
WARNING
1.To prevent fire or electrical shock, do not expose this Player to rain or moisture.
2.To avoid electrical shock, do not open the cabinet, no user-serviceable parts inside, refer servicing to qualified personnel only.
4.Listening with earphones for many hours at maximum volume may damage your hearing.
5.The Player should be connected to a power supply only of the type described in the operating instructions or as marked on the Player
6.The A.C plug is used as the disconnecting device for power, unplugging the plug disconnects the Player from the power supply, make
the disconnecting device readily operable all the time.
Attention:
Remove the protection card inside the disc compartment before using this Player.
* Avoid touching the OPU (laser).
* Prevent children from accessing the mechanism including OPU.
* Avoid using earphones at high volume. Hearing experts advises
against continuous loud and extend use.
~2~
Remote Control
Remote Control
14
1
15
2
16
3
17
4
18
5
6
7
19
8
20
9
21
22
10
23
11
24
12
25
13
1. MENU/PBC Button
Brings up the disc menu.
2. L/R Button
Selects left, right and stereo
sound tracks.
3. P/N Button
Selects PAL/NTSC/AUTO TV systems.
4. TITLE Button
5. SUBTITLE Button
Selects the subtitle's language.
6. Number Buttons (0,1,...,9)
7. SETUP Button
Brings up the setup MENU
to set up the system's
language, display,
password etc.
8. (PLAY/ENTER)/DIRECTION Buttons
9. STOP (
) Button
10. SKIP FORWARD (
)Button
Use to skip to next title, chapter or track.
11. SKIP BACKWARD (
) Button
Use to skip to previous title,
chapter or track.
12. ZOOM Button
13. GOTO Button
Use to enter the specific chapter, track
or time to playback.
~3~
14. DVD/USB Button
Switches between DVD and USB
mode.
15. DISPLAY Button
Displays the current disc playback
information.
16. MUTE Button
17. ANGLE Button
Use to access various
camera angles on a DVD.
18. LANGUAGE Button
Selects the voice language in a DVD.
19. SLOW Button
20. VOL- Button
Use to decrease the volume.
21. VOL+ Button
Use to increase the volume.
22. FAST REVERSE ( ) Button
23. FAST FORWARD ( ) Button
24. REPEAT Button
Allows you to repeat play
a title, chapter, track, or disc.
25. MARK Button
Use to mark a point where the
playback starts each time when
the MARK button is pressed
later on.
Description of the Player
17
18
OFF
ON
POWER
VOL
USB
2
19
20
21
1
ENTER
SETUP
DVD USB
MENU PBC
22
23
6 7 8 9 10 11 12 13 14 15 16
4 5
3
1. DISC COVER
2. USB slot
3. Rubber pads
4. SPEAKER
5. LCD
6. FAST REVERSE /SKIP BACKWARD(
7. FAST FORWARD /SKIP FORWARD(
8. STOP(
) Button
9. PAUSE /PLAY( / ) Button
10. CURSOR UP/DOWN/LEFT/RIGHT
/
/
) Button
) Button
11.
12.
13.
14.
15.
16.
17
18
19
20
LED
REMOTE CONTROL SENSOR
ENTER Button
SETUP Button
DVD/USB Button
MENU/PBC Button
Screw Hole
EARPHONE/SPEAKER VOLUME
POWER ON/OFF
EARPHONE Jack
~4~
21
22
12 V DC Power Input
Power/AV Signal output Jack: connection to
the 2nd screen.
23. Stand
Description of the LCD Screen
VOL
8
9
ON
POWER
OFF
10
AV INPUT
DC 12V
0.7A
11
REVERSE
16:9/4:3
DOWN
UP
12
1 2
3 4
5
1. LCD
2. SPEAKER
3. REVERSE button: flip the image 180 degrees
4.16:9/4:3 button
5. MODE button
6. DOWN button
7.UP button
~5~
6 7
8. Speaker volume dial.
9. EARPHONE JACK
10. Power On/Off switch
11. Power/AV signal input jack.
12. Stand
Placing the DVD Player or LCD Screen
The Stand/Hanger allows you to place this DVD Player or LCD Screen on table top or hang it on the wall.
On the Wall
OF
ON
PO
WER
F
VO
L
On the Surface
ENTER
~6~
SETUP
DVD USB
MENU PBC
Using the Remote Control
Installing the battery
* Never short circuit battery terminals.
* Always remove used batteries from the appliance case.
* Do not try to open the batteries.
* Do not mix up different kind of batteries or new and already used
batteries together.
* Only use batteries of the recommended or equivalent type.
* Remove batteries from the appliance before disposing of it at the
end of its service life.
CAUTION :
* When replacing used batteries, please comply with applicable
regulation relating to their disposal.
Please return them to a suitable collection facility for
environmentally friendly disposal.
* For Lithium batteries, there is a risk of explosion if battery is
replaced by an incorrect type.
* Type of battery:CR2025
1. Open the battery compartment cover using a coin.
2. Insert a 3V lithium battery into the battery compartment with
the polarity ( + ) facing up as marked.
Battery
Using the remote control
Point the remote control directly at the remote sensor
on the front of the DVD Player.
3. Replace the battery compartment cover and turn clockwise
until it stops.
ON
WARNINGS RELATING TO THE USE OF BATTERIES
* Batteries must be inserted taking care to match the polarities
shown.Make sure that the (+) and (-) terminals are placed in
the right direction.
* Never use batteries that show signs of electrolyte leaks or
cracking.
* Never dispose of used batteries in an open fire.
* Keep batteries out of reach of children.
* Never recharge disposable batteries.
56
Remote Control Sensor
~7~
OFF
POWER
VOL
battery compartment
cover
Connecting the LCD Screen to the Player
The power for the screens is provided by the DVD player through the provided cables which also provide the audio/video signal from
the player to the screen. Follow these steps to make the connection.
1. Connect one end of the Power/AV cable (mini DIN) to the OUT on the Player and the other end to the DC. AV INPUT on the 2nd screen.
2. Care must be taken to make sure that the arrow mark (
) on the connector of the cable aligns with the arrow mark (
Player.
Do not force in when making the connection, or you may risk damaging the pins on the connectors.
) on the
DVD Player
LCD Screen
POWER
POWER
ON
VOL
OFF
ON
VOL
OFF
AV INPUT
DC 12V
0.5A
Power/AV Cable(provided)
Warning!
1. Do not turn on the DVD player power until the connection of Power/AV cable between the Player and the screen is done.
2. Always turn off the DVD player power before disconnecting the Power/AV cable between the Player and the screen.
3. Connect the screen to the player using only the cable provided in this product, or you may risk damaging or causing fire if other cable
is used.
56
~8~
Connecting Earphones (Optional Accessory) to the Player and LCD screen
You can attach an earphone with a stereo mini-jack plug to the earphone jack on the DVD Player or Earphone Jack on the 2nd
screen for private listening. The volume can be adjusted using VOL + and VOL - on the remote control or use the speaker VOLUME
dial on the Player and 2nd screen to adjust the volume .
NOTE: When the earphone is connected to the earphone jack on the DVD Player or Earphone Jack on the LCD screen, the speaker
will be disconnected.
*Earphone is an optional accessory
2. Connecting Earphones to 2nd Screen
VO
L
1. Connecting Earphones to the Player
OF
ON
PO
WER
F
L
VO
R
WE ON
PO
OFF
T
INPU
AV 12V
DC
0.5A
~9~
Using USB Port
The player accepts most USB devices such as MP3, DSC, USB- drive, Digital Camcorder etc. The USB in this Player supports
version 1.1/2.0.
USB
USB slot
Connecting a USB device
Plug in the USB device to the USB port on the Player.
Removing a USB device
You can remove the USB device anytime even when it is playing. To remove the USB device, simply grasp the end of the USB and
remove it from the slot.
Playing a USB device
1. Repeatedly press DVD/USB to select USB, and the Player will start playing the first file in the first directory if there is more than
one directory.
2. To play other files, press MENU to bring up the file directory, then use direction key (
and
) to select and press
to play.
Note:
If you have different file types (photo, music, video) in the USB, make sure you have selected to display all file types ( see " Displaying
and Sorting Files") otherwise, some file types may not be displayed.
~ 10 ~
Using the AC Adaptor
OFF
ON
POWER
VOL
This portable DVD player can be powered by AC through the supplied switching power AC adaptor.
DC IN 12V
To DC12V IN on the DVD player
To home power outlet
Important !
Always turn off the DVD Player before connecting or disconnecting the AC cord.
Only use the AC adaptor supplied with this player. Using a different type of adaptor may cause malfunction or damage to the product.
When the AC adaptor is used for prolonged period of time, the adaptor may heat up, this is normal and is not a cause for concern.
When not using the adaptor, unplug it from the outlet.
~ 11 ~
Mounting the Player / Screen for In-Car Use
You can mount the Player to the head rest of your car using the provided straps.
3. Connect the Car Adaptor between your car cigarette lighter
and the Player.
OFF
ON
POWER
VOL
OFF
ON
POWER
VOL
1. Use hoop and loop fastener to fix elastic straps on the stands
of main unit as below.
2. Mount the main unit to the head rest and tighten the elastic
straps.
~ 12 ~
Playing a Disc
Turning ON /OFF the player
Play
1.To Turn On the Player
Slide POWER on the Player to ON, the LED lights and if
there is a disc in the disc compartment, playing will start
automatically.
2. To Turn Off the Player
Simply slide POWER to OFF.
3. To Turn On the Second LCD Screen.
Slide POWER on the screen to ON.
4. To Turn Off the Second LCD Screen.
Simply slide POWER to OFF.
Press
start play.
(on the remote control) or
(on the Player) to
Pause
1. During playback, press
(on the remote) or
(on
the player) to pause.
2. Press
(on the remote) or
(on the player) to resume
playback.
Adjusting volume
Press VOL+ or VOL- on the remote control or volume Dial
on the Player to change volume.
Preparation for Playback
Stop
1. Make sure the unit has the power from the AC adaptor.
2. Loading a disc, follow these steps:
Lift the screen (disc compartment cover) on the Player to
1. Press
on the remote to temporarily stop the playback, "
appears on the screen.
2. Press again to stop the playback.
"
Resume
There are two ways to resume your playback when interrupted.
Method 1. -- for short time interruption
1. Press STOP ( ), the Player remembers where you stopped.
2. To resume, press PLAY, the Player will play from where you
stopped.
Method 2. -- for longer time interruption
1. Enable the last memory in the setup menu.
1. Press OPEN to open the disc compartment door during playing.
2. You can turn off the power, and even remove the disc from the
Player, when you turn on the power and replace the disc, the
Player will play from where you stopped.
access the disc compartment.
Place a disc into the tray with the label side facing up.
Close the disc cover.
3. Turn on the power of the Player .
Slide POWER to ON.
~ 13 ~
Playing a Disc
Skip
Repeat Playback
You can skip chapters on DVD-Video, tracks on CDs, and
Video CDs.
1. To skip forward, press
during play ,it skips to the next
chapter or track. Each press increases the numbers of skips.
2. To skip to the previous chapter or track, press
.
You can play a chapter, a track, a title, a file or the entire disc
repeatedly.
1. During playback, repeatedly press REPEAT to choose a
Repeat option. Depending on the type of disc, the Repeat
options may be different.
2. To cancel repeat playback, repeatedly press REPEAT until
no message appears at the upper left corner of the display.
Fast Forward and Reverse
Mark (Bookmark)
1. During playback, to fast forward, press and hold
(on the
player) to increase the fast forward speed 2x, then repeatedly
press
to increase to 4x, 8x, 16x, 32x.You can also simply
repeatedly press
on the remote control to increase the
fast forward speed.
2. During playback, to fast reverse, press and hold
(on the
player) to increase the fast reverse speed 2x ,then repeatedly
press
to increase to 4x, 8x, 16x, 32x. You can also simply
repeatedly press
on the remote control to increase the
fast reverse speed.
3. To resume normal playback, press
.
Slow Motion
1. During playback, repeatedly press SLOW to play at 1/2, 1/4,
1/8, 1/16 speeds.
2. To resume normal playback, press
.
You can only perform slow motion play in forward playback.
~ 14 ~
The Mark function lets you "bookmark" points on the disc for
playback at a later time. You can store up to 12 bookmark
locations.
Follow these steps to set up marker playback:
1. During playback, press MARK on the remote control.
2. Use
and
to select a bookmark location.
3. When you reach the scene you want to mark, press
to
confirm.
4. Repeat the above procedure for a new scene. You can have
up to 12 bookmarks.
You can perform marker playback at any time by pressing
MARK, and using
to select one of the bookmarks, then
pressing
to start playing the bookmarked scene. The
playback continues until the end of the disc. Repeat the above
to play the other marked scenes.
Playing a Disc
GOTO
Displaying disc's MENU
You can go directly to a desired chapter and play, or play at a
desired point of time. Follow these steps:
(A)To play a specific chapter
1. Press GOTO, use
to select title (TT) and chapter (CH)
and enter the desired number.
2. Press ENTER to confirm and start play.
During DVD playback, press MENU/PBC to return to the disc's
Start Menu. If the disc does not have the Start Menu, or discs
that refuse MENU function,
appears.
For VCD playback, press MENU/PBC to turn on/off PBC
(Playback Control). If PBC is enabled, a menu of scene's
thumbnails will appear, you can make selection for playback.
(B)To play from a specific point of time.
1. Press GOTO twice to move to the time display and it
changes 0:00:00.
2. Fill in the time (hour: minute: second).
3. Press ENTER to confirm and start play.
Displaying the OSD Setup Menu
1. On the remote control: press SETUP at any time to enter
Setup menu.
2. On the Player: remove USB flash drive and disc from the
Player, then press SETUP to enter Setup menu.
ZOOM
LANGUAGE
ZOOM lets you enlarge the video image during playback and
pan through the enlarged image.
1. Press ZOOM repeatedly during video playback to enlarge
the image to x 2, x3 ,x 4,x1/2, x1/3, x1/4 times of the normal
size.
2. Press ZOOM repeatedly while displaying JPEG file and
Picture CD disc to zoom in the picture at 150% or 200% and
zoom out the picture at 25% or 50%.
Use direction keys (
and
) to move around (pan and
scan) the enlarged video or picture.
Repeatedly press LANGUAGE during DVD playback to change
the language of the voice if the disc has multiple languages.
This function is only valid for DVDs.
Subtitle
Repeatedly press SUBTITLE during DVD playback to change
the subtitle's language If the disc has multiple subtitle's
languages.This function is only valid for DVDs.
Mute
Press MUTE to silence the audio, press MUTE again to restore it.
~ 15 ~
Playing a Disc
Angle
Repeatedly press ANGLE during DVD playback to change the
camera angle if the disc has different camera angles.
This function is only valid for DVDs.
TITLE
Press TITLE, it takes you to the very beginning of the title and
play, or to the MENU if it has a title menu.
DISPLAY
Repeatedly press DISPLAY during playback to display various
playback information such as current title, chapter, track
elapsed time, languages etc.
L/R
This function is mostly used for karaoke (sing along) discs, by
repeatedly pressing L/R, you can select STEREO, MONO
(Left), MONO (Right), MIX MONO etc.
P/N
Repeatedly press P/N to change the screen to NTSC, PAL
and Multi system.
The LCD screen does not have NTSC or PAL, so if you watch
video on the Player's screen, it is recommended to set to
NTSC which will give a better video quality. The player will
play both PAL or NTSC DVD's titles even when the Player is
set to NTSC.
~ 16 ~
Playing MP3 and Regular Audio CD
Valid MP3 CD
Your MP3 files should be ISO 9660 or JOLIET format.
Play
In most cases, when a MP3 or audio disc is placed into the
player, the first song file of the first folder plays.
In other cases, the file manager appears. Use direction keys
(
and
) to select the song file and press
to play.
~ 17 ~
Playing Picture CD
Valid Picture
Rotate
The player can play both a Kodak Picture CD that you order
from photo processing store, and a home-made CD by burning
JPEG files onto a CD-R or CD-RW disc.
The picture can be rotated and flipped.
1. During playback, use the direction keys (
and
) to
rotate; clockwise 90 degrees, 90 degrees counter clockwise,
flip vertically and horizontally respectively.
Play
O
Rotate Right 90
In most cases, after the disc is placed into the player, the first
file will be shown.
In other cases, the file manager appears. Use direction keys
(
and
) to select the picture and press
on the
Player or
on the remote control to start the slide show
( plays photos automatically).
To return to file list, press MENU/PBC. To return to directory,
press TITLE.
To display thumbnail, press " " during playback of images.
To start slide show, press " " during playback of images.
Original
Flip Vertically
Rotate right 90 degrees
Flip Horizontally
Zoom
Flip vertically
Press ZOOM.
Repeatedly press
or
Use direction keys (
the enlarged image.
to shrink or enlarge the image.
)to move around (pan and scan)
Next/Previous
You can manually skip to the next picture by pressing
to skip to the previous picture by pressing
.
, and
~ 18 ~
Flip horizontally
Changing Settings
You can make changes on the Player's settings such as OSD language, audio/video output etc, follow these steps:
1. Press SETUP on the remote control, a list of setup pages appears on top of the screen.
-- General Setup Page -TV Display
Angle Mark
OSD Lang
Captions
Screen Saver
Last Memory
LB
On
ENG
Off
On
On
Normal/ PS
Wide
Normal/LB
Wide Squeeze
Set TV Display Mode
2.
3.
4.
5.
Use
and
to select the Setup Page, press ENTER to confirm.
Use
and
to move to the Item you want to make changes, press ENTER to confirm.
Use
and
to select your desired settings, press ENTER to confirm.
To get out of the current page, press .
The setup includes:
General Setup Page
TV Display
Set screen display aspect ratio
Angle Mark
Set camera angle mark on/off
OSD
Set OSD (On Screen Display) language
Captions
Set Captions on/off
Screen Saver
Set screen saver on/off
Last Memory
With "Last Memory" turned on, the Player will resume to play from the place where the Player was
interrupted by opening the compartment door.(See Resume function)
~ 19 ~
Changing Settings
Video Setup Page
Panel Quality
Set the panel's Sharpness, Brightness, Contrast, Hue and Color Sautration
Panel Inverse
Turn the image 180 degree
Preference Page (This setup only available when the Player is not in playback mode)
TV Type
PBC
Subtitle
Disc Menu
Parental
Country Region
Default
Set TV system (PAL, AUTO, NTSC) that you will connect the Player to
Set PBC (Playback Control) on/off . PBC is only valid for VCD
Set the language of subtitle
Set the language of disc menu
Set parental control of the allowed disc content
Set country Region Code
Reset all the settings to the factory default setting
Password Setup Page
Password Mode Set the Password on/off
Password
Change the Password (136900 if this is the first use)
~ 20 ~
Aanpassen LCD Scherm
Op het LCD Scherm
Volg deze stappen om de LCD kwaliteit tijdens het afspelen of
tijdens pauze aan te passen.
1. Druk herhaaldelijk op MODE in het scherm paneel om de
parameters in het menu te selecteren. U kunt HELDERHEID,
CONTRAST, SCHERPTE, KLEUR en TINT veranderen.
2. Druk herhaaldelijk (of houd het ingedrukt) op OMHOOG en
OMLAAG om de instelling van de geselecteerde parameters
te veranderen.
3. Om de instelling terug te zetten naar zijn standaard
waarden, selecteer dan RESET door herhaaldelijk op MODE
te drukken en daarna OMHOOG of OMLAAG te drukken ter
bevestiging.
MODE
DOWN
16:9/4:3
REVERSE
REVERSE
16:9/4:3
DOWN
UP
UP
MODE
OMLAAG
OMHOOG
OMGEKEERD
Verander het beeld
~ 21 ~
Troubleshooting
Als uw DVD speler niet naar behoren lijkt te functioneren, controleer dan de onderstaande items voordat u contact opneemt met een
geauthoriseerde service center.
Symptoom
Check
Stroom kan niet aangezet
worden of wordt plotseling
uitgeschakeld.
Zorg ervoor dat de AC-adaptor stevig is aangesloten op een stopcontact.
Schakel de stroom uit en dan weer in.
Afstandsbediening werkt niet
Controleer of de batterij juist is geplaatst met de "+"en "-" kanten in de juiste richting.
De battterijen kunnen leeg zijn. Vervang ze met nieuwe batterijen.
Controleer of de signaaloverdracht gericht is op de afstandsbediening sensor op de
DVD-Speler.
Disk speelt niet af
Controleer of de disk een DVD, DVD-RW, VIDEO CD, of AUDIO CD is.
Gebruik geen disk met krassen of vuil.
Controleer of de etiketzijde naar boven gericht is
De pick-up lens van de DVD-speler kan vuil zijn. Contacteer het service center voor het
schoonmaken van de lens.
Geen beeld
Controleer of de LCD aan/uit knop kapot is, en niet vrij kan bewegen wanneer het
bovenste klepje open is.
Geen geluid
Controleer de instelling van het volume. Als het op nul staat, verhoog dan het volume niveau.
Controleer of de hoofdtelefoon is aangesloten op de Hoofdtelefoon aansluiting.
De luidsprekers kunnen niet gebruikt worden tegelijkertijd met de hoofdtelefoon..
No video or sound output from
LCD Screen
Controleer of de Speler en de schermen stroom hebben (LED indicators staan aan).
Controleer of de DC/AV kabel goed is verbonden.
Warranty:
If you have questions regarding the warranty, the length of warranty and the working method of it, you can find the information on our
site www.lenco.eu or you can directly contact the place where you purchased your product.
~ 22 ~
Specifications
General
Power Adaptor Requirements
Input AC 100V~240V, 50/60 Hz, Output DC 12V
Power Consumption
> 15W
Weight
DVD Player
(9”) 950g
(8.5”) 872g
LCD Screen
(9”) 644g
(8.5”) 558g
DVD Player
244mm(W) x 194mm(D) x 50mm(H)
LCD Screen
244mm(W) x 194mm(D) x 37mm(H)
Dimensions
Operating Temperature Range
+10 O C~ +40 O C
Readable
Disc
DVD, DVD-R, DVD+R, DVD-RW, DVD+RW, VCD, DVCD, Mp3,JPEG,PICTURE CD,
CD, CD-G, HDCD, CD-R, CD-RW, MPEG4.
Readable
USB
DSC, Camcorder, U-drive, MP3 player, and other USB storage devices
The specifications are subject to change without notice.
Weight and dimensions are approximate.
Due to continued product improvements, if there is any discrepancy in this user manual, the actual unit prevails.
~ 23 ~
If at any time in the future you should need to dispose of this product please note that:
Waste electrical products should not be disposed of with household waste. Please
recycle where facilities exist. Check with your Local Authority or retailer for recycling
advice. (Waste Electrical and Electronic Equipment Directive)
For information and support, www.lenco.eu