Transcript
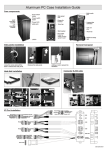
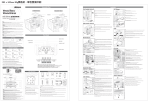
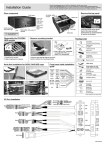
Elite 341
2. Installation Guide
1. Product Overview
Elite 341
Installation Guide
2.2 How to install the motherboard
Note: The sequence of installation may be different, depending on the type of
case and devices used.
1.1 Specifications
Available Color
Black
Dimension
L400 x W185 x H365mm
Weight
Net Weight : 3.9kg; Gross Weight : 4.8kg
Material
SECC
M/B
Micro-ATX
5.25” Drive Bay
2 (Exposed)
3.5” Drive Bay
2 (Exposed); 2 (Hidden)
1 Make sure the holes on the Motherboard and chassis line up properly
before securing the screws.
2.1 How to remove the side panel and install the power supply
1 Remove the 4 screws and pull the side panel backward.
Expansion Slot
4
Cooling System
Rear 120mm fan x 1
Front 120mm fan x 1 (optional); Left 120mm fan x 2 (optional)
I/O Panel
USB 2.0 x 2, MIC x 1, SPK x 1, IEEE 1394a x 1 (optional), eSATA x 1 (optional)
Power Supply
Standard ATX PS2 (optional)
1.2 Fittings Pack
Figure
Parts Name
Q’ty
#6-32 screw
18
Used for
M/B tray,power supply
M3 screw
10
CD-ROM,FDD,3.5’’ Bracket
HDD-screw
16
installing 3.5" device
1.3 Diagram
2.3 How to install add-on cards
A
B
C
D
E
F
2 Place the PSU in the location as shown below.If the PSU has a single fan,
please make sure the fan faces downwards.
HEADSET
MIC
USB 2.0
RESET
RESET LED
POWER
POWER LED
LEFT-VIEW
2008
-01-
-02-
2.4 How to install the 3.5” and 5.25” devices
-03-
3. Front Connector Installation Guide
2.5 How to install or replace case fans
1 Remove the front panel.
Install/replace rear / front / left fans
A. Rear fan x 1 : Supports 80/90/120mm fans
B. Front fan x 1 : Supports 80/90/120mm fans (optional)
C. Left fan x 2 : Supports 80/90/120mm fans (optional)
M5
Case Connector
Top
A
Red-MIC
Yellow-MIC-BIAS
Brown/brown-FPOUT-R
Green/Green-FPOUT-L
Black-GND
Brown-RET-R
Green/Green-RET-L
2 How to install 5.25” and 3.5" devices.
B
A
C
B
Red/Red-PORT1L
Yellow/Yellow-PORT1R
Brown/Brown-PORT2R
Blue-SENSE_SEND
Green/Green-PORT2L
Black/Black-AUD GND
purple-PRESENCE#
White-SENSE1_RETURN
Orange-SENSE2_RETURN
D
A
E
F
D
HD
-04-
-05-
-06-