1
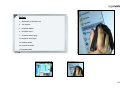
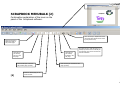
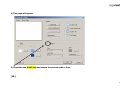
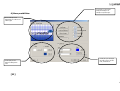
Quick user guide e-Board Interactive
INTRODUCTION:
HOW DOES IT WORK?
The e-Board Interactive is a white board with a mat, enamel
steel surface. This matte surface has the important
advantage of not reflecting a ‘Hotspot’ when projecting on
the board with a beamer. The board has a scratch resistant
enamel projection surface
•
•
•
One sensor is integrated in the board which captures the
ultrasonic signals of the included stylus pen. With this pen
your board can function as a computer. That is the
functionality basis.
Besides there is a software included to make a virtual
school/whiteboard. This way you can make notes on the
board like your used to with a classic school board. You can
even save and spread out these notes. Meanwhile you can
project images on your virtual school board during lessons
to visualize the topic.
This software also has the possibility to control PowerPoint
presentations directly (underline, highlight, include texts and
symbols, draw, emphasize etc., etc).
All software your mouse can control, can also be controlled
by the stylus pen. The pen actually replaces the computer
mouse.
•
•
•
•
•
THE ADVANTAGES
Control your laptop/pc on the board.
Optimal use of the possibilities on your
laptop/pc on large screens in the
classroom (possible to work in all kind
of programs)
Inexhaustible source for educational
material through the Internet :
websites, software, film clips, music,
images, presentations etc
Save and spread out your lessons
(share them with colleagues, publish
on the Internet, print out etc)
Easily exchange educational material
and documentations among each
other.
Simply move objects on the screen.
Dynamic and interactive lessons
whereby the motivation and attention
of your students increase.
Simple visualisation of educational
material.
Index:
1. Explanation of the Stylus pen
2. Tool palettes
3. Scrapbook palette
4. Scrapbook menu
7. Scrapbook Master page
13. Scrapbook save pages
15. Desktop palette
16. PowerPoint palette
17. Notepad palette
e-Beam interactive Styluspen
Twist off cap: twist this cap off to
exchange the batteries (penlight AA)
Small button: use this button to let
the tool palette appear or disappear .
[1]
Pen point: can be used as a left mouse click
Large button: can be used as a right mouse click
e-Beam interactive Tool Palette
The interactive palette knows
4 different lay-outs.
These differ per program you
wish to use.
The different lay-outs appear
automatically.
[2]
NOTEPAD PALETTE
This palette appears on
screen when you want to
make notes about your
desktop or other Windows
program (Word, Excel,
Internet etc.)
1) SCRAPBOOK PALETTE
This palette appears on the
screen when you start up the
Scrapbook program (virtual
white/school board).
2) DESKTOP PALETTE
This palette appears on the
screen when your mouse stands
on your computers desktop.
3) POWERPOINT PALETTE
This palette appears on the
screen when you start up
PowerPoint.
1) SCRAPBOOK PALETTE
•
This palette appears on the screen when you start up
the Scrapbook program (virtual white/school board).
•
•
•
•
•
Highlight.
Click this icon with the stylus pen and the written
texts will be highlighted.
In the middle (left) of the palette you can click on a
color. A ring of colors will surround the palette.
Choose the color in which you want to highlight by
clicking with the pen point.
In the middle (right) of the palette you can click on
the line and a palette with different thickness of lines
appears. Choose a line by clicking with the pen point.
Write.
Click this icon with the stylus pen and you can write with
the stylus pen.
In the middle (left) of the palette you can click on a color.
A ring of colors will surround the palette. Choose the color
in which you want to write by clicking with the pen point.
In the middle (right) of the palette you can click on the line
and a palette with different thickness of lines appears.
Choose a line by clicking with the pen point
•
•
•
•
Magnifying glass.
Click this icon with the stylus pen to zoom in
or out in your scrapbook.
A ring will surround the palette with zoom
possibilities: enlarge from 1 to 500% or click
the – or + sign with the pen.
•
•
V
•
•
Snapshot (foto of the screen).
Click this icon with the stylus pen (outside your
scrapbook) to make a print screen.
Two possibilities: 1) a “photo” of the whole screen
at that moment or 2) a “photo” of a part of the
screen (when choosing this option frame the part
of the screen you want to capture). After both
options, the print screen will be loaded in your
srapbook as an image. This image can be enlarged,
moved, shrunk, rotated etc. (Handy for example
when using pictures from the Internet.)
•
•
•
•
[3]
Middle.
Each icon that you click, new icons
will appear in the middle of the
palette, which can be used to adapt
the properties of this function. (For
example: color, line thickness, letter
type, etc.)
•
Participation function.
When you share the scrapbook
session via Internet, through this
function the other party can
participate in the same session.
Text frame.
Click this icon with the stylus pen and then
click on any position in your scrapbook.
A text frame appears. Type the desired text
with your computer or click on the keyboard
icon (on the lower right) to let an onscreen
keyboard appear. This can be used with the
stylus pen.
Click on the middle of the palette for font,
letter size, color, underline, bold, etc.
changes.
ERASER function.
Click this icon with the stylus pen to use the eraser.
Click on the middle of the palette to change the line
thickness. (a ring will surround the palette with
different eraser sizes) This eraser is meant for the small
corrections in your handwritten text of drawing.
MOUSE function.
Click this icon with the stylus pen for a Mouse function on
the stylus pen.
With the Mouse function you can click icons to for example
draw a frame around handwritten text or drawing. This
drawed frame can be enlarged, moved, shrunk or rotated
This function can also be used in combination with the
second cross in the upper panel,
to erase an object at once.
SCRAPBOOK PANEL (1)
Explanation of the icons on the panel of the
Scrapbook software. Scrapbook is a multi functional
software program. It replaces your classic white board,
school board, flipchart.
Click with the pen to delete the present
page. (for safety the software asks
confirmation.)
Click with the pen to view
the present page.
Click with the pen just to see all
pages. (overview) Double click on a
page to view this completely.
Click with the pen to view the present
page on the right and the other pages
appear smaller on the left. (these are
standby) Click once on a page left and
this will appear enlarged on the right.
[4]
Click with the pen to duplicate the
selected pages (copy)
Click with the pen to create a new page.
Previous pages are always saved (standby)
so it is easy to switch between different
pages.
Click with the pen to create a Full Screen. The panel will appear
“floating” on the screen. This can be moved by clicking on the upper
blue panel line and can be dragged to any position.
If only the tool palette is desired then close the panel by simply
clicking the x (upper right). To make the panel reappear, just press
the large button on the stylus pen. The panel will appear and choose
for option “Full screen off”.
SCRAPBOOK MENUBALK (2)
Continuation explanation of the icons on the
panel of the Scrapbook software.
Click with the pen: Repeats last action
(can bring back undone actions made
by the previous icon).
Click with the pen to
delete the notes on
the present page.
Click with the
pen: directly
returns to the
first page.
Click with the
pen: directly
forwards to the
last page.
Click with the pen: returns to
the previous page. (browse)
[5]
Shows on which page you are
at the moment.
Click with the pen: Undo last action. For
example you drew a line but actually do
not want this. Click on this icon and the
line will be deleted.
Click with the pen: forwards to next
page. (browse)
SCRAPBOOK MENUBALK (3)
Continuation explanation of the icons on the
panel of the Scrapbook software.
Click with the pen: Deletes the
text/drawing selected at that
moment.
Icon meant for sharing scrapbook sessions
through Internet. (For extensive info see
help file in the scrapbook software)
Click with the pen:
Mover the panel from upper
to lower part of the screen.
Click with the pen:
Opens the images database.
From this database images can be imported to the present page. There
are 2 possibilities:
1) Import as background. Image will be used as fixed
background and image itself can not be adapted. Of
course there can be written and drawn over the
image.
[6]
2) Import as ‘loose’ image. (there will be a frame
around the image) By clicking on the framed image
it can be enlarged, moved, shrunk or rotated.
Click with the pen: let the (roller)
blinds appear. Hany if you want to
show your notes at the moment
supreme. Pull the blinds down by
moving the pen up and down.
Different adjustments possible (shape,
transparent etc.)
Click with the pen: Let the spotlight
function appear. Your page will only
be visible through a small palette
(spotlight). Slide you pen over the
board to move the spotlight.
Different adjustments possible
(transparent etc.)
SCRAPBOOK MASTER PAGE
A new empty white page appears every time you click this icon
With the Master page function you can make this new
page linear or grid.
1) Click on the upper panel on View and then on Master page
[7]
2) Now you will see the following screen. In here you can adjust your Master page to your desire.
[8]
3) Click in the upper panel option on Page and then choose for Background Settings.
[9]
4) This page will appear.
5) Check the box Grid/Lines and choose the desired grids or lines
[10]
6) More possibilities:
In this part you can import
background images. For
example a corporate logo.
Shows example of the
adjustment you make on the
master page.
In this part you can
adjust the background
color.
[11]
In this part you can adjust
the grids or lines. Like the
color, thickness etc.
7) When the page is ready, click on Close Master Page.
Every time you click on the icon
to open a new page, your selfmade master page with your adjustments will
appear. In here you can make all the notes, drawings, images you desire.
8) Do you wish different Master pages? Easily install different Master pages by clicking the option Page on the
upper panel and choose Background settings. Thereafter the individual pages can be adjusted as desired by
following the same steps as setting the Master page from step 4. Click on OK and only the present page will be
changed.
[12]
SCRAPBOOK SAVING PAGES
The great advantage of the Scrapbook software is ofcourse the possibility to save and store your notes, lessons, meetings, brainstorm sessions,
presentations, trainings, drawings, images, etc.
1) To save your pages click in the upper panel on option File and thereafter option Save As
[13]
2) The following screen will appear.
Beside Save in can be provided in which location in your computer (or network) you wish to save the file.
Beside File name you can name your file. Beside Save as type you can choose in which file format the pages should be saved. The
first option is as Scrapbook File (*.ESB). This option is advised. It is the original file format for Scrapbook. If you save the file in
this format it is possible to adjust/change the file when you open it again later.
Other file formats (PDF, BMP, JPEG, TIFF, METAFILE, POWERPOINT) save your file as an image. You can open this again in format
Scrapbook, but it will not be adjustable anymore. The software has made an imag out of the file. It is possible to make notes on
the images. This option is handy when sending a file to persons without the Scrapbook software.
JPEG for example is a often used standard file format. It is also easy to send in an email or to publish on your website.
[14]
2) DESKTOP Palette
This palette appears on the screen when your mouse
stands on your computers desktop.
•
•
•
•
•
bureaublad) staat..
Calibrate.
Click this icon to calibrate the board surface.
Nine dots will appear which you accurately have to
click to calibrate the board as exact as possible.
If this doesn’t happen accurately the board will be
“out of focus” with as result that the board does not
register the pen point where it actually touches the
board surface.
Write.
Click this icon with the stylus pen and you can write, draw
over your desktop or any Windows of Mac program. It is
like a shield is put over the computer program.
The palette changes in a note pad palette (see 4). When
done click on the icon “save”
this icon appears in the note pad palette (zie4)
•
The page with notes will now be saved as an image in the
scrapbook.
•
•
Onscreen keyboard
Click on this icon and an onscreen
keyboard will appear. Herewith you
can for example type data in WORD or
EXCEL.
Scrapbook.
Click this icon with the stylus pen and the
Scrapbook software will start.
•
•
•
•
•
[15]
Snapshot (foto of the screen).
Click this icon with the stylus pen (outside your
scrapbook) to make a print screen.
Two possibilities: 1) a “photo” of the whole screen
at that moment or 2) a “photo” of a part of the
screen (when choosing this option frame the part
of the screen you want to capture. After both
options, the print screen will be loaded in your
srapbook as an image. This image can be enlarged,
moved, shrunk, rotated etc. (Handy for example
when using pictures from the Internet.)
Middle.
Each icon that you click, new icons
will appear in the middle of the
palette, which can be used to adapt
the properties of this function. (For
example: color, line thickness, letter
type, etc.)
Powerpoint.
Click on this icon and any wished PowerPoint
presentations can be started.
The palette changes in a PowerPoint palette
(see 3)
The folder used last will automatically open.
Tool palette properties.
•
Click this icon and the properties of the palette can be
adjusted (size, transparency, etc.)
•
This panel can also adjust more options.
•
•
MOUSE function.
Click this icon with the stylus pen for a Mouse function on
the stylus pen.
The stylus pen functions like any other computer mouse.
3) POWERPOINT Palette
This palette appears on the screen when you start up
PowerPoint.
By clicking the small button on the stylus pen the palette
will disappear from the screen. Now you can browse
through the presentation simply by clicking the board on
the pen. For the specific interactive tools, click the small
button and the palette will appear again.
•
•
•
Write.
Click this icon with the stylus pen and you can write with
the stylus pen in the PowerPoint presentation.
An option is to write notes in your presentation. Remember
to save the presentation with notes.
An option is also available that when forwarding to the
next page the notes will automatically be erased.
•
•
•
Highlight.
Click this icon with the stylus pen and the written
texts will be highlighted.
In the middle (left) of the palette you can click on a
color. A ring of colors will surround the palette.
Choose the color in which you want to highlight by
clicking with the pen point.
In the middle (right) of the palette you can click on
the line and a palette with different thickness of lines
appears. Choose a line by clicking with the pen point.
•
•
•
Å Back.
Click this icon to go back to the previous
PowerPoint page.
•
[16]
•
Stop PowerPoint.
This icon stops the showing presentation and then
shows the edit lay-out of PowerPoint. Herein you
can for example edit the presentation.
Middle.
Each icon that you click, new icons
will appear in the middle of the
palette, which can be used to adapt
the properties of this function. (For
example: color, line thickness, letter
type, etc.)
•
•
•
Symbol function
Click this icon and some symbols will
appear in the middle of the palette. The
symbols can be used to accentuate your
presentation.
Like the writing and highlighting function
the symbols can be edited in shape and
color. (middle palette)
Forward Æ
Click this icon to go to the next PowerPoint
page.
ERASER function.
Click this icon and your notes can be erased by simply
“wiping”.
MOUSE function.
Click this icon with the stylus pen for a Mouse function on
the stylus pen.
The stylus pen functions like any other computer mouse.
4) NOTEPAD PALETTE
This palette appears on screen when you want to make
notes about your desktop or other Windows program
(Word, Excel, Internet etc.)
•
•
•
Write.
Click this icon with the stylus pen and you can write with
the stylus pen.
In the middle (left) of the palette you can click on a color.
A ring of colors will surround the palette. Choose the color
in which you want to write by clicking with the pen point.
In the middle (right) of the palette you can click on the line
and a palette with different thickness of lines appears.
Choose a line by clicking with the pen point
•
•
•
Highlight.
Click this icon with the stylus pen and the written
texts will be highlighted.
In the middle (left) of the palette you can click on a
color. A ring of colors will surround the palette.
Choose the color in which you want to highlight by
clicking with the pen point.
In the middle (right) of the palette you can click on
the line and a palette with different thickness of lines
appears. Choose a line by clicking with the pen point.
•
•
Symbol function
Click this icon and some symbols will
appear in the middle of the palette. The
symbols can be used to accentuate your
presentation.
Like the writing and highlighting function
the symbols can be edited in shape and
color. (middle palette)
Undo.
Click with the pen: Undo last action. For example you
drew a line but actually do not want this. Click on this
icon and the line will be deleted.
Repeat.
Click with the pen: Repeats last action (can bring back
undone actions made by the previous icon).
Save.
Click this button to save the notes to the
scrapbook.
•
•
Middle.
Each icon that you click, new icons
will appear in the middle of the
palette, which can be used to adapt
the properties of this function. (For
example: color, line thickness, letter
type, etc.)
[17]
•
•
ERASER function.
Click this icon with the stylus pen to use the eraser.
Click on the middle of the palette to change the line
thickness. (a ring will surround the palette with
different eraser sizes) This eraser is meant for the small
corrections in your handwritten text of drawing.
MOUSE function.
Click this icon with the stylus pen for a Mouse function on
the stylus pen.
The stylus pen functions like any other computer mouse.