1
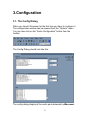
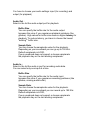
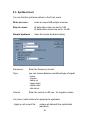
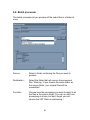
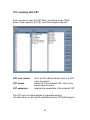
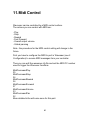
WAVOSAUR
User Manual
Audio Editor with VST support
http://www.wavosaur.com
1
Contents
1. General Informations....................................4
2. Installation.....................................................5
3. Configuration.................................................6
3.1 The Config Dialog................................6
3.2 The wavosaur.cfg file..........................9
4. Files................................................................11
5. Playing and Recording audio.......................14
5.1. Playing Audio files.............................14
5.2. Monitoring & Recording Audio.........15
6. Basic Editing.................................................17
6.1. Audio Data Selection.........................17
6.2. Zoom...................................................18
6.3. Audio Data Edition.............................21
7. Advanced Editing..........................................22
7.1. Loop....................................................22
7.2. Markers...............................................23
7.3. Grid Line on Selection.......................25
8. Process Menu : Processing Audio..............26
9. Tools..............................................................33
9.1. Oscilloscope Tools............................37
9.1.1 Real time Sample Osc.............38
9.1.2. Real time Spectrum Osc........39
9.1.3. Real time Pan View.................40
9.2. Analysis Tools....................................41
9.2.1. Statistics..................................42
9.2.2. 2D Spectrum Analysis............43
9.2.3. 3D Spectrum Analysis............50
9.2.4. Sonogram................................53
9.3. Synthesis Tool....................................54
2
9.4. Batch Processor................................56
12. VST Rack.....................................................57
12.1. Introduction......................................57
12.2. Working with VST............................58
13. MIDI Controls..............................................60
14. Support........................................................61
3
1.General Informations
Presentation:
Wavosaur is an Audio Editor for Windows XP, it supports VST plugins
effects and chaining of VST effects.
Wavosaur provides all the standard editing fonctions : cut, copy,
paste, trim/crop, reverse, mute, zoom, etc. and an unlimited set of
effects via the support of VST plugins.
Wavosaur have advanced fonctions like loop handling and markers.
You have also powerful tools for analysis (3D spectrum, sonogram).
You can also record audio data from your soundcard input.
Minimum Required:
- PC running windows XP/98 , 1GHz CPU, 512 Mb RAM
- A soundcard compatible with Windows
Current Status:
Currently the application is in beta stage, and you can freely
download the lastest beta releases for testing :
http://www.wavosaur.com
4
2. Installation
Wavosaur has no fancy installer, it comes as a simple executable
stored in a .zip archive.
To install it you just have to uncompress the .zip archive and drop the
Wavosaur executable anywhere you want.
It's recommended to create a "Wavosaur" folder and copy the
executable in it.
Wavosaur create a config file (wavosaur.cfg), all the configuration
informations are stored in this file.
Wavosaur create also a ini file (wavosaur.ini) for storing other
informations like "last opened files".
A wavosaur.log file is created as a bebug tool, it won't exist in future
releases.
Wavosaur does not write any informations in the registry (for version
>= 1.0.0.3963)
Wavosaur come as a simple and light file (<1 Mo) and is quickly
configurable so you can set it and use it very fast, and transport it on
a USB key drive for example.
5
3.Configuration
3.1. The Config Dialog
When you launch Wavosaur for the first time you have to configure it.
The configuration window can be opened from the "Options" menu.
You can also click on the "Audio Configuration" button from the
toolbar:
The Config Dialog should look like this :
The config dialog display all the audio ports detected by Wavosaur.
6
You have to choose your audio settings: input (for recording) and
output (for playback)
Audio Out :
Select in the list the audio output port for playback.
Buffer Size:
You can specify the buffer size for the audio output.
Increase this value if you experience playback problems (like
glitches). High values for buffer size means a higher latency for
playback. To reduce latency, you have to choose the lowest
"working"" buffer size.
Sample Rate:
You can choose the samplerate value for the playback.
Depending on your soundcard you can go up to 192 Khz.
Default samplerate is 44100,
If your soundcard does not support a chosen samplerate
the playback stay on the last working samplerate.
Audio In :
Select in the list the audio in port for recording audio data.
You can select only one input at a time.
Buffer Size:
You can specify the buffer size for the audio input.
Increase this value if you experience recording problems (like
glitches, missing audio buffer).
Sample Rate:
You can choose the samplerate value for the playback.
Depending on your soundcard you can record up to 192 Khz.
Default samplerate is 44100,
If your soundcard does not support a chosen samplerate
the playback stay on the last working samplerate.
7
Midi In :
You can choose a midi in port for incoming midi messages.
Multiple MIDI inputs can be selected.
This will be useful for the VST Host, and also for controlling
Wavosaur if you have a MIDI control surface. (see 11.MIDI Controls
for Wavosaur).
By default, there is no MIDI input is selected.
8
3.2. The wavosaur.cfg file
The configuration information from the config dialog are stored in the
wavosaur.cfg file. Wavosaur reads these config informations at
startup.
Other informations are also stored in the wavosaur.cfg files that
cannot be accessed (for the moment) within the config dialog.
You can edit manually the .cfg file to set many useful purposes.
Open the wavosaur.cfg file with a text editor (ie "notepad" in
Windows), you can find and edit the following informations:
VSTPathOpen:
The path where Wavosaur looks into when you open a VST plugin
from the VST rack, the default VST path is c:\
9
SamplePathOpen:
The path where Wavosaur looks into when you open an audio file.
The default sample path is c:\
SelectionGridLineNumber:
The number of line drawed on selection when "selection grid lines"
from the "Option" menu is selected (see 7.2.3)
AudioOutBitDepth & AudioInBitDepth
8 or 16 bits (default is 16 bits, 24 bits is not yet available) If your
soundcard supports it.
MidiCommand:
There are 6 editable MIDI command , you can choose a MIDI cc
number for controlling Wavosaur with MIDI (see 13)
You can MIDI control : play, stop,rewind, fast forward, volume and
global pan.
10
4.Files
Wavosaur can open .wav files, mono, stereo, of any bit depth and any
rate. Wavosaur can also open .aif and .iff files and import mp3 audio
files (see "Open").
File operations are in the "Files" menu of Wavosaur,
New:
Close the current file and create a new blank file.
Channel :
Enter the channel number in the edit, 1 for MONO,
2 for STEREO.
Frequency :
Enter the samplerate in this edit (it won't affect the
playback samplerate)
Lenght :
Enter the length in seconds of the file to be created
in this edit.
Bits per sample : Select the bit depth of the file to be created.
11
Open:
Open a .wav/.iff/.aif/mp3 file, and displays its
waveform the main editor view.
By default the file dialog shows all the .wav files,
you can choose to display all file for a given type by
choosing the extension in the drop down menu of
the file dialog window.
Wavosaur displays the opening/importing time in
the statusbar.
Save:
Save the current file to disk in .wav format.
Save As:
Save the current data with a new name.
Save selection As: save the current selection as .wav.
Print:
You can print the waveform (use print setup and
print preview before).
Print Preview:
Display the waveform to be printed.
Exit:
Close the current file and quit the program.
You can also use drag and drop to open a file (drop it into the display
area). The file menu also displays a list with the last opened files
(fixed to 4).
12
Import:
Let you import binary raw data or formated
text file.
Click "browse" to choose the file to import
Frequency :
choose the sample rate used in your file from the
Frequency textfield by entering a number in the edit
box.
Sign:
click the radio button that corresponds to the
sample format of data storage.
Byte Order :
click the Little endian or Big endian radio button to
specify the order in which the high and low bytes of
a 16-bit sample are stored.
Bits per sample : click on the format the data are stored: 8 16 24 or
32 bits PCM or 32 bits IEEE Float
Channels :
enter the channel number in the edit (1 for MONO,
2 for STEREO)
13
5. Playing and Recording Audio
5.1. Playing Audio
Now that you have loaded a sample into Wavosaur you have three
ways to play it : play from start, play normal, play loop. A cursor
(playbar) is always displayed, showing the part of the file that is
played.
The playing functions are grouped in the Transport Bar:
Record:
Play from start:
Play:
Pause:
Stop:
Go to start:
Fast rewind:
Fast forward:
Go to end:
Loop on/off:
Record audio data (see 5.2).
Play once the entire wav from start.
Play the audio at cursor position.
Stop the audio and set the cursor position.
Stop the audio.
Set the cursor at start of the file.
Rewind the playbar.
Move the playbar faster.
Set the cursor at end of the file.
When off, the playing is looped (infinite).
When a selection (see 6.1) is active, the play starts at "selection start"
and stops at "selection end", and the loop is effective on the
selection.
You can also play (normal) by pressing the spacebar on your
keyboard.
14
5.2. Monitoring and Recording Audio
You can record audio data into Wavosaur, first make sure you have
configured your audio in port (see 3.1).
Monitoring:
To monitor your input, go in the "Tools" menu and choose "Input
Oscilloscope", you can also press the "o" key.
Then a window will show up, displaying the current "audio in" signal
You can resize the oscilloscope window.
15
Recording:
note: The recording procedure may change in future releases
To record press the "record" button to start, then repress the record
button to stop.
The recorded data is appended to the end of the current file, a marker
(see 7.2 ) is inserted to show the beginning of the record.
Note: for the moment, recording is always stereo, if you record data
after a mono sample, it will be converted to stereo
16
6.Basic Editing
Wavosaur offers all the basic fonctions for editing your audio files.
These fonctions can be acceded via the "Edit" menu, the toolbar, and
keys shortcuts.
6.1. Data Selection
You can select a data clip with the mouse, and then perform
operations on this data clip (like cut, paste, mute etc...).
Set the cursor position.
Left click on the waveform:
Left click and drag (Shift+arrow):
Set the selection.
Double click (CTRL+A):
Select all the waveform (*)
Rigth click and drag:
Move the waveform view
Move the cursor.
Left & Right Arrow Keys:
(*) this behaviour changes if loop points or markers are presents (see
7.1).
17
6.2. Zoom
With the mouse or the keyboard you can zoom into the waveform,
zoom in time or zoom in amplitude:
MouseWheel (up/down arrow keys):
CTRL+MouseWheel:
Zoom in/out the waveform.
Zoom in/out the amplitude.
There's also a zoom toolbar with five buttons:
Zoom in time
Zoom out time
Zoom on selection
Zoom in amplitude
Zoom out amplitude
You can also select these operations from the "View" menu.
The zoom ratio (for time zoom) is displayed in the right corner of the
status bar:
18
Wavosaur can zoom "higher" than a 1:1 ratio for a more accurate
editing, you can see dots representing the sample values.
19
Wavosaur can zoom in amplitude. (CTRL+MouseWheel)
You can read the amplitude value in dB on the dB bar found on the
left of the waveform.
Very low noise can be easily observed with this amplitude zoom
20
6.3. Data Edition
The standard editing features are in the "Edit" menu, they all have
their keyboard shortcuts and/or toolbar button:
A tooltip text shows up when you move the mouse over the toolbar,
and displays the actions of the button.
The basic (and most often used) fonctions are :
Delete (Suppr):
Cut (CTRL+X):
Copy (CTRL+C):
Paste (CTRL+V) :
Paste mix:
Trim/Crop (CTRL+T):
Undo (CTRL+Z):
Delete the selected part.
Cut the selected part of the file (copied
to clipboard).
Copy the selected part of the file into the
clipboard.
Paste the content of the clipboard at
cursor position.
Paste and mix the clipboard with the
selection.
Trim the selected part of the file.
Undo the precedent action
When you cut or copy an audio clip, this audio clip is placed into the
clipboard.
For the moment, the "Undo" fonction is not effective for all actions.
Other actions like mute, fade out, volume etc are possible, (see
chapter 8).
21
7.Advanced Editing
With Wavosaur you can edit and/or create loop points and markers
for your audio files.
7.1. Loops
You can easily create Loop points in Wavosaur:
Set a selection for the sound that you want to be looped, then go to
"Tools" menu, select loop--> create loop points or just press the "L"
key to go faster. Loop points are inserted like this :
"kill loop" from the tools-->loop menu to delete the loop points.
By double clicking between two loop points the selection fit
automatically to the loop.
You can drag the loop points with the mouse unless you have
selected "lock Loop Points" in the menu.
22
7.2. Markers
With the tool menu --> markers, you can create multiple markers, they
are inserted at cursor position. Faster way to create markers is to
press the "M" key.
A number is appended to the marker name.
You can drag the markers with the mouse unless you have selected
"Lock Markers Points" in the menu.
Double cliking between two markers makes a selection.
You can kill a marker by selecting it with the mouse and press the
"suppr" keys simultaneously.
If you cut/delete a selection with a marker within, the marker is
deleted (undo doesn't bring back the marker).
Selecting "kill markers" from the "Tools" menu delete all markers.
Here's a description of the Markers menu:
23
Create marker:
Mark selection:
Kill all markers:
Lock marker points:
Previous marker (²):
Next marker (Tab):
set a marker at cursor.
place markers at selection start and
selection end.
delete all markers (no undo).
lock all markers.
set cursor on the previous marker.
set cursor on the next marker.
A marker toolbar is available for these operations on markers:
Create marker at cursor.
Go to previous marker.
Go to next marker.
Kill all markers.
Mark selection.
24
7.3. Selection grid lines
This option in the "Options" menu display time grid lines on selection.
The number of bar is fixed to 4 in the wavosaur.cfg file (will be
customizable in future release).
This can be useful for quickly creating rythm based loop.
You can edit the cfg file to displays the number of line you want (see
3.2).
25
8.Processing Audio
Many useful functions are available for editing and processing of your
audio files in the "Process" menu.
A toolbar provides a quick access to some of those functions:
Normalize.
Convert to mono.
Convert to stereo.
Mute.
Fade in.
Fade out.
See below for a description of all available features in the process
menu :
26
Reverse:
Reverse the selected part of the audio file.
Invert:
Flip the waveform (+180°).
before
after
Swap Channel:
Swap left and right channels.
Convert to mono:
Convert a stereo file to mono.
50%50%
: the 2 channels are lowered (-6
dB) and mixed.
Left only : mono conversion only keep the
left channel.
Right only : mono conversion only keep the
right channel.
Convert to stereo:
Convert a mono file to stereo.
27
Resample :
Resample the data to a new samplerate.
Sample rate : enter the new samplerate target in this edit
Change only samplerate without processing: it just changes the
samplerate information within the file, and doesn't affect audio data.
Apply filter of interpolation :
If checked, data are interpolated when resampling.
Different levels of interpolations are available :
- Linear interpolation.
- Cosine interpolation.
- Cubic interpolation.
Fade in:
Fade in the volume of the selected part.
Fade out:
Fade out the volume of the selected part.
28
Other Fade :
Here's a selection of pre defined fades you
can apply on your samples
Cubic Fade
Square Fade
29
Sin Fade
Exponential Fade
30
Mute:
Mute the volume of the selected part.
Normalize:
Normalize the audio to the specified value.
Custom is not available yet.
Predefined values for normalize are 0, -0.3, -1
or -6 dB.
Vocal Remover:
Remove the mono (center) material from
stereo files.
Volume:
Change the volume of the selected part of the
audio file:
+ 6 dB : the volume is doubled.
- 6 dB : the volume is divided by two.
custom : you can choose the value (not
implemented yet)
Insert Silence:
Insert silence:
1 second at start of file.
1 second at en of file.
custom (not implemented yet).
31
DC Remover:
Remove the DC offset in the selection if any.
before:
after:
32
9.Tools
Beside the "loops" and "markers" sections you can also find useful
functions in the "Tools" menu.
There's a toolbar with some functions from this menu:
Statistics.
2D spectrum.
3D spectrum.
Auto detect region.
Interpolate.
Show input oscilloscope.
See below for a description of all other available features in the tools
menu :
33
Interpolate:
Interpolate values between two values (the
selection start and the selection end)
Example on how to remove simple "click noise" with the interpolate
function:
Waveform with a "click"
Zoom into the waveform
34
Select the "click"
Choose interpolate in the "Tools" menu.
35
Auto detect region:
Set automatically markers to separate
different parts in the waveform.
You have to set a threshold in time and amplitude to determine how
the markers will be inserted.
Currently it's hardfixed to -60 dB & 1 seconds.
ie if a part of the waveform is les than -60 dB during 1 second or
more, a marker is inserted.
36
9.1. Oscilloscope tools
In the "Tools" menu you have two useful options for monitoring your
input and/or your ouput signal.
"Input Oscilloscope" monitors the audio in signal according to the
audio in port you choose in the configuration dialog.
"Output Oscilloscope" monitors the output signal.
The oscilloscopes let you monitor in real time the level, the spectrum
and the pan distribution of the signal.
You can open as many instances of the oscilloscopes as you want:
37
9.1.1. Real time Sample Oscilloscope
Choose "Sample" in the "Type" menu
You can resize the window, and open multiple instances.
The input/output data is displayed in real time.
The Settings menu displays one option ; "Persistance", when checked
the oscilloscope displaying is not refreshed.
38
9.1.2. Real time Spectrum Oscilloscope
Choose "FFT" in the "Type" menu.
The oscilloscope then displays a real time view of the overall
spectrum of the sound actually played (or monitored from input)
You can resize the window, and open multiple instances.
The input/output data is displayed in real time.
39
9.1.3. Real time Pan View
Choose "Pan" in the "Type" menu.
The oscilloscope then displays a real time view of the pan distribution.
This is represented as"module/phase" :
Centered samples have a 0° angle, full right panned samples are
45°right and full left panned samples are 45° left.
40
9.2. Analysis tools
Wavosaur gives you tools to analyse your audio files, you can display
statistics and different spectrum analysis.
Important informations are also given in the status bar :
The bit depth
The number of channels (MONO or STEREO)
The Sample rate
And the 3 other informations give you
- the time at selection start,
- the time at selection end
- the time at cursor.
In the "Options" menu you can choose the time value to be displayed
in 3 different formats :
- sample,
- seconds,
- time (h:m:s)
Theses tools are differents from the oscilloscope tools as they are not
real time.
41
9.2.1. Statistics
You can find the statistics in the Tools menu. You can also press the
"S" key. You can export the informations into a txt file.
Statistics displays a window with informations for each channels
about the selection :
RMS power.
Average value (DC offset).
Min sample value.
Max sample value.
General informations about the sample are displayed too :
Total sample number
File Name
Channel, Frequency Bits per Sample
Loop & Marker informations
42
9.2.2. 2D Spectrum Analysis
In the Tools menu you have "spectrum analysis", you can also press
the "F" key. It displays a window with a 2D graphic representation of
the frequency spectrum.
The analysis is effective on the selection. It can takes some times to
perform the analysis regardless to the size of the data to analyse.
The Spectrum Analysis represents the sound in the frequency domain
(amplitude vs. frequency).
Data displayed in the spectrum window shows the amplitude of the
fondamental and harmonic frequencies of the sound.
So you can see the spectral distribution of your sound.
The Spectrum Window should look like this:
The frequency representation is linear by default, you can change the
representation with the provided options in the menu.
43
The Spectrum windows provide these options in the menu:
Setup :
Display: you can change the graphic displaying (see below)
Windowing: you can choose different windowing algorithms.
Level : set the floor level for amplitude display(-150 dB by default).
-100 dB is more adapted for 16 bit files
X Log Squale: change the frequency displaying squale, from linear to
logarithmic.
The logarithmic represention is easier to read because it's more
adapted to the human earing.
Spectrum windows with log squale:
Refresh: (re)perform the data analysis on the audio selection.
Memory :
memorize current: memorize the current display
memory on/off: swith on/of the memorized graph
delete memory: delete the memorized graph
44
More on the setup displays options:
The setup menu gives you choice from 3 different display styles :
Rectangle :
45
Filled rectangle :
46
Line :
Use these different displays in combination with the X-log squale and
floor value to obtain the better representation of the spectrum,
depending on the audio material you want to analyse.
The setup menu also gives different windowing styles for the analysis.
You can choose between several windowing algorithms :
- Rectangular
- Bartlett
- Hanning
- Hamming
- Blackmann
- Blackmann-Harris
- Gaussian 2.5
- Gaussian 5.0
- Gaussian 10.0
- Papoulis
You can easily check the difference between these different
windowings by analysing a very simple audio file (sin file)
47
More on the memory function:
When you memorize a spectrogram,it appears with another color
(grey) when you hit the "refresh" button.
So if you select another part of the audio you'll have the new selected
part spectrum represented in red and the memorized spectrum in
grey, like in this picture:
Depending on the audio data you want to analyze, you'll have to
choose different settings for the display. Because the memorized
spectrum can be hidden by the current spectrum, a good option is to
choose "line" from the setup/display menu.
48
You can easily see the two spectrums with the "line display":
49
9.2.3. 3D Spectrum Analysis
In the "Tools" menu you have "3D Spectrum Analysis", you can also
press the "K" key.
It displays a window with a 3D view of the spectrum (of the selection).
Y axis = amplitude
X axis = frequency
Z axis = time
You can rotate the X & Y axis with the arrow keys
You can rotate Z axis with the "w" and "x" keys.
50
Just like the 2D spectrum analysis window, the 3D spectrum analysis
window have its own menu too :
Settings : not implemented yet
Views : You have predefined views
- classic amp/freq
- time/amp
- time/freq
- reset
"classic amp/"freq won't show the z axis
51
"time/amp" won't show the x axis
"reset" switches back to the default 3D view
52
9.2.4. Sonogram
In the Tools menu you have to select "Sonogram", you can also press
the "G" key.
It displays a window with a sonogram view of the spectrum (of the
audio selection).
Currently the sonogram is only effective on MONO samples.
The sonogram is displayed in black and white.
53
9.3. Synthesis tool
You can find the synthesis options in the Tools menu.
Dirac at cursor :
insert a unique 0dB sample at cursor.
Step at cursor :
all data after cursor are set to 0 dB
all data before cursor are set to -inf dB
Simple Synthesis :
Open the simple Synthesis dialog
Frequency :
Enter the frequency in hertz.
Type :
you can choose between predefined type of signal:
- sinus
- square
- ramp up
- ramp down
- white noise
- abs sinus
Volume :
Enter the volume in dB, use - for negative values.
You have 4 radio buttons for applying the synthesis:
- Apply on all current file :
replace all data with the synthetized
waveform.
54
- Apply only on selection :
replace all data in selection with the
synthtized waveform
- Apply at start/end :
insert the synthetized waveform at start
or end of the current datas, you have to
specify the length for the synthetized
waveform
55
9.4. Batch processor
The batch processor let you process all the audio files in a folder at
once.
Source :
Select a folder containing the files you want to
process.
Destination :
Select the folder that will receive the processed
files. Warning : If you choose the same folder as
the source folder, your original files will be
overwritten !
Function :
Choose here the processing you want to apply to all
the files in the source folder. You can run only one
processing at a time, but don't forget you can
choose the VST Rack as processing !
56
10.VST Rack
10.1. Introduction
Wavosaur is also a VST host for VST effects plugins, so you can use
the infinite variety of VST plugins to process your audio.
Wavosaur allow you to listen to your data processed by a chain of
VST effects in real time before you apply the processing.
You can find the VST section under the toolbar:
Rack:
Processing:
Apply:
open the VST Rack view where you can set a chain
of effects.
when checked, the playing is affected by the VST
chain.
apply the VST effect chain on the entire wave
(destructive).
You can undo the action after an apply.
At the moment "apply" is effective on all audio data (not only the
selection).
57
10.2. working with VST
First you have to open the VST Rack, by clicking on the "Rack"
button. When opened, the VST rack should appear like this :
VST rack column:
VST preset:
VST parameter:
list of all VST effects loaded, click on a VST
name to select it.
preset list of the selected VST, click on the
preset name to load it.
displays the parameters of the selected VST.
The VST rack is in alpha stage but is actually working.
Use the buttons on the right to load/kill/view your VST effect plugins.
58
Load VST:
View:
Kill:
Load FXB:
Save FXB:
Load FXP:
Save FXP:
Load Chain:
Save Chain:
Reset Chain:
Load a VST in the selected emplacement.
Open the GUI of the selected VST.
Remove the selected VST.
Load a standard preset bank for the selected VST.
Save a standard preset bank for the selected VST.
Load a single preset.
Save a single preset.
Load a chain of VST (.sor files).
Save the current chain of VST & the actual
parameters.
Remove all VST in the chain.
Behaviour and use of the VST Rack will probably change in next
releases. At the moment it works like that :
- Choose "Load VST" to load a VST into the rack,
- Choose "View" to open the VST plugin interface.
- Choose "kill" to unload the selected VST in the rack.
You have to click on the VST name in the rack to select it.
You can choose to import/export a predefined chain of effects by
choosing the "load chain" and "save chain" button. The place of the
VST effects in the rack and their parameters values are saved in a ".
sor" file.
Rem1 : the VST plugins GUI don't disappear when you close the rack
windows.
Rem2 : at the moment the BPM tempo host is fixed at 120 BPM
Rem3 : don't forget to uncheck "processing" when you want to listen
to your sample unprocessed (specially after an "apply" !)
59
11.Midi Control
Wavosaur can be controlled by a MIDI control surface.
The actions you can control with MIDI are :
- Play
- Stop
- Rewind
- Fast Forward
- Overall output volume.
- Global panning
Note : the procedure for the MIDI control setting will change in the
future.
First you have to configure the MIDI In port in Wavosaur (see 3.
Configuration) to receive MIDI messages from your controller.
Then you can edit the wavosaur.cfg file and set the MIDI CC number
used to trigger the Wavosaur fonctions:
MidiCommandPlay
35
MidiCommandStop
34
MidiCommandRewind
36
MidiCommandForward
37
MidiCommandVolume
33
MidiCommandPan
32
More detailed infos will come soon for this part.
60
12.Support
The official support forum can be found at:
http://wavosaur.com/forum
You can also send a mail to:
[email protected]
2006 The Wavosaur Team
61