1
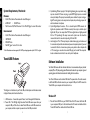
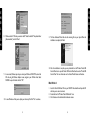
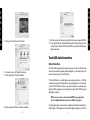
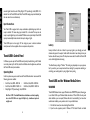
Contents
Introduction . . . . . . . . . . . . . . . . . . . . . . . . . . . . . . . . . . . . . . . . . . . .4
What’s in the Box? . . . . . . . . . . . . . . . . . . . . . . . . . . . . . . . . . . . . . . .4
Transit USB Specifications . . . . . . . . . . . . . . . . . . . . . . . . . . . . . . . . . .4
Transit USB Features . . . . . . . . . . . . . . . . . . . . . . . . . . . . . . . . . . . . . .6
Software Installation . . . . . . . . . . . . . . . . . . . . . . . . . . . . . . . . . . . . . .7
Windows XP . . . . . . . . . . . . . . . . . . . . . . . . . . . . . . . . . . . . . . . .7
Windows 2000 . . . . . . . . . . . . . . . . . . . . . . . . . . . . . . . . . . . . . .10
Windows Me . . . . . . . . . . . . . . . . . . . . . . . . . . . . . . . . . . . . . . .13
Windows 98SE . . . . . . . . . . . . . . . . . . . . . . . . . . . . . . . . . . . . . .16
Mac OS 9.2.2 . . . . . . . . . . . . . . . . . . . . . . . . . . . . . . . . . . . . . . .20
Mac OS X . . . . . . . . . . . . . . . . . . . . . . . . . . . . . . . . . . . . . . . . .21
Transit USB Audio Connnections . . . . . . . . . . . . . . . . . . . . . . . . . . .23
Output Connections . . . . . . . . . . . . . . . . . . . . . . . . . . . . . . . . .23
Input Connections . . . . . . . . . . . . . . . . . . . . . . . . . . . . . . . . . . .24
Transit USB’s Control Panel . . . . . . . . . . . . . . . . . . . . . . . . . . . . . . .24
Operating Mode . . . . . . . . . . . . . . . . . . . . . . . . . . . . . . . . . . . . .25
Latency . . . . . . . . . . . . . . . . . . . . . . . . . . . . . . . . . . . . . . . . . . .25
Transit USB and the Windows Media Drivers . . . . . . . . . . . . . . . . . .26
WDM/MME . . . . . . . . . . . . . . . . . . . . . . . . . . . . . . . . . . . . . . . .26
ASIO . . . . . . . . . . . . . . . . . . . . . . . . . . . . . . . . . . . . . . . . . . . . .26
Transit USB and Macintosh Audio . . . . . . . . . . . . . . . . . . . . . . . . . . .26
Mac OS 9.2.2 . . . . . . . . . . . . . . . . . . . . . . . . . . . . . . . . . . . . . . .26
Mac OS X . . . . . . . . . . . . . . . . . . . . . . . . . . . . . . . . . . . . . . . . .27
Contact Information . . . . . . . . . . . . . . . . . . . . . . . . . . . . . . . . . . . . .28
Warranty Information . . . . . . . . . . . . . . . . . . . . . . . . . . . . . . . . . . . .29
E
N
G
L
I
S
H
E
N
G
L
I
S
H
Introduction
Thanks for choosing the Transit USB by M-Audio.Transit USB is your compact, professional
audio solution for any Windows or Macintosh computer*, using the convenience of USB
connectivity – no need to disassemble your computer, no bulky external power supplies.
Transit USB gives you full 24 bit digital audio at sampling rates from 8 kHz to 96 kHz, with
the flexibility of both analog and optical digital connectors in a lightweight form factor you
can carry with you anywhere.
Please take the time to read this concise Users’ Guide. It will explain how to install the
Transit USB on your computer, and tell you how to get the best performance out of your
Transit USB audio interface.
Technical Features:
•
•
•
•
•
•
* must meet minimum system requirements
What’s in the Box?
The following items are included with your Transit USB:
•
•
•
•
•
Transit USB audio interface
One (1) standard USB cable
One (1) TOSLink to 1/8” Optical plug adapter
M-Audio Driver CD (includes driver installation software)
Users’ Guide and Warranty Card
Supports the following sampling frequencies (in Hz): 8000, 9600, 11025, 12000, 16000, 22050,
24000, 32000, 44100, 48000, 88200*, 96000
Supports 16 & 24-bit Linear PCM I/O, 16-bit AC-3 and 16-bit DTS output over S/PDIF
TOSLink
Supports the following audio protocols: ASIO,WDM, MME, SoundManager, CoreAudio
Unique hybrid optical/analog input jack automatically detects whether input is analog or
optical digital
1/8” mic input provides power for electret condenser mics
software-controlled input and output levels, using standard Windows or MacOS
volume controls
* Transit USB does not support analog recording at 88200 Hz.
Audio Performance Specifications:
•
•
Input: Dynamic Range 100 dB (typical –60 dB input, A-weighted);
Signal-to-Noise Ratio 100 dB (typical,A-weighted); THD+N –90 dB = 0.00316% (typical)
Output: Dynamic Range 104 dB (typical –60 dB input, A-weighted); Signal-to-Noise
Ratio 104 dB (typical, A-weighted); THD+N –94 dB = 0.00316% (typical)
Transit USB Specifications
System Requirements, Windows:
•
•
•
•
•
•
Recommended:
• Pentium III 500 MHz or faster
• 128 MB RAM or more
• DVD-ROM drive and DVD player application (for AC-3 & DTS pass-through)
Product and Operational Features:
Single USB 1.1 connection for input and output
S/PDIF 1/8” mini Optical In or 1/8” mini Analog Mic/Line In
S/PDIF optical out and 1/8” mini Analog Line Out
Sleek, slim plastic case with blue power LED.
Completely USB powered (no power supply needed)
One year warranty
2
Minimum:
• Pentium II 350 MHz
• 64 MB RAM
• CD-ROM drive
• Available USB 1.1 port
• Windows 98SE, Me, 2000 (SP4) or XP (SP1)
3
E
N
G
L
I
S
H
E
N
G
L
I
S
H
System Requirements, Macintosh:
Minimum:
• G3, G4*, iMac, iBook or Powerbook with native USB support
• 64 MB RAM
• CD-ROM drive
• Mac OS version 9.2.2, MacOSX version 10.1.5 or MacOSX “Jaguar” version 10.2.6 or later
Recommended:
•
•
•
•
G3, G4*, iMac, iBook or Powerbook with native USB support
128 MB RAM
DVD-ROM drive
MacOSX “Jaguar” version 10.2.4 or later
3.
4.
5.
* G3 and G4 accelerator cards not supported; AC-3 & DTS pass-throughsupported only with OS X 10.3 or higher
Optical/Analog Mic/Line Input Jack - This hybrid digital/analog jack accepts either analog
input via a standard 1/8" stereo mini plug, or optical S/PDIF digital input via an included
mini-optical adapter. The input jack automatically senses whether the input is analog or
digital.The analog input can also accept mic-level inputs, and provides plug-in power for
electret condenser microphones.
Optical Digital-Output Connector - This is a standard optical S/PDIF connector for
digital audio (sometimes called a TOSLink connector) that accepts a standard optical
digital cable. This port can output either PCM stereo digital audio or digitally-encoded
AC-3 or DTS pass-through. The output comes with a plastic cover that should be
removed and stored for use when transporting the Transit USB.
Line-Output Jack - This 1/8" mini-jack accepts a standard stereo plug, such as those used
for connection with portable audio devices and powered computer speakers. If you need
to connect the Transit to a home stereo system, you may obtain a cable or adapter with
a 1/8” stereo plug on one end and two male RCA plugs on the other. This output also
boasts an enhanced current drive for use with a pair of headphones.
Transit USB Features
Software Installation
Your Transit USB comes with driver software that allows it to communicate with your particular
computer (Mac or PC) and operating system.Please locate the section for your computer type and
operating system and follow the instructions for installing the driver software.
This diagram is an illustration of your Transit USB, with descriptions and information about
its physical features, which are described here.
1.
2.
USB Connector – Connect the squared “device” end of the supplied USB cable here.
Power LED – This LED lights bright blue when Transit USB receives power from your
computer’s USB port.This will occur when Transit USB sees a valid USB connection to
your computer, and the computer is powered on and the USB port enabled.
4
Your Transit USB comes with a standard USB cable. The squared end of the cable connects
to the Transit USB; the flat end connects to your computer’s USB port. Do NOT connect the
Transit USB to your computer until instructed to do so.
Windows XP
1.
Place the Transit USB CD into your CD-ROM drive. Do NOT connect the Transit USB
to your computer’s USB port at this time. Browse the CD content and double click the
Transit USB folder.Then double click the Transit USB Icon.
5
E
N
G
L
I
S
H
E
N
G
L
I
S
H
2.
The M-Audio Transit USB Installer screen will appear, asking you to confirm that you
wish to install Transit USB. Click Next to continue.
5.
After the driver files have been installed, the Performance Enhancements screen appears with
default settings for CD and DVD playback selected. Unless you’re certain your hardware is
incompatible with these settings, it is recommended that you leave them selected .
3.
The installer will copy the Transit USB files to your computer’s hard drive.
6.
You will be prompted to restart your computer. Click Finish to restart.
4.
The Software Installation window may appear one or more times, warning you that the driver
software has not passed the Windows Logo testing. Click the “Continue Anyway” button.
7.
On rebooting, the M-Audio Transit USB Control Panel icon will appear in the system
tray. Connect the Transit USB to your computer’s USB port. Windows will now display
the Found New Hardware dialog and will open the New Hardware Wizard.
Choose the selection,“Install the software automatically,” and click Next.
6
8.
7
E
N
G
L
I
S
H
E
N
G
L
I
S
H
9.
The New Hardware Wizard will write the remaining files to your system.You may once
again see the warning that the driver software has not passed the Windows Logo testing;
click “Continue Anyway” and allow the installation to complete. Click Finish.
10. After the installation is complete, you may double-click on the M-Audio Transit USB
Control Panel icon to open the Transit USB Control Panel. See the section “Transit USB
Control Panel” for more information on the Control Panel’s features and function.
2.
The M-Audio Transit USB Installer screen will appear, asking you to confirm that you wish
to install Transit USB. Click Next to continue.
3.
The installer will begin to copy the Transit USB files to your computer’s hard drive.
4.
The Digital Signature window will appear, warning you that the driver software does not
contain a Microsoft digital signature. Click the Yes button to continue the installation.
Windows 2000
It is important to make sure, when installing under Windows 2000, that you have the Service
Pack 3 installed.To obtain this update, visit the Windows Updates area at www.microsoft.com.
Note: Transit USB requires that you have Microsoft DirectX version 8.1 or later
installed. The Transit USB installer will automatically check for the correct
version of DirectX and install the latest Direct X update. This update will be
skipped if you already have DirectX version 8.1 (or higher) in your system.
1.
Place the Transit USB CD into your CD-ROM drive. Do NOT connect the Transit USB
to your computer’s USB port at this time. Browse the CD content and double click the
Transit USB folder.Then double click the Transit USB Icon.
8
9
E
N
G
L
I
S
H
E
N
G
L
I
S
H
5.
6.
Once the driver files have successfully been installed, the CD Performance
Enhancements screen will appear. By default, the performance enhancement settings for
CD and DVD playback will be selected. It is recommended you leave them selected
unless you are certain that your hardware is incompatible with these settings.
If you selected DVD performance enhancements, you will be prompted to restart your
computer. Click Finish and allow your computer to restart.
10
7.
8.
9.
On rebooting, the M-Audio Transit USB Control Panel icon will appear in the system
tray. Connect the Transit USB to your computer’s USB port. Windows will display the
Found New Hardware dialog and will open the New Hardware Wizard.
Choose “Install the software automatically,” and click Next.
The New Hardware Wizard will write the remaining files to your system. When the
installation is complete, click Finish.
11
E
N
G
L
I
S
H
E
N
G
L
I
S
H
10. After the installation is complete, you may double-click on the M-Audio Transit USB
Control Panel icon to open the Transit USB Control Panel. See the section “Transit USB
Control Panel” for more information on the Control Panel’s features and function.
3.
The installer will copy the Transit USB files to your computer’s hard drive.
4.
Once the driver files have successfully been installed, the CD Performance
Enhancements screen will appear. By default, the performance enhancement settings for
CD and DVD playback will be selected. It is recommended you leave them selected
unless you are certain that your hardware is incompatible with these settings.
Windows Me
1.
2.
Note: Transit USB requires that you have Microsoft DirectX version 8.1 or later
installed. The Transit USB installer will automatically check for the correct
version of DirectX and install the latest Direct X update. This update will be
skipped if you already have DirectX version 8.1 (or higher) in your system.
Place the Transit USB CD into your CD-ROM drive. Do NOT connect the Transit USB
to your computer’s USB port at this time. Browse the CD content and double click the
Transit USB folder.Then double click the Transit USB Icon.
The M-Audio Transit USB Installer screen will appear, asking you to confirm that you
wish to install Transit USB. Click Next to continue.
12
13
E
N
G
L
I
S
H
E
N
G
L
I
S
H
9.
5.
After the driver files have been installed, you will be prompted to restart your computer.
Click Finish and your computer will reboot.
If you are running an older version of Windows ME, you may be required to replace the
file stream.sys. Click Yes to continue.
10. After the installation is complete, you may double-click on the M-Audio Transit USB
Control Panel icon to open the Transit USB Control Panel. See the section “Transit USB
Control Panel” for more information on the Control Panel’s features and function.
6.
7.
On rebooting, the M-Audio Transit USB Control Panel icon will appear in the system tray.
Connect the Transit USB to your computer’s USB port.
The New Hardware Wizard will write the remaining files to your system.
Windows 98SE
1.
8.
If you are running an older version of Windows ME, you may be required to replace the
file ksuser.dll. Click Yes to continue.
14
2.
Note: Transit USB requires that you have Microsoft DirectX version 8.1 or later
installed. The Transit USB installer will automatically check for the correct
version of DirectX and install the latest Direct X update. This update will be
skipped if you already have DirectX version 8.1 (or higher) in your system.
Place the Transit USB CD into your CD-ROM drive. Do NOT connect the Transit USB
to your computer’s USB port at this time. Browse the CD content and double click the
Transit USB folder.Then double click the Transit USB Icon.
The M-Audio Transit USB Installer screen will appear, asking you to confirm that you wish
15
E
N
G
L
I
S
H
E
N
G
L
I
S
H
Click Finish and your computer will reboot.
to install Transit USB. Click Next to continue.
3.
The installer will begin to copy the Transit USB files to your computer’s hard drive.
6.
On rebooting, the M-Audio Transit USB Control Panel icon will appear in the system
tray. Connect the Transit USB to your computer’s USB port. Windows will display the
Found New Hardware dialog and will open the Windows Hardware Wizard. Choose the
default “Search for the best driver for your device” and click Next.
4.
Once the driver files have successfully been installed, the CD Performance
Enhancements screen will appear. By default, the performance enhancement settings for
CD and DVD playback will be selected. It is recommended you leave them selected
unless you are certain that your hardware is incompatible with these settings.
7.
Windows will ask you for the location of the driver, uncheck all boxes except “Specify
Location” and click "Next".
5.
After the driver files have been installed, you will be prompted to restart your computer.
16
17
E
N
G
L
I
S
H
E
N
G
L
I
S
H
8.
9.
Windows will ask “ What do you want to install?” Select the default “The updated driver
(Recommended)” and click “Next”.
In some cases,Windows may ask you to insert your Windows CD-ROM. If so, insert the
CD and, using the Windows Explorer menu, navigate to your CD-Rom drive. Select
Win98SE to open the folder and click "OK".
11. The New Hardware Wizard will write the remaining files to your system. When the
installation is complete, click Finish.
12. After the installation is complete, you may double-click on the M-Audio Transit USB
Control Panel icon to open the Transit USB Control Panel. See the section “Transit USB
Control Panel” for more information on the Control Panel’s features and function.
Mac OS 9.2.2
1.
10. In some Windows will ask you to update your stream.sys file. Click “Yes” to continue.
18
2.
3.
Insert the Transit USB driver CD into your CD-ROM drive. AutoRun will open the CD
and allow you to view its contents.
Double click on the “M-Audio Transit USB Installer” icon.
Click Continue in the initial installer introduction screen.
19
E
N
G
L
I
S
H
E
N
G
L
I
S
H
Mac OS X
4.
An informational screen will appear next. Please read through it’s contents and click Continue.
5.
For first-time installations,the default Easy Install is the desired selection..Click Install to continue.
6.
You will be prompted to restart your computer. Click Continue.
7.
8.
When your computer has restarted, connect the Transit USB to your computer’s USB port.
Under Control Panels, select Sound, then select the Output tab. Click on M-Audio Transit
USB to select Transit USB as your default audio device.
20
1.
2.
3.
4.
5.
6.
Insert the Transit USB driver CD into your CD-ROM drive and open the CD to view its contents.
Double click the M-Audio Transit USB Installer.dmg file. An icon labeled Transit USB will
appear on your desktop.
Double click on the Transit USB icon. The file M-Audio Transit USB Installer.mpkg will
appear. Double click on the installer file.
You will need your Administrator Password for the next step.To continue, click the lock
icon in the lower left corner of the window that states, “Click The Lock To Make
Changes." In OSX version10.2.2 this authentication dialog will automatically appear.
Enter your password and click "OK."
The next window "Welcomes You..." to the installation process. Click "Continue."
21
E
N
G
L
I
S
H
E
N
G
L
I
S
H
7.
Select your OS X hard drive. Click "Continue."
11. After the computer has restarted, now plug the Transit into your computer’s USB Port.
12. Go to "System Preferences" in the Apple Menu. Select the "Sound" preference panel, and
click the "Output" tab. Select "M-Audio Transit USB" to choose the Transit USB as your
default output device.
Transit USB Audio Connnections
Output Connections
8
9.
If prompted to do so, click "Upgrade" to continue.
When prompted, click "Continue Installation."
Your Transit USB is equipped with an analog stereo output on a 1/8” mini jack. This analog
output can be connected to powered speakers, headphones or to the analog inputs of your
home stereo system, using a 1/8”-to-RCA adapter.
The Transit USB also has an optical digital output, sometimes referred to as a TOSLink
connector.You may connect this digital output to the optical digital inputs of a home theater
or stereo, CD-R or MiniDisc recorder, or any device that supports a two-channel optical
digital input. When outputting a two-channel signal, the signal at Transit USB’s analog and
digital outputs is identical.
NOTE: If you need to connect to a device with coaxial S/PDIF inputs, you may purchase
the Co2 Coaxial/Optical Bi-directional Converter from M-Audio for this purpose.
10. When prompted, click "Restart" to finish the installation.
22
This optical digital output can also transmit a multichannel encoded digital audio signal from
a Dolby Digital or DTS-equipped source. Transit USB’s digital output supports 16-bit AC-3
23
E
N
G
L
I
S
H
E
N
G
L
I
S
H
encoded signals. Note that when “Dolby Digital / DTS pass-through, 16-bit, 48000 Hz” is
selected from the Transit USB Control Panel,Transit USB’s analog outputs are defeated. (See
the next section for more information.)
Input Connections
Your Transit USB is equipped with a unique combination optical/analog input which can
accept a standard 1/8” stereo analog input at either Mic or Line level. This input can also
accept an optical digital input, via the included TOSLink-to-mini optical adapter.Transit USB’s
input jack automatically detects whether the input is analog or digital.
Transit USB’s input can also supply +5V bias voltage to power an electret condenser
microphone such as those supplied with some computer audio products.
Transit USB’s Control Panel
In Windows, you can open the Transit USB’s control panel by double clicking on the M-Audio
icon in the system tray. On the Mac, select Control Panels under the Apple menu, and locate
the Transit USB control panel selection.
Operating Mode
In this drop down menu you can select how the Transit USB sends and/or receives audio.The
following options are available:
•
•
•
2-In/2-Out, 16-bit, 8000 – 48000 Hz
•
2-In/2-Out, 24-bit, 8000 – 48000 Hz
2-In/0-Out, 24-bit, 88200 – 96000 Hz •
0-In/2-Out, 24-bit, 88200 – 96000 Hz
Dolby Digital / DTS pass-through, 16-bit, 48000 Hz
Latency
Latency is defined as the time it takes for your input signal to pass through your audio
software and appear at the outputs. Smaller buffer sizes result in lower latency, but may not
function well with slower systems.This drop-down menu selects the buffer size Transit USB
uses to handle digital audio streaming.
The default Latency setting is “Medium.” This setting may adequately serve your purposes,
but if you wish to, you can experiment with lower settings. If you experience stuttering or
crackling in your audio playback, try using a higher latency setting.
Transit USB and the Windows Media Drivers
WDM/MME
Note: Due to USB 1.1 bandwidth limitations and hardware constraints, sampling
rates above 48000 Hz do not support full duplex (i.e., simultaneous input and
output) mode.
Transit USB’s Windows drivers support Windows’ native WDM/MME protocol, allowing you
to use Transit USB as your Windows default audio device. If Transit USB is the only audio
device installed on your computer, Windows will select it automatically. If you have other
audio devices installed, you may need to select it as your default device:
24
25
1.
2.
Click the Start menu, then choose Settings/Control Panel
Open the audio properties panel. In Windows XP it’s labeled “Sounds and Audio
E
N
G
L
I
S
H
E
N
G
L
I
S
H
3.
Devices;” in Windows 2000 and Windows ME it’s labeled “Sounds and Multimedia;” and
in Windows 98SE it’s called “Multimedia.” Select the Audio tab.
Under Playback and Record, select Transit USB from the drop down list. Click Apply, then
click Okay to close the Control Panel.
ASIO
Transit USB also supports Steinberg’s ASIO protocol, used in applications such as Cubase,
Reason, Live, Logic and other programs.Transit USB’s ASIO drivers are automatically installed.
If you have other audio devices installed in your computer, you may need to select Transit
USB as the ASIO device in your audio software. Refer to the instructions in your audio
software for details.
3.
folder (usually located within the Programs folder). Locate the program’s ASIO folder.
Drag Transit USB’s ASIO driver files to the ASIO folder within your application’s folder.
Mac OS X
The Transit USB supports MacOS X Core Audio protocol.To select the Transit USB as your
system’s audio device:
1.
2.
Under the Apple menu, select System Preferences / Sound
Select Transit USB under input and output tabs to choose the Transit USB as your default
audio device.
Transit USB and Macintosh Audio
Mac OS 9.2.2
Transit USB supports Apple’s Sound Manager protocol under OS 9.To select the Transit USB
as your system’s audio device:
1.
2.
Under the Apple menu, select Control Panel / Sound.
Under the Output menu, select Transit USB from the list of available devices. Close the
control panel.
ASIO Drivers:
Transit USB also supports Steinberg’s ASIO protocol under OS 9, used in applications such
as Cubase, Reason, Live, Logic and Digital Performer 3. In order to use Transit USB’s ASIO
drivers with your DAW application, you will need to copy the drivers into your program’s
ASIO folder.
1.
2.
Contact Information
For additional help, contact Midiman/M-Audio Technical Support by telephone (626-4458495, 9-5 PST M-F), by fax (626-445-7564) or by e-mail ([email protected]).
Transit USB’s driver installer will create an ASIO folder on your desktop. Double click
on it to open it.
Double click on your computer’s hard disk icon and browse to your audio software’s
26
27
E
N
G
L
I
S
H
E
N
G
L
I
S
H
Warranty Information
M-AUDIO U.S.
M-AUDIO U.K.
45 E. Saint Joseph St.
Arcadia, CA 91006-2861
U.S.A.
Unit 5, Saracen Industrial Estate
Mark Rd.
Hemel Hempstead, Herts HP2 7BJ
England
Sales Information:
626-445-2842
Sales Information (email):
[email protected]
Tech Support:
626-445-8495
Tech Support (email):
[email protected]
Fax:
626-445-7564
Internet Home Page:
http://www.m-audio.com
Sales Information:
44 (0) 144 241 6590
Sales Information (email):
[email protected]
Technical Support:
44 (0) 871 717 7102
Tech Support (email): [email protected]
Fax:
44 (0) 144 224 6832
Internet Home Page:
http://www.maudio.co.uk
M-AUDIO Canada
M-AUDIO France
1400 St-Jean Baptiste Ave., #150
Quebec City, QC G2E 5B7
Canada
Unit 5, Saracen Industrial Estate
Mark Rd.
Hemel Hempstead, Herts HP2 7BJ
England
Tel:
418-872-0444
Fax:
418-872-0034
Email:
[email protected]
Internet Home Page:
http://www.m-audio.ca
Sales Information:
0810 001 105
Sales Information (email): [email protected]
Technical Support:
0820 00 731
Tech Support (email): [email protected]
Fax:
44 (0) 144 224 6832
Internet Home Page:
http://www.maudio.co.uk
M-AUDIO Deutschland (Germany)
M-AUDIO Japan
Kuhallmand 34
D-74613 Ohringen
Germany
Annex Buliding 6F
2-18-10 Marunouchi
Naka-Ku, Nagoya 460-0002
Japan
Sales Information:
Sales Information (email):
Technical Support:
Technical Support (email):
49 7941 98 7000
[email protected]
49 7941 98 70030
[email protected]
Tel:
Fax:
Technical Support:
Email:
28
81 52 218 3375
81 52 218 0875
0820 00 731
[email protected]
M-AUDIO warrants this product, under normal use, to be free of defects in materials and workmanship
for a period of One (1) Year from date of purchase, so long as: the product is owned by the original
purchaser, with proof of purchase from an authorized M-AUDIO dealer and, the product has been
registered to the original purchaser, the purchaser having returned to M-AUDIO the completed product
warranty card. This warranty explicitly excludes power supplies and included cables which may become
defective as a result of normal wear and tear.
In the event that M-AUDIO receives, from an original purchaser and within the warranty coverage period,
written notice of defects in materials or workmanship, M-AUDIO will either replace the product, repair
the product, or refund the purchase price at its option. In the event repair is required, shipment to and
from M-AUDIO and possible nominal handling charges shall be born by the purchaser. In the event that
repair is required, a Return Authorization number must be obtained from M-AUDIO.After this number is
obtained, the unit should be shipped back to M-AUDIO in a protective package with a description of the
problem and the Return Authorization clearly written on the package.
In the event that M-AUDIO determines that the product requires repair because of user misuse or regular
wear, it will assess a fair repair or replacement fee.The customer will have the option to pay this fee and
have the unit repaired and returned, or not pay this fee and have the unit returned un-repaired.
The remedy for breach of this limited warranty shall not include any other damages. M-AUDIO will not
be liable for consequential, special, indirect, or similar damages or claims including loss of profit or any
other commercial damage, even if its agents have been advised of the possibility of such damages, and in
no event will M-AUDIO's liability for any damages to the purchaser or any other person exceed the price
paid for the product, regardless of any form of the claim. M-AUDIO specifically disclaims all other
warranties, expressed or implied. Specifically, M-AUDIO makes no warranty that the product is fit for any
particular purpose.This warranty shall be construed, interpreted, and governed by the laws of the state of
California. If any provision of this warranty is found void, invalid or unenforceable, it will not affect the
validity of the balance of the warranty, which shall remain valid and enforceable according to its terms. In
the event any remedy hereunder is determined to have failed of its essential purpose, all limitations of
liability and exclusion.
29
E
N
G
L
I
S
H