1
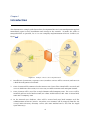
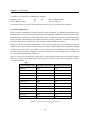
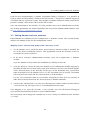
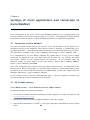
Kerio Connect Step-by-Step Kerio Technologies Kerio Technologies s.r.o. All rights reserved. This guide provides detailed description on Kerio Connect, version 7.0. All additional modifications and updates reserved. For current versions of the product and related manuals, check http://www.kerio.com/mailserver/. Information regarding registered trademarks and trademarks are provided in appendix A. Contents 1 Introduction . . . . . . . . . . . . . . . . . . . . . . . . . . . . . . . . . . . . . . . . . . . . . . . . . . . . . . . . . . . . . . . . . . . 4 1.1 Before you start . . . . . . . . . . . . . . . . . . . . . . . . . . . . . . . . . . . . . . . . . . . . . . . . . . . . . . . . . . 5 2 Installation . . . . . . . . . . . . . . . . . . . . . . . . . . . . . . . . . . . . . . . . . . . . . . . . . . . . . . . . . . . . . . . . . . . . . 2.1 Windows . . . . . . . . . . . . . . . . . . . . . . . . . . . . . . . . . . . . . . . . . . . . . . . . . . . . . . . . . . . . . . . . . 2.2 Mac OS X . . . . . . . . . . . . . . . . . . . . . . . . . . . . . . . . . . . . . . . . . . . . . . . . . . . . . . . . . . . . . . . . . 2.3 Linux . . . . . . . . . . . . . . . . . . . . . . . . . . . . . . . . . . . . . . . . . . . . . . . . . . . . . . . . . . . . . . . . . . . . . 2.4 Configuration Wizard . . . . . . . . . . . . . . . . . . . . . . . . . . . . . . . . . . . . . . . . . . . . . . . . . . . . . 3 Server configuration . . . . . . . . . . . . . . . . . . . . . . . . . . . . . . . . . . . . . . . . . . . . . . . . . . . . . . . . . . 3.1 Running Kerio Connect . . . . . . . . . . . . . . . . . . . . . . . . . . . . . . . . . . . . . . . . . . . . . . . . . . 3.2 Administration interface . . . . . . . . . . . . . . . . . . . . . . . . . . . . . . . . . . . . . . . . . . . . . . . . . 3.3 Setting domain and user accounts . . . . . . . . . . . . . . . . . . . . . . . . . . . . . . . . . . . . . . . . 3.4 Setting connection to the Internet and to the SMTP server . . . . . . . . . . . . . . . . . 3.5 Antispam control of the SMTP server . . . . . . . . . . . . . . . . . . . . . . . . . . . . . . . . . . . . . 3.6 Antivirus control . . . . . . . . . . . . . . . . . . . . . . . . . . . . . . . . . . . . . . . . . . . . . . . . . . . . . . . . 3.7 Email backup . . . . . . . . . . . . . . . . . . . . . . . . . . . . . . . . . . . . . . . . . . . . . . . . . . . . . . . . . . . . 3.8 How to create and manage resources . . . . . . . . . . . . . . . . . . . . . . . . . . . . . . . . . . . . . 3.9 How to set public folders . . . . . . . . . . . . . . . . . . . . . . . . . . . . . . . . . . . . . . . . . . . . . . . . 10 10 10 11 12 13 13 14 15 16 4 Settings of client applications and connection to Kerio WebMail . . . . . . . . . . . . . . . 4.1 Connection to Kerio WebMail . . . . . . . . . . . . . . . . . . . . . . . . . . . . . . . . . . . . . . . . . . . . . 4.2 MS Outlook settings . . . . . . . . . . . . . . . . . . . . . . . . . . . . . . . . . . . . . . . . . . . . . . . . . . . . . 4.3 MS Entourage settings . . . . . . . . . . . . . . . . . . . . . . . . . . . . . . . . . . . . . . . . . . . . . . . . . . . 4.4 Synchronization with mobile devices . . . . . . . . . . . . . . . . . . . . . . . . . . . . . . . . . . . . . 18 18 18 19 20 A Legal Notices . . . . . . . . . . . . . . . . . . . . . . . . . . . . . . . . . . . . . . . . . . . . . . . . . . . . . . . . . . . . . . . . . . 21 3 7 7 7 8 8 Chapter 1 Introduction This document is a simple guide focused on description of Kerio Connect configuration applied immediately upon its first installation and startup in the network. To make the guide as comprehensible as possible, let us see an exemplary implementation of Kerio Connect (see figure 1.1): Figure 1.1 Example of Kerio Connect implementation 1. Install Kerio Connect on a separate server (no other services will be run on it) and run it in a local firewall-protected network. 2. Kerio Connect will be connected to the Internet via a leased line. Email will be received and sent vie SMTP. For this reason, it is necessary to enable antivirus and antispam control. 3. Kerio Connect will be used for a single domain called company.com. The server will be installed and run in the local network, on a host with IP address 192.168.1.10 and DNS name mail.company.com. 4. In the internal user database, there will be created only one local account used for administration of Kerio Connect. Any other user accounts will be mapped from the Microsoft Active Directory directory service (the same method can be used for the Apple Open Directory). 4 1.1 Before you start Name of the Active Directory domain will be the same as the name of the email domain and the name of the Kerberos realm. 5. The server will be available both from the local network and from the Internet. For security reasons, however, only SSL/TLS-secured Internet connections will be allowed. 6. All undelivered email (messages where the part preceding the @ symbol in the address is not valid) will be sent to [email protected]. 7. Enable the Kerio Connect’s dual antivirus control. We will use the integrated McAfee antivirus (license of Kerio Connect with McAfee is required) and the external Clam AntiVirus which will be installed on the same computer as Kerio Connect. 8. All email will saved and backed-up in a local archiving folder once a week. 9. In the system, add resources shared across the company (company cars, meeting rooms, projectors, etc.) so that users can reserve them. 10. Set a public calendar folder where company events which should have been shared and known by all employees across the company can be added. Ritghs to add new events will be assigned to the company’s receptionist. Now set a public contact folder which can be used only by members of the sales department who can add company customers contacts in it. 11. To access their email, users will use Kerio WebMail, Kerio Outlook Connector (Offline Edition), MS Entourage and an ActiveSync-based application for direct access to the mailbox from their mobile devices. The exemplary configuration can be easily customized. For detailed information on setting of individual features of Kerio Connect, refer to Kerio Connect 7, Administrator’s Guide, chapter Deployment Examples. The whole document can be downloaded from the Kerio Technologies website at http://www.kerio.com/mailserver/manual. 1.1 Before you start Before you start the installation and configuration, prepare your environment as follows: Set DNS MX records Although Kerio Connect is located in a private network, email will be sent and received to and from the Internet. Therefore, it is necessary to set the corresponding record in the public DNS for a public IP address assigned by the provider (in this example, the 215.75.128.33 IP address will be used). In the local network it is necessary to assign the mail.company.com name the local IP address 192.168.1.10. Private address can be set on the local DNS server. 5 Chapter 1 Introduction A public server can be as the following example: company.com mail.company.com MX A 10 mail.company.com 215.75.128.33 You should also set a record for your backup mail server, if you have one available. Firewall configuration Kerio Connect is installed in a local network behind a firewall. In addition to the mailserver’s configuration, it is also necessary to perform corresponding additional settings of the firewall. If the mailserver is to be accessible from the Internet, certain ports have to be opened (mapped) in the firewall. Each mapped port might introduce security problems. Therefore, map ports only for those services which you want to make available from the Internet. In the case of our network environment, it is necessary to map port 25 (a default port for the SMTP service). This setting is required for cases where an MX record for the particular domain is addressed to the server. Any SMTP server on the Internet can connect to your SMTP server to send email to one of its domains. For this reason access to the mapped port 25 must not be restricted to particular IP addresses. Now, it is necessary to map ports that will be used for connections out of the local network. Since the security risk is higher here, only SSL/TLS-secured services will be mapped. Settings are shown in table 1.1. Service (default port) Outgoing connection Incoming connection SMTP (25) allow allow SMTPS (465) allow allow POP3 (110) allow deny POP3S (995) allow allow IMAP (143) allow deny IMAPS (993) allow allow NNTP (119) allow deny NNTPS (563) allow allow LDAP (389) allow deny LDAPS (636) allow allow HTTP (80) allow deny HTTPS (443) allow allow Table 1.1 Services to be allowed on the firewall 6 Chapter 2 Installation Kerio Connect supports three types of operating systems. You can choose from Windows, Mac OS X and Linux. List of versions (or distribution packs) of the operating systems supported by Kerio Connect can be found at Kerio Technologies website (Kerio Technologies). It is necessary to install a special additional installation package on any operating system (as for Linux, two packages are in question). For any type of installation package file, check http://www.kerio.com/mailserver/download. Once a corresponding installation package is downloaded, the installation can be started. Installations differ by operating system: 2.1 Windows Once the installation package is downloaded, run the installation under a user with administration rights for the operating system. Standard wizard is used for the installation. Kerio Connect is installed under the following directory: C:\Program Files\Kerio\Mailserver When the installation is completed, the configuration wizard is started (see section 2.4). 2.2 Mac OS X Once the installation package is downloaded, run the installation under a user with administration rights for the operating system (the installation program requires authentication). The installation package is opened as a disk in the Finder application and an executable installation file is offered. In the standard installation wizard select the Easy Install option to start complete installation of the product to the /usr/local/kerio/mailserver directory. When the installation is completed, the configuration wizard is started (see section 2.4). 7 Chapter 2 Installation 2.3 Linux Kerio Connect is distributed in two RPM or DEB packages which include the server and the administration console. The installation must be performed by a user with root rights. Kerio Connect Engine is installed to /opt/kerio/mailserver and the Kerio Administration Console to /opt/kerio/admin. To install RPM packages, use this command: # rpm -i <installation_file_name> In case of the recent versions of the distributions, problems with package dependencies might occur. In this case, install package compat-libstdc++ To install DEB packages, use this command: # dpkg -i <installation_file_name.deb> It is recommended to read carefully the LINUX-README file immediately upon the installation. The file can be found in /opt/kerio/mailserver/doc 2.4 Configuration Wizard Since the identical configuration wizard is used for all operating systems, the following instructions also apply to all of them: On Windows and Mac OS X, the configuration wizard is opened automatically upon a successful installation of Kerio Connect. On Linux, it is necessary to run the wizard by using the following command: ./cfgwizard Launch the command from the folder where Kerio Connect is installed (typically /opt/kerio/mailserver). Warning: The Kerio Connect Engine must be stopped while the configuration wizard is running. The following parameters are to be set in the configuration wizard: 1. On the first page, create an email domain (a unique domain identificator which is used to recognize to which server mail should be delivered. In email addresses, the domain identificator follows the "at" symbol (@) and enter the server’s Internet hostname. The Internet name of the server is a DNS hostname where Kerio Connect is installed. Server names are used for server identification while establishing SMTP traffic. Warning:If Kerio Connect is running behind NAT, enter the Internet server name that can be converted to the IP address of the sending server, i.e. the Internet hostname of the firewall. 2. In the next step of the wizard, create an administration account. Keep the Admin as name and enter password. Memorize the name and password defined in this dialog well since they will be later used for authentication to theKerio Connect’s administration console. 8 2.4 Configuration Wizard 3. The next dialog of the wizard allows setting of location of the data store. In this directory, all user accounts and server logs will be stored. 4. In the last dialog, a summary of the parameters just set is provided. When this dialog is closed, a notice of the successful completion of the installation is displayed. 9 Chapter 3 Server configuration 3.1 Running Kerio Connect On Windows and Mac OS X, Kerio Connect is automatically started upon a successful installation, while on Linux, the server must be run by hand. Starting and stopping of the server depends on the operating system where Kerio Connect is installed, as follows: Windows To run Kerio Connect, use the icon which appeared in the notification area of the system toolbar. To open a pop-up context menu, right-click on the icon. The Start/Stop Kerio Connect options can be used to either run or stop the server. Linux The following commands can be used to stop, run or restart Kerio Connect: /etc/init.d/kerio-connect start /etc/init.d/kerio-connect stop /etc/init.d/kerio-connect restart Mac OS X On Mac OS X, Kerio Connect can be started or stopped by using the Kerio Connect Monitor (its startup icon is available in the Other section of System Preferences). Username which must belong to the Admins group and password is required for stopping or running of the service. Once authenticated, clicking Stop or Start is sufficient. 3.2 Administration interface Kerio Connect is configured through the Kerio Connect Administration interface. Kerio Connect Administration uses secure protocol HTTPS and runs on port 4040. To access this interface, simply enter the following address into your browser http://DNS.server.name/admin (http://IP.address/admin if the name is not set in DNS) and Kerio Connect will automatically redirect itself to https://DNS.server.name:4040/admin (https://IP.address:4040/admin). This implies that the URL can have the following form: http://mail.company.com:4040/admin or https://192.168.1.1:4040/admin If a correct URL is entered, authentication page is opened requiring username and password of the primary administrator that was specified in the configuration wizard. 10 3.3 Setting domain and user accounts Upon the first authentication, a product registration dialog is displayed. It is possible to register either the full product version or the trial version — charge-free technical supported is available for any registered version. This support is available during the whole period of the product’s validity, either of the full or of the trial version. Note: For connection to the interface, it is also possible to use Kerio Administration Console, the desktop application. For detailed guidelines for usage of the administration console, refer to Kerio Connect 7, Administrator’s Guide. 3.3 Setting domain and user accounts Email domains are configured in the Configuration → Domains section. This section already includes the domain created in the configuration wizard. Mapping of user accounts and groups from a directory service 1. On the domain server, install the Kerio Active Directory Extension which is available for free at the Kerio Technologies website. This application extends the directory service by certain Kerio Connect’s features. 2. In the Kerio Connect’s administration interface, open the Configuration → Domains section. Open the domain created within the installation by clicking on the Edit. 3. Go to the Directory Service tab and enter domain server’s information. Enable mapping by checking the Map user accounts and groups from a directory service to this domain option. Select Active Directory as the directory service type. In the Hostname entry, specify DNS name or IP address of the domain server. Use the Username entry to specify a username with read and write rights for the Active Directory’s LDAP database. Use the Test connection button to test whether all parameters have been set correctly to allow Kerio Connect connect to the Active Directory’s domain controller. 4. Switch to the Advanced tab. It is necessary that Kerberos realm is defined in the Kerberos 5 entry on this tab. The upper-case is set automatically for the name. Once mapping is set, open the Accounts → Users section. User list will include all mapped users and one local account for Kerio Connect administration. The user groups can be mapped in a similar way as users. Groups are administered in Accounts → Groups. 11 Chapter 3 Server configuration Setting an alias for undeliverable email Aliases can be defined in the Accounts → Aliases section. 1. Click on Add. 2. This opens a dialog where a new alias can be added. In the Alias entry, enter the * symbol. In the E-mail address textfield specify the address of the mailbox where any undeliverable email will be sent (in our case it is [email protected]). 3. Once the alias is saved, you can test it by the Check address button available in the Aliases section. The alias for undeliverable mail (or star alias) is used when the part of the e-mail address before @ sign is not found among domain’s user names and aliases. 3.4 Setting connection to the Internet and to the SMTP server Anyone can connect to the SMTP server to send messages to local domains. Sending of messages to other domains will be restricted to local users only. Users connected from the Internet will be prompted to authenticate on the SMTP server by username and password. This setting can be done on the Relay Control under Configuration → SMTP server: 1. On the tab, enable the Allow relay only for option. Warning:It is strongly recommended not to switch the SMTP server to the Open Relay mode if Kerio Connect is available from the Internet (i.e. it uses a public IP address and port 25 is not blocked by a firewall). If you set the Open Relay mode, Kerio Connect will very probably be abused by spammers to distribute spam mail which will overload your internet line. This might also cause that your server will be included in blacklists of SMTP servers. 2. Check option Users from IP address groups and select the Local Clients group which includes all private ranges of IP addresses. 3. Enable option Users authenticated through SMTP for outgoing mail to allow users connected from the Internet send email. Note: Authentication against the SMTP server must be set in the email client. Settings of some popular clients are focused in chapter 4.2). Now go to Security Options to set security restrictions for the SMTP server: 1. Set the Maximum number of messages from one IP address per hour option to 100 messages. 2. Set 20 in option Maximum number of concurrent connections to the SMTP server from one IP address. 12 3.5 Antispam control of the SMTP server 3. Set Max. number of unknown recipients to 10. 4. In Do not apply these limits to IP address group, set Local clients. This will exclude Kerio Connect users from these rules. If you use private IP addresses in your internal network, you can simply choose Local Clients group where all private IP addresses ranges are defined. Details on security of the SMTP server can be found in chapter SMTP server of the Kerio Connect 7, Administrator’s Guide. 3.5 Antispam control of the SMTP server The SMTP server is accessible from the Internet and, therefore, it is necessary to configure an antispam control of the SMTP server. Antispam filters can be set under Configuration → Content Filtering → Spam Filter: 1. Antispam rating can be started and set on the Spam Rating tab. Default settings of this tab can be kept. 2. On the Blacklists tab, it is recommended to enable control involving Internet spammer databases and to set +2 points as a score for each database. 3. Switch to the SpamAssassin tab and enable option Check every incoming message in Spam URI Realtime Blocklist (SURBL) database. 4. On tabs Caller ID and SPF, set control of e-mail policy records of the sender SMTP server and set the spam score to +2 points. This control allows to filter out messages with fake sender addresses. 5. On the Spammer Repellent tab, enable SMTP connection delay (keep the predefined value of 25 secons). This filter efficiently stops spam messages at the SMTP level which relieves the server from a remarkable volume of spam testing. Antispam filters of the SMTP server are focused in the Kerio Connect 7, Administrator’s Guide, chapter Antispam control of the SMTP server. 3.6 Antivirus control Another necessary settings of Kerio Connect to be done are enabling of the antivirus control and attachment filter that can be performed in the following sections: 13 Chapter 3 Server configuration Antivirus Kerio Connect allows to set various configuration options of antivirus control. Kerio Connect can be purchased in versions either with or without the integrated McAfee antivirus. In addition to that, Kerio Connect supports a respectful number of external antiviruses (for the list of supported antivirus applications, see the Kerio Technologies website). This implies that it is possible to use either the integrated McAfee antivirus or any of the supported external antiviruses. The strongest protection option is to combine the built-in McAfee with an external antivirus. As promised in the introduction chapter 1, below you can find description of combination of Kerio Connectu with the built-in McAfee with the external Clam AntiVirus. Antivirus check can be enabled under Configuration → Content Filter → Antivirus: 1. Check that the Use the integrated McAfee antivirus engine option is running. 2. On the Kerio Connect’s host, install the external Clam AntiVirus. 3. Under Configuration → Content Filter → Antivirus, enable option Use external antivirus and select Clam AntiVirus in the menu. Attachment Filter To set attachment filter, go to the Configuration → Content Filter → Attachment Filter section and check the Enable attachment filter option. In the list, it is also possible to add/remove other attachments to be filtered and use the Add button to add attachment types which are not included in the list yet. 3.7 Email backup Email backup and archiving can be set under Configuration → Archiving and Backup. Email archiving Email archiving can be set on the Archiving tab: 1. To enable archiving, check the Enable mail archiving option. 2. The default path to the directory can be kept. 3. Enable the Archive to local folder option. 4. Set the interval used for creating of new archive folders to one week. Archiving folders will be displayed in the Kerio Connect’s administrator mailbox. They can be viewed, for example, in the Kerio WebMail interface. 14 3.8 How to create and manage resources Backup of the data store and configuration files Backup can be set on the Backup tab: 1. The backup can be enabled by checking the Enable message store and configuration recovery backup option. 2. In the Backup scheduling table, set one full backup for Sunday midnight so that the backup does not burden the server within working hours. 3. In the Backup directory entry, specify the path to the directory where backups will be stored. The path must be entered in a way in accordance with convenience of the operating system where Kerio Connect is running. 4. Enter your email address in the Email address field. Kerio Connect will automatically generate results of each backup and send it to the address defined. 3.8 How to create and manage resources Kerio Connect allows reservation of various resources (company cars, meeting rooms and other equipment). To make reservations work, it is first necessary that each resource has its own calendar created. In other words, it is necessary to create all resource items in Kerio Connectu via the administration interface, section Accounts → Resources: 1. Click on Add. 2. In the dialog on the General tab, enter a name for the resource. The name will be also used as the part of the resource’s email address preceding the at symbol. Therefore, diacritics, blanks and special symbols are disallowed. 3. In the Type entry, select one of the options (room or equipment). 4. Go to the Permissions tab and add all users who will be allowed to book the particular resource item. 5. Set a reservation manager. This user is allowed to operate with the resource calendar. The resource manager can delete or move reservations. Once a resource has been created, check in Kerio WebMail or your email client: • that the resource’s free/busy calendar is showed while you are trying to use it in an appointment creation process, • that the resource calendar can be subscribed by standard sharing process, • that the Resources folder has appeared in public folders, including contacts of all created resources so that users can add them easily while creating appointments. 15 Chapter 3 Server configuration Resource reservation is focused Kerio Connect 7, User’s Guide in Kerio Connect 7, Administrator’s Guide and 3.9 How to set public folders Kerio Connect supports public folders. This feature can be used to create a public company calendar called Events and a public folder labelled Customers with contact information of the company’s customers but with view/edit rights assigned to your sales department only. Notes: • Public folders are special folders that is displayed in mailboxes of all users of the particular domain with corresponding reader rights (obviously, access rights can be edited). • Public folders can be created and edited only by users with special access rights. ?Upon installation of Kerio Connect, these rights are assigned only to the primary administrator. Public calendar 1. Log on to the Kerio WebMail interface as your Kerio Connect primary administrator (use name and password specified in the server installation’s configuration wizard). 2. In the folder tree, right-click on Public Folders. 3. In the pop-up context menu just opened, click on New subfolder and enter Events as the calendar name and Calendar as the type of the new public folder. 4. Right-click the new folder and choose Access rights from the pop-up menu. 5. By default, all users of the domain have read rights for the folder. Keep this setting and click on Add. 6. In the Sharing type menu, keep the User option and in the Username entry, specify email address of the calendar administrator (in our example, this will be the receptionist). Click on OK. 7. In the permission rights table, select the Administrator permission level for the user. Customer contact list 1. In the Kerio Connect administration interface, go to Accounts → Groups and create a group called SALES that will include all users from your sales department. 2. Log on to the Kerio WebMail interface as your Kerio Connect primary administrator (use name and password specified in the server installation’s configuration wizard). 16 3.9 How to set public folders 3. In the folder tree, right-click on Public Folders. 4. In the pop-up context menu just opened, click on New subfolder and enter Customers as the calendar name and Contacts as the type of the new public folder. 5. Right-click the new folder and choose Access rights from the pop-up menu. 6. By default, all users of the domain have read rights for the folder. Cancel this setting and click on Add. 7. In the Sharing type menu, select the Group option and in the Group name entry add the SALES group email address. Click on OK. 8. In the access rights table, set the Editor permission level for the group (members of the group will be allowed to add, remove and edit contact items in the folder). 17 Chapter 4 Settings of client applications and connection to Kerio WebMail Users will connect to the server via the Kerio WebMail interface or use a supported MS Outlook (on Windows) or MS Entourage (on Mac OS X) clients. The following sections include instructions on how to connect to Kerio WebMail and how to set email clients optimally. 4.1 Connection to Kerio WebMail To access the HTTP service using a web browser, insert the IP address (or the name if it is contained in DNS) of the computer where Kerio Connect is running. A protocol has to be specified in the URL — either HTTP for non-secured access or HTTPS for SSL-encrypted access. The URL will be as follows: http://mail.company.com or https://mail.company.com. It is recommend to use the HTTPS protocol for remote access to the service (simple HTTP can be tapped and the user login data can be misused). By default, the HTTP and HTTPS services use the standard ports (80 and 443). If the standard ports are changed, specify the port number in the URL address: http://mail.company:8000 or https://mail.company.com:8080. Note: The description above focuses accessing email via PDA devices. If connection of the PDA device to Kerio Connect fails, it is possible that it chooses a wrong connection (it tries to connect to the full version instead of Kerio WebMail Mini). In this case, simply enter the following URL: https://mail.company.com/pda. If the a correct URL is entered, authentication page is opened requiring username and password. Click on Connect to connect to the account. 4.2 MS Outlook settings Kerio (MAPI) account — Kerio Outlook Connector (Offline Edition) Install and configure the account as follows: 1. On the client station, install MS Outlook (currently supported versions are listed at the Kerio Technologies website). 2. Install Kerio Outlook Connector (Offline Edition) on the same station. 3. Login to Kerio WebMail (see section 4.1) and select Integration with Windows in the Settings menu. 18 4.3 MS Entourage settings 4. Click on the Click here to auto-configure Kerio Outlook Connector link. 5. Depending on your browser and its settings, the tool gets downloaded and launched automatically or it only gets downloaded and you can run it by double-clicking on the tool’s icon. 6. The script now runs MS Outlook, creates a new profile and preconfigures your Kerio account. 7. For security reasons, enter only your user mailbox password. Once the password is set, configuration of MS Outlook is completed. POP3 and IMAP account To set an IMAP/POP3 account in MS Outlook, follow these guidelines: 1. A particular POP3 or IMAP account is set withing creation of the profile in MS Outlook. 2. In the new account wizard, opened automatically upon setting a name of the new profile, select POP3 or IMAP. 3. Set the E-mail and Internet Settings section carefully. In the Name entry, specify first and second name of the user, and enter the user’s address in the E-mail Address field. Specify username in the Username entry. If the user does not have an account in the primary domain, it is necessary to use full username including the domain name: [email protected]. Specify Password that will be used for connection to Kerio Connect. Finally, enter the DNS name or IP address of the server where Kerio Connect is running in the Incoming mail server and Outgoing mail server (SMTP) entries. 4. If the user connects from the Internet, it is necessary to set authentication in accordance with the configuration of the SMTP server (see section 3.4). Click on Advanced settings. This opens a dialog including several tabs where other parameters of the account can be set. Switch to the Outgoing mail server tab, enable the My outgoing server (SMTP) requires authentication option and select Use the same settings as my incoming mail server. 5. Run MS Outlook in the new profile. Note: These instructions can be also used for any email client which supports IMAP and POP3 protocols. 4.3 MS Entourage settings Kerio Connect uses an interface for MS Exchange in MS Entourage and thus it allows work with groupware data (email, calendar, contacts and public email folders), use the Free/Busy server, connect to various LDAP databases for contact searching, etc. The account can be set as follows: 1. Install a supported version of MS Entourage and run it. 19 Chapter 4 Settings of client applications and connection to Kerio WebMail Note: For updated list of the Kerio Technologies website. supported versions of MS Entourage, refer to 2. Login to Kerio WebMail (see section 4.1) and select Integration with MAC OS X in the Settings menu. 3. Click on Auto-configure Entourage. 4. The tool gets downloaded and starts automatically. 5. The installation requires username and password for an account with administration rights for the computer. 6. Once installation is completed, an MS Entourage dialog is opened where you are supposed to authenticate with your mailbox password. Enter the password and confirm the dialog. 7. Finish the wizard to complete MS Entourage configuration. 4.4 Synchronization with mobile devices Kerio Connect supports the ActiveSync protocol for direct data synchronization with mobile devices (for the list of currently supported devices, see the Kerio Technologies website). This protocol allows synchronization of email, events, contacts and tasks. Implementation of ActiveSync applications can vary on individual mobile devices. However, each device includes configuration of the ActiveSync account requiring the following information to make connection to the mailserver feasible: 1. It is necessary to enter DNS name or IP address of the server where the mailserver is running. 2. Login username and password for connection to the particular Kerio Connect account is required. 3. Account settings require specification of the email domain where the user is created on the server. 4. If your security policy requires SSL communication, you will need to import an SSL certificate issued by a trustworthy certification authority or at least a self-signed one (such certificate can be created in Kerio Connect) to the device. Installation of the certificate on the device is easy, as suggested int he guidelines below: 1. In a browser on the mobile device enter the address where Kerio Connect is running (the same address you use for connection to the Kerio WebMail interface — see section 4.1). 2. At the Kerio WebMail login page, use the Install SSL certificate link provided below the login dialog. If certificate fails to be installed in this way, make another attempt by using guidelines provided in Kerio Connect 7, Administrator’s Guide 20 Appendix A Legal Notices Microsoft , Windows , Windows NT , Windows Vista , Internet Explorer , Active Directory , Outlook , ActiveSync and Windows Mobile are registered trademarks of Microsoft Corporation. Apple , Mac OS , Tiger, Panther , Leopard and Snow Leopard are registered trademarks or trademarks of Apple Computer, Inc. Linux is registered trademark of Linus Torvalds. Kerberos is trademark of Massachusetts Institute of Technology (MIT). 21 22